Preface


This guide contains spoilers.
There are four parts to each image in this guide:
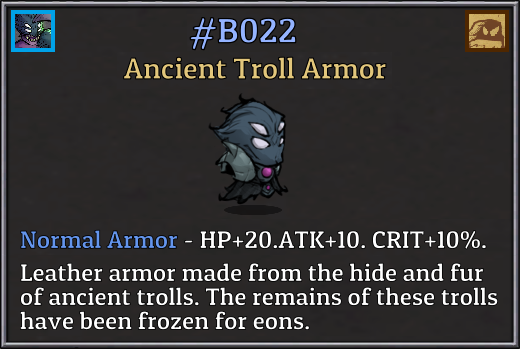
1. A picture
2. A description
3. An area icon (shown in the top right; shown near the name of bosses)
4. An unlock icon (shown in the top left)
For Equipment locations, the earliest location that I know of to find the piece of Equipment will be listed. Furthermore, The Secret Path and Skull Dungeon Equipment drops seem to be the same as The Ice Path and The Ruin drop tables, respectively, so any pieces of Equipment marked with the former locations will be found in the latter locations as well.
I've tried to make the identifying icons as clear as possible, but I am listing them here for clarification purposes. From left to right, the area icons below represent the Tower of Goblins, Bramble Courtyard, The Secret Path, The Ice Path, Skull Dungeon, The Ruin, The Main Tower, The Main Tower in Nightmare Mode, the Eyes Monsters (gambling), and all areas.
From left to right, the first part of the unlock icons below represent Goblin King, The Puppy, Boss Slime, Demon Spider, Big Head, Nightmare, Wood Knight, Rakshasa, Yaksha, and Cyclops.
From left to right, the second part of the unlock icons below represent Cyclops (Christmas Season), Great Golem, Great Mole Shark, Monk Murloc, Adventure Team Gumballs, Ancient Trolls, Ice Giant, Murloc Princess, Death Lord, and Death Asura.
From left to right, the third part of the unlock icons below represent Fallen Dragon, General, The Mad King, Werewolf (only regular enemy that has unlocks), Adad, Forgotten Lord, Gibil, Nusku, Trail of the Castle (only non-enemy that has unlocks), and Dragon.
From left to right, the fourth and final part of the unlock icons below represent Evil Tyrant, Lord Harwood, Fallen Treasure Hunter, and Death Spirit.
Equipment #A001 - #A010


Equipment #A011 - #A020


Equipment #A021 - #A022


Equipment #B001 - #B010


Equipment #B011 - #B020


Equipment #B021 - #B024


Equipment #C001 - #C010


Equipment #C011 - #B019


Equipment #D001 - #D010


Equipment #D011 - #D020


Equipment #D021 - #D030


Equipment #D031 - #D041


Equipment #E001 - #E010


Equipment #E011 - #E020


Equipment #E021 - #E030


Equipment #E031 - #E036


Equipment #F001 - #F010


Equipment #F011 - #F020


Equipment #F021 - #F030


Equipment #F031 - #F035


Equipment #G001 - #G010


Equipment #G011 - #G020


Equipment #G021 - #G030


Equipment #G031 - #G040


Equipment #H001 - #H010


Equipment #H011 - #H020


Equipment #H021 - #H030


Equipment #H031 - #H032


Equipment #I001 - #I010


Equipment #I011 - #I020


Equipment #I021 - #I030


Equipment #I031 - #I036


Equipment #J001 - #J010


Equipment #J011 - #J020


Equipment #J021 - #J030


Equipment #J031 - #J040


Equipment #J041 - #J046


Item #K001 - #K004


Item #L001 - #L010


Item #L011 - #L019


Item #M001 - #M010


Item #M011 - #M020


Item #M021 - #M030


Item #M031 - #M040


Item #M041 - #M050


Item #M051 - #M060


Item #M061 - #M070


Item #M071 - #M080


Item #M081 - #M083


Item #N001 - #N010


Item #N011 - #N020


Item #N021 - #N030


Item #N031 - #N040


Item #N041 - #N050


Monster #Y001 - #Y010


Monster #Y011 - #Y020


Monster #Y021 - #Y030


Monster #Y031 - #Y040


Monster #Y041 - #Y050


Monster #Y051 - #Y060


Monster #Y061 - #Y070


Monster #Y071 - #Y080


Monster #Y081 - #Y090


Monster #Y091 - #Y094


Boss #Z001 - #Z010


Boss #Z011 - #Z020


Boss #Z021 - #Z030


Boss #Z031 - #Z034


Notes
- I have set this guide up separately from the main guide because I wanted to create an easy to use resource for people to discover what they still need to unlock or find for the Compendium, and where they can unlock it. I felt that a stand-alone guide would give people less information to sift through before they found what they were looking for.
- I have confirmed the majority of the area locations and boss unlocks myself, but there are likely to be mistakes here and there. Furthermore, due to the random nature of discovering items, most pieces of equipment can be found in more places than I have listed as I only sought out one area per item. I'll iron out incorrect/missing details over time if I find further information or if people point out inconsistencies.
- The Compendium has a few errors, such as a couple description errors and some boss names being inconsistent with their displayed name right before you fight them in-game.
- The Item section of the Compendium in-game is not listed alphabetically (#K > #N > #L > #M), and some of the Treasures in particular are not placed in numerical order, so there are a few placement inconsistencies in the Item sections of this guide.
- In the in-game Compendium, the smaller icons representing Shadow Armor (#A017) and Robe of Witchcraft (#A018) are swapped with one another next to their name/number.
- Some of the Compendium entries, specifically in the Monster tab, seem to be bugged. #Y087 is likely the heavily armored enemy found in The Ruin, as every single other enemy in that location has an entry, all of which are located before and after #Y087. Furthermore, I have defeated every enemy in the game that I am aware of multiple times, and yet there are still 4 incomplete entries, including the one already mentioned.
- Some entries don't seem to show up until after they have been defeated/discovered, which is likely unintentional. This can leave some strange numbering inconsistencies where a number will seem to have been skipped randomly. For example, #D031 lists an unknown entry, whereas #D037 is simply skipped and has no entry until discovered (in theory). This was the case for me when defeating The Mad King; his entry number (#Z022) simply did not show up in the Compendium at all for me until after I had defeated him once.
Source: https://steamcommunity.com/sharedfiles/filedetails/?id=759420385
More Lost Castle guilds
- All Guilds
- Lost Castle Guide 10
- Lost Castle
- (Mostly) Comprehensive Lost Castle Guide
- Lost Castle
- Guide 7
- Guide 5
- Lost Castle
- Lost Castle -
- Lost Castle