
Table Of Contents

This is a long guide that goes over a lot of information you might already know if you aren't a beginner to Mirror Dungeons, so here are the main sections for you to skip through as you need.
Table of Contents <-- You are here!!
Introduction to Mirror Dungeons
What Should You Do to Prepare?
What is Starlight?
Starlight Buffs
Starlight Prioritization
Mirror Of The Wuthering Information
The Eight Nodes
Simulation Difficulty Description
Simulation Mounting Trials
Ritornello Difficulty Description
Ritornello Mounting Trials
Enemy Base Levels
Theme Pack Layouts
Story Floor Theme Packs
Affinity Floor Theme Packs
'Keyword' Floor Theme Packs
Theme Pack Recommendations
Starting E.G.O Gifts
General Strategy + Tips and Tricks
Thanks for Reading!!
Intro To Mirror Dungeons

Mirror Dungeons in Limbus Company are side modes mainly played for the weekly Lunacy reward upon completing them, as well as the Battle Pass experience upon farming them. They have a rogue-lite structure similar to the end of canto dungeons, though each one tends to have its own twist, which I will go into more detail in later in this guide. Mirror Dungeons are also randomly generated, unlike the end of canto dungeons. They consist of a variety of nodes, whether battle nodes of either type or support nodes to help make the dungeon easier, until you reach a boss at the end of each floor. Upon completing a certain percentage or all of the dungeon, you will get the rewards specified.
Within a Mirror Dungeon, you will gain access to one 12 sinner team that can be changed at the cost of Cost, a resource only accessible within the Mirror Dungeon itself and expires at the end of each run. You also will have a choice of E.G.O Gifts to start the dungeon with, typically relevant to a certain status effect or damage type you want to enter the dungeon with. Cost can also be used to buy or upgrade additional E.G.O Gifts, further buffing your team. Cost is gained upon beating any enemy fight, though the harder the fight (elite, focused, or boss), the more Cost gained.
Mirror Dungeons also have another exclusive resource called Starlight, though this resource is not lost upon finishing a dungeon run. This resource can be spent in the dungeon to help with E.G.O Gift acquisition, but I would recommend against that for its second use; filling out the Starlight Tree. The Starlight Tree is a variety of permanent buffs that can be purchased with Starlight to enhance every run you do in the dungeon from there onward. I will go into more detail on the Starlight Tree and how to acquire Starlight later in this guide.
The Simulation Difficulty of the Mirror Dungeon of The Wuthering is available as soon as you complete Canto II, but might contain some enemies from future Cantos, so beware of spoilers. It, however, shouldn't contain any bosses from Cantos you have not completed yet as far as I am aware. The Ritornello Difficulty of the Mirror Dungeon of The Wuthering is available once you finish Canto V, and is suitably harder than the Simulation Difficulty in exchange for slightly more Battle Pass experience. It also contains bosses and enemies from Canto VI, so as before, be warned of spoilers. Throughout this guide, I will likely be referring to them interchangeably with Normal or Hard in addition to their new names of Simulation and Ritornello respectively, as that is in plain English that is easier to understand.
Every Floor completed and Floor Boss felled in a Mirror Dungeon will give you a benefit and a detriment in the form of a new E.G.O Gift and Mounting Trial paired together. I already explained E.G.O Gifts earlier, but Mounting Trials are essentially buffs to the enemies you fight, and some are much worse than others. Since you get to choose which Mounting Trial of a random selection is applied, its important to know what they actually do. As such, the further you go into the Dungeon, the more buffs the enemies will get and the harder the Dungeon will be to complete. Simulation Difficulty has four Floors to complete, while Ritornello has five Floors, so that means three Mounting Trials in Simulation Difficulty and four for Ritornello on the final Floors of each. Do keep in mind that this means Ritornello has more opportunities to obtain E.G.O Gifts just due to the nature of having an extra Floor to conquer.
The Weekly Rewards for completing a Mirror Dungeon consist of 750 Lunacy, obtained in either sets of 250 within Simulation Difficulty or one mass set of 750 with Ritornello (Though it will not exceed 750 weekly, so don't worry about that. This is more of a time spent issue than more resources given), as well as a few levels within the Battle Pass per completion. Right now, the most time-efficient method would be to complete one Ritornello Mirror Dungeon weekly to get all rewards, however, some more experienced farmers might recommend completing a Simulation Mirror Dungeon a day in addition to that one Ritornello weekly so as to gather Battle Pass Experience, and thus Identity Shards to shard Identities and EGOs in the Dispensary without gambling in the Extraction. In the end, its up to you what to do, this guide is just to tell you how to get through it!
This Guide assumes you have completed Canto VI for some sections, specifically the Theme Pack and Bosses sections, so be warned about potential spoilers within.
What Should You Do To Prepare?


First, for the most efficient farming of Starlight, having at least 6 teams, each based around one of the 7 main status effects (Burn, Bleed, Tremor, Rupture, Sinking, Poise, Charge) is best. Why? Because most of the E.G.O Gifts I discussed earlier are based around those status archetypes, and so building your teams around obtaining specific E.G.O Gifts to buff them even further is advised.
In addition, having no repeated sinners between those 6 teams is because of the Rest Bonus system the Mirror Dungeon Of The Wuthering employs, where the longer an Identity has spent not being used within the dungeon, the more Starlight is obtained simply for having it on the team. This bonus increases linearly for each additional run, up to a maximum of 5 bonus Starlight per Identity, which essentially means that if an Identity has a Rest Bonus of 4, it has not been used for a four completed Mirror Dungeons in a row. Thus, for efficient farming, rotating in a cycle of 6 teams lets you get the maximum bonus of 60 Starlight for free at the beginning of each Dungeon. Do note that the Identities used for the Rest Bonus don't need to be used to fight, they just need to be brought into the Mirror Dungeon!
For the newbies among you who might not be able to fuel the experience tickets nor the thread needed to build 6 teams, don't worry! Simulation Difficulty buffs every Identity to Lvl 45 on entry. Ritornello Difficulty will use your Sinners' actual levels, and both Difficulties use your actual Uptie Levels, so be warned before entering. Lower Upties can still clear Simulation, but I'd get at least Uptie III for Rintornello.
If, however, you simply don't have the identities to even build that many teams, simply cycling between two different teams should be the bare minimum you attempt, since with merely a single Rest Bonus, you also get free Cost at the start of your Mirror Dungeon run. For every O and OO Identity with at least 1 Rest Bonus (so it wasn't used in the last complete Mirror Dungeon), you will gain an additional 50 free Cost on entry each. For OOO with the same conditions, you will gain an additional 25 free Cost on entry each. OOO with no Rest Bonus (so it was used in the immediately preceding complete Mirror Dungeon run) will gain NO free Cost, and O and OO with the same conditions will gain 25 free Cost on entry each, however, this should never occur except for your first run since you should always aim for at least 1 Rest Bonus.
Here is a visual to help explain:
The top row shows the Starlight Rest Bonus, where Yi Sang was used in the previous run and thus gives no Rest Bonus, while each sequential character to the right hasn’t been used for the number of runs that they have the Starlight Bonus for. For example, W Don hasn’t been used for 2 complete Mirror Dungeon runs, Rosepanner Meursault hasn’t been used for 4 complete Mirror Dungeon runs, and LCB Hong Lu hasn’t been used for 5 or more complete Mirror Dungeon runs.
The bottom row shows how having even a single Rest Bonus gives +25 Cost to the base amount for that Identity, while O and OO give 25 Cost by default. Heathcliff, Rodion, and Outis were all used in the previous run, and thus have no Rest Bonus, but Heathcliff and Rodion both give 25 Cost despite that. Ishmael, Sinclair, and Gregor all have at least 1 Rest Bonus, and thus all give +25 Cost.
Here are a few good, basic guides for Status Effects to help you with that Team Building and understand how they all work:
We don't have Burn done yet lmao, wait a few days/weeks/months.
How to Bleed by Borderlined
https://steamcommunity.com/sharedfiles/filedetails/?id=3117516645
We don't have Tremor done yet lmao, wait a few days/weeks/months.
How to Rupture by Ekimmak
https://steamcommunity.com/sharedfiles/filedetails/?id=3159078900
How to Sinking by Silver
https://steamcommunity.com/sharedfiles/filedetails/?id=3118228803
We don't have Poise done yet lmao, wait a few days/weeks/months.
How to Charge by Silver
https://steamcommunity.com/sharedfiles/filedetails/?id=3181246823
Otherwise, the best way to prepare is to hop right in and figure things out manually! Feel free to ask additional questions in the comments and I'll try to answer as best I can.
What Is Starlight?


 Now What Can Starlight Be Used To Buy?

Starlight is this mode's main internal reward system.
Starlight is given whenever the player accepts rewards after having completed either Mirror Dungeon difficulty. As stated above in the Preparation section, Rest Bonuses give starlight, as well as using new Status Teams and new Identities in general. Trying out new Theme Packs, picking Starlight Gain Encounter Reward Card Packs, and just clearing more nodes all help boost your Starlight gain in the end.
Starlight is calculated the same for Simulation and Ritornello Difficulties, except for 5 key parts.
First, in the parts it is calculated together;
- 12 Starlight is gained every run from choosing a Keyword for the Starting E.G.O Gift that wasn't chosen in the previous run
- Up to 60 Starlight is gained from the Rest Bonus
- 3 Starlight is gained for each Floor Theme that was not chosen in the previous run (Since Ritornello has 1 extra floor, it has 1 extra chance for this reward)
- Varying amounts of Starlight are gained from Encounter Reward Cards, as explained later.
- Varying amounts of Starlight are LOST based on using the Starlight Refresh in the shop.
Finally, for these four categories, Ritornello gains a 1.5x boost as compared to Simulation Difficulty.
- Cleared Floors (25 for Floor 4, 40 for Floor 5).
- 0.5 Starlight is gained per node cleared, rounded down.
- 1 Starlight is gained per fight.
- 1 Starlight is gained per E.G.O Gift still owned at the end of the Mirror Dungeon.
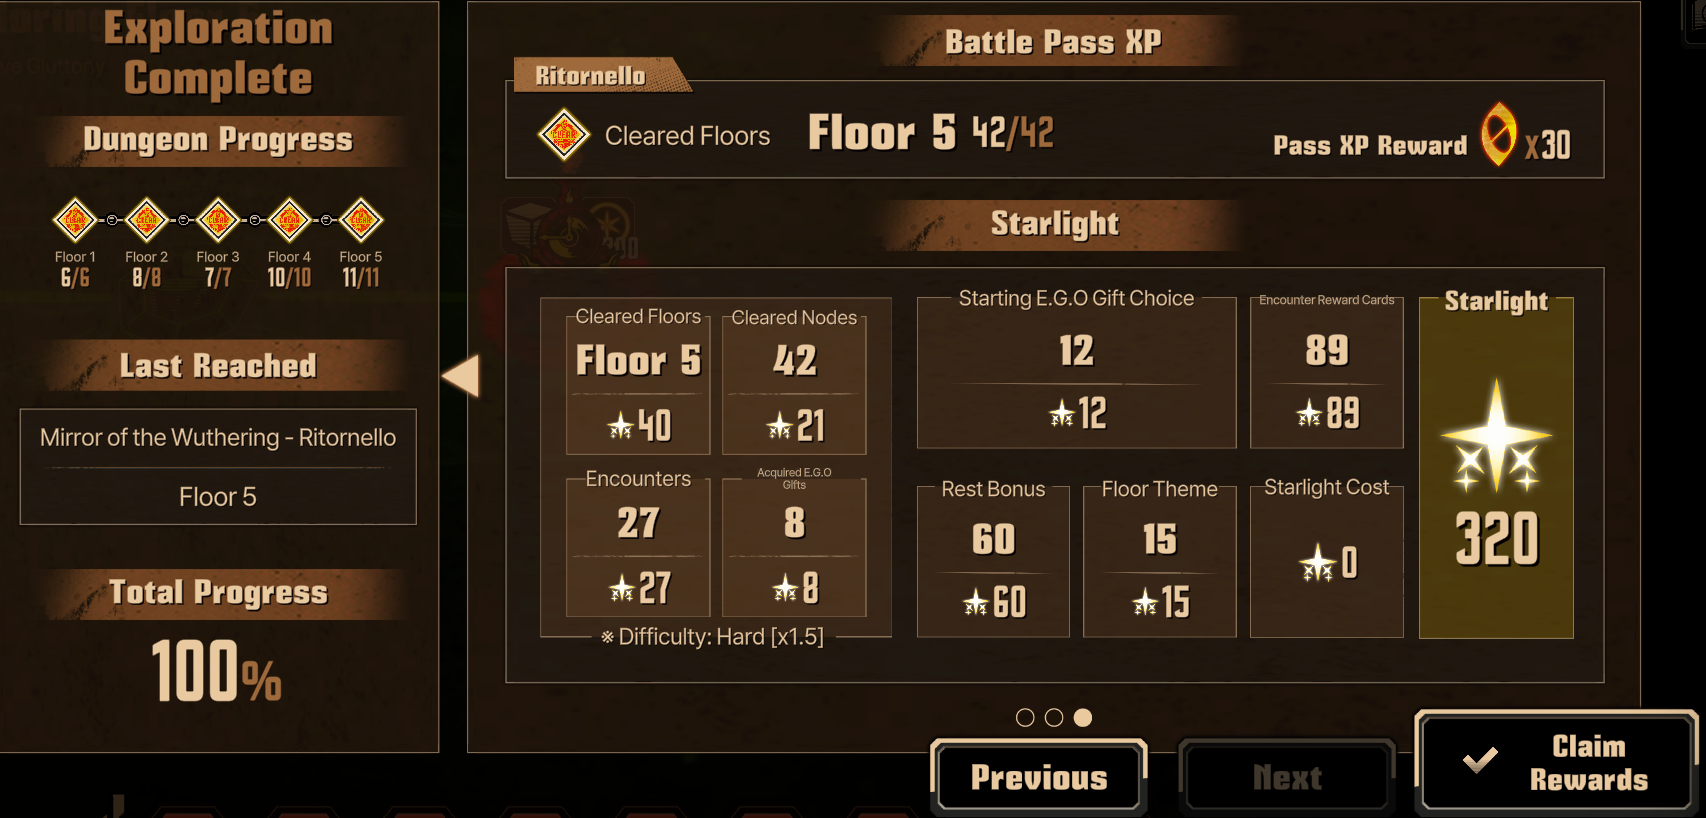
Here are two example end screens, one for Simulation Difficulty and one for Ritornello Difficulty.
As can be seen, it tells you what each point of Starlight obtained was sourced from, and how much greater the potential Starlight gain is in Ritornello as compared to Simulation. Do remember that Starlight gain tends to vary, but will be in the same range each time you complete the Mirror Dungeon.
Starlight has three main uses, but two of those uses are basically useless for the average player.
- First, 10 Starlight can be used in the shop node to refresh the E.G.O Gifts available in the shop. I would NEVER recommend doing this, since it only affects the single Mirror Dungeon run, as compared to the main method of Starlight consumption, which affects all future Mirror Dungeon runs. The only time this might be recommended is after having completely filled out the Starlight Tree.
- Second, It can be used for the Wish of Stars buffs, which are consumable Starlight Tree buffs for single Mirror Dungeon runs that can only be purchased after having unlocked every Base Starlight Buff (the larger, center Buffs with smaller Buffs surrounding them). Again, I would recommend filling out the smaller Starlight Buffs before worrying about consumable purchases with Starlight such as Wish of Stars.
These buffs are respectively:
Event Horizon (100 Starlight):
- Staring E.G.O Gift Choice +1, meaning you can bring a total of 3 Starting E.G.O Gifts
Milky Way (250 Starlight):
- Gain 250 Starting Cost
Impending Comet (500 Starlight):
- After selecting a starting E.G.O Gift, receive a random Tier IV E.G.O Gift.
I do NOT recommend using these unless you have literally gotten every single starlight buff available, including all secondary buffs, since they are honestly a waste of starlight otherwise. Triumphant Return is useless since you never are truly struggling with Cost in the Mirror Dungeon, especially if you have the permanent Cost Starlight buffs. Event Horizon is useful, but expensive for only a single extra Tier II E.G.O Gift that you can purchase with Cost quite quickly in the Dungeon itself instead of outside it. Impending Comet is nice since it gives you a tier IV, which, while saying it is Random isn't actually completely Random (It'll pick one of the two or so tier IV gifts associated with the status type you choose for your starter E.G.O Gifts, or just pure random if you choose random). It still isn't great since it has a consumable cost of 500 Starlight, which makes it less than ideal. Save your starlight for the actual, permanent buffs, not these Wish of Stars, unless, of course, you've already finished the tree.
- Finally, you can fill out the Starlight Tree. The Starlight Tree is a, well, tree of permanent buffs for every Mirror Dungeon run from the moment they are purchased onward, and the main way of spending your Starlight. It takes 24650 to complete the Tree, so most players who just do weekly or daily runs don't actually complete their Starlight Tree, so its important to prioritize which Buffs you want to obtain first and foremost.
So, what Starlight Tree Buffs should be prioritized with our limited Starlight?
Starlight Buffs (1/2)

For the Starlight Buffs in the Mirror of the Wuthering, there are four main paths, as listed below.
1. The E.G.O Gift Path to the North (Up)
2. The Shop Past to the East (Right)
3. The Rest Stop Path to the South (Down)
4. The Floor Theme Path to the West (Left)
These are just the main Buffs on each path, with some more minor buffs such as Damage Dealt / Taken on the Floor Theme Path.
Note 1: If it is marked with a * in the Name category, then it is a Secondary Path of Stars Buff surrounding the main Base Starter Buff.
Note 2: Wish of Stars is only unlocked upon completing every Base Starter Buff, not the Secondary Starter Buffs.
Note 3: Certain similar Secondary Starter Buffs will be squashed down, with the comment stating if it is multiple or not.
Note 4: With the May 16th Update, Thunder, Biting Winds, Fair Winds (excluding Secondary Buffs), Cascade of Levin, and Gathering Storm are all made free and the Starlight spent on them is removed. As such, I am pre-assuming these are free in this list. Even if you are looking at this before that update, I still think they are the most important to go for, and you'll be refunded the Starlight cost regardless.
Name Direction Starlight Cost Effected Category Effect Parent Comments Eye of the Storm Center Free [Limited] Gain 200 Starlight upon engraving this Star (1-time only, unaffected by activation status N/A The First Buff, and a no-brainer. Thunder North Free [Starting E.G.O Gift] Introduce 7 E.G.O Gifts to the Starting E.G.O Gift pool Eye of the Storm My first recommended direction, since there's no real penalty in terms of Starlight. For info on what these are, check the Starting E.G.O Gift section below. Thunder* North Free [Starting E.G.O Gift] Unlock the 'Keyword' E.G.O Gift Category Thunder This includes the 7 Status Effect-related Keywords. No brainer to pick them up, though E.G.O Gifts first. Biting Wind North Free [Starting E.G.O Gift] Introduce 6 E.G.O Gifts to the Starting E.G.O Gift pool Thunder The Blunt / Slash / Pierce version of Thunder. Biting Wind* North Free [Starting E.G.O Gift] Introduce 6 E.G.O Gifts to the Starting E.G.O Gift pool Biting Wind The Blunt / Slash / Pierce version of Thunder*. Fair Winds North Free [Universal] Gain +50 Starting Cost Biting Wind Essentially a free boost to starting Cost. Fair Winds* North 125 / 200 / 300 [Universal] Gain +50 Starting Cost Fair Winds Much less important to get right away, since together it only is +150 Starting Cost for Starlight much better used elsewhere. Cascade of Levin North Free [Universal] Introduce 16 Tier 2 E.G.O Gifts to the Shops, Gift Fusion results, and Encounter Rewards pool Fair Winds Again, I recommend just taking it since it is free and gives more potential gifts for fusion. Gathering Storm North Free [Universal] Introduce 28 Tier 3~4 E.G.O Gifts to the Shops, Gift Fusion results, and Encounter Rewards pool Cascade of Levin Again, I recommend just taking it since it is free and gives more potential gifts for fusion. Last of the E.G.O Gift Starlight Buffs. Tornado North 200 [Starting E.G.O Gift] E.G.O Gift choice +1 Gathering Storm HIGHLY recommend taking this, since even one more starting E.G.O Gift boosts your snowball in the dungeon greatly. Ringing of the New Year's Eve East 200 [Shops] Higher Tier E.G.O Gifts appear; small chance for Tier 4+ E.G.O Gifts to appear Eye of the Storm The first Shop buff, and very much so needed to make Shops start to be worth it. Ringing of the New Year's Eve* East 300 / 375 / 450 [Shops] More chance for higher Tier E.G.O Gifts appear in Shops (same % gain as the other linked Buffs) Ringing of the New Year's Eve I'd recommend going for these three, but hold off until you finish the last Base Buffs in the Shop path. Faint Evenfall East 300 [Shops] Number of E.G.O Gifts sold at Shops +1 Ringing of the New Year's Eve Very useful, combined with the last of the Shop Base Buffs that does the same thing. Faint Evenfall* East 400 [Shops] Refresh Cost -20% for Refreshes that consume Cost Faint Evenfall Two Starlight Buffs that do the same thing additively. Useful if you want to E.G.O Gift hoard. Black Polar Night East 300 [Shops] E.G.O Gift purchase Cost -5% Faint Evenfall Works additively with similar Buffs, up to a maximum of -40%. Black Polar Night* East 300 [Shops] Additional Discount: Tier _ E.G.O Gift purchase Cost -7.5% Black Polar Night 4 Buffs for each Tier, with Tier 4 counting for 4 and 5. Works additively with similar Buffs, up to a maximum of -40%. Still Dawn East 300 [Shops] E.G.O Gift purchase Cost -5% Black Polar Night Works additively with similar Buffs, up to a maximum of -40%. Still Dawn* East 300 [Shops] Additional -7.5% purchase Cost for E.G.O Gifts with 'Keyword' Still Dawn Buffs for each of the 7 main Status Effects. Works additively with similar Buffs, up to a maximum of -40%. Wintry Daybreak East 300 [Shops] E.G.O Gift purchase Cost -5% Still Dawn Works additively with similar Buffs, up to a maximum of -40%.
Starlight Buffs (2/2)
Name Direction Starlight Cost Effected Category Effect Parent Comments Wintry Daybreak* East 300 [Shops] 'Keyword' E.G.O Gift purchase Cost -7.5% Wintry Daybreak 4 Buffs for Slash / Pierce / Blunt / Keywordless respectively. Works additively with similar Buffs, up to a maximum of -40%. Nightless City East 400 [Shops] Number of E.G.O Gifts sold at Shops +1 Wintry Daybreak Synergizes with other Shop nodes amazingly. Nightless City* East 200 [Shops] Gain +20% additional Cost when selling Tier _ E.G.O Gifts Nightless City One for each of the Tiers, with Tier 4 counting for Tier 4 and 5. Nightless City* East 400 [Shops] Skill Replacement Cost -20% Nightless City Two Secondary Nodes that stack additively; only useful if you use Skill Replacement. Sheepback Clouds South 250 [Rest Stops] E.G.O Gift Enhance Cost -7.5% Eye of the Storm Works additively with similar Buffs, up to a maximum of -40%. Sheepback Clouds* South 250 [Rest Stops] Tier _ E.G.O Gift Enhance Cost -7.5% Sheepback Clouds One for each of the Tiers, with Tier 4 counting for Tier 4 and 5. Works additively with similar Buffs, up to a maximum of -40%. Grand Sea of Clouds South 250 [Stops] 20% chance for a Cost-free Refresh Sheepback Clouds Useful, but chance-based and thus not something to rely on. Katabatic Wind South 250 [Rest Stops] E.G.O Gift Enhance Cost -7.5% Grand Sea of Clouds Works additively with similar Buffs, up to a maximum of -40%. Katabatic Wind* South 250 [Rest Stops] Additional -7.5% Enhance Cost for E.G.O Gifts with 'Keyword' Katabatic Wind One for each of the 7 main Status Effects. Works additively with similar Buffs, up to a maximum of -40%. Fierce Gust South 250 [Rest Stops] When Enhancing, 20% chance to refund Enhancement Cost Katabatic Wind Useful, but chance-based. Path of the West Wind South 250 [Rest Stops] E.G.O Gift Enhance Cost -10% Fierce Gust Works additively with similar Buffs, up to a maximum of -40%. Path of the West Wind* South 250 [Rest Stops] 'Keyword' E.G.O Gift Enhance Cost -7.5% Path of the West Wind A Buff for Slash / Pierce / Blunt / Keywordless each. Works additively with similar Buffs, up to a maximum of -40%. Updraft South 450 [Universal] Gain +10% Cost after winning a Combat Encounter (Not affected by Starter Buffs or other E.G.O Gifts) Path of the West Wind A minor buff to Cost gain. Updraft* South 250 / 300 / 350 / 450 [Universal] Gain +10% Cost after winning a _ Encounter (Not affected by Starter Buffs or other E.G.O Gifts) Updraft Regular / Focused / Elite / Floor Boss Encounter respectively. Minor buff to Cost gain. Night Rain West 300 [Floor Theme] Number of Floor Theme Choices +1 Eye of the Storm Incredibly useful, and one of my first picks. Feast of Lightning West 300 [Damage] Damage Dealt +2.5% Night Rain Minor buff, but if you are truly struggling might help. Feast of Lightning* West 300 [Damage] Damage Dealt +2.5% Feast of Lightning 3 Separate Secondary Buffs. See parent's comment. Feast of Lightning* West 300 [Damage] Offense Level +1 Feast of Lightning 2 Separate Secondary Buffs. See parent's comment. Impending Thunder West 300 [Encounter Reward Cards] Number of Encounter Reward Card Choices +1 Feast of Lightning Useful to guarantee Starlight spawns most of the time. Hazy Mist West 300 [Damage] Damage Taken -2.5% Impending Thunder Minor buff, but if you are truly struggling might help. Hazy Mist* West 300 [Defense] Damage Taken -2.5% Hazy Mist 3 Separate Secondary Buffs. See parent's comment. Hazy Mist* West 300 [Defense] Defense Level +1 Hazy Mist 3 Separate Secondary Buffs. See parent's comment. Iterant Rain West 300 [Floor Theme] Number of Floor Theme Choices +1 Hazy Mist See Night Rain's comment. Endless Current West 400 [Encounters] +1 to all E.G.O resources at the start of the Mirror Dungeon run Iterant Rain It's only 7 Resources. Genuinely not worth the cost. Endless Current* West 400 [Encounters] +1 to all E.G.O resources at the start of the Mirror Dungeon run Endless Current It's only 14 Resources total (with Base Buff included). You'll get more. Endless Current* West 400 [Floor Theme] Max Speed +1 Endless Current 2 of the same Secondary Buff. Genuinely useful to redirect attacks in Focused Encounters, or for those few IDs that benefit from higher Max Speed.
Starlight Prioritization

If you just want the quick and easy way to look at this section, the image is right there to reference. However, I will now be explaining my reasoning for each of these, so you can follow a slightly different path if you disagree with those choices!
Free: First, the Free Nodes are, obviously, free and should be taken before you even do your first Simulation Mirror Dungeon run. Don't forget about these!
With 200 Free Starlight: Second, you get 200 Free Starlight from the Eye of the Storm center Node, which I recommend investing in Tornado right away for an extra Starting E.G.O Gift. After that, you've used up all the free and starting Starlight, so you can jump into your first few runs of the Mirror Dungeon.
1st: I listed getting Impending Thunder and Night Rain as the first priority after that, since Impending Thunder increases Encounter Reward Card Choices by 1, helping you increase your Starlight grinding efficiency, and Night Rain increases your Floor Theme Choices by 1, letting you avoid killer Theme Packs without refreshing as often, as well as get the E.G.O Gifts you want with more precision.
2nd: I listed getting to the end of the Shop path as the next priority, since the Shop with no upgrades is honestly quite useless, so getting at least the base upgrades on them helps you get the worth out of them and start earning rare Tier IV E.G.O Gifts from it.
3rd: This is just to get Itinerant Rain, which is the exact same thing as Night Rain. If you haven't seen yourself struggling with Floor Theme Choices, then you can skip this, but I like having my options open.
4th: Starting to fill out that Shop Path, by adding an even higher chance for higher Tier E.G.O Gifts, and making Refresh both cheaper and potentially free with Grand Sea of Clouds and Faint Evenfall's Secondary Starlight Buffs.
5th: Finishing off that Shop Path, getting all the E.G.O Gift Cost lowering Secondary Buffs to make the Shops efficient.
6th: The Enhance Path, essentially just making Enhancements much cheaper overall. Most of these do the exact same thing as one another, so I recommend rushing to the end and getting Updraft's Base Buff, and then filling out the rest.
If Struggling / End: These are just the last few buffs remaining, mostly things that enhanced your Cost gain or decreased / increased the damage taken / dealt by your sinners. I personally don't really feel like the Dungeon needs these to progress, but if you are struggling in a specific area, look over these and see which might be useful for your predicament.
Encounter Reward Cards
 TierCostCost & Keyword Gift ChanceE.G.O ResourceRandom E.G.O GiftStarlightTier ITier IITier IIITier IVTier VTier VITier VII
Encounter Reward Cards appear at a percentage chance upon completing either an Elite or Focused encounter, as explained later on. Upon being shown an Encounter Reward Card pack, you will be shown a choice of 3 or more (depending on E.G.O Gifts and Rewards redeemed) potential Encounter Reward Cards to choose from. There currently are 5 different types of Encounter Reward Cards, and 7 different s of each type. They are shown as shown below.
Note 1: The 'Keyword' in & Keyword Gift Chance depends on the Starter E.G.O Gift Category you chose at the beginning of the Mirror Dungeon. If you chose Random, then you get completely Random Gifts in that Encounter Reward Card.
Note 2: The maximum for Simulation Difficulty is V, while the maximum for Ritornello Difficulty is VII. As you go deeper into the Mirror Dungeon, the more likely you get higher Encounter Reward Cards.
& Keyword Gift Chance
I Gain 80~120 Gain 40~60 , 33% chance to gain a random 1 'Keyword' E.G.O Gift +4 for 2 of the least-owned Affinities Gain a random 1 E.G.O Gift Gain additional 4~10 upon clearing the Mirror Dungeon II Gain 90~135 Gain 45~68 , 33% chance to gain a random 1~2 'Keyword' E.G.O Gift +4 for 3 different Affinities Gain a random 1~2 E.G.O Gift Gain additional 6~12 upon clearing the Mirror Dungeon III Gain 100~150 Gain 50~75 , 33% chance to gain a random 1~3 'Keyword' E.G.O Gift +6 for 2 of the least-owned Affinities Gain a random 1~2 E.G.O Gift Gain additional 8~14 upon clearing the Mirror Dungeon IV Gain 110~165 Gain 55~83 , 33% chance to gain a random 2~3 'Keyword' E.G.O Gift +8 for 2 of the least-owned Affinities Gain a random 2 E.G.O Gift Gain additional 10~16 upon Clearing the Mirror Dungeon V Gain 120~180 Gain 60~90 , 50% chance to gain a random 2~3 'Keyword' E.G.O Gift +6 for 3 of the least-owned Affinities Gain a random 2~3 E.G.O Gift Gain additional 12~18 upon clearing the Mirror Dungeon VI Gain 135~210 Gain 68~105 , 50% chance to gain a random 2~4 'Keyword' E.G.O Gift s +8 for 3 of the least-owned Affinities Gain a random 2~3 E.G.O Gift Gain additional 14~20 upon clearing the Mirror Dungeon VII Gain 150~230 Gain 75~115 , 50% chance to gain a random 3~4 'Keyword' E.G.O Gift +10 for 4 of the least-owned Affinities Gain a random 3 E.G.O Gift Gain additional 17~25 upon clearing the Mirror Dungeon
Personally, my priority when choosing Encounter Reward Cards is:
>>> Random but Guaranteed E.G.O Gift > & Keyword Gift Chance > ==
However, circumstances can change your decision, so play it based on your current situation, and only use this as my suggestion.
Mirror Of The Wuthering

The Mirror Of The Wuthering is everything we've discussed so far, just combined into one big 'thing'.
Before we actually jump into the dungeon itself in case you didn't read the previous sections, make sure you redeem the free E.G.O Gift rewards in the Starlight Tree! Read Starlight Prioritization for more information.
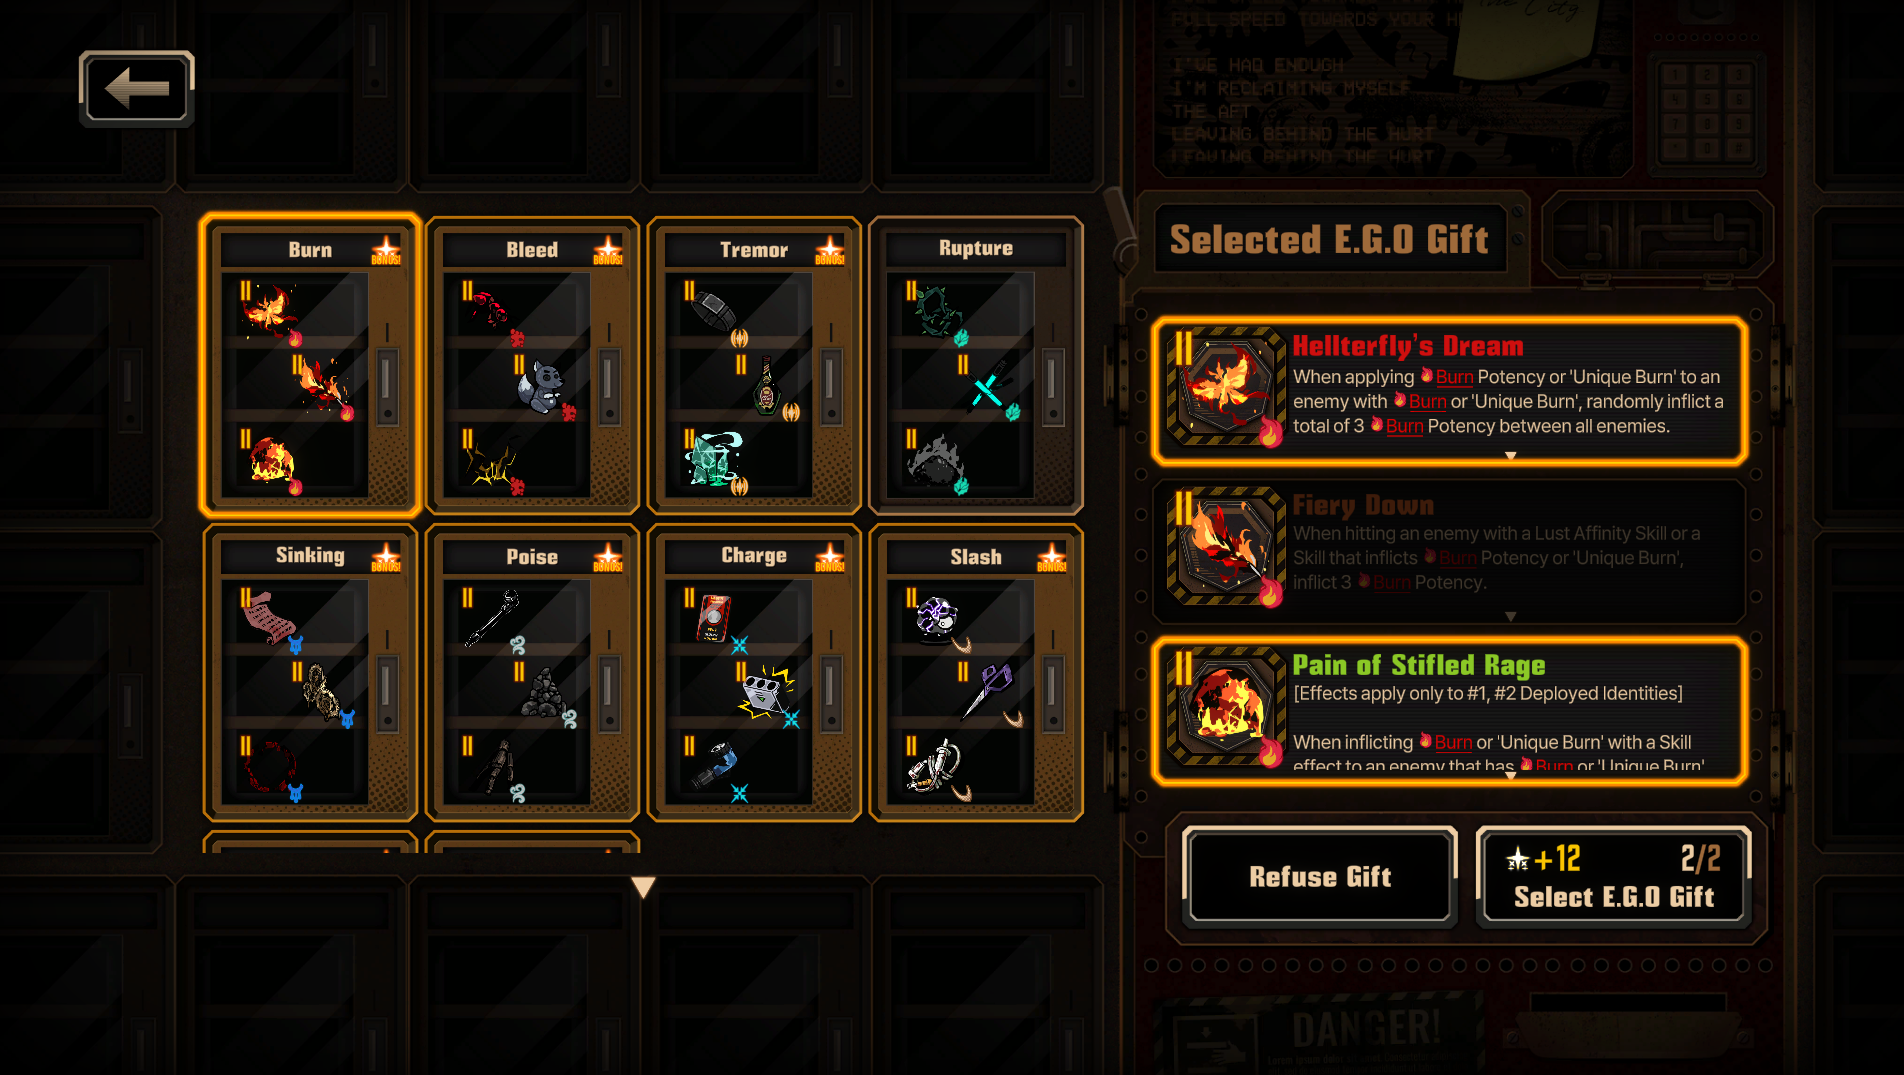
Now after that is completed, the first thing you'll do upon entering the dungeon is choose a Starter E.G.O Gift from one of the 11 Categories available, each associated with a Keyword. There is Burn, Bleed, Tremor, Rupture, SInking, Poise, Charge, Slash, Pierce, Blunt, and Random. For information on what specific gifts there are, look at the 'Starting E.G.O Gifts' section below. Selecting a Starter Gift gives 12 extra Starlight if the Starting E.G.O Gifts you chose were different from the Starting E.G.O Gifts in the immediately preceding complete Mirror Dungeon run. If you are confused as to how exactly to select your Starter Gifts, make sure you click on the E.G.O Gift itself after selecting the category, and then press the button in the bottom right to move on to team selection.
After you reach the team selection screen, you will have to choose, well, your team. I have already discussed the Rest Bonus in previous sections, so I won't be rehashing that information here, but remember to take it into account. You can always back out of the dungeon and re-enter if you realize the Starter E.G.O Gifts you chose to not match properly with the next team on rotation.
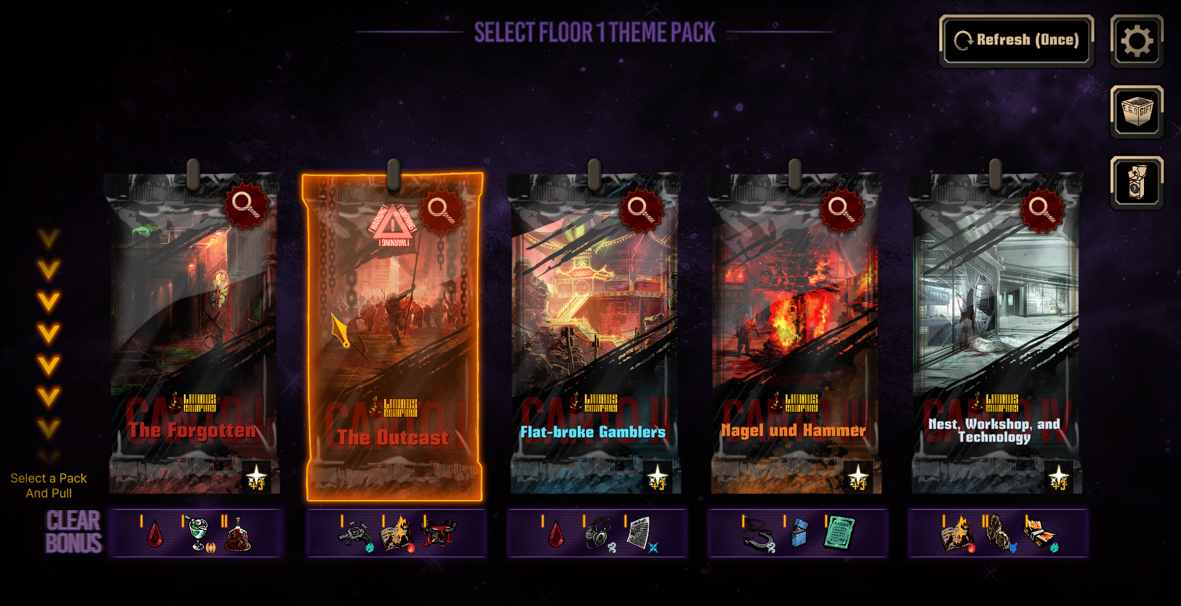
Next, you have to choose your Theme Pack. The Mirror Of The Wuthering Dungeon is based around the concept of Theme Packs and Card Draws, where the player gets to choose from a set of Theme Packs for what enemies, bosses, and rewards they get on a certain floor. As you can see in this screenshot, I have five possible Theme Packs to choose from, each showing me different information.
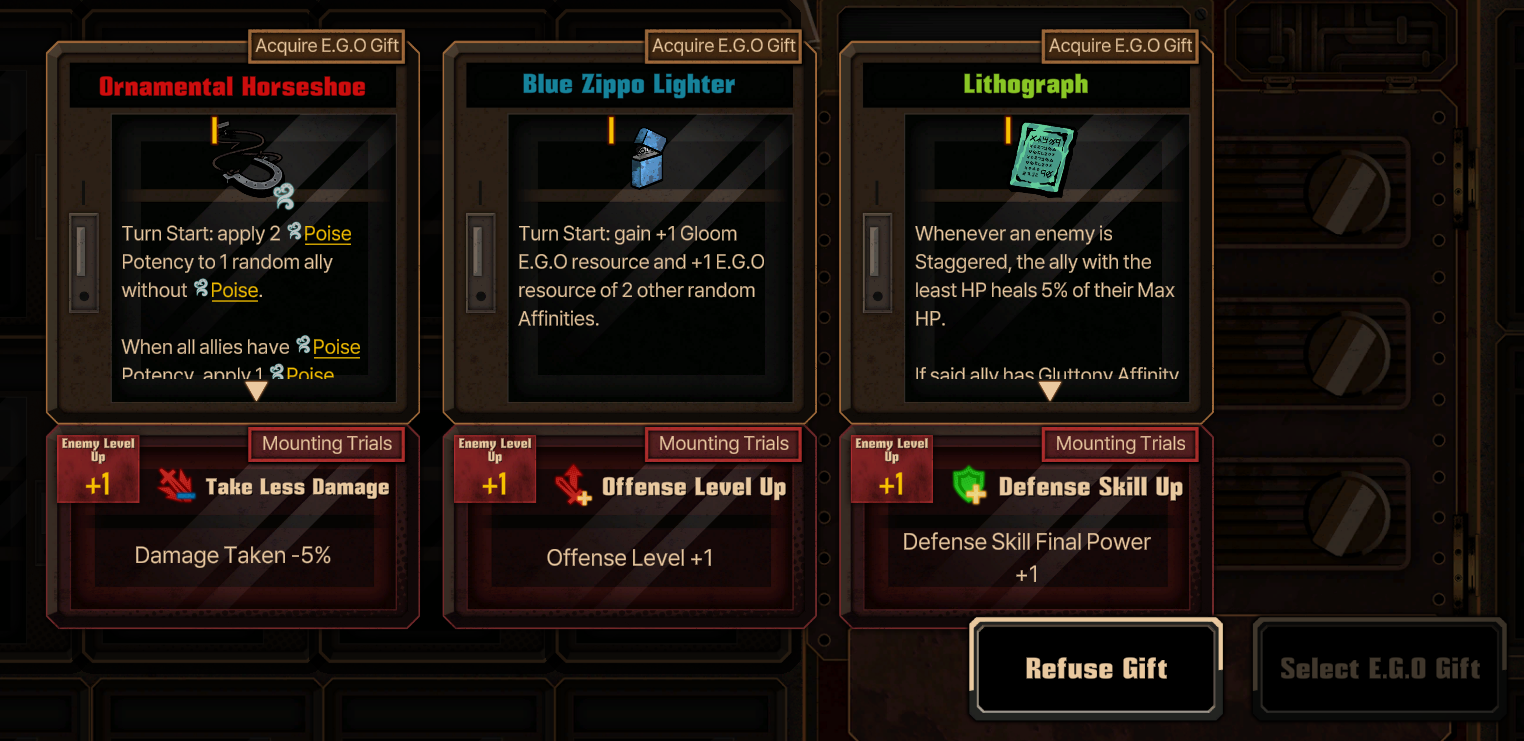
The 'Clear Bonus' section below each theme pack means that I will be guaranteed an offer of those three E.G.O Gifts upon beating the Floor Boss of that pack, and then will get to choose one out of those three. So, for example, The 'Nagel und Hammer' Theme Pack will let me choose between Lithograph, Blue Zippo Lighter, and Ornamental Horseshoe. This will be your main method of acquiring fusion ingredients, since those Clear Bonus E.G.O Gifts have a higher percentage to be apart of the Keyword that the Starter Gift you selected it apart of. I selected the 'Poise' Keyword for my Starter Gift, and you can already see I am being offered one of the two fusion ingredients for the first Poise Fusion Gift.
On the bottom right of each of the card packs themselves, you might also see a Starlight symbol saying '+3'. This is because, for every Theme Pack you choose that you didn't choose in the immediately preceding complete Mirror Dungeon run, you get +3 Starlight at the end of the run. This means a potential +12 free Starlight in The Simulation Dungeon, and +15 in the Ritornello Dungeon. For example, I entered 'The Outcast' in the Dungeon directly before this, so it does NOT have that bonus that every other Theme Pack has in that corner.
At the top right of each theme pack, you see a Magnifying Glass. Upon clicking those, you can see every E.G.O Gift offered in that pack itself, since not all 192 E.G.O Gifts are offered in every single Theme Pack, most of them being separated based on Affinity or Keyword. I will go over those differences in a later section on Theme Packs.
You might also see a warning symbol at the top center of 'The Outcast; that isn't on the other Theme Packs. That Symbol indicates it is a harder Theme Pack, or more specifically, that that Theme Pack has harder potential bosses, typically from the Dungeon of the associated theme. For example, 'The Forgotten' and 'The Outcast' are both relevant to Canto I, as you can see directly behind the names, but 'The Forgotten' only has a single possible Floor Boss, G Corp Manager, while 'The Outcast' can have Ebony Queen, Doomsday Calander, or Golden Apple as its Floor Boss. I will go over bosses in a later section on Theme Packs.
Finally, if you look in the top right, you'll see four buttons. The Gear Wheel is simply the Options button, where you can forfeit the dungeon, open config, or go to the main window of the game. The button directly below that shows all the E.G.O Gifts you own in the current Mirror Dungeon run, which at the moment should just be the two Starter Gifts. The button below that shows every Theme Pack within your chosen Difficulty, along with the Featured E.G.O gifts of those packs. In addition, if you've encountered that Theme Pack in the past already, it will show the potential bosses in that pack. This can be useful as a quick reference of what possible bosses are in Packs to avoid the troubles of certain ones without having to look up this guide.
Finally, there's the Refresh button. It lets you, once per Floor, refresh the possible Theme Packs you are offered so as to either avoid Theme Packs with bad bosses or try for a new group of Clear Bonuses at the bottom. Make sure not to forget you have that option!!
Finally, to select a pack, you simply have to left click the pack, and pull down.
Time to fight!
Simulation Difficulty


You are finally able to enter the Dungeon itself! Time to learn how it works.
First of all, Simulation Difficullty is the Normal version of the Mirror Dungeon Of The Wuthering, meaning is is a bit easier than the Rintornello Difficulty. Unlike Rintornello, it automatically levels up all units that enter to Lvl 45, meaning it can be used to test out certain teams before committing resources into that Identity (Your Uptie Level stays the same). It also has a bit easier Mounting Trials enemy levels, and 1 less entire Floor. Otherwise, it is fairly similar in concept to Rintornello.
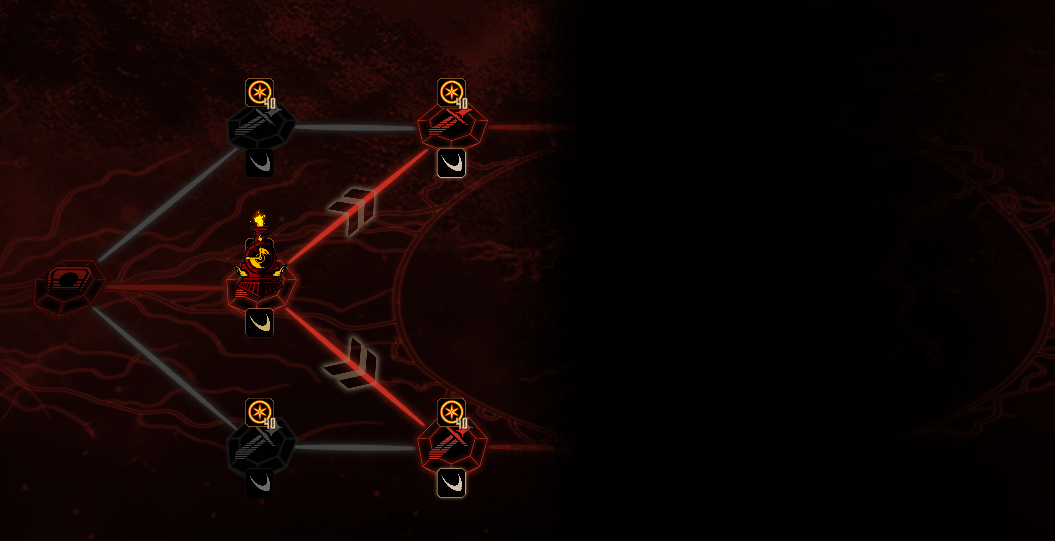
A typical Floor in The Mirror Dungeon will be some combination of the Eight Nodes in the section prior, with two main distinctions. Random Nodes, which have no set Node selected for it prior to generating the Floor, and set Nodes, which will always be that no matter how many times you run the Mirror Dungeon. This usually ends up with having the Start and Boss Nodes at the beginning and end of a Floor, a set Node right after or before them respectively, and a number of Random Nodes between them based upon what Floor Theme Pack was selected (look at Floor Theme Layouts for more information).
Random Nodes consist of Regular Encounters, Focused Encounters, Elite Encounters, and Event Nodes.
Set Nodes vary between Start, Rest Stop, Shop, and the Boss Node depending on the Floor involved.
A typical Floor 1 in Simulation Difficulty:
Floor 1 is a bit special compared to the other floors, in that the Random Node pool is reduced to just Event Nodes and Regular Encounters for just that Floor, no matter what Theme Pack is selected. This does mean that there are fewer chances for E.G.O Gifts on Floor 1, so when selecting a Theme Pack at the start of the Dungeon, selecting one with easy enemies and E.G.O Gifts you don't necessarily want (not including the ones obtained after beating the Floor Boss) is smart since you likely won't be able to get many E.G.O Gifts on this floor anyway.
A typical floor 4 in Simulation Difficulty:
Floor 2 and onward all have the full Random Node pool, and have their layouts as follows:
Note: The amount of Random Nodes on a Floor depends on the Theme Pack selected, not the Floor, so I will be saying '# Random Nodes'. See Theme Pack Layout for more information.
Floor 1: 1 Start Node, # Random Nodes, 1 Rest Stop, 1 Floor Boss Node
Floor 2: 1 Start Node, 1 Shop Node, # Random Nodes, 1 Floor Boss Node
Floor 3: 1 Start Node, 1 Rest Stop, # Random Nodes, 1 Floor Boss Node
Floor 4: 1 Start Node, 1 Shop Node, # Random Nodes, 1 Shop Node, 1 Rest Stop, 1 Floor Boss Node
As you can see, you can only create fusion gifts at the end of the First and Fourth Floors, and at the start of the Third, meaning that in almost all circumstances, you will only get your powerful fusion gifts for the final boss of the Mirror Dungeon. Keep this in mind when preparing your strategies for Simulation Difficulty. My general suggestion is to upgrade your Starting E.G.O Gifts to ++ at the end of Floor 1, and then try to find Fusion Ingredients through the Clear Bonus of Theme Packs.
Otherwise, on each Floor itself, I recommend planning your route at the beginning of the Floor at the Start Node, and following that path to the Boss. Since Rest Stops and Shop Nodes are fixed, you are only seeing whether you want to visit Elite, Focused, and Event Nodes over Regular Encounters. I typically have this as my priority list;
Event == Elite Nodes > Focused Nodes > Regular Encounters
The reward with the Weekly Bonus is 250 Free Lunacy, 45 Limbus Pass Experience, and 100 Manager Experience.
The reward without the Weekly Bonus is 30 Limbus Pass Experience and 100 Manager Experience.
Finally, if you quit early, you will get a percentage of the full rewards based on what you completed. This does mean you will miss out on some Weekly Lunacy if you do not complete all four Floors!
The Eight Nodes


Now you are finally in the Mirror Dungeon properly! Let's go over the types of Nodes within it.
(Note the color of your Nodes will be different than mine, since the color is determined by the Floor Theme Pack. The color does not matter, only the appearance.)
There are eight different types of Nodes in the Mirror Dungeon, half of them being fights and the other half helping you get stronger. Let's go through each of them.
The Start Node is a non-functional Node that appears at the Start of every Floor, and whose only purpose is to serve as the beginning of the Floor where the player starts. It'll connect to 2 or 3 more Nodes at minimum, upon which you'll have to continue through the Floor from the Start Node in order to progress.
The Regular Encounter Node is a battle Node, with basic enemies of the Theme Pack you selected previously. Regular Encounter Nodes can have a variety of symbols below them, each signaling the Weak or Fatal resistances of the enemies within. This symbol below can be a Slash / Pierce / Blunt symbol, indicating weakness to that damage type, it can be any of the 7 Sin Affinities, indicating weakness to that Sin, or it can be a mix of both. For example, the first example has a 'Blunt' symbol below it, indicating the enemies within will take more damage if I bring a Blunt Team within. This can be useful for guessing some of the enemies within sometimes in more varied packs, since there might be certain enemies you want to avoid due to their attacks being too strong. Above every Regular Encounter Node is an amount of Cost you will earn for completing that fight, which before any Starlight upgrades is 40 Cost per Regular Encounter. This will not change depending on the enemies within, only based on any Starlight upgrades on the Starlight Tree modifying that specifically. These are the most common Nodes on every floor.
A Focused Encounter is very similar to a Regular Encounter Node, with a similar weakness format as before. However, the fight will give you manual control over your sinner's clashes and have you face Peccatulum or weak Distortions (Bongy) in battle. In exchange for this different fight, you get 60 Cost (20 more than Regular) and a chance at an Encounter Reward Card Pack or Random Gift. I recommend always going for Focused Encounters if able, since sometimes they can be even easier than Regular Encounters.
An Elite Encounter is very similar to a Regular Encounter Node, with a similar weakness format as before. However, the fight faces an enemy with about 10 or so extra levels, and usually more powerful Skills, than Regular Encounter Nodes. In exchange for this harder fight, you get 80 Cost (40 more than Regular) and a chance at an Encounter Reward Card Pack or Gift. I recommend going for this on floors 2 and 3, but weigh how strong your team actually is on floors 4 and 5 before deciding to enter one of these.
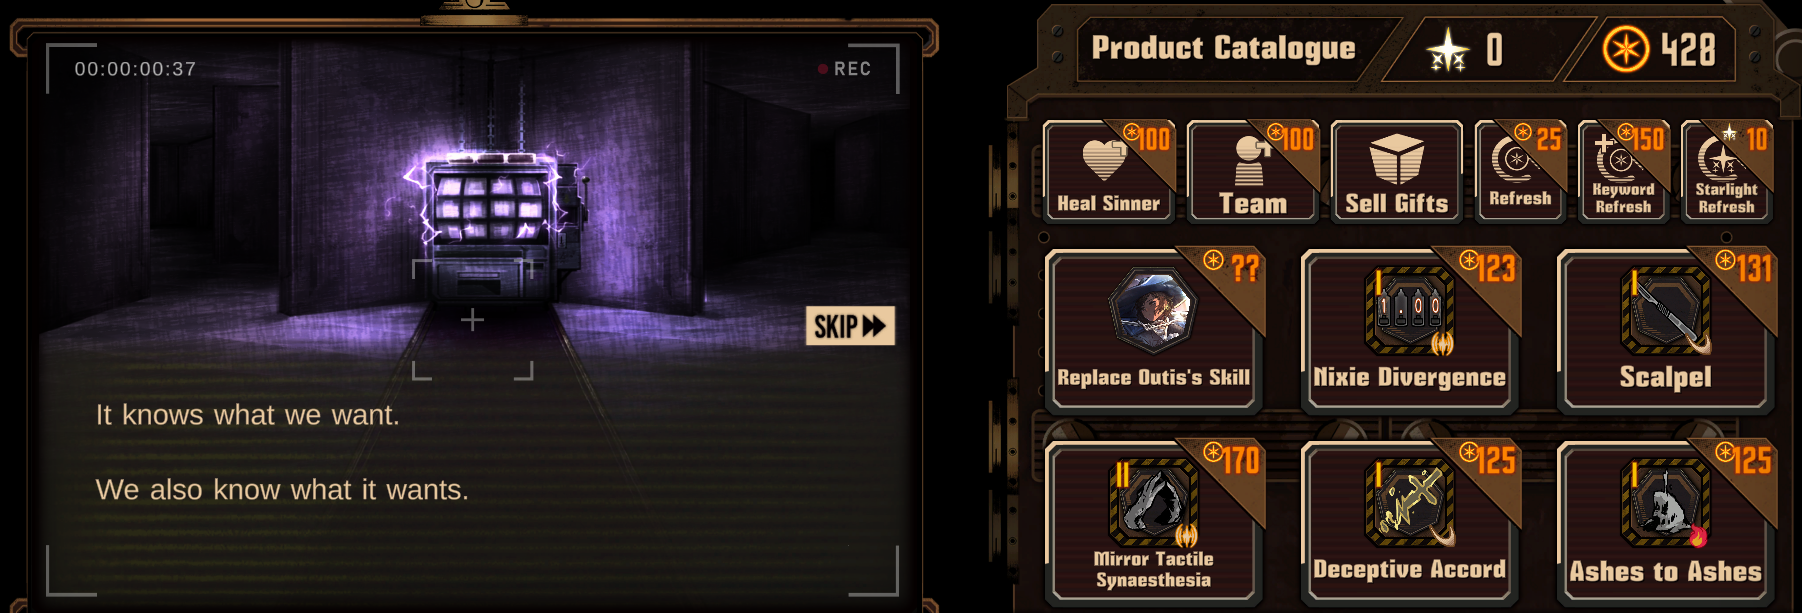
At the end of every Floor of the Dungeon is a Boss Node, which has a very similar weakness format as the Regular Encounter Node, just a different appearance. Above the Boss Node are two symbols, one indicating that (80 + 20 * Floor Number) Cost is earned upon beating the Floor Boss (before modification by Starlight Upgrades) and one that indicates that you will gain an E.G.O Gift upon beating the Floor Boss. Those E.G.O Gifts are the Clear Bonus Rewards seen when choosing the Theme Pack. These E.G.O Gifts also have randomized Mounting Trials tied to them, meaning one cannot be picked without the other, and if none are picked, one Mounting Trial is randomly selected from the list. When the boss on the Final Floor is defeated, the Mirror Dungeon ends.
Pictured above is an example Mounting Trial / E.G.O Gift screen from Floor 1 of Simulation Difficulty.
Events Nodes are signified by a question mark, and are the first Utility Node you might encounter. Each Event Node is an encounter with an Abnormality where the player has a minimum of 2 choices, one typically bestowing an E.G.O Gift upon the player, and the other typically harming the Sinners health or sanity. These choices can require a Skill Check based on Sin Affinities, where the player has to choose a Sinner with higher chances of success based on the Sin Affinities of their Identities' skills. With the Mirror of the Wuthering, you can also fight some of the Abnormalities that there is a fight encounter for, upon which you gain TWO E.G.O Gifts instead of the typical one for just doing the Event Node normally. I almost always recommend taking the fight, since these Abnormality fights were incredibly nerfed in the Mirror Dungeon, having very little heath compared to their normal counterparts. Given an okay team, you can beat these every time and get a second free E.G.O Gift. I would only really recommend ignoring the fight if you are going for time or are very low on health. The buffs for these Event Nodes (that aren't just obtaining an E.G.O Gift) include gaining levels, healing health or sanity, and gaining special effects in the next battle.
Refer to the Guide in the Tips and Tricks section for Abnormality Event Choices, and the outcomes therein.
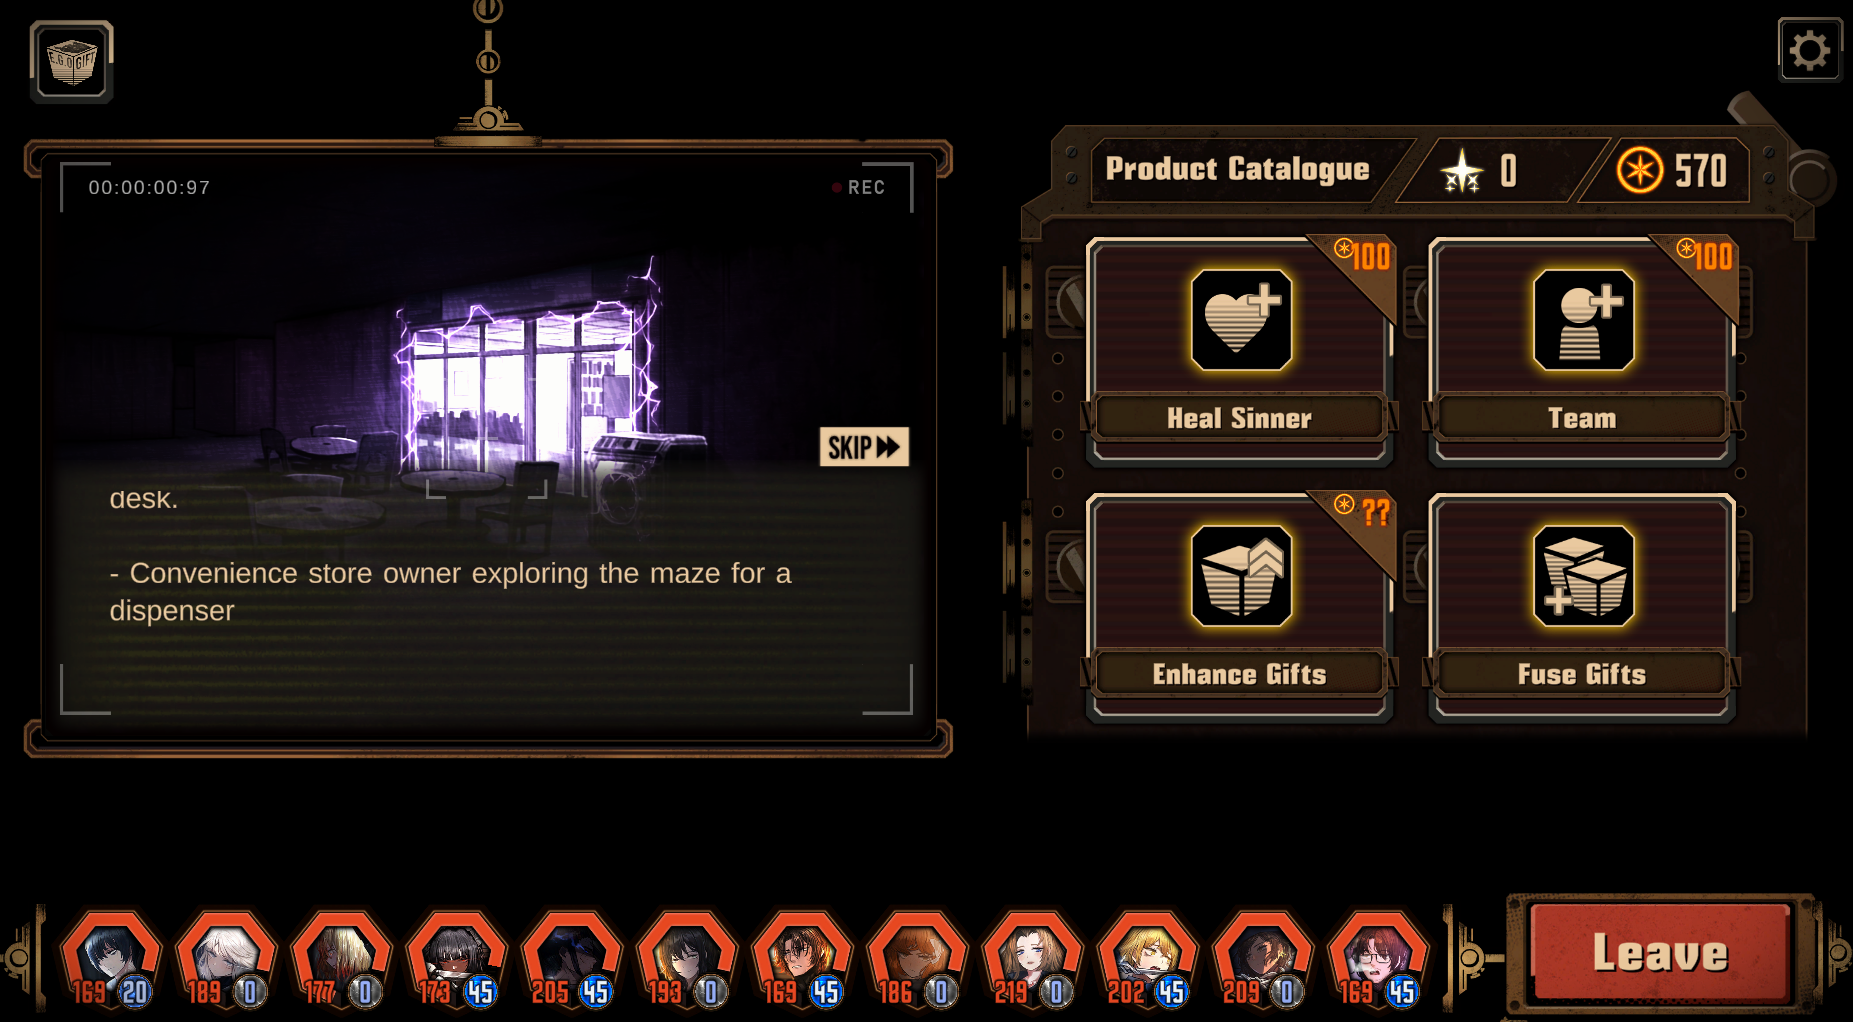
In Shop Nodes, you can buy random E.G.O Gifts with Cost, with their prices depending on the Tier of the Gift and what Starlight Buffs are unlocked. You can also change a Sinner’s skills in 3 ways: replace 1 S1 in their Dashboard with a S2 for 75 Cost, do the same but have 1 S2 replace with 1 S3 for 125 Cost, or replace 1 S1 with a S3 for 200 Cost, before Starlight buffs. Each Sinner is randomly selected per refresh. You can also refresh the entire shop randomly for 25 Cost or based upon a specific Keyword at 150 Cost, though it increases both by 25 Cost every time you refresh. You also can refresh with 10 Starlight, but I heavily discourage this. You can also Sell useless E.G.O Gifts for Cost in the Shop Node. Finally, you have the same Healing and Team options as the Rest Stop shown below.
Rest Nodes are signified with a chair, and typically the second Utility Node you'd encounter, being at the end of the first Floor of both Difficulties. Rest Nodes have four separate abilities, three of which consume Cost. First, the top left 'Heal Sinner' Ability costs 100 Cost and lets the Manager choose between healing one Single Sinner 50% of their max health and 45 sanity, or let every Sinner heal 20% of their max health and 15 sanity. The top right ability 'Team' lets you swap the Identities you are using out at the cost of 100 Cost, though I recommend against ever using this Ability since the Rest Bonus will be consumed twice, once for both the new Identity and old Identity, but only give the bonus once. The bottom two abilities relate to Enhancing and Fusing Gifts, where you can either Enhance specific E.G.O Gifts in order to make them more powerful, or fuse useless gifts together for a more useful and stronger gift relevant to your team. The Cost price for Enhancement goes up based on rarity, while the cost of Fusion is the E.G.O Gifts consumed.
Refer to the guide in the Tips and Tricks section for Fusing and Enhancing E.G.O Gifts.
Simulation Mounting Trials

Mounting Trials are the carry-over element from the Mirror of the Lake that has now been integrated into the concept of Mirror Dungeons in Limbus Company, where every time you beat a Floor Boss, you get an E.G.O Gift and a corresponding buff to the enemies you fight, called a Mounting Trial. If you choose to refuse the E.G.O Gift, then the Mounting Trial you get is picked randomly from the options available, so there's no real reason to refuse the gift (Especially when you can sell or fuse it later on!). Anyway, here are the specific Mounting Trials for the Simulation Difficulty and my comments on each.
Note 1: The Floor Number listed means the Floor where the Boss is fought. The Effects themselves don’t apply until the Floor Number + 1.
Note 2: Enemy Level Ups vary between 1~2 for Simulation Difficulty.
Name Effect Icon Floor Comments Defense Level Up Defense Level +2 1 The best of the F1 Trials, since Defense Level...doesn't really matter much. Defense Skill Up Defense Skill Final Power +1 1 The second best of the F1 Trials, since Defense Power only really matters with Ahab and Jun. Max HP Up Max HP +5% 1 Middle of the pack. HP hurts since it extends the fight, but not massively. Offense Level Up Offense Level +1 1 Only actually does something a third of the time, and even then, if you know how to evade properly, it doesn't do much. Take Less Damage Damage Taken -5% 1 Any 'Damage Taken -%' type buff is automatically terrible. They are essentially Max HP +10%s. Body Reinforcement Offense Level +2, Defense Level +4 2 Best of the F2 Trials, simply due to doing the least. Body Corpulence Offense Level +2, Defense Level +2, Max HP +5% 2 About equal to Body Reinforcement. Max HP Up Max HP +20% 2 It isn't affecting skills at least. Clash Attack Boost Clash Power +1, Defense Level -3 2 With evade units, this is about here in difficulty, but without evade units, its the worst of F2. Final Attack Boost Final Power +1, Max HP +5% 2 Better than Base Attack Boost, since Final technically does less Damage if it hits. Base Attack Boost Base Power +1, Max HP +5% 2 Better than Final Power Up, since a sum of 2 total Power Up is not fun. Final Power Up Final Power +1, Defense Skill Final Power +1 2 Basically combines Defense Skill Up and Final Attack Boost into an unholy abomination. Defense Gear Defense Level +3, Max HP +22.5% 3 Does the least of the Final Floor Trials. Body Growth Offense Level +3, Defense Level +2, Max HP +10% 3 Does a little of a lot, but not much in any one category. Final Combat Gear Final Power +1, Defense Level -2, Max HP +17.5% 3 Better than Base Combat Gear, since Final technically does less damage on hit. Base Combat Gear Base Power +1, Defense Level +3, Max HP +5% 3 Just barely below Final Combat Gear. Body Fortification Offense Level +5, Max HP +7.5% 3 Will do about +2 Clash Power and some extra damage, but only if you get hit. Coin Attack Boost Plus Coin Power +1, Minus Coin Power -1, Defense Level +1 3 Coin Power sucks, since it can vary from +1 Power to essentially +4 Power depending on how many Coins the enemy has. Peerless Might Base Power +1, Plus Coin Power +1, Minus Coin Power -1 3 Literally just a worse Coin Attack Power. Eyes and Teeth for an Eye Damage Taken -25%, Damage Dealt +25% 3 Damage Taken -25% = Max HP Up +50%. The Damage Dealt +25% is just a cherry on top.
F1 Simulation (though all are close to about equal):
Defense Level Up > Defense Skill Up > Max HP Up >= Offense Level Up > Take Less Damage
F2 Simulation:
Body Reinforcement >= Body Corpulence >= Max HP Up > Clash Attack Boost (with evade IDs) > Final Attack Boost > Base Attack Boost >= Final Power Up > Clash Attack Boost (without evade IDs)
F3 Simulation:
Defense Gear > Body Growth > Final Combat Gear > Base Combat Gear > Body Fortification > Coin Attack Boost > Peerless Might > Eyes and Teeth for an Eye
Ritornello Difficulty


Well, if this is your first time in Ritornello Difficulty, then I wish you luck. Its honestly quite similar to Simulation Difficulty, with a few major changes to let it stand on the stage on its own.
First, your units will remain at the original level and uptie level they actually are outside of the Mirror Dungeon, meaning you are playing with the big boys now, no more pulling you up to snuff.
2. Ritornello has a Fog of War, where you can only see the immediately proceeding Nodes, causing you to have to plan out your path on the fly. The recommended strategy for dealing with this is to always go to the proceeding Node with the most connections LEAVING it, so as to avoid getting trapped in a terrible Elite Node fight with no option to escape.
3. Harder Mounting Trials, as discussed in the next section.
4. A Fifth Floor.
5. It contains all the Floor Theme Packs that Simulation has, as well as some more, harder, ones.
6. Finally, higher-level enemies on average.
Otherwise, it's the exact same as Simulation Difficulty, so read that section for the basic information.
The first change can be mitigated by just...leveling up your units to the recommended level yourself, while the second change can be mitigated through planning as you go through the method described at that step. The third and fifth changes require you to think out your picks a bit harder, but the new Mounting Trials are honestly not that much worse, and the harder Theme Packs can just be straight-up dodged once you have Night Rain and Iterant Rain unlocked. The fourth and sixth changes are the only major issues, but that issue is mostly in the time and effort it takes to complete the Mirror Dungeon, since a side-effect of having a fifth Floor is that you have even more chances to collect E.G.O Gifts, and higher level enemies means less smooth braining allowed.
Floor Layout:
Floor 1: 1 Start Node, # Random Nodes, 1 Rest Stop, 1 Floor Boss Node
Floor 2: 1 Start Node, 1 Shop Node, # Random Nodes, 1 Floor Boss Node
Floor 3: 1 Start Node, 1 Rest Stop, # Random Nodes, 1 Floor Boss Node
Floor 4: 1 Start Node, 1 Shop Node, # Random Nodes, 1 Rest Stop, 1 Floor Boss Node
Floor 5: 1 Start Node, 1 Shop Node, # Random Nodes, 1 Shop Node, 1 Rest Stop, 1 Floor Boss Node
Also! If you are struggling to finish MD3H, then know that you still will get rewards for quitting early. Assuming maximum Weekly Rewards Remaining (3):
Floor 1 Clear - 75 Limbus Pass Experience, 225 Lunacy
Floor 2 Clear - 120 Limbus Pass Experience, 450 Lunacy
Floor 3 Clear - 180 Limbus Pass Experience, 600 Lunacy
Floor 4 Clear - 210 Limbus Pass Experience, 750 Lunacy
Floor 5 Clear - 225 Limbus Pass Experience, 750 Lunacy
For the section below:
F1 Ritornello:
Expand Body I > Durable > Max HP Boost I >= Amplify Body I > Damage Taken Down
F2 Ritornello:
Resilient I > Amplify Body II >= Expand Body II > Base Power Boost > Final Power Boost > Take an Eye I
F3 Ritornello:
Max HP Boost II > Clash Attack Boost I (With Evade) > Amplify Body III >= Expand Body III > Final Power Boost II > Base Power Boost II > Final Power Boost III > Clash Attack Boost I (Without Evade)
F4 Ritornello:
Resilient II > Expand Body IV > Clash Attack Boost II > Amplify Body IV > Base Power Boost III > Final Power Boost IV > Coin Power Boost > Headstrong
Ritornello Mounting Trials

Note 1: Enemy Level Ups vary between 1~4 for Rintornello Difficulty, typically falling in the 3~4 range.
Name Effect Icon Floor Comments Expand Body I Defense Level +1, Max HP +5% 1 Best of the F1 Trials, since it does the least. Durable Defense Level +2, Defense Skill Final Power +1 1 Second best for similar reasons. Just worry for Jun and Ahab. Max HP Boost I Max HP +7.5% 1 Third best since it, again, doesn't do much except extend fights. Amplify Body I Offense Level +1, Defense Level +1 1 Doesn't do anything at all a third of the time, but put below Max HP Boost I because of that third. Damage Taken Down Damage Taken -7.5% 1 I hate Damage Taken Down Trials. Essentially is the same thing as +15% Max HP. Resilient I Defense Level +4, Max HP +10% 2 Best cause it does the least. Amplify Body II Offense Level +2, Defense Level +2, Max HP +5% 2 Affects Enemy Skills the least out of the remaining Trials. Expand Body II Offense Level +2, Max HP +10% 2 About equal to Amplify Body II Base Power Boost I Base Power +1, Defense Level +1 2 Rare instance Base is better than Final, since Defense Level +1 vs Max HP +5% is in its favor. Final Power Boost I Final Power +1, Max HP +5% 2 See Base Power Boost I's comment. Take an Eye I Damage Taken -10%, Damage Dealt +10% 2 You know how I feel about these by now. Max HP Boost II Max HP +30% 3 I dislike this... but it does the least out of the current Trials. Clash Attack Boost I Clash Power +2, Max HP +7.5% 3 Its second best if you can evade correctly, otherwise, its the worst of the batch. Amplify Body III Offense Level +4, Defense Level +3, Max HP +7.5% 3 Doesn't do a massive amount compared to others in this batch. Expand Body III Offense Level +4, Max HP +15% 3 About equal to Amplify Body III. Final Power Boost II Final Power +1, Defense Level +6 3 As usual, Final is better than Base. Base Power Boost II Base Power +1, Defense Level +5 3 As usual, Base is Worse than Final. Final Power Boost III Final Power +2, Defense Level -2, Max HP +5% 3 Does a ton of bad for very little benefit. Resilient II Defense Level +9, Max HP +30% 4 It does the least directly. Expand Body IV Offense Level +4, Defense Level +3, Max HP +30% 4 Not as much effective Offense Level as the lower 2. Clash Attack Boost II Clash Power +2, Max HP +30% 4 Interestingly, not the worst offender this time around due to it not affecting damage, only Clashing. Amplify Body IV Offense Level +6, Defense Level +6, Max HP +15% 4 About equal Offense Level as above. Base Power Boost III Base Power +1, Final Power +1, Max HP +20% 4 Two separate Powers, but just barely better than Final Power Boost IV. Final Power Boost IV Final Power +2, Max HP +25% 4 That +5% Max HP makes it just ever so slightly worse than Base Power Boost III. Coin Power Boost Plus Coin Power +2, Minus Coin Power -2 4 Who would willingly take this? It's equivalent to anywhere from Base Power +2 to Base Power +8. Headstrong Damage Taken -50%, Damage Dealt +50% 4 It was the worst in Mirror of the Lake, and its the worst here. Damage Taken -50% practically doubles the enemies' health.
Theme Pack Layouts

Note 1: All MD1, MD2, and MD3 Tier I, Tier II, and Tier III E.G.O Gifts with a Keyword are in every Floor Theme Pack. MD4 E.G.O Gifts and Tier IV and V Gifts are specific to certain Theme Packs. This does mean that Keywordless E.G.O Gifts are NOT in every category.
Note 2: There is a 'Special' Category of 18 E.G.O Gifts that include these Gifts: Carmilla, Child Within a Flask, Oracle, Imposed Weight, Illusory Hunt, Homeward, Tomorrow's Fortune, First-aid Kit, Painkiller, Voracious Hammer, Golden Urn, Milepost of Survival, Special Contract, Faith, Piece of Relationship, Ancient Effigy, Non-Disclosure Agreement, and Lunar Memory. This category is used for literally every Theme Pack but Story Theme Packs and the three 'To Be __' Theme Packs, so assuming you'll encounter it is a fair assumption.
Note 3: Look at my E.G.O Gift Fusion and Upgrading Guide to see which categories certain E.G.O Gifts are in.
Story Floor Theme Packs
Pack Name Pack Cover Basic Description Simulation Floor Range Ritornello Floor Range Random Node Count Boss List (Equal Probability) Unique E.G.O Gifts The Forgotten Canto I Enemies 1 1 4 G Corp. Head Manager MD1 Gifts The Outcast Canto I Enemies / Bosses 2 1 5 Ebony Queen's Apple, Doomsday Calendar, Golden Apple MD1 Gifts, Ebony Brooch, Contained Maggots Flat-broke Gamblers Canto II Enemies 1 1 4 Aida MD1 Gifts Automated Factory Canto II Enemies 2 1 5 You Want To Get Beat? Hurtily?, Clippity-cloppity? Tap Away! MD1 Gifts, Made-to-Order, Haunted Shoes The Unloving Canto II Enemies / Bosses 2~3 1~2 3 Baba Yaga MD1 Gifts, Frozen Cries Nagel und Hammer Canto III Enemies 1 1 4 Guido The Persistent MD1 Gifts Faith & Erosion Canto III Enemies 1~2 1 4 Four-Legged Beast, Slithering Inquisitor MD1 Gifts, Nagel und Hammer Scriptures, Blood-red Mane The Unconfronting Canto III Enemies / Bosses 3~4 2~4 6 Kromer MD1 Gifts, Squalidity Nest, Workshop, and Technology Canto IV Enemies 1~2 1 4 Rosepanner Workshop Rep. Niko, Lobotomy E.G.O::Red Sheet - Marile MD2 Gifts Falling Flowers Canto IV Enemies 3~4 2~4 6 So That No One Will Cry, Drifting Fox, Effloresced E.G.O:: Spicebush MD2 Gifts, Spicebush Branch, Kaleidoscope Tearful Things Canto IV Enemies 3~4 2~4 5 Fairy Gentleman, Shock Centipede, Brazen Bull-Tearful MD2 Gifts The Unchanging Canto IV Enemies / Bosses N/A 4~5 7 Dongrang, Who Denies All, Effloresced E.G.O::Farmwatch MD2 Gifts, Broken Glasses Lake World Canto V Enemies 2 1 5 Twinhook Pirates First Mate Smee MD2 & MD3 Gifts Crawling Abyss Canto V Enemies 3~4 2~4 6 Ambling Pearl, Skin Prophet, Dream-Devouring Siltcurrent MD2 & MD3 Gifts The Evil Defining Canto V Enemies / Bosses N/A 4~5 7 Ahab Trio, Effloresced E.G.O::GasHarpoon MD2 & MD3 Gifts, Harpoon Prosthetic Leg Dregs of the Manor Canto VI Enemies 3~4 2~4 6 Josephine, Hindley, Dead Rabbits Boss MD4 Gifts A Certain World Canto VI Enemies N/A 4~5 7 Nelly MD4 Gifts, Chief Butler's Secret Arts Hell's Chicken Hell's Chicken Enemies 1~3 1~3 6 Papa Bongy MD1 Gifts, Hot'n Juicy Drumstick, Dry-to-the-Bone Breast, Tango Marinade, Contaminated Needl & Thread, Sharp Needle & Thread S.E.A. S.E.A. Enemies 1~3 1~3 6 King Trash Crab MD2 Gifts, Oil-gunked Spanner, Twinkling Scrab, Trash Crab Brain Wine Miracle in District 20 Gnome Enemies 2~4 2~4 6 Manager Gnome MD2 & MD3 Gifts, Pom-pom Hat, Huge-Gift Sack, Sad Plushie Yield My Flesh To Claim Their Bones Y.M.F.T.C.T.B. Enemies 2~4 2~4 6 Distorted Bamboo-Hatted Kim MD2 & MD3 Gifts, Black Ledger, Rusted Hilt, Fractured Blade, Broken Blade, Red Tassel, Ragged Bamboo Hat, Old Dopo Robe
Affinity Floor Theme Packs
Pack Name Pack Cover Basic Description Simulation Floor Range Ritornello Floor Range Random Node Count Boss List (Equal Probability) Unique E.G.O Gifts Repressed Wrath Wrath Strong Enemies 4 2~3 6 Papa Bongy, Skin Prophet, Brazen Bull-Tearful Wrath & Special Gifts Unbound Wrath Wrath Strong Enemies N/A 4~5 7 Papa Bongy, Skin Prophet, Brazen Bull-Tearful Wrath & Special Gifts Addicting Lust Lust Strong Enemies 4 2~3 6 Clippity-cloppity? Tap Away!, So That No One Will Cry, Fairy-Long-Legs Lust & Special Gifts Tangling Lust Lust Strong Enemies N/A 4~5 7 Clippity-cloppity? Tap Away!, So That No One Will Cry, Fairy-Long-Legs Lust & Special Gifts Treadwheel Sloth Sloth Strong Enemies 4 2~3 6 Dream-Devouring Siltcurrent, Drifting Fox Sloth & Special Gifts Inert Sloth Sloth Strong Enemies N/A 4~5 7 Dream-Devouring Siltcurrent, Drifting Fox, Effloresced E.G.O::Spicebush Sloth & Special Gifts Devoured Gluttony Gluttony Strong Enemies 4 2~3 6 Ambling Pearl, Faelantern, Fairy Gentleman Gluttony & Special Gifts Excessive Gluttony Gluttony Strong Enemies N/A 4~5 7 Ambling Pearl, Faelantern, Drenched Gossypium Gluttony & Special Gifts Degraded Gloom Gloom Strong Enemies 4 2~3 6 Blubbering Toad, Headless Ichthys Gloom & Special Gifts Sunk Gloom Gloom Strong Enemies N/A 4~5 7 Blubbering Toad, Headless Ichthys Gloom & Special Gifts Vain Pride Pride Strong Enemies 4 2~3 6 You Want To Get Beat? Hurtily? Pride & Special Gifts Tyrannical Pride Pride Strong Enemies N/A 4~5 7 You Want To Get Beat? Hurtily?, Effloresced E.G.O::GasHarpoon Pride & Special Gifts Insignificant Envy Envy Strong Enemies 4 2~3 6 Wayward Passenger, kqe-1j-23, Shock Centipede Envy & Special Gifts Piritful Envy Envy Strong Enemies N/A 4~5 7 Wayward Passenger, kqe-1j-23, Shock Centipede Envy & Special Gifts Emotional Repression Wrath Weak Enemies 2~3 2~3 5 So That No One Will Cry, Ambling Pearl, Manager Gnome Wrath & Slash / Pierce / Blunt Gifts Emotional Seduction Lust Weak Enemies 2~3 2~3 5 Papa Bongy Lust & Slash / Pierce / Blunt Gifts Emotional Indolence Sloth Weak Enemies 2~3 2~3 5 Headless Ichthys, Steam Transport Machine, Golden Apple Sloth & Slash / Pierce / Blunt Gifts Emotional Craving Gluttony Weak Enemies 2~3 2~3 5 Fairy-Long-Legs, Wayward Passenger Gluttony & Slash / Pierce / Blunt Gifts Emotional Flood Gloom Weak Enemies 2~3 2~3 5 Ardor Blossom Moth, kqe-1j-23, Dream-Devouring Siltcurrent Gloom & Slash / Pierce / Blunt Gifts Emotional Subservience Pride Weak Enemies 2~3 2~3 5 Fairy Gentleman, Drenched Gossypium, Faelantern Pride & Slash / Pierce / Blunt Gifts Emotional Judgement Envy Weak Enemies 2~3 2~3 5 Blubbering Toad, Everything There of an Inquisitor Envy & Slash / Pierce / Blunt Gifts
'Keyword' Floor Theme Packs
Pack Name Pack Cover Basic Description Simulation Floor Range Ritornello Floor Range Random Node Count Boss List (Equal Probability) Unique E.G.O Gifts Slicers & Dicers Slash Strong Enemies 4 2~3 6 Wayward Passenger, Distorted Bamboo-Hatted Kim Slash & Special Gifts Piercers & Penetrators Pierce Strong Enemies 4 2~3 6 King Trash Crab, Drenched Gossypium, Alleyway Watchdog Pierce & Special Gifts Crushers & Breakers Blunt Strong Enemies 4 2~3 6 Papa Bongy, Brazen Bull-Tearful, Blubbering Toad Blunt & Special Gifts To Be Cleaved Slash Weak Enemies 1~2 1~2 5 Ardor Blossom Moth, Fairy-Long-Legs, Faelantern MD4 & Slash Gifts To Be Pierced Pierce Weak Enemies 1~2 1~2 5 King Trash Crab, Drifting Fox, Fairy Gentleman MD4 & Pierce Gifts To Be Crushed Blunt Weak Enemies 1~2 1~2 5 So That No One Will Cry, Steam Transport Machine MD4 & Blunt Gifts Burning Haze Burn Users 3~4 2~3 6 Brazen Bull-Tearful, Skin Prophet, Ardor Blossom Moth Burn & Special Gifts Season of the Flame Burn Users N/A 4~5 7 Brazen Bull-Tearful, Skin Prophet, Ardor Blossom Moth Burn & Special Gifts Trickled Sanguine Blood Bleed Users 3~4 2~3 6 Headless Ichthys, Fairy-Long-Legs, Drenched Gossypium Bleed & Special Gifts Mountain of Corpses, Sea of Blood Bleed Users N/A 4~5 7 Kromer, Effloresced E.G.O::Farmwatch, Spiral of Contempt Bleed & Special Gifts Dizzying Waves Tremor Users 3~4 2~3 6 Fairy Gentleman, Papa Bongy Tremor & Special Gifts Abnormal Seismic Zone Tremor Users N/A 4~5 7 Fairy Gentleman, Papa Bongy Tremor & Special Gifts Crushing External Force Rupture Users 3~4 2~3 6 So That No One Will Cry, Alleyway Watchdog, Faelantern Rupture & Special Gifts Unrelenting Might Rupture Users N/A 4~5 7 Effloresced E.G.O::Spicebush, Wayward Passenger, King Trash Crab Rupture & Special Gifts Sinking Pang Sinking Users 3~4 2~3 6 Drifting Fox, Blubbering Toad Sinking & Special Gifts Sinking Deluge Sinking Users N/A 4~5 7 Drifting Fox, Dream-Devouring Siltcurrent, Brazel Bull-Tearful Sinking & Special Gifts Deep Sigh Poise Users 3~4 2~3 6 Steam Transport Machine, Santata Poise & Special Gifts Poised Breathing Poise Users N/A 4~5 7 Dream-Devouring Siltcurrent, Distorted Bamboo-Hatted Kim, Ahab Trio Poise & Special Gifts Rising Power Supply Charge Users 3~4 2~3 6 kqe-1j-23, Shock Centipede Charge & Special Gifts Thunder and Lightning Charge Users N/A 4~5 7 kqe-1j-23, Shock Centipede, Wayward Passenger Charge & Special Gifts
Theme Pack Recommendations
For a quick and dirty ranking, I'd say avoid any and every Theme Pack with Ahab or Ahab Trio, as well as Mountain of Corpses, Sea of Blood. They just are too annoying to deal with with an average Mirror Dungeon team.
If you want to make your own list, just ctrl-f boss names on the list above, and remember to avoid those!
Lets go through floor by floor though! I will be going through assuming Rintornello Difficulty floors, since thats the one where Theme Packs actually matter a bit more.
Floor 1:
The only possible Floor Theme Packs for Floor 1 are either weak Story Floor Theme Packs and the three 'To Be __' packs. None of these are massively bad, though I'd avoid the three 'To Be __'s since Cleaved and Pierced have slightly annoying abnormality fights, and Crushed has the long Steam Transport Machine. Not hard, just long. Aim for 4 Random Nodes if possible, which means avoiding Automated Factory, Lake World, The Outcast, and the three 'To Be __' (5 Nodes). S.E.A. and Hell's Chicken both have 6 Random Nodes, and I would only pick them on Floors 2 or 3, unless their Clear Bonus gives you a specific E.G.O Gift in their Clear Bonus you want from their Intervallo. Finally, The Unloving is the only Floor Theme Pack with 3 Random Nodes, though I think that 4-wave final fight against Baba Yaga evens out how long the floor takes compared to the other 4 Random Node Floor Theme Packs. Overall, all the potential ones here are mostly easy, so focus on Clear Rewards.
Floor 2:
Still has Unloving, so you can go for that again if you want. Otherwise, I'd aim for 5 Nodes, and avoid The Unconfronting (unless you want Kromie), Falling Flowers (unless you want 1/3 Spicebush), and Y.M.F.T.C.T.B (unless you want Kim). By Floor 2's Floor Boss, you should be able to beat all the other possible bosses fairly easily.
Floor 3:
Exact same as Floor 2, everything that can spawn on Floor 2, can spawn on Floor 3, except for the 'To Be __' and 'The Unloving' which are removed. Nothing is added.
Floor 4:
This is when you can actually start worrying about avoiding specific fights. 'The Unchanging' has Dongrang and Farmwatch, which both aren't massively hard, but worth looking out for. 'The Evil Defined' has both Ahabs, so avoid at all costs. 'Tyrannical Pride' and 'Poised Breathing' has a chance at Ahab, so the same situation. Otherwise, I'd say the only ever must-dodge is Mountain of Corpses, Sea of Blood, since the three possible bosses are Kromer, Farmwatch, and Spiral of Contempt; All not Ahab-level bosses, but all fairly annoying on a late floor.
Floor 5:
Basically the same as Floor 4, but worry a bit more than Floor 4 since you just picked a strong Mounting Trial.
Of course, my recommendations are based on difficulty and time. If you want to optimize the maximum amount of Cost, Starlight, or E.G.O Gifts, you might want to do the exact opposite of what I'm saying and go for the longest floors! Keep in mind that there is no plan for every situation, so think a bit on your own about what exactly you are setting out to accomplish.
Enemy Base Levels

This is the table of base enemy levels per floor. Remember that these are the BASE numbers, and thus you should add whatever bonus Enemy Level +s you got from the Mounting Trials in either Difficulty to this Base Number.
Note: Unlike Mirror of the Lake, the Base Lvl no longer varies between Elite, Focused, Boss, and Regular Encounters.
Floor # Simulation Base Lvl Simulation Minimum Potential Lvl Simulation Maximum Potential Lvl Ritornello Base Lvl Ritornello Minimum Potential Lvl Ritornello Maximum Potential Lvl Floor 1 Lvl 40 Lvl 40 Lvl 40 Lvl 45 Lvl 45 Lvl 45 Floor 2 Lvl 40 Lvl 41 Lvl 42 Lvl 46 Lvl 47 Lvl 50 Floor 3 Lvl 40 Lvl 42 Lvl 44 Lvl 47 Lvl 49 Lvl 55 Floor 4 Lvl 40 Lvl 43 Lvl 46 Lvl 48 Lvl 51 Lvl 60 Floor 5 N/A N/A N/A Lvl 50 Lvl 54 Lvl 66
Starting E.G.O Gifts


This is the list of possible Starting E.G.O Gifts for both versions of Mirror of the Wuthering. Unlike Mirror of the Lake, these Gifts are set in stone and will never change, so the rerolling strategy of Mirror of the Lake is dead in the water. However, these Gifts are still pretty powerful, so at least we don't have to spend 4 minutes rerolling before getting to start the run itself.
The 'Random' Category just pulls from the other 10 Keyword Categories, so I will not list it here. It does not contain anything outside of the shown E.G.O Gifts.
Note 1: You can reference the E.G.O Gift Guide in the Tips and Trick's Section for upgrades of these gifts. None of these gifts are fusion requirements.
Note 2: Every E.G.O Gift here is a Tier II Gift of the Keyword Category it is within.
Burn Bleed Tremor Rupture Sinking Poise Charge Hellterfly's Dream Wound Clerid Oscillating Bracelet Barbed Snare Red Order Cigarette Holder Employee Card Fiery Down Little and To-Be-Naughty Plushie Reverberation Fluorescent Lamp Melted Spring Stone Tomb Portable Battery Socket Pain of Stifled Rage Awe Sour Liquor Aroma Smoking Gunpowder Grandeur Old Wooden Doll Patrolling Flashlight
Slash Pierce Blunt Dreaming Electric Sheep Gathering Skulls Today's Expression Tailor's Scissors Once, A Blessing Compression Bandage Resolution Torn Bandolier Temporal Bridle
Generally, I recommend taking the first two gifts since the third and new gifts don't tend to apply to the whole team. However, some of the E.G.O Gifts for the Slash / Pierce / Blunt Category are special, in that they promote using a specific team composition. Resolution, the third gift in the Slash Category, promotes using a Shi Association team. Torn Bandolier promotes using Ammo using Identities. Temporal Bridle promotes using Minus Coin Blunt Identities, which is Lobotomy E.G.O::Sunshower Heathcliff and The One Who Shall Grip Sinclair. Be fun with your Starter Gifts, and let them help you try out some new team compositions you wouldn't have thought of prior to trying out the Mirror Dungeon.
General Strategy

For your first few runs of the Simulation Difficulty, you shouldn't have a massive amount of trouble, especially if you remember to unlock those free E.G.O Gift Starlight Nodes first thing. Just remember to avoid any Theme Packs that are especially annoying for the build you are playing, or just in general, such as Piercers and Penetrators, the Evil Defined, Lake World, and Tyrannical Pride. For your First Floor in both Simulation and Ritornello, you cannot fight Elite nor Focused Encounters, so your chances of getting specific E.G.O Gifts related to the floor are close to nil. Generally, just remember to swap out your team for the optimal farming rotation for starlight and avoid the terror Packs, and you'll be fine in Simulation.
For Ritornello, much of the same applies, since these modes are fairly close in concept as compared to Mirror Dungeon of the Lake. It is absolutely completable without any of the Starlight Buffs unlocked as long as your team is strong enough and you pay attention, but it certainly doesn't hurt to already be taking your first few bites of the Starlight Tree when you take on Ritornello Difficulty for the first time. Generally, for the first floor you only care about the guaranteed drops from the boss and what types of enemies you'll be fighting, since you want enemies you can quickly raise your Sanity against and you won't encounter any Elite nor Focused Encounters. The end of floor 1 has a rest stop, so you can upgrade some of your starter E.G.O Gifts to ++ right away if needed (looking at you Wound Clerid). The second floor has the first shop, so you can start caring about what E.G.O Gifts the Theme Packs might have, though mostly only if you have a few Shop Starlight upgrades under your belt. Its quite easy to grab a Fusion Ingredient or two first thing on floor 2, and then fuse at the start of floor 3 or end of floor 5 from that start. You can start caring a bit less about floor difficulty, though still go for the easier bosses / fatal weakness enemies if possible just to make it easier on yourself. Third floor has a rest node, so fuse and enhance those E.G.O Gifts away as you can. Same rules as before apply, fatal weaknesses to your current team, and guaranteed boss E.G.O Gift Drops. Continue this until Floor 5, where you want to make sure you aren't fighting a uber difficult boss (unless you want to have a funky time), and end it with a bang!
As mentioned earlier in the guide, I recommend reading some of the 'How to __' Guides to team build and prepare your runs.
We don't have Burn done yet lmao, wait a few days/weeks/months.
How to Bleed by Borderlined
https://steamcommunity.com/sharedfiles/filedetails/?id=3117516645
We don't have Tremor done yet lmao, wait a few days/weeks/months.
How to Rupture by Ekimmak
https://steamcommunity.com/sharedfiles/filedetails/?id=3159078900
How to Sinking by Silver
https://steamcommunity.com/sharedfiles/filedetails/?id=3118228803
We don't have Poise done yet lmao, wait a few days/weeks/months.
How to Charge by Silver
https://steamcommunity.com/sharedfiles/filedetails/?id=3181246823
I also recommend referencing these guides while going through the dungeon itself:
E.G.O Gift Fusion & Upgrading Cheat Sheet by Borderlined
https://steamcommunity.com/sharedfiles/filedetails/?id=3115645873
MD4 Team Cycling by Effective-Engine6745
Mirror Dungeons Abnormality Cheatsheet (W.I.P.) by Echo
https://steamcommunity.com/sharedfiles/filedetails/?id=2940932941
Thanks For Reading!

Special Thanks to Ang, who let me use their Starlight Tree image, @muuyo, for the Floor Length List, Silver, who created many of the fancier titles for this guide, as well as everyone else who gave smaller details to help refine this guide.
Final Note: If there's anything you think I should add, such as an extra Tip & Trick), got wrong (I've had to rewrite my damn outline for this guide 3 times already now with Project Moon changing stuff every week, I'm sure something from an earlier patch slipped in somehow), or anything else, let me know in the comments or on Discord! My Discord is the same as my name, but I'm also commonly on the two major Project Moon discords if you want to find me in the wild.
Source: https://steamcommunity.com/sharedfiles/filedetails/?id=3237308577
More Limbus Company guilds
- All Guilds
- TRADUCCIN al ESPAOL de Limbus Company
- Limbus Company Guide 831
- Limbus Company new players FAQ
- What to do if you have lost the love of your life
- How to increase your chances of getting christmas nightmare EGO!!
- Getting extra weekly bonus's from Mirror Dungeon overhauls
- How to delete Limbus Company
- CantoVII speed guide
- How to Discard (with simple Q and A's)
- How to get VSync for Limbus Company