General Information
I'm creating this guide for the purpose of helping new and experienced players create the best formations to advance through permanent campaigns and events.
For each campaign and event there will be sections for new players where I only use the original champions and Hitch. I will also make a section for experienced players that I will assume have most champions (my guides will contain all event champions except for Stoki and Krond).
For the permanent campaigns there will be sections on blessings, and how you should spend your favor.
If you find yourself in having some, but not all of the event champions I use feel free to tell me who you have and I'll try and find a good formation for you.
NEW Champion Analysis Guide! (Yeah, bear with me, it's an enormous WIP) I plan on tackling a few champs each week.
https://steamcommunity.com/sharedfiles/filedetails/?id=1523839268
Getting Started
Hello and welcome to Idle Champions of the Forgotten Realms! If you're a big DnD fan, I hope you enjoy this game, and if you're brand new to anything DnD (like me!) I think you'll still enjoy it.
Here I'll give some general tips to the new player.
Reset often! At the start of the game you'll find you can't progress all that far and that many champions will be too expensive to buy. Reset your game when it gets hard to progress any further and you'll earn Divine Favor which will increase your gold find and you can spend on other goodies.
Open your chests at the End of your runs. This will help give you a solid boost to your favor.
Try and farm over night! You'll have a big favor gain in the morning!
Subscribe to the Newsletter and get Hitch! Tutorial at end of this section
Join the reddit/discord communities for free chests, discussions and more!
How to subscribe to the newsletter and get Hitch.
Access the menu in the top right of the screen.
Click on Newsletter.
Entire your email and subscribe!
Access the shop in the top left of the screen and enter the code for Hitch sent in an email.
Once Delina is unlocked click on the arrow on her portrait so you can swap her with Hitch!
Abilities & Specializations (Bruenor - Asharra)


Bruenor
Abilities Inspired ~ Increases the damage of Bruenor by 100% for each adjacent champion.
Rally ~ Increases the damage of champions in the same column as Bruenor by 100%.Specialization
What's the difference?
If you choose Champion, Bruenor will have future upgrades that increase his Inspired ability.
If you choose Battle Master he will have future upgrades that increase his Rally ability.
Which should I choose?
If you are a brand new player on your first few runs of the game choose Champion. To begin Bruenor is probably your best damager. After your done with your first run or two always choose Battle Master.
Celeste
Abilities Crusader's Mantle ~ Increases the damage of champions adjacent to Celeste by 100%.
Mass Cure Wounds ~ Heals the champions in the column ahead of Celeste by 10 every second.Specialization
What's the difference?
Choosing War Domain will give Celeste future opportunities to upgrade her Crusader's Mantle ability.
Choosing Life Domain will give her future upgrades to Mass Cure Wounds.
Which should I choose?
Always War Domain. Barring a massive change to the game system, damage will always outweigh healing ability.
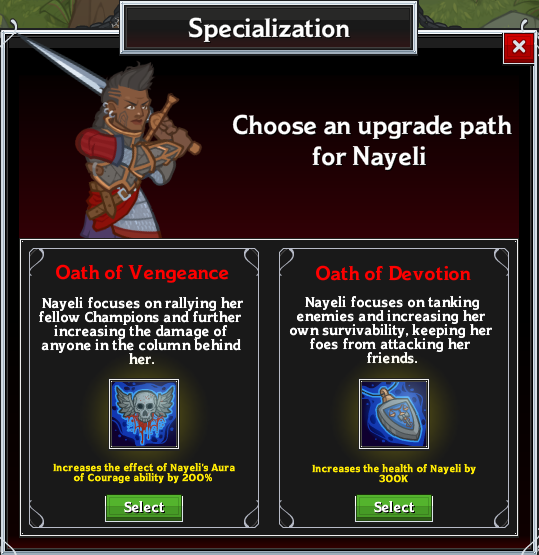
Nayeli
Abilities Aura of Courage ~ Increases the damage of champions in the column behind Nayeli by 100%.
Aura of Protection ~ Increases the damage of all champions by 50% for each enemy currently attacking Nayeli. Stacks additively per enemy.Specialization
What's the difference?
Oath of Vengeance allows Nayeli to enhance her Aura of Courage ability with future upgrades.
Oath of Devotion gives Nayeli upgrades that dramatically increase her total health.
Which should I choose?
Always choose Oath of Vengeance. Same reason as with Celeste. It's most important to maximize your total damage.
Jarlaxle
Abilities Room to Work ~ Increases the damage of Jarlaxle by 100% if there is no one directly in front of him.
Equal Opportunity ~ Increases the damage of Jarlaxle by 100% if Jarlaxle is adjacent to at least 3 unique races.
Increased Gold Find ~ Jarlaxle has a passive ability where he periodically gets upgrades that increase your gold find by 10%. Stacks multiplicatively.Specialization
What's the difference?
If you choose Loner, Jarlaxle will get future upgrades that improve his Room to Work Ability.
If you choose Socialite he will get future upgrades that improve his Equal Opportunity Ability.
Which should I choose?
I find Socialite to be more effective since it's hard for Room to Work to be in use with Nayeli tanking. Loner is only the better choice in odd event formations where Jarlaxle can be placed without anybody in front of him.
Calliope
Abilities Bardic Inspiration ~ Increases the damage of champions in the column in front of Calliope by 100%.
Song of Protection ~ Grants 250 temporary hit points to damaged champions within 2 slots of Calliope.Specialization
What's the difference?
College of Valor focuses Calliope's future upgrades on enhancing Bardic Inspiration.
College of Lore focuses Calliope's future upgrades on enhancing Song of Protection.
Which should I choose?
For the same reasons mentioned for previous champions College of Valor is better.
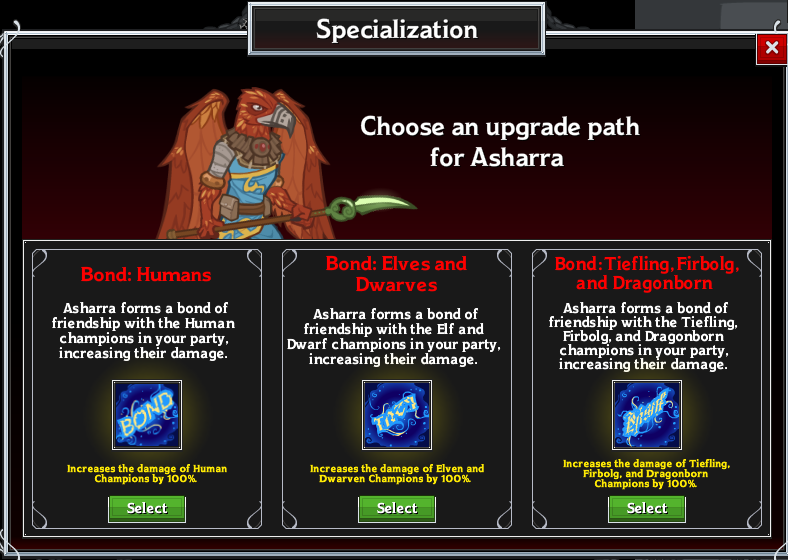
Asharra
Abilities The only ability Asharra has is the one granted by her Specialization.Specialization
What's the difference?
You may choose between one of 3 Asharra's Bonds, each of which increases the damage of champions belonging to a certain racial group(s) by 100%.
Which should I choose?
Choose the Bond that alligns with your main damage dealer.
Abilities And Specializations (Minsc - Arkhan)
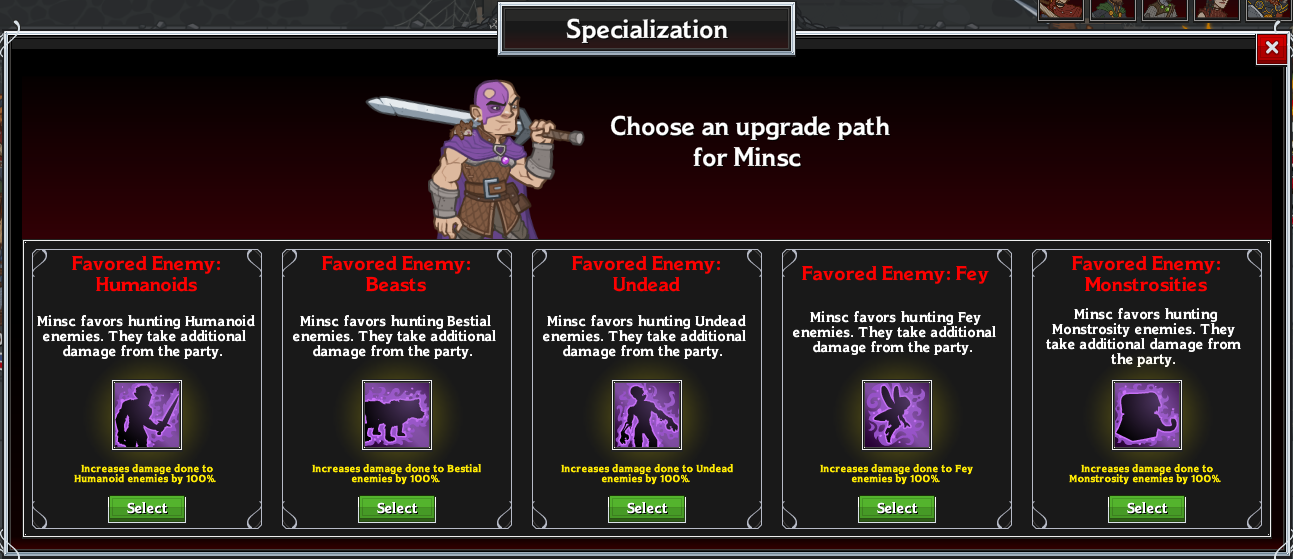


Minsc
Abilities The only ability Minsc has is the one granted by his Specialization.Specialization
What's the difference?
You may choose between one of five Minsc's Favored Enemies, each of which increases the damage done to a certain enemy type by 100%.
Which should I choose?
Wait until you reach your wall, and decide based upon the enemy type there. If you are in the Tomb of Annihilation campaign always choose Favored Enemy: Undead. Keep in mind that it is possible for none of the Favored Enemy choices to apply to certain enemies.
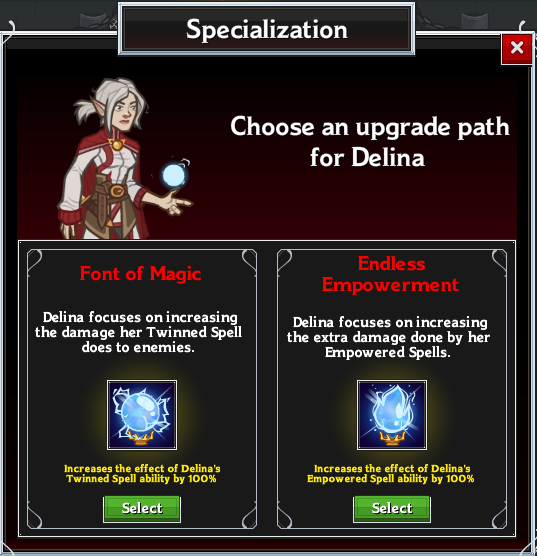
Delina (if for some odd reason you aren't using Hitch)
Abilities Twinned Spell ~ Delina's attacks richochet to a nearby enemy for 50% of the original damage.
Empowered Spell ~ When Delina attacks enemy they take an additional 50% of the original damage dealt over the next two seconds.Specialization
What's the difference?
Font of Magic gives Delina future upgrades for her Twinned Spell ability.
Endless Empowerment gives her future upgrades for her Empowered Spell ability.
Which should I choose?
Honestly you shouldn't choose at all since you should be using Hitch (if you don't have Hitch check the "Getting Started" section for information on how to get him). But if you do insist upon using Delina I advise taking the upgrade path for which you have better gear.
Hitch
Abilities Spare Dagger ~ Adds a thrown dagger to Hitch's basic attack.
Friendly ~ Increases the damage of champions by 100% if their Charisma score is greater than 13.Specialization
What's the difference?
Choosing More Daggers gives Hitch future upgrades that add more spare daggers to his basic attack.
Choosing Charismatic focuses his future upgrades on enhancing his Friendly ability.
Which should I choose?
Charismatic is always the better bet.
Makos
Abilities Makos' abilities are granted through his SpecializationSpecialization
What's the difference?
Dark Luck gives an additional 100% gold from enemies that Makos dishes the killing blow on.
Dark Blessing increases the damage of champions who aren't adjacent to Makos by 100%.
Which should I choose?
Makos is one of the few champions where you will frequently use both specializations. If you are currently trying to farm gold and increase your favor choose Dark Luck, if you are trying to complete a variant or push to a new high level choose Dark Blessing.
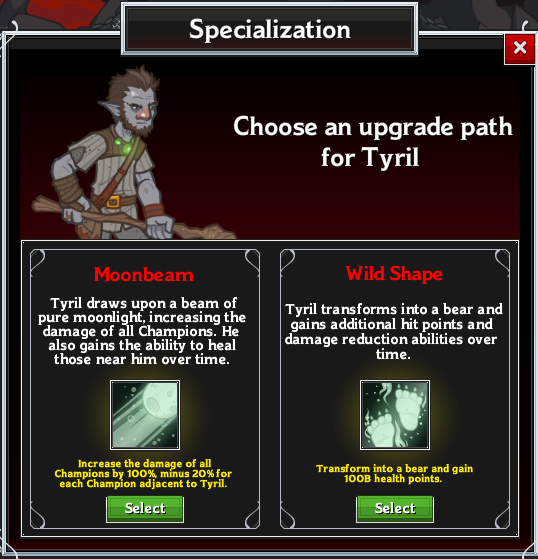
Tyril
Abilities Tyril's abilities are granted through his SpecializationSpecialization
What's the difference?
Choosing Moonbeam allows Tyril to learn a damage buff that increases the damage of all champions by 100% -20% for each champion adjacent to Tyril (stacking additively) it also allows him to heal adjacent champions by 12.5B every second.
Choosing Wild Shape turns Tyril into a Bear with a bonus 100B health. He learns Wild Resilience which initially reduces damage taken by 12.5B(cannot reduce below 5% of original damage) and also gets upgrades to further increases his total health. His Ultimate Ability changes depending on the specialization.
Which should I choose?
Moonbeam is best.
Jamilah
Abilities Reckless Attack ~ Increases Jamilah's damage by 100% but also increases the damage Jamilah takes by 100%.
Frenzy ~ Jamilah's basic attack hits one additional target at 50% the original damage.Specialization
What's the difference?
Brute Strength is a one time upgrade that increases Jamilah's damage by 200%
Uncanny Speed is a one time upgrade that decreases Jamilah's attack cooldown by 2 seconds.
Which should I choose?
Brute Strength will get you further. Neither choice is bad however.
Arkhan
Abilities First in Line ~ Increase the damage of Arkhan by 100% if he is in the front row of the formation.
Loyalty ~ Increases the health of Arkhan by 50% if there are 2 champions in the column behind him.Specialization
What's the difference?
Chango Unchained alters Arkhan's Ultimate attack into a more powerful version.
Chango Restrained increases the health of Arkhan by 54q and provides self healing of 700t every second when his health is under 50%. He also gets a future health upgrade.
Which should I choose?
You're probably never going to use Arkhan, so use whatever you want.
Time Gates
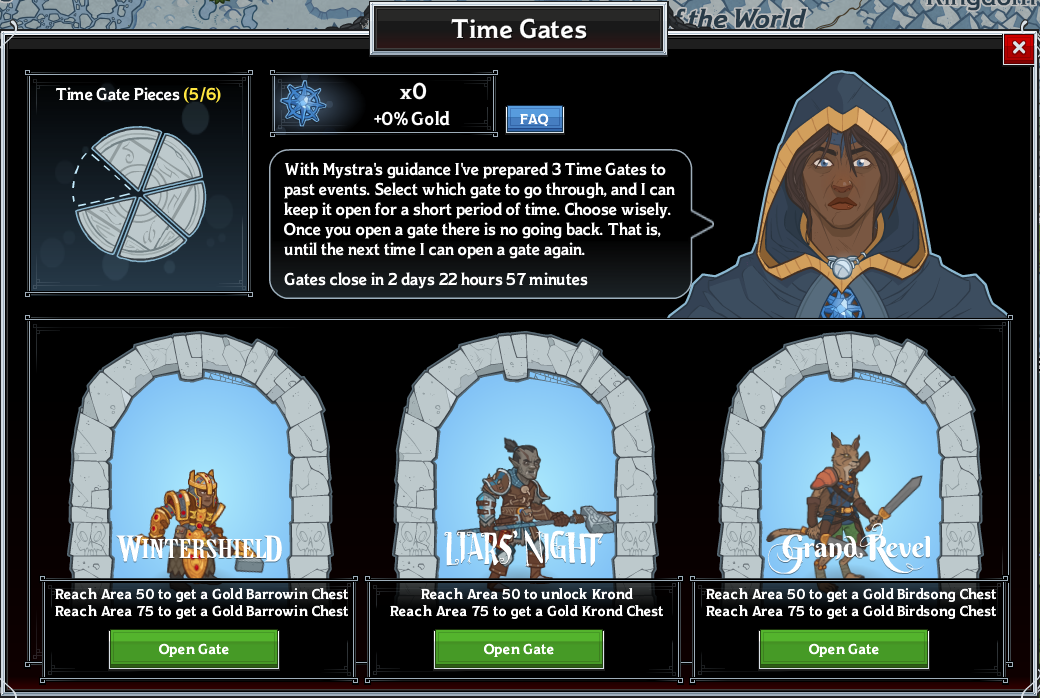
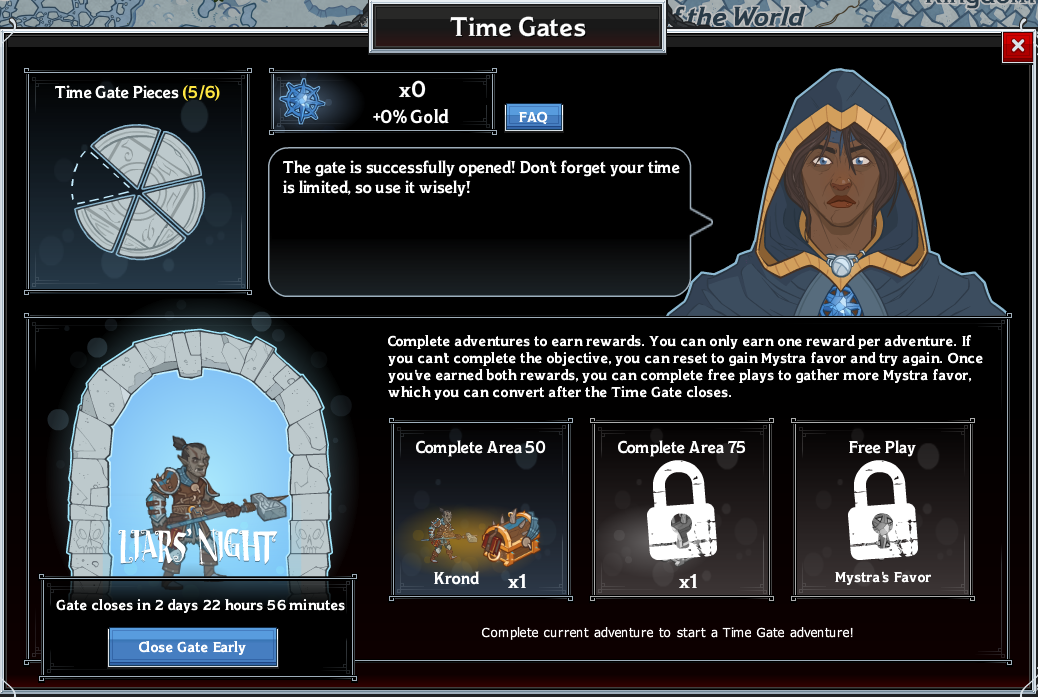
Time Gates are a new feature that allow you to obtain champions from previous events as well as gather 2 gold chests for said champion.
Natural Time Gates will open every 21 days, and last for 3 days. They start on the weekend in between events, so you should always have a weekend buff while a natural Time Gate is live. You can also force open Time Gates, but more on that later.
Time Gates can be accessed via the campaign map or between the Journal & Complete Adventure Tabs. When you open up the menu, you will get something that looks like this.
After opening the menu, you will get to choose to open a Time Gate for one of three past event champions. If you do not have every champion unlocked there is a guarantee that at least one of the champions you do not already own will be available. In my case this is Krond.
After selecting a champion, the menu will alter to look like this.
There will be 3 objectives. They must be completed sequentially. The first unlocks the champion (if you don't already own them) as well as a gold chest. The base requirement* for this first objective is to reach area 50. The second objective will always reward a gold chest, and the requirement is 25 areas further than the first objective (here it's 75) lastly the free play option will unlock. Unlock in events, there is no random chest reward upon completing 50. You will only gain favor. This Mystra's favor will be converted immediately after the Time Gate closes at 1/4 of the rate the typical event favor converts. (10 billion favor will give a 25% conversion rate rather than 100%)
As I mentioned earlier, you can also force open a Time Gate. In the images above you can see that I have 5/6 Time Gate pieces. When you collect 6 pieces you may force open a Time Gate. The sole restriction here is that you may not open it within 3 days of a natural Time Gate, to prevent overlapping Time Gates.
Time Gate pieces drop from bosses roughly every 5 days or so. Roughly this leads to a forced Time Gate every 4 weeks, while you can get a natural every 3 weeks.
*Lastly, I mentioned the term Base Requirement in an earlier section. The base requirement for any Time Gate objective is 50, 75, free play. However, let's say I chose Krond. When Krond next shows up in a Time Gate, his requirements will be 100, 125, free play. You can make his requirements decrease though. If Krond appears in the next Time Gate, AND I decide not to choose Krond, his requirements will drop 25 areas each the next time he appears. This only happens if he appears and you don't choose him. If Krond is not among the 3 options, his requirements will not drop.
General Tips Have a solid amount of silver chests on hand prior to Time Gates. As you only have 3 days to build favor during a Time Gate, opening chests on early runs will really help your progress.
Don't choose the same champion every time they appear as it will get more and more difficult to complete their objectives.
Be smart when you Force Open Time Gates, don't open one during an event.
Sword Coast Overview & Blessings
The Grand Tour of the Sword Coast is the first main campaign of Idle Champions and is where you will begin your tutorial mission. The formation allows for 9 members in a diamond pattern.
Blessing Guide
Blessings are really great at helping you progress further in the game. However in order to purchase them you need to spend your hard-earned favor which counts towards your gold find. In other words NEVER spend all of your favor. A good rule of thumb is to stick between spending 10%-25% of your total favor. You need to purchase a certain amount of blessings in each tier before unlocking the next tier. Below is a tier by tier summary of blessings.
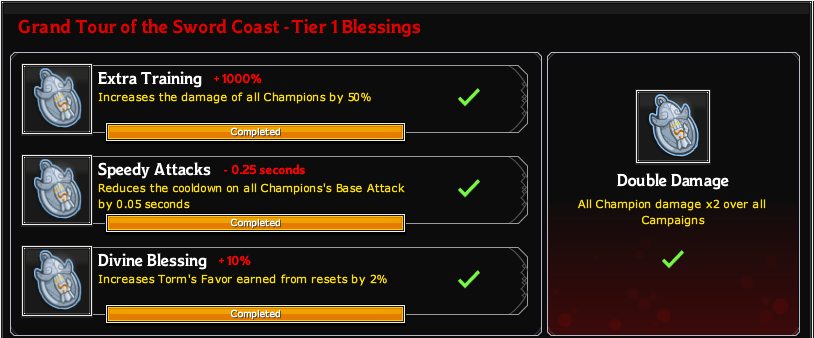
Tier 1 Blessings
Each Tier of Blessings has 3 blessings specific to the campaign that you're in and one global blessing that applies to ALL campaigns, even events!
When compared to the blessings found in the Tomb of Annihilation the blessings in the Sword Coast are rather lackluster. However, as a new player just beginning the game they will all be quite useful. They are as follows.
Extra Training ~ A damage buff with each upgrade giving an additive +50% damage to all of your champions, at maximum upgrade will give a +500% damage buff.
Speedy Attacks ~ An attack cooldown buff with each upgrade lowering the basic attack cooldown of all champions by .05 seconds, reaching up to .25 seconds at max.
Diving Blessing ~ Each upgrade increases Torm's favor received upon reset by 2%, reaching a maximum of 10%.
Double Damage ~ Doubles the damage of ALL your champions across ALL campaigns.Breaking down the Tier 1 blessings you'll want to focus on Extra Training and Divine Blessing. Speedy Attacks can largely be ignored until later since it's a rather tiny increase in attack speed. The global blessing is extremely useful since it applies to ALL campaigns, so get that as soon as you can.
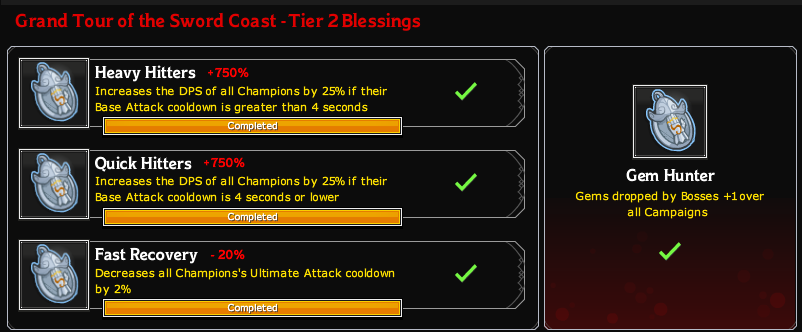
Tier 2 Blessings
The Tier 2 Blessings look pretty great at first glance, however they don't stack.
Heavy Hitters ~ A damage buff increasing damage by 25% of all champions with an attack speed of GREATER than four seconds, capping at 750%.
Quick Hitters ~ A damage buff increasing damage by 25% of all champions with an attack speed of LESS THAN OR EQUAL to four seconds, capping at 750%.
Fast Recovery ~ Decreases ultimate attack cooldown of all champions by 2%, capping at 20%.
Gem Hunter ~ Increase gems dropped by boss loot bags by one across ALL campaigns.For Tier 2 Blessings you want to focus your favor on either Quick or Heavy Hitters. If your main damage champions attack quickly go for Quick Hitters, if not go for Heavy Hitters. Spending favor on Fast Recovery is up to you an your play style. If you use ultimates a lot then purchase these blessings. If you're like me and don't use them much, if at all, just save favor for now. Gem Hunter is truly useful. One extra gem may not seem like much, but when you start killing hundreds of bosses a day it seriously adds up.
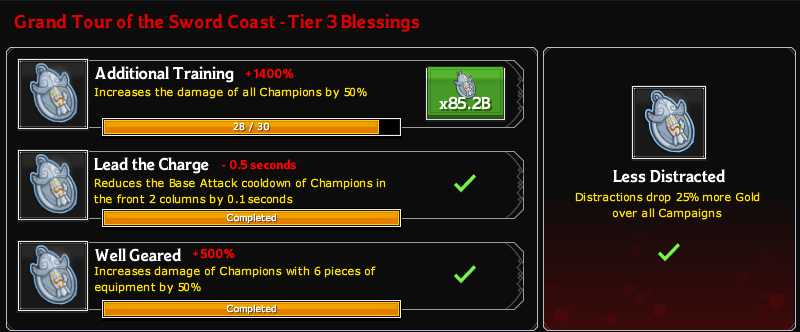
Tier 3 Blessings
The Tier 3 Blessings get to be a little more useful/interesting.
Additional Training ~ A damage buff with each upgrade increasing the damage of all champions by 50% capping at 1500%
Lead the Charge ~ An attack cooldown buff with each upgrade decreasing the attack speed of champions in the front two columns by .1 seconds capping at .5 seconds.
Well Geared ~ A damage buff with each upgrade increasing the damage of all champions with all 6 gear slots filled by 50% capping at 500%
Less Distracted ~ Distractions drop 25% more gold across ALL campaigns.Purchase these blessings as you can since they are all pretty useful. The exception is Less Distracted. Distractions aren't currently helpful with the pitiful amount of gold they drop so unless you have an abundance of favor, don't bother wasting any on it.
Tier 4 Blessings
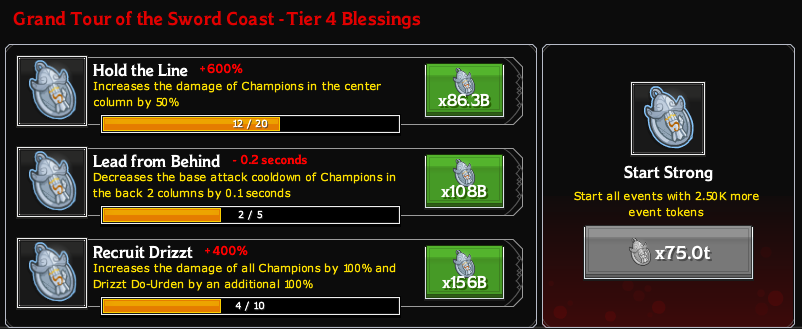
The Tier 4 Blessings are solid all around and the global is pretty fantastic. Hold the Line ~ A damage buff with each upgrade increasing the damage of champions in the center column 50% capping at 1000%
Lead from Behind ~ Nearly identical to 'Lead the Charge' this blessing decreases the attack cooldown of champions in the back two columns by .1 seconds per upgrade capping at .5 seconds.
Recruit Drizzt ~ A damage buff with each upgrade increasing the damage of all champions by 50% with double the effect on Drizzt capping at 1000% (2000% for Drizzt)
Start Strong ~ Begin all events with 2,500 tokens.Champions in your center column now recieve an additional 100x damage from this blessing (200x if that center champion is Drizzt) which is a pretty impressive buff. More importantly the global blessing guarantees an extra run on all events.
Sword Coast Formations


Blessings to Keep in Mind
Best Farming Variant ~ Terror in the Dark (100% Outdoors)
Vanilla Formation Nayeli ~ Oath of Vengeance
Bruenor ~ Shield Master, Jarlaxle ~ Choice*
Asharra ~ Bond: Elves, Celeste ~ Choice, Calliope ~ Choice
Hitch ~ Charismatic, Makos ~ Dark Blessing
Tyril ~ MoonbeamWhile revamped Jamilah & Delina are also viable DPS contenders, I advise a Jarlaxle formation, especially for the newer player as he has a pretty solid gold buff and is also part of a very affordable formation. I left a bunch of specs up to the players choice, namely for if you find yourself dying before hitting your wall. If you're dying take Life Domain so Celeste's heals can reach Nayeli, and College of Lore for quicker damage shields. Jarlaxle gets gold/DPS upgrades with either choice, so just choose your preference. Reached 313.
Waffle Crew Formation Evelyn ~ Compel Duel
Diath ~ Leadership Training, Makos ~ Dark Blessing
Strix ~ Panic, Celeste ~ Life Domain, K'thriss ~ Efficient Bookkeeping
Gromma ~ Circle of the Arctic, Paultin ~ Choice
Tyril ~ MoonbeamNot many of the revamped core champions have an impact in this formation, but I am now finding that Makos out-buffs Hitch by a substantial margin, so he is now in the formation. Still, if you're farming rather than pushing, Azaka is miles better in Makos' slot. Reached 352.
Tomb Of Annihilation Overview & Blessings
Welcome to the Tomb of Annihilation Campaign. This campaign allows for a 10 man formation in comparison to the Sword Coast's 9 man. Kelemvor's Favor is the blessing currency.
Blessings Guide
Blessings are really great at helping you progress further in the game. However in order to purchase them you need to spend your hard-earned favor which counts towards your gold find. In other words NEVER spend all of your favor. A good rule of thumb is to stick between spending 25%-40% of your total favor. You need to purchase a certain amount of blessings in each tier before unlocking the next tier. Below is a tier by tier summary of blessings.
Tier 1 Blessings
Every tier of blessings will have 3 unique blessings that apply only to the specific campaign you are on, as well as 1 global blessing that applies to ALL campaigns, even events!
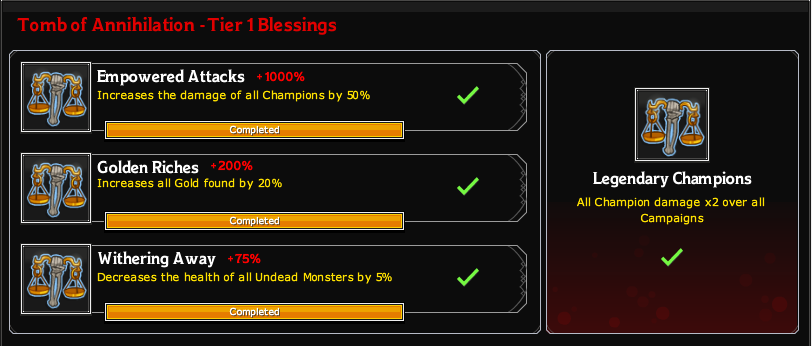
The tier 1 blessings in the Tomb of Annihilation are all extremely useful. They are as follows.
A damage buff with each upgrade increasing the damage of every champion by 50% maxing at a whopping 1000%
A gold buff with each upgrade increasing your gold find by 20% maxing at 200%
An enemy debuff with each upgrade increasing undead health by 5% maxing at 75%
A GLOBAL damage buff that doubles all champion damage
Using the rule above purchase every blessing as soon as you can without violating the rule of only spending 25-40% of your total favor. It's probably best to focus on the gold blessing first.
The global blessing is great because it helps you in the Sword Coast and Event campaigns too.
Tier 2 Blessings
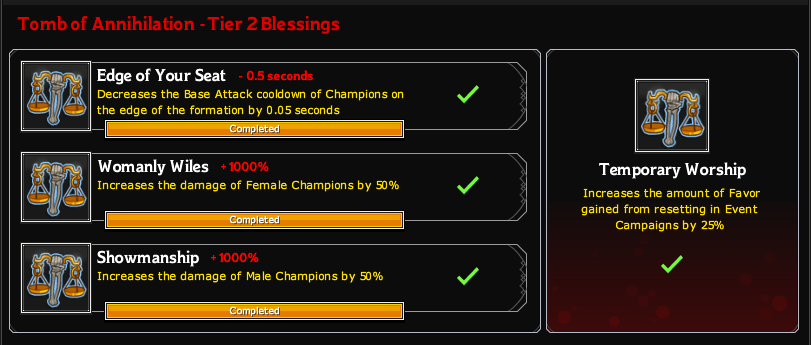
Here are the tier 2 blessings.
A buff that reduces the basic attack cooldown of champions on the edge of your formation. Each upgrade reduces the cooldown by .05 seconds maxing at .5 seconds
A damage buff with each upgrade increasing the damage of female champions by 50% maxing at 1000%
A damage buff with each upgrade increasing the damage of male champions by 50% maxing at 1000%
An EVENT favor buff that increase favor on resets in events by 25%
The first blessing can mostly be ignored for the others until you have Barrowin*
The second and third blessing are mostly identical, but the second is probably more important so purchase those first since your primary dps champions are likely Ash and Jam, if you like Makos buy the third blessing.
If you are currently in an event buy the event blessing as soon as you can, if it will be a while until the next event you can ignore it and focus on the other blessings until then.
Tier 3 Blessings
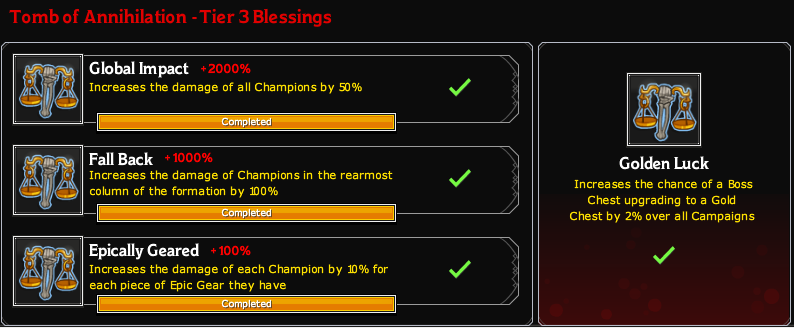
The tier 3 blessings get very expensive very fast and they are as follows.
A damage buff with each upgrade increasing the damage of all champions by 50% maxing at 2000%
A damage buff with each upgrade increasing the damage of champions in the back row by 100% maxing at 1000%
A damage buff with each upgrade increasing the damage of each champion individually by 10% for each epic piece of gear they have maxing at 100%
A GLOBAL loot buff that increases the odds of a boss chest upgrading to a gold chest by 2%
The first blessing is straight forward and awards and enormous 2000% damage buff to all champs.
The second blessing is wonky and forces you to change your formation to throwing damage dealers in the back row. I find this to be much for useful on farming runs than damage runs.
The third blessing rewards you for epic gear by boosting the damage of each champion individually depending on how many epics they have.
The global buff appears to be extremely useful. The exact numbers are unknown so this is speculation, but it is believed that silver chests upgrade to gold at about a .5%-2% rate. This means worst case scenario you double the amount of gold chests that drop....at the excessive cost of 100 billion favor.
*With Barrowin in your party make sure Barrowin never sits in the middle slot of the formation, you want Barrowin to have as fast of an attack rate as possible. If your formation allows it put your dps in the middle slot.
If you're curious, it costs 927 billion favor to purchase every Blessing that is currently in this campaign. (up to Tier 3)
Tomb Of Annihilation Formations


Blessings to Keep in Mind Withering Away ~ Reduces the health of Undead enemies by 5% caps at 75%.
Edge of Your Seat ~ Reduces the basic attack cooldown of champions on the edge of the formation by .05s capping at .5s.
Fall Back ~ Buffs the damage of champions in the rear column by 100%, caps at 1000%.
Top Shelf ~ Buffs the damage of champions at the top of each column by 50%, capping at 2000%.
Best Farming Variant ~ Templar's Camp (100% Outdoors)
Vanilla Formation C1: Nayeli ~ Choice
C2: Jarlaxle ~ Either, Bruenor ~ Shield Master
C3: Calliope ~ College of Valor, Celeste ~ Life Domain, Asharra ~ Bond: Elves
C4: Tyril ~ Moonbeam, Minsc ~ Choice, Hitch ~ Charismatic, Makos ~ Dark BlessingChoose Nayeli's Tank/HP spec if enemies can target champions other than Nayeli, they'll need the health buff. 333 is a super awesome Vanilla formation with good gold find to boot.
Team Krond C1: Nayeli ~ Oath of Vengeance
C2: Krond ~ Thunderclap, Donaar ~ Oh Yeah
C3: Calliope ~ College of Valor, Vlahnya ~ Spy Network, Paultin ~ Choice
C4: Tyril ~ Moonbeam, Makos ~ Dark Blessing, Azaka ~ Resist the Curse, K'thriss ~ Efficient BookkeepingPNG
Although Bruenor is a very powerful buffer and contributes to Survival of the Fittest, K'thriss is that much stronger of a buffer that he is still more viable within a Team Krond formation.
Waffle Crew C1: Evelyn ~ Compel Duel
C2: Gromma ~ Circle of the Arctic, Donaar ~ Oh Yeah
C3: Diath ~ Leadership Training, Paultin ~ Choice, K'thriss ~ Efficient Bookkeeping
C4: Strix ~ Panic, Hitch ~ Charismatic, Azaka ~ Resist the Curse, Tyril ~ MoonbeamWhile Celeste is a better buffer than Donaar, using her causes me to sacrifice heals on Evelyn. I idle a TON in this game as I do most of my favor gaining overnight, so a lack of heals is not an option. If you're okay missing heals then swap Donaar and Celeste and move Celeste into Hitch's location. A minor weekend buff allowed me to idle at 376 while leaving familiars on ultimates.
*The spec choice on Paultin is rather inconsequential. I find a 50% gold buff more useful than a 100% damage buff, so I chose Luck of the Vistani. Either spec is fine however.
Waterdeep Dragon Heist Overview & Blessings.
Welcome to Waterdeep Dragon Heist! This brand new campaign in Idle Champions was released following the Stream of Many Eyes in early June. This new campaign shakes things up with a dual tank 10 man formation. Helm's Favor is the blessing currency. Waterdeep Dragon Heist unlocks after completeing 15 separate adventures.
Blessings Guide
Blessings are really great at helping you progress further in the game. However in order to purchase them you need to spend your hard-earned favor which counts towards your gold find. In other words NEVER spend all of your favor. Early game you can justfiy spending about 25-40% of your favor, since you can make it back up in just a couple of runs. As you go further and further that will go down to the point where you should only spend up to about 5% of your current favor. You must purchase a certain amount of blessings in each tier before you are eligible to purchase blessings from the next tier. Below is a tier by tier summary of blessings.
Tier 1 Blessings
As with previous campaigns, each tier of blessings has 3 that are specific to that campaign and one global blessing that applies to ALL campaigns, event events!
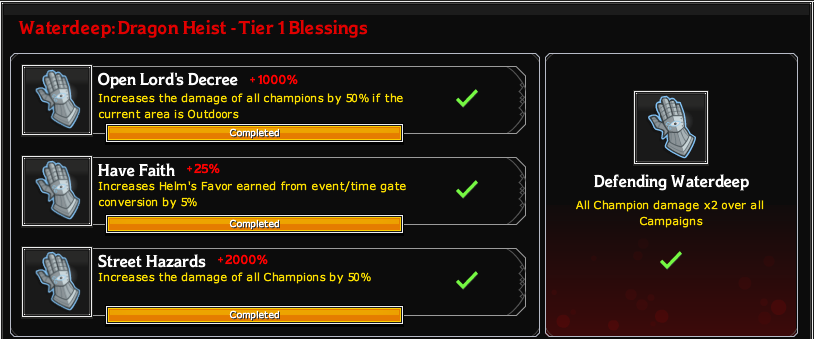
The blessings in Waterdeep Dragon Heist (WDH) are really quite powerful. They are as follows. Open Lord's Decree ~ A damage buff that applies to all champions as long as the current area is outdoors. The buff begins at a 50% bonus and caps at 1000%.
Have Faith ~ A currency exchange buff that boosts the amount of favor gained when transferring from event/TG to Helm's Favor. The buff begins at 5% and caps at 25%.
Street Hazards ~ A damage buff that applies to all champions. Buff starts at 50% and caps at 2000%.
Defending Waterdeep ~ A 2x damage buff applies across ALL campaigns.
The 2x global is very nice. You should be able to bulk max these blessings fairly quickly given how WDH is a very easy formation to farm with, so purchase whatever you would like in T1.
Tier 2 Blessings
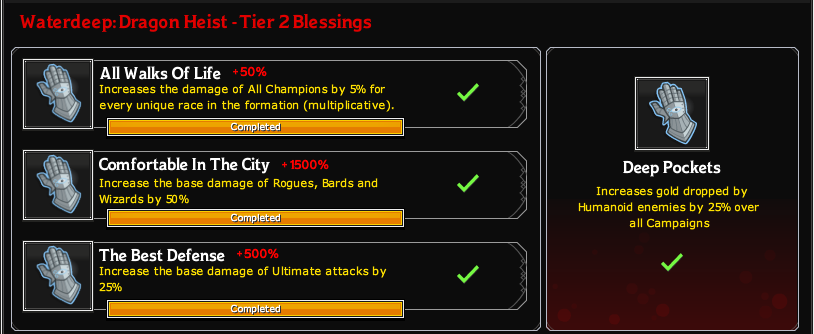
The tier 2 blessings are pretty decent, especially with specific formation compositions. All Walk's of Life ~ A damage buff that stacks multiplicatively with each unique race in the formation. Damage buff begins at 5% and caps at 50%.
Comfortable in the City ~ A damage buff that applies to Rogues/Bards/Wizards. Buff starts at 50% and caps at 1500%.
The Best Defense ~ A damage buff to Ultimate attacks that starts at 25% and caps at 500%.
Deep Pockets ~ A gold buff resulting in humanoid enemies in ALL campaigns dropping 25% more gold.
A 25% boost to gold from humanoid is rather lackluster as it isn't a very large buff and only applies to certain enemy types. In Tier 2 your favor spending may slow down a bit, I'd advise focusing on All Walk's of Life, however prioritize Comfortable in the City if your DPS is a Rogue/Bard/Mage (ie Birdsong)
Tier 3 Blessings
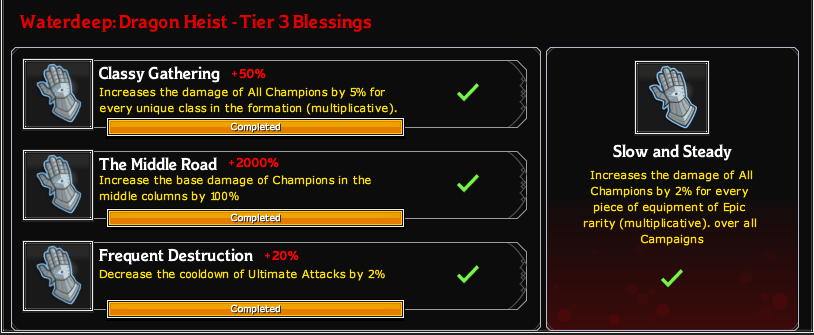
The tier 3 blessings are fantastic, especially the global as it will continue to get stronger and stronger as you play. Classy Gathering ~ A damage buff that stacks multiplicatively with each unique class in the formation. Damage buff begins at 5% and caps at 50%.
The Middle Road ~ A damage buff applied to the middle two columns starting at a 100% buff and capping at 2000%.
Frequent Destruction ~ Reduces the cooldown of Ultimates by 2%, capping at 20%.
Slow and Steady ~ A damage buff increasing the damage of ALL champions over ALL campaigns by 2% for each piece of Epic Gear collected. Stacks multiplicatively.
In all WDH is a great campaign for very diverse formations (I see lots of potential for Team Krond given the diversity in that formation) and also for players who love abusing ultimate attacks. The final T3 global is absolutely fantastic as it will continue to get stronger and stronger as you play well into the future (albeit it takes a significant amount of gear to get it going)
Waterdeep Dragon Heist Formations


Blessings to Keep in Mind Open Lord's Decree ~ Increases damage dealt while outdoors, currently caps at 1000%
All Walk's of Life ~ Increases damage for each unique race in the formation. Rate caps at 50% (multiplicative)
Comfortable in the City ~ Increases the damage of Bards/Rogues/Wizards, current cap at 1500%
Classy Gathering ~ Increases damage for each unique class in the formation. Rate caps at 50% (multiplicative)
The Middle Road ~ Increases the damage of champions in the center to columns. Currently caps at 2000%
Best Farming Variant ~ Attack on the Manor (80% Outdoors)
Vanilla Formation A (Non-Arkhan) C1: Nayeli ~ Choice*, Minsc ~ Choice
C2: Jamilah ~ Uncanny Speed, Celeste ~ War Domain, Bruenor ~ Battle Master
C3: Tyril ~ Moonbeam, Calliope ~ College of Valor
C4: Makos ~ Dark Blessing, Hitch ~ Charismatic, Asharra ~ Bond: Humans*Calliope can shield your non-tanking front slot, so it's up to you which spec you go with on Nayeli.
This formation was moving along pretty well until reaching area 276 where Minsc no longer was useful, as he can't spec against constructs.
Vanilla Formation B (Arkhan) C1: Nayeli ~ Oath of Vengeance, Arkhan ~ Usurped Power
C2: Hitch ~ Charismatic, Bruenor ~ Battle Master, Makos ~ Dark Blessing
C3: Calliope ~ College of Valor, Celeste ~ War Domain
C4: Tyril ~ Moonbeam, Asharra ~ Bond: Dragonborn, Minsc ~ ChoiceArkhan thrives in this formation. While he does have far lower health than your average tank, he makes up for it by getting massive buffs to heals and shields received by Celeste and Calliope. First time having a Vanilla formation breach 300 in a non-event level.
Team Krond C1: Nayeli ~ Oath of Devotion*, Donaar ~ Oh Yeah
C2: Krond ~ Thunderclap, Bruenor ~ Battle Master, Paultin ~ Additional Secrets
C3: Vlahnya ~ Spy Network, Calliope ~ College of Valor
C4: Azaka ~ Resist the Curse, Tyril ~ Moonbeam, Mako ~ Dark Blessing*I chose Oath of Devotion for Nayeli, however Vengeance is still viable, it simply requires a more active playstyle since Donaar will not have his HP scaled by Nayeli's. If you play active enough to make sure Calliope is always shielding everyone you're fine. I walled at 340.
Waffle Crew C1: Gromma ~ Circle of Arctic*, Evelyn ~ FS: Protection
C2: Diath ~ Leadership Training, Paultin ~ Additional Secrets, Donaar ~ Oh Yeah
C3: Strix ~ Panic, K'thriss ~ Efficient Bookkeeping
C4: Tyril ~ Moonbeam, Azaka ~ Resist the Curse, Hitch ~ CharismaticWDH has some truly great blessing and allows me to idle all the way up to 349.
*I choose Arctic here since the Mountain debuff is completely useless on enemies that decide to attack Evelyn. You may decide to use Barrowin rather than Tyril. You probably get further with Barrowin's Ult, just make sure that Strix is in Hide rather than Panic. Switch Makos/Birdsong/Nerys in for Azaka on off-stages.
Highharvestide
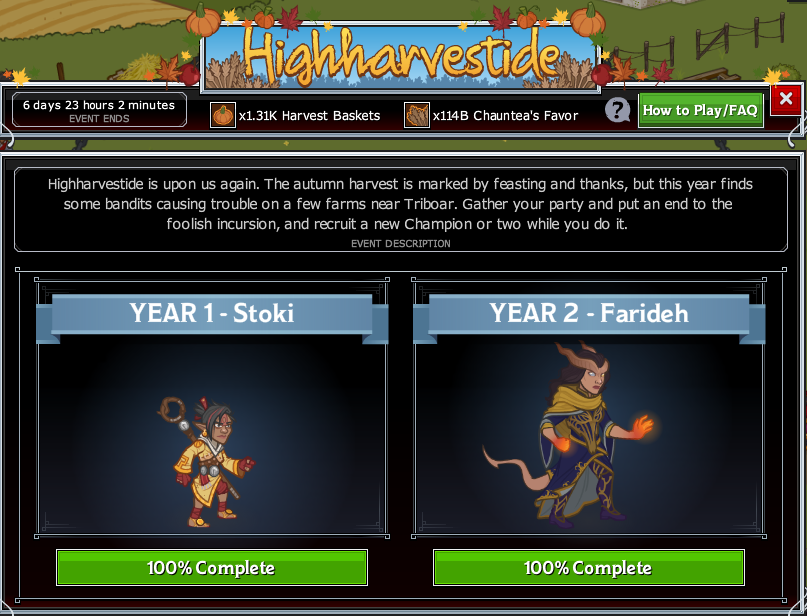


Welcome to Highharvestide, the first repeat event in Idle Champions!
To go along with Stoki, you can now also unlock Farideh! With there now being 2 champions per event CNE opted to go with 2 formations (1 for each champion) and individual Adventures/Variants. However they do share the same favor, so progress in one still helps you in the other. Also to combat the event token competition free plays initially have a reduced cost starting at 500 tokens for each champion, and increasing every free play for that specific champion by 500 tokens until ultimately reaching the standard 2500 tokens.
So let's move onto formations! (If you're looking for info about the event champions, check out my new guide keep in mind it's still a huge work in progressm but it was getting too cramped to keep that information here as well.) https://steamcommunity.com/sharedfiles/filedetails/?id=1523839268
As usual I'll stick with 3 formations for each Free Play formation. The first will use no event champions, the second will use the event champions unlocked in that adventure set, and the last will be an optimal progression formation using any combination of champions. Keep in mind my gear and favor levels are very high, you may or may not reach as far as I do, I'm just showing how best to make your formation and what's attainable for somebody F2P.
Stoki
Vanilla Champions C1: Nayeli ~ Oath of Vengeance, Minsc ~ Choice
C2: Bruenor ~ Battle Master, Hitch ~ Charismatic, Jamilah ~ Uncanny Speed
C3: Calliope ~ College of Valor, Celeste ~ War Domain
C4: Tyril ~ Moonbeam, Asharra ~ Bond Humans, Makos ~ Dark BlessingManaged to reach the 240 boss, timely ultimates would likely have pushed me past, but I didn't have the patience.
Vanilla & Stoki C1: Nayeli ~ Oath of Vengeance, Asharra ~ Bond Humans
C2: Bruenor ~ Battle Master, Hitch ~ Charismatic, Jamilah ~ Uncanny Speed
C3: Calliope ~ College of Valor, Celeste ~ War Domain
C4: Tyril ~ Moonbeam, Stoki ~ Ki Strike, Makos ~ Dark BlessingStoki managed to break me through the 240 boss (note in the previous formation I forgot to spec Minsc *facepalm*) but either way couldn't pass 245.
Optimal C1: Nayeli ~ Oath of Vengeance, Evelyn ~ Protection
C2: Celeste ~ War Domain, Strix ~ Hide, Barrowin ~ Greater Blessing
C3: Calliope ~ College of Valor, Ishi ~ Wait for It
C4: Hitch ~ Charismatic, Deekin ~ DOOM, Birdsong ~ Theme of ValorForgot to take a ss at my final wall, but did manage to clear 300. Thank you for hit based non armored boss.
Farideh
Vanilla Champions C1: Nayeli ~ Oath of Vengeance, Asharra ~ Bond Humans, Tyril ~ Moonbeam
C2: Bruenor ~ Battle Master, Jamilah ~ Uncanny Speed
C3: Calliope ~ College of Valor, Celeste ~ War Domain, Hitch ~ Charismatic
C4: Makos ~ Dark Blessing, Minsc ~ ChoiceMinsc choice is most likely going to be humanoid as that's what the majority of enemies are, but I'll leave it to your discretion as you may wall at a certain area with another enemy type. Depending on gear Hitch may be a more efficient DPS that Jamilah, if that's the case you might consider replacing Jamilah with Jarlaxle to gain his gold buff and lose minimal DPS. Using this formation I walled at 240.
Vanilla & Farideh C1: Nayeli ~ Oath of Vengeance, Asharra ~ Bond Tieflings, Tyril ~ Moonbeam
C2: Bruenor ~ Battle Master, Farideh ~ Choice
C3: Calliope ~ College of Valor, Celeste ~ War Domain, Hitch ~ Charismatic
C4: Makos ~ Dark Blessing, Jamilah/JarlaxlePretty much an identical wall using Farideh. The choice between Jam and Jarl is based on whether you'd want a pretty minor increase to your DPS or minor increase to your golf find. Again, walled at 239-240 with this group.
Optimal C1: Nayeli ~ Oath of Vengeance, Evelyn ~ Protection, Hitch ~ Charismatic
C2: Celeste ~ War Domain, Strix ~ Hide
C3: Calliope ~ College of Valor, Ishi ~ Wait for It, Barrowin ~ Greater Blessing
C4: Deekin ~ DOOM, Birdsong ~ Theme of ValorTechnically this isn't an optimal DPS formation, however I have yet to reach the level cap in an event, so Ishi trumps an buffing champion every time. If you were to go max DPS, choose your best 10th slot champion. I walled at 297, though I could've pushed 5-10 further with stacks/Catti Ult if I had the patience.
Liars' Night
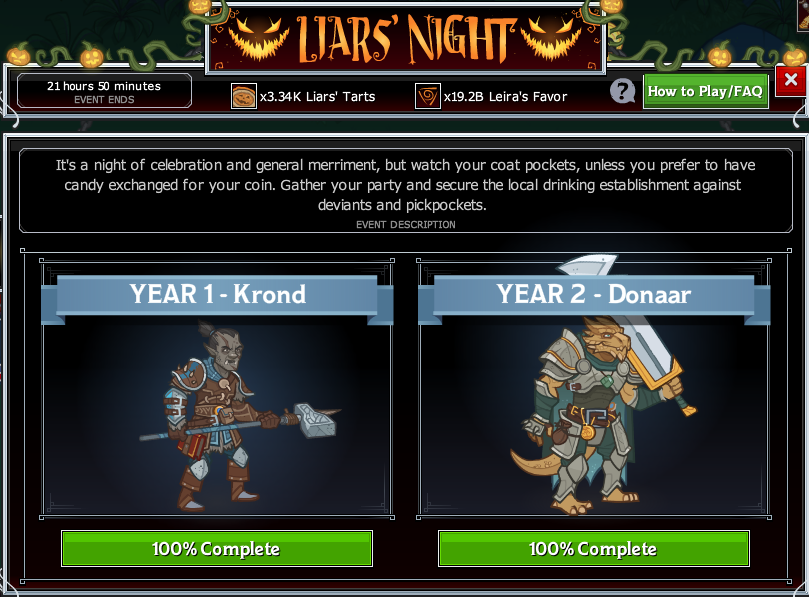


My apologies for being super behind on this one, schoolwork is really beginning to ramp up. Anyway onwards to Liars' Night our second repeat event!
Not only can you now unlock the new and improved (and evil) Krond, a brand new Year 2 Champion Donaar is available as well. Like Highharvestide both champions have their own adventure/variant chain and formation. They share the same favor.
Onwards to formations! (They may not be optimal, but I love Krond and he gets his own formation section now.)
Krond
Vanilla Champions C1: Nayeli ~ Oath of Vengeance
C2: Bruenor ~ Battle Master, Jamilah ~ Uncanny Speed, Hitch ~ Charismatic, Tyril ~ Moonbeam
C3: Calliope ~ College of Valor, Celeste ~ War Domain, Minsc ~ Choice
C4: Makos ~ Dark Blessing, Asharra ~ Bond: HumansSpamming Ultimates allowed me to pass 255, but fell very flat after that w/o respeccing Minsc.
Vanilla & Krond C1: Nayeli ~ Oath of Vengeance
C2: Bruenor ~ Battle Master, Minsc/Arkhan ~ Choice, Krond ~ Choice, Tyril ~ Moonbeam
C3: Calliope ~ College of Valor, Celeste ~ War Domain, Minsc/Arkhan ~ Choice
C4: Makos ~ Dark Blessing, Jamilah/Jarlaxle ~ ChoiceKrond needs a few more strong/evil champions that provides buff for a mostly vanilla party to support him, but even so he manages to reach almost as far as the previous formation, just unable to conquer the 255 boss.
Optimal C1: Evelyn ~ Compel Duel
C2: Celeste ~ War Domain, Barrowin ~ Greater Blessing, Hitch ~ Charismatic, Nayeli ~ Oath of Vengeance
C3: Strix ~ Hide, Ishi ~ Wait For It, Birdsong ~ Theme of Valor
C4: Deekin ~ Epic Tale, Calliope ~ College of ValorJust couldn't quite take down the 275 bat without stacking, however had I swapped out Ishi for a damage buffer I would have progressed much, much further.
*Donaar is a solid substitue for Celeste, however his knockback performs rather poorly with Strix DPS
KROOOOOND! C1: Nayeli ~ Oath of Vengeance
C2: Arkhan ~ Choice, Barrowin ~ Greater Blessing, Krond ~ Thunderclap, Donaar ~ Choice
C3: Calliope ~ College of Valor, Jamilah ~ Choice, Minsc ~ Choice
C4: Makos ~ Dark Blessing, Deekin ~ DOOMOptimal Krond didn't fair much better, but I stupidly misspecced Minsc. Also this was without manual hammer stacking.
Wintershield
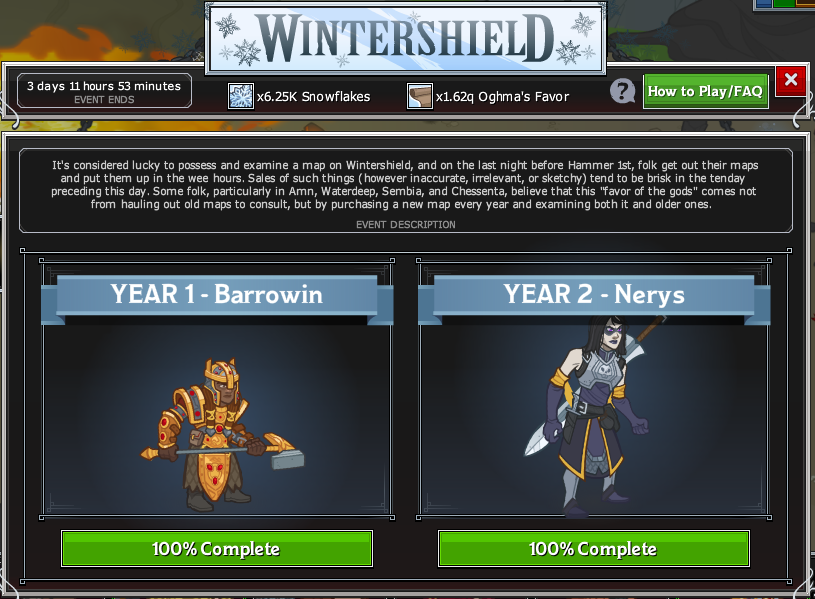


The all powerful (and now nerfed) Barrowin makes her return as well as a new Year 2 Champion ~ Nerys Kathon!
Formations ~ Year 1
Vanilla Champions C1: Nayeli ~ Oath of Vengeance
C2: Bruenor ~ Battle Master, Celeste ~ War Domain, Jamilah ~ Brute Strength
C3: Calliope ~ College of Valor, Tyril ~ Moonbeam
C4: Makos ~ Dark Blessing, Asharra ~ Bond: Humans, Hitch ~ Charismatic
C5: Minsc ~ ChoiceThis formation resulted in a wall at the 265 boss. Better use of ultimates probably would've allowed to continue further, but no way would I surpass 270.
Vanilla & Barrowin C1: Nayeli ~ Oath of Vengeance
C2: Bruenor ~ Battle Master, Celeste ~ War Domain, Jamilah ~ Brute Strength
C3: Calliope ~ College of Valor, Barrowin ~ Greater Blessing
C4: Makos ~ Dark Blessing, Asharra ~ Bond: Humans, Hitch ~ Charismatic
C5: Minsc ~ ChoiceBarrowin is sadly no longer much of an upgrade over Tyril. However the Ultimate is fantastic. This formation also walled at 265.
Team Krond C1: Nayeli ~ Oath of Vengeance
C2: Donaar ~ Oh Yeah, Bruenor ~ Battle Master, Krond ~ Thunderclap
C3: Calliope ~ College of Valor, Vlahnya ~ Spy Network
C4: Nerys/Azaka ~ Kelemvor's Will/Resist the Curse, Makos ~ Dark Blessing, Warden/Ishi ~ Choice/Wait For It
C5: Tyril ~ MoonbeamI took greater advantage of ultimates (especially Nerys' which is quite fantastic) and had slightly higher favor in this run than my year 2 run, which allowed me to reach the 380 boss without any potions/weekend buffs. I'm going to make a strong push for 400 if next weekends buffs are strong.
*Azaka/Ishi are listed as Nerys/Warden swaps for farming favor.
Formations ~ Year 2
Vanilla Champions C1: Nayeli ~ Oath of Vengeance
C2: Bruenor ~ Battle Master, Hitch ~ Charismatic, Celeste ~ War Domain, Jamilah ~ Brute Strength
C3: Calliope ~ College of Valor
C4: Makos ~ Dark Blessing, Minsc ~ Choice, Asharra ~ Bond:Humans, Tyril ~ MoonbeamSpamming ultimates allowed me to surpass the 265 boss by the skin of my teeth, I don't expect to pass 270. You can tinker with Makos DPS gold spec to increase your favor. Formation won't change much except Makos moving to C2, and Ash speccing to Tieflings.
Vanilla & Nerys C1: Nayeli ~ Oath of Vengeance
C2: Bruenor ~ Battle Master, Hitch ~ Charismatic, Celeste ~ War Domain, Jamilah ~ Uncanny Speed*
C3: Calliope ~ College of Valor
C4: Makos ~ Dark Blessing, Nerys ~ Kelemvor's Will, Asharra ~ Bond:Humans, Tyril ~ MoonbeamI managed to reach 278 before Nayeli was overwhelmed. Realized I had forgotten to spec Jamilah for speed, but alas no respec potions.
Minsc is definitely the weak link in the pure vanilla formation, and Nerys replaces him admirably in the formation. Since you already have Celeste/Calliope for heals Nerys is fine in the bank since her sword buff reaches your highest DPS champ regardless of their position.
*Note that Jamilah is now specced to Uncanny Speed. Your endgame kills will come from Spiritual Weapon attacks rather than Jamilah's attacks. That being the case you will likely be overwhelmed with the slow kill speed of Brute Strength.
Team Krond C1: Nayeli ~ Oath of Vengeance
C2: Donaar ~ Oh Yeah, Bruenor ~ Battle Master, Vlahnya ~ Spy Network, Krond ~ Thunderclap
C3: Calliope ~ College of Valor
C4: Azaka/Nerys* ~ Resist the Curse/Kelemvor's Will, Makos ~ Dark Blessing, Ishi/Warden* ~ Wait for It/Choice, Tyril MoonbeamMy Krond formation allowed me to reach the 365 boss without ANY weekend buffs or potions. Easily the furthest I've gotten in any event, coming very very close to reaching the level cap on all characters.
Now that Gromma has been buffed, plenty of people prefer Circle of the Arctic/Mountain Gromma over Nayeli. I prefer Nayeli for 2 reasons. Nayeli contributes to Survival of the Fittest
My DPS can have any alignment and benefit from the tank buff
*Note that mention swaps for Azaka and Ishi. The formation with Azaka and Ishi is primarily for grinding favor, which I find far more important. However if you're more concerned about area progression you will do much better off using Nerys and Warden in those slots. I passed area 350 with this formation.
Midwinter


Regis makes his return and K'thriss Drow'b the Drow Warlock makes his first appearance as a year 2 champion and 2nd member of the C-Team!
Formations ~ Year 1
Vanilla Champions Makos ~ Dark Blessing, Arkhan ~ Usurped Power, Nayeli ~ Oath of Vengeance
Bruenor ~ Battle Master, Jamilah* ~ Uncanny Speed
Asharra ~ Bond: Dragonborn, Calliope ~ College of Valor*, Celeste ~ War Domain
Hitch ~ Charismatic, Tyril ~ MoonbeamThis is a much different formation than I typically go with on Vanilla characters but I was very interested in how well an Arkhan focused formation would perform. This formation was exemplary for it. Arkhan gets boosted Rally, Crusader's Mantle, Aura of Courage, Bardic Inspiration, and Dark Blessing. *Since Arkhan is your true DPS here, you may be better off using Minsc/Jarlaxle in Jamilah's slot.
*Not sure if I'll continue using this formation with Vanilla characters. While it is VERY effective (got me past 310) it require a hefty sum of gold before Arkhan unlocks Usurped Power which most new players can't do. Oh well, thought I'd toy with it at least.
Vanilla & Regis Makos ~ Dark Blessing, Arkhan ~ Usurped Power, Nayeli ~ Oath of Vengeance
Bruenor ~ Battle Master, Jamilah* ~ Uncanny Speed
Asharra ~ Bond: Dragonborn, Calliope ~ College of Valor*, Regis ~ Ahead/Melee
Hitch ~ Charismatic, Tyril ~ MoonbeamLargely the same result as the vanilla formation minus heals.
Team Krond Tyril ~ Moonbeam, Donaar ~ Oh Yeah, Nayeli ~ Oath of Vengeance
Bruenor ~ Battlemaster, Krond ~ Thunderclap
Calliope ~ College of Valor, Ishi/Warden ~ Wait For It/Eldritch Strike, Vlahnya ~ Spy Network
Makos ~ Dark Blessing, Azaka/Nerys ~ Resist the Curse/Kelemvor's WillTeam Krond was effective yet again, reaching area 367 of the event without buffs/potions.
Formations ~ Year 2
Vanilla Champions Arkhan ~ Usurped Power, Nayeli ~ Oath of Vengeance
Bruenor ~ Battle Master, Celeste ~ War Domain
Calliope ~ College of Valor, Asharra ~ Bond: Dragonborn
Makos ~ Dark Blessing, Minsc ~ Choice, Hitch ~ Charismatic, Tyril ~ MoonbeamWhile not quite as effective as the Y1 vanilla formation, it still performs reasonably well, falling behind since Arkhan can't usurp as many abilites.
Vanilla & K'thriss Arkhan ~ Usurped Power, Nayeli ~ Oath of Vengeance
hitch ~ Charismatic, Celeste ~ War Domain
Calliope ~ College of Valor, Asharra ~ Bond: Dragonborn
Makos ~ Dark Blessing, Minsc ~ Choice, K'thriss ~ Efficient Book Keeping, Tyril ~ MoonbeamSlightly more efficient than the vanilla formation, it pushed another 5 areas.
Team Krond Tyril ~ Moonbeam, Gromma ~ Circle of the Mountain
Azaka ~ Resist the Curse, Donaar ~ Oh Yeah
Bruenor ~ Battle Master, Krond ~ Thunderclap
Makos ~ Dark Blessing, Warden ~ Eldritch Strike, Calliope ~ College of Valor, Vlahnya ~ Spy NetworkNot the most efficient Krond formation, but still pushed into the 360's.
Extra Formation Tyril ~ Moonbeam, Donaar ~ Oh Yeah
Azaka* ~ Resist the Curse, Nayeli ~ Oath of Vengeance
Bruenor ~ Battle Master, Krond ~ Thunderclap
Makos ~ Dark Blessing, Warden ~ Eldritch Strike, Vlahnya ~ Spy Network, Calliope ~ College of ValorA slight adjustment to the Team Krond formation brings Nayeli in, but forces you to sacrifice having a tank. I went all out with this formation in the "Truth Beyond Knowing" variant which gave a MASSIVE passive buff. Using said buff, a weekend buff and a whole lot of potions I broke into the 400's for the first time.
Grand Revel
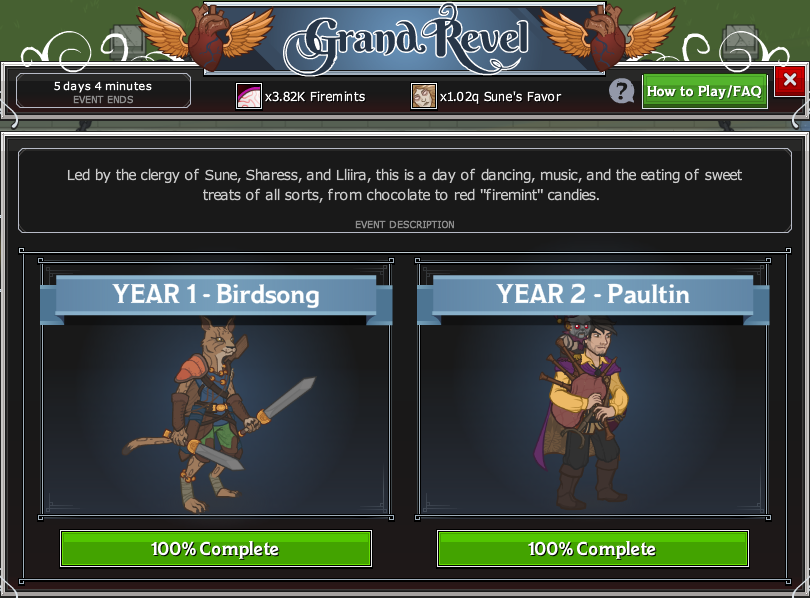


The quick feline Birdsong makes her return, and Paultin the Human Bard joins in for Year 2 to round out the Waffle Crew!
Take note that in this event I'll be using a Waffle Crew formation over a Krond formation as a deep delving team.
Formations ~ Year 1
Vanilla Champions C1: Nayeli ~ Oath of Vengeance
C2: Celeste ~ War Domain, Hitch ~ Charismatic, Arkhan ~ Usurped Power
C3: Bruenor ~ Battle Master, Makos ~ Dark Blessing
C4: Asharra ~ Bond: Dragonborn, Minsc ~ Choice, Calliope ~ College of Valor
C5: Tyril ~ MoonbeamArkhan formations have really been becoming my bread and butter, however this one halts since Arkhan is allowed to tank, ruining his ability to cleave and firebreath. Walled in the low 280's.
Vanilla & Birdsong C1: Nayeli ~ Oath of Vengeance
C2: Celeste ~ War Domain, Hitch ~ Charismatic, Arkhan ~ Usurped Power
C3: Bruenor ~ Battle Master, Asharra ~ Bond: Dragonborn
C4: Tyril ~ Moonbeam, Minsc ~ Choice, Calliope ~ College of Valor
C5: Birdsong ~ Theme of DeceptionThis formation doesn't really do Birdsong justice, it only shows she's an equal buffer to Makos. Birdsong shines as a DPS which she is not doing in this formation.
Waffle Crew C1: Evelyn ~ Compel Duel
C2: Azaka ~ Resist the Curse, Donaar ~ Oh Yeah, Diath ~ Leadership Training
C3: Bruenor ~ Battle Master, Strix ~ Hide
C4: Gromma ~ Circle of the Arctic, Paultin ~ Additional Secrets, Barrowin ~ Greater Blessing
C5: Hitch ~ CharismaticDifficult for me to tell now if Team Krond or Waffle Crew is the current meta now. I'm favoring Waffle Crew slightly since the synergy seems a bit better, however if Krond gets a strength buffer in slot 5 things could shake up again.
Formations ~ Year 2
Vanilla Champions C1: Nayeli ~ Oath of Vengeance, Arkhan ~ Usurped Power
C2: Celeste ~ War Domain, Bruenor ~ Battle Master, Makos ~ Dark Blessing
C3: Calliope ~ College of Valor, Minsc ~ Choice, Hitch ~ Charismatic
C4: Asharra ~ Bond: Dragonborn, Tyril ~ MoonbeamA pretty effective Arkhan formation. Breached 300, but keep in mind that there were 3 applicable weekend buffs, so I likely would've walled around 299 normally.
Vanilla & Paultin C1: Nayeli ~ Oath of Vengeance, Arkhan ~ Usurped Power
C2: Celeste ~ War Domain, Bruenor ~ Battle Master, Makos ~ Dark Blessing
C3: Calliope ~ College of Valor, Paultin ~ Additional Secrets, Hitch ~ Charismatic
C4: Asharra ~ Bond: Dragonborn, Tyril ~ MoonbeamIt astounds me how far the addition of Paultin brought this formation. In the pure Vanilla formation I walled at 305. Adding Paultin into the mix vaulted me up to 340! All champions apart from him are Vanilla. This trial here is what convince me to run Waffle Crew over Team Krond in my final formation.
Waffle Crew C1: Evelyn ~ Choice, Diath ~ Leadership Training
C2: Azaka ~ Resist the Curse, Celeste ~ War Domain, Strix ~ Hide
C3: Gromma ~ Circle of the Arctic, Paultin ~ Additional Secrets, Barrowin ~ Greater Blessing
C4: Deekin ~ DOOM, Hitch ~ CharismaticGotta say I'm really enjoying Waffle Crew formations. Probably could have defeated 375 with better use of ultimates, but oh well.
Fleetswake

Zorbu the Gnome Ranger makes his reappearance, and Esvele the Human Rogue steps into the limelight under the mantle of the Black Viper!
Event info PNG
Unfortunately I wasn't able to test how far I could get with most formations this event/add SS's, given I was away from home. I created formations to the best of my ability, hope they help!
Formations ~ Year 1
Vanilla Champions C1: Nayeli ~ Oath of Vengeance, Arkhan ~ Usurped Power
C2: Celeste ~ War Domain, Bruenor ~ Battle Master
C3: Calliope ~ College of Valor, Hitch ~ Charismatic, Asharra ~ Bond: Dragonborn
C4: Makos ~ Dark Blessing, Minsc ~ Choice, Tyril ~ MoonbeamPNG
Vanilla & Zorbu C1: Nayeli ~ Oath of Vengeance, Tyril ~ Moonbeam
C2: Bruenor ~ Battle Master, Hitch ~ Charismatic
C3: Celeste ~ War Domain, Zorbu ~ Choice, Calliope ~ College of Valor
C4: Asharra ~ Bond: Humans, Minsc ~ Choice, Makos ~ Dark BlessingPNG
Waffle Crew C1: Diath ~ Leadership Training, Evelyn ~ FS Protection
C2: Strix ~ Panic, Celeste ~ War Domain
C3: Hitch ~ Charismatic, Paultin ~ Choice, Gromma ~ Circle of the Arctic
C4: Azaka ~ Resist/Makos ~ Blessing, K'thriss ~ Efficient Bookkeeping, Tyril ~ MoonbeamPNG
Formations ~ Year 2
Vanilla Champions C1: Arkhan ~ Usurped Power, Nayeli ~ Oath of Vengeance
C2: Celeste ~ War Domain, Bruenor ~ Battle Master
C3: Hitch ~ Charismatic, Asharra ~ Bond: Dragonborn
C4: Tyril ~ Moonbeam, Minsc ~ Choice, Makos ~ Dark BlessingPNG
Vanilla & Black Viper C1: Minsc ~ Choice, Nayeli ~ Oath of Vengeance
C2: Black Viper ~ Choice, Bruneor ~ Battle Master
C3: Celeste ~ War Domain, Calliope ~ College of Valor, Asharra ~ Bond: Humans
C4: Tyril ~ Moonbeam, Hitch ~ Charismatic, Makos ~ Dark BlessingPNG
Waffle Crew C1: Gromma ~ Circle of the Arctic, Evelyn ~ Choice
C2: Diath ~ Leadership Training, Celeste ~ War Domain
C3: Strix ~ Panic, Hitch ~ Charismatic, Azaka ~ Resist the Curse
C4: Tyril ~ Moonbeam, Paultin ~ Choice, K'thriss ~ Velvet TouchWaffle Crew is incredibly effective once again. I softwalled at 388, and surpassed 390 using ultimates but faltered from there onwards.
Festival Of Fools


Event info PNG
Formations ~ Year 1
Vanilla Champions (Non ~ Arkhan) C1: Minsc/Jarlaxle, Tyril ~ Wild Shape
C2: Nayeli ~ Oath of Vengeance
C3: Bruenor ~ Battle Master, Jamilah ~ Uncanny Speed
C4: Hitch ~ Charismatic, Celeste ~ War Domain, Calliope ~ College of Valor
C5: Asharra ~ Bond: Humans, Makos ~ Dark BlessingAn absolutely horrendous formation for beginners that are forced to use vanilla champs and can't afford a quality Arkhan build yet. Jamilah is trash and dealing with armored bosses, and Tyril is forced to be a bad buffer. Only managed to reach the 270 boss with this formation.
Vanilla Champions (Arkhan) C1: Nayeli ~ Oath of Vengeance, Arkhan ~ Usurped Power
C2: Bruenor ~ Battle Master
C3: Celeste ~ War Domain, Calliope ~ College of Valor
C4: Asharra ~ Bond: Dragonborn, Hitch ~ Charismatic, Minsc/Jarlaxle
C5: Tyril ~ Moonbeam, Makos ~ Dark BlessingMan Wrerdor sucks. I just barely passed him at 250...and managed to get all the way to him at 300. Team Arkhan never stood a chance against this armored behemoth. Walled at 299.
Vanilla & Strix C1: Nayeli ~ Oath of Vengeance, Arkhan ~ Usurped Power
C2: Bruenor ~ Battle Master
C3: Celeste ~ War Domain, Calliope ~ College of Valor
C4: Asharra ~ Bond: Dragonborn, Hitch ~ Charismatic, Strix ~ Choice
C5: Tyril ~ Moonbeam, Makos ~ Dark BlessingAdded lots of DPS with Strix, but not enough to attack speed to pass 300.
Waffle Crew C1: Evelyn ~ FS: Protection, Gromma ~ Circle of the Arctic
C2: K'thriss ~ Efficient Bookkeeping
C3: Donaar ~ Oh Yeah, Hitch ~ Charismatic
C4: Diath ~ Born Leader, Paultin ~ Choice, Azaka ~ Resist the Curse
C5: Strix ~ Panic, Tyril ~ MoonbeamAfter conquering 350 with ultimates it was absolutely smooth sailing until 400, but likely wouldn't have progressed long after that anyway.
Formations ~ Year 2
Vanilla Champions C1: Celeste ~ War Domain, Nayeli ~ Oath of Vengeance
C2: Bruenor ~ Battle Master, Jamilah ~ Uncanny Speed
C3: Minsc ~ Choice, Calliope ~ College of Valor
C4: Hitch ~ Charismatic, Asharra ~ Bond: Humans
C5: Tyril ~ Moonbeam, Makos ~ Dark BlessingPNG
Vanilla & Rosie C1:
C2:
C3:
C4:
C5: PNG
Waffle Crew C1:
C2:
C3:
C4:
C5: PNG
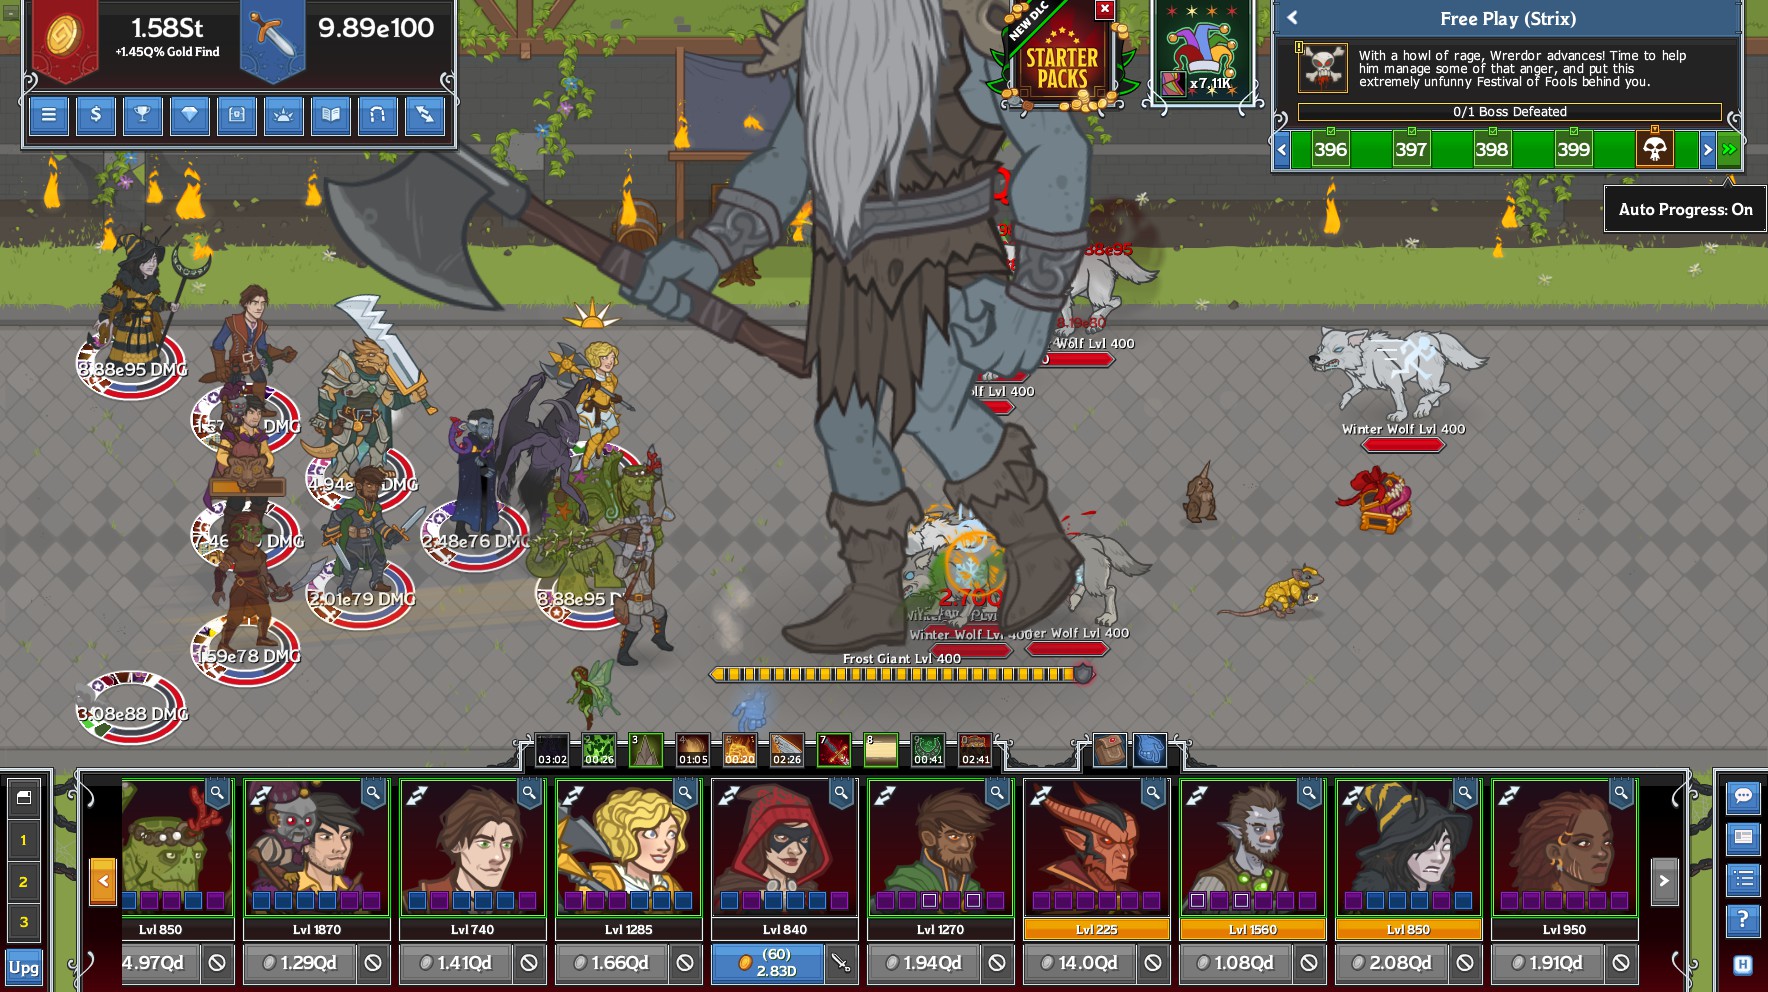
Greengrass (Nrakk)
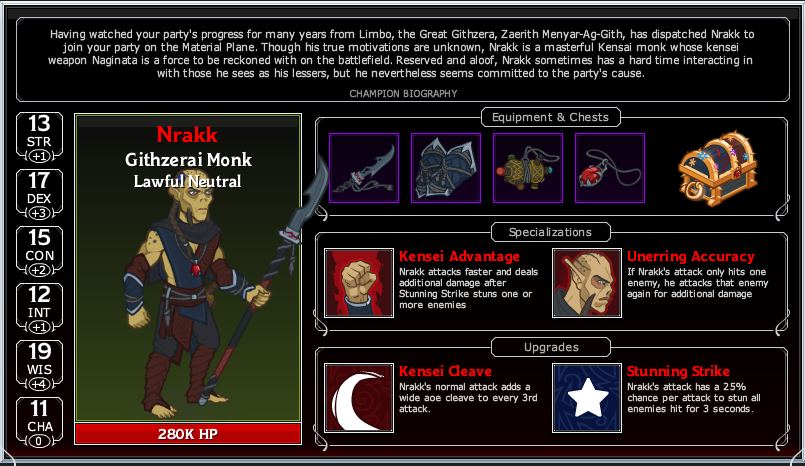


In this event you can unlock Nrakk, a Githzerai Monk!
Noteworthy Upgrades Kensei Cleave ~ Every third attack, Nrakk strikes with a wide aoe attack.
Deft Strike ~ Every second attack, Nrakk deal a bonus 100% damage.
Stunning Strike ~ Nrakk's basic attack has a 25% chance to stun all enemies hit for 3 seconds.
Sharpen the Blade (Ultimate Attack) ~ Increases the damage of Nrakk by 200% for the next 30 seconds.Specialization
What's the difference?
Kensei Advantage has a unique effect. If Nrakk lands a Stunning Strike his next attack has its cooldown lowered by 2 seconds and that attacks damage is increased by 50% for each enemy under the effect of Stunning Strike.
Unerring Accuracy activates when Nrakks attack hits only a single enemy, he then quickly hits that enemy again with an additional 200% damage.
Which should I choose?
This choice is largely up to you, Nrakk isn't great as a main damage dealer, so he is in more of a support role. Unfortunately neither of his specialization choices impact anyone but himself.
How and when to use Nrakk
Nrakk is a decent buffer, however not good enough to justify removing Hitch from your formation. He's best used in variants that have restrictions preventing Hitch from being used.
He also works very well at boss control. There is 1 specific situation in mind where he is fantastic. There are certain bosses that have the ability to stun/instakill or otherwise hinder your champions ability to defeat them. Without spoiling too much a certain health draining boss from an event, a web spitting arachnid, and a lead ball shooting contraption come to mind. His ability to stun the enemy gives your party more time to damage these bosses. Pair him with Drizzt to really hinder the bosses attack rate.
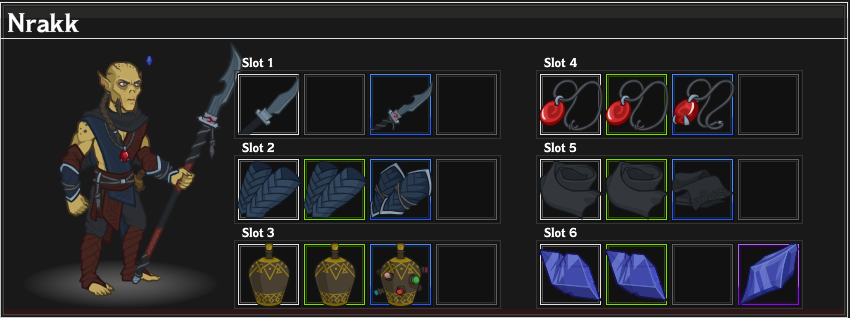
Gear
I apologize for the completionists reading this, I doubt I will ever come to close to completing an event champions collection page before the event comes around 2-3 times.
Slot 1 ~ Naginata Increases the base damage of Nrakk by (50/125/200/375)%
Slot 2 ~ Bracers Increases the base damage of Nrakk by (50/125/200/375)%
Slot 3 ~ Jug Increases the damage of all champions by (10/65/120/230)%
Slot 4 ~ Amulet Increases the effect of Deft Strike by (25/87.5/150/275)%
Slot 5 ~ Scarf Buffs Nrakk's Ultimate effect by (25/87.5/150/275)%
Slot 6 ~ Ioun Stone Reduces the cooldown of Nrakk's Ultimate by (7/13/?/65) seconds
FORMATIONS
Depending on the champions you have or wish to use there are various formations that will work best. C1 stand for column 1 and so forth. Champions listed in a column are listed in order. Meaning the first champion listed takes the top spot in that column.
Keep in mind that I have very good gear and high favor levels when I make these guides. If you're a new player you won't be able to get as far as I do. These guides are to show you what is possible with the champions you have and the best formations to put them in.
Event Formation (Vanilla Champions) C1: Nayeli Oath of Vengeance, Tyril Moonbeam
C2: Bruenor Battle Master, Jamilah Brute Strength
C3: Minsc Choose at Wall, Celeste War Domain, Calliope College of Valor, Makos Dark Blessing
C4: Hitch Charismatic, Asharra Bond HumansThis isn't the end all formation. Champions such as Hitch, Asharra & Minsc are free to be moved around.
With timely use of ultimates I was able to pass the level 200 boss with this formation. I met my match at the level 220 boss.
Event Formation (Vanilla With Nrakk) C1: Nayeli Oath of Vengeance, Tyril Moonbeam
C2: Bruenor Battle Master, Jamilah Brute Strength
C3: Minsc Choose at Wall, Celeste War Domain, Calliope College of Valor, Makos Dark Blessing
C4: Nrakk Your Choice, Asharra Bond HumansTake note that some of the champions can be moved around. For instance Nrakk, Asharra & Minsc can all swap places with no ill effect on party damage.
I hit my wall at level 200 using this Nrakk formation.
Event Formation (Many Event Champions) C1: Barrowin Greater Blessing, Nayeli Oath of Vengeance
C2: Bruenor Battle Master, Strix Hide
C3: Calliope* College of Valor, Celeste* War Domain, Birdsong Theme of Valor, Asharra Bond Tiefling/Firbolg/Dragonborn
C4: Hitch Charismatic, Zorbu* Favored Enemy AberrationChampions such as Calliope, Celeste, and Zorbu may be swapped for Dhadius, Regis, and Minsc. It largely depends on your wall and quality of gear. If you have yet to reach the level caps Dhadius is every bit as good as Calliope.
Yes you are seeing correctly! I AM using Arkhan. At the time of this posting, Arkhan currently has a 200% gold buff, plus I stand no chance of passing 250 without serious potion use, so here I am, farming at 249 with Arkhan in the formation.
The Running (Catti-brie)
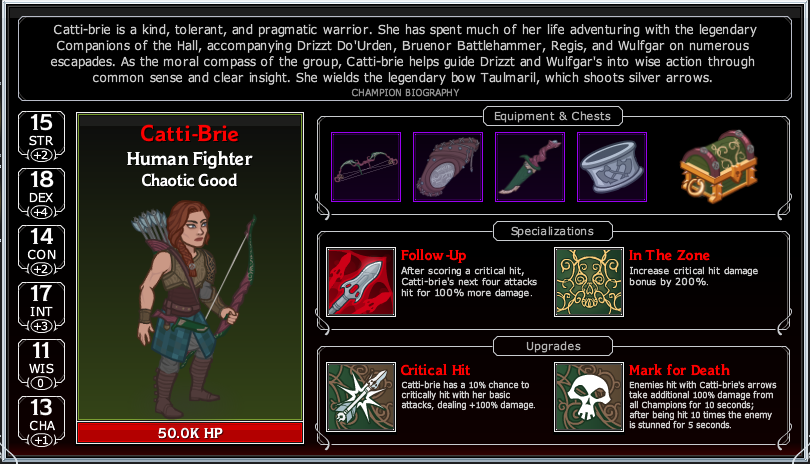


In this event you can unlock Catti-brie, a Human Fighter!
Noteworthy Upgrades Long Shot (Basic Attack) ~ Catti-brie attacks the enemy furthest from the formation.
Powerful Draw ~ Catti-brie deals bonus damage to enemies that are further away from the formation. Deals 0% bonus damage when the enemy is 20% of the total distance away from the formation, up to 100% when the enemy is at the spawn point.
Critical Hit ~ Catti-brie's basic attack has a 10% chance of being a critical hit, dealing 100% bonus damage.
Marked for Death ~ When Catti-brie hits an enemy they take 100% more damage from all champions for the next 60 seconds. During this time if the enemy is hit by 10 attacks they will be stunned for 5 seconds.
Empty the Quiver (Ultimate Attack) ~ Catti-brie fires 6 arrows at once from her bow. Each enemy hit by her arrows can be crit by ALL champions using Catti-brie's crit chance and damage bonus for the next 30 seconds. What truly makes Catti-brie her amazing is that her Ultimate also grants Marked for Death to the enemies hit.Specialization
What's the difference?
Follow up helps Catti-brie continue dealing higher damage for the next 4 shots after landing a critical. This specialization has later upgrades that boost the effect of Follow Up. In the Zone helps to further boost the power of a single critical hit. This specialization later has upgrades that increase the chance of landing a critical hit.
Which should I choose?
Catti-brie is very lacking as a DPS since she misses the Hitch buff. Since both of her specializations are self-buffs, neither is that important. HOWEVER, when you factor in her Ultimate ability which gives ALL champions her crit ability and bonus damage for 30 seconds towards enemies hit by her ultimate, In the Zone seems to have a clear advantage.
How and when to use Catti-brie
Catti-brie is a mediocre buffer at best (Marked for Death gives the same damage buff as Asharra's tier 1 bond, however it only hits a single enemy and is removed after the enemy is stunned.) When her Ultimate is activated she becomes a godly near Hitch tier buffer. But it gets even better! The buffs granted by her Ultimate(Mark of Death and critical chance from all champions to enemies hit) lingers even after you swap her out of your party. Meaning you can swap Asharra back in AND recieve the benefit of Catti-brie's buffs. THIS EFFECTIVELY TURNS A 9 MAN FORMATION INTO A TEMPORARY 10 MAN AND A 10 MAN INTO A TEMPORARY 11 MAN! In a 9 man use her as a temporary swap out for your 9th champion, and in a 10 man use her as a temporary swap out for your 10th champion. Catti-brie is a very unique yet highly effective character.
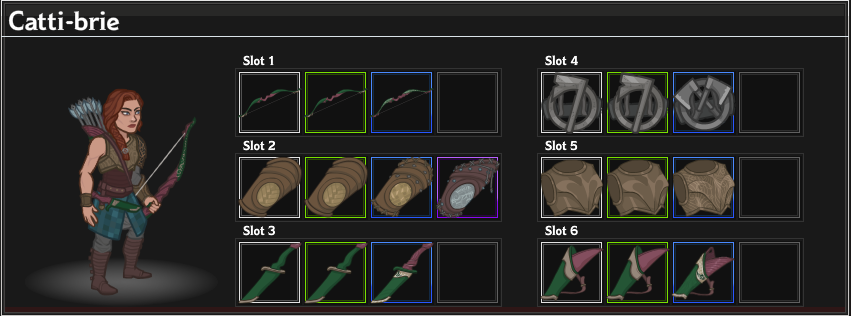
Gear
I apologize to you completionists reading this, I doubt I will ever come close to completing an event champion's collection page before the event comes around at least a few times.
Slot 1 ~ Bow Increases the damage of Catt-brie by (50/125/200/375%)
Slot 2 ~ Bracers Increase the damage of all champions by (25/65/120/230%)
Slot 3 ~ Dagger Increases the chance of a critical hit by (25/87.5/150/275%)
Slot 4 ~ Hair Clips Increase the damage of a critical hit by (25/87.5/150/275%)
Slot 5 ~ Breastplate Increases the effect of Marke for Death by (25/87.5/150/275%)
Slot 6 ~ Quiver reduces the cooldown of Catti-brie's Ultimate attack by (9/17/34/?) seconds.
FORMATIONS
Depending on the champions you have or wish to use there are various formations that will work best. C1 stand for column 1 and so forth. Champions listed in a column are listed in order. Meaning the first champion listed takes the top spot in that column.
Keep in mind that I have very good gear and high favor levels when I make these guides. If you're a new player you won't be able to get as far as I do. These guides are to show you what is possible with the champions you have and the best formations to put them in.
Event Formation (Vanilla Champions) C1: Nayeli Oath of Vengeance
C2: Bruenor Battle Master, Jamilah Brute Strength
C3: Calliope College of Valor, Celeste War Domain
C4: Asharra Bond Humans, Hitch Charismatic
C5: Tyril Moonbeam, Makos Dark Blessing, Minsc Your Choice
The placement of champions in the first 3 columns is set in stone (you can mirror it of course), but the champions in C4, C5, are free to move around with each other as you see fit. If you're just starting and can't afford Jamilah use the same formation and specialization, just put your best DPS in her position. If you're farming favor rather than pushing through a variant, you're better off choosing Dark Luck for Makos, and farming use his Ultimate. Choose your Minsc spec based upon your wall.
With a minorly helpful weekend buff I managed to reach the 210 boss using the basic champions.
Event Formation (Vanilla with Catti-brie) C1: Nayeli Oath of Vengeance
C2: Bruenor Battle Master, Jamilah Brute Strength
C3: Calliope College of Valor, Celeste War Domain
C4: Asharra Bond Humans, Hitch Charismatic
C5: Tyril Moonbeam, Makos Dark Blessing, Catti-brie In the Zone
Almost identical to the Vanilla formation, with sole difference being the Minsc/Catti-brie swap. Again the champions in C4 & C5 are free to be moved around. In the Zone should be your spec choice for Catti-Brie for the reasons I described earlier.
Using Catti-Brie in place of Minsc I managed to push past the 215 boss.
Event Formation (Many Event Champions) C1: Nayeli Oath of Vengance
C2: Bruenor Battle Master, Strix Hide
C3: Regis Ruby Encouragement Ahead & Ruby Weakness Magic, Barrowin Greater Blessing
C4: Hitch Charismatic, Dhadius Empowered Empowerment
C5: Asharra Bond Tieflings, Drizzt Whirl of Steel, Catti-brie In the Zone
Really tricky formation to get all your buffs to apply. Birdsong needs to be left out for this one since it's either her or Dhadius that buffs your DPS. Your formation will be much simpler using Tyril over Barrowin, but pfffft, who likes simple? With this formation, Drizzt handily trumps Makos as a buffer, plus his chance to miss is very helpful since there's nobody to heal your tank. Whether you use Catti-brie vs Minsc/Zorbu is up to you, but keep in mind that swapping her will lower your Companions of the Hall buff.
With the help of a potent weekend buff I was able to beat the level 265 boss.
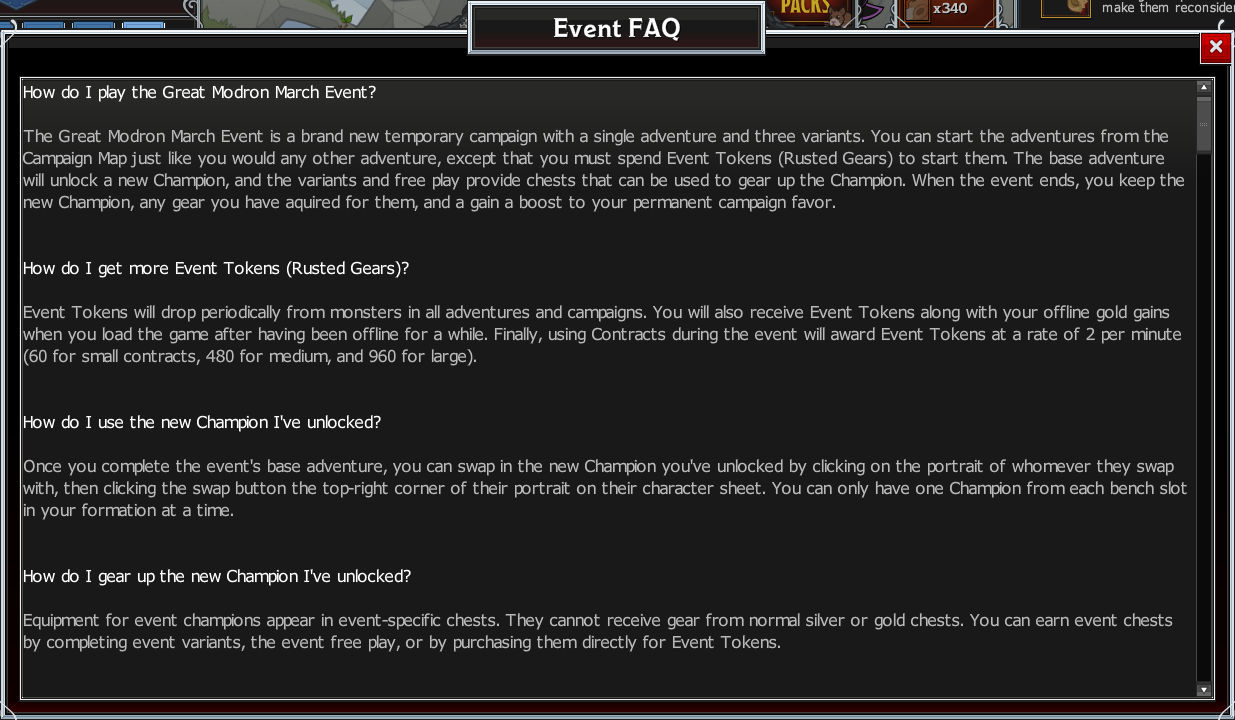
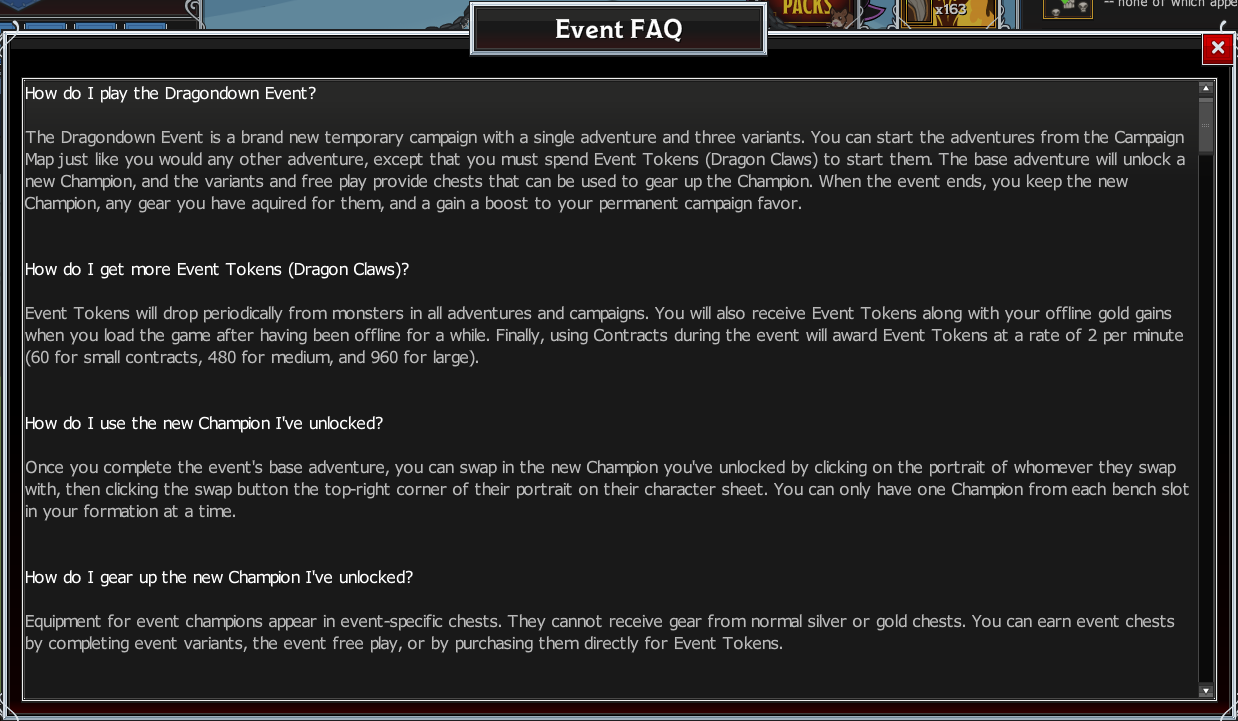
Event FAQ
The Great Modron March (Evelyn)
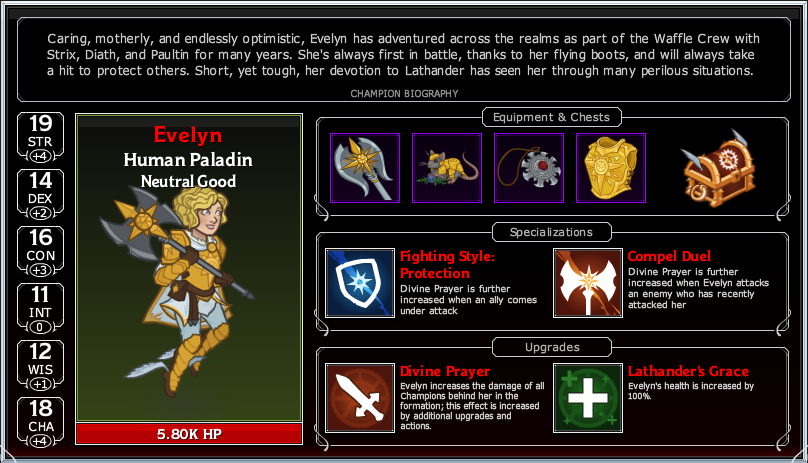


In this event you can unlock Evelyn, a Human Paladin!
Noteworthy Upgrades Mighty Axe (Basic Attack) ~ Evelyn attacks the front most enemy with her axe. Every 3rd hit she strikes with an aoe cleave.
Lathandar's Grace ~ Increases Evelyn's max health by 100%
Divine Prayer ~ Increases the damage of ALL champions behind Evelyn by 100%
Channel Divinity ~ Whenever Evelyn strikes an enemy, the effect of Divine Prayer is increased by 100% for 15 seconds (does not stack)
Steadfast Might ~ Increases the effect of Divine Prayer by 25% for each enemy attacking Evelyn (unsure of stacking, assuming additive)
Conduit of the Light ~ Increases the effect of Diving Prayer by 100% whenever Evelyn receives an EFFECTIVE heal for 15 second (does not stack, Effective meaning a heal that actual heals, ie Evelyn is not already at maximum health)
Find Steed (Ultimate Attack) ~ Evelyn dashes forward atop her Celestial Pegasus and deals damage to enemies in a line. Damaged enemies are also stunned for ?? seconds.Specialization
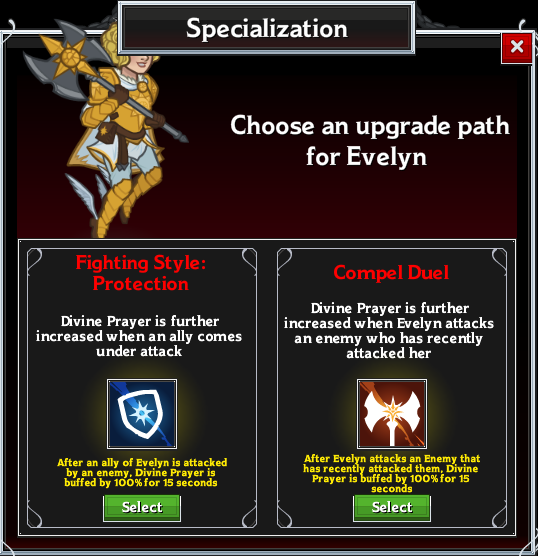
What's the Difference?
Fighting Style: Protection increases the effect of Divine Prayer when an ally is under attack. Take note that that Evelyn herself being attacked does not trigger this. Compel Duel increases the effect when Evelyn hits an enemy that has hit her (Righteous!)
Which should I choose?
This specialization is a rather straight forward choice. Neither branch of this specialization tree has different future upgrades apart from the specialization itself. Use Fighting Style: Protection if you are choosing not to use Evelyn as your main tank. On the other hand if you do use her as your main tank, choose Compel Duel.
How and when to use Evelyn
If you can even take advantage of the majority of her buffs, she instantly outclasses Asharra. W/o any gear Divine Prayer is on par with Asharra's second specialization set. This is also not including her 4 four 100% damage all upgrades. She should also be a viable tank in place of Nayeli, which gives you the option to run multiple DPS formation since you can move your DPS line further back and still receive her buff. Most importantly you can abuse the Fall Back 1000% buff in Toa provided you have Dhadius.
Gear
I apologize to you completionists reading this, I doubt I will ever come close to completing an event champion's collection page before the event comes around at least a few times.
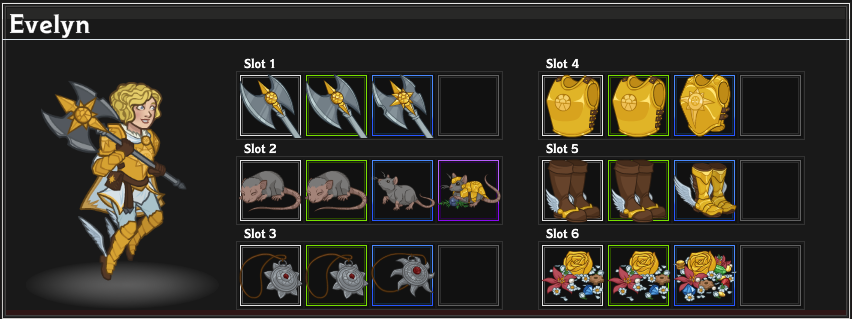
Slot 1 ~ Axe Increases the damage of Evelyn by (50/125/200/375%)
Slot 2 ~ Mouse Increases the damage of all champions by (25/65/120/230%)
Slot 3 ~ Symbol Increases the effect of Divine Prayer by (25/87.5/150/275%)
Slot 4 ~ Breastplate Increases the effect of Evelyn's specializations by (25/87.5/150/275%)
Slot 5 ~ Boots Increases the damage of Evelyn's Ultimate Ability by (25/87.5/150/275%)
Slot 6 ~ Pretty Things Reduces the cooldown of Evelyn's Ultimate Ability by (10/19/38/95) secondsFormations
Depending on the champions you have or wish to use there are various formations that will work best. C1 stands for column 1 and so forth. Champions listed in a column are listed in order, meaning the first champion listed takes the top spot in that column.
Keep in mind that I have very good gear and high favor levels when I make these guides. If you're a new player you likely won't be able to progress as far as I do. These guides are written to show what is possible as a free player with the champions you have available and how best to use them.
Event Formation (Vanilla Champions) C1: Hitch Charismatic
C2: Makos Dark Blessing, Minsc Your Choice
C3: Nayeli Oath of Vengeance
C4: Bruenor Battle Master, Jamilah Brute Strength
C5: Calliope College of Valor, Celeste War Domain
C6: Tyril Moonbeam, Asharra Bond HumansNot the greatest formation for vanilla champions as having Nayeli tank is going to lose you buffs elsewhere. Some changes may be made to this formation depending on if you need healing. Tyril may switch to C2 and heal your front line champion, at the cost of a reduced Moonbeam buff. Also you may tank with Hitch/Minsc/Ash/Tyril/Makos, but Hitch seems to have the best health pool. As usual you can switch to a Makos Dark Luck DPS for favor farming, although in my opinion that isn't very efficient until you can afford to upgrade Dark Luck at least once. With a mediocre weekend buff, I managed to make it to level 218.
Event Formation (Vanilla with Evelyn) C1: Evelyn Compel Duel
C2: Tyril Moonbeam, Hitch Charismatic
C3: Nayeli Oath of Vengeance
C4: Bruenor Battle Master, Jamilah Brute Strength
C5: Calliope College of Valor, Celeste War Domain
C6: Makos Dark Blessing, Minsc Your ChoiceHitch/Minsc/Makos are free to rotate. The buff Evelyn gets from receiving heals outweights the lessened power of Moonbeam, so Tyril is fine in C2. However if you play actively, Tyril is better in C6, and you can manually move Celeste or Tyril into C2 to heal Evelyn every 15s, or simply cast Celeste's Ultimate to get Evelyn's heal buff. With a weekend buff I walled at 225.
Event Formation (Many Event Champions) C1: Evelyn Compel Duel
C2: Hitch Charismatic, Catti-brie, In the Zone
C3: Birdsong Theme of Valor
C4: Nayeli Oath of Vengeance, Celeste War Domain
C5: Bruenor Battle Master, Strix Hide
C6: Calliope College of Valor, Barrowin Greater BlessingNote* Tyril is only in this formation because I already stacked 4 hammers on Strix. Moonbeam + Tyril's global upgrades surpass Barrowin's global upgrades. There is some degree of flexibility in this formation. As always if your Regis is better than your Celeste or your Dhadius better than your Calliope you can swap them in no problem. For most levels you'll likely be better off with Minsc/Zorbu in for Catti-brie, but I use her always unless I'm farming at a wall. With a minor weekend buff I reached the 290 boss and walled.
Event FAQ
Dragondown (Binwin)
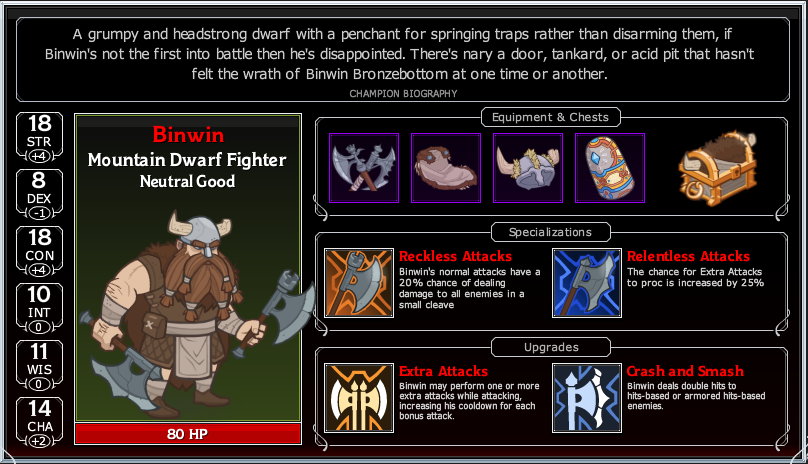
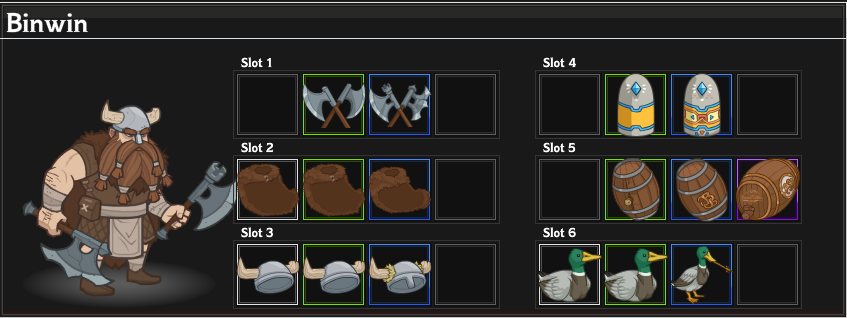


In this event you can unlock Binwin, a Mountain Dwarf Fighter!
Noteworthy Upgrades Twin Axes (Basic Attack) ~ Binwin attacks the front-most enemy with his twin axes, Rook and Ruin
Extra Attacks ~ When attacking, Binwin has a 50% chance to immediately attack another enemy for 50% more damage while adding 2 seconds to his next attack cooldown. (This can trigger multiple times with the chance for an extra attack reducing by 50% and damage increasing by another 50% for every extra attack.)
Crash and Smash ~ Binwin deals 2 more hits to enemies with hit/armor-based health.
Barrel Roll (Ultimate Attack) ~ Binwin hops on a sturdy wooden barrel and rides toward a single enemy, dealing damage along the way. When he reaches the target enemy, the barrel explodes, dealing AOE damage and slowing all affected enemies.Specialization
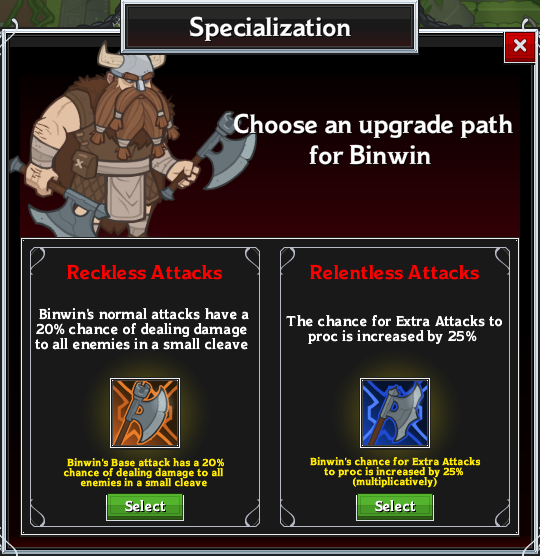
What's the Difference?
Reckless Attacks gives Binwin a small chance (20%) to deal aoe damage on each attack. Relentless Attacks increases the chance of Extra Attacks by 25% (multiplicatively)
Which should I choose?
Reckless Attacks may be useful in variants with tons of hit/armor based enemies (Durable Deep), however with only 20% odds of aoe it seems quite unreliable. If you have absurdly high gear levels and reliably get 3-4 extra attacks, you may find this aoe route better. For pretty much every other situation Relentless Attacks should be better. If Binwin is in your party it better be as a damager because he is a trash buffer. His damage relies on chaining extra attacks together. That extra 25% increase will greatly help here.
How and when to use Binwin
Unless you have incredibly high gear levels, Binwin will largely live on the bench. His DPS can't make up for the lack of Nayeli in your party unless his is chaining 4-5 extra attacks together. Most people will never achieve gear like this. He will mostly be used as a niche armor breaker for event bosses or specific variants.
Gear
I apologize to you completionists reading this, I doubt I will ever come clost to completing an event champion's collection page before the event comes around at least a few times.
Slot 1 ~ Axes Increase the damage of Binwin by (50/125/200/350%)
Slot 2 ~ Cloak Increases the damage of Binwin by (50/125/200/350%)
Slot 3 ~ Helm Increases the damage of all champions by (25/65/120/230%)
Slot 4 ~ Stone Increases the chance of Extra Attacks by (?/35/60/110%)
Slot 5 ~ Brew Increases the damage of Binwin's Ultimate Ability by (25/87.5/150/275%)
Slot 6 ~ Duck Reduces the cooldown of Binwin's Ultimate Ability by (5/10/20/?) secondsFormations
Depending on the champions you have or wish to use there are various formations that will work best. C1 stands for column 1 and so forth. Champions listed in a column are listed in order, meaning the first champion listed takes the top spot in that column.
Keep in mind that I have very good gear and high favor levels when I make these guides. If you're a new player you likely won't be able to progress as far as I do. These guides are written to show what is possible as a free player with the champions you have available and how best to use them.
Event Formation (Vanilla Champions) C1: Makos Dark Blessing, Hitch Charismatic, Tyril Moonbeam
C2: Nayeli Oath of Vengeance
C3: Bruenor Battle Master, Asharra Bond Humans, Jamilah Brute Strength
C4: Celeste War Domain, Calliope College of Valor
C5: Minsc Your ChoiceNot the most optimal formation using vanilla champs since Nayeli's tank buff is wasted, but honestly it's not horrible. Tyril's Moonbeam is really solid in this formation, and you can run dual DPS. Asharra is in the DPS column with Jamilah as crowd control. Once she stops killing switch her with Hitch. This formation paired with a decent weekend buff brought me to 220.
Event Formation (Vanilla with Binwin) C1: Asharra Bond Dwarves/Elves, Hitch Charismatic, Tyril Moonbeam
C2: Celeste War Domain
C3: Bruenor Battle Master, Jamilah Brute Strength, Binwin Relentless Attacks
C4: Minsc Your Choice, Calliope College of Valor
C5: Makos Dark BlessingIn all honesty this is a useless formation. If you're using Binwin, I'm assuming it's as a DPS as he is piss in the wind compared to Nayeli when it comes to buffing. Binwin does have potential, but only with Barrowin in the party, and very good gear. With an impressive weekend buff I walled at just 195.
Event Formation (Many Event Champions) C1: Evelyn Fighting Style: Protection, Hitch Charismatic, Catti-brie In the Zone
C2: Nayeli Oath of Vengeance
C3: Bruenor Battle Master, Barrowin Greater Blessing, Strix Hide
C4: Celeste War Domain, Calliope College of Valor
C5: Birdsong Theme of ValorI was really hoping to finally reach level 300 for the first time ever, but armored boss had other ideas :/ Again you lose Nay's tank buff here, but should benefit from Eve's who unfortunately will only receive her heal buff if you manually heal her by moving Celeste around or using her Ultimate. Up until she walls, it's much more efficient to run Birb as your DPS. Also Strix really struggles against z50 boss when you're approaching your wall. If Birb is still capable of hurting the boss, swap her as your DPS. This boss is really tricky. Stuns don't work so I use Barrowin's and Minsc's ults (temp swap in) to deal much more effective damage to the armored health. I got stopped at the lvl 300 boss.
Event FAQ
Founder's Day (Deekin)
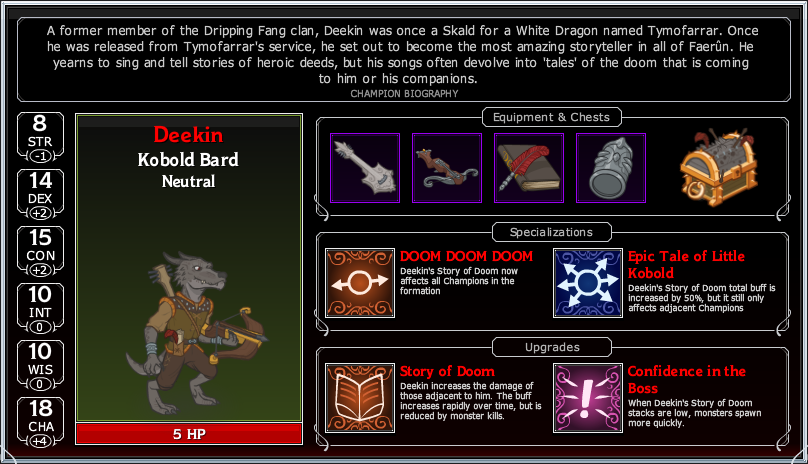

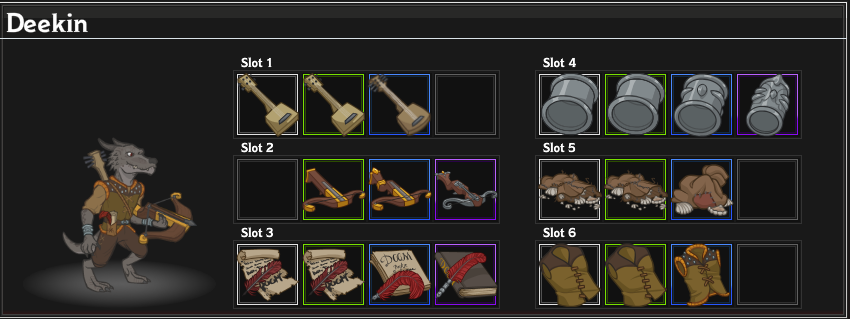


In this event you can unlock Deekin, a Kobold Bard!
Noteworthy Upgrades Building Suspense [Basic Attack] 7.25s [Ranged] ~ Deekin takes aim with his crossbow and fires at a random enemy (single target)
Story of Doom ~ Adjacacent champions do 5% more damage for each Story of Doom Stack. Story of Doom gains a stack every 1.5s to a max of 15. Every enemy killed reduces stacks by 20%. (These stacks are multiplicative!!!)
Confidence in the Boss ~ When Deekin has less than 6 stacks of story of doom, enemy spawn speed is increased 100%.
Troubadour Troupe ~ Increase the damage of all champions by 100% for each bard in the formation.
DOOOOOOOM! [Ultimate Attack] [Melee] ~ Deekin shouts Doom as loud as he can, dealing massive damage and setting Story of Doom to max stacks for 30sSpecialization
What's the Difference?
DOOM DOOM DOOM eliminates the adjacency requirement of Song of Doom, while Epic Tale of Little Kobold keeps the adjacency requirement of Song of Doom, but boosts it's power by 50%.
Which Should I choose?
The 50% increase here does NOT apply to the base stack value, it applies afterwards, so think of it as an all champ damage +50%, therefore it isn't a huge deal. But an extra 50% damage is still an extra 50% damage so if you can handle the adjacency requirement, go that route.
How and When to use Deekin
Deekin might be the best champion to date. First is for utility. As long as Song of Doom (SoD) has less than 6 stacks, enemy spawn speed doubles. SUPER EFFECTIVE FOR GEM FARMING!!!! Even better my Deekin has no gear whatsoever. At max Doom stacks, my party is already doing 10% of my Bruenor formation damage (my Bruenor is full epic all gear near lvl 100). But that's still not all!!! Deekin has a whopping 4! (Yes, 4!) Item slots that buff! Get your blacksmith contracts ready ladies and gents! As soon as he has literally all 6 slots filled with pretty much any rarity he should replace Bruenor unless I'm very much mistaken.
Gear
I apologize to you completionists reading this, I doubt I will ever come close to completing an event champion's collection page before the event and a couple Time Gates roll around.
Slot 1 ~ Lute Increases the damage of all champions by (10/65/120/230%)
Slot 2 ~ Crossbow Increases the damage of all champions by (10/65/120/230%)
Slot 3 ~ Tale Increases the effect of Story of Doom by (25/87.5/150/275)
Slot 4 ~ Bracers Increases the effect of Troubadour Troupe by (25/87.5/150/275)
Slot 5 ~ Clamshells Increases the damage of Deekin's Ultimate by (25/87.5/150/275)
Slot 6 ~ Armor Reduces the cooldown of Deekin's Ultimate by (9/18/36/?) seconds
Formations
Depending on the champions you have or wish to use there are various formations that will work best. For simplicity I'll stick with 3 formations. The first assumes you have no event champions. The second assumes the current event champion is your only event champion. The third assumes you have just about all of them. C1 will stand for column 1 and so forth. Champions listed in a column are in order, meaning that the first champion listed takes the top spot in that column.
Keep in mind that I have very good gear and high favor levels when I make these guides. If you're a new player you likely won't be able to progress as far as I do. These guides are written to show what is possible as a free player with the champions you have available and how best to use them.
Event Formation (Vanilla Champions) C1: Nayeli Oath of Vengeance
C2: Bruenor Battle Master, Jamilah Uncanny Speed
C3: Celeste War Domain, Calliope College of Valor
C4: Asharra Bond Humans
C5: Makos Dark Blessing, Hitch Charismatic
C6: Minsc Your Choice, Tyril MoonbeamRun Hitch as DPS until you can't go further simply to speed things up, then swap with Jamilah. Asharra works as an early DPS too. Spam your ultimates against the z50 boss.
Event Formation (Vanilla with Deekin) C1: Nayeli Oath of Vengeance
C2: Deekin Epic Tale of Little Kobold, Jamilah Uncanny Speed
C3: Celeste War Domain, Calliope College of Valor
C4: Asharra Bond Humans
C5: Makos Dark Blessing, Hitch Charismatic
C6: Minsc Your Choice, Tyril MoonbeamYou can swap Deekin and Tyril to increase Moonbeam's buff power, but in doing so you'll need to pick DOOM DOOM DOOM for Deekin and lose the 50% buff, up to you. Again, ult spam on boss.
Event Formation (Many Event Champions) C1: Evelyn Compel Duel
C2: Nayeli Oath of Vengeance, Celeste War Domain
C3: Strix Hide, Barrowin Greater Blessing
C4: Calliope College of Valor
C5: Deekin DOOM DOOM DOOM, Birdsong Theme of Valor
C6: Hitch Charismatic, Catti-brie In the ZoneThis formation paired with a good weekend buff brought me to the 295 boss. Clunky formation overall but it does the job. Swap to a Birdsong/Tyril/Zorbu formation to handle z50 bosses and ult spam.
Midsummer (Diath)
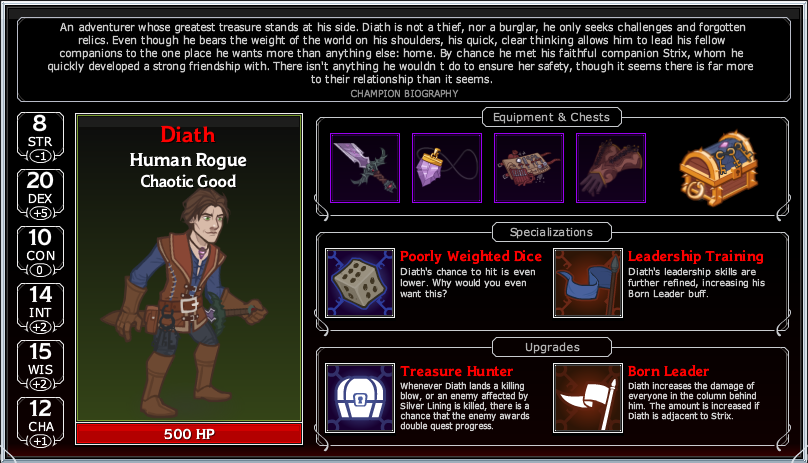

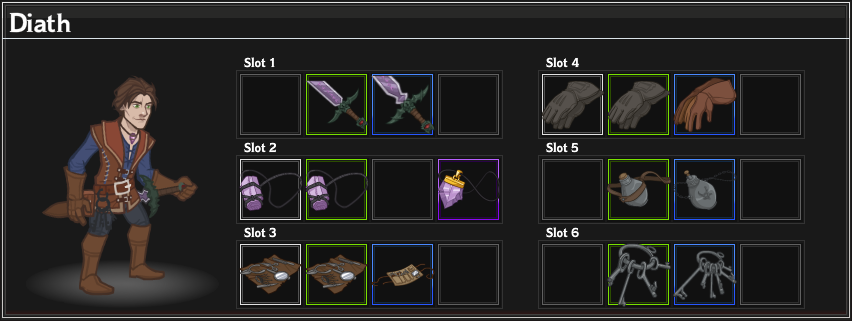


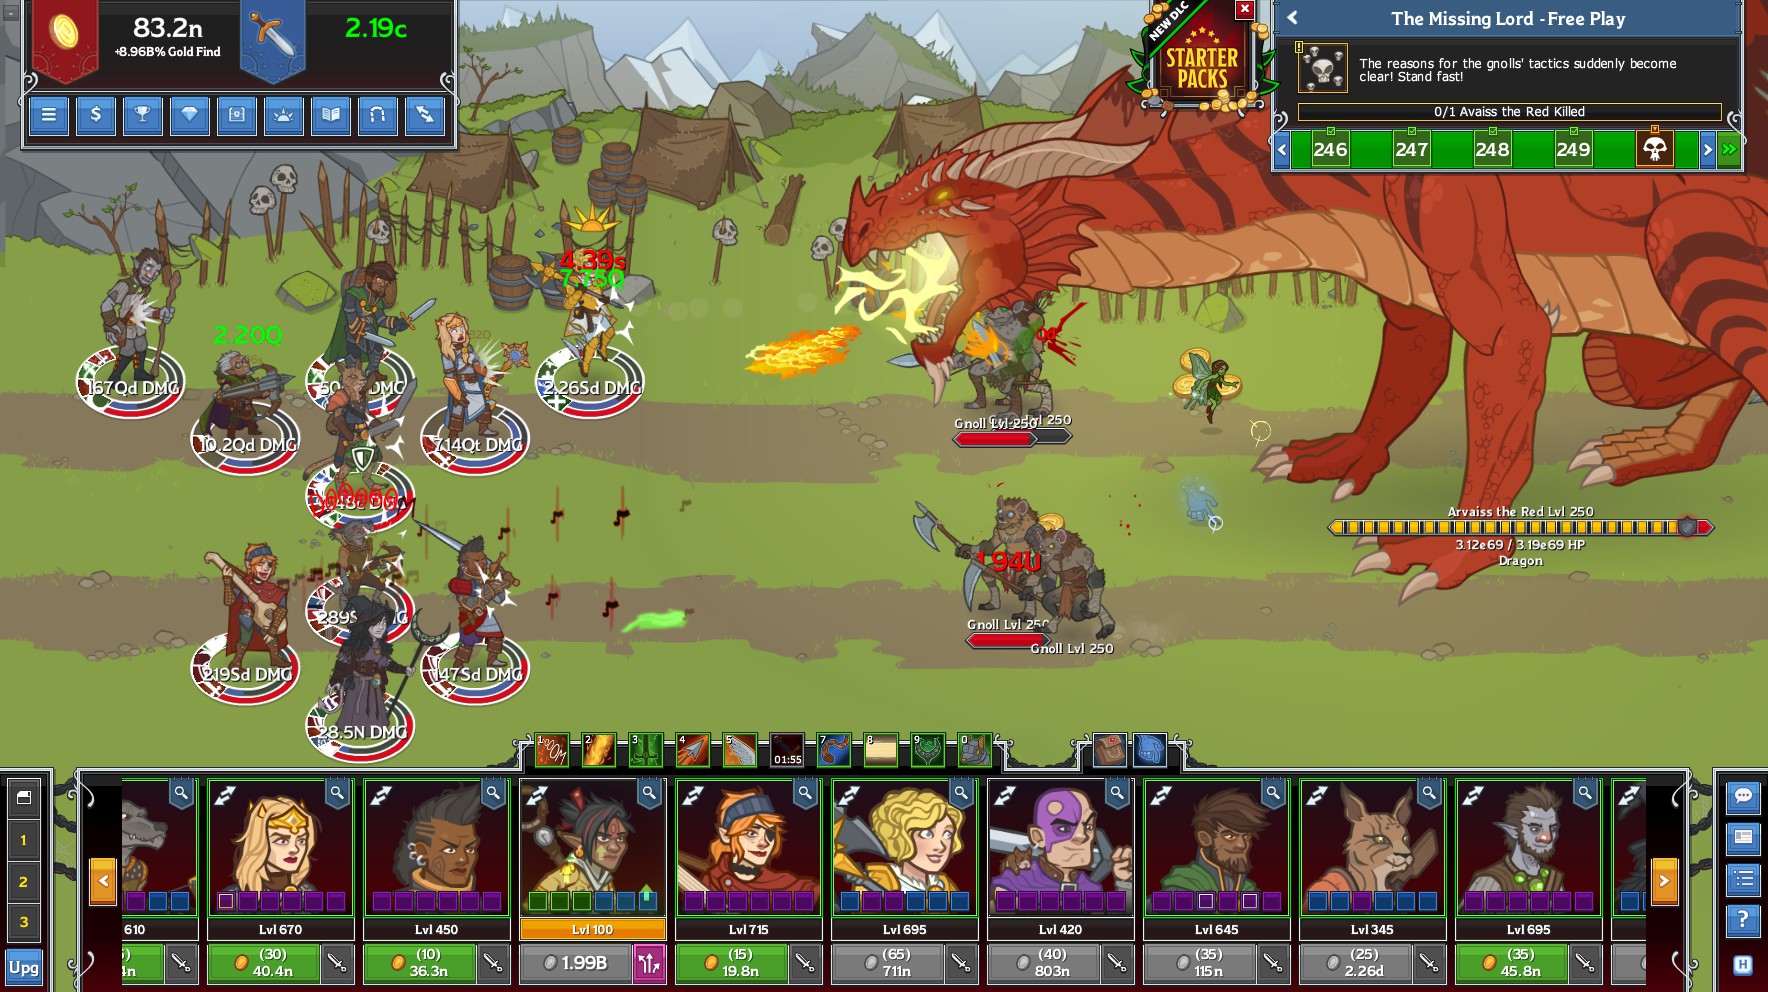
In this event you can unlock Diath, a Human Rogue!
Noteworthy Upgrades Acrobatic Backstab [Basic Attack] 3.25s [Melee] ~ Diath backstabs a random opponent. Unfortunately, he doesn't always hit them. (33% chance to miss)
Treasure Hunter ~ When Diath lands a killing blow, there is a 10% of double quest rewards (counts as 2 items or 2 kills)
Silver Lining ~ Treasure Hunter now also activates on enemies that Diath misses, regardless of how they are killed (still same odds of activation)
Born Leader ~ Champions in the column behind Diath do 100% more damage.
Eyes Unclouded ~ If Diath is adjacent to Strix, increases the potency of Born Leader by 100% for each member of the Waffle Crew in the formation (multiplicative)
Maegera the Dawn Titan [Ultimate Attack] [Melee] ~ Diath uncorks his Iron Flask, unleashing Maegera the Dawn Titan (hits all enemies)Specialization
What's the Difference?
Poorly Weighted Dice doubles the chance of Diath missing an attack (66%), while Leadership Training further buffs Born Leader by 200%
Which should I choose?
Poorly Weighted Dice is designed to speed up progression while Leadership Training is designed to buff your damage. Unless you have amazing gear buffing Treasure Hunter, Diath's speed buff is pretty lackluster, especially if you already have Deekin.
How and when to use Diath
Through raw numbers (no gear included) Diath is a significantly stronger buffer than Calliope/Dhadius provided you have Strix/Evelyn. However, Calliope gets a huge gear buff as a core champ, Diath can be difficult to fit in a formation, you lose a stack of Troubadour Troupe by removing Calliope, and Evelyn will likely lose her heal buff. As of right now Diath can't quite top Calliope (IMO) however when we get Paultin (another Wafflecrew member) the multiplicative buff to Eyes Unclouded may counter these issues.
Gear
I apologize to you completionists reading this, I doubt I will ever come close to completing an event champion's collection page before the event and a couple of Time Gates roll around.
Slot 1 ~ Shortsword Increases the damage of all champions by (10/65/120/230%)
Slot 2 ~ Necklace Increases the damage of all champions by (10/65/120/230%)
Slot 3 ~ Tools Increase the chance of Treasure Hunter activation by (25/87.5/150/275%)
Slot 4 ~ Gloves Increase the effect of Born Leader by (25/87.5/150/275%)
Slot 5 ~ Flask Increases the damage of Diath's Ult by (25/87.5/150/275%)
Slot 6 ~ Keys Reduce the cooldown of Diath's Ult by (?/20/40/?) seconds
Formations
Depending on the champions you have or wish to use there are various formations that will work best. For simplicity I'll stick with 3 formations. The first assumes you have no event champions. The second assumes the current event champion is your only event champion. The third assumes you have just about all of them. C1 will stand for column 1 and so forth. Champions listed in a column are in order, meaning that the first champion listed takes the top spot in that column.
Keep in mind that I have very good gear and high favor levels when I make these guides. If you're a new player you likely won't be able to progress as far as I do. These guides are written to show what is possible as a free player with the champions you have available and how best to use them.
Event Formation (Vanilla Champions) C1: Nayeli Oath of Vengeance
C2: Jamilah Uncanny Speed*, Bruenor Battle Master
C3: Calliope College of Valor, Celeste War Domain, Hitch Charismatic, Minsc Your Choice
C4: Asharra Bond Humans, Makos Dark Blessing
C5: Tyril MoonbeamA pretty solid formation here. Works well with Tyril and Nayeli with the one downside being not being able to land heals on C1. Jamilah's spec choice depends on your how deep your runs go. At a certain point the Uncanny Speed side gets an extra damage multiplier. Against z50 multiples you may want to try Hitch or Asharra in the DPS slot to mow through the boss more quickly. With no weekend buff/potions I reached z238.
Event Formation (Vanilla with Diath) C1: Minsc Your Choice
C2: Nayeli Oath of Vengeance, Diath Leadership Training
C3: Jamilah Uncanny Speed, Hitch Charismatic, Asharra Bond Humans, Bruenor Battle Master
C4: Celeste War Domain, Makos Dark Blessing
C5: Tyril MoonbeamWithout Strix/Evelyn in the party Diath is pretty weak. I walled over 10 zones earlier at 223. The front slot should have your tankiest non-location dependent buffer (Minsc/Makos/Asharra/Tyril) not Hitch as he's dual DPS here.
Event Formation (Many Event Champions) C1: Evelyn Compel Duel
C2: Celeste War Domain, Nayeli Oath of Vengeance
C3: Birdsong Theme of Valor, Strix Hide, Deekin Epic Tale, Minsc Your Choice
C4: Barrowin Greater Blessing, Calliope College of Valor
C5: Hitch CharismaticA very solid formation, with adjacency requirements not posing any issues. Minsc may be swapped for the other typical 10th spot champs (Stoki/Catti etc) I walled at 280, but could've gone a few further if I tried until the boss fell in Stinky range.
Boss Busting Formation
If you're looking for this formation you likely don't need me to explain specs. Get ready to pop some potions ;)
Aghairon's Day (Ishi)
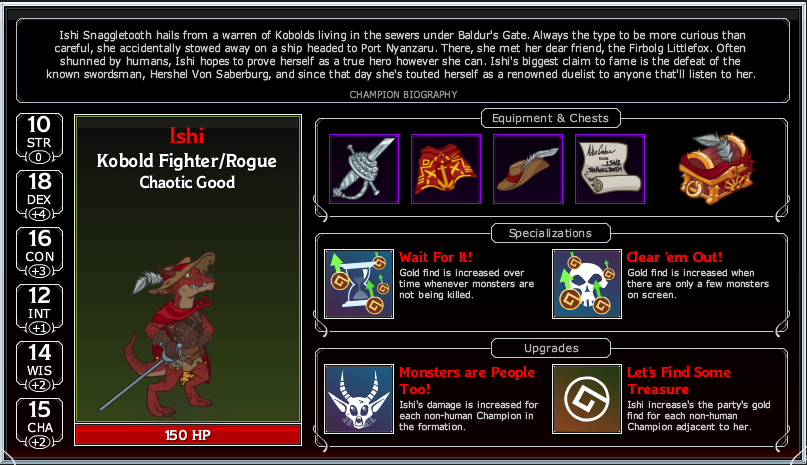


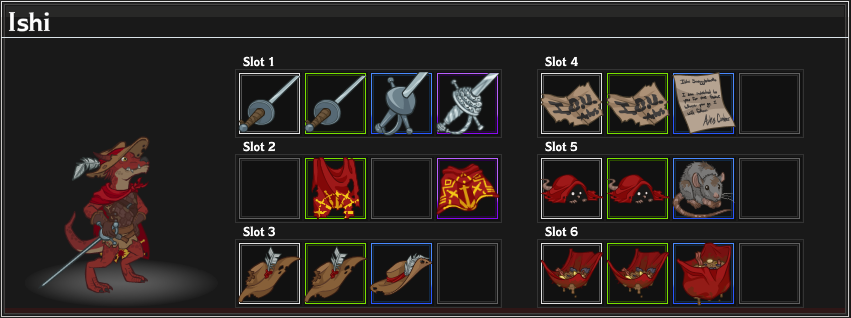


In this event you can unlock Ishi, a Kobold Fighter/Rogue!
Noteworthy Upgrades Quick Strike [Basic Attack] ?s [Melee] ~ Ishi attacks the front-most enemy a quarter second faster than anyone else. (Single target, can be upgraded to three targets)
Monsters are People Too! ~ Ishi's damage is increased 25% for each non-human in the formation. (additive)
Let's Find Some Treasure ~ Increases all gold found by 10% for each non-human adjacent to Ishi.
Confidence Boost [Ultimate Attack] [Melee] ~ Ishi's damage is increased 100% for each non-human in the formation (multiplicative) lasts 15s, duration can be increased with gear slot 5.Specialization (A)
What's the Difference?
Wait for It! slowly increases your gold find during the gaps between enemies being killed. Clear 'em out! applies a flat 25% increase to gold find provided less than 5 enemies are on screen.
Which should I choose?
Wait for It! is simply better in just about every aspect. It applies a much larger boost, and is helpful endgame. Clear 'em out won't even be active endgame since you'll likely have more than 5 enemies on screen while farming. Clear 'em Out! may have a slight edge in idle gem runs, but it'll be rather small.
Specialization (B)
What's the Difference?
The three specs are identical. They just vary on effectiveness depending on how many of certain champion races are in your formation.
Which should I choose?
If Ishi is in a support role it doesn't matter. As a DPS choose whichever will give you the largest boost.
How and when to use Ishi
Ishi is decent as a DPS, especially if dual DPS with Birdsong you can clear enemies very quickly. Confidence Boost is an incredible ultimate assuming Ishi is your DPS. Pop CB quickly followed by other Ultimates (non-Barrowin formations) to shred through enemies. (Armored Bosses cry in terror when you pair Ishi & Birdsong Ultimates)
As a support Ishi is an EXCELLENT gold finder. While your wall will be lower, your gold boost should make up for it. Ishi has earned her spot as my 10th champ, swapping to Catti/Minsc to clear a boss to farm higher.
Gear
I apologize to you completionists reading this, I doubt I will ever come close to completing an event champion's collection page before the event and a couple of Time Gates roll around.
Slot 1 ~ Rapier Increases the damage of Ishi by (50/125/200/350%)
Slot 2 ~ Cape Increases the damage of all champions by (10/65/120/230%)
Slot 3 ~ Hat Increases the effect of Monsters are People Too! by (25/87.5/150/275%)
Slot 4 ~ IOU Increases the effect of Let's Find Some Treasure by (25/87.5/150/275%)
Slot 5 ~ Nub-Ub Increases the duration of Ishi's Ultimate by (10/25/50/?%)
Slot 6 ~ Soup Reduces the cooldown of Ishi's Ultimate by (11/21/42/?) seconds.
Formations
Depending on the champions you have or wish to use there are various formations that will work best. For simplicity I'll stick with 3 formations. The first assumes you have no event champions. The second assumes the current event champion is your only event champion. The third assumes you have just about all of them. C1 will stand for column 1 and so forth. Champions listed in a column are in order, meaning that the first champion listed takes the top spot in that column.
Keep in mind that I have very good gear and high favor levels when I make these guides. If you're a new player you likely won't be able to progress as far as I do. These guides are written to show what is possible as a free player with the champions you have available and how best to use them.
Event Formation (Vanilla Champions) C1: Nayeli Oath of Vengeance, Hitch Charismatic
C2: Jamilah Uncanny Speed*, Bruenor Battle Master
C3: Asharra Bond Humans, Celeste War Domain, Calliope College of Valor
C4: Minsc Your Choice
C5: Tyril Moonbeam, Makos Dark BlessingThis formation works out quite nicely using vanilla champions. With a Tyril & Calliope buff I managed to reach 239, easily a new record for me using vanilla champions during an event.
Event Formation (Vanilla with Ishi) C1: Nayeli Oath of Vengeance, Hitch Charismatic
C2: Ishi Wait for it! & Your Choice*, Bruenor Battle Master
C3: Asharra Bond Humans, Celeste War Domain, Calliope College of Valor
C4: Minsc Your Choice
C5: Tyril Moonbeam, Makos Dark BlessingI struggled to use Ishi in this formation as she doesn't synergize to well with vanilla champions. I never worked up the gold high enough to purchase Asharra's second Bond, so Ishi did not benefit from that buff at all. Unless you have very good gold find, Ishi is best left to support roles during events. Walled at 231.
Event Formation (Many Event Champions) C1: Evelyn Fighting Style: Protection, Nayeli Oath of Vengeance
C2: Celeste War Domain, Strix Hide
C3: Calliope College of Valor, Ishi Wait for It!, Your Choice, Barrowin Greater Blessing
C4: Birdsong Theme of Valor
C5: Hitch Charismatic, Deekin DOOMUsing Ishi as a gold support I still managed to idle wall at 289 after hammer stacking past a few bosses. While my idle wall is much higher using a different 10th champion (Stoki/Catti/Minsc) Ishi's gold buff is significant enough to overpower farming at a higher level. Plus my tanks don't need as much hp.
Brightswords (Wulfgar)
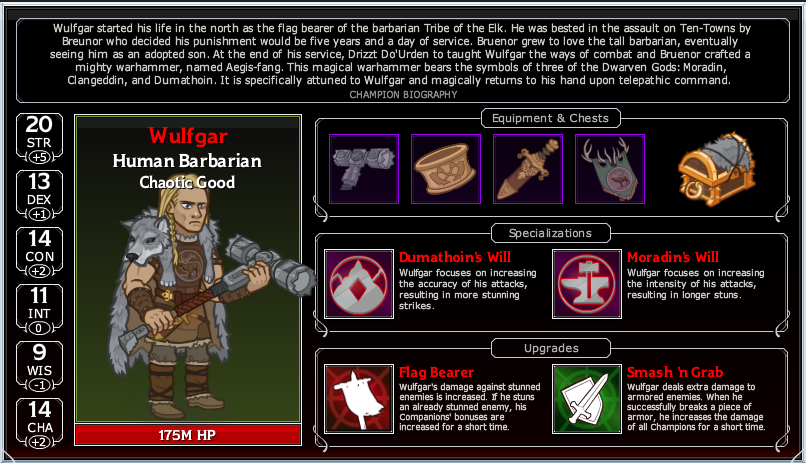

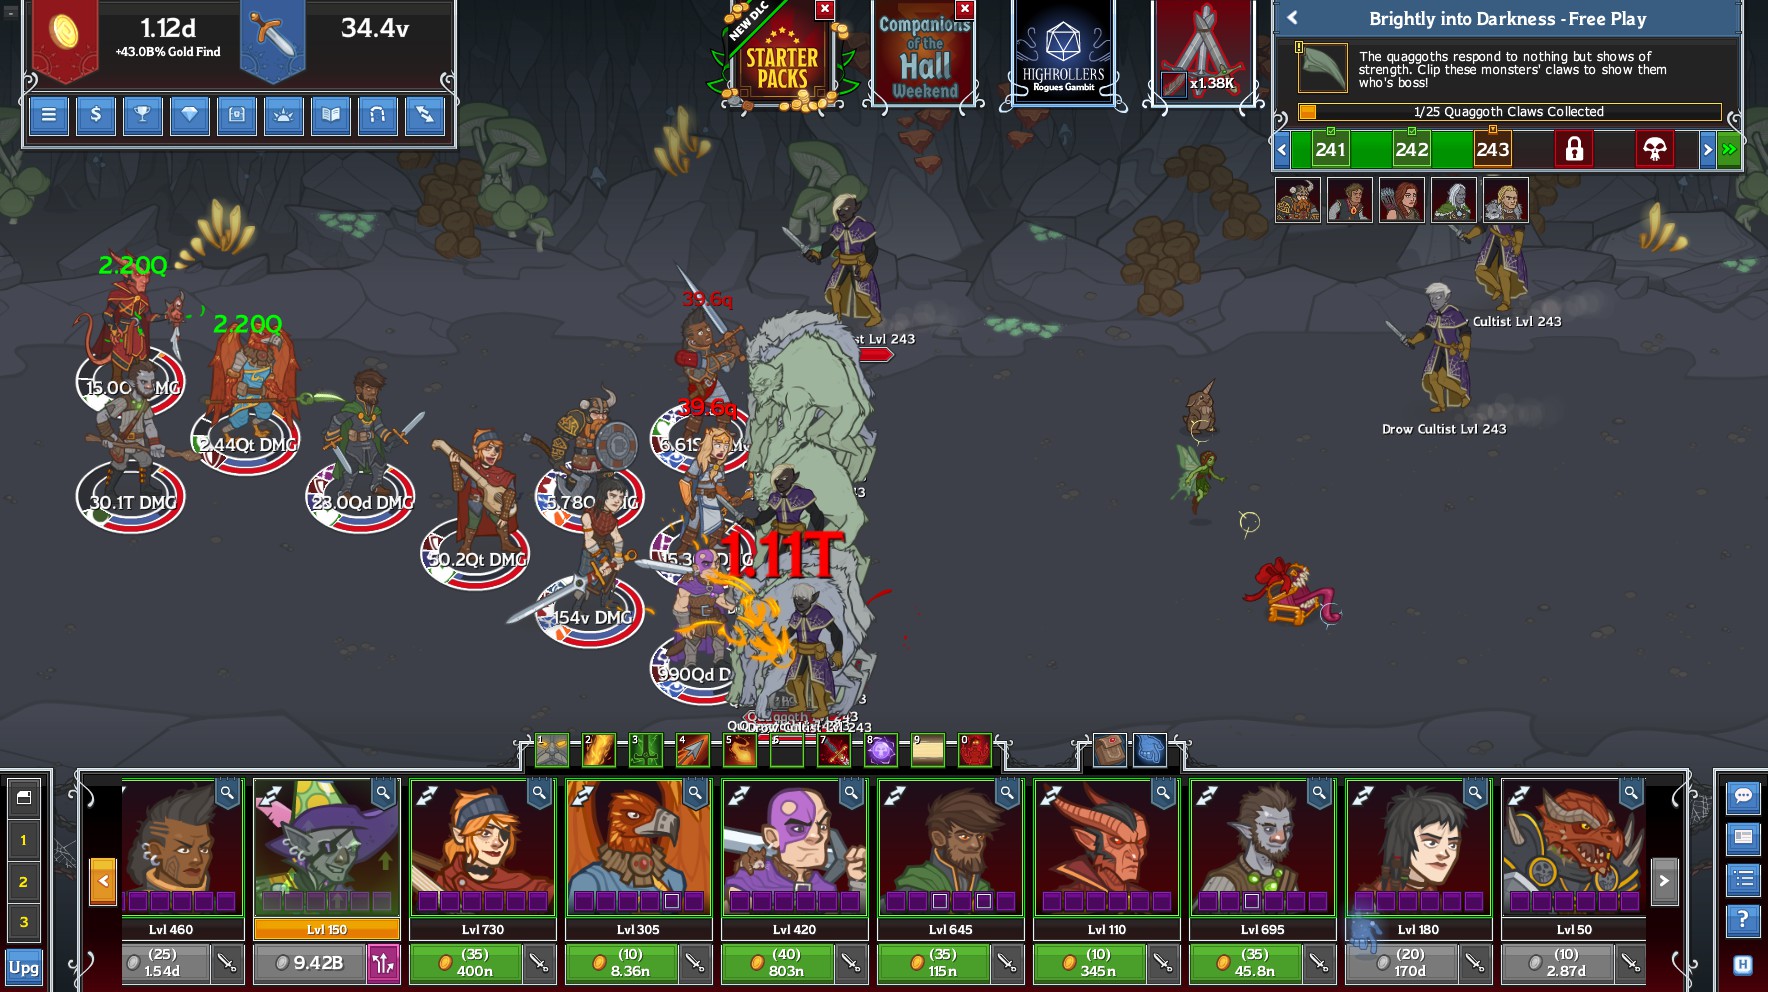


In the final event of Year 1, you can unlock Wulfgar, a Human Barbarian!
Noteworthy Upgrades Barbarian Smash [Basic Attack] 4.5s [Melee] ~ Wulfgar smashes the nearest group of enemies with a 20% chance to stun them for 5s (Aoe, can choose to increase stun chance or duration in spec)
Martial Training ~ Whenever Drizzt or Wulfgar kill an enemy, they do 100% more damage for 10s (does not stack)
Companion Abilites ~ Wulfgar fights best with his companions at his side. Wulfgar grants them additional buffs against stunned enemies. Bruenor ~ If Bruenor is in the party the effect of Rally is increased 25% for every stunned enemy capping at 400% (no bonus effect past 16 stunned enemies)
Regis ~ If Regis is in the party, stunned enemies drop 50% more gold.
Catt-brie ~ Increases the chance of Catti-brie's criticals by 25% against stunned enemies.
Drizzt ~ Drizzt deals a bonus 400% damage against stunned enemies. Smash 'n Grab ~ Wulfgar deals 100% bonus damage to armored enemies. If he manages to remove an armor chunk the damage of all champions increases by 100% for 10s.
Flag Bearer ~ Wulfgar deals a bonus 200% damage against stunned enemies. If he manages to stun a currently stunned enemy, he increases the power of all Companion abilities by 200% for the duration of the stun.
Tempus! [Ultimate Attack] [Ranged] ~ Wulfgar cries out his deity's name and throws his warhammer Aegis-Fang with all his might at the enemy furthest from him, dealing damage to all enemies in a straight line and stunning them for 10s.Specialization
What's the Difference?
Clangeddin's Will is a hefty self DPS boost, Dumathoin's Will additively increases Wulfgar's chance to stun by 10%, and Moradin's Will increases the length of his stuns by 2 seconds.
Which should I choose?
Upon first glance increasing the length of Wulf's stuns seems the obvious choice, increasing the odds of a double stun. However, it's still not enough time for him to land another attack, so it's largely useless. If you don't have a decent DPS character Wulfgar isn't bad, but he's the wrong slot to be pure DPS. Your best bet is increasing his stun chance to 30%.
How and when to use Wulfgar
Wulfgar himself honestly isn't bad and has a pretty useful toolset, however he's in a very powerful buffing slot shared with Tyril and Barrowin and he struggles to get out from under their shadow. Combine that with the rest of the Companions simply not being that great (buff Drizzt's CHA PLEASE!!!) he'll be benched for most missions. His toolset is too spiky to be a great boss killer, but he does have a small area of expertise: Durable Deep, and any upcoming variants that will have high amounts of armored enemies. Armored enemies aren't killed quickly meaning you get a whole bunch built on your tank. A feast of enemies for Wulf to stun, and potentially double stun, massively buffing Companion Abilities.
Gear
I apologize to you completionists reading this, I doubt I will ever come close to completing an event champion's collection page before the event and a couple of Time Gates roll around.
GEAR PNG
Slot 1 ~ Warhammer Increases the damage of Wulfgar by (50/125/200/350%)
Slot 2 ~ Hair Clip Increases the damage of Wulfgar by (50/125/200/350%)
Slot 3 ~ Dagger Increases the effect of Martial Training by (25/87.5/150/275%)
Slot 4 ~ Banner Increases the effect of Smash 'n Grab by (25/87.5/150/275%)
Slot 5 ~ Bracer Buffs Wulfgar's Ultimate attack damage by (25/87.5/150/275%)
Slot 6 ~ Cloak Reduces the cooldown on Wulfgar's Ultimate attack by (9/17/34/?) seconds
Formations
Depending on the champions you have or wish to use there are various formations that will work best. The first assumes you have no event champions. The second assumes the current event champion is your only event champion. The third and fourth assume you have just about all of them. C1 will stand for column 1 and so forth. Champions listed in a column are in order, meaning that the first champion listed takes the top spot in that column.
Keep in mind that I have very good gear and high favor levels when I make these guides. If you're a new player you likely won't be able to progress as far as I do. These guides are written to show what is possible as a free player with the champions you have available and how best to use them.
Event Formation (Vanilla Champions) C1: Nayeli Oath of Vengeance, Celeste War Domain, Minsc Your Choice
C2: Bruenor Battlemaster, Jamilah Uncanny Speed
C3: Calliope College of Valor
C4: Hitch Charismatic
C5: Asharra Bond: Humans
C6: Makos Dark Blessing, Tyril MoonbeamAs ugly as it looks upon first glance, this event formation actually treated my core champions fairly well. True only one in three enemies should trigger Nays tank buff, but it really isn't awful. If I had used click pots, and respecced Minsc for bosses, I think I would've made it to 250 and walled there. That being said I did neither of those things and met my match at the 243 Quaggoths. (Respecced Minsc would've breezed me through these)
Event Formation (Vanilla with Wulfgar) C1: Nayeli Oath of Vengeance, Celeste War Domain, Minsc Your Choice
C2: Bruenor Battlemaster, Wulfgar Dumathoin's Will
C3: Calliope College of Valor
C4: Hitch Charismatic
C5: Asharra Bond: Humans
C6: Makos Dark Blessing, Arkhan/Jamilah*Wulfgar really doesn't perform well without all the Companions and it shows. He just barely managed to activate Martial Training nearing 100 mobs allowing him to boost his damage and clear the wave. But this formation truly didn't do well. Choose between Jamilah and Arkhan depending on who has better all champ gear.
Event Formation (Speed/Armor Takedown) C1: Nayeli Oath of Vengeance, Zorbu FE: Drow, Evelyn Fighting Style: Protection
C2: Celeste War Domain, Birdsong Theme of Consideration
C3: Calliope College of Valor
C4: Tyril Moonbeam
C5: Strix Hide
C6: Hitch Charismatic, Deekin DOOMThe goal here is for your DPS to make the most damaging attacks as possible, as quickly as possible. Thankfully our boss here is Drow, so Zorbu becomes a high tier buffer combining Hunter's Pack with FE. Birdsong is more than up to the task of eliminating the 250 boss, though triggering Deekins Ult as well as others for crowd control is very helpful. Met my match at the z265 boss before switching to the next formation.
Event Formation (Hammer/Farming) C1: Nayeli Oath of Vengeance, Celeste War Domain, Evelyn Fighting Style: Protection
C2: Barrowin Greater Blessing, Strix Hide
C3: Calliope College of Valor
C4: Birdsong Theme of Valor
C5: Ishi Wait for It
C6: Hitch Charismatic, Deekin DOOMApproaching max text limit. Idle wall: 286
End Notes
The guide is finished! Well kinda...I'm sure I muddled stuff up in certain places and I hope that you guys can maybe find some places to improve upon, but as is, I hope you find it helpful!
In the future I plan on making a Grand Tour of the Sword Coast guide as well as short and simple guides for events. The event guides will have 2 version. A new player version where I won't use any event characters and a veteran version.
Cheers! ~ Nameless
Source: https://steamcommunity.com/sharedfiles/filedetails/?id=1319319295
More Idle Champions of the Forgotten Realms guilds
- All Guilds
- Time gates Champion Choice
- Combination Codes for Chests
- Chugsworth's Compendium
- Gaawarr's Guides to Idle Champions
- Idle Champions of the Forgotten Realms - Gold Farming
- Idle Champions of the Forgotten Realms - Initial Guide
- Idle Champions of the Forgotten Realms - Golden Item Compilation
- Idle Champions of the Forgotten Realms - How to Makos Farm for Fun and Profit
- Idle Champions of the Forgotten Realms - Support Capabilities by Cost