Garrison management is the most important part of the game and usually the team with the better management will win the game. The goal of this guide is to give new players an idea about the overall game play strategy and garrison placement. I know it’s much to read, but this guide is going into detail and the garrison management is the most complex part of the game.
Guide To Garrison Management And Basic Gameplay
The Basics
- Squad leaders (SLs; either recon or normal) and the commander can build garrisons. The squad leaders of the armor squads can’t.
- You can build garrisons everywhere in zone you control.
- You can build garrisons only in the next enemy-controlled combat area.
- There must a distance of 150m (164 yards) between each garrison.
- Building a garrison costs you 50 supplies; supply drops give you 100.
- You have a team limit of 10 garrisons; there is no limit per squad.
- SLs can take down the garrisons they’ve build, but the commander can take down all garrisons
- Garrisons can be destroyed by all types of explosives; outposts (ops) can’t.
- You’ll loose all your garrisons and outpost in an combat area, once your loose the point. The only exception are the ops of the recon squads.
- You can instantly rebuild the garrisons in a just-fallen sector.
Role Responsibilities
Depending on your the role, squad type and assigned task you have the following responsibilities:
Defending SquadMake sure you build defenses and your have enough garrisons around. If you only have one in the hard cap if just a matter of time, till you’ll loose it. At least three garrisons will should be around and once one was removed your should replace it asap. Also make sure you don’t place your op next to the main garrison, place a few meters away, otherwise it’s to easy to take out both.
Attacking SquadTry to outflank the enemy by placing flanking garrisons. However sometime directly pushing a point also works when you’re able to place a garrison close to the point.
Recon SquadYou must get your outpost behind the enemy lines and keep removing and/or finding the enemy garrisons and ops. You should stay sneaky and only support the attack/defense when there is a chance to help there. Attacking together with the other squads doesn’t help them much (exception is sniper taking out machine gunners etc.), removing the garrison and ops will help your team more.
 Commander
You primary responsibility should be to manage the whole garrison strategy. For example when you joined the game from early beginning in warfare mode you can tell your squads to move for the middle objective and place the backup-garrisons by our self. This will give your team an time advantage.
Dropping supplies of cause is the main thing you can help out building garrisons. Drop them for yourself for the backup garrisons or for the recon squads behind the lines. A well placed supply drop at the right time can help your recon squad to build the next garrison instantly once you have taken a point, before your enemy can fix their backup garrison strategy.
When loosing a point, you should be ready to build-up your backup for the next point (or already have the backup finished).
Good Garrison Management
In this section I’ll try to explain a good example for attack and defense garrisons placement for each game mode. Just keep in mind, that a you have at least setup three garrisons for defense and try to have at least two close to the cap point when attacking.
Always keep an eye on how many garrisons your have (especially when you’re defending) and replace all garrisons once they were destroyed. Garrisons can act as a kind of radar, so you can see where the enemy is coming from. Tell your squad, commander or the other squads that a garrison is hot or was destroyed and tell them to rebuild the garrisons.
When you’re defending your HQ point, don’t rely on the HQ spawn. Once the enemy starts capping the HQ point, you can’t spawn there any longer, so place a garrison in the HQ too.
Once a point has been taken or is fallen, move your garrison management strategy forward or backwards. Always keep an eye on how many garrisons you have and tell your if your gonna hit the team limit (especially when your don’t have a commander).
Try to vary your placement of backup garrisons a bit, since the recon squads tend to look for the garrisons at the same places again and again. Sometimes putting them in well-known areas or at interesting places (radar towers, compounds, churches etc.) will make them easily to find.
Of cause the following examples are the ideal placement of garrisons and assumes that the enemy is weak. Most of the times this ideal layout won’t work and you should adjust your strategy depending on the battlefield situation.
Warfare Mode
Let’s take a look how to manage your garrisons in Warfare mode. In warfare you must have the right strategy for defense and attacking, while in offensive mode your team only must manage defense and attacking,
 Defense
This section explains the early beginning of a warfare match and generic placement of garrison for the defending side.
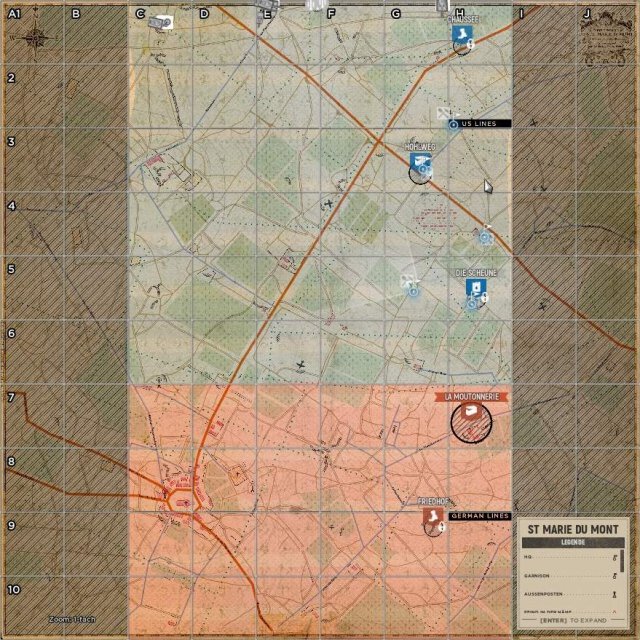
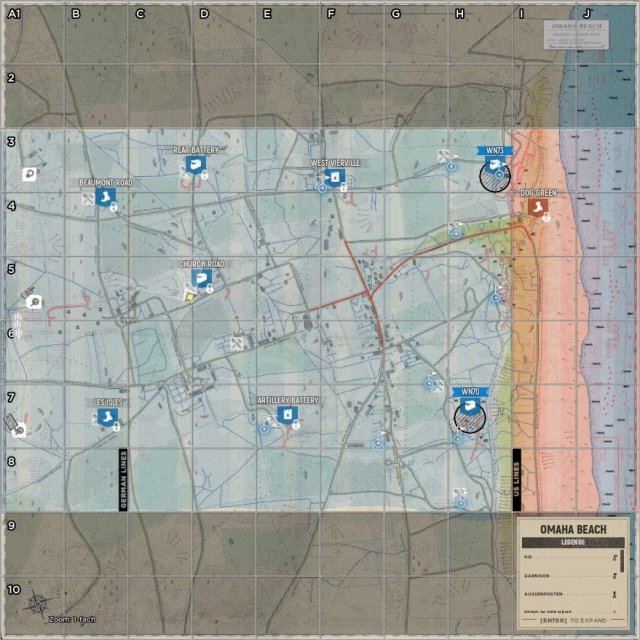
- Garrison G3: this should be the first garrison your place. This is your backup garrison for the point if you can’t take the middle point.
- Garrison H4: this should be your second garrison to place and it should be outside the combat area, so you don’t loose it once the middle point has fallen. You can skip placing this garrison depending on your last point is so close to the next combat area, that it’s garrison already can act as backup garrison for the combat area.
- Garrison H5: This should be the attack garrison for the middle point and acts as your points main garrison once you’ve taken the point.
- Garrison G5: If you have taken the point this should be your third backup garrison.
- Garrison H2: This garrison is optional. But with a good enemy recon squad you probably loose this garrison at G3 soon and then this would acts as a backup. This become even more important the more you get closer to the enemies HQ. Ideally this one in place in the next combat area, so it’s the backup garrison for the whole sector.
When attacking an enemy point your goal should be to flank out the enemy by placing as much as garrisons around the point as possible.
If you have two or better three garrisons close to the enemy point he will have a hard time defending the point from two or three sides. Usually the enemy can’t stand that for a long time so keep pushing.
Another good tactic is to push the enemy from one side and then sneak around to place a second garrison and take him by surprise.
Let’s take a look at this ideal example:
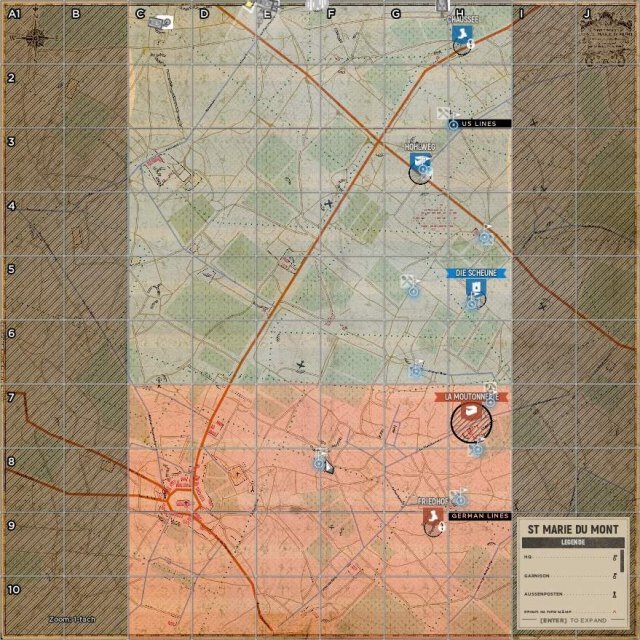
- Garrison G6: This will be your first attack garrison. This also can act as a defense garrison for the middle point. In most matches you won’t take the point from there, but you can help your team to defend the middle point while attacking from there. If you take the next point this is automatically your backup garrison for the next point.
- Garrison E8: This should be your second garrison to create a flank behind the enemy point. Note: it’s bit more far away so the enemies doesn’t find is instantly.
- Garrison H8: This could be your third garrison and an ideal starting point for attack from the rear. And if you manage to take the point in this example would be the ideal starting point for the last point.
- The other two garrisons (H8/H7): once you’ve placed the garrison under La Moutonnerie your probably can place a second closer from the north or vice-versa. Once you’ve taking the point these garrisons will become your main defensive garrisons.
After your have taken the next point your team should:
- Rebuild the backup garrisons in the point they defended before.
- Remove the backup garrisons from the point closer to your HQ.
- Optionally remove the garrison from E8. In this example it only can act as an flanking garrison for the next point and is not a good backup garrison for La Moutonnerie.
- Of cause move the defending team to the next point. As attacker your should make sure that the defending team is ready to defend the point before moving on.
Offensive Mode
In offensive mode your either must have a strategy for defensive or offensive garrison management depending on the side you are.
This mode I highly recommend you to have a commander, as he can manage to build backup garrisons, build attack garrisons behind enemy lines and can drop supplies behind enemy lines in preparation for the next points. As commander you should drop supplies whenever the drop is available.
Let’s see how the ideal garrison management could look like.
Attacking TeamThe attacking team must try to get behind the enemy lines to place an garrison in the rear. You can either try this with your squad, but a combination of recon squad and commander usually works out better.
So as commander tell your recon squads to get behind the enemy lines, so they can remove their garrisons there and build garrisons for flanking.
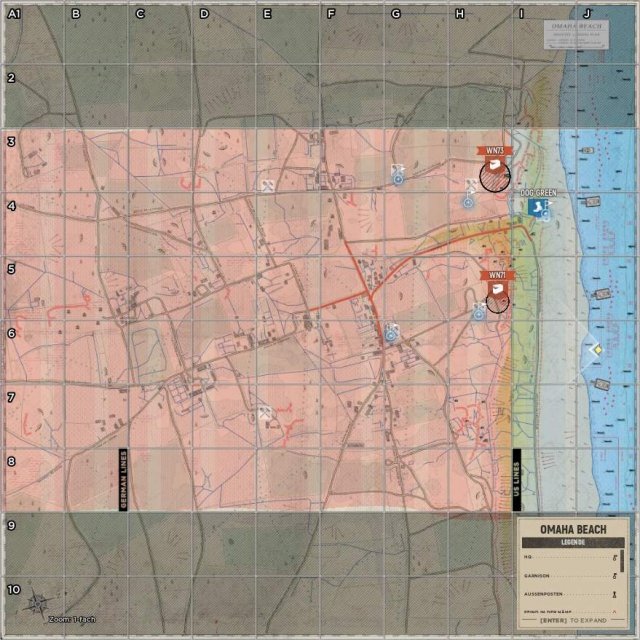
- Garrison I4: starting point for an attack.
- Garrisons on line G: try to build garrisons there as a starting point. Later they can act as starting point for attacking the the next points.
- Garrisons on line H: your attack garrisons once you get closer from the rear.
- Note the supplies behind enemy lines: preparation for the next point you must take. Your recon squads should get ready in time to build them.
After Taking a Combat Area or Sector
You should get ready to redeploy with your squad for the next garrisons (ideally the ones the recon squads build right on the next points). Walking should be avoided as it takes to much time (and the time is against your) and leave enemies still camping in the fallen point behind.
Defending TeamThe defending team should build resource nodes asap, not just to spam artillery, get better tanks but also to drop supplies for backup garrisons.
The commander and the recon squads should remove enemy supply drops and fight the enemy recon squad behind the own line.
This could be the ideal setup for garrisons. We assuming the American side has taken the beach, but this setup should be ready before they have done so. Make sure your always on team limit of 10 garrisons.
Note: the initial garrisons on the map doesn’t count to the the team limit of 10 and you can place garrisons next to them under 150m (164 yards). Keep this in mind or you may accidentally place too many garrisons and end up being unable to replace a garrison in the hard cap.
- Garrisons on line G and H: you can have four backup garrisons (ten minus two backup garrisons). The more you have the unlikely it’s for the enemy to take your point.
- Garrisons on line E and F: these are your backup garrisons, you should build them after you’ve finished with the garrisons on line H and G.
- Note the supply drops all around the map: these are just for preparation once you loose a point, so you can get the next line of garrisons up.
If you still have one point left in the combat area: place more garrisons around this point and prepare the next line of garrisons. If you lost the last point in the combat area, you backup garrisons for the next line should be ready, so you can stop the enemy attack right in the beginning.
Source: https://gameplay.tips/guides/7476-hell-let-loose.html
More Hell Let Loose guilds
- All Guilds
- Hell Let Loose - Maps
- Hell Let Loose - Support Class Guide
- Hell Let Loose - Simple Guide to AT Guns
- Hell Let Loose - Infantry Beginner Guide
- Hell Let Loose - Infantry Tips for Beginners
- Hell Let Loose - How to Officer (Basics)
- Hell Let Loose - Tank Guide
- Hell Let Loose - Basic Guide
- Hell Let Loose - Tank Driver Guide (ADV in Detail)
