
Introduction
This guide will hopefully give you some insight into setting up your own deep 4-2-3-1 formation. I do not recommend copying this tactic down to a tee, as I spent many seasons building a squad of players which would complement my playing style. So although I encourage you to use this as inspiration for your own tactics, I would recommend some nuances. If you wish to get stuck in with a new save and try the tactic out right away, I recommend playing as Manchester City, as they are probably the best equipped team to play in this style. As mentioned in the guide description, feel free to get in touch if this guide has helped, or to share your own strategies.
Formation
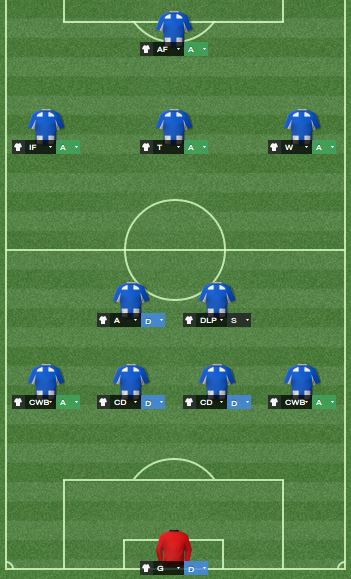
So here is a first look of how the formation is set up, including player roles. I will go into more depth surrounding specific roles later on, so I will just cover the basics for now. Once again, I am focusing on using attacking wing backs and they are vital when it comes to launching counter attacks.
The deep midfielders are important for aiding the defence with respect to absorbing the pressure which naturally comes along with playing counter attacking football. The anchorman is essential in aiding the centre backs and I would strongly advise against trying to play this formation without one. As for the other DM, Depending on who is on the field, I either go for a Deep Lying Playmaker or a Half Back... I'm not hipster enough to entertain playing a Regista. The half back is a role I do rate very highly, but players capable of playing it well are hard to come by.
The wingers aren't too important when it comes down to the player roles, so I just select the role that my wingers are best suited to. The AMC however I do place importance on. For this tactic, I've opted with a trequartista role. The trequartista plays a similar role to the Advanced Playmaker, the difference being that a treq has a lot more movement in his play, constantly making overlapping runs and roaming around the advanced areas of the field as well as linking up play, making it the ideal selection for counter attacking football.
As for the striker, you want to select a role that won't see him dropping back into midfield too often, as he's there to finish the chances, simple as that. For the striker, I recommend either Advanced Forward or Poacher.
So that sums up the basics of how to set up the formation. More detail into tactics can be found below.
Squad

As with any tactic, it is essential that you are equipped with the right players to play your way. If your team doesn't buy into your philosophy, then performances will naturally suffer as a result. So let's have a closer look at the ideal players for this formation.
First, we'll get the obvious out of the way with what I like to call a positions "primary attributes". These are the stats which determine whether or not the player can perform well in his designated role. I won't go on about this as it is relatively basic stuff. If you are unsure what these specific attributes are, utilise the "highlight key attributes" button in the player's attributes section. What I want to focus on is what I call "secondary attributes"
I touched on this in my last guide, secondary attributes are what makes a player suited to your system. Since this is a counter attacking set up, there are key attributes which must be taken into consideration, which are not shown through highlighting key position attributes. The 7 key attributes I believe necessary to perform well in a counter attacking set up are as follows:
Composure
Concentration
Natural Fitness
Off the Ball
Stamina
Teamwork
Work RateOther attributes such as dribbling and passing would also be important, but I place the above as priority. See picture below:
(Highlighted key attributes for the Complete Wing Back position)
As outlined by the key attributes feature, not all of the stats are mentioned through position alone, so when building your squad, I advise a bit of thought into who you are buying/selling, as the best player in a certain position may not necessarily be the best player for your squad.
Tactics


The infamous Paint arrows previously used to help illustrate my points will not be used this time around, sorry to disappoint! This section is based entirely off my own experiences with my squad, so unless yours is very similar to mine, chances are this will give you different results as it does for me. I'll start with the team instructions that I issue.
The first instruction I give is Drop Deeper. This makes your team stand off opponents on the ball and drags the wingers back into your own half whilst defending. Getting men behind the ball can be seen as a negative tactic and some people won't like to do it but I feel it's justified with the attacking play created after winning the ball.
The driving force of my attacks is the wings, so the next instruction I issue is to exploit the flanks. With this active, as soon as the ball is won, my full backs and wingers instantly look to get forward and launch the counter attack. The success of this instruction is demonstrated by re-visiting the Left Back pictured above. You can see below his stats after implementing this formation for one season:
(Paz was credited with 25 assists from Left Back in one season)
The starting wingers and wing backs combined with a total of 89 assists in the season just gone, making up 77.4% of my total assists, with the majority of the rest coming from substitutes in these positions.
The final instruction I issue is to Play Out of Defence. If you start playing hoof ball when sitting deep, that is when your tactics start to become really negative. As soon as I win possession, I want my players to be creating space and passing positively. This instruction can be complemented with instructing your team to play at a Higher Tempo, but I tend not to do this for 90 minutes as it is physically demanding on your team, ideal for 10-15 minute bursts if the game is lulling a bit.
Now here's what to expect with your chance creation, assuming your tactics emulate mine. The below diagram shows how my team traditionally lines up when defending:
As the AML is an Inside Forward, he tends to sit in narrower, with respect to the AMR. The good thing about this is that it creates a lot of space outside for players to overlap, the Left Back in particular and this is where my chances usually come from. The drawback of this is that with the winger not staying wide to cover the full back, you can be prone to leaving the full back out-numbered. This is why I select my left-sided DM to be my anchorman.
When the ball is won, this shape changes rapidly as the team explodes forward, the four wide men bomb forward, interchanging passes with the central three in midfield along the way, and this very defensive set up quickly becomes a back three, with the anchorman sat slightly in front of the two CBs, whilst the remaining seven players attack. The chances usually result with a cross being whipped in to the striker or opposite wing players on the back post and thankfully, my players tend to be very clinical in front of goal.
As many people who have tried to play counter attacking football on this game, the "Counter" mentality simply does not work and usually just leads to you conceding a lot of goals, so I choose to leave my mentality on standard. If setting the mentality to counter works for you then go for it, but please tell me your secrets!!! Increasing the fluidity could be beneficial to you, under the right circumstances. For instance, if your wingers lack work rate, increasing fluidity will result in a lot more movement out of them in both defence and attack. Again, I don't have this problem and so leave the fluidity set to balanced.
As for individual instructions, the only one I really tend to set is to tell my ST to Hold Position. It is essential that he stays up the field to provide an outlet for on-running attackers once a counter attack is initiated, but also so someone is always there to finish off your chances. Applying the same instruction to your Anchorman to help protect your defence is recommended too, especially if you do bump up the fluidity.
Well, that's another guide done, I hope people find it as informative as the last. If I get another influx of requests, chances are I will do another. If you have any questions feel free to get in touch through the methods listed above or pop a comment below. :)
Source: https://steamcommunity.com/sharedfiles/filedetails/?id=304992030
More Football Manager 2014 guilds
- All Guilds
- Football Roles Explained
- Creation of successful tactic on FM14
- Youth are a big deal
- Football Manager 2014 Regen Dates - Annual Youth Intake
- Best corner tactic FM 14
- Football Manager 2014 Guide 6
- 3-5-2. Attacking and posession play
- Transfer Market Guide-Lines
- Newgen Scouting Made Easy