
Before We Begin
This won't be a 100% guide, therefore i can't and won't list any quest givers.
The detailed exploration of each mechanic and system is up to you, otherwise it would be far too much to write.
Be aware that english isn't my mother language.
Draw my attention to spelling, grammar mistakes as well as erroneous/ outdated information under the guide in the comments.
Critic is welcome.
[GER] version:
https://steamcommunity.com/sharedfiles/filedetails/?id=2553048369
00 Final Fantasy XIV
Release/ Rework: 30. September 2010 / 27. August 2013
Genre: MMORPG
Puplisher: Square Enix
Plattform: PC, Steam, Mac, PS4, PS5, XBox (Unrestricted Cross-Play)
Model: Pay-to-play, Free trial up to Level 60
Expansions: Heavensward 3.x, Stormblood 4.x , Shadowbringers 5.x, Endwalker 6.x and Dawntrail 7.x
Comat system: „Global Cooldown“-based with Tab-Targeting
FFXIV requires a Square Enix account, which you can create here[secure.square-enix.com] .
The Square Enix account works on all available platforms. With a free trail access only on the laid out platform. The game license does not work across platforms. (PC license doesn't work on PS5, for example, but the Square Enix account does).
The Square Enix account is bound to your region. With a Japanese account you have to buy the JP version of the game and its expansions.
The difference between the PC and Steam versions of the game:
- With Steam, another payment method is added
- Extensions of the two versions are not compatible
- If the basic version of the game is from Steam, you also have to buy the expansions on Steam and vice versa.
Available benchmark: ~4 GB.[de.finalfantasyxiv.com]
The system requirements are listed at the following link:
https://de.finalfantasyxiv.com/system_requirements/
01 Free Trial | Subscription System
Free Trialhttps://store.steampowered.com/app/312060/FINAL_FANTASY_XIV_Online_Free_Trial/
There is no time limit for the free trial phase, but there is a level cap of 60 on all job classes. The playable content lasts until the end of Stormblood 4.x.
Missing features in the Free Trail:
No writing of private messages
no linkshells, fellowships, a group, or retainers can be created
no way to create and join an FC
no way entering PvP dutys
no way adding friends
no trading of items
no in-game mail sendable
online store not usable
not able to register in the Lodestone
/shout, /yell and /tell cannot be used
gift codes are not redeemable
a cap of 300,000 gil
maximum of eight characters that can be created, one per worldThese restrictions will be removed with the purchase of the Starter Edition.
Subscription systemAs soon as you have purchased the Starter Edition, your ability to continue using the free trail access expires!
https://store.steampowered.com/app/39210/FINAL_FANTASY_XIV_Online/
With this purchase, you will permanently upgrade your access to a full version and will therefore also be asked to pay a monthly fee in order to be able to continue playing the game afterwards. The full version comes with a 30-day subscription.
If you still like the game and want to get all the expansions. It is enough to buy the most recently released expansion which also includes the previous expansions. This unlocks new jobs, races, areas, questlines, as well as a higher level cap.
Your subscription is always managed on the Mog-Station[secure.square-enix.com] , no matter what platform you play on.
The game content of the two subscriptions Beginner and Standard are absolutely identical. Only the maximum number of characters that can be created and the price of the 30-day subscription differ slightly compared to the standard version.
Beginner A maximum of one character per world and eight in the data center. You can subscribe for a maximum of 30 days at a time. Standard A maximum of eight characters per world and 40 in total within a data center. You can subscribe for up to 180 days at a time. A maximum of 360 days can be hold as remaining game time.
_______________________
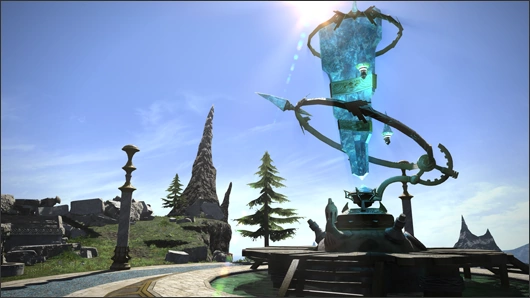
02 Data Center | Server
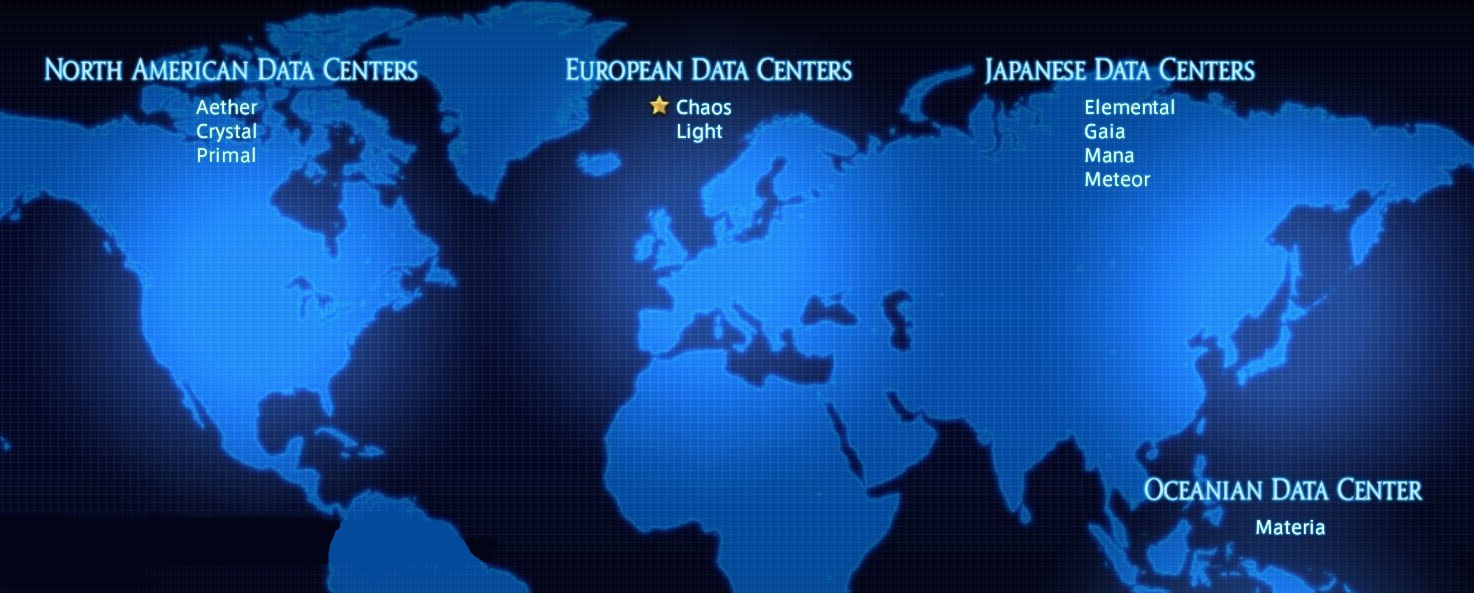
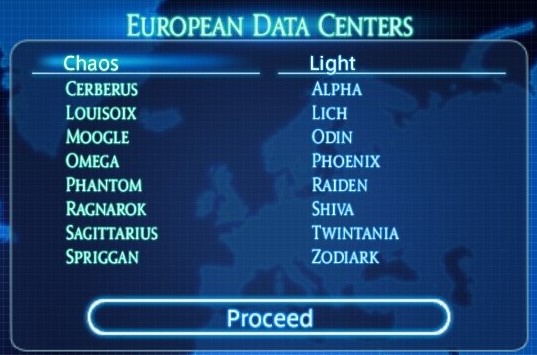

The Data Centers are divided in North America | Europe | Japan and Oceania.
All players within a data center can interact with each other, enter instances and visit each other.
The World is another name for the Server that you choose for your character. This is subject to the data centers mentioned above.
Your actions are limited when you visit another world. So if you're playing with friends, make sure you select the right world.
Preferred worlds are marked with a small red-yellow star; these have fewer players and are rewarded with a ''Road to XX'' buff when a character is created on this world which increases the EXP acquired.
This buff lasts for 90 days or from the time the character is created until the world loses its preferred world status. Depending on which value lasts longer.
In addition, there are one-off 15 additional free game days.
If a world is overloaded, you will not be able to create a new character there.
You can check the server status HERE[na.finalfantasyxiv.com] at any time.
03 Character Creation
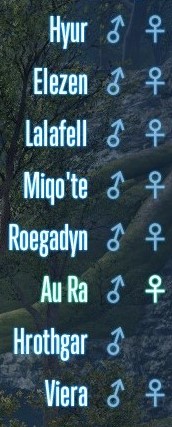
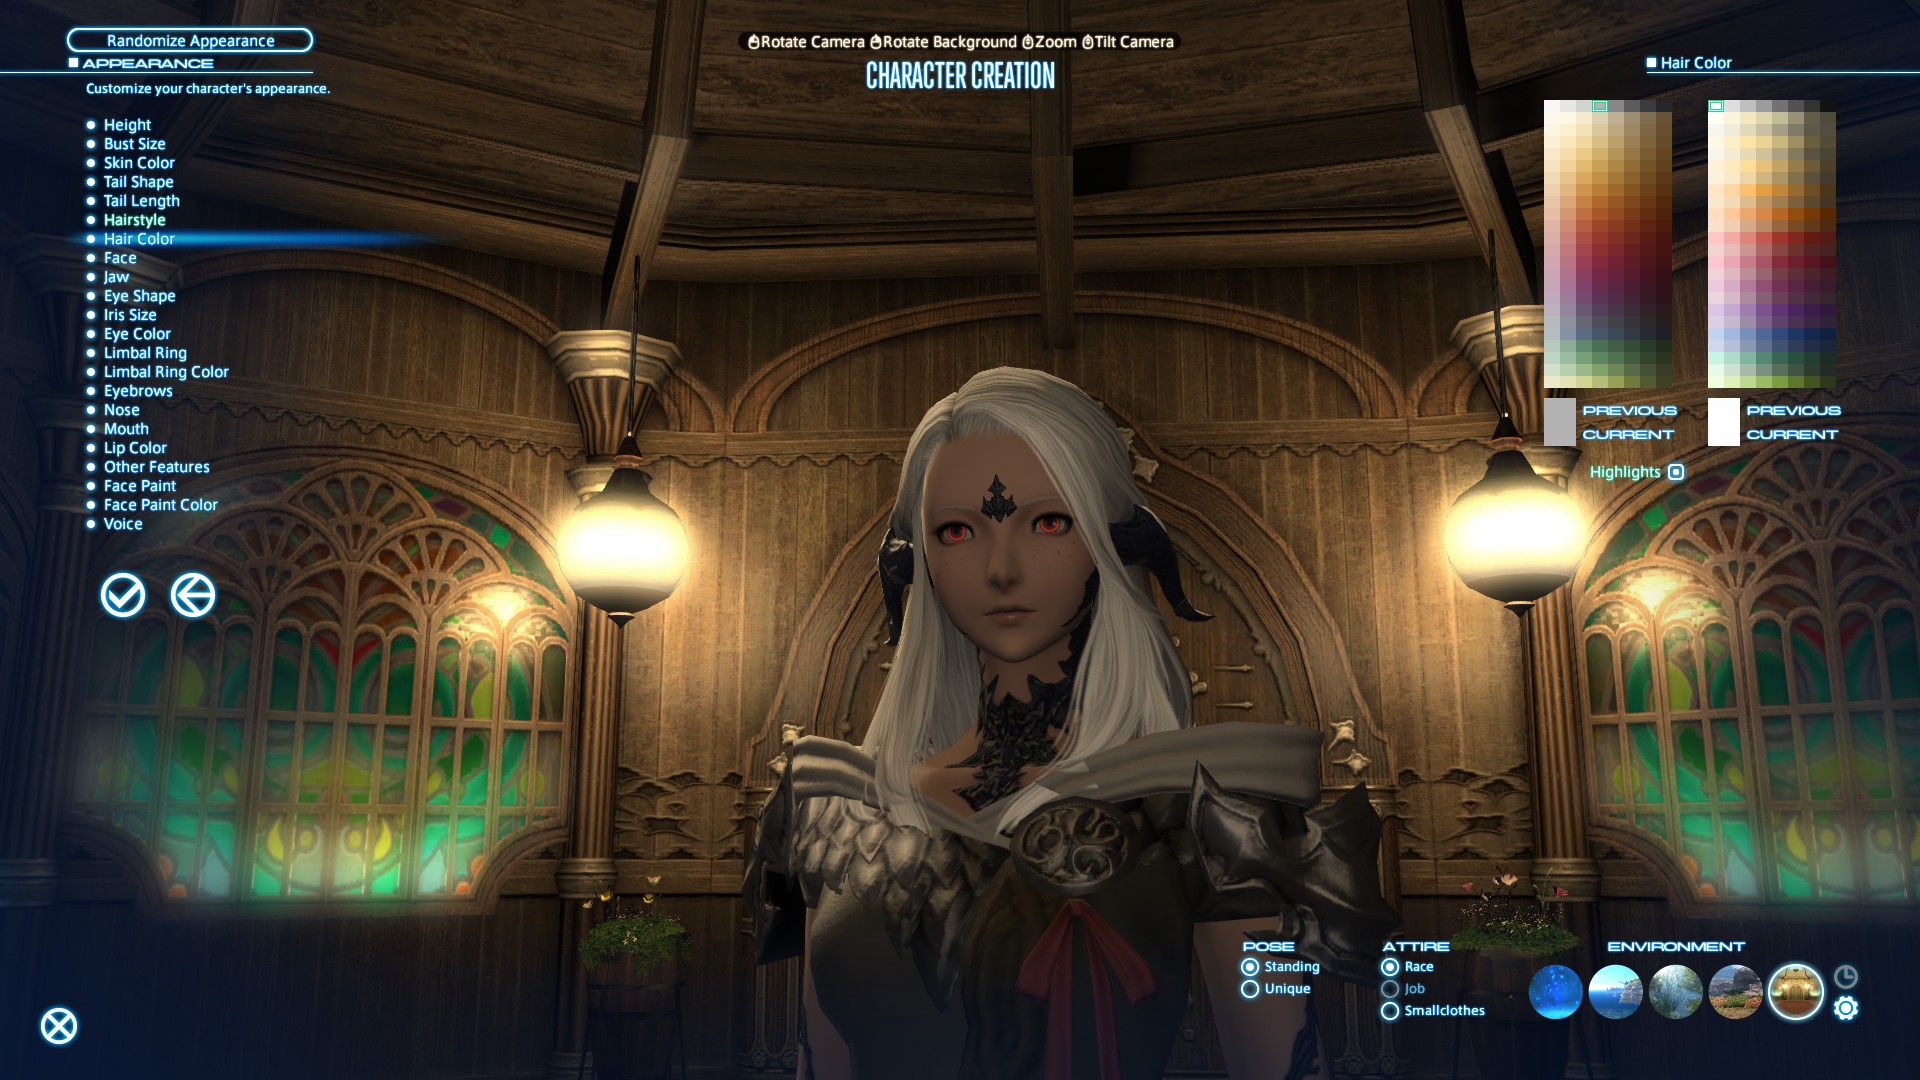

In Eorzea you have a total of eight races to choose from, each divided into two clans.
When creating a character, it doesn't matter what race, gender or deity you belong to. All breeds have almost identical attributes which are negligible.
Please allow yourself plenty of time to create your character, as you can only change your appearance in conjunction with Fantasia, with the exception of hairstyles and certain details.
You only get Fantasia once for free during the course of the game for completing A Realm Reborn.
Otherwise you have to purchase it in the Online Store.
If you decide on a name, it will stay with you permanently. To change your name you have to go to the Moogle Station.
Class / JobThe so-called Class indicates which role you start the game with and assigns you one of the three starting areas. These include Ul'dah, Grindania and Limsa Lominsa.
Classes are split between DoW (Disciple of War) and DoM (Disciple of Magic).
Disciple of War Disciple of Magic Gladiator Conjurer Puglist Thaumatism Marauder Arcanist Lancer Archer
If you want to start the game as a Marauder, your capital and your first spawn is in Limsa Lominsa.
The Class from levels 0-30 is called the Marauder.
At Level 30 you get a so-called Job Crystal via a Job Quest that turns your Class into one Job upgraded. This ensures that numerous additional skills can be unlocked and used up to the level cap.
The Marauder becomes an Warrior with his job crystal, if he discards his job crystal he becomes a class and thus loses the opportunity to use all of his Job skills.
Class* Job role Marauder Warrior Tank Gladiator Paladin Tank Lancer Dragon DPS Pugilist Monk DPS Rogue Ninja DPS Archer Bard DPS thaumaturge Black Mage DPS Arcanist** Summoner | Scholar DPS | Healer Conjurer White Mage Healer *All classes listed are the starter classes
**The Arcanist is the only class that gains two job crystals during the course of its job quest and can therefore switch to either a dps or a healer.
As a player, you and your character are not only tied to one job class. You can change your Job class at any time outside of instances or conflicts. So you don't have to rely on alternative characters. Additional jobs can also be unlocked as the game progresses. By obtaining a new weapon such as a bow and completing the required class quest, you can change your job class by simply changing the weapon. With one character you can learn all classes and jobs without exception.
_______________________
04 First Steps In Eorzea


Once your character creation has been completed, the game lets you set off on Eorzea with a cutscene.
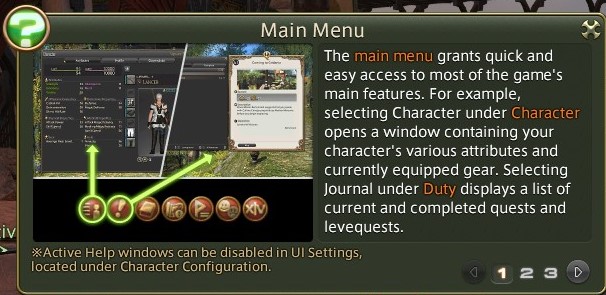
As soon as you get in touch with a new system, you will receive small assistance in the form of short texts and images which can be accessed again at any time via the menu.
In order to unlock the desired content, the game relies on your character level and your main story progress.
The further you have progressed in the main story, the more systems and content can be unlocked (usually via a separate quest).
The game generally takes a lot of time to get you used to individual systems and content.
You don't have to use systems that you don't want to use. Chocobo, crafting, PvP, etc.
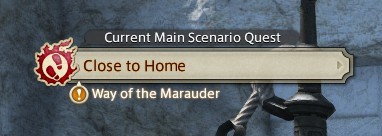
Main and side questsEorzea provides a guide to the Main story and the Job quests are available which are displayed in your HUD.
In order to get through the main story as effectively as possible, only complete your job quests in addition to the main story.
1. Main quest
The main story give you quests that tells the story all around Eorzea. These usually have cutscenes and are recorded synchronously in several languages. Also unlock useful and important features for the first time, such as dungeons, flying on mounts, the Grand Company, etc.
2. Unlocking content
Blue quest markers unlock content such as additional Trails, Dungeons and Raids or higher levels of difficulty for existing instances. Mostly new skills in jobs quests.3. Side quests
In rare cases there are emotes or companions as rewards, but usually only a few items, EXP or Gil.
4. Repeatable jobs
Completing it increases reputation with beast tribes or relic weapon progress.
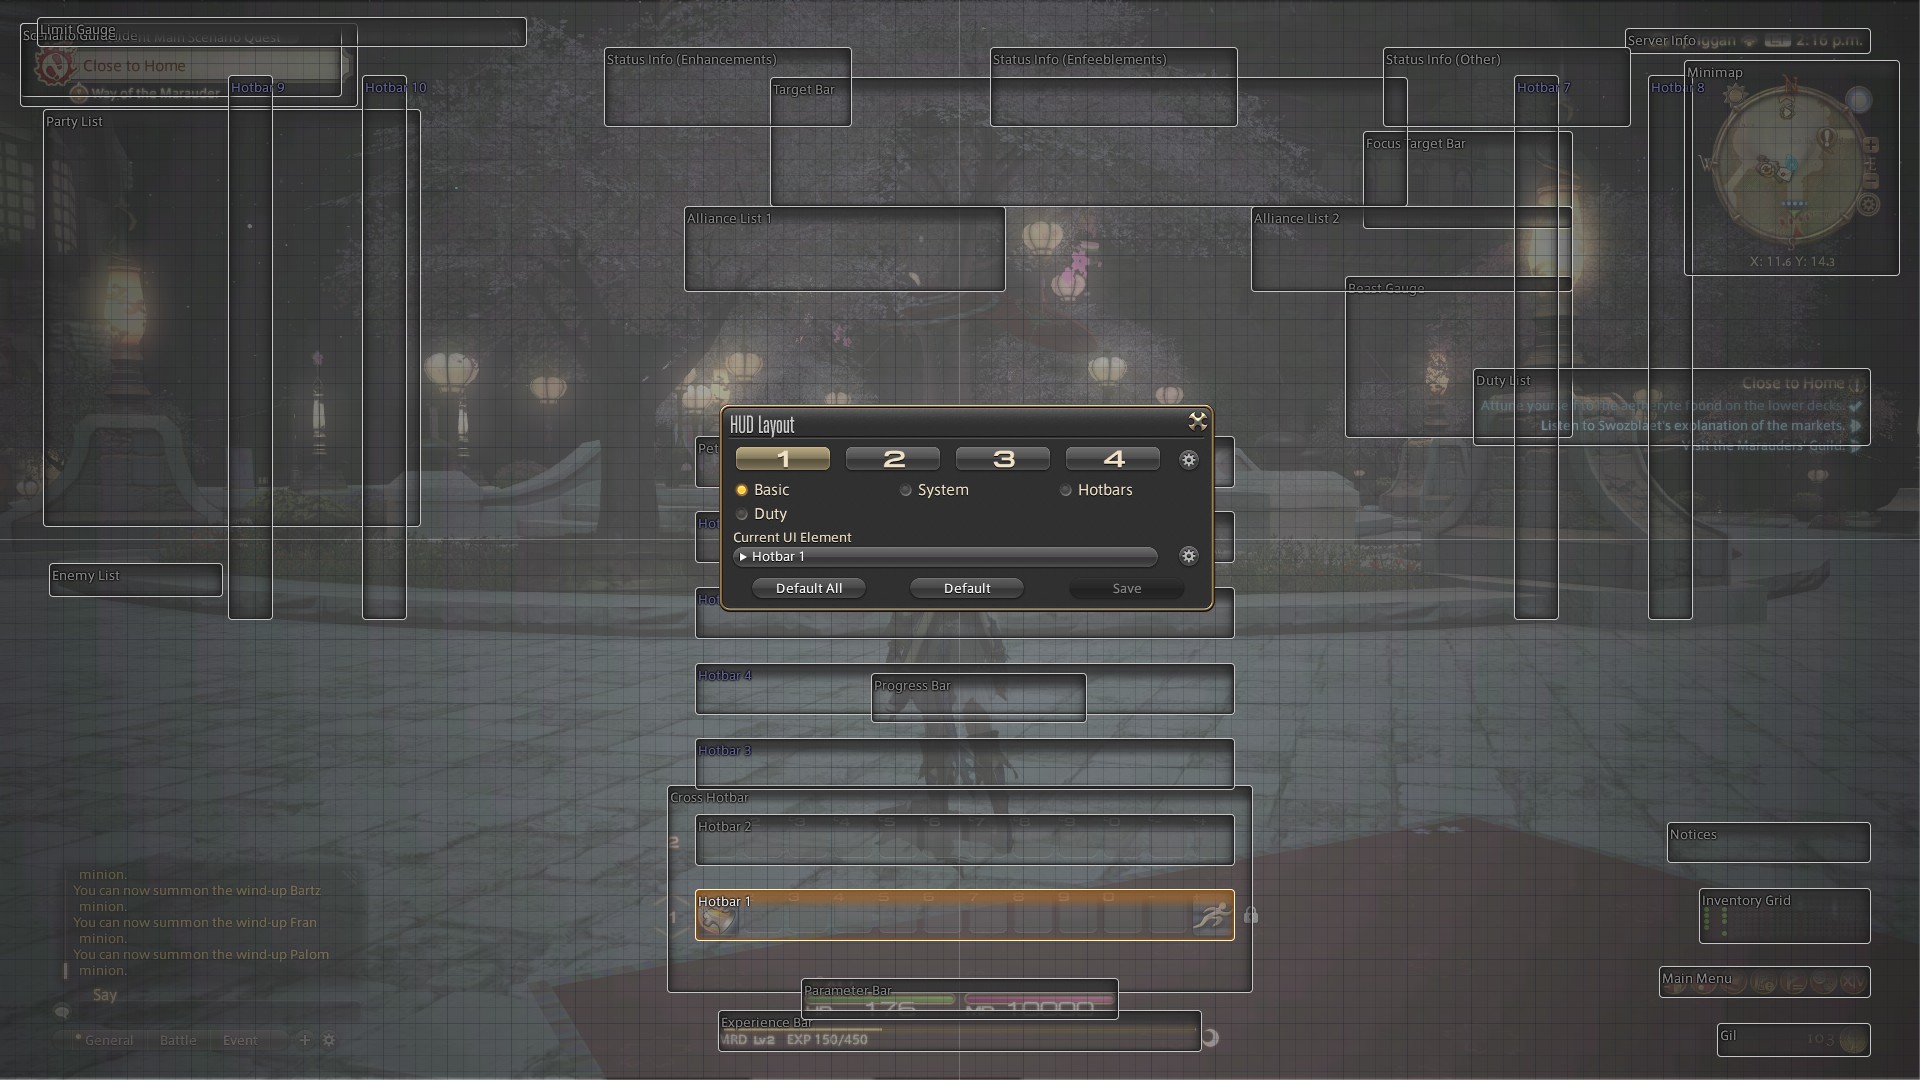
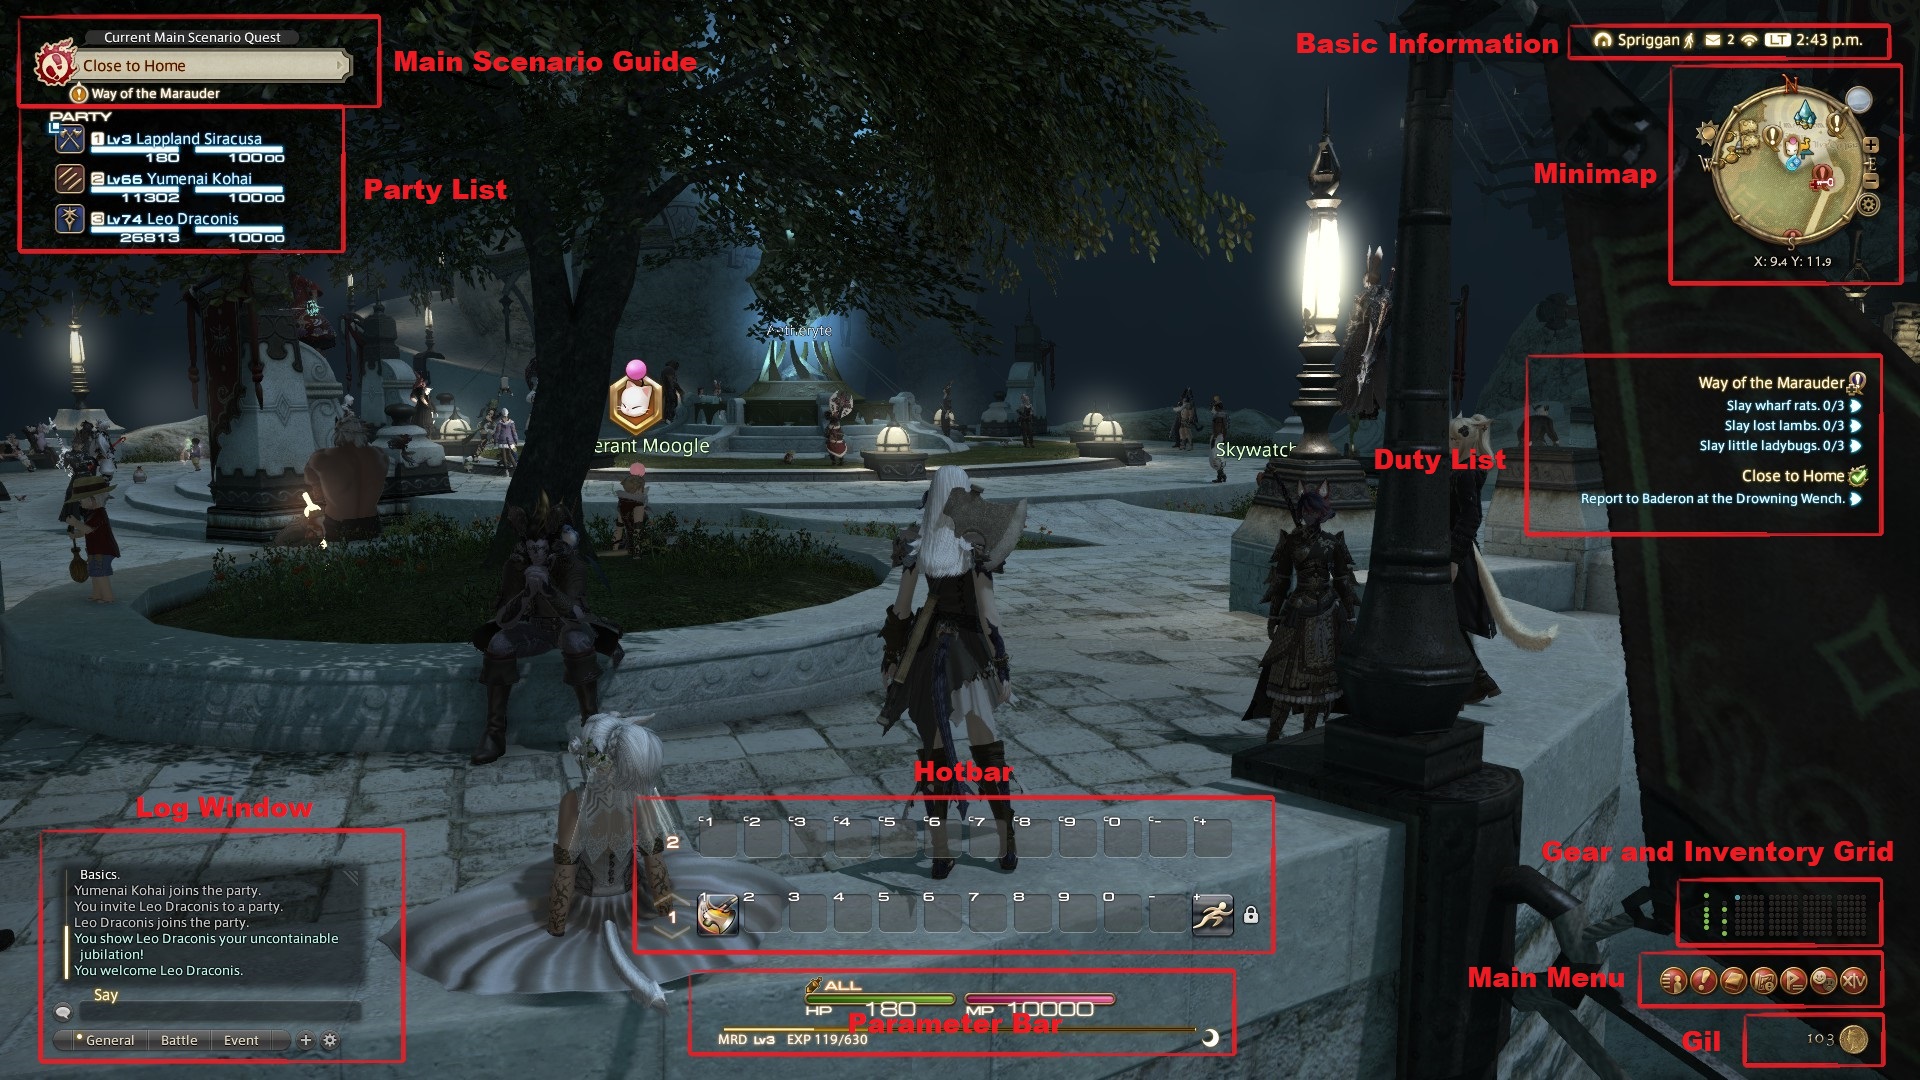
HUD / UIThe HUD can be completely dismantled/ moved/ reduced/ enlarged and can also be hidden as you like.
If you are bothered by too much information such as the time, EXP and inventory, you can hide it by simply right-clicking, for example.
All actions are listed under Main Menu.
Adapt your HUD to your playing style as early as possible. You will most likely have to readjust your HUD a few times to accommodate additional actions, functions or changed priorities.Basic HUD structure:
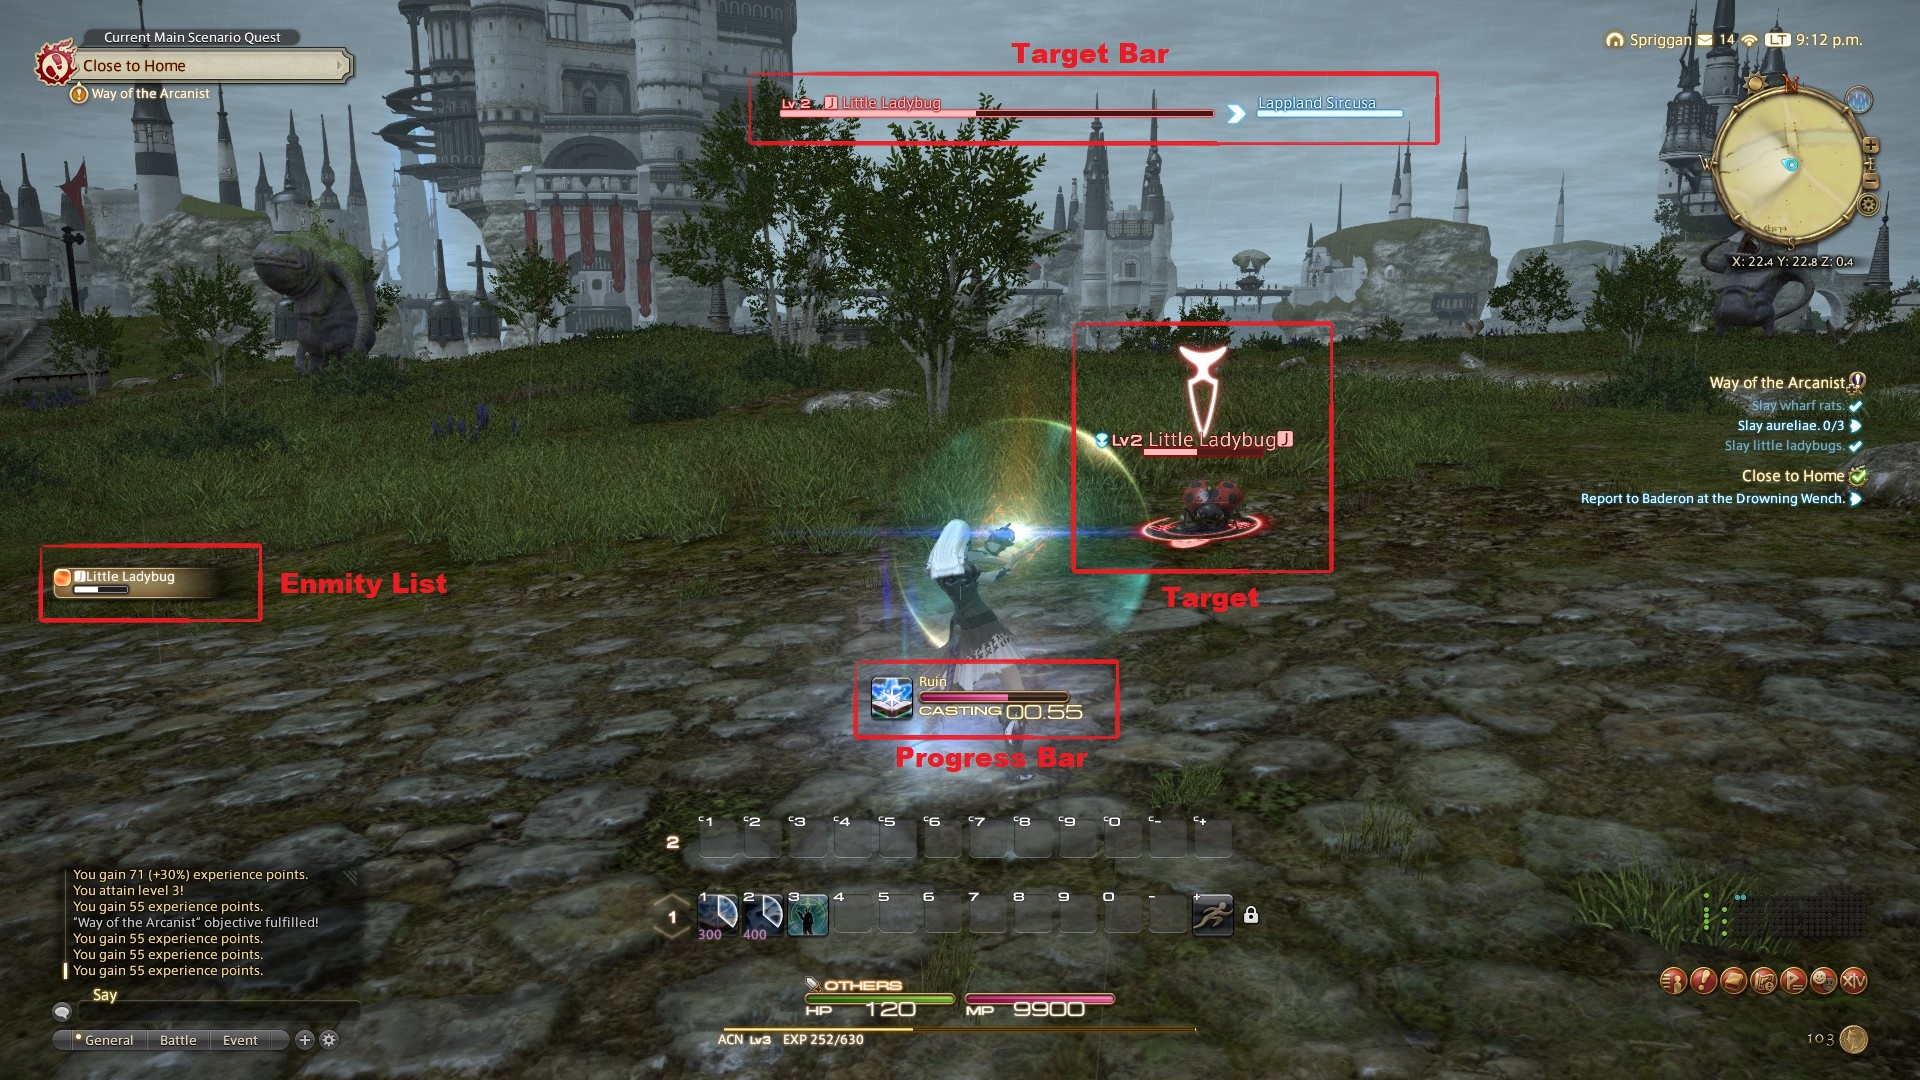
Additional HUD information in combat:
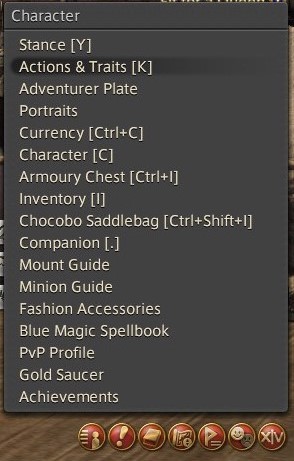
Drag & DropEach individual icon can be dragged onto your hotbar as a shortcut using drag & drop. Almost every action is available. From calling mounts, executing emotes, setting alarms to opening HUD settings and logging out of the game, everything is included. This function leaves complete freedom for a personalized HUD.
Skills and actions are listed at Actions and Traits.
To be able to take an icon out of the hotbar, there is a small lock next to the hotbar 1.
With a click on the lock, these can now be removed or moved from the hotbar using drag & drop.
05 Matchmaking
 Duty FinderParty Finder
In Eorzea you are given the opportunity to play most of the story-relevant gameplay solo or with NPCs. However, you will still encounter many trials and raids that you have to complete with other players.
NPC matchmakingDuty Support
ARR - XX
Available from the first dungeon. All dungeons that are unlocked via the main scenario are available for duty support.
Duty Support NPCs are adjusted to the level of the instance.
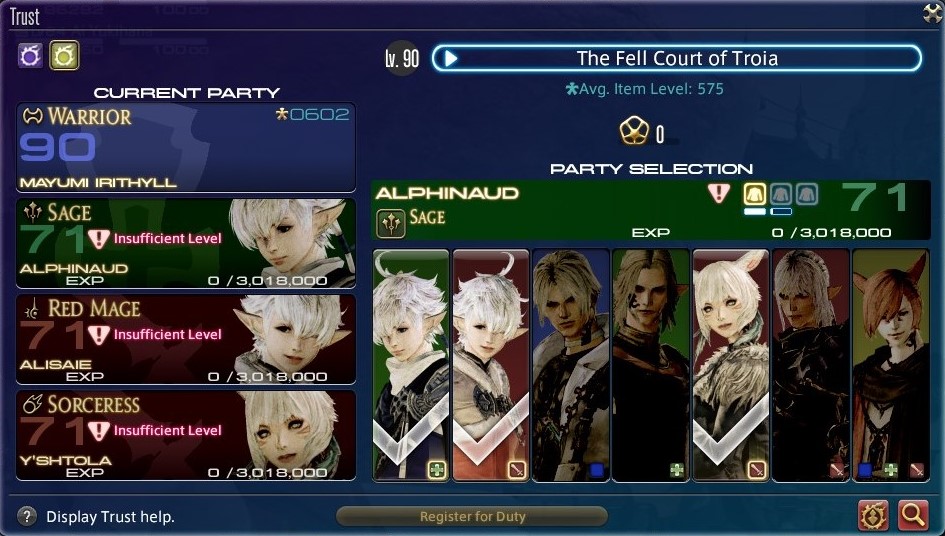
Trust
Shadowbringers - XX
The trust system is identical to duty support, but can only be used from the Shadowbringers expansion onwards.
Starting from level 71, the NPCs must be leveled up in order to be able to accompany you in future dungeons.
You can only enter instances that have already been explored.
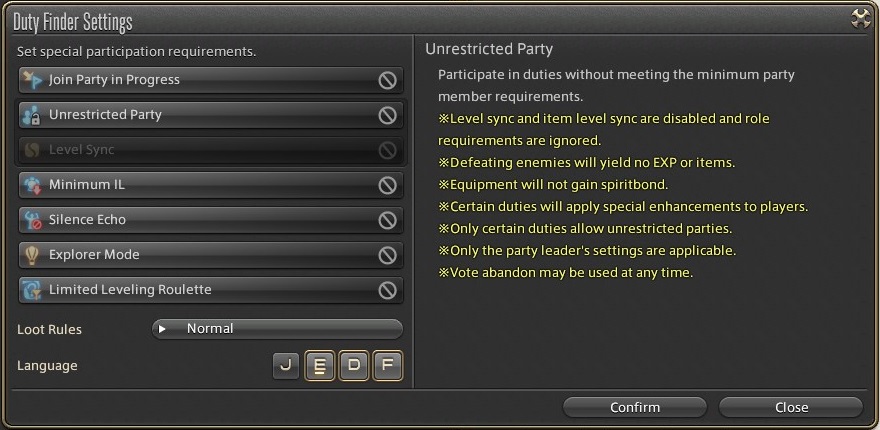
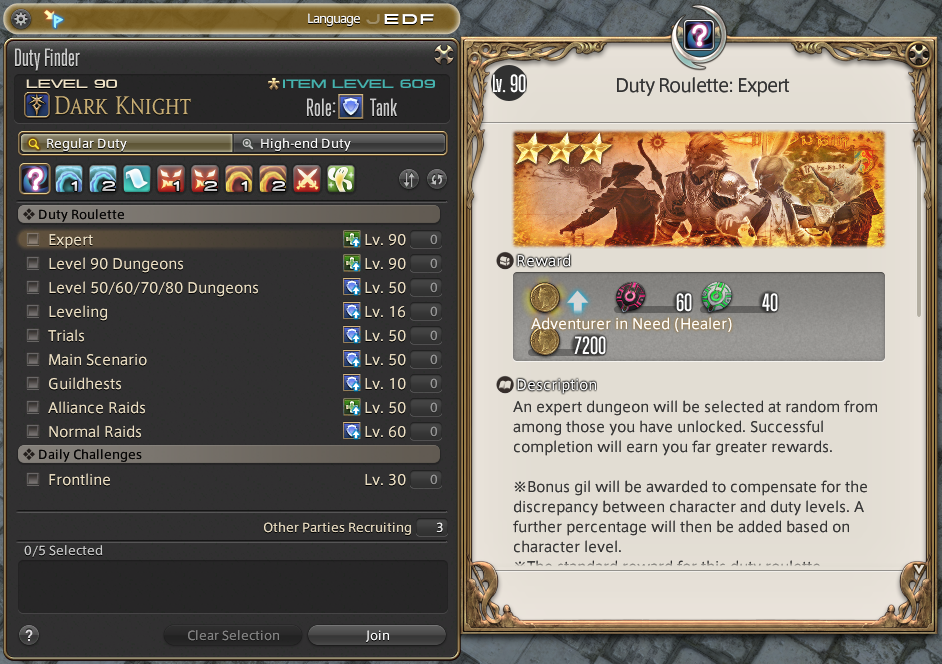
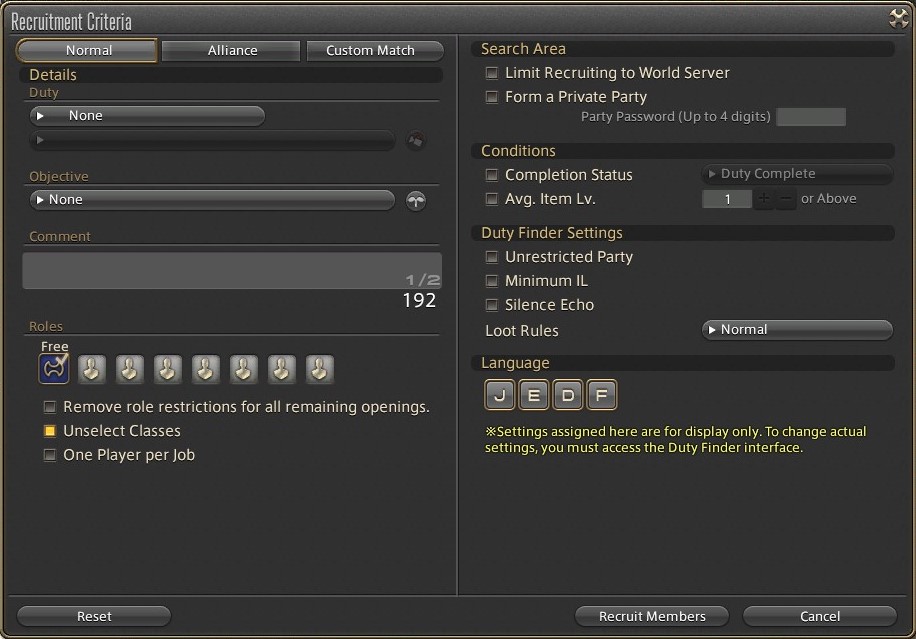
Multiplayer matchmakingThe or can be used for multiplayer.
The is the game's automatic matchmaking system that finds you players in your data center with all the associated worlds of the selected language.
Further settings of the can be found at the top left (marked with a gear).
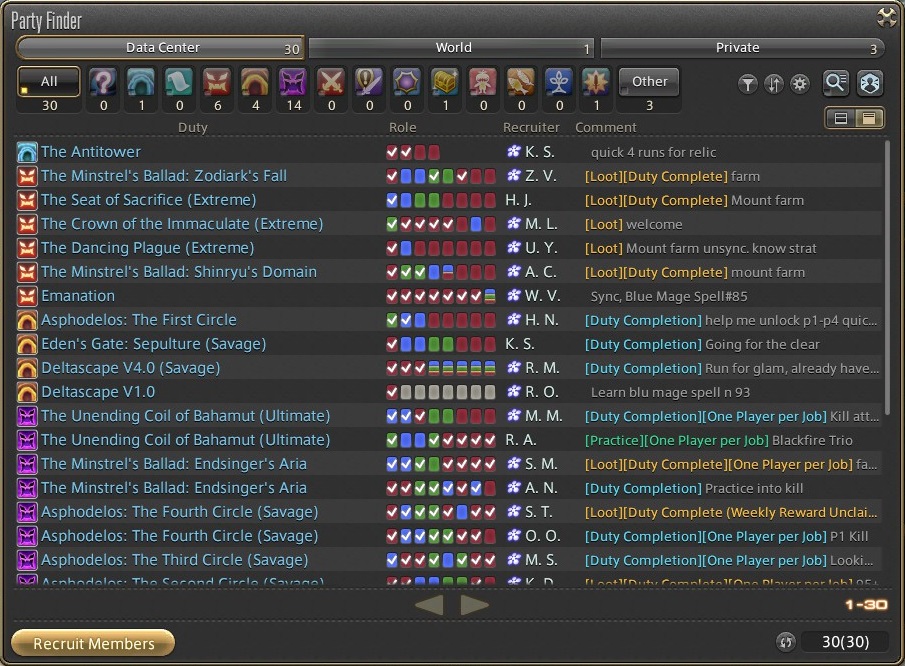
The represents the manual option.
Players must actively participate in a desired group.
Additional settings can be made using the , such as a specified item level, job classes, languages used and more.
Dungeons and Trials are usually found and completed via the . Demanding content such as Extreme and Savage versions of instances are generally searched for via the .
06 Gear
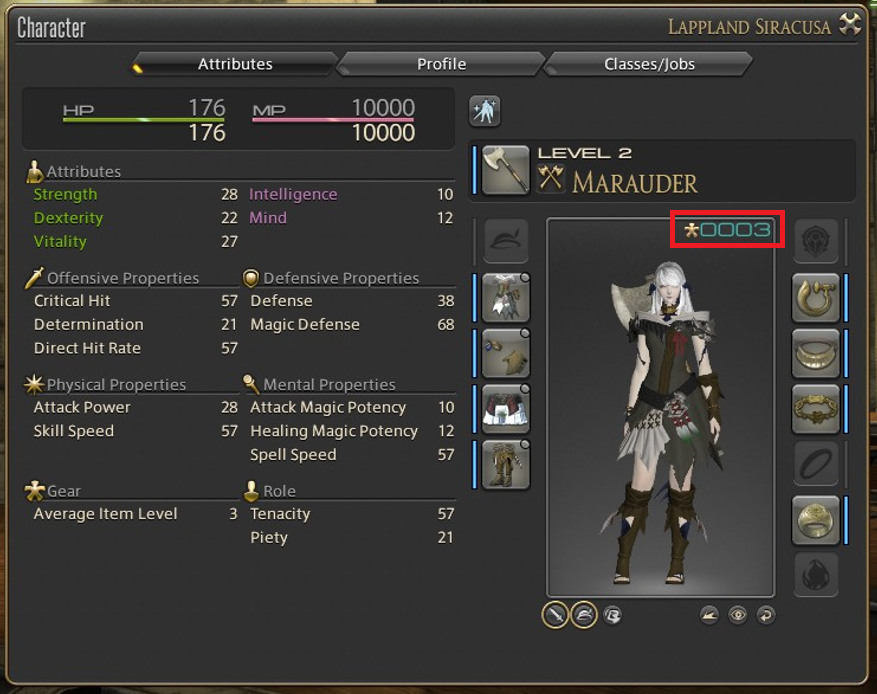
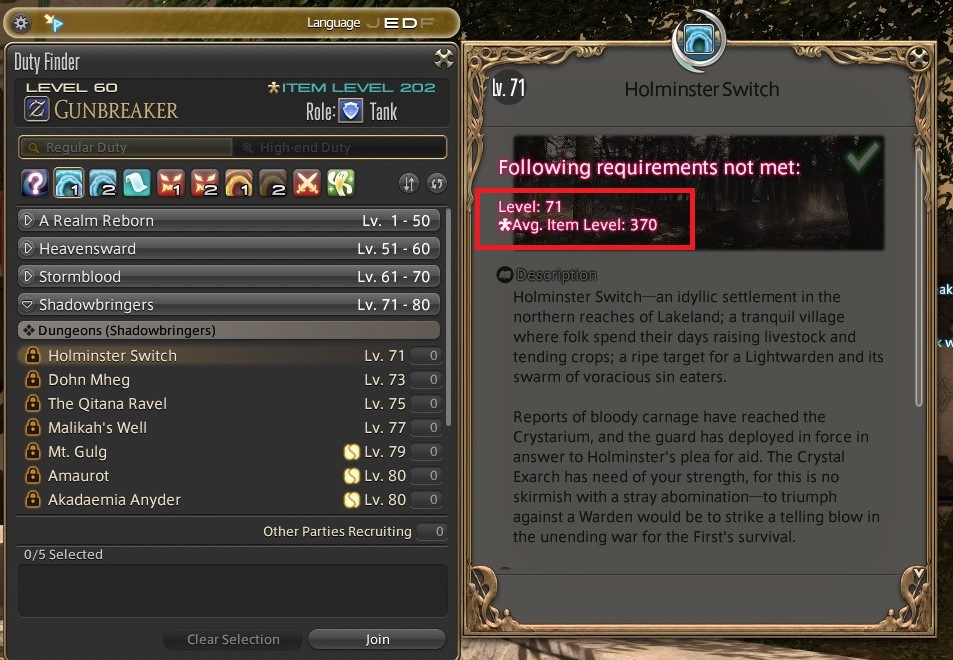
Instances depend on your Character level and Item-level. Instances below level 50 ignore the item level.
If you open your character menu, your average item level will be there.
The character level and job class indicate whether you can equip a certain gear or not. As long as the specified Level remains the same or below your character level, you can create them.
The small colored bars shown next to the gear show the current durability status of the item. If the bar is blue, the state is >/=100%.
As your equipment wears out, the blue bar changes to green at 99%.
When the durability reaches 0%, the color changes to red. The respective equipment becomes unusable and loses its attributes. Equipment can be repaired independently as a crafter or by an NPC.
The equipment can also drop to 0% within an instance, so pay attention to its durability regularly.
Instances and quests constantly require a higher character and item level.
Therefore, keep your equipment up to date, which you can purchase for Gil from the market board and dealers or find within dungeons.
Basic upgrade order: Weapon > Chest / Pants > Helmet / Gloves / Shoes > Jewelry
Allagan Tomestones
07 Looting Und Items
 WhiteUntradablePink/ AetherialGreenUniqueUntradableBlueUniqueUntradableViolet/ RelictUniqueUntradable
LootingMob Looting
Dropped items from slain mobs are automatically added to your inventory.
Instance looting
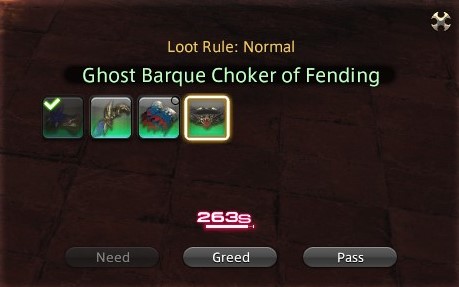
Mobs usually don't have any drops within dungeons. For example, there are boxes distributed in dungeons that contain the loot, which is divided by rolling the dice.
Before a timer expires, each player has the chance to choose between need, greed and pass. If the loot timer expires or everyone has rolled the dice for the items, the loot is distributed.
Need - Need always has priority over Greed. Only applicable if the loot can be used for your current job class. [1 - 99]
Greed - Anyone can choose greed. [1 - 99]
Pass - Anyone can select pass. [0]ItemsGear differs in its color and with its upcoming tags.
All other items such as furniture, potions, fish, materials etc. are usually white.
Can be found in dungeons, obtained as a reward after completing a quest, bought from NPCs or made yourself via a crafter.
- Becomes when used.
Equivalent to /Gray Items, these can be found within a dungeon or in levequests.
Pink items can increase random and additional specific attributes of the item. Two items with the same name can therefore have different attributes.
- Can be exchanged for GC Seals in Grand Company.
- Spiritbound progress has been heard.
Can usually be found as Dungeon loot, but rewards can also be obtained as a quest or bought from special NPC dealers like in the Grand Company.
- Mostly and .
- Can be exchanged for GC Seals.
Can be obtained through job quests, achievements, dungeons, tomestones and raids, some can also be crafted with a crafter.
- Mostly and .
- Can be exchanged for GC Seals.
This is a special equipment that is limited to weapons only.
The only exception is the wedding ring.
- Always and .
08 Basic Game Mechanics


The first time you get into a conflict, your auto-attack will be activated. That's only a tiny fraction of the damage you deal compared to your skills.
Enemies also have an auto-attack that cannot be dodged.
SnapshotsA snapshot saves your current status and position.
This is always created immediately before an attack is carried out. This will determine whether you have played the mechanic correctly.
These mechanics are based on either an animation or the casting of an ability.
If you stand in an area marked by the opponent in color (Telegraph) before the attack is cast to the end, you will receive the corresponding damage/debuff in the following animation.
Once an opponent begins casting or animating an attack, their Enmity is locked against the target.
If a player is targeted by an attack, there is no way to change the attack target.
Snapshots for players:
Players also create snapshots using their skills. Spells with a cast time, creating a snapshot at the end of the cast.
For instant casts or any Melee GCD, the snapshot is created when you press the skill.
What this means for you is that if your opponent moves out of your range before you have finished casting the skill, it will be canceled.
If the enemy moves away after you have pressed a Melee GCD, your damage will still be dealt, even if the animation has not yet ended.
GCDGCD stands for Global Cooldown.
These are all skills that are tied to a ~2.5 second timer.
If such a skill is used, all other skills will also be set to 0 with a ~2.5 second cooldown.
All other skills that take longer are oGCDs. These can and should be used between GCDs. This reduces the time in which you do not deal any further damage or healing.
ClippingoGCDs are usually tied to animations that take a little longer than those of GCDs. In order to use skills as efficiently as possible, oCGDs are usually executed between GCDs. Keyword Weaving.
If too many skills are executed within ~2.5 seconds, the animations cannot be ended in time and so-called clipping occurs.
Limit BreakThe Limit break is synchronized with every player in an instance.
If a party member uses the limit break, it is also used up for everyone else.
If your party consists of at least four players, you will see the Limit break gauge, which slowly fills up as the battle progresses.
If the first gauge is filled, it briefly flashes orange and LB1 can be executed.
The more bars are filled, the stronger/effective the limit break becomes.
The limit break is linked to the job class that executes it.
Tanks perform defensive limit breaks,
Healer, healing limit breaks
and dps offensive limit breaks.
The limit break mostly belongs to the dps in order to be able to complete a content faster. However, it is usually saved for the healer until the last boss of the instance in order to compensate for a misplayed mechanic in an emergency and to revive the party.
Depending on the situation, the LB is used when the enemy groups are too large to protect the party from dying.
Magical dps and Ranged dps have an AoE as Limit break which is particularly suitable for masses of opponents.
If the final boss of a content has 10% of his life left, melee dps are free to use their Limit Break.
A few instances require a Tank Limit Break to complete the content.
Limit breaks are a separate damage type that cannot accept any further effects such as critical or direct hit. The Limit break varies randomly by ±5% in strength/effectiveness. They are also not affected by buffs or debuffs in any form that only affect the player.
EffectsEvery unit, regardless of whether it is a player, boss or other opponents and NPCs, has an internal timer called server tick/ actor tick.
If a unit receives a status effect such as Poison or Regeneration, the corresponding effect takes effect every three seconds.
For example, use regeneration on a party member at a ''50 potency'' for 30 seconds. The healing is delivered every three seconds with a ''50 potency'', ten times within the 30 seconds. (500 potency)
09 Distribution Of Roles


TanksAs a tank, you are the group's shield, you absorb the damage from your enemies so that the other party members can concentrate as best as possible on dealing out damage or healing you.
Enmity is an enemy mechanic for targeting and attacking players.
Players permanently increase their enmity by dealing damage, healing and applying status effects during the conflict.
With your class-specific action as a tank, you massively increase the enmity generation and are therefore the opponent's prioritized target.
If there are two tanks in a party, both activate their tank stance and change their enmity with Provoke or Shirk.
With the enemy's enmity, the tank determines the direction and position of the opponent and thus the responsibility for successfully contesting the instance.
The tank decides how many enemies will be caught at the same time and must take their damage.
Each focused opponent indicates in your party list how high the enemy is towards the player.
A - 2-3-4-5-6-7-8
HealerAs a healer, it is your job, along with the tank, to keep the party alive. You block incoming or heal taken damage by your party members, revive them, remove debuffs and deal damage.
As long as no member is dependent on shield or healing, dealing damage will help you avoid future incoming attacks.
You decide how much damage the party can take in the meantime without dying. Healers can therefore pull additional enemies as needed.
If a member suffers from a debuff, it can only be removed with esuna as soon as it has a timer.
Damage DealerAs a damage dealer/ DPS it is your job to deal as much damage as possible. The more efficiently you distribute damage, the faster content can be completed.
If bosses trigger certain mechanics or instances require the activation of switches, it is usually the attackers' job to complete them.
Damage dealer are divided into physical and magical dps, most of which have job/class actions that can increase the damage dealt in the party.
Melee dps must stand close to opponents in order to deal damage to them. Combos are usually tied to positionals such as rear and flank as described in the actions. Instant cast
Ranged dps are proc-based and thus trigger effects or cause critical damage. Instant cast
As Magical dps, casts are canceled when moving, therefore deal a little more damage and usually have the ability to revive.
_______________________
10 City
Major Cities
 Pos 1:Pos 2:

Cities are special safe zones in which you cannot get into conflicts outside of quests.
Each expansion adds one Major and Minor City. A network of small Aetherytes ensures fast movement in cities.
Capital Cities Limsa Lominsa, Gridania, and Ul'dah are the three capitals that belong to the , but due to the unlockable ones Classes and their special Aetheryte, are much more relevant than others and are therefore separated from the other cities. A variety of systems and features can be unlocked in major cities, such as Reatiner, The Hunt, Glamor System, PvP, etc.
Market boards can be found in every major city. Minor cities Minor cities do not have market boards, but they do have traders with whom you can get the endgame gear of the respective expansion. Special areas Some zones are similar to cities, but serve as a hub for certain game modes or features.
NPC-traderNPC traders are usually found in cities, but can also be found in open areas.
Standard trader Standard traders sell more basic items, from armor, weapons, food, potions and more. Gild trader Guild traders sell ingredients and goods that are specialized for the guild they belong to. A Gourmet sells ingredients, a Blacksmith sells ores, etc. These traders are usually located in the location where the respective guild is based. Event trader Event traders sell what each event has to offer. The corresponding dealers are located in each Capital City for the respective events.
Some items may only be sold once you have completed a quest or reached a certain rank in a Beast tribe.
MarketboardMarket boards can be found in capitals and residential districts, which allow you to purchase all items that are buyable and negotiable for the Gil price specified by the players.
The items available on your world are listed by level or alphabetically.
The cheapest items are displayed per piece at the top. (Taxes are not included in the market price.) 5x Item x 10,000 Gil = 50,000 Gil 1x Item x 30,000 Gil = 30,000 Gil
RetainerRetainers are your warehouse and your bank. Items, crystals and gil can be loaded and unloaded at any time.
With two retainers that you can employ, you get 350 item slots.
If a retainer is hired, he can be designed completely freely with his own character creation and can also assign a personality.
You can now call your retainers with a bell, which is usually located near a market board.
Instead of just storing items, you can also use the retainer to sell your items on the market board.
If a player buys an item from your retainer, the gil will first end up with the retainer until you pick it up.
The sale of items will stop as long as you interact with your retainer.
Ventures
Employee retainers can be sent on expeditions in exchange for a venture to collect items and gain EXP. Retainers who are trained to become a DoL or DoW cannot reach a higher level with the corresponding class than you are.
For example, if you are a level 21 miner, your retainer will only be able to level up to a maximum of 21.
If you change the class of your retainer, your progress will be deleted. The class is reset to lvl 0.
Grand CompanyDuring the course of the game you have to decide on one of the three state societies: The Maelstrom (Limsa Lominsa), The Order of the Twin Adder (New Gridania) and The Immortal Flames (Ul`dah) are available.
Once you have chosen a company, FATE and some Duty roulette completions will be rewarded with Company seals.
Company seals can be exchanged with the Quartermaster for weapons, armor, crafting materials and ventures. Each Free Company has its own weapon and armor style.
A rank system ensures that new items, equipment and features are unlocked. In order to unlock the highest rank of your Grand Company, you are dependent on leveling up the Adventurer Squadrons.
Adventurer Squadrons
As a player, you can hire this NPC in your active Grand Company.
Once you have hired and trained enough squadrons, they can be sent on missions for XP and certain items.
If your squadrons are leveled high enough, so-called Flagged Missions can be run and completed, which unlock further missions.
Expert Delivery Missions
Equipment items obtained from Dungeons, Trials and Tombstone dealers can be exchanged for company seals via the Personnel officer.
If you change your grand company, your rank will be saved and a 15 day timer will block you from changing again. The squadrons will be taken over as soon as the feature has been activated in the new grand company. Company seals are not taken over, but remain in effect. You cannot wear any gear from a grand company that you are not affiliated with. The first change is free, each change after that will cost you 50,000 Gil. By saving your ranks, all grand companies can be upgraded to the highest rank.
11 Free Company

Free companies are basically the same as guilds in other MMOs.
You can give World buffs to each member, purchase an FC property, and use your own chat channel, which is available to you across worlds.
Free companies often recruit via the /shout or /yell channel in capital cities. You can find out more about existing free companies via Lodestone[na.finalfantasyxiv.com] . An in-game search for free companies is not available.
Free Company entitlements
Members can promote their free company by being active.
The amount of XP required to advance a rank varies depending on the number of members. The higher the FC rank, the more advantages can be unlocked for the FC, such as: using and expanding the Company Chest, activating World buffs and acquiring an FC property.
Unlimited activity counts: Fighting monsters, mining resources, producing items in HQ, completing Guildleves, Grand Company leaves, hiring new members in the FC, completing supply and provisioning missions as well as treasure hunts. These activities generate additional Free Company Credits and can be used to purchase items or activate world buffs.
More Free company features
Free Company Crafting Allows you to craft Aetherial Wheels, Exterior Walls, and Company Airships for your Free Company. Free company Airships and Subaquatic voyages These expeditions work like Retainer Ventures, on a larger scale and bring you exclusive and rare items. Aetherial Wheels Allows you to use world buffs without spending company credits. Retainer dispatchment A permit is required to install a retainer on your property. These are available from ''Independent sutler'' in every residential area.
Depending on the size of your property, one, two or three retainers can be set up.
Once you have placed a retainer, your retainer will offer its items for sale. Free company actions Rank 1 and 2 Actions (World-buffs) can be paid for with Company Credits or exchanged via the Aetherial Wheel. All FC world buffs are active for 24 hours.
12 Travel & Rest


Moving from A to B can be shortened using mounts, predetermined routes and aetherites to save you time.
Routes
If you activate a Chocobo Stop in two different locations in the same area, you can travel from one stop to the next.
Ferry docks and airships are located in open areas as well as in your cities and can take you to the next location for an amount of Gil.
Using jetties is usually significantly cheaper than using an Aetheryte.
MountsChocobo Rental
As long as you don't have your own mount yet, you can rent a Chocobo in main cities for a small amount of Gil.
After you have decided on one of the three grand companies, you can now accept the quest for your own Chocobo. By completing this quest you will receive a whistle to call your first mount.
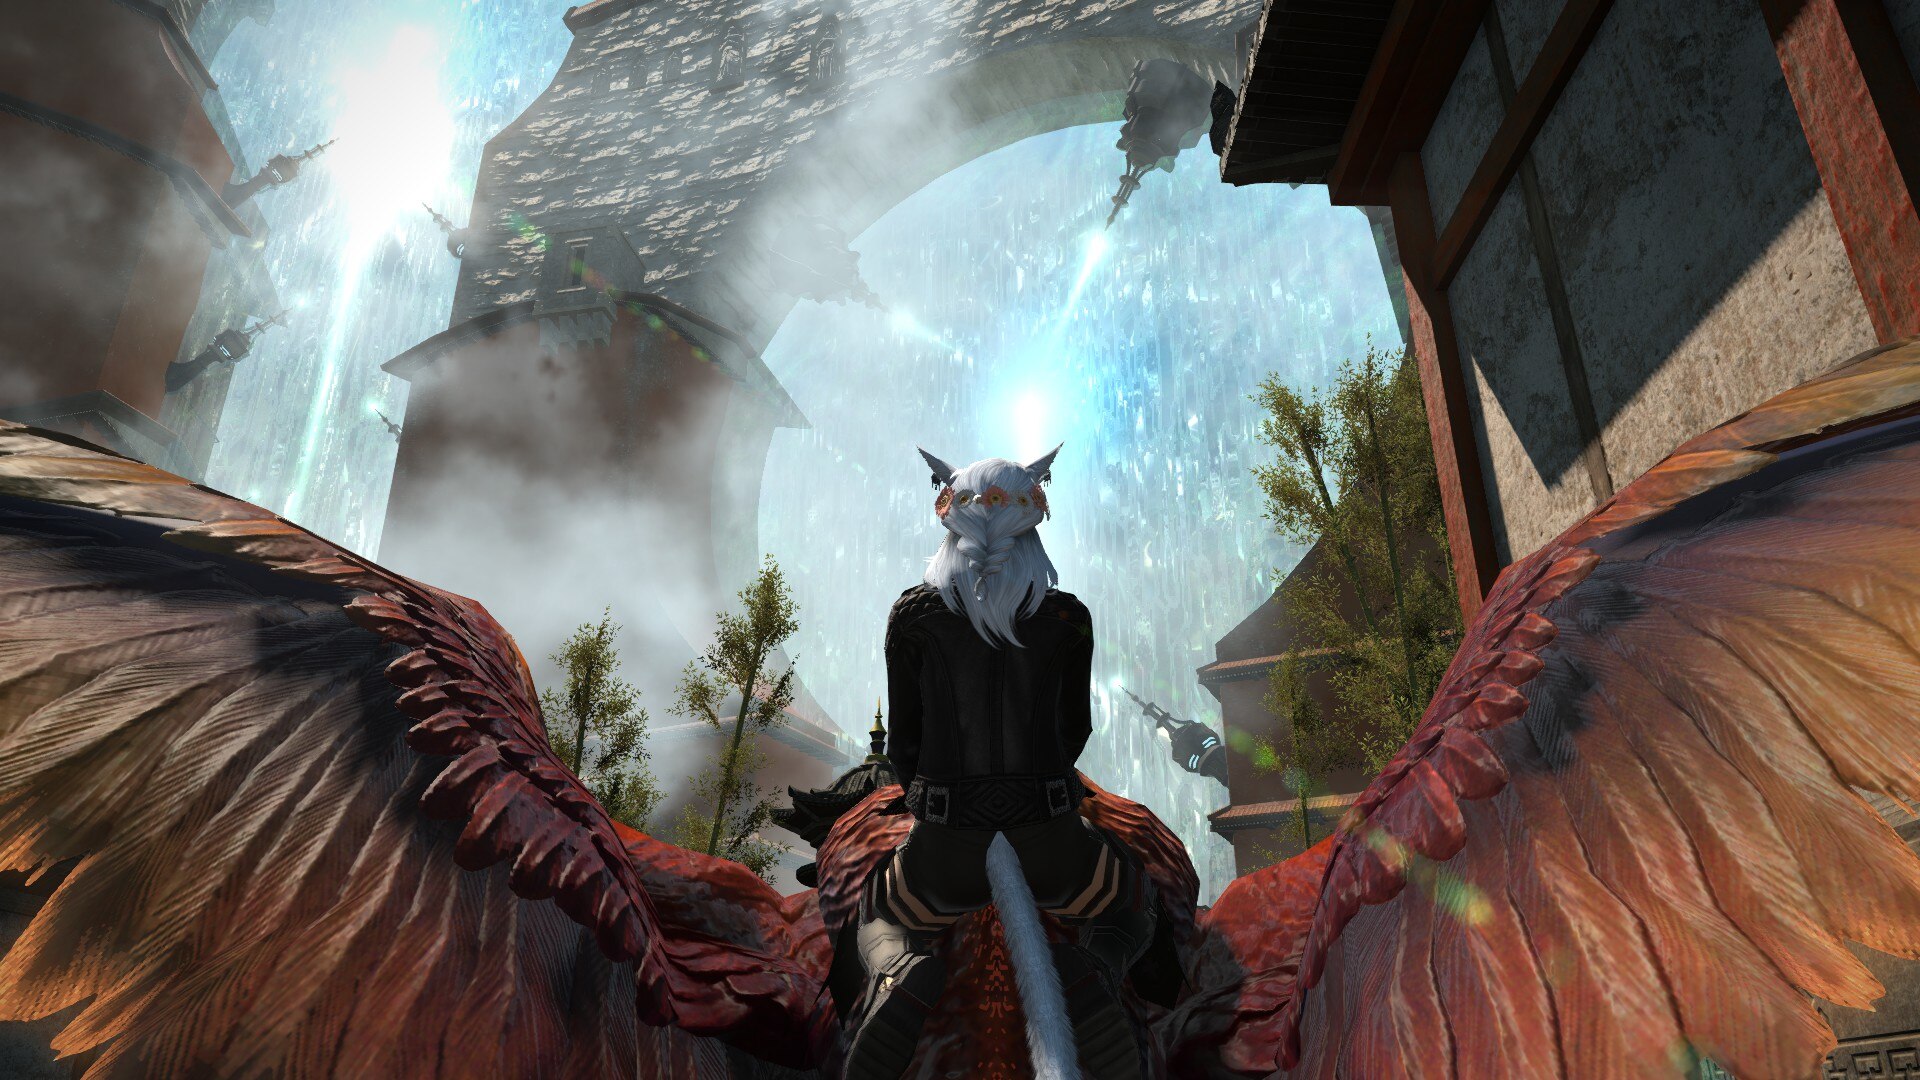
You will be able to fly with your mount after completing ARR.
With the help of an aether compass and completing certain quests, from the first expansion onwards, aether currents can now be found in open areas.
Once you have found all aether currents or completed them via quests, you can now also fly in the respective area.
AetheryteAetherytes are commonly found in cities and settlements. It is the fastest way to get from A to B. To do this, the Aetheryte you want to visit must have already been harmonized by interacting with you.
Depending on how far away the Aetheryte is, the teleport will cost you more.
Favorites
If you access an Aetheryte, you have the opportunity to favorite a small number of Aethers, which saves you some of the teleportation costs.
If you have activated your two-level authentication (2FA), you will receive an additional favorite point that saves you 100% of the costs.
City Aetheryte
In addition to the Main-aetheryte, there are several smaller Aetherytes in every city that allow you to move quickly within the city.
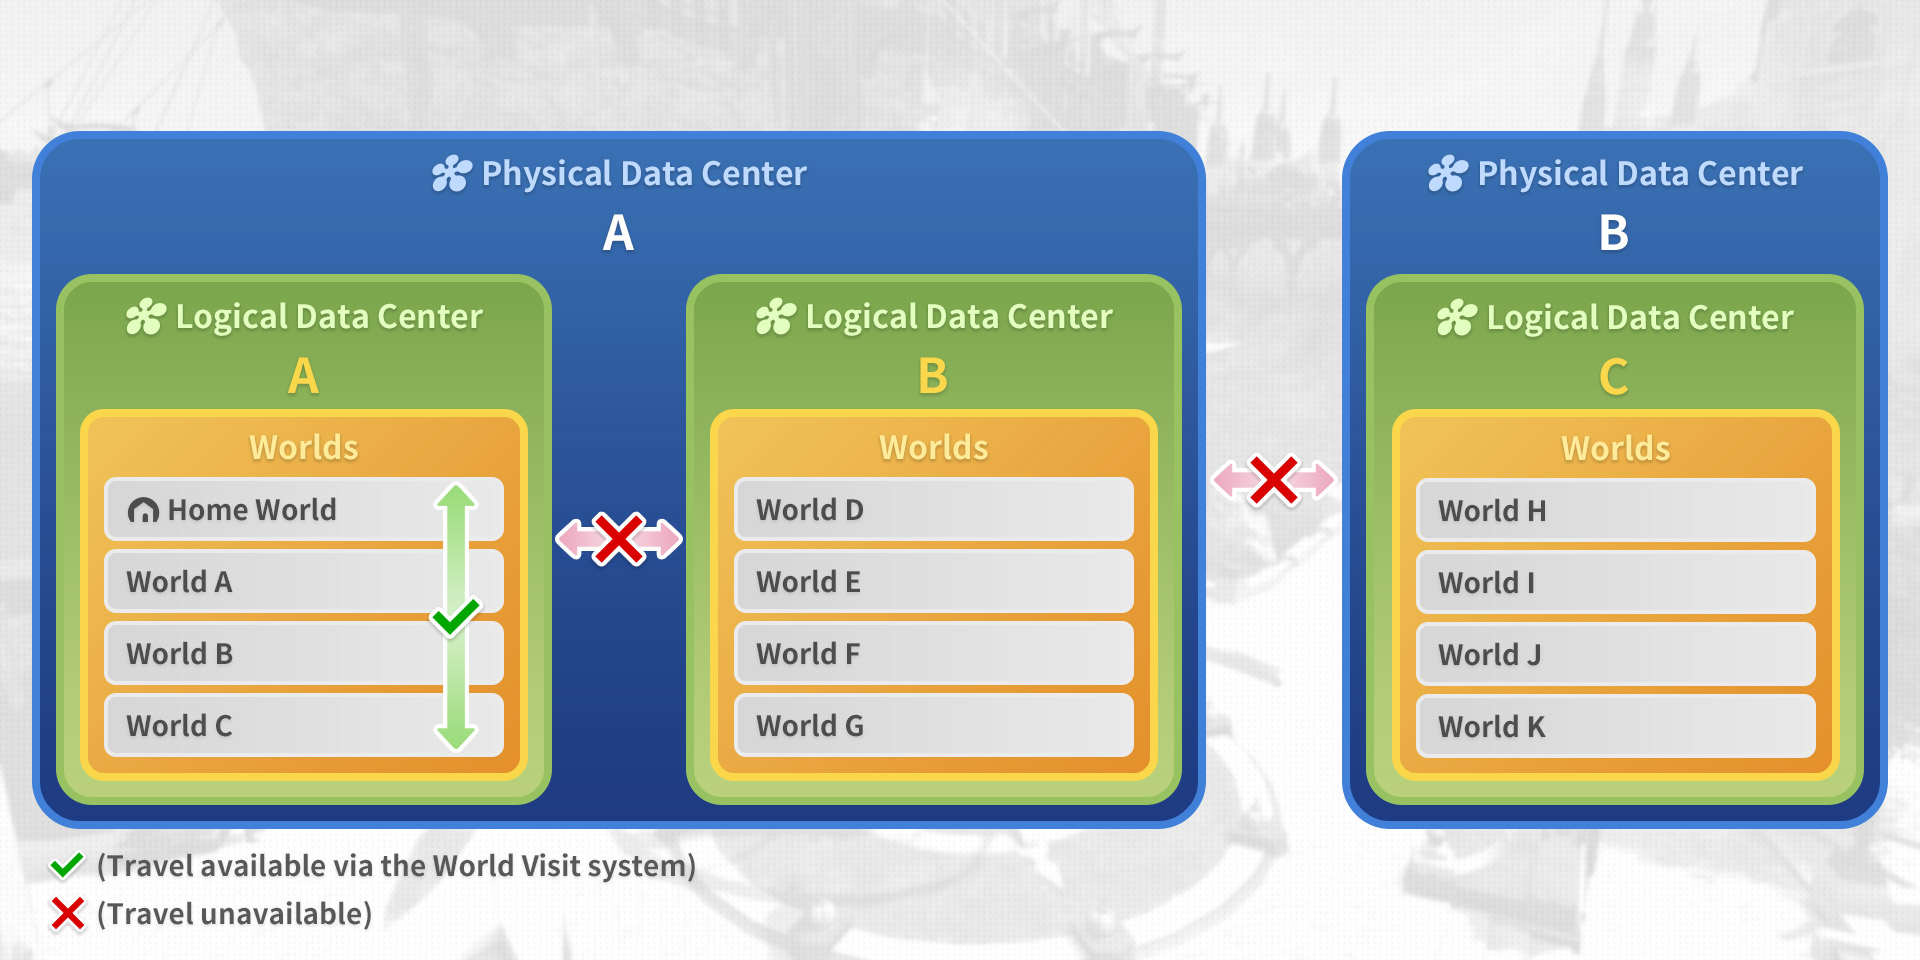
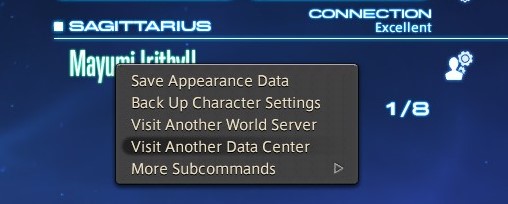
World Visit
At each central aetheryte in one of the three capitals you are able to travel between worlds within your Logical data center.
If you visit another world, you can only use certain functions and features to a limited extent or not at all.
Data center travel
Allows you to travel between the data centers within your Physical data center via the character menu.
This means that you can travel within Europe between Chaos and Light, but not to other networks such as Japan, America, etc.
RestWhen you log out, an EXP bonus builds up within a safe environment. This includes
Cities, villages and settlements with an Aetheryte can be identified by a crescent moon next to your EXP bar.
Depending on how long you are away, you will receive a correspondingly large bonus to EXP, which turns the bar blue.
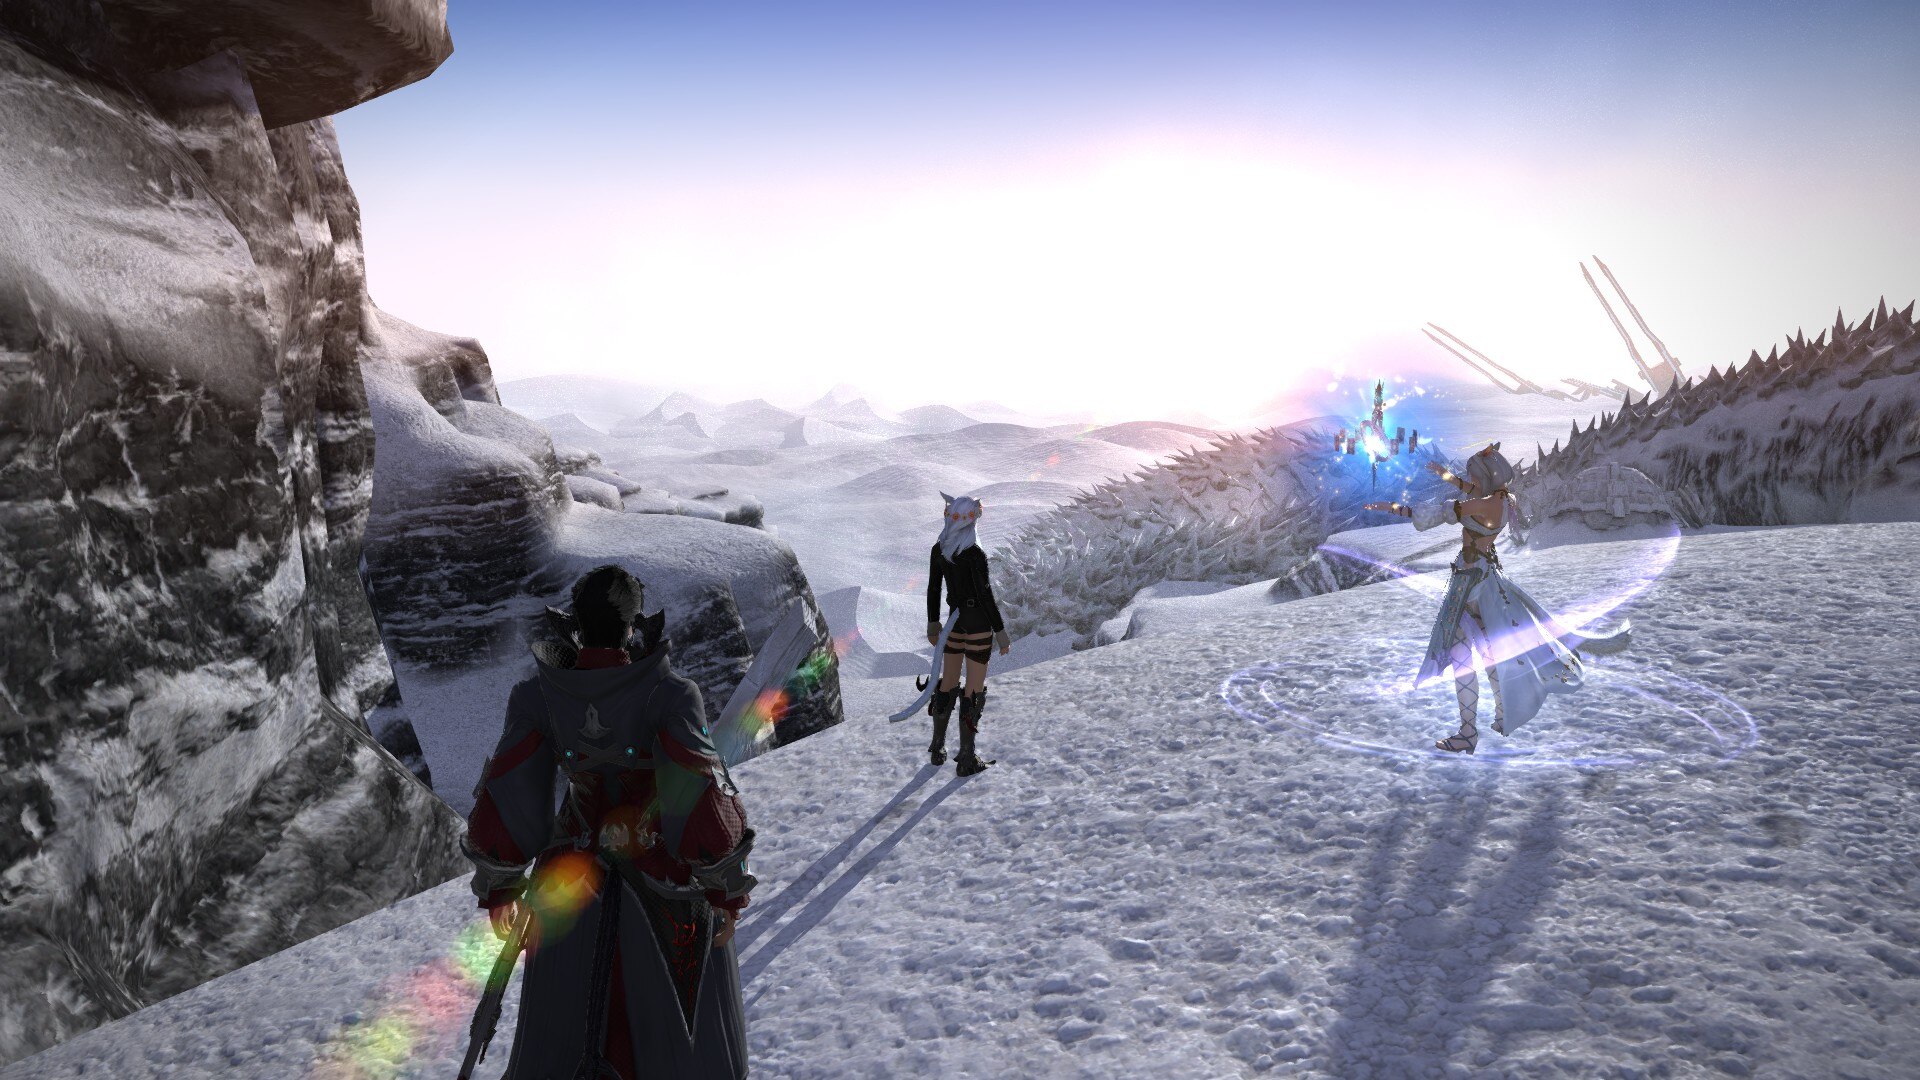
DivingWithin the Stormblood expansion you learn the ability to dive in deep waters, which you can recognize by the green-brown color.
[CTRL] + [Space]
_______________________
13 Table Of Content Ⅰ.


With each expansion, Eorzea has grown and added new content. In order to unlock as much content as possible, you need to make as much progress as possible in your main story.
In general, Eorzea gives you a lot of freedom so that you can concentrate as best as possible on the story without the need of grinding.
Hunting LogThe Hunting Log is available to you for every starter class. If you defeat the specified marked opponents, you will be given a small additional amount of EXP as a reward at the end.
A few enemy types are also located in dungeons and cannot be found in open areas.
GuildhestsA small series of instances, suitable for preparing you more gently for playing together with party members instead of dungeons and trials.
LevequestsLevequests are divided into two types for DoW/M
If you accept a level quest, it must be activated manually under your quests.
Completing level quests requires so-called Allowance, three of which are renewed every 12 hours. (max. 100)
Battle Levels
The difficulty of the levels can be scaled and also completed in a party.
Completion is rewarded with EXP and Gil.
Grand Company Leves
Mastering the GC levels is only possible solo. When you complete it, the EXP and Gil rewards are significantly smaller, but you are also rewarded with GC Seals.
Temple Leves
Temple leves are exclusively present in Ishgard and Heavensward areas.
Unlike normal leves, here you can accept large-scaled levequests which require ten allowances.
FATEsFATEs can be found in every open area.
With a set timer, the Fates disappear either when the allotted time expires or when the mission is completed.
FATEs are particularly suitable for claiming the remaining EXP that you need to unlock your next instance or if you are in the queue for content.
Can usually be done solo with FATE level equipment.
Shared FATEs
By completing FATEs in certain areas, your completions will be saved.
With each completion you move up a ranking system which offers you different items in the respective area at the Gemstone Trader. Like Riding Maps and Mob Drops.
Rank 1: 1 FATE | Rank 2: 6 FATEs | Rank 3: 60 FATEs
DungeonsThe formed party, consisting of you and three other players, navigates through a labyrinth-like dungeon and defeats opponents, mostly solves small puzzles, fights some mini-bosses and completes the content by defeating the final boss.
Dungeon completions contribute a large portion of your level advancement.
When you enter a new dungeon for the first time, you and every party member also receive an EXP bonus.
unlimited loot, unlimited completion, a job specific loot at the end of the dungeon (no weapon)
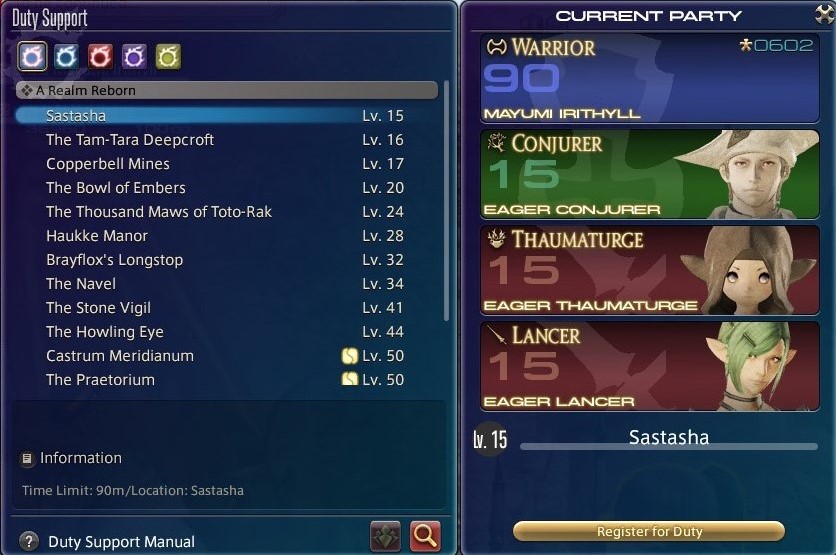
Duty Support
In order not to have to rely on matchmaking, the duty support offers you NPCs who will join you in the corresponding dungeon.
All dungeons that are unlocked via the main scenario are available for duty support.
Duty Support NPCs are adjusted to the level of the instance.
Trusts
The Trust System is identical to Duty Support. However, it can only be used from the Shadowbringers expansion onwards.
Starting from level 71, the NPCs must be leveled up in order to be able to accompany you in future dungeons.
You can only enter instances that have already been explored.
-- Table Of Content Ⅱ.


TrialsUnlike dungeons, here the attention of a single boss is put to the test.
Trials
Your available trials are divided into Normal (Light Party) and Hard (Full Party). From Heavensward onwards, this separation is removed and all trials are completed in a full party.
In trials there is usually no item level sync. For you this means that you can complete trials with the best possible gear at the respective level.
Normal and hard trial completions usually do not have any item rewards.
Extreme Trials
Existing trials are upgraded via quest and are significantly more difficult to complete.
Completing it rewards you with a weapon case and rarely with a special crafting material. In addition, extreme trials usually come with a mount, which are also rarely available as a reward. As soon as the trial is replaced by a new one, the drop chance of the mount also increases. From Heavensward onwards, every extreme trial completion is rewarded with 1-2 totems. Which can be exchanged for the corresponding drops.
Unreal Trials
Unreal trails are part of the Faux Hollows feature and are identical to older Extreme trails, but manually adjusted to the current level cap.
In addition, Unreal trials have an item level sync to prevent out-gearing. Usually one Unreal trial is available with every major patch. As soon as the next patch is released, the old Unreal trail will no longer be accessible.
Unreal trials are not directly rewarded with an item. Every week the first and second clears are rewarded with a “telling” and a “retelling” of the Faux Hollows minigame. The resulting Faux Leaf can be exchanged for exclusive mounts, minions and glamour.
Stone, Sky, SeaStone, Sky, Sea offers you a dummy with a set timer for all trials, normal raids and Savage raids. Depending on whether and how quickly you can defeat the dummy in the allotted time, this will give you a rough idea of whether your gear or rotation is sufficient to be able to handle the content in a party.
Stone, Sky, Sea is not available for high-end content such as Unreal trials, Ultimate raids and criterion dungeons.
-- Table Of Content Ⅲ.
Raids*
*A distinction is made here between a normal raid and an alliance raid. Where a Normal raid consists of one full party and Alliance raids consists of three full parties.
Unlike dungeons or trials, current raids have a limit on how much loot you can obtain per week. This limitation will be removed as soon as new major updates are released.
Normal RaidIn Normal raids you fight with seven other players against a single boss, similar to Trials.
Normal raids are divided into four raids per tier, (A1-4) (B1-4) ( C1-4) and therefore have 12 raids per series.
These are released in the patches (x.01, x.2, and x.4) of an expansion and usually do not have item level sync.
Gear tokens form your loot, which is rolled after completing a duty. Every normal raid series and every tier has its own token type (gear, + weapon token). (accessory, head, chest, glove, leg, boot) If the raid tier is current, you can play on one gear tokens per week in every raid of a tier. If the last raid of a tier is successfully completed, each party member is guaranteed a weapon token drop. Depending on which expansion the raid was published in, you can exchange these tokens for gear at a dealer in the corresponding minor city. As soon as the subsequent major update is patched, the number of required gear and weapon tokens from retailers will be halved and the loot limitation for raids 1-3 of a tier will be lifted. The subsequent major patch also solves the limitation of the fourth raid and its weapon token.
Savage Raids
Savage raids are the upgraded version of a normal raid and challenge you with new and more complex mechanics, more HP and higher dps.
The final boss of a tier is usually divided into two phases with a checkpoint.
As soon as you finish a savage raid, all party members will be locked for the entire raid tier until the weekly reset loot, regardless of whether they roll on an item or not. Each completion is rewarded with a Book (token) drop, which can be exchanged for savage gear, weapon creation items or upgrade items. Respective upgrade items can be upgraded to the same item level in conjunction with the associated Tomestone gear as the savage gear from the same raid tier. If the savage raid is the latest in the series, players can obtain one book per week. The number of treasure chests that appear after the clear depends on how many players have already completed the raid in the current week. No player completed: 2 Chests | one to four players: 1 Chest | five or more: 0 Chests
Ultimate Raids
Starting with Stormblood, some raid tiers will be patched with a single Ultimate raid.
Published two weeks after patch (x.11 or x.31).
Wiping at any point restarts the fight. There are usually no checkpoints.
Ultimate raids can be unlocked after completing the last raid of a tier.
Players must have a full party to access the content. Matchmaking is only possible via the Party Finder.
In order to keep the difficulty of the raid difficult even after further patches, there is a strict item level sync. And no way to deactivate it. Thanks to job revisions, older Ultimate raids have more room for misplayed mechanics.
Due to the extremely difficult content, Ultimate Raids are not intended as gear progression. Weapons have the same item level as the original savage raids, but with an additional materia slot and special particle effects where no loot locking is active. Completing it unlocks achievements, exclusive titles and adventure plate designs. If the ultimate raid is new, there is one totem per week for completing it, with the following patch the limitation will be lifted.
Alliance raidsAlliance raids are completed with the help of 24 players who are divided into three full parties. This content is structured similarly to a large dungeon.
These will be released on odd-numbered major patches (x.1, x.3, x.5), with three alliance raids per expansion.
Defeating the intermediate bosses will reward you with gear in a chest for each party that can be rolled onto. After defeating the final boss, a coin (token) from the respective alliance raid drops for each player. If you exchange it with the corresponding dealer, you will receive an item to upgrade your Tomestone gear to a higher item level. The improved gear corresponds to the same item level as from the previous most recent savage raid. The loot is intended as a catch-up in order to keep up with current content. Current alliance raids are limited to one gear and one token per week. In addition, the final boss offers an exclusive Minion and Orchestrion roll as guaranteed loot.
_______________________
-- Table Of Content Ⅳ.

Wondrous TailsIf you already have a job at the level cap, you will have access to the Wondrous Tails feature.
Every week you can receive a Wondrous Tails Journal from the NPC Khloe Aliapoh. The journal lists random duties that are rewarded with an Sticker upon clearing.
Up to nine stickers are randomly placed on the 4x4 field.
Depending on how many lines you connect, your reward when you hand in the journal will vary.
With nine stickers: EXP + Gil/ Tomestones/ Treasure map If you draw a line with the stickers you will also receive: MGP/ Khloes bronze certificate/ Tomestones (Weekly capped) For two lines: MGP, Khloes silver certificate/ Tomestones (uncapped) Three lines: MGP/ Khloes silver / gold certificate
Second chance
If you complete any duty where at least one player is new, you will receive a Second Chance. You can collect up to nine of these in a week to either complete a specific duty again or reapply the stickers at random.
-- Table Of Content Ⅴ.


Deep DungeonsDeep dungeons are roguelike based and create randomly generated levels when you enter.
If all party members are defeated, you have to earn the progress you have earned again.
Deep Dungeons have their own leveling system, whereby you can create a maximum of two save games and when you defeat a boss you have the option to continue playing at a later point in time.
Players and jobs are saved when the game is created and can no longer be changed.
Place of the Dead (POTD)
Quarrymill in South Shroud (lvl 1 - 60)
Levels 101-200 can only be entered with a static party (not via matchmaking).
Heaven on High (HoH)
The Ruby Sea in Onokoro (lvl 61 - 70)
Levels 31-100 can only be accessed with a static party.
Eureka Orthos
The Eight Sentinels in Mor Dohna (lvl 81 - 90)
Levels 31-100 can only be accessed with a static party.
The EXP reward for defeating a boss determines the level of your jobs. Each of the Deep Dungeons offers at least one Exclusive Mount, as well as Minions and Orchestrion Rolls. Exclusive titles are rewarded by completing solo at the highest level.
Variant dungeonVariant dungeons are dungeons that can be completed via multiple paths.
Your actions and random events determine which route you can take. Depending on the path, the mechanics of the bosses also change.
Role restrictions are lifted and the difficulty of the dungeon is scaled based on your party size.
Jobs can be changed outside of combat.
Variant actions are made available to you to choose from in the form of existing skills that are tied to your roles.
Exploring all paths will be rewarded with a mount.
Criterion dungeons
Criterion dungeons require a light party in which the classic role distribution applies.
All reviving skills are deactivated via jobs, but each party member can revive using an additional skill once for each objective fulfilled.
As soon as the dungeon is entered, party members receive a party composition bonus on top of the damage dealt, depending on how many job skills affect your entire party. The more skills you have of this type, the higher your bonus will be. The bonus is only given to jobs and has no effect on classes.
Criterion Dungeons Savage
Matchmaking is disabled for Savage Criterion dungeons, players must organize a light party independently.
As soon as the first enemy is pulled, an invisible timer begins. If the duty is not completed by the end of the timer, all enemies in the dungeon will receive a massive damage buff, while at the same time it will reduce the damage you take. The timer will be reset as soon as the party wipes.
Wipe the party, all enemies respawn and you have to start again from the start.
Players who disconnect during the dungeon will not be able to rejoin.
Any possibility of reviving other players will be disabled and your variant actions will become unusable.
The party composition bonus is taken from the criterion dungeons and works identically.
-- Table Of Content Ⅵ.


Field Operations The Forbidden Land, Eureka AnemosThe Forbidden Land, Eureka Anemos is a special four-part duty series that you can enter from level 70, whereby you will be synched to an ILVL of 300.
You can unlock the open world-like duties one after the other in connection with a required level and your existing quest line.
You get Elemental EXP by defeating enemies running around and completing FATEs.
Each opponent is assigned to one of the six elements and marked with a corresponding symbol.
Magia Board
As you progress through your questline, you will receive Magicite, which can be inserted into the Magia Board using the Magia Melder. Each assigned Magicite increases the defensive of one linked element and the offensive of another.
The enclosed Magicite can also be moved later in the Magia Board, thereby consuming Magia Aether. These slowly fill up again on their own or when the Magia detector is accessed.
FATEs
FATEs can be triggered by defeating certain types of enemies at the location of a potential FATE or spawn randomly on the map.
If a FATE is ended, a timer must expire before it can be triggered again. Other FATEs require additional requirements such as a specific weather and time.
Mutations
If opponents lose a large part of their HP, they are able to cast “Mutate”.
The mutation is tied to the current weather depending on the opponent's element. Not all enemy types are able to mutate.
Logograms and Logos Actions
Logogram are mob drops that are opened with the help of the NPC Drake and stored at the Logos Manipulator. There they can also be combined with each other and taken with you as Lost Actions.
Mutated enemies give you significantly more Elemental EXP when defeated and increases the chance of a Golden lockbox. FATEs reward you with Elemental EXP, Anemos Lockboxes, Tomestones and Anemos Crystals. In certain FATEs also glamour, minions, a triple triad card and other special items. Traded in Anemos Lockboxes will be accepted for a random reward. - Mounts, Minions, Orchestrion Rolls, Glamour, Housing items, Materia, ... -
The Bozjan Southern FrontThe Bozjan Southern Front is a special duty that you can enter from level 71.
This duty is structured like a smaller open world map, although there is no directly set goal apart from the story.
As soon as you enter the duty, you will be synced to level 80 and your equipment to ilvl 430. All materials used are ignored.
Mettle and Resistance rank
By completing skirmishes and critical engagements players receive Mettle which is used to increase your Resistance Rank on to have Commander increased.
Increasing the resistance rank is required to enter further zones and unlock further features.
Skirmishes and Critical Engagements
Skirmishes scale with the number of players entering them. Like FATEs, they spawn randomly on the map and can also be triggered when certain opponents are defeated. The more skirmishes you complete, the more likely you are to be accepted for a Critical Engagement.
Critical Engagements spawn when defeating certain enemies and completing skirmishes.
As soon as a Critical Engagement spawns, you must queue up to join via the Resistance Recruitment window.
Competitors are accepted at random. If you are not accepted, you will be given priority the next time a Critical Engagement spawns. You can also purchase a prioritization from Bozjan Cluster in return.
By defeating running enemies that are not part of a skirmish or critical engagement, there is a chance to get Bozjan Cluster. These can be exchanged for various items and services at the Quartermaster.
Forgotten Fragments and Lost Finds
Defeating enemies, completing duties and completing quests give you the chance to get Forgotten Fragments. When exchanged with the Resistance Appriaser, these become Lost Finds and automatically stored in the Finds Chash.
Lost Finds are special duty actions within Bozja.
In order to use Lost Finds, they must be placed from the Finds Chash into the Lost Finds Holster. Lost Finds that can be used directly from the holster are only applied to the user.
All other Lost Finds must be placed in the Duty Action slot for use. If you replace the Duty Action with other Lost Finds, all remaining uses will be destroyed and will not be returned to the Lost Finds Chash. Therefore, only put the Lost Finds that you need in your Duty Action slots.
By completing the FATEs (skirmishes and critical engagements) you will be rewarded with EXP, Mettle, Tomestones and Bozjan Coins. Depending on the FATE, there are also Forgotten Fragments, Field Notes and Special Items. If Field Note duplicates are exchanged at the Locksmith you will receive Lockboxes which will be accepted for a random reward. - Mounts, Minions, Orchestrion Rolls, Glamour, Housing items, Materia, ... - Bozjan Coins can be exchanged at the supplier for gear, which can be further upgraded with the help of an upgrade item.
Your resistance rank increases within Bozja up to level 15. As you continue the questline you unlock Zandor, which requires your character to be at lvl 72. The same system exists as on the Bozjan Southern Front.
-- Table Of Content Ⅶ.
 A-RanksS-RanksSS RanksAllied SealsCenturio SealsSack Of Nuts
Challange logThe Challenge Log lists the content and job classes you have already unlocked. Completing the given challenges usually rewards you with EXP for your equipped job class, Gil or a currency relevant to the current content.
The challenge log is reset weekly.
Beast TribesEach individual Beast Tribe provides you with up to three quests per day to increase your reputation. A maximum of twelve quests can be accepted.
Your rewards vary depending on Beast Tribe EXP, Gil, Reputation, Tokens, Tomestones, Ventures. Beast Tribe Vendor may also offer mounts, minions, orchestrion rolls, materia, etc. in exchange for tokens.
The HuntPlayers are alerted to bounty hunts within cities using the Hunting Board. These differ in Mark Bills and Elite Marks.
Mark Bills require you to kill regular enemies with a special mark, which are updated daily.
Elite Marks (B-Ranks) are changed weekly and require the killing of a large opponent with a passive aggression level 4. Depending on what ground it spawns on, it has that level cap of the corresponding expansion.
Rewards will only be awarded if you have accepted the corresponding orders.
The Hunt Board is located in a different city per expansion with separate rewards.
The Hunt (A Realm Reborn), Clan Hunt (Heavensward), Veteran Clan Hunt (Stormblood)
Completing active Marks rewards you with Gil and , the latter of which can be exchanged for gear, riding maps, special items, etc. Depending on which Grand Company you belong to, exclusive gear is offered.
Nutsy Clan Hunt (Shadowbringers), Guildship Hunt (Endwalker)
As of Shadowbringers, are replaced by . The usual Gil and EXP rewards remain. can be exchanged for items, gear, glamour, materia, mounts, etc.
Mark Identification
Unlike B-Ranks, A-S-S have an active aggression marker of level 4. The listed ranks do not have hunt marks, but the kill is rewarded to all fellow combatants.
Spawn randomly on maps and remain active until they are killed.
Can only be spawned manually and requires very specific requirements.
Since A-S-SS ranks cannot be distinguished from one another externally, S-SS ranks are marked with a message in the chat log: ''You sense the presence of a powerful mark....''
As long as an S-Rank is not currently active, a B-Rank will not be able to spawn on the same map during this time.
If an S-rank from Shadowbringers is killed, there is a chance that it will spawn minions in all directions. If the minions are defeated within five minutes, an SS rank will spawn.
Hunt marks reward you based on the enmity you achieve in your party. Regardless of the damage dealt or the size of the party. The map on which the marks are killed determines newer loot. In addition to EXP, Gil and Tomestones of Poetics you get in ARR - , Heavensward/Stormblood - and from Shadowbringers to Endwalker - . If Marks are killed with a job of the current level cap, you will receive capped Tomestones instead of Poetics.
Player-versus-PlayerPvP allows you to challenge other players in various game modes.
All jobs have fixed damage and armor values as well as exclusive new skills and actions.
Each player has his own limit break and gauge. This fills up as you fight your opponents or complete objectives.
Wolves' The Pier
Form your PvP hub and enable further unlocking of various PvP modes, training on dummies, dueling and the interaction of different traders.
PvP Profiles
The PvP profile lists your available job actions, your PvP rank, the progress of your PvP Series and W/L statistics for all game modes.
Series Malmstones
Every new major patch starts a new Series. All PvP content is rewarded with Series EXP, which enables the series to be leveled up.
Seasons
The Crystaline Conflict game mode is divided into unranked and ranked. If you complete victorious ranked matches, you will move up Ranks, which are divided into risers.
Every time you complete a PvP match you will be rewarded with EXP, PvP EXP, Series EXP and Wolf Marks. Depending on which place you achieve, your reward will be higher. In exchange for Wolf Marks, exclusive mounts, Minions, Glamour, Modern Aesthetics, Adventure plates, Materia, Orchestrion rolls, etc. can be purchased from various NPCs. Leveling up the series mainly gives you Trophy Crystals. Depending on the active series, you will get an insight into additional exclusive items such as Adventure plate kits, mounts, minions or emotes. At the end of a season, the top 100 players in a data center will be rewarded with exclusive Adventure plate kits, Trophy Crystals and, if applicable, Commendation Crystals.
-- Table Of Content Ⅷ.
Addendum will be added with future patches
_______________________
-- Table Of Content Ⅸ.
UntimedTimedUnspoiled Nodes:Folklore Nodes:EphemeralCollectables

GatheringGathering allows you to collect a variety of resources and items. These can be sold, negotiated or processed with a crafter.
Botanist, Miner
Depending on the class, there are different nodes distributed in each open area, which hold resources. If you dismantle these you will gain EXP in addition to the items.
If a new item is found, you will receive an EXP bonus.
With each successful successive item you acquire at a node, your Chain increases and provides additional experience points.
Collection success is based on your gathering rating with the Gatherer's Boon effect randomly acting, with the chance of an additional item.
The higher the perception value, the higher the chance of triggering this effect.
Nodes are divided into the following categories:
Are available at any time and respawn after dismantling additional nodes. Further divided into Unspoiled and Folklore / Legendary nodes. These only spawn a node at certain times in 12 hour intervals and are active for 2 hours. (Eorzea Time)
Include resources as well as .
These nodes can only be tracked down by using a special item once. These are at the respective level cap of the corresponding expansion. Winned are used for Aetherial Reduction. The nodes spawn in a cluster size of three and respawn as long as they are within the 4h time window. This process repeats itself every 12 hours. (Eorzea Time)
Gathering Point Characteristics
From Heavensward onwards, nodes randomly trigger Location Effects and, depending on your gear, increase attributes such as gathering, perception or the removal of further items.
Hidden items can appear within nodes.
Hidden: Naturally appear every four to six nodes.
Rare: Only a limited number of items can be removed per node. Rare items are not affected by skills.
If you dismantle collectables, the interface opens in which collectable-specific skills and the current collectable value are listed. As soon as the item has a set collect value, it can be collected.
If a collectable fish is caught, the collectable value is assigned a random value depending on your perception.
Aetherial Reduction
These collectable items can be broken down into crystal, cluster and aethersand.
Fishing
Rod Fishing
Fishing requires baits which are divided into three types: Saltwater, Freshwater and Lure. Baits are usually used up with every cast, while lures last until a fish has bitten.
If the level of the bait is adjusted to the area, the fish rate increases.
Ocean Fishing
Every two hours (ST) you have a time window of 15 minutes to line up in Limsa Lominsa for the Ocean Fishing.
As soon as all three routes have been traveled, a score is awarded depending on the items fished. Your EXP reward varies depending on your score.
Spear fishing
Teeming waters behave like nodes and can be found in deep waters.
If you access the node, spearfishing is presented as a mini-game in a separate interface.
As you start fishing, your catch counter increases and the time until the node disappears.
Gatherer: If you mine items or catch fish, you will gain EXP in addition to the items. If a new item is found, you will receive an EXP bonus. Miner / Botanist: With each successful consecutive item you acquire at a node, your Chain increases and provides additional experience points. Fisher: Caught fish are recorded together with the fishing locations in the Fishing Log. Required baits and additional requirements are listed in the Fish Guide.
-- Table Of Content Ⅹ.
 SynthesisProgressQualityDurabilityNormal QualityHigh QualityCollectable


Practicing as a crafter unlocks exclusive content and can make your gameplay easier. Crafters use resources that you get by mining, collecting, fishing, killing certain opponents or from certain content.
Each crafter class has its own pool of items that can be crafted.
CraftingOnce you have unlocked a crafter class, all available recipes for that class will be displayed in the Crafting log.
In order to synthesize an item, Crystals are required in addition to the given resources.
Synthesizing items requires the correct use of your skills as a crafter.
The synthesis will end as soon as the bar has been completely filled. Increasing the increases the chance of a successful synthesis that the item will improve from Normal to High . The quality bar behaves logarithmically. All actions you take during synthesis reduce the durability of the item. If this drops to 0, the synthesis is aborted and your resources are destroyed.
Crafted items differ between Normal , High and a .
Normal Ordinary item without special properties. N/A High Synthesizing in HQ slightly increases the item's stats. With a collectable, the exact collect value is recorded with which you can successfully complete the synthesis.
You always gain EXP when you have successfully completed a synthesis. As well as an EXP bonus when the item is synthesized for the first time or in HQ.
Soul CrystalSoul Crystals for crafters slightly increase some stats and the chance of a better condition of the item during synthesis.
A maximum of three crafters can be assigned a Soul Crystal including new skills.
RepairAs a crafter you can repair gear with the required class and level regardless of whether it is craftable or not
Dark Matter are used for this.
With the help of the crafters, items can be repaired (+100% durability)
Crafters, collectors and their associated guilds, in which you can learn the classes, are spread across the three starter cities.
DesynthesisMost of the game's items can be dismantled, depending on which item it can only be dismantled by a specific crafter, which increases its desynthesis level.
The dismantled item mainly gives off items that you would need to craft the item.
-- Table Of Content Ⅺ.
Collectable AppraiserAll collectables with a minimum collectable value can be exchanged at a collectable appraiser in most cities.
Depending on the collect value, you will be rewarded with different amounts of EXP and White/Purple scrips. Scrips received can be exchanged at the Scrip exchange for Materia, Gear, Baits/lures, Exclusive Resources, Tokens and Master recipe.
LevequestsFieldcraft levelsAssumed levels as miner and botanist, unlike those of fisher, must be completed within a time window.
Tradecraft levesBy synthesizing and handing over the required items, the order is completed without a time limit.
Temple levesHere you can adopt more time-efficient, large-scaled field- and tradecraft leves.
These special leves are only found in Ishgard and Heavensward areas.
Completing a level is rewarded with EXP, Gil and possibly additional items. By handing over an item in HQ, EXP and Gil rewards are doubled.
Custom DeliveriesCollecting, fishing or synthesizing required collectibles for all clients is limited to a maximum of twelve submissions per week. These taxes increase your reputation towards the respective clients, which means they pay out higher rewards.
Depending on the collect value, you will be rewarded with EXP, Gil and Scrips.
Supply and Provisioning MissionYour grand company lists daily orders for each collector and crafter class. When the requested item is delivered, the order is completed.
With a completed mission you will receive EXP and GC Seals. Missions marked with a star or submitted in HQ double your reward.
Ishgardian Restoration The DiademThe Diadem is an instance where you can get exclusive resources by collecting and fishing. These can be inspected by the resource inspector and processed further as a crafter.
With the help of Inspected Resources, collectables can be produced and delivered to the Collectable Appraiser.
Inspecting resources rewards Skybuilders' Scrips. These are also available together with EXP when delivering collectables to the collectable appraiser within the firmament.
Doman Reconstruction
_______________________
-- Table Of Content Ⅻ.


 Disciples Of WarDisciples Of MagicDisciples Of The LandDisciples Of The Hand

Treasure HuntBy mining or spearfishing at specified nodes you can get to Timeworn Maps. When decrypted, these show a map section in which a chest is buried. This can then be unearthed using an external action.
If you put your hand on the chest, several enemies will spawn that must be defeated within a time window in order to then be able to open the chest.
The loot table inside the chest varies depending on the timeworn map. By opening the chest you get the chance to access a portal that allows you to open additional chests after defeating additional opponents and thus provides EXP, Gil and Tomestones that are shared between all party members as well as, if necessary, Gear, Materia, Minions, Tokens, Orchestrion rolls, furniture, crystals or clusters.
MateriaUsing Materia allows you to increase the attributes of your gear.
Extract
Each gear generates EXP when it receives spiritbond which is given in percent. Since each class is based on different attributes, with a spirit bond of 100%, depending on the gear, only certain materia can be extracted.
Which material level can be determined depends on the item level that the gear has.
Gear in HQ and materials already used increase the rate at which spiritbond is generated.
- Tenacity, Skill Speed, Direct Hit Rate, Critical Hit, Determination (Yellow | Purple | Red) - Piety, Spell Speed, Direct Hit Rate, Critical Hit, Determination (Yellow | Purple | Red) - Gathering, Perception, GP (Green) - Craftsmanship, Control, CP (Blue)
Melding
By adding Materia to your gear, specific attributes can be increased and optimized as desired, up to a specified maximum value.
This can be done with a Materia melder or with the help of a crafter class.
With a “Request Meld” to other players you can meld as well as overmeld.
Materia has an item level that can only be melded in gear that has an equal or higher item level than the materia itself.
Materia Ⅰ Ⅱ Ⅲ Ⅳ Ⅴ Ⅵ Ⅶ Ⅷ Ⅸ Ⅹ Itemlevel 15 30 45 55/ 70 160 290 420/ 430 420/ 430 560 560
Overmelding
The number of Materia slots indicates how much Materia can be inserted into your gear.
Materia slots are limited, but can still have invisible "overmeld slots". These only appear in crafted gear and allow you to use additional materia.
With each Materia used after the specified Materia slots, your chances of successful overmelding decrease significantly.
The higher your Materia level, the lower your chance of successful overmelding.
NQ/ HQ Overmelding count 1 2 3 4 Ⅰ 80/ 90% 40/ 48% 20/ 28% 10/ 16% Ⅱ 72/ 82% 36/ 44% 18/ 26% 10/ 16% Ⅲ 60/ 70% 30/ 38% 16/ 22% 8/ 14% Ⅳ 48/ 58% 24/ 32% 12/ 20% 6/ 12% Ⅴ 12/ 17% 6/ 10% 3/ 7% 2/ 5% Ⅵ 12/ 17% / / / Ⅶ 12/ 17% 6/ 10% 3/ 7% 2/ 5% Ⅷ 12/ 17% / / / Ⅸ 12/ 17% 6/ 10% 3/ 7% 2/ 5% Ⅹ 12/ 17% / / /
GlamourWith the help of glamour prism you can change the visual look of a gear.
Cast/ Remove glamor
If gear is used as a glamour, the job class, gender, race and type of gear on which it is projected must be compatible.
Glamor can be projected on any gear that has the same or lower level than the item it is projected on.
One glamour prism is consumed with each use.
The option to remove glamor from your gear is at the top of the “cast glamor” interface. A glamour dispeller is consumed during use.
Glamour Plates
Gear that you want to use as glamor can be stored within your Grand Company or your Inn room.
Each gear has symbols within the info box that show where it can be stored.
Glamour Dresser One glamour prism is used once per piece of equipment to store it.
When the glamor is stored, the name of the manufacturer as well as the item will be removed and will be reset in any form. Armorie Storing glam does not require a glam prism here. Can only store event glam for this.
With the help of the stored glamor, glamour plates can now be created and linked to an gear set. New gear is automatically overwritten with your glamour plate when you change.
AestheticanThe aesthetician allows you to customize unlocked hair styles, hair colors, tattoos and facial features.
Within each Inn Room, the Aesthetician will have you summoned via a Crystal Bell.
-- Table Of Content ⅫⅠ.


 NotSmall:Cottage:Medium:House:Large:Mansion:
Ceremony of Eternal BondingThe Ceremony of Eternal Bonding allows you to marry in Eorzea regardless of your race, religion, grand company or gender.
In order to get married, you have to go to the Online Store[www.finalfantasyxiv.com] to purchase a wedding plan there.
With the purchase you will now receive a bracelet on your Delivery Moogle, which both partners in a joint party must put on in order to be able to complete the quest.
Once the questline has been completed, you can now plan a ceremony inside the chapel and carry it out on a desired date.
Only other players within your world can attend the ceremony.
HousingEach residential area of a world is divided into Wards, each divided into two Divisions. Each area has its own environmental style.
Players can each purchase a plot as a private individual and as a leader of a free company. Each player can also own an Apartment in residential areas and a Private Chamber within an FC house. These can be designed and viewed as you wish.
Acquire plots
Plots are always allocated on a lottery system.
Lots of the plot are collected for five days, within aher four days the winner of the lot can decide to accept the plot or .
If the plot is accepted, the owner of the lot must leave 50% of the property value as a fee.
Losers will receive a full refund. If the refund is claimed within 90 days, the refunds will expire.
Purchase via relocation
If you want to move within a server to any plot regardless of its size, you must take part in the lottery as usual. If you accept the lottery you win, your old plot will be reset and all decorations will be moved to the warehouse of the new plot.
At least 15% of the old property price will be deducted from you.
The warehouse is temporarily increased to the capacity of an L plot regardless of the plot size.
Apartments Each division of a ward has its own apartments which are withheld from the demolition timer. Private/
Free Company Housing Private/ Free Company properties can only be purchased in designated wards. After purchasing a property, the license to erect a building is included. The price of the property varies depending on the location and size. The building price is tied to the plot size.
3,000,000 - 3,750,000 Gil -- 450,000 Gil
16,000,000 - 20,000,000 Gil -- 1,000,000 Gil
40,000,000 - 50,000,000 Gil -- 3,000,000 Gil Private chambers Each FC member can create and decorate a private chamber within the FC house and exist as long as the FC house.
If no house is built within 45 days, you will lose your plot due to inactivity.
Estate sharing
Allows you as a plot owner to set up up to three friends as tenants who receive access to the special features of the plot. A player can be registered as an tenant with a maximum of two houses. Players can remove themselves from the tenant list.
Demolition
If the property is entered by the owner of a private property or an FC member of an FC house, the property will be reset within 45 days. Gil and decorations are temporarily stored in the resident caretaker for a limited time.
If you lose your plot via the demolition timer, 80% of the plot costs will be refunded.
Housing features
Stable Tending With this you are able to further level your Chocobo from rank 10 to 20 and adjust the color of the feathers. Gardening A system that allows you to create a garden and grow plants. The plot size determines how many gardens you can create. Company Workshop Free Company Crafting allows players to craft Aetherial Wheels, Exterior Walls, Company Airships and Submersibles to produce for their Free Company. Company Airships and Submersibles can be sent on Exploratory Voyages.
-- Table Of Content ⅪⅤ.
RelicsZodiac Weapons Lvl 50
Anima Weapons Lvl 60
Eureka Anemos Weapons Lvl 70
Resistance Weapons Lvl 80
Manderville Weapons Lvl 90
_______________________
0.01 Online-Store | Mogry-Station
0.02 2FA
0.03 Patch Expiration
_______________________
0.04 To Do List
List Completed Needs to be edited 00 O 01 O 02 O 03 O 04 O 05 O 06 O 07 O 08 O 09 O 10 O 11 O 12 O 13 I. O 13 II. O 13 III. O 13 IV. O 13 V. O 13 VI. O 13 VII. O 13 VIII. O 13 IX. O 13 X. O 13 XI. O 13 XII. O 13 XIII. O 13 XIV. O 0.01 O 0.02 O 0.03 O
Tombstones
Raid loot table
Limited Job
Interrupt
Relics
Online-Store
Mogry-Station
2FA
Patch Ablauf
Orchestrion roll
Sightseeing log
Doman Reconstruction
Minions
Gold saucer
Triple triad
Chocobo
Macros
Chat
Private island
Dye
Companion App
Eorzean Collection


Originally posted by Mayumi Irithyll: Original guide from start to finish: 2021/ 07/ 24 - 2024/ 01/ 06 Yoshi p. please add aura fangs, thank you.
Source: https://steamcommunity.com/sharedfiles/filedetails/?id=3133794807
More FINAL FANTASY XIV Online guilds
- All Guilds
- FFXIVSteamFFXIVSteam
- Final Fantasy XIVWebsites
- La recherche d'quipe pour les nuls
- The Base of Final Fantasy XIV
- Poner el juego en Espaol
- How to WIN at FFXIV also known as (final fanta xeno in vision)
- Madelyn Cline
- Gua general de FFXIV en espaol
- Top 8 mounts to get as Solo Player in FFXIV Heavensward
- Black Screen on Login Fixed the