Wiki Like A Master
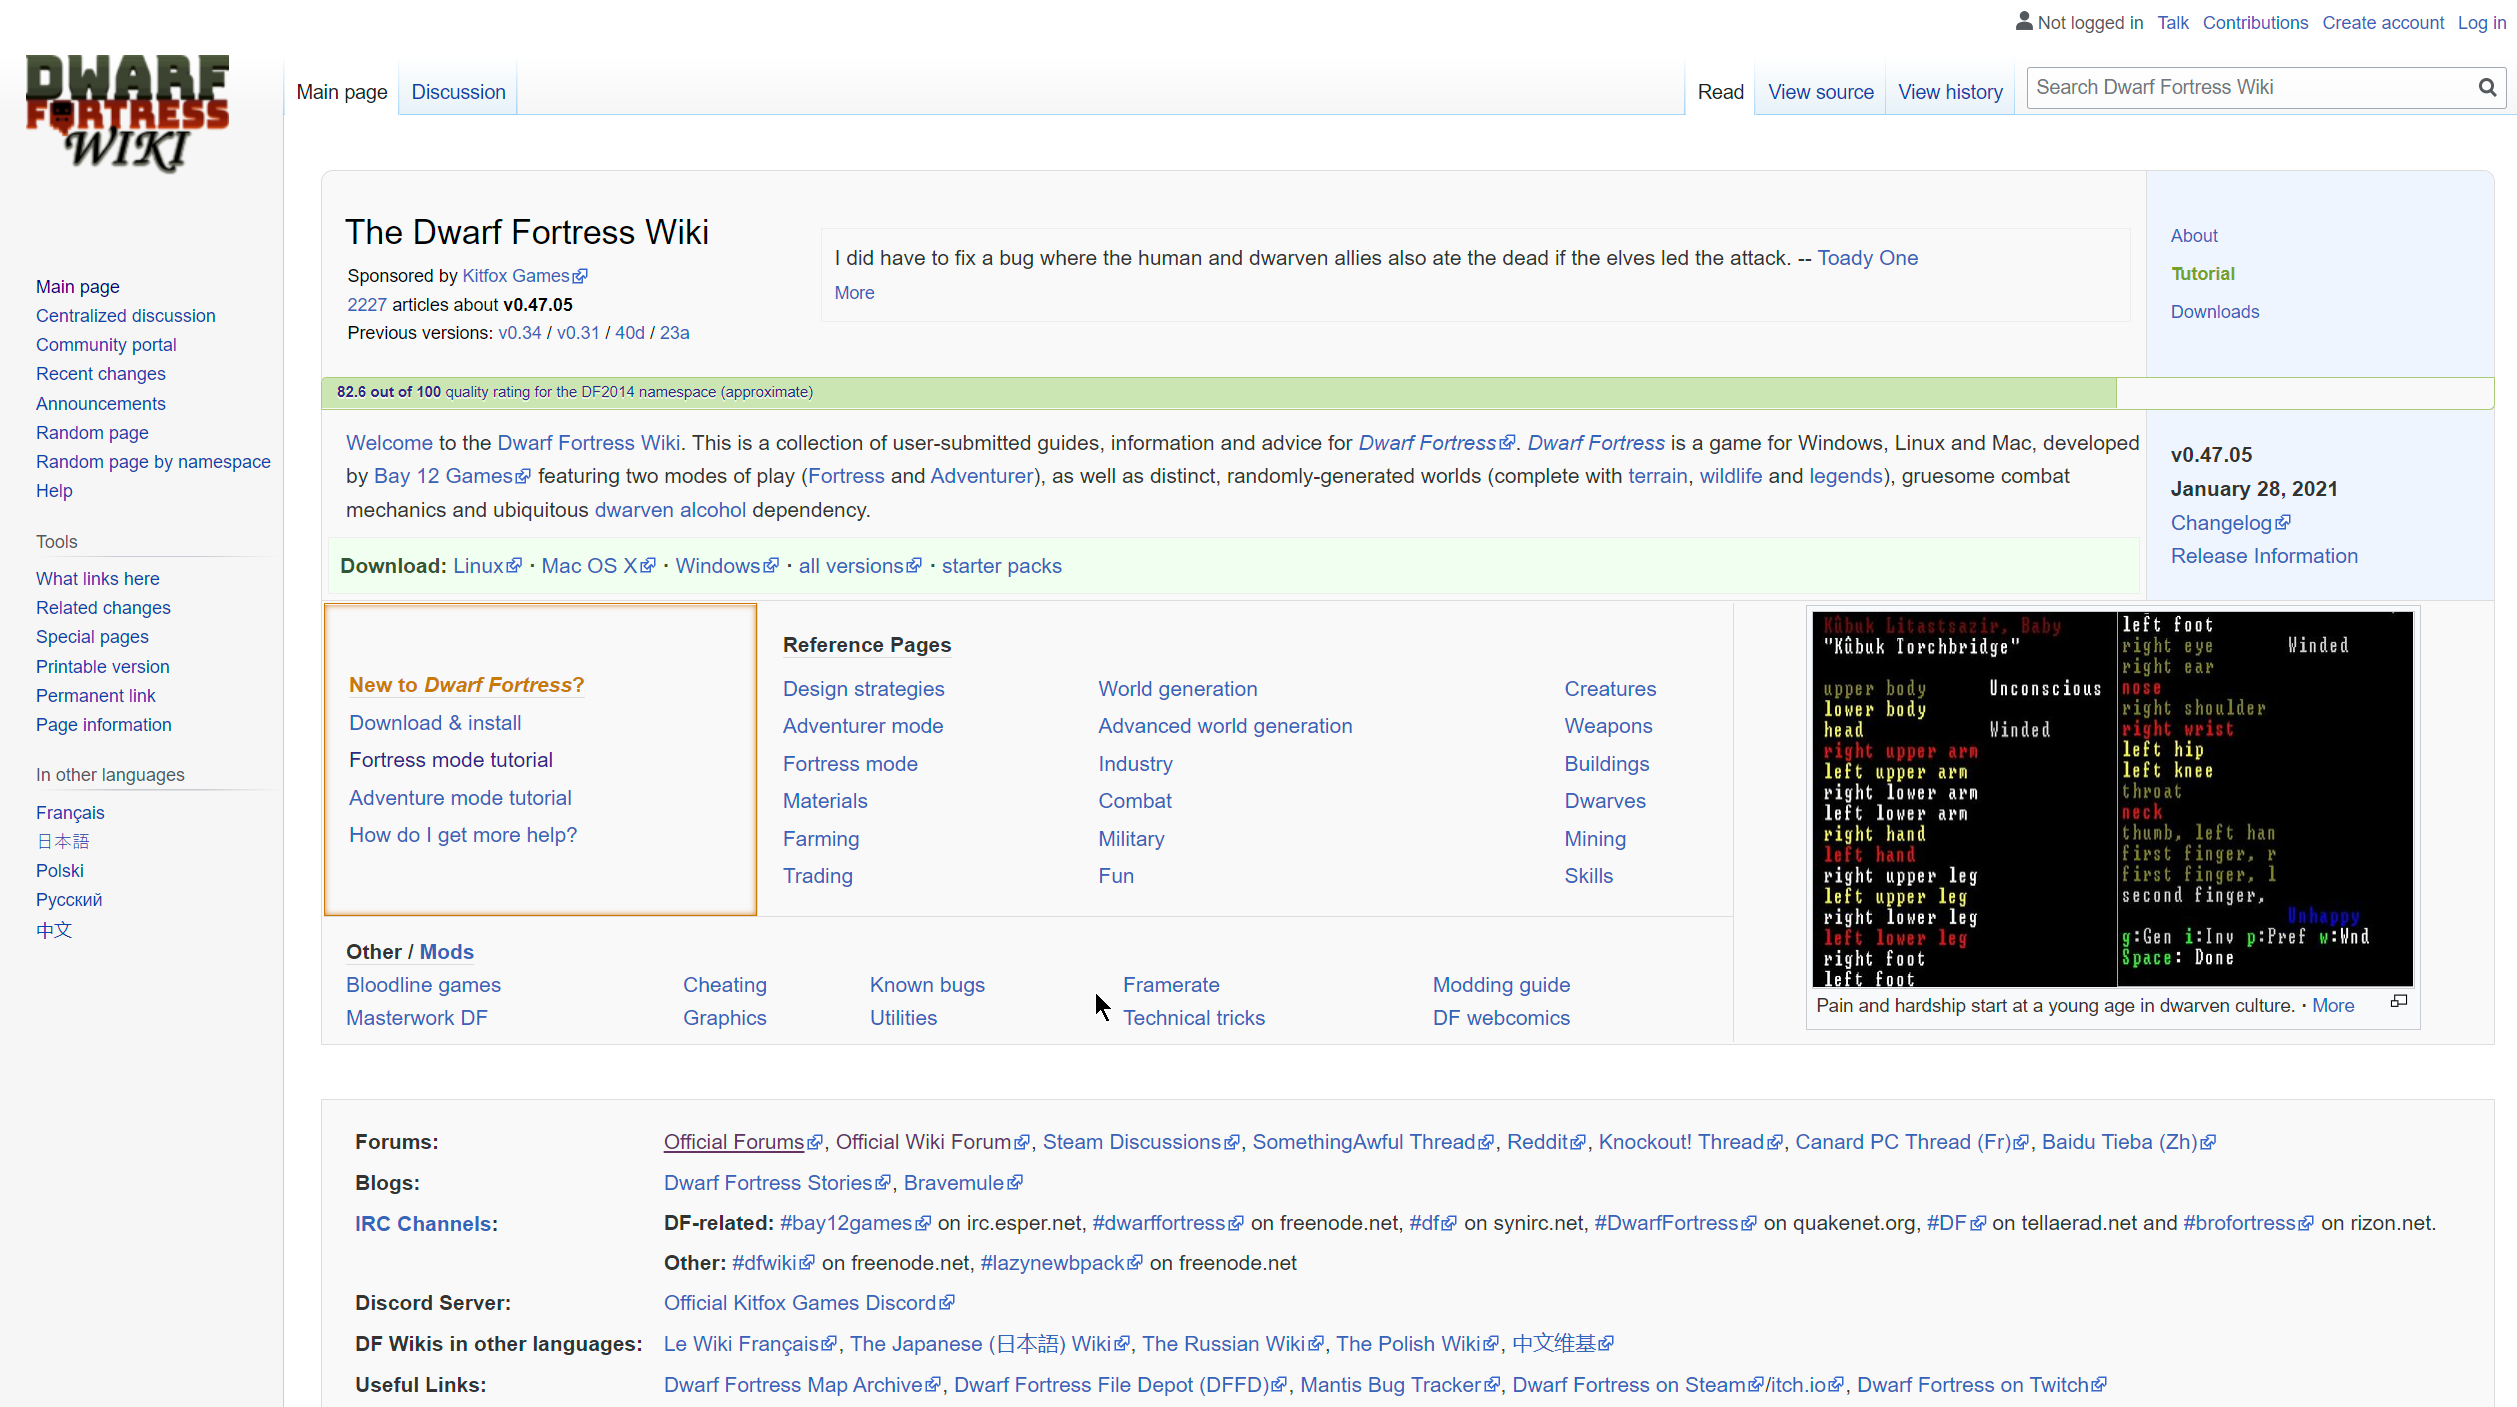
The first and foremost pro tip is: use the wiki. This game has been around for so long I don't even remember, and people have accumulated tons of information about it.
Dwarf Fortress Wiki[dwarffortresswiki.org] People may have been playing this before you were born, so don't forget that even if the UI has gotten an update the game is really old, and not that much has changed. So don't hesitate to look stuff up and see what you can find. Much of it is very entertaining and funny too and relates to Losing being Fun especially when it involves bugs or unexpected behavior.
And also don't forget to "forum like a master" because most of the discussion about DF takes place on the official forums and elsewhere:
Official Forums[www.bay12forums.com] This guide will however attempt to distill the wiki to the most important things while describing them in terms of the new GUI.
Lose Like A Master

They say Losing is Fun, but its really only fun when you Lose like a Master and not like a noob.
Losing like a noob means that you let all your dwarves starve to death while trying to drink water with their hands in a bedless dirt hole without ever having brewed your first alcoholic beverage, crafted your first mug, or carved out your first decorated feast hall. Losing this way is not fun.
When masters lose, it's because a vampire came to visit the fortress, turned half of the dwarves into vampires, and then a forgotten beast showed up on a rampage and trashed everything while mother dwarves ran into battle carrying their babies, then went into tantrum mode when their babies got killed. Oh and then they tantrum spiraled and started killing each other too. You have to admit this is much more entertaining than everyone starving to death without any mugs of beer in their unsmoothed bedless dirt hole.
And one of the dwarves might have managed to carve a wall with scenes of the beast slaughtering other dwarves before he died, which will later be discovered by some other dwarves wondering what happened.
So if you lose like a master then don't worry about it, just start a new fortress because your trashed fortress ruin is still part of the history of the world and it can be reclaimed or visited by adventurers later when adventure mode is back in action. Consider yourself to have successfully created interesting world history and features that would otherwise not exist and which can literally come back into play later. This kind of thing is supposed to happen sometimes.
A noob will give up, but a master will just create a new fortress and do it all again, then go visit the ruin later. And they will end up with a world with a bunch of trashed fortress ruins everywhere, after which they will visit them all in adventure mode to get the fancy gear that's probably still thrown around.
Generate Worlds Like A Master
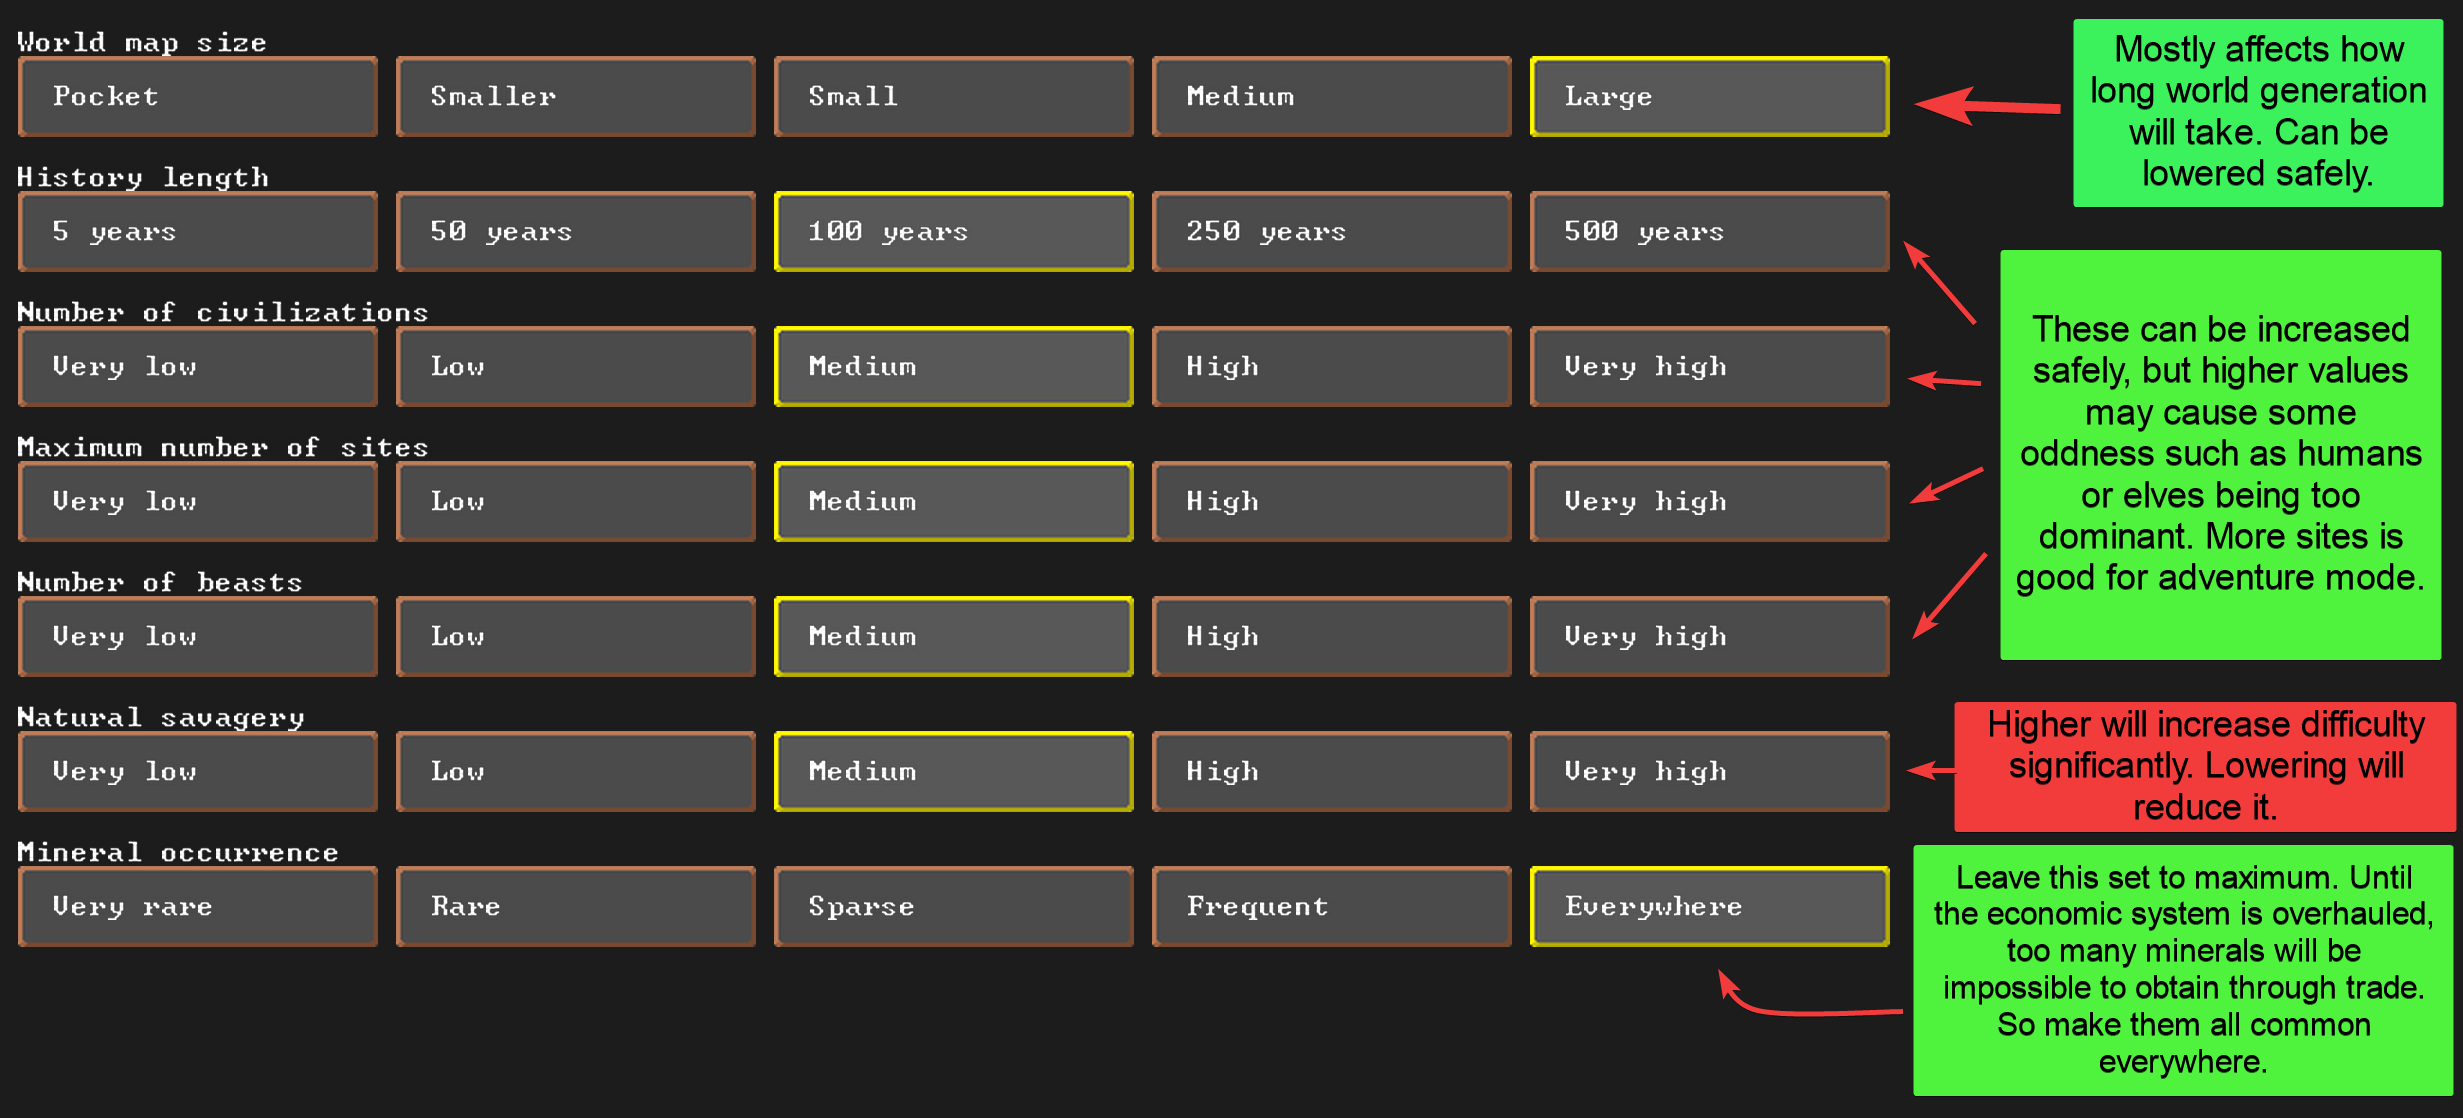
World Generation is perhaps the core thing that really makes Dwarf Fortress what it is. Rather than write Lord of the Rings, Toady wrote a computer program that rewrites a new Lord of the Rings as often as you want to run it. So it makes some sense to learn about the configuration parameters.
Generating worlds is not very difficult, and at first you will probably be happy with the defaults, but later you might want to take some things to the extreme such as creating a jungle world, or creating an icy volcanic world with a high level of evil and savagery. These extreme parameters can cause all playable races in the world to die during world generation, so it can be kind of interesting to see how bad things can get and still be viable.
I won't bother to go into much detail about world generation here because there is a lot of detailed info on the wiki about world generation including all of the Advanced parameters.
World Generation[dwarffortresswiki.org]
Advanced World Generation[dwarffortresswiki.org]
But here are some tips for the basic options:
Some tips on basic options
For some examples of how to do extreme things with Advanced parameters, see Worldgen Examples[dwarffortresswiki.org] though some may be somewhat out of date since worldgen has been changed over time.
Embark Like A Master
Noobs would be advised to do the "quick start and short tutorial" because it is rather quick and will show you the basics, but pretty soon you're going to want to embark like a master and search out exactly the sort of site you want to embark in, as well as possibly customize your starting equipment.
If you haven't done the quick start tutorial yet then do that because it actually is very quick with only about 10 panels of stuff to go through. If you then want to re-embark yourself then just click the gear icon in the upper right, abandon the fortress, and start a new game in the existing world that you generated.
So from now on the rest of this guide will assume:
that you've already done the short tutorial.
that you have a relatively sane world with minerals set to "Everywhere" and the other basic parameters close to the defaults.
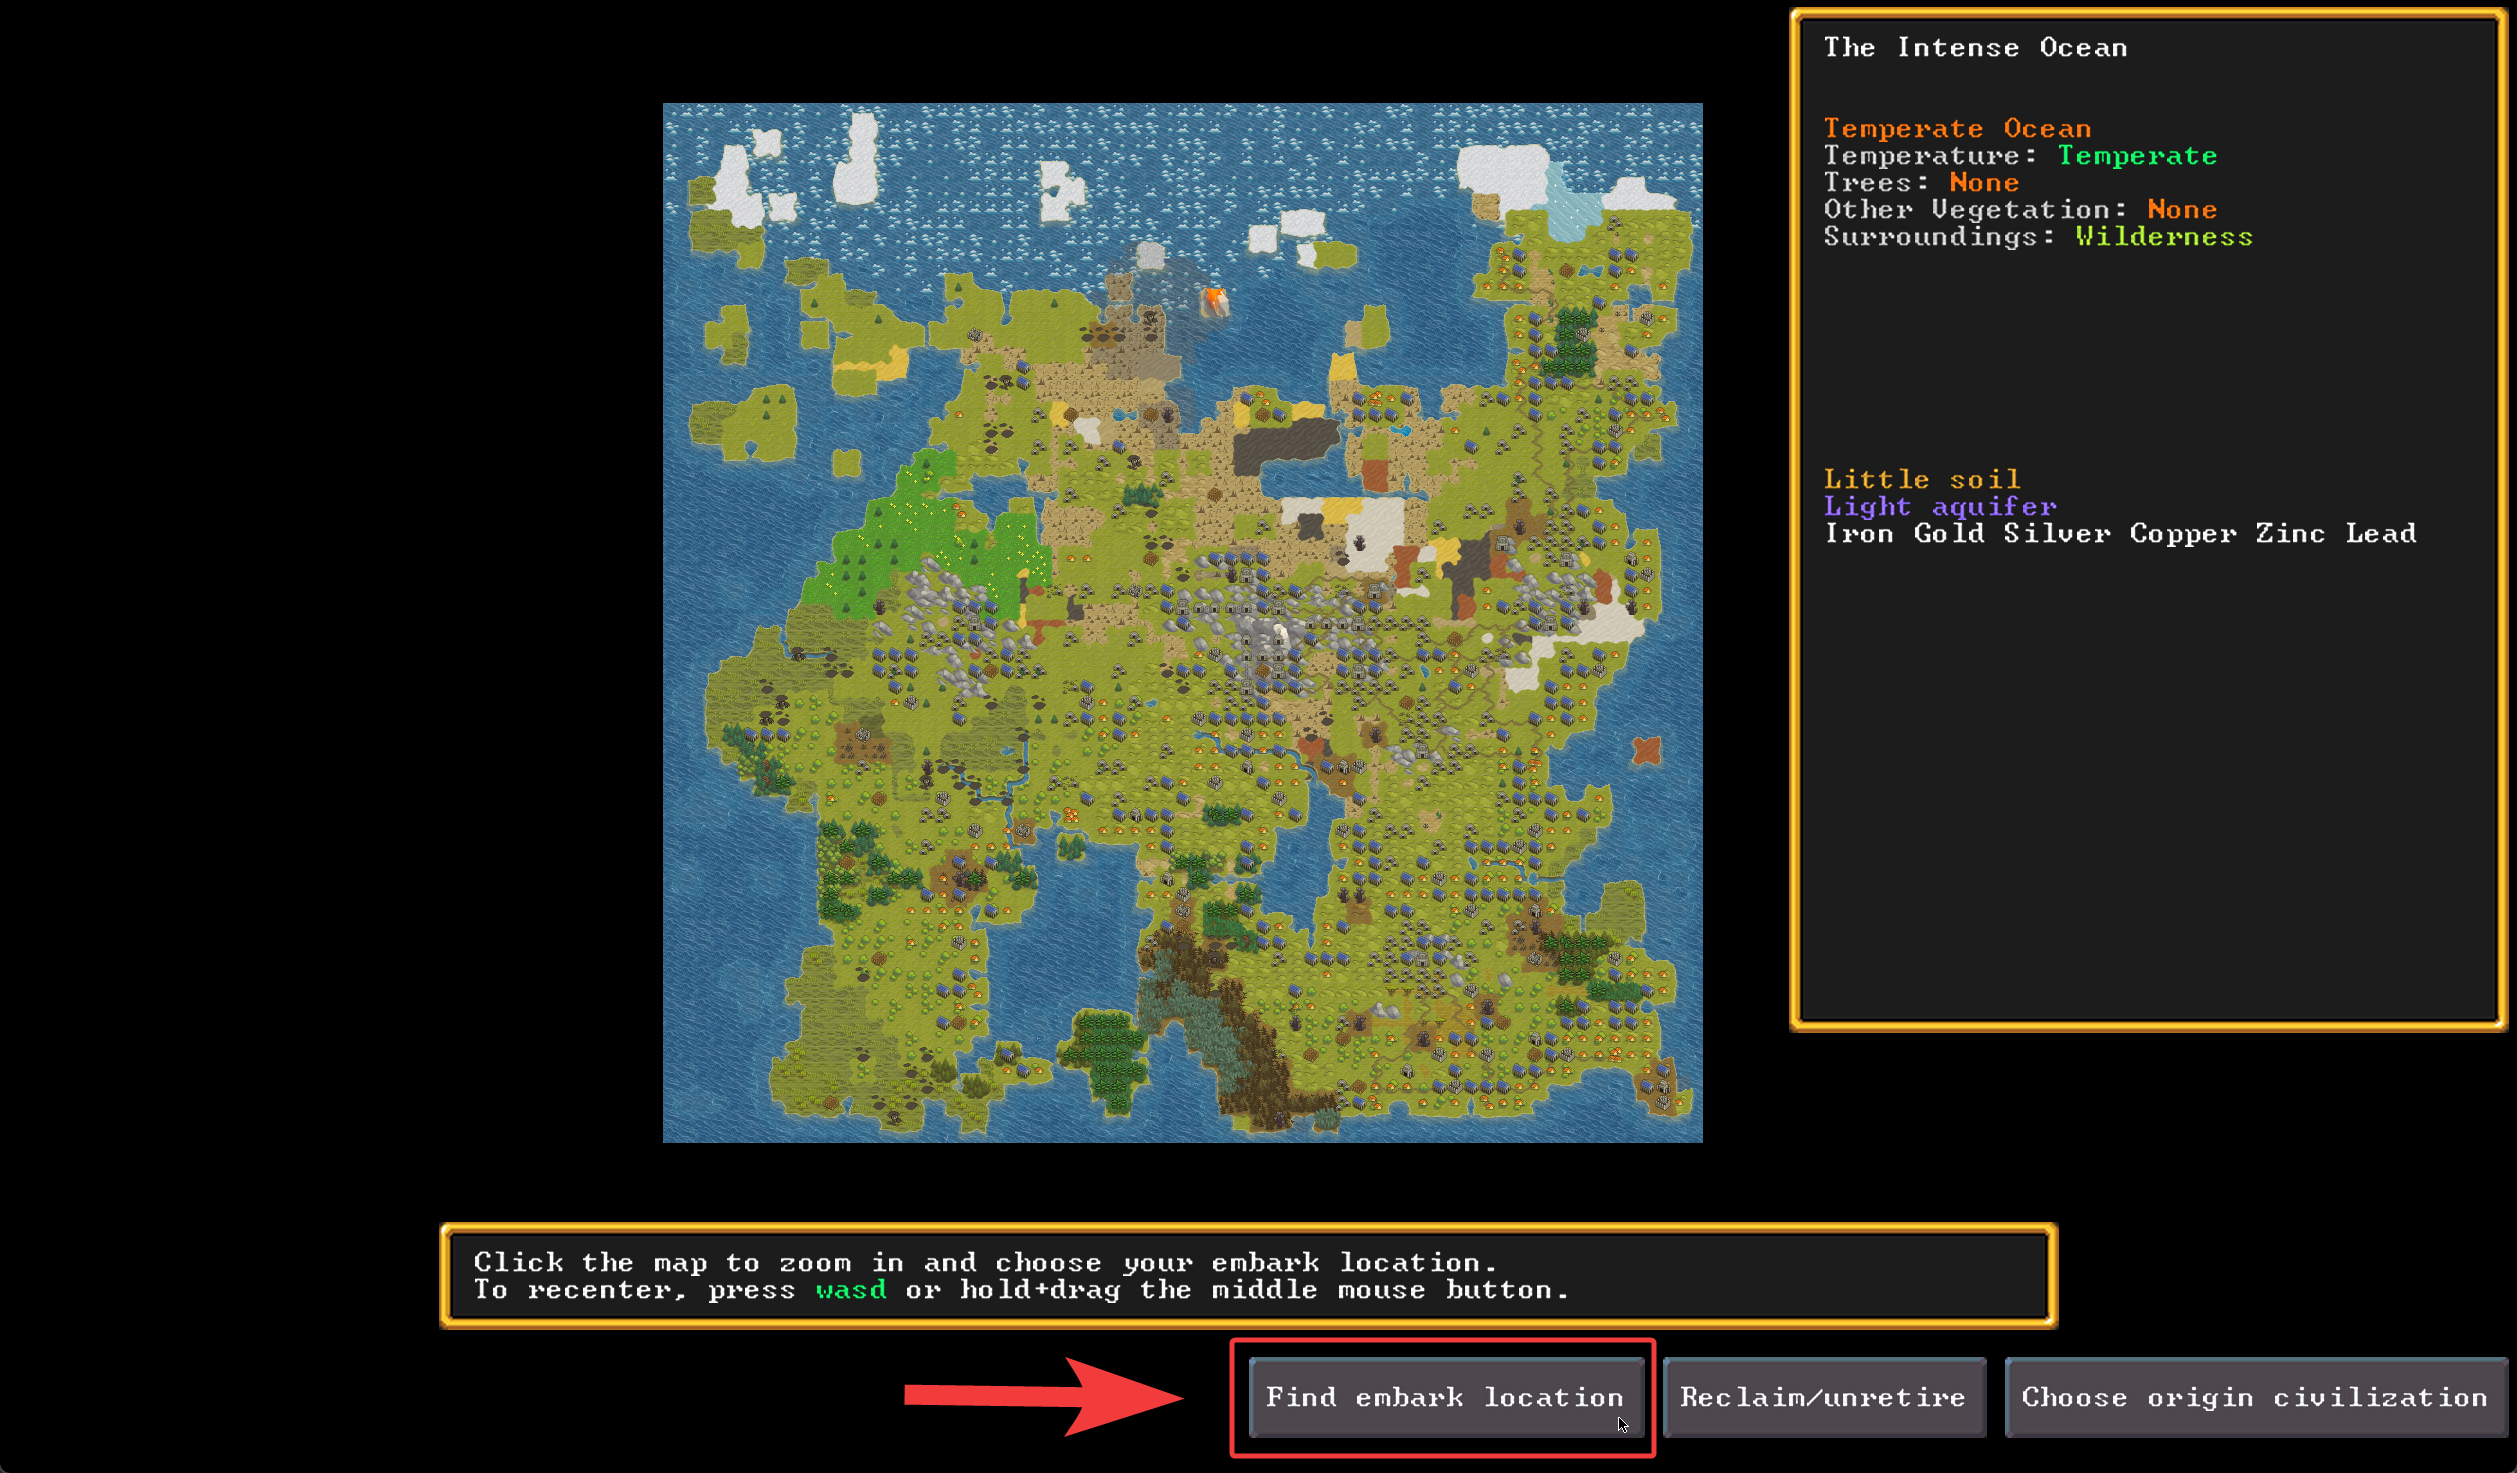
An example sane (at least by dwarven standards) world.
By now you have probably figured out that you can scroll with WASD and zoom in and out with mouse buttons.
The noob thing to do here is to try to find a location manually, then pick a bad location and then starve to death without any beer. In dwarven terms this is the greatest shame ever as you should at least be holding a pick and a mug of Dwarven Wine, Ale, or Beer with your guts hanging out when you die. Ideally you should also be holding a named artifact or at least some sort of masterwork. Any other sort of death is only fit for a tree-hugging spineless elf.
If you feel like it then look around at your world manually, but once you're done browsing select Find embark location and set the search tool to finding something the dwarves can deal with.
But wait, lets take a little detour to talk about.....
Origin Civilization
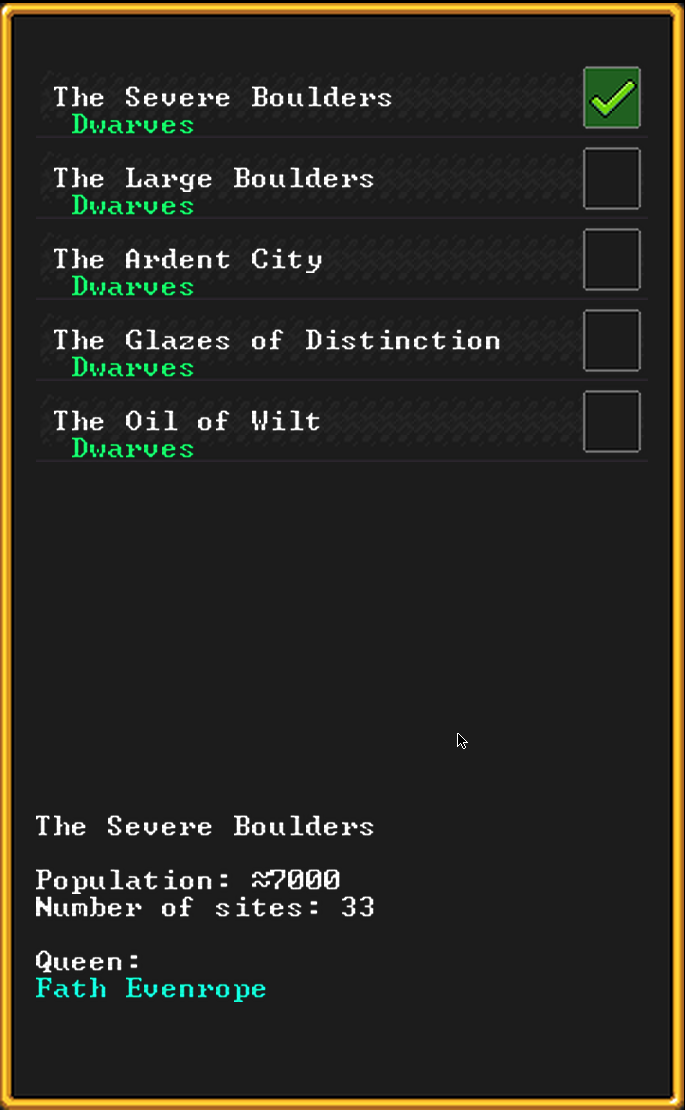
This isn't really super important, but you might want to look through the choices and pick the biggest civilization. All of the choices will be dwarven because this is Dwarf Fortress not sissy elf treehouse or human village or something. The main impact of this decision is that a larger civilization should have more immigrants for you, but it may not matter much at this point.
So for this example I'll pick this one shown in the screenshot which is a decent size for the world I have. Just pick big.
Find embark location
Until you're actually a master, you want to pick an embark location that is possible for you to deal with. In the screenshot on the right are the main settings to be concerned about. More tips on each one are as follows:
X and Y Dimensions - You can make these as large as you want, but keep in mind that your embark dimensions are limited to 6x6. So anything larger is more likely to just make the search fail unnecessarily.
Savagery - This is mostly about how giant the wildlife is. Pick "Calm" until you're looking for more of a challenge in this arena. Savage areas have giant versions of animals and animal people though the animal people are usually non-aggressive.
Spirit - Good and Normal are fine, though the "good" areas come with some odd challenges as well as benefits. Evil biomes have nasty weird evil living in them and shouldn't be selected until you're looking for more of a fight.
Elevation - This isn't too critical, but at low elevation you're more likely to get large water and high elevation is like mountains.
Temperature - This works like you'd expect with the extremes being more difficult to survive in. Pick Medium until you get interested in desert or arctic survival situations.
Rain and Drainage - These will impact flooding problems and your ability to retain water in reservoirs you dig out. High is good if you have rivers or aquifers that can constantly feed more water to you, but low will be a disaster when combined with lots of rain or sources constantly producing water.
Flux Stone Layer - Always say "Yes" until the economy gets an overhaul. Flux stone is needed to make steel, so you really need some. At some point after some economic overhauls you should be able to trade for a supply of it but until then you may get stuck without it.
Aquifers - If you're not yet a DF civil engineering pro then just say "No" to aquifers because they will be a frustrating disaster for you getting flooded as you try to dig below them. Many a dwarf has abandoned their embark due to aquifers interfering with their mining efforts. At least now there are light aquifers, but until you know how to pump and drain constantly seeping water even those are going to be annoying. Don't embark with aquifers until you've read the tactics for dealing with them on the Wiki and specifically want an aquifer to try your hand dealing with. They are a special challenge that many people just never want to learn to deal with. I never really learned to deal with them effectively myself either. But they can be good if you can get practiced in dealing with their problems.
River - This one is really up to you, but a source of water that doesn't seep out of the rocks and flood your mine can be very handy. They normally come with fish, and sometimes some problematic creatures. But you can survive pretty well without one.
Soil - Until you know how to irrigate stone cave floor or farm in dangerous caverns, you probably want at least a little soil to make farming a little easier. Once you get better at controlled flooding or defending cavern floor then you won't need this, but until then a little dirt will be convenient.
Clay and Sand - These don't matter except for making clay and glass crafts.
Iron - Iron is pretty important so even if you select nothing else, say "Yes" to Iron to go with your Flux Stone that you already said "Yes" to.
Gold and other metals - These aren't really that important, and if you probably won't find a location that matches everything if you set more than one or two of them to Yes. If you have to pick one maybe pick gold for the trade value, though that one can get you into trouble as you may have more attacks attracted by the wealth. (This won't happen until you start refining it though.)In summary, the main things you don't want are, in order of posed difficulty:
Aquifers
Evil
Savagery (usually)
Super low drainage especially if combined with high rain and aquifers
Temperature extremes (usually)The main things you do want are:
Flux Stone (or just forget about steel and hope for the best)
Iron
Soil (some)
River (if possible)
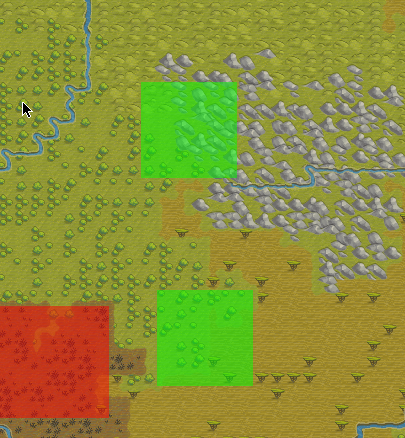
So hit Begin and the map will get scanned. Once the search is done the found areas will show up in bright green, which might be a little hard to spot if only one or two areas were found. They look like the image shown on right. The red rectangles are existing settlements where you can't settle.
Zoom in on an area that looks good and hit Embark to start selecting the specific rectangle.
Embark
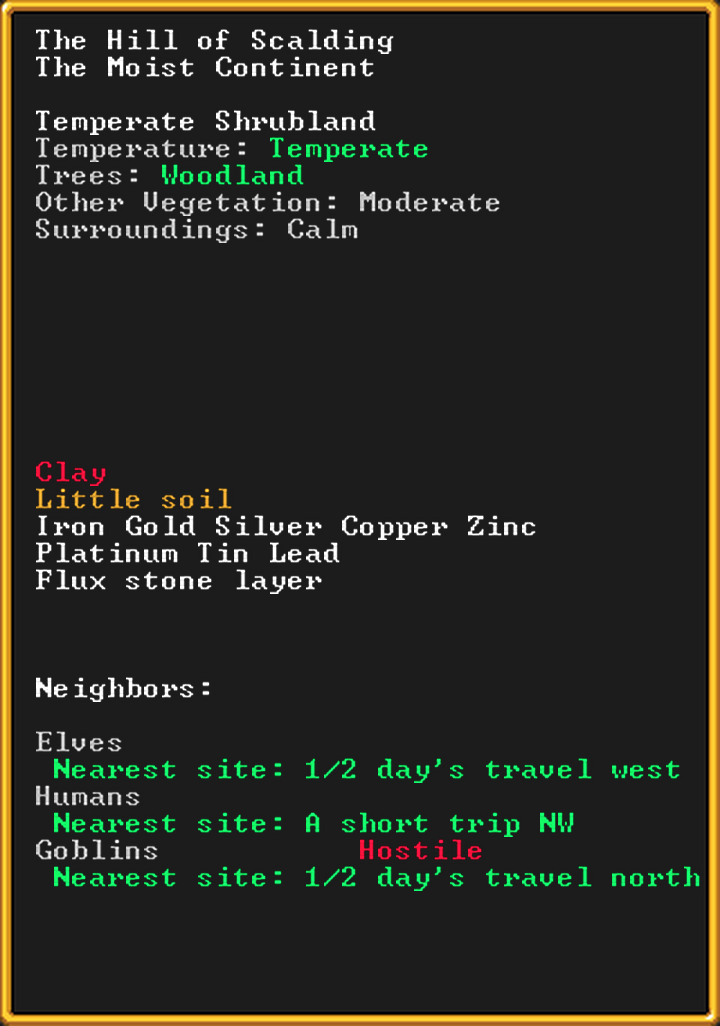
The thing to do now is to pay very careful attention to this information panel in the upper right that will show you what sort of stuff is in the area you have under the mouse cursor. This shows only the single tile under the cursor, not the whole 4x4,etc embark rectangle. So check out each tile in the embark rectangle size you select and make sure you aren't getting a tile of something you don't want in there. Even if you do it may not be a huge problem as a little corner of evil on your map might just make things a little more interesting.
Difficulty Settings (Like A Noob Or Master)
I usually just leave these at the default and setting Enemies and Economy to normal is reasonable, but the great thing about DF is that you can play it any way you want. Sometimes the "pro" thing to do if you just want to work on something specific and not be annoyed is disable sieges, raise attack thresholds, or whatever you want.
Sometimes you want everything as normal, but you find one particular thing especially annoying. Like I find vampires really annoying early on, so this time I'm cranking up the divisor on the fraction of vampires that immigrate to the fortress. Hopefully I won't get one until much later.
And maybe at some point you'll think the sieges are too easy and try to crank the difficulty up to near impossible so you can create a more interesting fortress ruin on the map.
In short, just do whatever you feel like with this but at least play on "Normal" once or twice to get an idea of what the default is like. You wouldn't want to miss out on all the fun all the time, or not even know what it is.
Prepare For The Journey Carefully Like A Master


Customizing your band of dwarves is something you can usually just skip, but it's worth learning how to do it because in some especially challenging situations, like trying to settle an evil arctic volcano, you're going to need to make sure no points are wasted on anything useless for the environment like Master Fish Dissection. A Master Dancer might not come in too handy either. And as with skills, you're not going to want any worthless equipment in these difficult situations either.
Picking Skills
The first tip here is to remember 1) you don't need most skills at first and 2) dwarves learn by doing. You could start out with completely unskilled dwarves, just assign them work, and they would skill up in whatever they're doing. Often you end up having to do this anyway with immigrants that arrive with skills that are worthless to you. And speaking of immigrants, remember you're going to have other dwarves show up with random skills too so this will not be all the skills you're stuck with long term. We're really just making sure we can get started effectively in a particular environment.
Some skills have limited opportunities to level up though because you can't swing a pick axe at them.
So the two types of skills you want to pick to start out with are:
Things that are immediately needed that you don't want to wait for, like at least one dwarf with decent mining ability.
Things like medical and combat skills that have limited opportunities to level and are needed or likely to be needed before anyone with those skills shows up.You always start out with seven dwarves. Here are the main expeditionary roles that you need and a simple list of skills for them:
Leader/Broker- Leader: 3
- Appraiser: 3
- Judge of Intent: 2
- Armor User: 2
Mason/Stone Crafter- Mason: 5
- Stone Crafter: 5
Carpenter/Brewer- Carpenter: 5
- Brewer: 5
Farmer/Jeweler- Planter: 5
- Gem Cutter: 5
Metal Smith/Cook- Armorsmith: 5
- Weaponsmith: 3
- Cook: 2
Doctor- Diagnostician: 5
- Wound Dresser: 1
- Surgeon: 1
- Bone Doctor: 1
- Suturer: 1
- Soaper: 1
Variations on Skills
Obviously there can be a lot of variation on this. For example if embarking in a particularly violent area you may need more weapon skills. You could even send in a whole combat team that has to learn everything else on the job. The aforementioned is just an implementation of the idea of picking immediately useful skills and hard-to-learn skills and obviously doesn't need to be followed exactly.
Here's a quick breakdown of which skills are most immediately useful and how difficult they are to learn:
Appraiser, Judge of Intent - These are needed for trading and are hard to train.
Leader - This is used for teaching combat skills.
Miner - Easy to learn but helps a lot to have one dwarf with some skill in this area. The others will learn on the job, just bring more than one pick.
Woodcutter, Carpenter - You're going to be needing these right away to cut trees and make beds, but these can be learned pretty quickly by just cutting down lots of trees and making stuff. So they could be sacrificed if necessary.
Mason, Stonecrafter - These can also be learned, but you're immediately going to want to use them and some skill will speed things up. Stone crafting will allow you to crank out the junky stone trinkets for trade.
Gem Cutter - This is even better for cranking out trade items and starting with skill will help you crank out the higher quality cut gems sooner and make you rich enough to buy out caravans.
Planter, Brewer, Cook - You need these immediately, but planting is really the only must because the others can be learned while doing very slowly at first. Brewing is also very important to the dwarves, and Cooking helps keep morale up.
Weaponsmith, Armorsmith, Metal Crafter - You will probably have less metal especially at first, so to avoid wasting it it helps to start out with one dwarf with some skill in these areas. Otherwise you'll use up metal cranking out low quality items for a while.
Medical Skills - Hopefully you won't need these immediately, but they're difficult to learn so it makes sense to start with some. Soaper isn't really necessary here but I put it there as a reminder of how medically important soap is in the game.
Ambusher, Trapper, Fisher, Herbalist - It's easier and safer to produce food rather than hunt and gather, so these aren't really the best skills to start out with since they relate to tactics that aren't that great. Of these sorts of things, Fisher is probably most useful.
Combat Skills - How important these are depends on the hostility of your situation. They can take a while to learn but can be learned so in more peaceful situations it isn't really that important to start out with them. In more hostile situations you might want an assault team with weapons and combat skills that will just be slow at everything else.Other skills are less important, or are very useful but can be learned easily by anyone assigned to the job.
Picking Items and Animals
The default equipment you start with is good, but here are some things you must not remove and some things that you can ditch if you want more points for other stuff:
Cloth - This is useful for cleaning and bandages, and tougher to produce, so keep these.
Anvil - This is absolutely critical! You must have an anvil or you are screwed! You need an anvil to make an anvil, and they must be made of iron or steel. So if you are somehow dumb enough to start without an anvil then you will do no metal working until you can trade for one. You have been warned.
Pick - This is absolutely critical! You must have one! Not having a pick will be even worse than not having an anvil. You will be unable to dig and will have to trade for one. Not having both picks and an anvil is so undwarflike that you might as well have turned into a short ugly elf or goblin if you're going to go that way. Ideally you should bring 3 picks.
Food, Drink, and Seeds - Don't start with less than the default amount of food, drink, and seeds or you're going to be tempting fate much more than usual. Especially don't ditch the seeds.The rest of the stuff is good to have so don't remove it unless you really have a plan to construct it immediately. Wood things like crutches can usually be removed and easily constructed on site.
Things to possibly add:
Two more picks, total 3.
Seven leather backpacks.
Copper weapons and armor. Axes are good because they can chop trees too.
Replace some food with one of each type of the cheapest type of meat because you get a free barrel for each type.
More food and seeds if starting in an especially difficult spot.Most things you can make or trade for later.
As for animals, I think this is a good minimal recommendation:
1 Male, 2 Female Dogs
1 Male, 2 Female Cats
1 Male, 5 Female ChickensAfter ditching some other items you would have enough points you could bring more animals than that, but I think everyone is going to want dogs and cats running around to control vermin. Don't forget to make nest boxes for chickens. Don't forget which animals are grazing types and need grass.
The chickens are super cheap will really crank out the eggs, but the pigs are expensive and not that important if you want to save the points. Once they breed enough their tallow would be nice for soap making. (Soap is almost like antibiotics in this game.)
Embark!
Change any names you want and make sure you spent all the points you could, then finally you're ready. Embark!
Strike The Earth Like A Master


Since it is assumed that you have done the basic quick start tutorial, this section will cover starting up a fort from an intermediate level perspective that assumes you already know basics of digging and setting of stockpiles. Now its time to get a little more strategic with the planning of rooms, defense, and configuration of stockpiles.
Moving to Safety Immediately
Normally this is no rush, but I'm going to assume that one day you might want to settle an evil freezing savage volcano or something and will need shelter and safety immediately. So lets cover how to get to safety immediately, should it be necessary, without sacrificing too much in the way of planning.
Dig a Ramp
Normally you'd just dig a stairwell first, but since you already know how to do that, and we want to start preparing for caravans that will eventually have wagons too, lets go over using ramps.
Every 3D tile (cube) in the game actually consists of two areas: the main space on the level, and a thin floor. When you just "dig normally" the main area of the cube is removed and the floor remains so that if you dig out the main area of the cube below then there's no opening between them.
But when you "channel" in a cube where the main area is empty you do two things: 1) remove the floor of that cube on the current level and 2) turn the main area of the cube under the floor into a ramp (it is passable but not empty).
This means that when you "channel" (dig out the floor) on your current level, not only will the floor "plate" be removed on the current level but the main area of the cube under that, on the level below, will become half-filled with "ramp". Dwarves can then walk down one level to that passable-but-not-totally-empty cube area and dig horizontally without digging out the ceiling.
Here is a diagram from the wiki showing how this works. Don't worry if this takes some getting used to, or if you make some mistakes you have to fix.
The light blue thin tiles show a removed floor "plate" and the green ones are floor plates that are still there.
Back to the entrance ramp: Eventually we want our entrance ramp to be three tiles wide, but for now lets just dig out one.
So select Dig (m) and then Dig a channel (u) and click twice on one of the ground tiles immediately north of the wagon. Note that "Dig a ramp" actually digs a ramp into a wall then digs out the ceiling above the ramp, so that's not what we need for ramping down. Use "Dig a channel".
Unpause the game until the ramp is dug then pause again.
Digging In
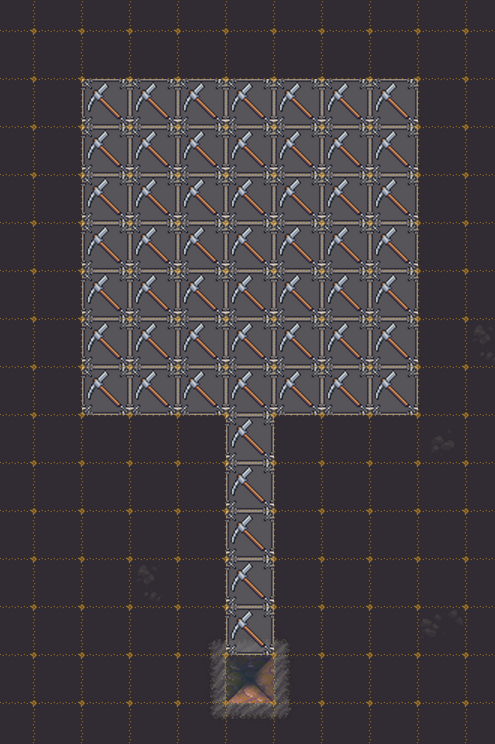
Now move the view down a level and dig a short tunnel off the ramp followed by a 7x7 room. We're picking 7x7 because we eventually want this to become our trade depot and we want to enlarge the ramp and tunnel to 3 tiles wide, but for now this going to be our general stockpile. If you want to enlarge the tunnel and ramp to 3 wide now go ahead because it won't take long, but in a hostile situation its better to leave it one tile wide so you can wall the tunnel off faster.
Unpause until this is dug out then pause again.
Moving In
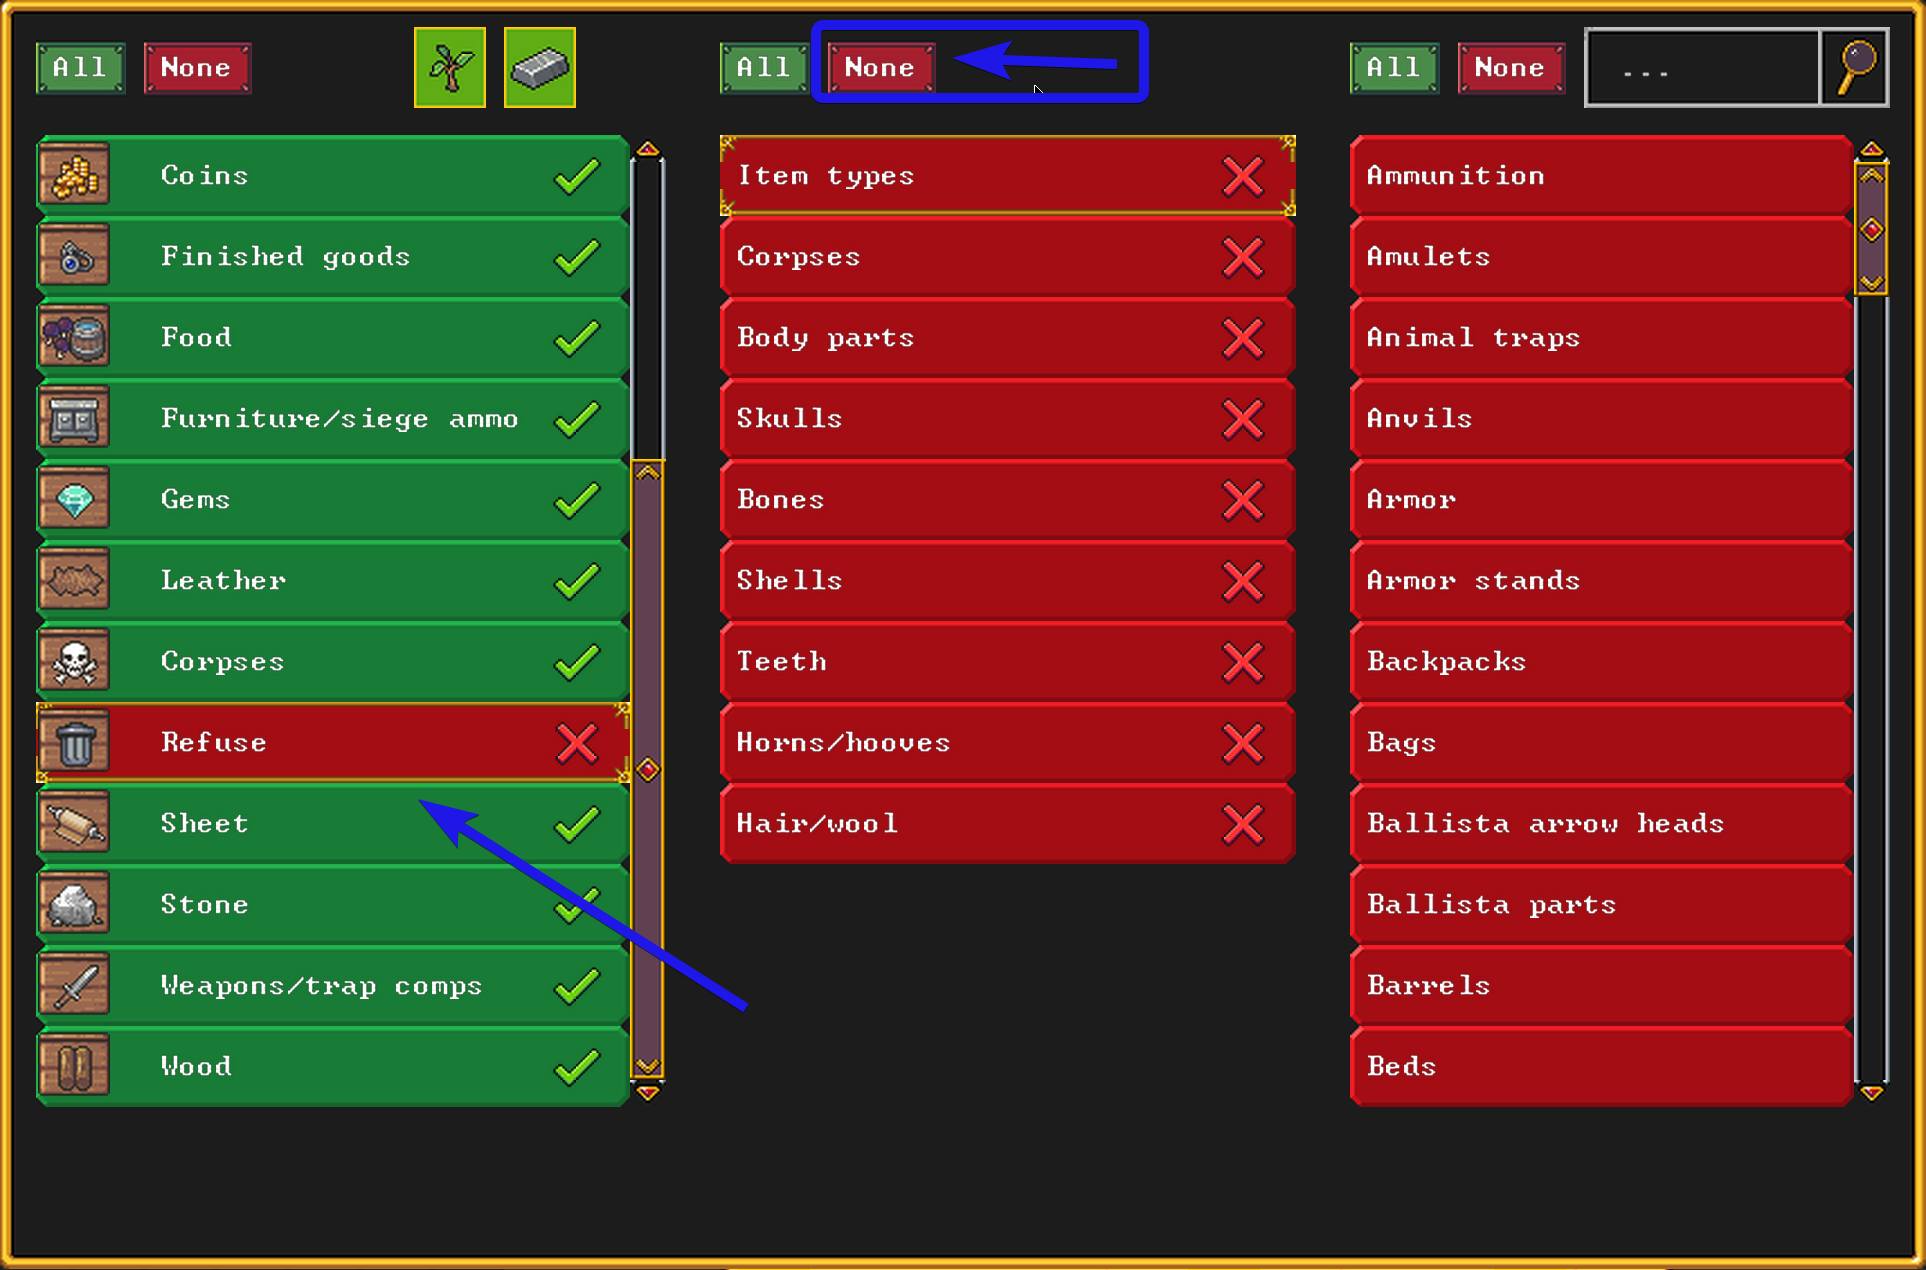
Create a stockpile over the whole room, then select "All" in the configuration, then hit "Custom" and disable All Refuse like this:
A second thing we want to do here to keep the dwarves from milling around outside where it could be dangerous is set this as the meeting area.
Select Zones (z), select Meeting Area, and drag over the whole room to cover the same area as the stockpile. Don't bother to name it because it isn't going to be here very long. The dwarves will not be happy long-term with an ugly dirt hole as their meeting hall.
Finally, move the view back up, select the wagon (which may be a little difficult with the dwarves and animals sitting all over it), and click the remove icon.
The wagon is useless but the wood you get from it could be quite useful in some situations with few trees. A very noob thing to do leave the wagon sitting there when you could desperately use wood you get by deconstructing it.
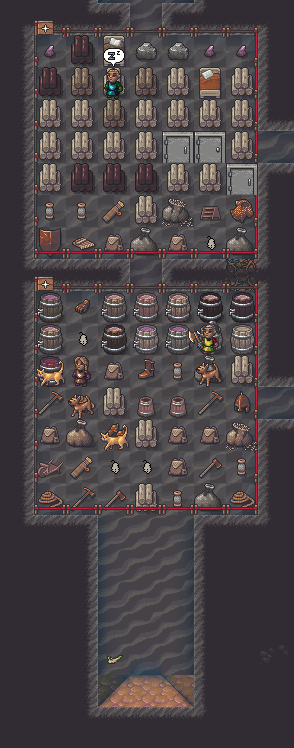
Note that the 7x7 stockpile might seem big, but you don't have any storage bins yet so you're probably going to need more stockpile space. Dig out another 7x7 or so room to the north of the first one and place another "All with Refuse Disallowed" stockpile in that room.
Safe At Last
After unpausing for a bit, and with sufficient stockpile space, you should see your wagon get deconstructed, everything moved inside to the stockpile, and the drawves hanging around the meeting area.
If there were a lot of evil outside this would be the point where you would want to wall your dwarves in, everything else out, using whatever material they have available (which might only be wood from the wagon, but ideally would be stone). To do this you'd use the Constructions menu under b-n.
You should end up with something that looks like this:
Waste Management Like A Master
The next problem is that you don't have a refuse pile, and rotting stuff will accumulate in places where you don't want it.
The noob thing to do would be to let this sit around, rot, create miasma, and make the dwarves unhappy after which they'll throw tantrums and kill each other.
But this is easily avoided by creating a refuse "stockpile", preferably outside.
If the surface is reasonably safe, just go up and create a rather large, such as 10x10, stockpile and set it as refuse. If not then dig out a large room somewhere away from everything else and put a similarly sized stockpile in there. Put a door on this room to help control smell as soon as you can, but at first just use a long hallway.
Make sure to go into custom settings on your "All" pile and disable refuse as previously mentioned. The other noob thing to do is to just click "All" without excluding refuse, and end up with rotting refuse in your main catch-all stockpile.
Later we will talk about other ways of dumping things, but for now just create the refuse pile away from where dwarves will be.
Also you may want to go into custom settings and make sure corpses are allowed. This will be enabled if you just enabled all refuse types. Later we will need a proper tomb with coffins to keep dwarves happy when their friends die, but the refuse pile makes a decent temporary morgue in case anyone dies before you get this done. And you also need a place for dead monsters and animals.
Not Starving Like A Noob


Keeping Animals Alive
So now you're all moved in and can wall yourself off if its really necessary, but this isn't really a good idea if it isn't. So now lets tackle the next problem which is that your grazing animals are hanging out with the dwarves with their pile of food and booze but no grass. The noob thing to do here is to let them starve then get confused as to why all your grazing animals are dropping dead.
If you were going to wall yourself in at this point then the best course of action would be to build a butcher shop and kitchen relatively soon, butcher the grazing animals, then cook some tasty animals to conserve other food supplies. Since you'd be unable to support them their best fate would be the kitchen.
But for now lets assume that isn't necessarily and it would be better to keep them alive to produce more tasty animals for later.
Move the view back to the surface, then click Zone (z) then click Pen/Pasture. You need this to be relatively large so they have enough grass. The less fertile the ground the bigger it needs to be so it pays to err on the side of largeness.
Now once you have the zone added you need to assign animals to it. Click the button that looks like a +Rabbit and select grazing animals. This means things like cows and horses and not cats and dogs. There's no need to confine pets that will run around eating vermin when not hanging out with the dwarves.
Unpause the game and you'll see your dwarves drag the animals out to their new pasture.
Later you might want to try to protect the pasture from predators and enemies with a wall or something, but for now don't worry about it.
Farming
Initially you don't need a huge farm. I recommend two separate 3x3 plots. At this point create a small down stairwell adjacent to one of your rooms, if needed to get to dirt, and dig out a room with at least two 3x3 areas of dirt floor in it. You might want a third 3x3 plot for pig tails which can be used for brewing and cloth.
If you don't have a dirt layer then you're going to have trouble for a bit because you will either need to farm in a natural cavern or you will need to gather surface plants and try surface farming. You can also flood an area with water then shut the water off to create muddy floor, but that will be covered later.
For now we will assume you have some dirt floor in a dirt layer somewhere and this will be good enough for now even if underground dirt layer farming has been nerfed somewhat.
b-o-f-p is where the farm plots are. That's Structures->Workshops->Farming->Farm plot.
Create two plots (or three) and unpause long enough for your farmer to construct them. Then repause the game.
Set one plot to grow Plump Helmets in every season, then set the other farm plot to grow Sweet Pods in spring and summer, Quarry bushes in autumn, and Plump helmets in winter. If you made a third plot then select pig tails for the allowed seasons and leave the other seasons fallow for now.
Note that some plants like dimple cups are not food, they're used for textiles, so don't plant non food/drink plants at this point.
Something like this should be fine for now. This shows three 3x3 farm plots and a seed stockpile room.
Don't unpause yet because your farmer will be working while others are executing some activities you need to designate.
Sleep Like A Master
Right now the dwarves will be unhappy sleeping on the floor, so they need at least 3-4 beds in a dormitory. Later they will get their own bedrooms, and the dorm will get used for temporary overflow, but for now a dorm will be good enough.
You don't need 7 beds because they won't all be sleeping at the same time anyway.
First thing to do is dig out a 5x5 room near your main stockpiles and build a Carpenter Workshop in the middle. Use junk stone as the material so you can save the wood for other things. Then create a new stockpile surrounding the workshop and select Wood as the type.
In general it seems to help a bit to place workshops adjacent to stockpiles of their input material, and to have a stockpile that accepts the output nearby.
This won't be a very large stockpile so don't disable wood on the main stockpiles just yet. If you feel like it, configure the new wood stockpile to transfer from the "all" stockpiles, but this isn't strictly necessary right now.
Once this is done, manually set up construction of at least 3 beds. If you have plenty of wood and can chop some trees make 5 instead.
Dig out another area of the same size and put a Stoneworker's Workshop in the middle of the room, then just like before create a stockpile around it and set the type to stone.
You want to make as much stuff as possible out of stone rather than wood. For now make at least 5 stone doors to help keep some rooms comfortable. Soon you're going to want some stone tables and thrones as well because we need offices to get work orders up and working. So add at least 3 stone tables and rock thrones to the stone workshop. (Notice that stone equivalents of some items have different names, such as "rock throne" not "stone chair". Later we will go into how to use stone for as many things as possible to save the wood for things that absolutely require it.)
Dorm
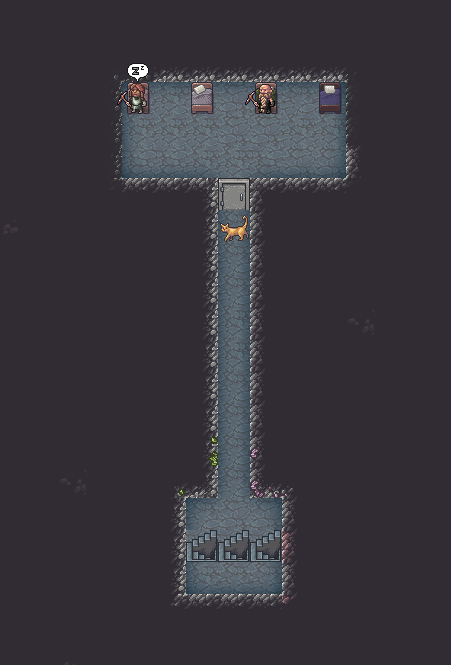
While the beds and stuff are being made, find a good stone location away from where you're planning to put workshops and dig out a room big enough for the beds. Maybe 3x7 in case you need to add more beds.
Stone is best for this because it can be smoothed and carved which will make the dwarves happy. And try to locate it away from noise sources such as workshops or meeting halls.
Once you have the area dug out, put a door on it and place the beds in the room. Then use Zones (z) to designate the room as a Dorm (and NOT a bedroom).
Something like this will work just fine for now:
At this point the dwarves are going to be much happier now that they have proper beds to sleep in, but we still need to improve their meeting hall situation and make sure they don't run out of booze.
Don't worry if the dorm isn't smoothed and carved yet, you can get to that later. This will be worth it though as it will keep them happy until you can construct individual bedrooms for them.
Party Like A Master

At this point you should still have plenty of booze and food from your embark supplies, but this isn't going to last forever.
It might seem silly but setting up brewing of alcohol needs to be a relatively high priority because dwarves are unhealthy and unhappy if they don't have a constant supply of alcohol. Drinking water is for elves and very shameful to dwarves. Dwarves also need a fine meeting and dining hall which will eventually become a tavern.
Fortunately, brewing and cooking aren't difficult.
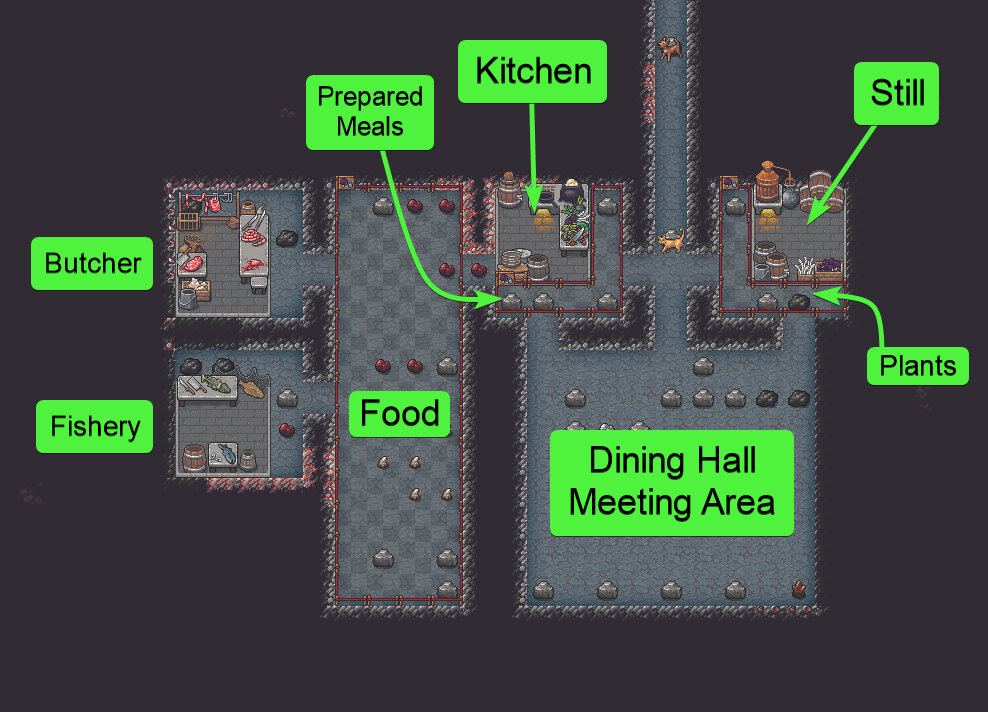
The best thing to do here is start carving out a stone meeting hall with some side rooms for the kitchen and distillery. These are 3x3 workshops so again something like a 5x5 room to put them in gives them both a decent amount of stockpile space. However you can also just build a large pantry next to therm and use less space.
Though you may not need them yet, be thinking about where to put the butcher workshop and fishery. Those tend to be smelly so I'd recommend putting them behind the kitchen and pantry. And put doors on the dining/meeting hall, the kitchen, and the distillery to help control bad smells in case anything rots. In general, put doors around every room where things can rot and create miasma.
What you end up with should look something like this, but you want doors everywhere between the rooms, and you're going to want tables and rock thrones very soon:
Eventually you also want the meeting/dining hall smoothed and carved.
For now, drag both a meeting hall and dining hall zone over the large room, and go remove the old temporary meeting area in the first stockpile.
Also, another noob thing to do is to allow drinks to be used to make meals which depletes the drinks and can leave the dwarves thirsty. Lets disable this by using the Labors control panel (looks like a hammer in the lower left of the screen) like this:
Also make sure using seeds for brewing and cooking is disabled (should be the case by default.)
Note that you can customize the food stockpiles to remove seeds, and you can place a plant-only stockpile around the still.
But don't start queuing up the meals or smoothing and carving the walls just yet because next we want to build two more workshops and set up Management and Bookkeeping that will save us from having to add these jobs to workshops in an annoying one-off manner.
Rock Like A Master
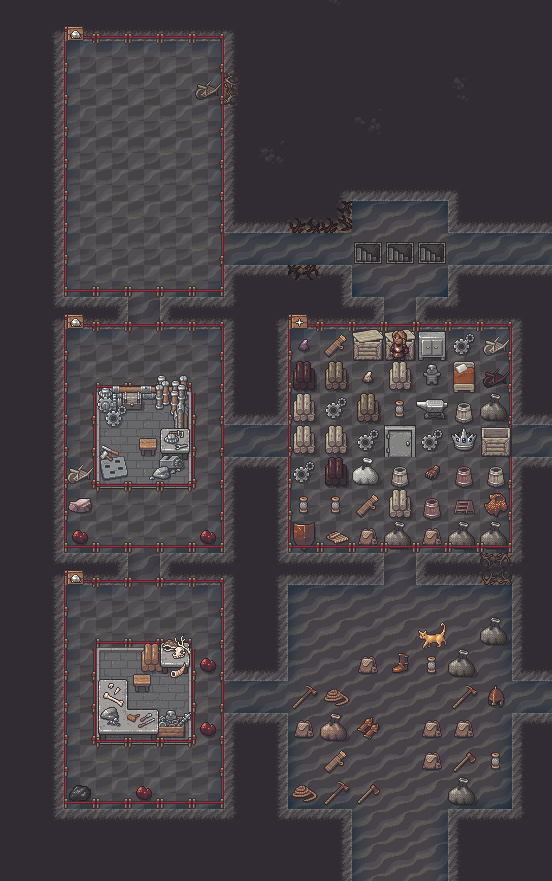
There are two more workshops that we need right away. Lets build those before we set up the offices for the bookkeeper and manager.
Craftsdwarf's Workshop
Mechanic's Workshop
Crafts
By now you are probably noticing that you have a lot of stone and are wondering if it is just waste. Well, for dwarves it is not because they can make tons of little (almost useless) decorative crafts. A few will get claimed by dwarves who like them, and that will make them happy, but the vast majority will get traded to caravans for all kinds of much more useful stuff like cloth, leather, food, weapons, armor, metal, or anything worthwhile.
You might think that shale figurines would be worthless, but someone out there really eats dat s--- up, and if you crank out a large number of rock crafts, especially at higher quality, they can be worth a rather large number of dwarfbucks worth of other stuff.
Mechanisms
The other thing you need is a few mechanisms, and we will get to the reason why in a bit, but for now just build the mechanic's workshop. You should end up with something like this:
Notice the initial stockpile has been removed, but the goods haven't all been relocated yet. The two new workshops are added, and at the top I added another stone stockpile to help feed the craftsdwarf.
Chicken Ranching Like A Master
Build Nest boxes at the craftsdwarf's workshop, if you have chickens, one nest box per chicken. They can be made of stone. This will produce a lot of eggs.
The nest boxes are like furniture that need to be placed. They don't need to be placed anywhere special, but you might want to create another animal pen/pasture zone and assign the chickens to the room or area with the boxes.
Chickens will claim a box. If you want eggs to hatch, they need to be forbidden or removed as stockpile and food production items. Either that or the boxes should be placed in a room with a locked door to keep dwarves away from the boxes. Also make sure a rooster has access to the boxes if you want hatched eggs. But doing this all the time may produce too many chicks, so the better thing to do might be to manually forbid a controlled number of eggs. You can worry about all this later though, but for now build and place the nest boxes to get the egg laying going.
Manage And Bookkeep Like A Master


Now it's time to get proper management set up so we can put all of these workshops to proper use much more easily than the noob way of adding individual items to each workshop one at a time.
At this point you should have at least 2 doors, 2 tables, and 2 chairs (rock thrones). So dig out some small offices like this and place a roch throne and table in each one:
Drag an Office zone around the inside of each room.
Assign Admins
Click the crown icon in the lower left and open the Nobles and administrators screen.
The main ones you need to assign are the manager and bookkeeper, and these can be anyone. Just pick whoever is least skilled or most idle at the moment.
I also took this opportunity to assign the expedition leader as the Broker since I gave him some relevant skills. The other positions aren't really needed yet, and assigning some of them could be a bad idea because they'll demand stuff.
Assign Offices
After assigning those dwarves, remember the names of the ones you assigned, go back to your office zones, hit z for Zones, click on an office, and assign the manager to an office like this:
Do the same for the bookkeeper.
Check the Nobles screen again to make sure the "needs office" icon is now green for each one, and now we are ready to queue up some work orders.
Add Your First Work Orders (Like a Master)
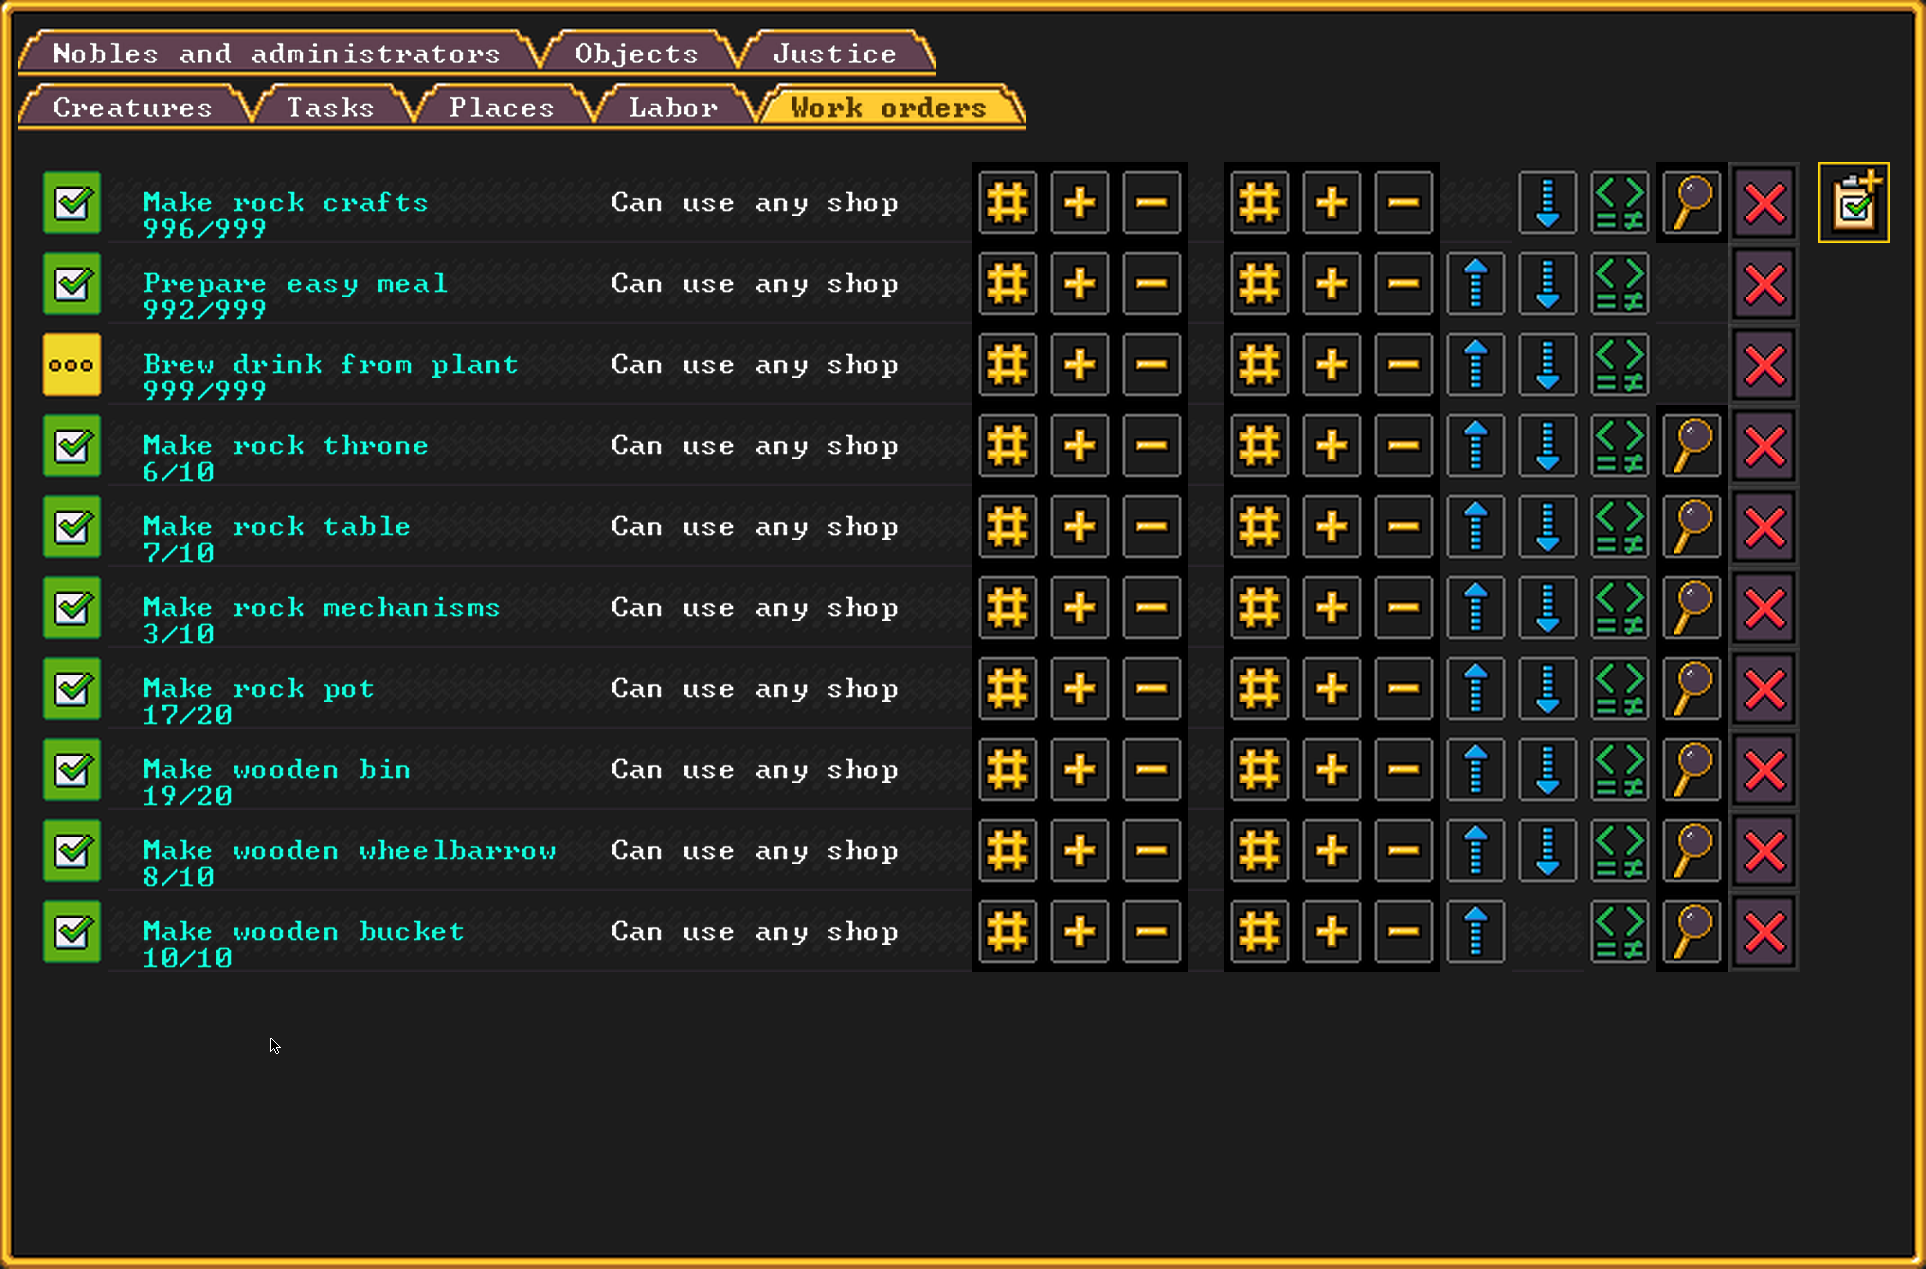
Click the Work Orders icon (looks like a clip board) or hit o, and queue up a few things we've been needing:
This is a good initial list of stuff to start with. I might have forgotten a few things when I took the screenshot but that's most of it.
And if you really want to manage like a pro then set some stuff that needs constant production to a large number like 999 then set conditions on it. Like only prepare meals when the number of unrotten prepared meals is less than 10, etc.
Whenever you need something produced just come back here to add it. Of course you'll need to make sure you actually have the required workshop and materials plus available dwarves with the proper labor enabled on them.
Mining Like A Master

At this point your next priority, at least for your miner, is to start digging to obtain regular stone to make things with while also looking for ore, gems, and "economic stone" such as flux stone and coal.
About Minerals
By now you've probably noticed that this isn't minecraft and none of the rocks are named "iron ore" or anything like that. Instead you get the actual geological name of the mineral.
While you could go get a geology textbook, the easier thing to do is just look up what each type of rock is good for. Rather than rewrite the wheel here I'm just going to refer you to this guide on the wiki:
The Non-Dwarf's Guide to Rock[dwarffortresswiki.org] Use this any time you find something to figure out what it's good for and not good for. Note that pretty much any low-value stone will become valuable in the hands of a skilled master craftsdwarf, so there's no need to try to exclude that from trinket production.
Going Exploring
Leave the game paused while you designate some mining. First designate a short tunnel north or some other direction away from your rooms and then designate a staircase at least 10 levels deep but for now no deeper than 20 or 30 levels. You probably already have a short central staircase by now, if you're like me, so you can also dig that one deeper. But it can be helpful to create a new staircase for the mine that you can barricade off from the rest of the fort more easily if you need to.
At this point you will ideally avoid digging into a cavern, because those are generally more dangerous than the surface, but that may not be possible to avoid. So if you dig into one then use b-n and wall it back up for now. That is unless you want to see interesting things happen sooner rather than later.
Designate some tunnels off in all directions on several levels and start exploring for minerals. Don't worry if you end up with lots of boulders because you need those to build buildings and craft all sorts of stuff, so even the junk rock will be very useful. And your miner will be gaining skill. Generally speaking you want to eventually form a grid of large squares, but early on it's better to dig a little on each level rather than dig all over one single level.
But don't designate too much stuff just yet because you also need to dig out more rooms. Keep the tunnels relatively minimal and focus on probing around at this point until you get some more rooms you need dug out. You just want to make sure there's always stuff for at least one miner to do.
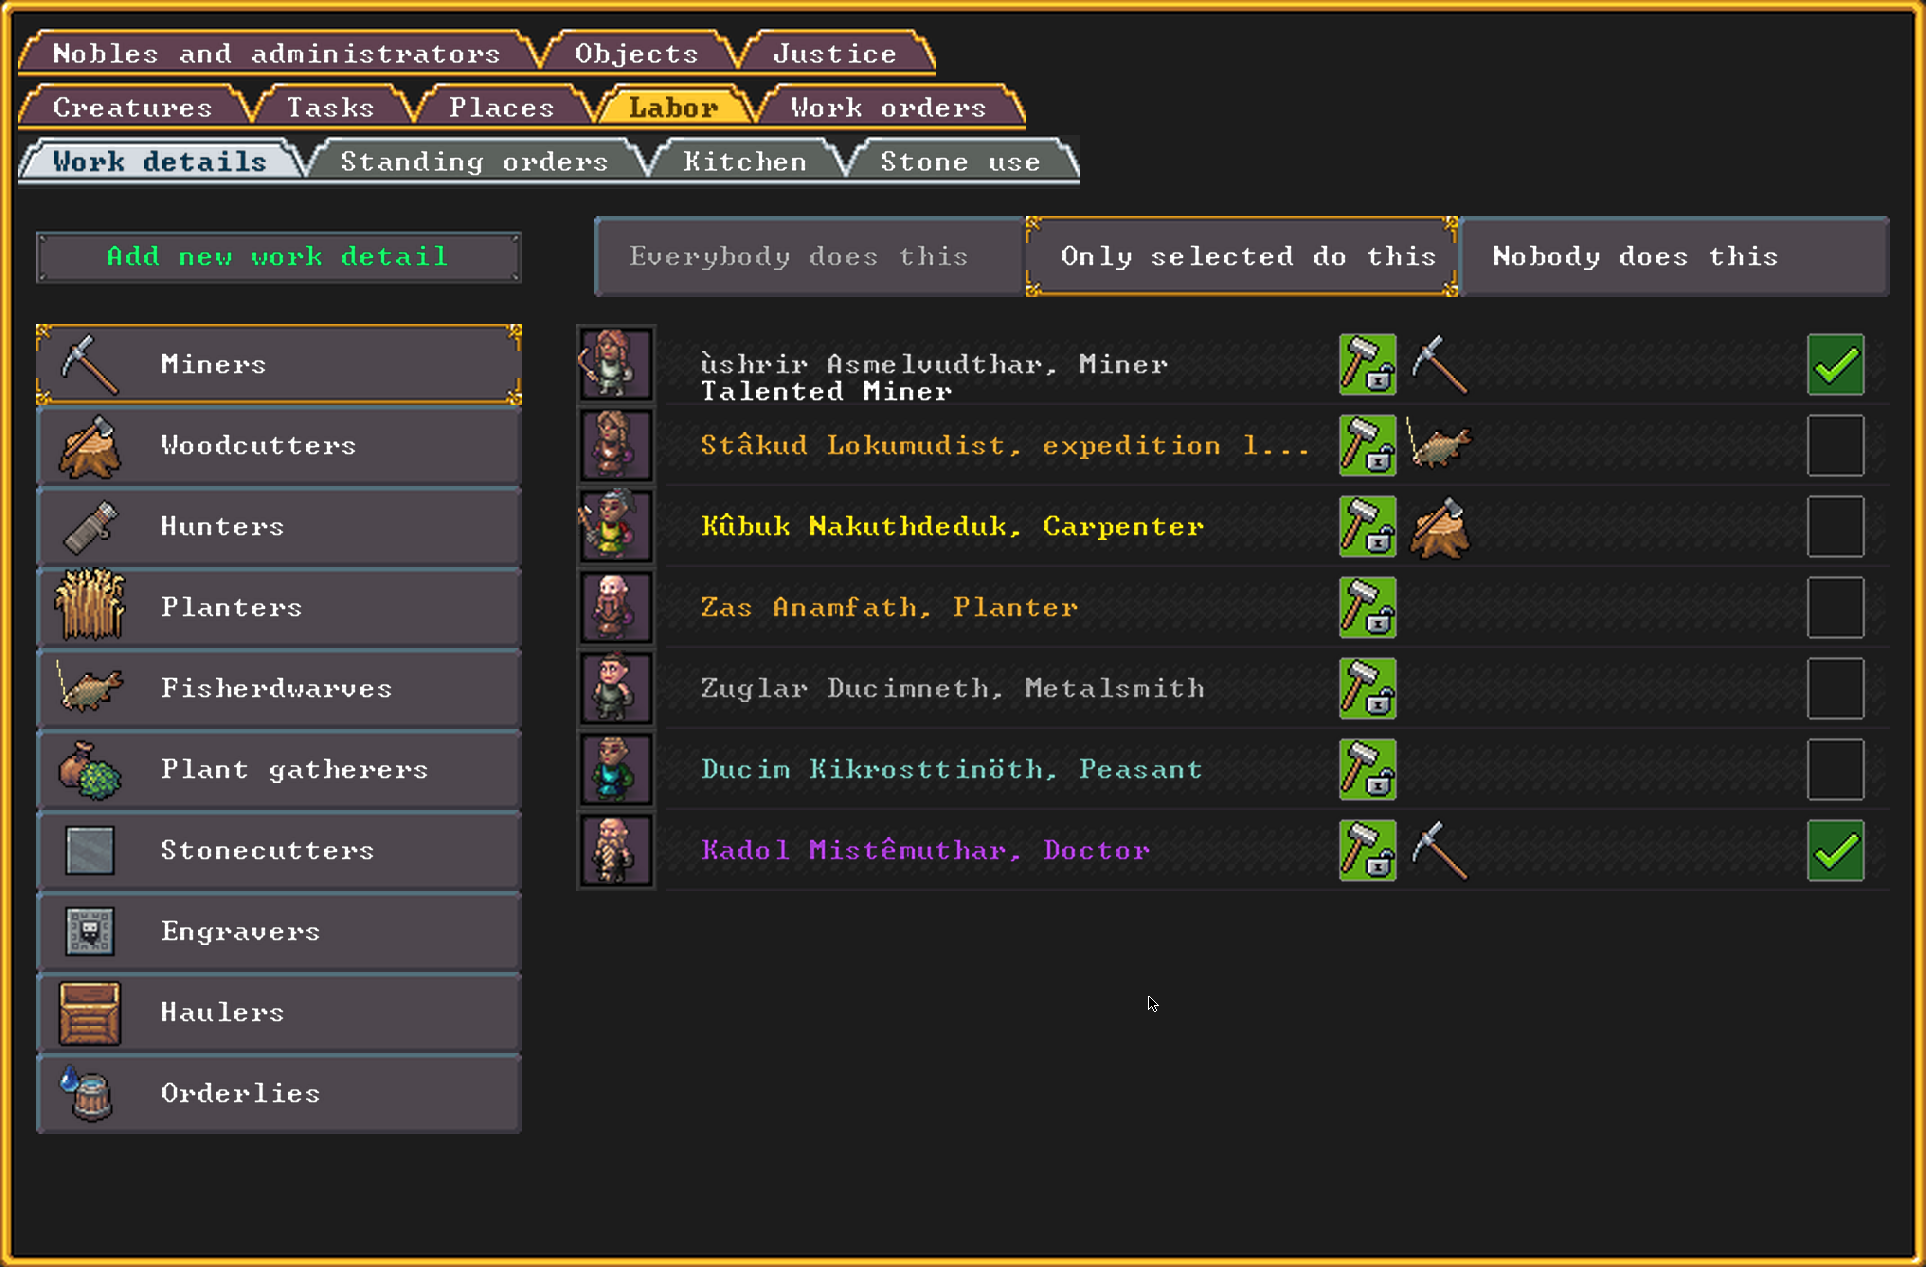
If any of your dwarves are too idle then set them to mining as well using Labor (y) - Work Details and those extra picks you brought. The new guys will be slow and not produce as much usable stone but they will get better and digging out junk is the best way for them to learn.
Looks like the Doctor is a little low on patients at the moment. Tell him to get off his ass a grab a pick!
Labor Management
Another thing to do is disable other labors for your main miner, especially Hauling and Orderly, so he will stick to mining and not get diverted by hauling things or cleaning up messes. The secondary miners can keep their menial part time jobs though.
Disable other stuff, like hunting and fishing, for everyone if you don't want to do any of that right now.
In general, do this for any dwarf who's current job is especially important at the moment. Want to make sure that stone crafter really cranks out the nick nacks before the next caravan shows up? Disable all labors for him except for stone crafting. You can't do this with too many dwarves when you only have 7 or you'll end up with hardly anything getting hauled.
Automining
Initially you should mostly be exploring, but I will go ahead and mention some things that will help you later mine out veins of ore and gems that you've found.
Automining Options
There are three options here, but Auto is the one you usually want. Note that this comes with some dangers since miners will keep digging out all adjacent ore and the vein might lead somewhere dangerous. So if you want to play things safe, remove the designations with x after they've mined out a decent amount of ore for the time being.
Gemcutting Like A Master
Soon you are going to find some gems in your mining exploration. So in anticipation of that, dig out some space and build the following:
Jeweler's workshop (b-o-j)
Rough gem stockpile
Cut gem stockpile
Check your stocks and make sure you have some extra bins. If not then create a work order for some. This will speed up moving the cut gems to the trade depot later.At this point you've probably figured out building workshops and stockpiles pretty well, and have some idea of where to locate them, so I will leave the logistical details to you.
Like stone crafting, cutting gems can also produce a lot of valuable trade goods and so you want to get started on this sooner rather than later too. Hopefully you started with someone with some gem cutting skills but if not don't worry, just put some dwarf on it anyway. Prioritize mining gems over mining ore for now.
If you started with stone crafting and gem cutting skills, and start these forms of production rather quickly, then you're going to be cranking out some pretty mucho dwarfbucks worth of tradable trinkets before the first caravan arrives.
Fortress Access Control (Like A Master)
If we had a lot of evil outside then we should have walled ourselves in anyway, but either way we need to set up a gate to allow caravans in and wall ourselves off the rest of the time, or only wall ourselves off if a bunch of goblins show up.
To do this we use a Bridge even if we don't have anything to bridge over yet. This is because a bridge is a drawbridge and it will raise up to form a wall.
We can make these out of stone.
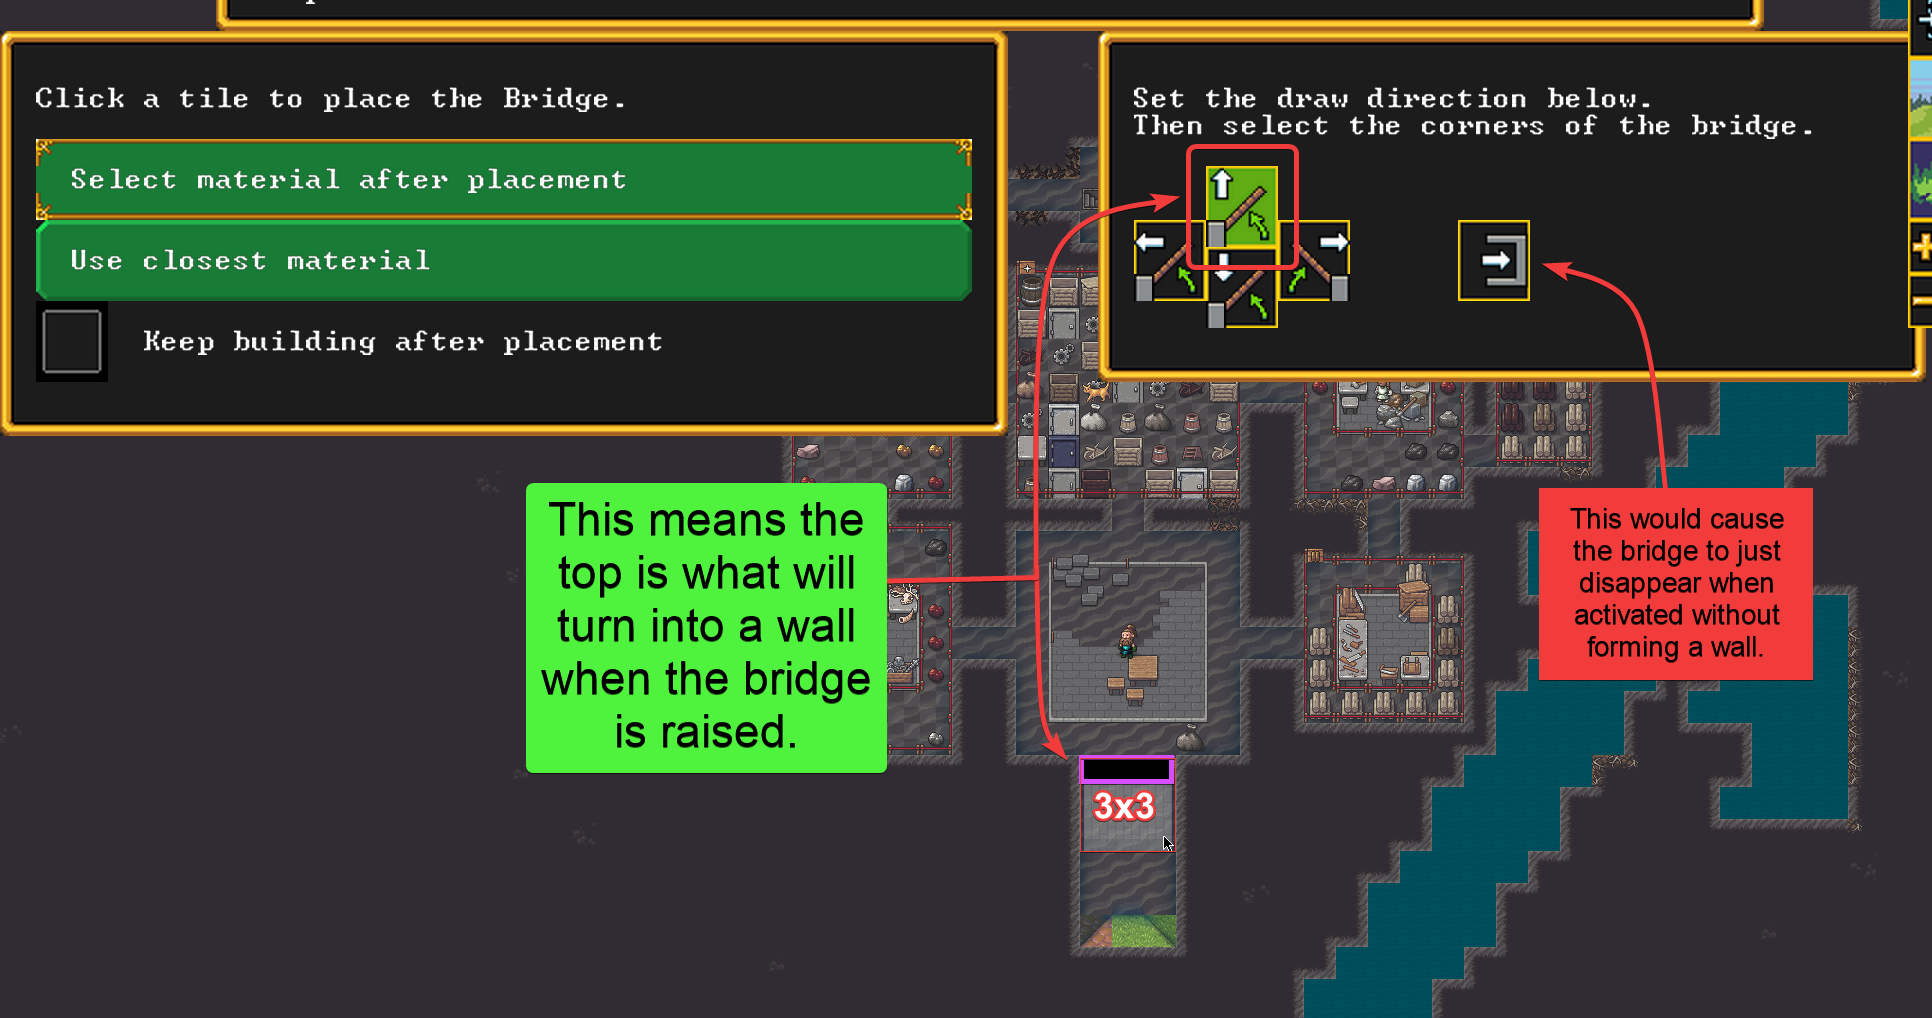
Hit b-n-b for Structures->Constructions->Bridge and draw a 3x3 bridge in our entrance like this:
As you can see, in this case we need to select the top icon so the bridge will raise up at the top edge and form a wall.
If your entrance is oriented in another direction then select the appropriate direction. Whichever direction you pick, that side of the 3x3 square will turn into a wall when the bridge is activated by lever pulling.
Once you've placed the bridge, move on to using those mechanisms you made to place the lever for it.
Levers and Mechanisms
The best place for the lever is not next to the gate, it's where the most idle dwarves are hanging out mostr often. Don't worry, dwarves are really good at mechanical linking over long distances and distance doesn't matter.
Go down to your meeting hall and hit b-m-l for Structures->Machines->Lever. Build a lever. A lever works like a workshop, except only two jobs are allowed to be queued: link the lever and pull the lever.
Unpause the game until both the bridge and the lever get built. Click on the bridge to see if it has been completed yet because it might look complete on the screen even if it is not, and you can't link it until it is done.
Once the bridge is done, go back to the lever and click on it. Notice that the panel looks like a workshop. Click "Link lever" then move back up to the bridge and click that as the target. This will queue a lever linking job in the lever's "workshop".
A dwarf will go get mechanisms and bring them to both the lever and the bridge and then it will be linked when he is done.
Test it out by going back to the lever and selecting "Pull lever". This should cause the bridge to raise and form a wall, closing off your fortress. Pull the lever again to open it back up.
Levers can also be linked to doors, floodgates, and other things that can be opened and closed or activated and deactivated. They're your main user interface for dwarven contraptions.
Congratulations. You now have some proper access control to your fortress.
Doors
The simplest form of access control is just a door. The main problem with those is that they're only one tile wide, but they can be locked simply by clicking on them and clicking the lock icon. They can also be linked to levers just like the bridge, but then they become entirely controlled by the lever and can't be opened or closed normally by dwarves.
But this form of access control can be very convenient for back entrances or locking dwarves out of rooms or other areas like dangerous caverns.
Build The Trade Depot And Trade Like A Master
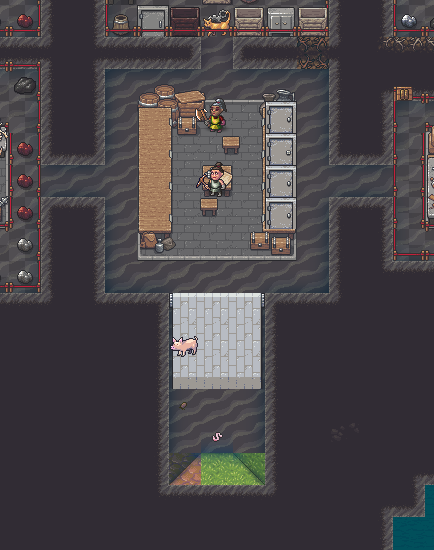
Finally it's time to turn that initial all-purpose shelter and storeroom into the trade depot.
Remove the stockpile if you haven't already, then remove any zones that are still there that you might have forgotten to remove.
Hopefully you already did this and the dwarves managed to clear all the stuff out of the room and move it into other stockpiles, but if not just go ahead and place the trade depot anyway.
Hit b-T and build the Trade Depot. As always, just use junk stone. You should end up with something like this.
Now you're ready to trade when caravans arrive.
Trading With Caravans
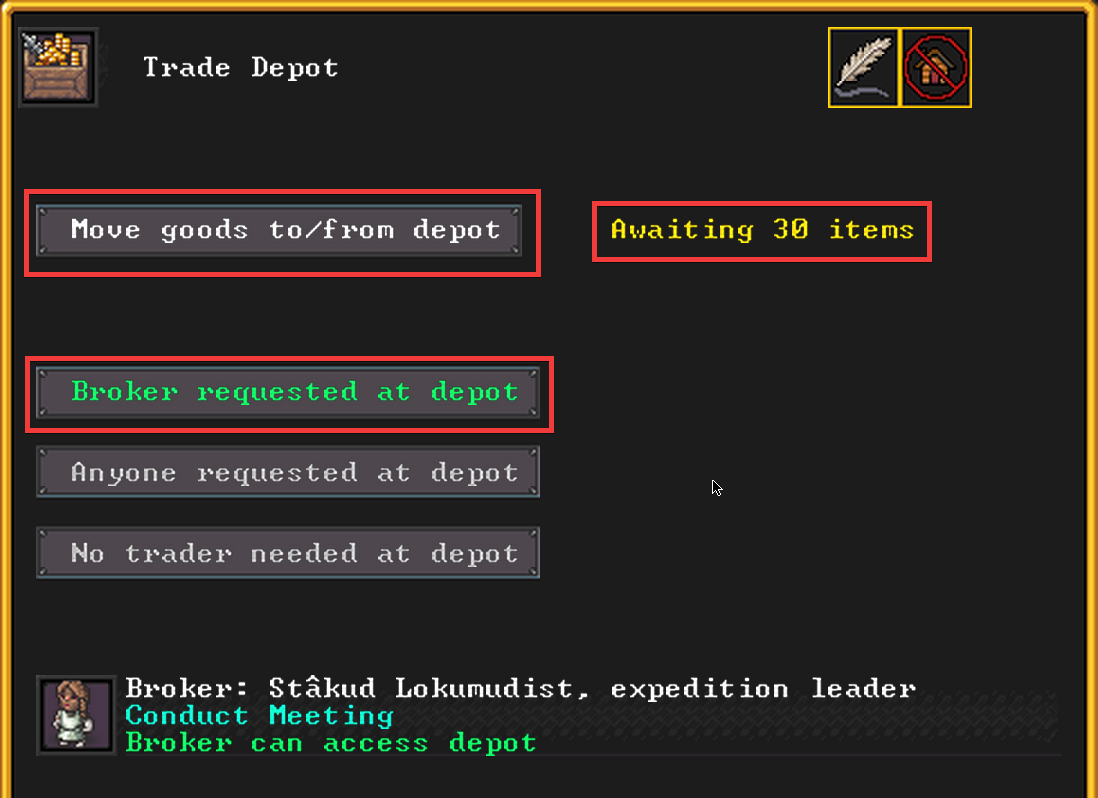
The trading process goes like this:
Request broker at depot (make sure you assigned one in Nobles/Admins, preferably with skills).
Move trade items to depot. This can take some time.
Enter trade.
Add items to the offer bid.
Add items from caravan to the offer ask.
Hit Trade to finalize and propose the selected items for exchange.
The first two steps look like this. Click on the depot, request the broker, and select items to move to the depot.
Trade Depot Window
Move any junk you planned to trade, like stone or other crafts and cut gems, to the depot. Hopefully you created a bunch of bins to put things in because this will speed up the hauling tremendously.
If you aren't sure if you have enough to trade, or want to get rid of some stuff, move extra things that you can make easily such as doors, stone coffers, or whatever to the depot. It may not be worth much but it can all add up.
Don't offer wood items to elves or they get pissed off that you killed the wood or something. They will get offended and leave. They really like stone and gems and stuff though because they don't make any of that themselves.
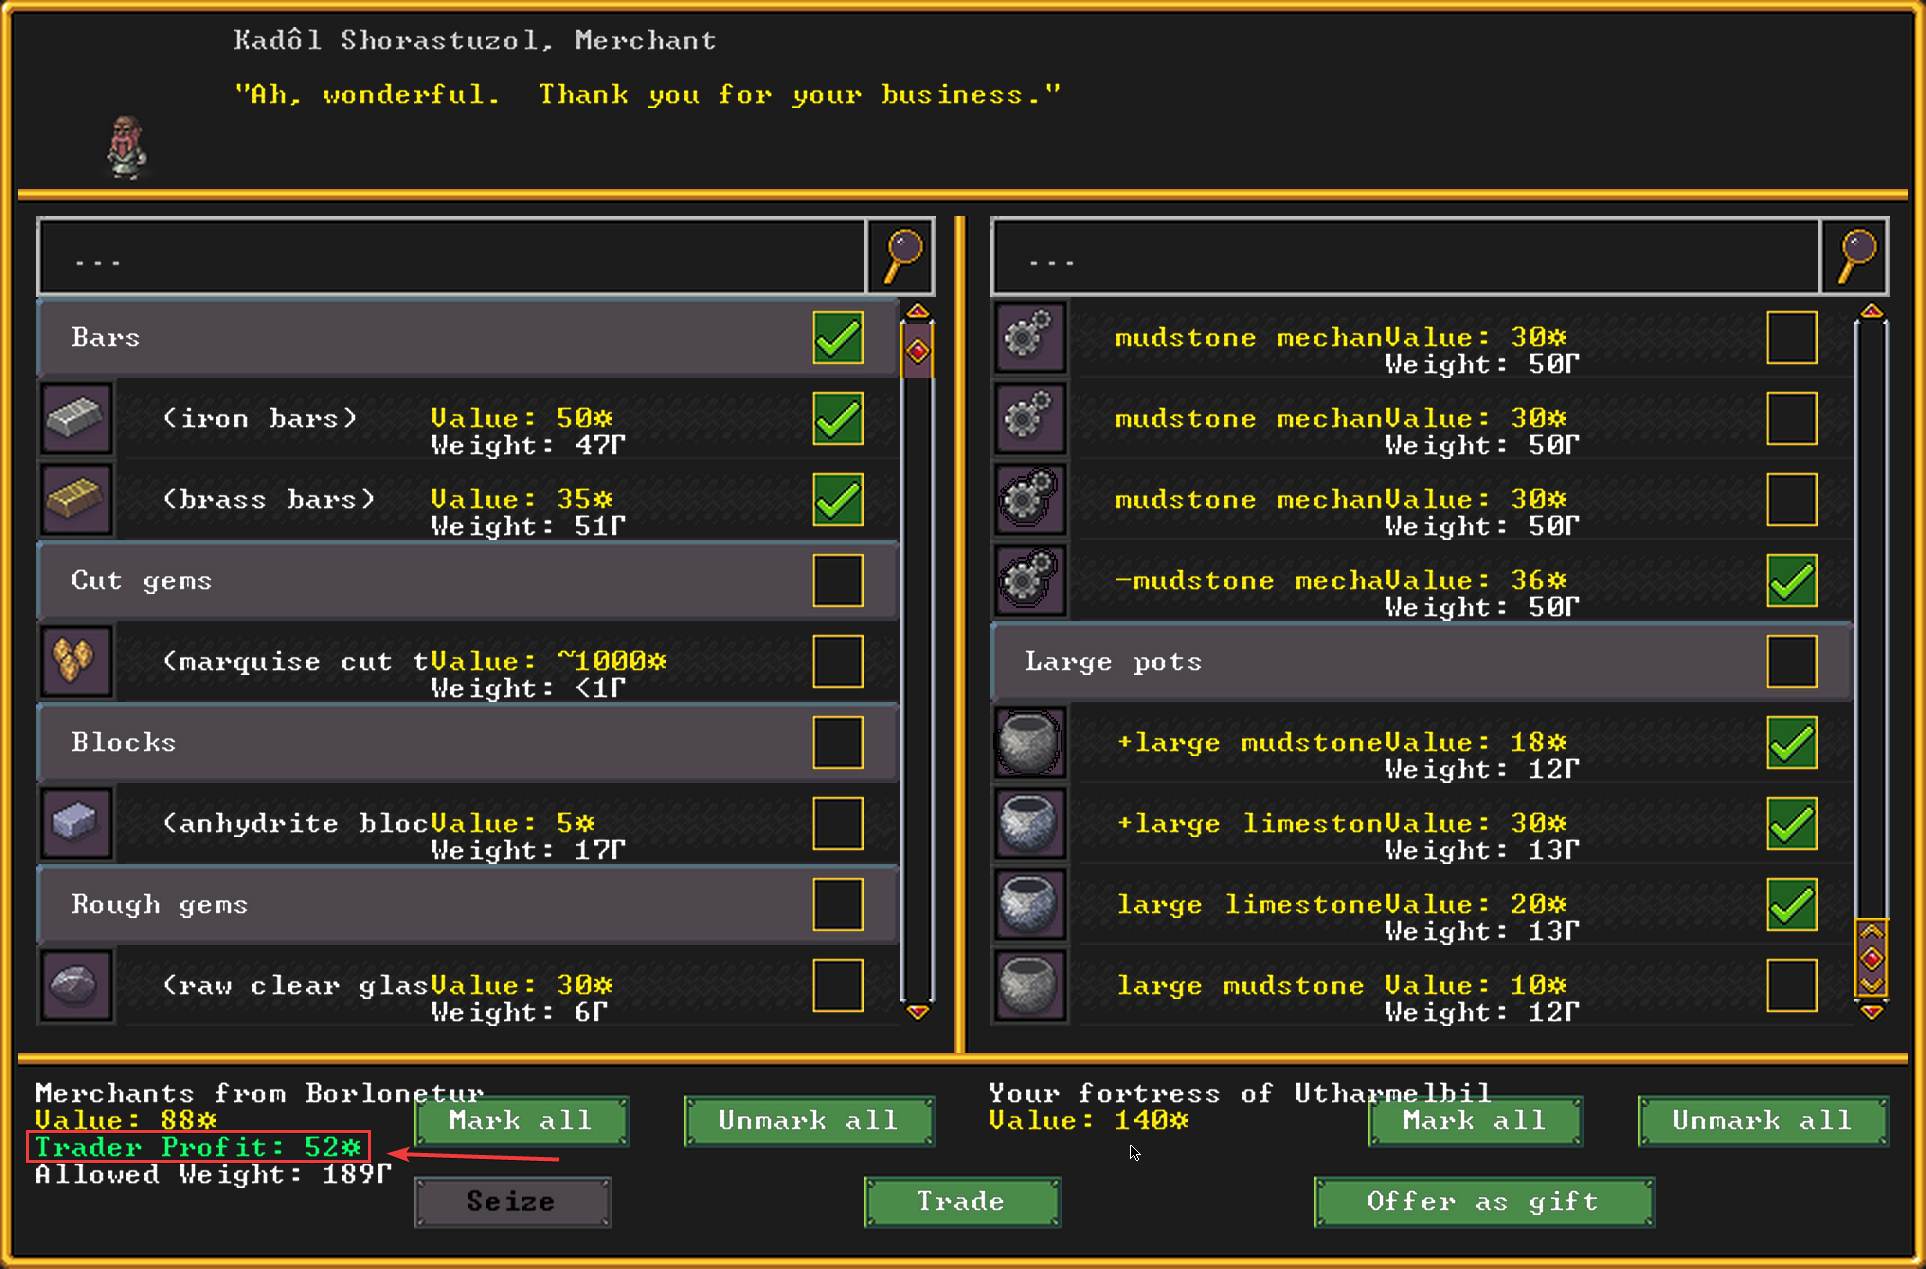
Exact break-even offers will not be accepted because merchants expect to make some kind of profit for their long dangerous trip. So you'll have to give them some profit. However how much will depend on the broker's skill.
The Trade haggling window.
Notice that when Trade Profit is green, he will probably accept. If it's yellow then he will probably make a counteroffer requesting more goods. However sometimes they will accept even if this is yellow, especially if they're already happy about how much they made from a previous exchange. The accuracy of the color code and what is or isn't accepted is going to depend on skills, but it's not obvious how this works.
Also notice that caravans have a weight limit. This limits your ability to sell them lots of heavy stone stuff that they can't carry, unless you can take more of their heavy stuff off their hands. Sometimes they show up with something stupid like a bunch of clay blocks which are very heavy but cheap, and it makes sense to buy them just to free up their weight capacity so they can accept more stuff from you.
Constantly trying to lowball can make negotiations worse (they demand even more profit) or offend the trader enough for them to pick up and leave without trading.
You can do multiple small trades or one big trade, but a smaller number of larger trades are more likely to result in better deals that are closer to the acceptance threshold without being over it much. It could possibly help soften up the trader to give him a very favorable but very small deal first.
Diplomacy
You'll also get a little Diplomacy button in the notifications area. This is where you can request items for next year, but they will jack up the price on these items. Need more leather, cloth, exotic food, or whatever? Here is your chance to request anything that you can't easily produce yourself yet.
They will also tell you which items they will consider to be worth more next time. If you can produce those it will make sense to do so since you will be the one who gets to jack up the price on those things.
Forge Like A Master
At this point you're somewhat overdue to do some forging. You've probably found some ore by now, and hopefully some bituminous coal or lignite. If you don't have those then you can always make charcoal from trees. And if you're in the unfortunate situation where you don't have any fuel, you will need to find a cavern with mushroom trees or dig down to magma to build a magma forge and magma smelter.
The usual process for getting started is to build a Wood Furnace and make some charcoal from wood logs. Just dig out some space near your woodpile, build the wood furnace under b-o-u-f and make one or two bars of charcoal. Really you should only need one. It's also possible to jumpstart the coke-making process by bringing a single bar of charcoal in your embark prep. This is an especially good idea if you anticipate a treeless environment.
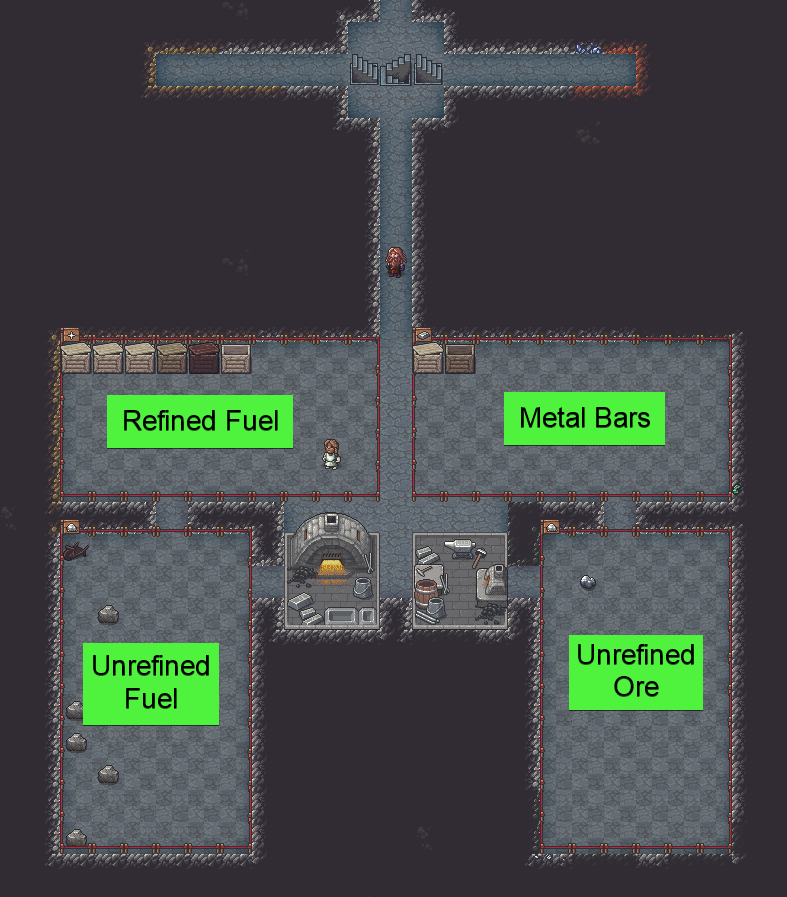
Now find a decent spot away from your sleeping area and build a Smelter (b-o-u-l) and a Metalsmith (b-o-i). I recommend something like this:
As always this is just a crude example.
You might also want an output stockpile for finished metal items closer by, but I'll leave that to you.
The custom stockpile configurations look like this:
Unrefined Fuel - Stone:Economic: Bituminous Coal and Lignite
Refined Fuel - Bars/blocks: Other material: Coal
Unrefined Ore - Stone: Metal Ores: All
and Stone: Economic: (flux stones for steel)
Calcite
Chalk
Dolemite
Limestone
Marble Metal Bars - Bars/blocks: Bars:Metal: AllAfter that, add work orders to "Make coke from Bituminous coal" and "Make coke from Lignite" 9999 times any time there is at least one Bituminous coal or Lignite respectively.
This will get you to producing fuel.
Rather than constantly trying to immediately smelt all ore as you find it, I would click the Stocks (k) button at the top middle of the screen and see how much ore you have of each type, then decide how to most wisely use your fuel supply on whatever metal you want to start with. Then queue up a work order to smelt that as many times as you need bars of that metal.
After that it's up to you to produce whatever seems most useful at the moment. You could produce more picks to put some useless Fish Cleaner immigrants on mining duty. Or you could start making weapons.
At this point I would highly discourage you from cranking out lots of crafts with valuable metals like gold and platinum because this will make you too wealthy and attractive to attackers. The best kind of metallic wealth to produce at first is the sharp and pointy kind, or the blunt and smashy kind, or the solid armor kind.
You could still make some metal crafts to trade, just don't make them of platinum or gold. And you want to be able to arm some dwarves with at least copper armor and weapons before using metal on anything else besides maybe picks.
Metal can also be used to make containers like bins that would otherwise have to be made of wood, but this is not worth it unless you're short on wood and have enough ore and fuel.
Prioritize And Conserve Materials Like A Master
This brings us to our next tip which we have already touched on somewhat: using the most common materials as much as possible to save the others for things that really need it.
Make Everything Possible From Rock
In general you want to make as little as possible out of wood so you can save the wood for stuff that really needs it.
It's a little confusing how to do this sometimes because it's not always obvious what the rock equivalents of wood items are.
Here is a list of the most common rock equivalents to make instead of the wood items. The main theme here is look for the word "rock" in the item list.
Rock tables instead of wood tables
Rock thrones instead of wood chairs
Rock doors instead of wooden doors
Rock pots instead of wood barrels
Rock coffers instead of wood chests
Rock mugs instead of wood mugs or metal gobletsThose are the main things you might be tempted to make unnecessarily out of wood. Note that sometimes you still need the wood version for some reason. Like a rock pot usually serves the same purpose as a wood barrel, but some workshops and such require the wooden one.
Other more commonly useful rock things: altar, armor and weapon stands, bookcase, cabinet, coffin, floodgate, grate, hatch cover, mechanisms, pedestal, and statues. There are others like jugs but their usefulness is more limited.
Save Wood and Metal
Some things can't be made out of rock. For example, beds and display cases must be made of wood. Bins can be made of wood or metal but wood is usually the better material for those, unless you have tons of fuel and ore. Buckets similarly require wood or metal. Other things that can't be made of rock but can be made of wood or metal: crutches, splints, cages, animal traps, stepladder, wheelbarrow... and others.
This should give you an idea of why you want to save your wood and metal for things that need it.
Other Materials
There are other materials things can be made of like cloth, bone, ivory, pearl, shell, wax, yarn, glass, clay, ceramic, and leather. But most of these (except maybe glass or clay) are hard to get a consistent supply of. Clay and glass use up fuel though, and dwarves are usually more inclined to use fuel on metal.
Summary Make everything possible to make out of rock using rock.
Things that can be made of wood or metal should usually be made of wood unless you're just swimming in metal and are short on wood.
Save metal for things like weapons that really need metal for physical mechanics reasons.
Obviously save things like gold for fortress bling (gold statue) and trade items.
Get creative with other materials as you happen upon them.
Waste Management Like A Master, Part 2: Legendary Dumping
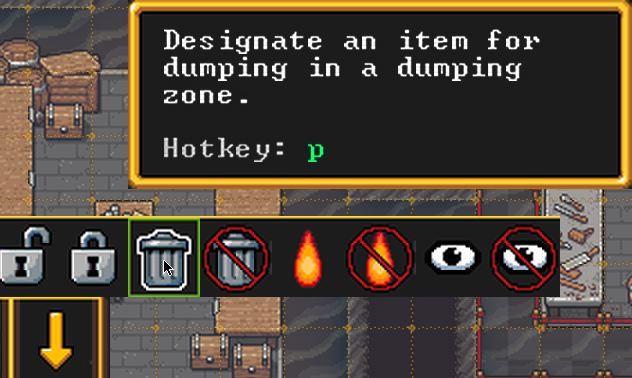

Sometimes the dwarves for whatever reason just don't want to place a priority on cleaning up stuff, like random boulders, that seem fine to them but look ugly to you. Or it's just easier to manually prioritize things for dumping, especially if they're creating a problem.
This is when it's time to employ dumping items in "Garbage Dumps" (even though the items may just need to be moved and could be worth something).
Construction
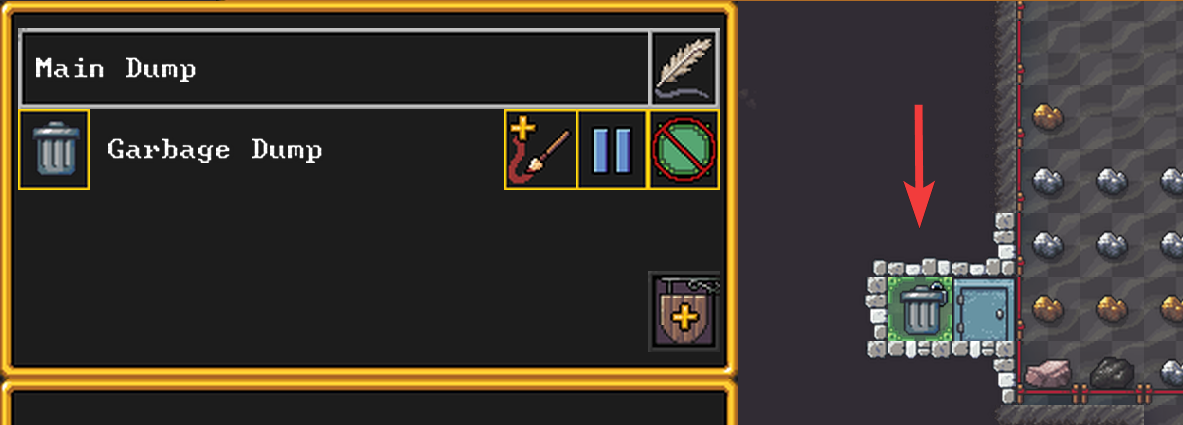
You probably only need one of these, especially right now. Here's the way to construct it.
Almost everyone uses this dump design.
The key features here are:
It's only 1x1 inside because any amount of stuff can be dumped in one tile.
There's a door on the room to control miasma in case we dump anything bad.
I put it next to a stone stockpile because often its going to contain junk stone which will be used by the nearby stone workshops.
To add this, dig out a room as shown, add a door, then use Zones (z) to add a Garbage Dump to the empty tile inside.
Dumping
To use this, use the i-p designation command which looks like this in the UI:
UI for object flags such as "dump" and "forbid".
Items flagged for dumping will be brought to this dump zone, unflagged for dumping, and flagged as Forbidden. This will prevent the dwarves from doing anything with the dump contents until the items are (re)claimed (un-forbidden).
Making Dumped Items Usable Again
Often you don't really want everything left in the dump, because it's usable rock, or it's refuse that eventually needs to be moved to a refuse pile or something., So periodically use the i-F "Claim forbidden items" command and click twice on the dump tile.
If items are forbidden the map tile will show a tiny lock icon in the corer. The individual item's window will show the lock border hilighted a little bit:
It's difficult to see, but that's what it looks like right now.
Using i-F ("claim") will clear the "forbidden" flag on the items in the pile, and they can now be used by dwarves for whatever they're needed for. If there's nothing to use them for and no stockpile to move them to, they'll just sit there until there is a need to move them which is usually ok. But be warned that unflagging the pile could cause a flurry of hauling to stockpiles to occur.
And don't forget you can set forbidden status on other things manually, which is useful to keep dwarves from messing with stuff that you don't want them messing with.
Construct Individual Bedrooms Like A Master
Your dorm will work out just great for now, but if you want the dwarves to have the most happy thoughts so that they can weather the worst situations without tantruming too much, it helps to make sure they can all have their own bedrooms.
These rooms don't need to be big. A simple strategy that works well, and is rather dense and low time/effort is:
Dig out 1x3 or 2x2 rooms.
Put a door on them.
Add a bed to each one.
Drag a bedroom zone over each room.
Add a cabinet and coffer, which can be made of stone.
Smooth the walls.
Carve the walls.Essentially the idea is to do maximum improvement to minimal space using only wood for the bed and stone for everything else. It helps if you have a high level stonecrafter cranking out some masterwork items. Even if they're just made of low-value rock, their high craftsdwarfship will make dwarves happy.
You can assign dwarves if you want, but you can also just leave it to them to claim their own bedrooms. This will let them pick the one with their favorite types or colors of stone around and stuff like that, to the extent that it's possible.
Cabinets let them store clothes, and coffers let them store other little items they've claimed.
Some nobles and administrators will have greater bedroom, dining room, and office requirements but the game will notify you about those. Just create more elaborate rooms for them and assign them as needed.
A very elaborate wiki article[dwarffortresswiki.org] on bedroom complex design is available for those looking for ideas.
Build Extra Workshops
This might be a good time to mention that you really want more than one of your more commonly used workshops like the Stoneworker and Crafts workshops, for example.
These are super cheap and fast to build, requiring a minimum of 9 tiles of mined-out space plus one piece of junk stone. So build 2 or more extras of everything important.
Not only will this help produce things in parallel when you get more dwarves, but if a dwarf goes into a strange moon and ties up a workshop it will not stop production of other things.
Some workshops will require a little more effort but not much. For example, the Metalsmith will need an anvil, but as soon as you find any iron you can easily construct 3 more anvils or so and build more Metalsmith workshops with them.
Work Details
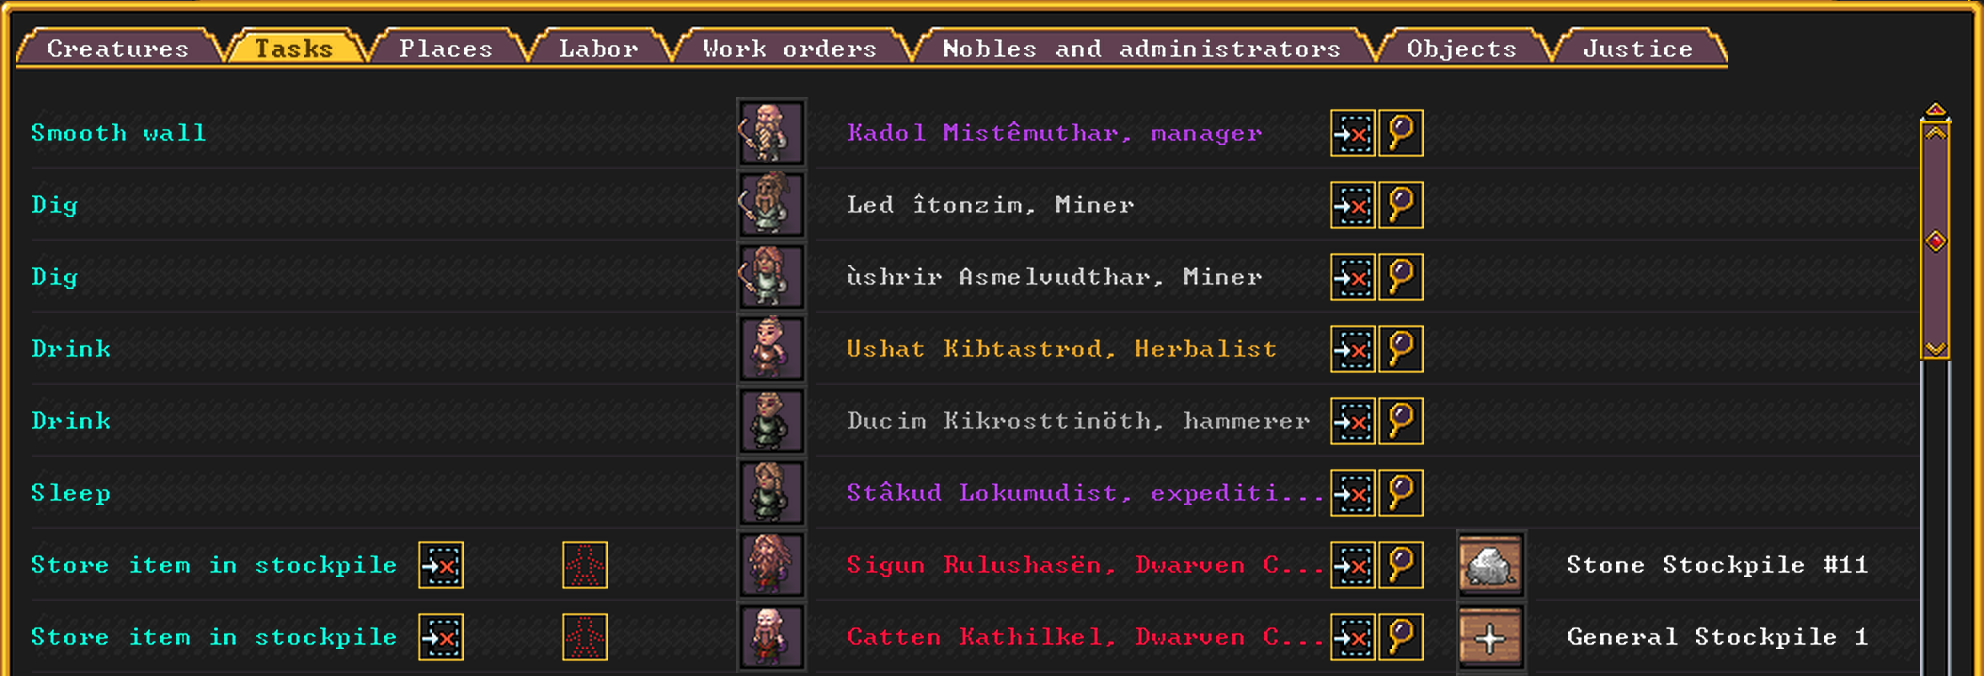


Now is probably also a good time to mention a few more things about Work Details (y). So far you've probably been using the defaults, but those aren't really good enough except at first. Until now you haven't needed to pay too much attention to the details of how dwarves decide what to do, but once you have more than a few dwarves you need to know more.
Tasks
Different conditions cause different Tasks to get placed on the dwarves' todo list. These can be automatic or a result of designations or work orders.
Individual automatic tasks - these are things individual dwarves do for themselves like eat, drink, sleep, etc. They'll usually take priority over other tasks.
Communal automatic tasks - these are things like cleaning and hauling between stockpiles. Dwarves will notice which things need to get done based on how you've configured stockpiles, for example, or what sorts of problems exist and queue up tasks for those.
Designated tasks - these are tasks generated by designations, orders to place or construct things, and tasks manually added at workshops or by work orders.Every task falls into a Labor category. For example, all of the mining, channeling, ramping, or stairway digging is categorized as Mining labor.
The Tasks (t) Window lets you see what each dwarf is doing and what is scheduled to be done.
Labors
Internally, every dwarf has a flag (checkbox) for which Labors they're allowed to do. But the UI doesn't let you enable or disable individual labors on individual dwarves. Instead you use Work Details which are "Labor flag sets" and then enable or disable entire sets of Labors for each dwarf.
To do this you can either click on an individual dwarf and set their enabled work details (labor sets):
Labors for a dwarf.
Or (usually better), view the Labor menu (y) and select which dwarves are on which work detail from a list of dwarves.
Labor window (y), custom work detail for keeping Ducimn focused on gemcutting.
Specializing and Generalizing
The main things you need to do with work details are:
Keep some dwarves specialized entirely or almost entirely on an important function like mining, or cracking out trinkets and cut gems to trade.
Keep most dwarves available for stuff like hauling and cleaning, but remove a few highly skilled ones to keep them focused on their main job or jobs.
Some dwarves should probably have two or three labors enabled due to having multiple skills, because you want some backups for important things too.
Immigrant Labor
Immigrants usually show up without any default work assignments, so every time you notice them show up, check your workdetails and figure out what to put them to work doing. At the very least, assign them to hauling, cleaning, smoothing, and carving walls. Of course if they have good skills in a worthwhile area then assign them to their professional focus.
Sometimes you just want to ignore their profession though when it is something like Fish Dissection.
Smooth And Carve Like A Master
Smoothing walls and floors is rather helpful. It keeps dwarves happy.
Once walls and floors have been smoothed they can be carved. This not only keeps dwarves happy but by looking at what they carve you can tell what they've been thinking about. They'll carve their favorite things and even events that happen.
Enable smoothing and carving for all dwarves except for the ones on important jobs you don't want to have distracted. This helps give idle dwarves something to do and raises their skills.
Prioritize smoothing and carving gathering and sleeping areas first. The unskilled dwarves will start out very slow and won't be creating any masterwork carvings at first but they will get better.
You may not want to get too carried away too quickly though because this raises the value of your fortress and makes it more attractive to attackers.
Designate one large room or some smaller rooms at a time then designate more when those are done. Don't designate everything or dwarves may get too focused on smoothing and carving when other things need to get done.
Just go small areas at a time as you notice dwarves being idle.
Tombs And Memorializing The Dead
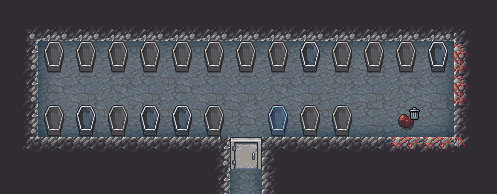
Tombs are pretty easy, and it can be helpful to start making a communal tomb sooner rather than later so that when dwarves die later the survivors will suffer minimal distress. Seeing their dead friends corpses laying around makes them unhappy, and smelling their rot makes them even more unhappy. Unmemorialized dwarves also like to come back as ghosts to harass the other dwarves, which also causes lots of negative thoughts. This kind of horror can drive the whole fortress into insane destruction.
Communal TombsWarning: There currently appears to be a bug where every coffin needs its own individual tomb zone. Below is how the game should work, and is approximately how it used to work, and I expect it will eventually get fixed to work this way, but for now you will need to create one tomb zone per coffin and just not assign dwarves to the zones.
The first type of tomb is the easiest type. It's like a dorm for the dead except using coffins. Just queue up 20 or so rock coffins and when they're done, dig out a room and place the coffins in the room like furniture. They're under b-f-x.
Then drag a tomb zone around the room. Put a door on the room. You might also create a stockpile of type Corpses:Dwarves in the middle of the room if there is enough space so it will get used as a morgue as well.
That's it. You don't need to assign any dwarves. When they die they will get automatically allocated to coffins. It used to be you needed to enable the coffins for use, but this is now done by just adding the zone.
Something like this is typical and it can be placed at the edge of the map:
As usual, smoothing and carving can be nice but it's not really a priority for the communal catacombs.
Assigned TombsThese are for the fancy noble dwarves that demand that their tombs be constructed ahead of time and that they be of sufficient value. The UI will let you know what the requirements are, but similar to special individual bedrooms and offices, just dig out a room, make a nice burial object of a nice material of a nice quality, place it in the room. Smooth and engrave the room if needed to raise the value. Drag a tomb zone over the room, and assign the whiny noble to the tomb.
Memorializing the LostAs in real life, sometimes the body of the deceased is completely lost somehow and not available for burial.
To address this situation properly, queue up a "Make rock slab" job and make a few rock memorial slabs in anticipation of the need to memorialize some of the fallen. Later you are supposed to "Engrave memorial slab" at a stoneworker's workshop, then install the slab somewhere like other furniture. This will keep the dead happy. (Note, currently there seems to be a bug with engraving memorial slabs.)
Fight Like A Master
This section isn't done yet, so for now what I will say is that it won't be too long before you have some weapons and armor and should start setting up a small militia.
For now I will just refer you to this wiki page:
Military quickstart[dwarffortresswiki.org] This should give you some idea of how this works but it has not been updated for the new UI.
To Be Added
Things I'm planning to add, but haven't done yet because my screenshot game is not far enough along yet, or I just haven't gotten to it.
Fertilizing Farm Plots
Hospital
Traps
"Strange Mood" Management
Justice
Wells and Water
Dealing with Aquifers
Using Magma
More elaborate mechanism tricks
Surface Farming
Obscure IndustriesThe main goal is to distill some of the more important stuff from the wiki with updated screenshots and references for the new UI.
Copyrights And Credits
Except as noted, this guide is copyright by me and should not be reproduced or translated without my permission. However, I'm not looking for royalties or anything (just 5 star ratings, maybe some point awards) so just ask in the comments if you want to translate it or republish and it will probably be OK. I just want a description of what you're planning,
Image CreditsMost images are game screenshots by me, but some are from the DF Wiki.
The guide icon was created by me based on a public domain artwork from https://commons.wikimedia.org/wiki/File:Dwarf.jpg
Dwarf Cartoon by Kruggsmash[kruggsmash.com] on YouTube.
Ramp mining diagram by Loci[dwarffortresswiki.org] on the DF Wiki.
Leave A Comment
Please leave questions or comments below as to what you think should be added, anything I missed, or anything that seems incorrect. I especially need to know about errors and need to know what's most important to people to add.
Also if you find this useful please click to rate it up because it takes some minimal number of ratings before the rating is shown and this will help with visibility. Awards are appreciated, but not really needed, as I would much rather have written feedback.
Source: https://steamcommunity.com/sharedfiles/filedetails/?id=2899235556
More Dwarf Fortress guilds
- All Guilds
- How to make an adventurer survive in adventure mode.
- Translate into other languages
- [PT-BR] ADVENTURE MODE - GUIA COMPLETO
- DFHack
- DFHack is not running
- Force Militia to Equip Boots+Gauntlets
- Infinite Steel (Leggings Exploit)
- Turn Obsidian into Sand
- How to Create Squads
- Making Artificial Volcanoes and Magma Landmines
