Introduction. What The Guide Covers And What It Doesn't.
This guide contains the most powerful leveling strategies that I have to offer (Most likely, I know all of them, and they all are here).
Guide contains several spoilers regarding bosses and game stages.
You should use this guide if you are an experienced player and completed the game. Otherwise you can ruin your experience with this great game. Because grinding is not fun.
This guide IS NOT covering complete leveling from first level, like kill 15 goblins to reach level 2, then go there, etc. You will have to reach the city and Greatwall by yourself, but that's easy, right?
General Class Tactics
Having troubles taking out bosses? BBI is too difficult for you? Then these listed below tactics are for you.
Note that I have never completed the game by strength builds. And I think that full magic build is the best. Knowing that, note that I may not know something about strength classes. For example, I think that melee-only classes are not mobile enough to keep up with BBI bosses or some enemies.
Mage/SorcererHoly enchanting, x4 demon's periapts, focused bolt(Hold the attack button). One of the strongest attacks in the game. Minimal cost.
Boosts via Ferocity.
Magick ArcherSix/Ninefold Bolt or Explosive Rivet/Volley + 4 Demon's periapts or 4 Magic Rebalancers.
Ricochet Hunter - One of the best skills for BBI in the game.
Mystic KnightGreat cannon with enchant, can be used with abyssal anguish.
Good damage, but a lot of preparations needed.
For quicker killing without much preparation and same mobility as Mage/Sorcerer, use blessed trance, and use focused bolts with a staff.
Please note that MK's enchants last less than Mage/Sorcerer's.
Assasin/Strider/RangerMultishot skills - five/tenfold arrow with blast arrows with 4 conquerer's periapts are the strongest attack these classes can do.
Use your pawns to carry even more blast arrows.
FighterDragon's Maw. Fighter is is invulnerable to any form of attack during the entire attack animation. Req. much stamina.
WarriorArc of Deliverance/Obliteration can oneshot some bosses. One of the strongest skills in the game. Requires much time for preparation.
Method 1. Level 10+
So, you've encountered someone strong, and you cannot get past him. And there is no way of going through him on the storyline. Let's say this is Grigori (Red Dragon), because he is sort of a damage check to make sure will you survive in the post-game, so many have troubles with him. You will need to levelup then. Weakest and most rewarding enemies for you will be the Wraith method.
Almost everyone knows about this because this is a very good spot to farm vocation level and exp.
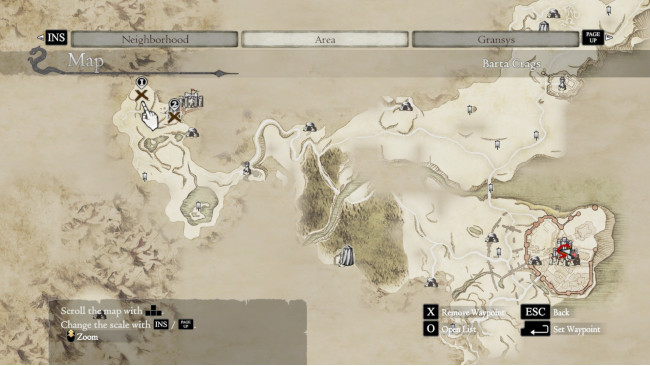
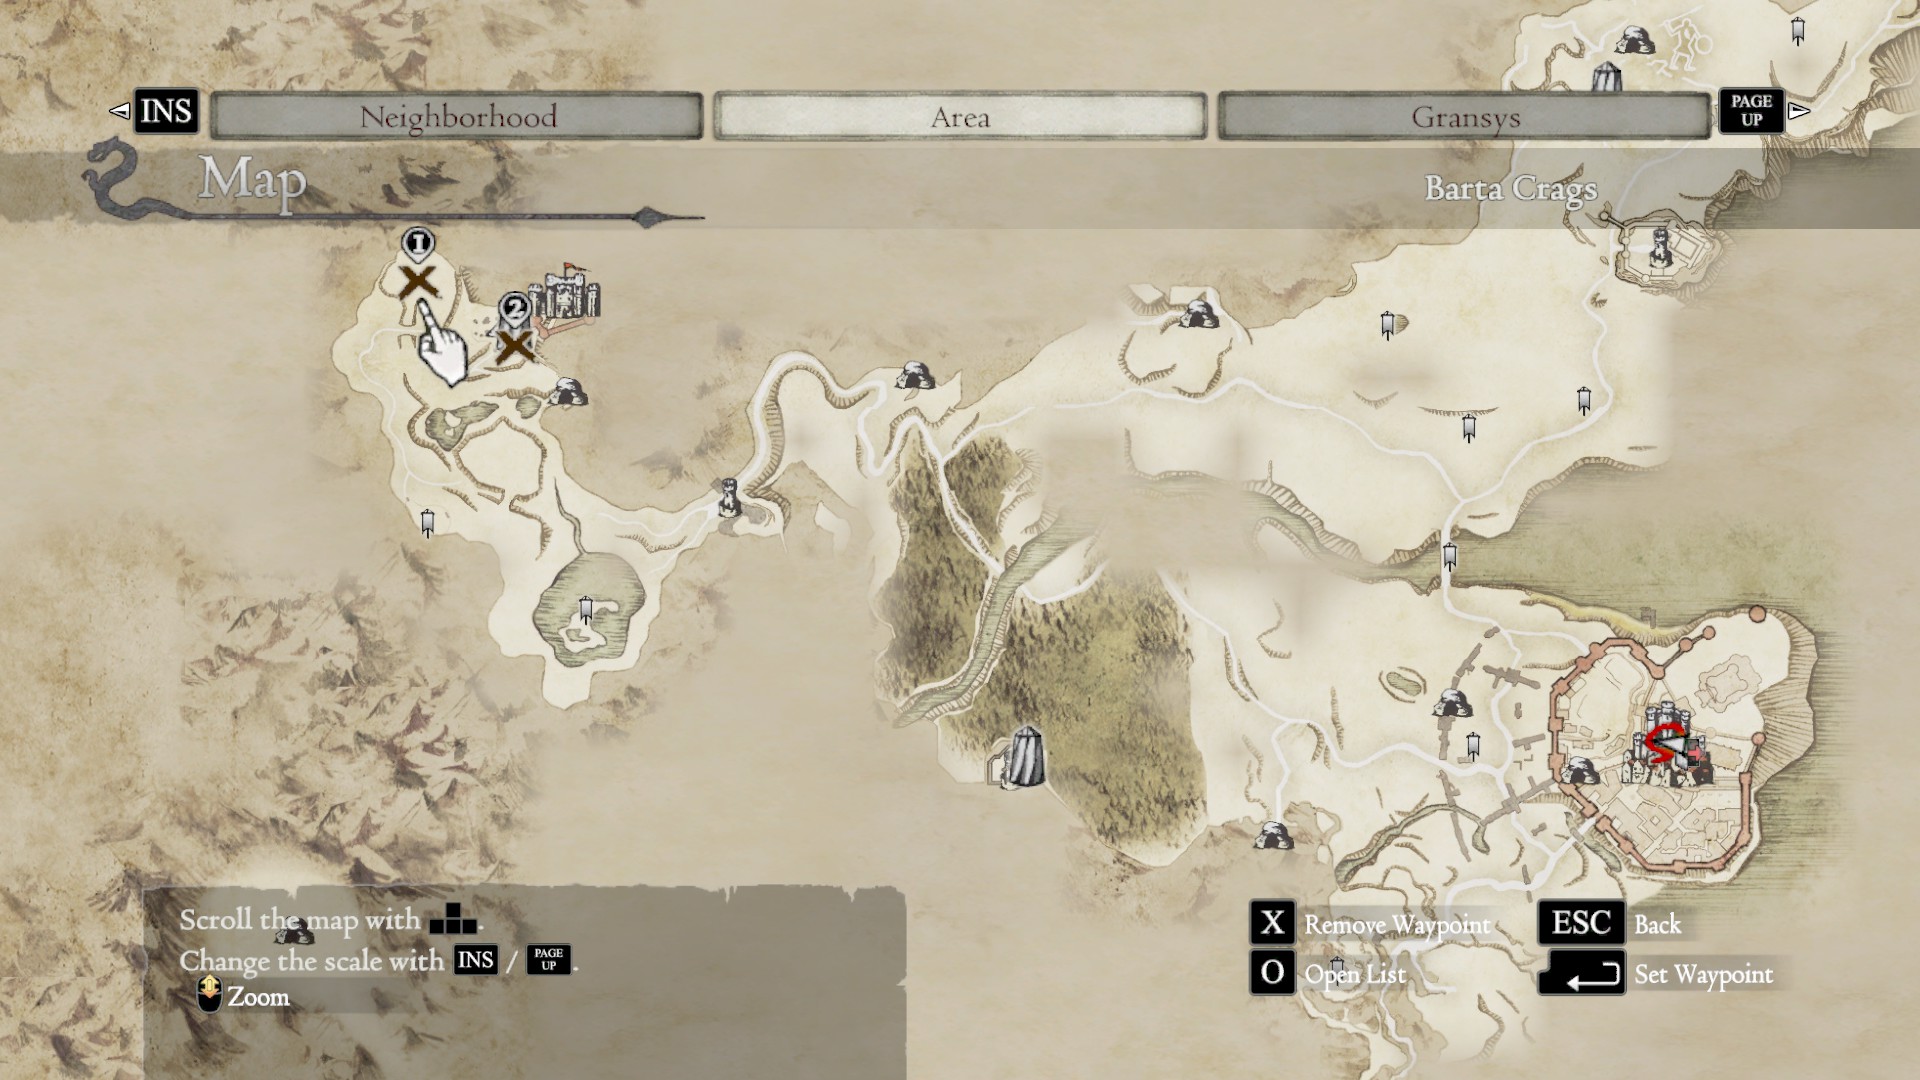
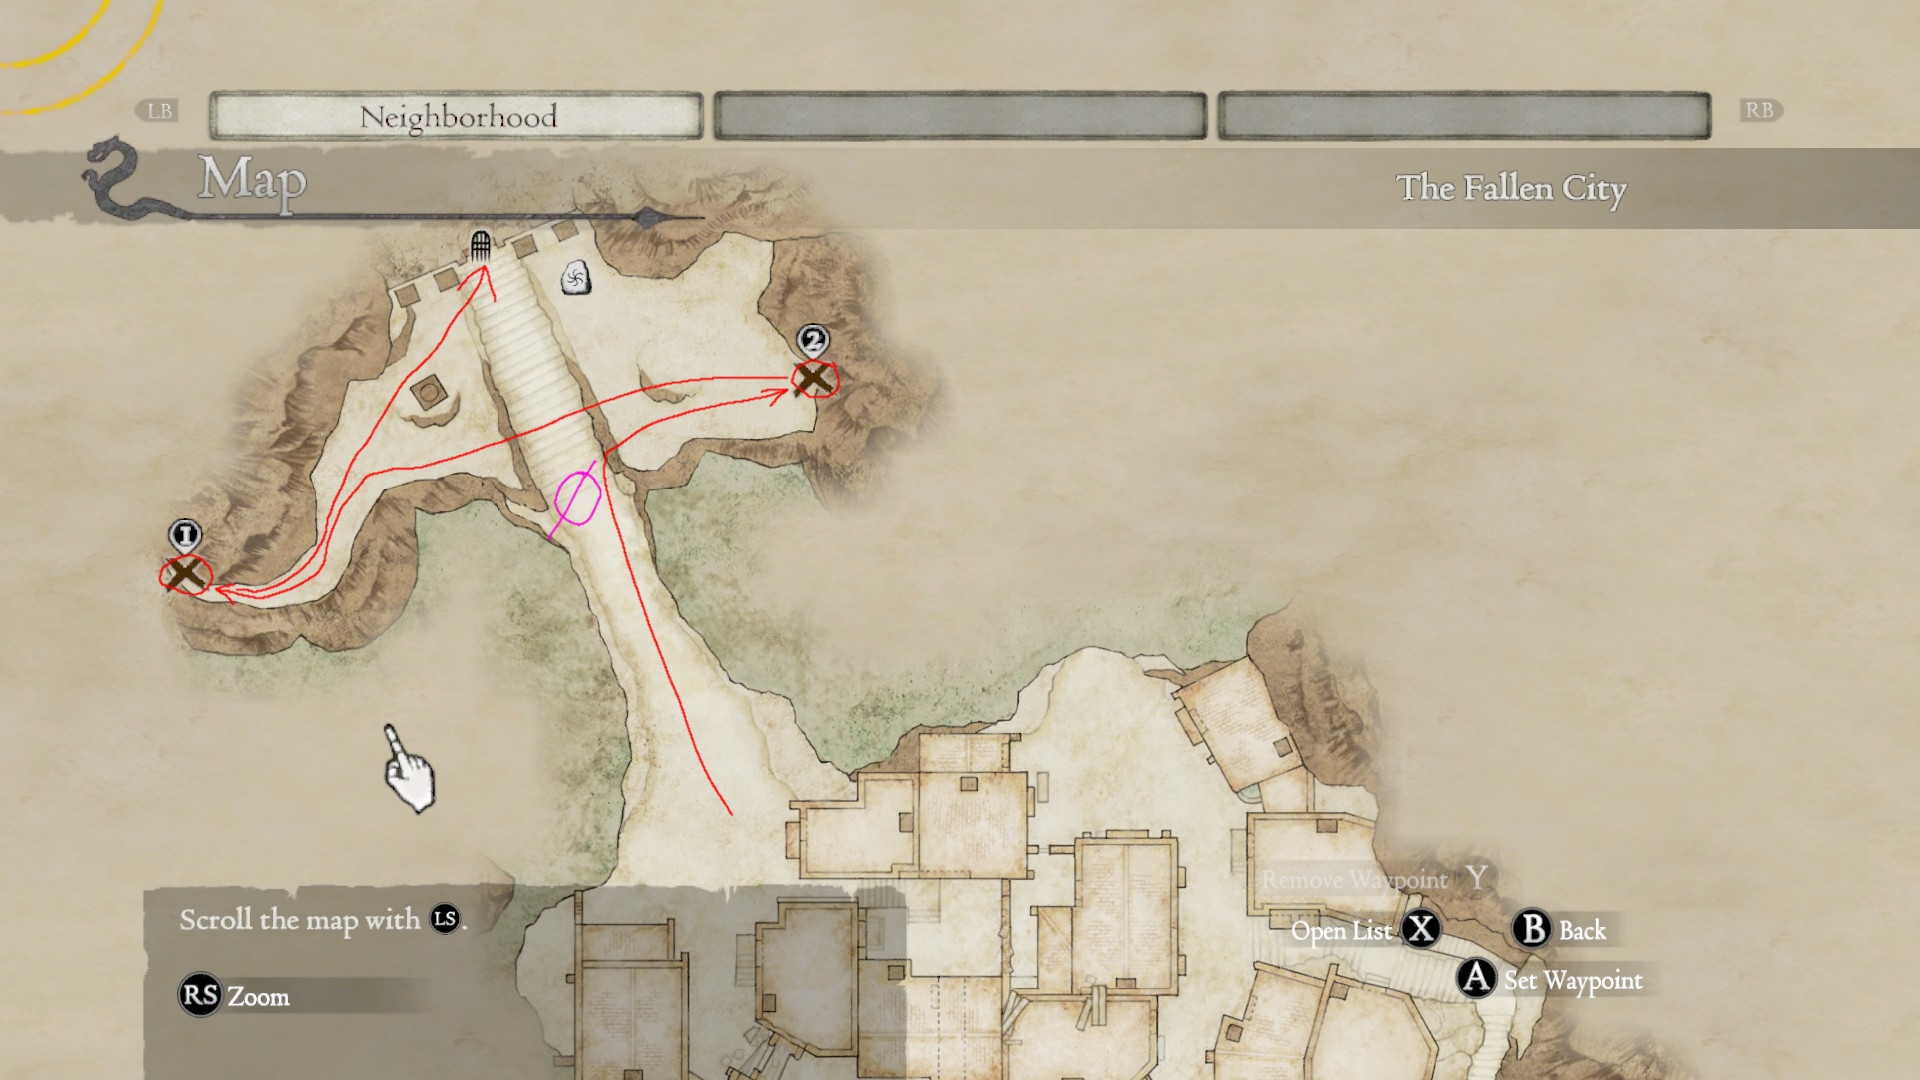
Get rid of any supporting pawns, leaving only main pawn if you need to level its vocation up. Unequip its weapons so it can't do damage and ruin your farming. Go to Greatwall, place a portcrystal, sleep till night, then go to the mark shown in the screenshot.
1 - Wraith 2 - Greatwall
You will encounter a flying undead - Wraith.
He will spawn many skeleton warriors, each rewarding with great amount of exp. They should not be trouble, but if you find it hard to deal with them, stock up on Throwblasts and Dragon's spits and blow them away. If you're playing on hard they'll shower you with giant gold bags (10k gold each).
Apply any exp/gold boosting items you have, and kill skeletons all night, ignoring the wraith, so it can summon more skeletons.
When the sun rises, run/teleport to Greatwall, sleep till night.
If you have trouble farming this way, and you risk dying, run away from the battle sometimes and save your progress.
Some advices on the battle:
Wraith uses 6 spells:
-Lightning bolt that may interrupt you, but causing almost no damage.
-Inflicting POISONED and DRENCHED area of effect spell that will take your lantern out.
-Levin
-Rise undead
-Red Anodyne - heals undead
-Maelstrom - very rare cast. Hurricane that will kill you if you don't escape the cast area. Cast time is very long.
Skeletons fear light and fire. Use holy/fire enchanted weapons or holy/fire spells.
IF THE WRAITH DIES, sleep 4 times for him to respawn. Maybe you'll have to sleep 5 times.
It is highly recommended to place a portcrystal at the Greatwall.
I recommend playing on hard mode for X2 exp and easy gold. For each empty slot in your party you get +25% exp, allowing you to get +75% if you venture alone. Use weal (X2 exp) and prosperity (Gold drops from everyone) granting items like Piligrim's Charm, bought from Fournival, or Barroch. Or you can get the Blessed Flower to get a one in-game day long weal. Blessed Flower is granted in this quest http://dragonsdogma.wikia.com/wiki/Talent_in_Bloom . After you get the flower, duplicate it at Black Cat. Flower will die after 24 in-game hours, so always store one in your storage in case because it is not withering in it. Check wiki for more info http://dragonsdogma.wikia.com/wiki/Blessed_Flower .
When to move to Method 2At some point you will gain needed strength to move further on the storyline, and that's when you'll need to move to Method 2. Enter the POST-GAME. Recommended level is 80-90, depending on your class.
Method 2. LVL 80+

This method gives you more exp than Method 1, but isn't accessible so easly. To access it you will have to be in the post-game (post-Grigori).
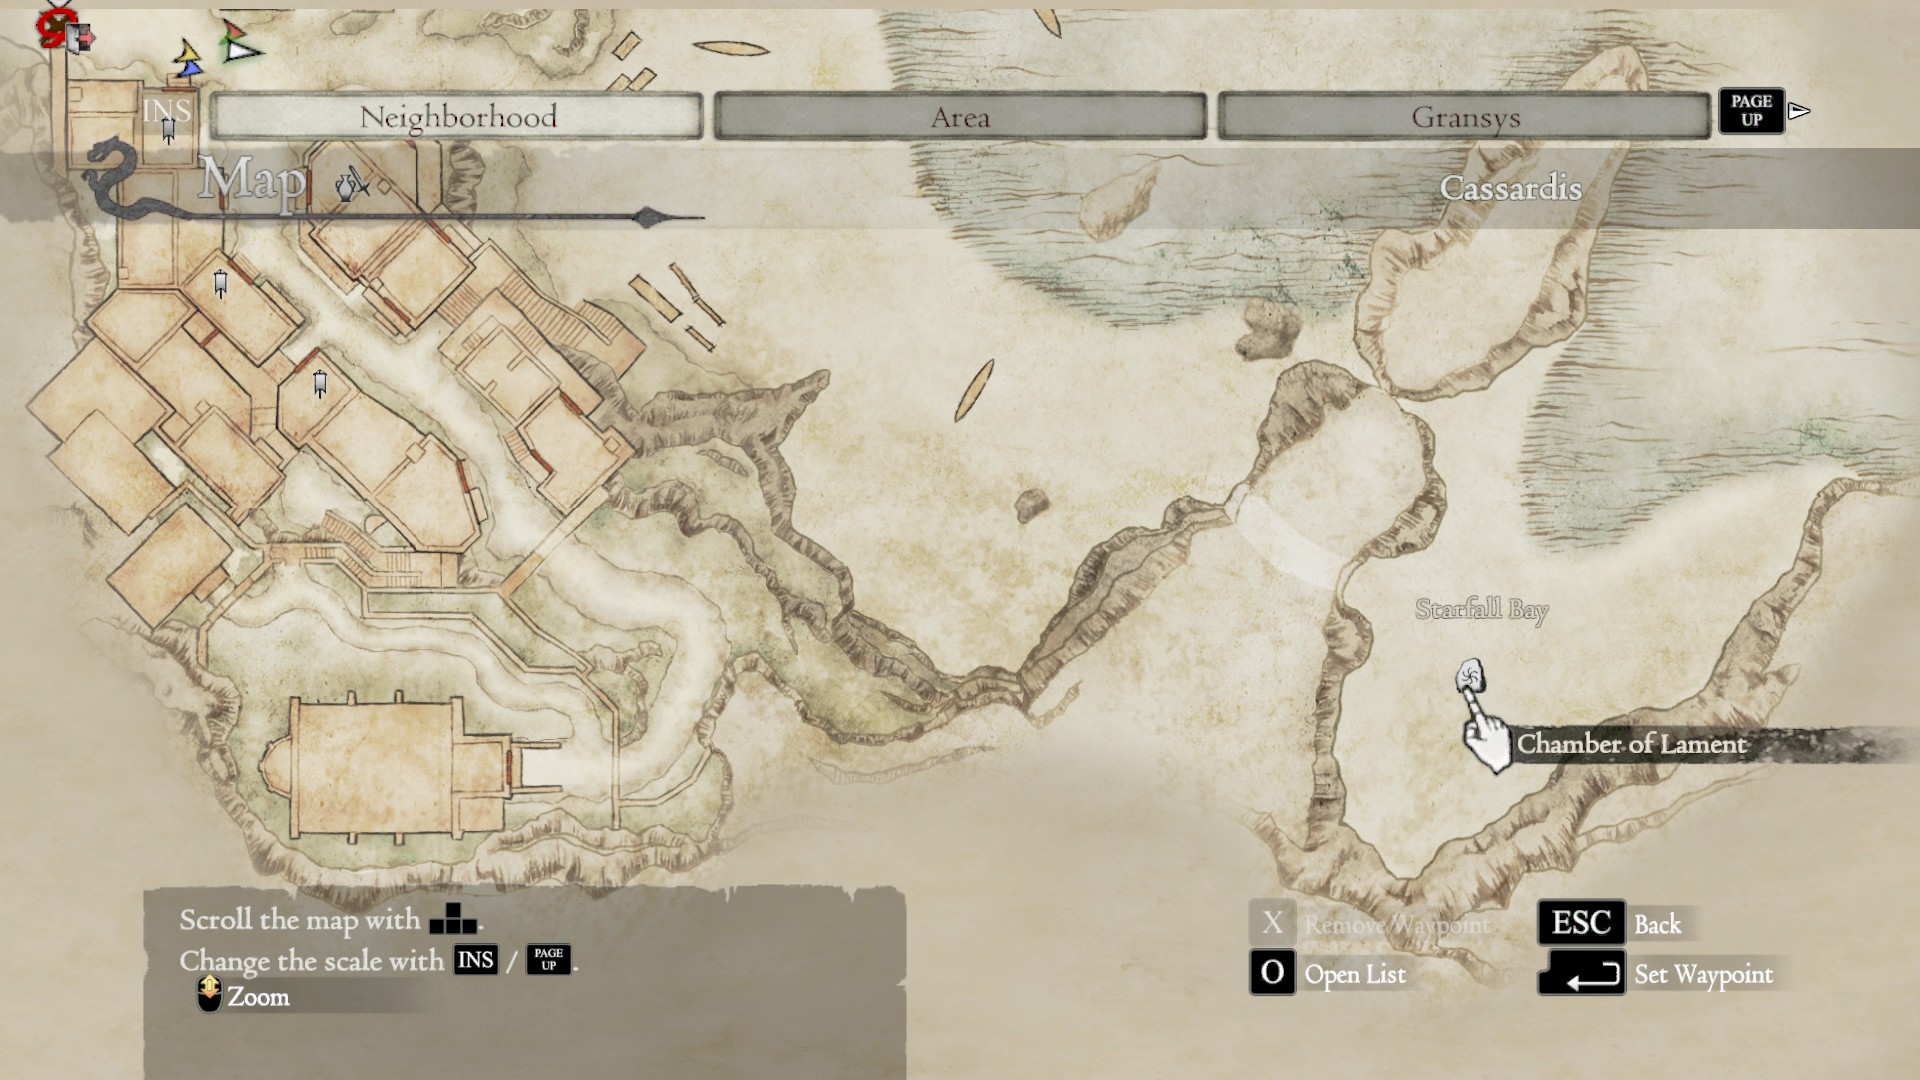
Go to the Everfall in Gran Soren, and jump to the CHAMBER OF LAMENT. Use the screenshot to navigate easily. You need LAMENT, floor 8.
This is the Ur-Dragon's lair. Killing him will reward you greatly with exp, easy money (selling wakestones), holy enchanted weapons and materials needed to upgrade them. See my Ur-Dragon guide to learn how to defeat him easily: http://steamcommunity.com/sharedfiles/filedetails/?id=603524306
MAKE SURE YOU ARE FIGHTING THE OFFLINE VERSION. THE ONLINE VER. WILL NOT DO YOU ANY EXP PROFIT. Go to options and set connectivity to offline before you enter the chamber.
Faster UR farmingIf you play not on NG+, you must go to inn every time you kill the dragon for him to respawn. This is easily fixed by completing the game. After you get on NG+, there will be a shortcut to him at Cassardis. Go to the riftstone shown on the screenshot below.
The benefits are:
-Avalibility at any moment of the game.
-Faster access to the boss: You will spawn near the monument, enabling you to take out corrupted pawns as soon as you enter, without running through the entire arena.
EverfallIf you are bored with Ur-Dragon, try running through Everfall. There might be some fun enemies to keep you entertained. Exp will not be that high, however.
When to move to Method 3?Gather enough strength for being able to take out Daimon's 2nd form. Recommended level is 100-120. But depends on what class you are.
When you are feeling that you are progressing too slow, move to Method 3.
Method 3. LVL 100-200
Killing Daimon rewards you with the almost biggest exp reward in the game. Make sure to be under the weal effect. Play on Hard Mode for X2 exp. DO NOT USE PROSPERITY ITEMS OR DAIMON'S DROP WILL BE TURNED INTO GOLD. Use Veteran's Periapts or Matyr's Talismans. Solo kill on hard mode with weal gave me 1.2 MILLION EXP, if I remember correctly.
When you feel that you can take on the BITTERBLACK ISLE, begin. Kill everyone, including Daimon 1st time, enter Post-Daimon. Kill them again. Make sure to unlock the shortcut after the Bishop/Cursed Dragon.
Must-have augmentsWithout these you will lose speed, which is vital in these runs.
GRACE - Most vital augment. Secret augment. Increaces height you can fall without taking damage, remaining unhindered.
Dexterity - Fastens terrain climbing process.
Leg Strength/Sinew - Allows you to carry more, remaining lighter.
Athleticism - Reduces stamina consumed by sprinting.
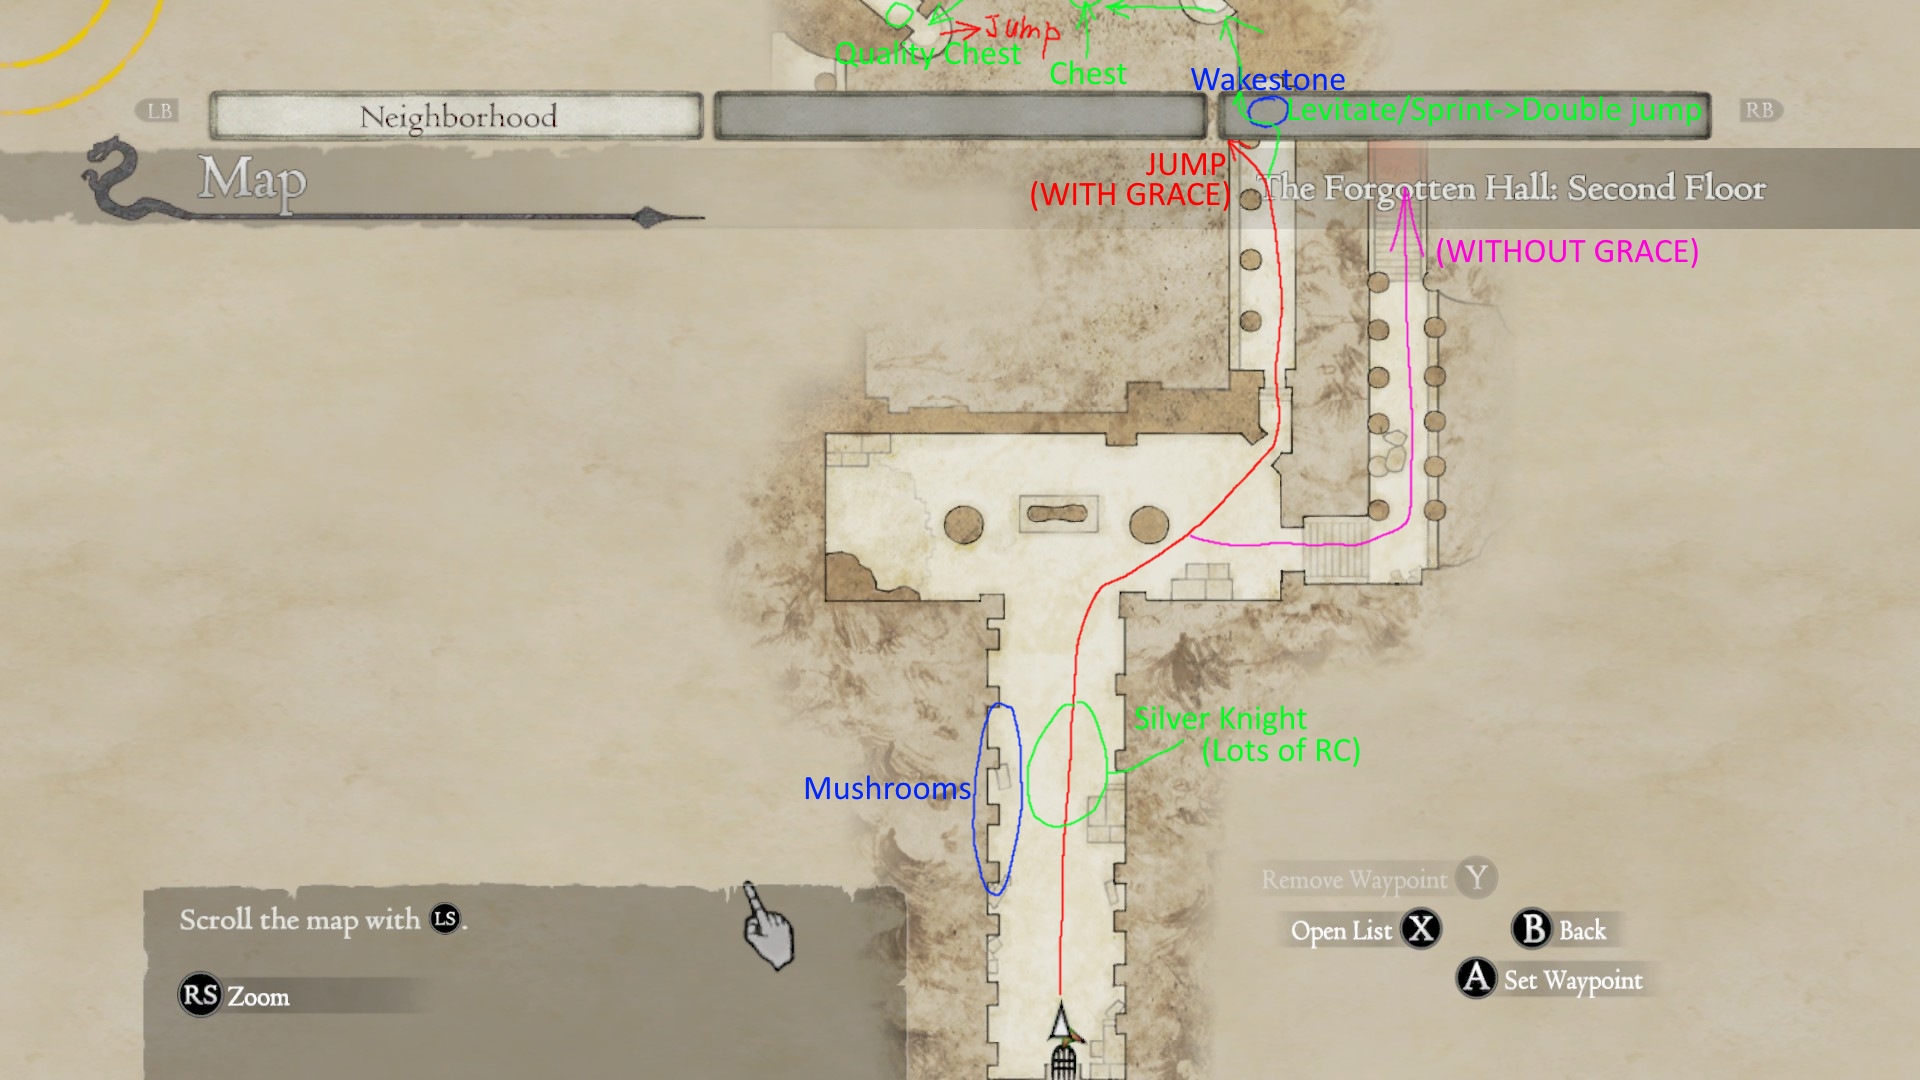
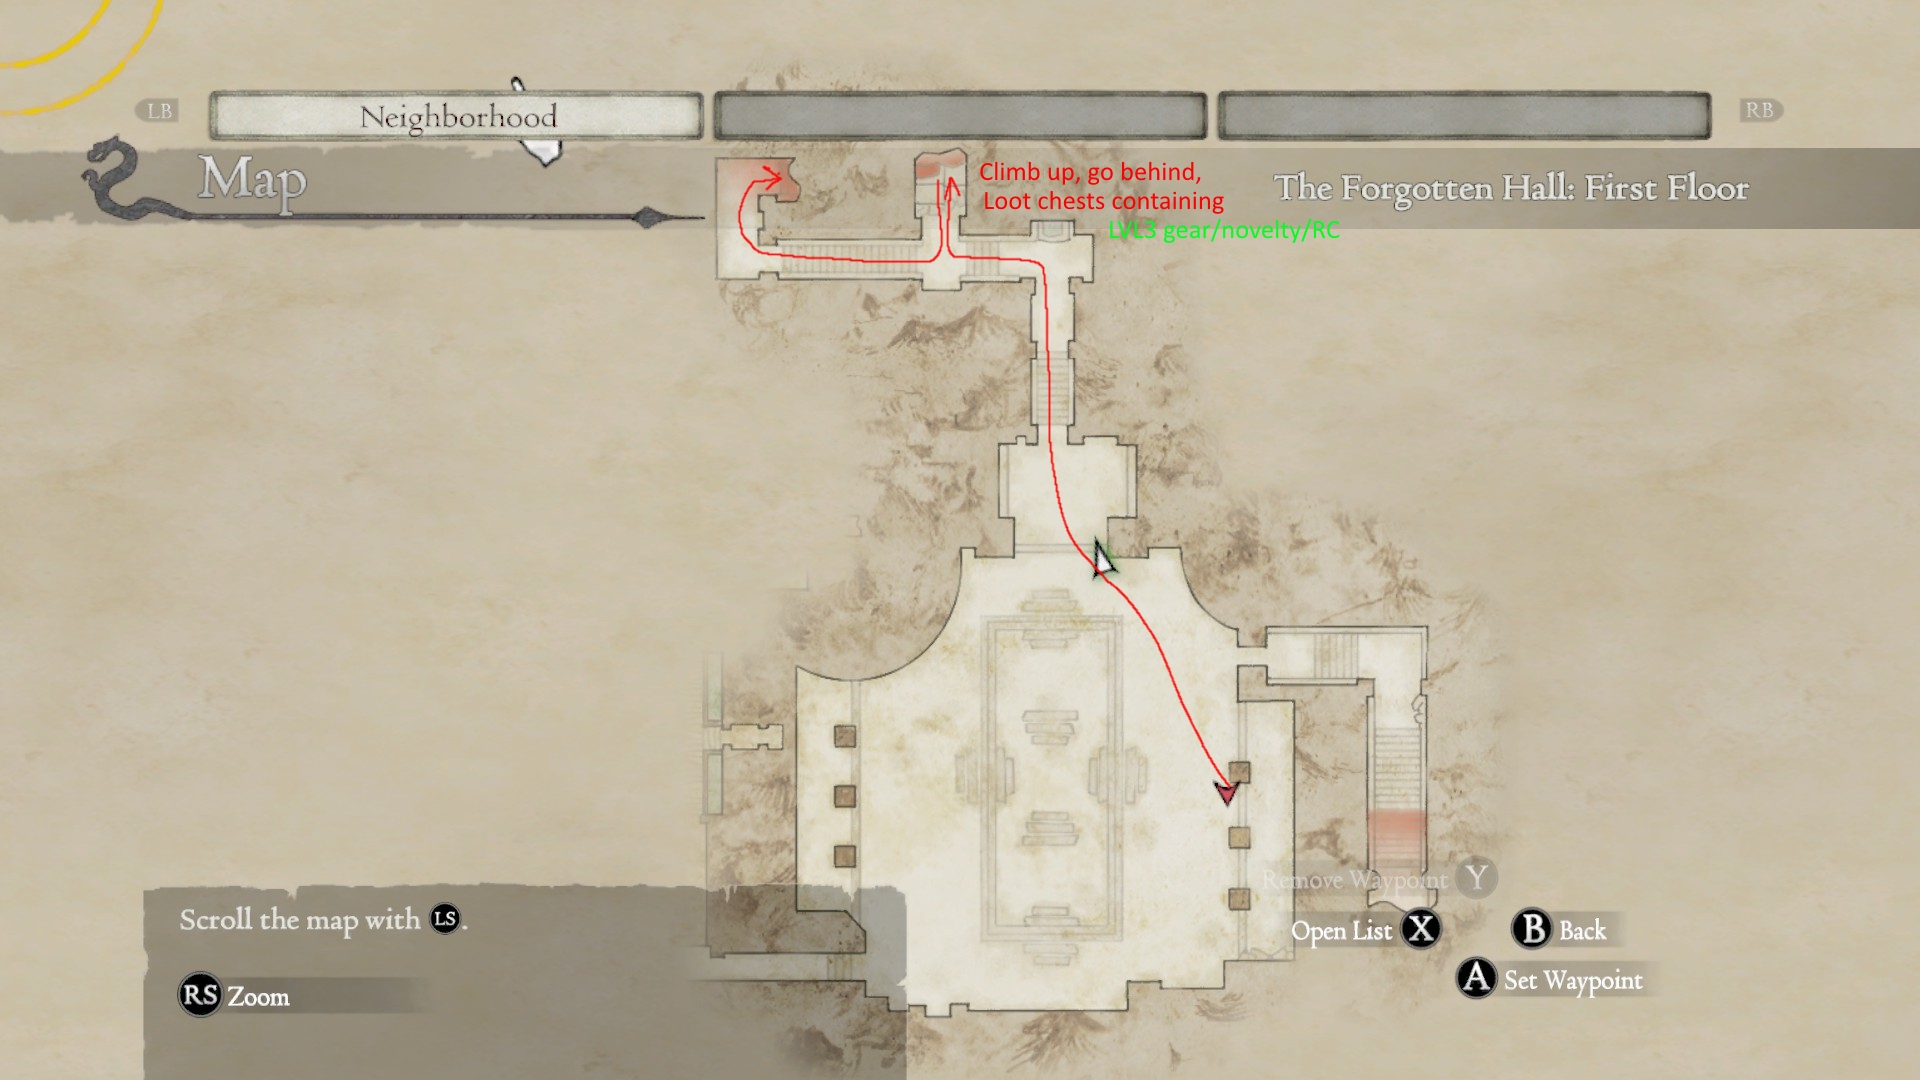
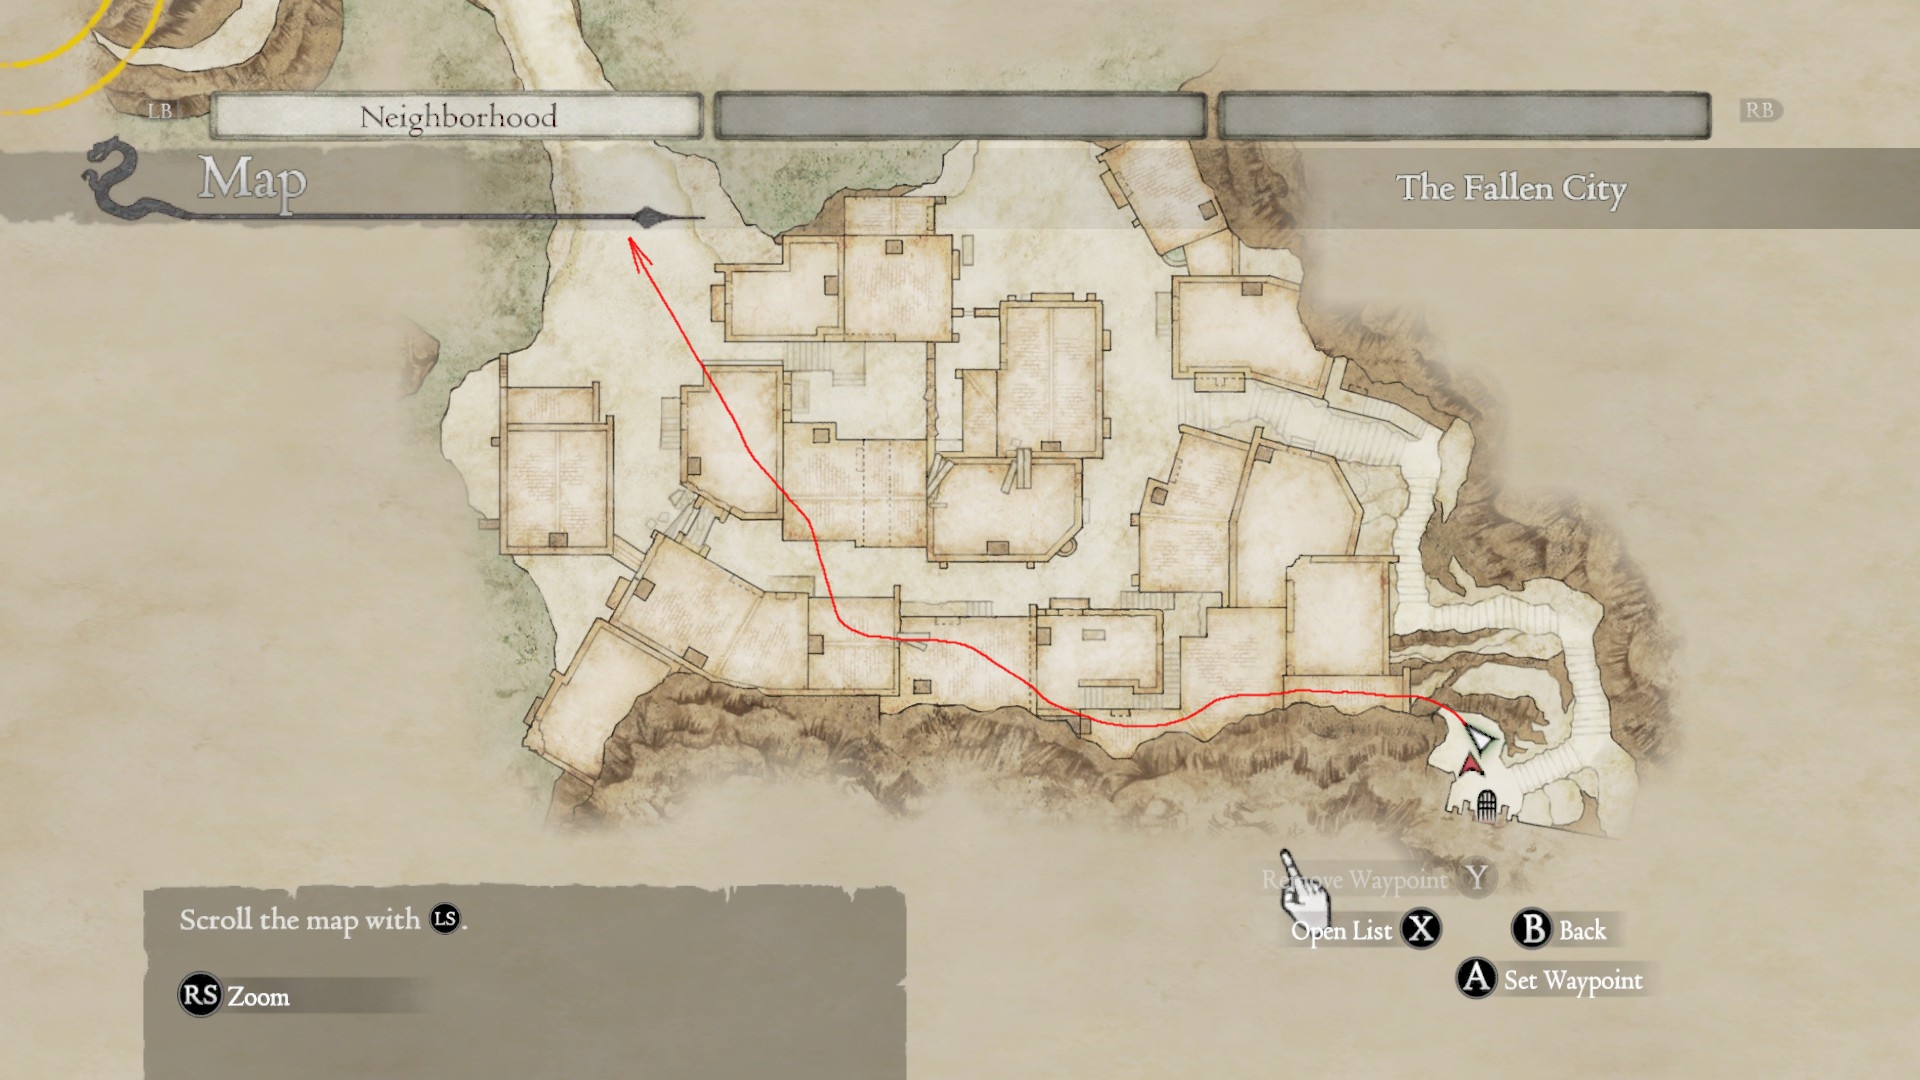
Farming sequence.You are RUSHING to Daimon. This means IGNORING EVERYONE, except some farm spots.
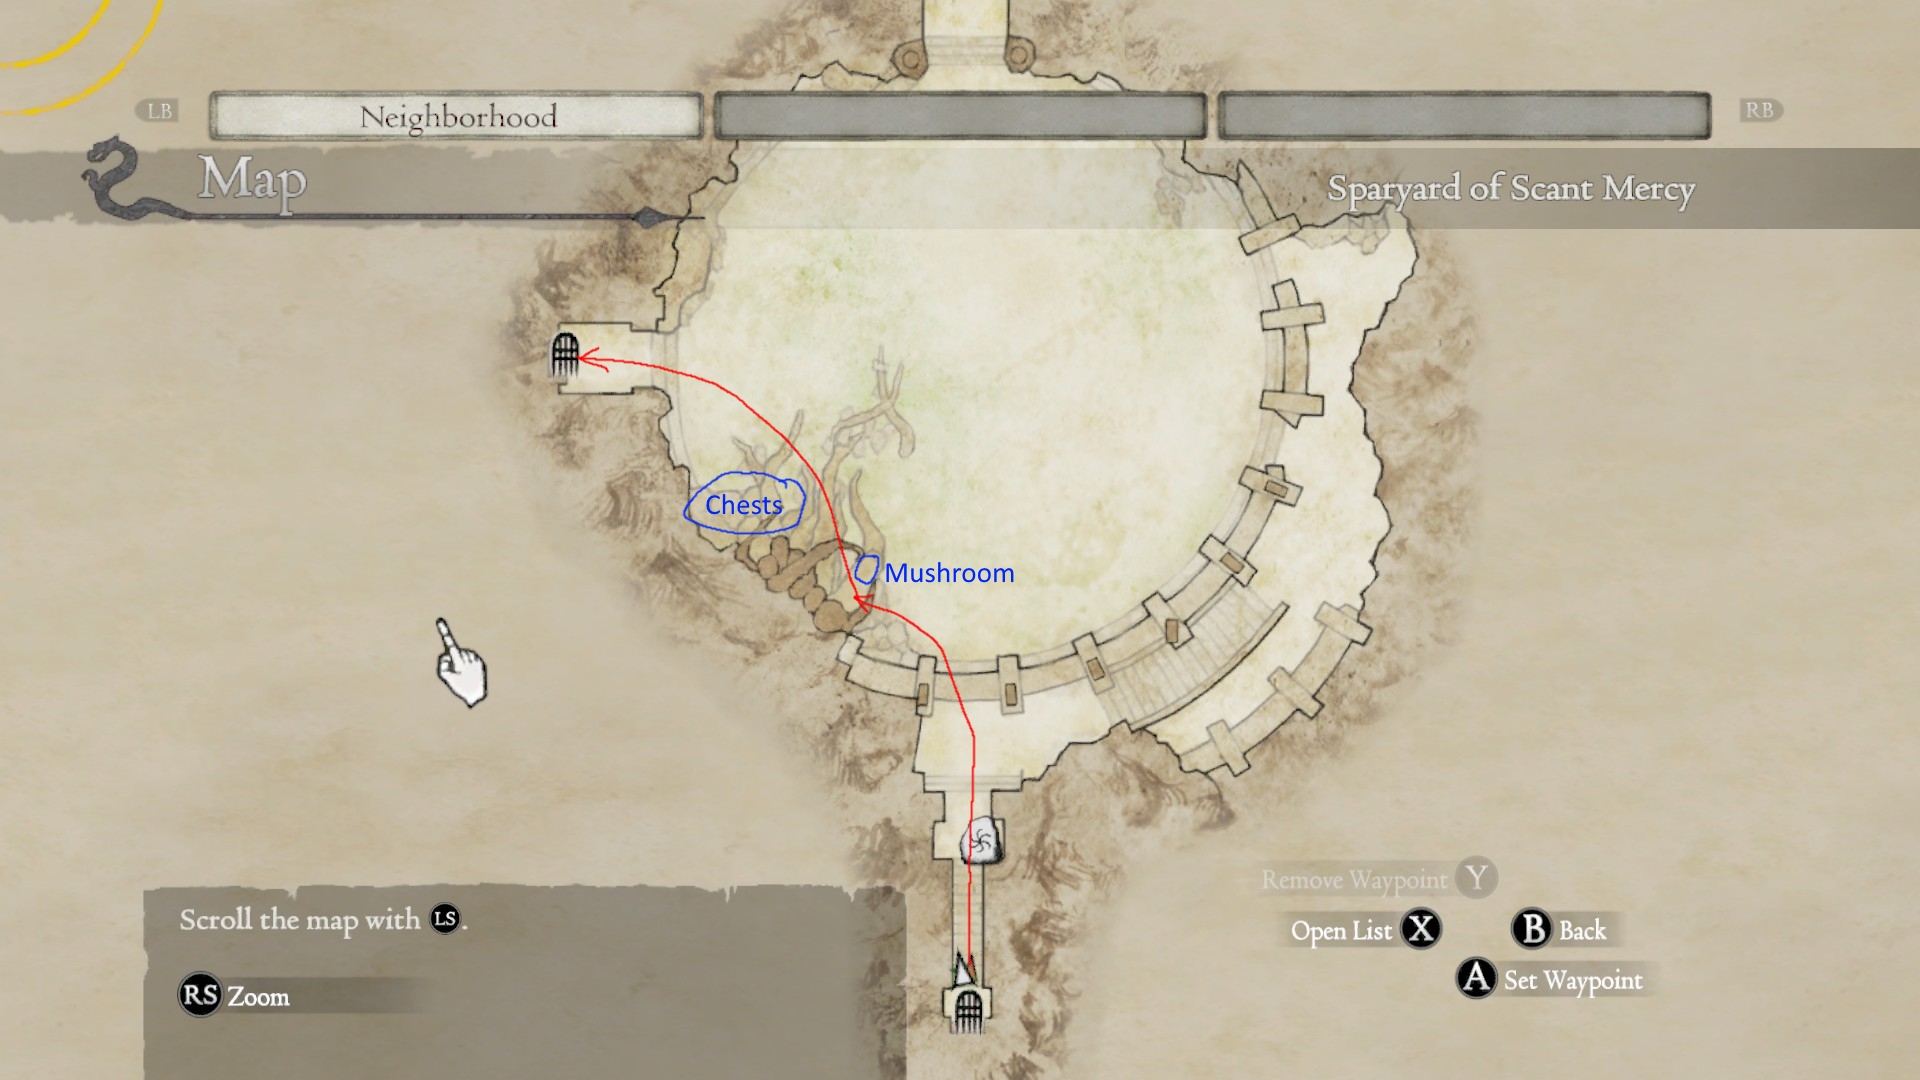
Enter the shortcut and pass the spider minilevel. Follow the red line on the screenshots, collecting items from marked spots if you can. Only the best places are highlighted.
RED - Main rushing way.
GREEN - Quality items and way to them. Highly recommended to loot.
BLUE - Optional items.
PINK - Alternate way. Last Screenshot - Enemies.
This floor may have Silver knight on it. He drops lots of RC. Highly recommended to kill him.
Green arrows: To access the balcony you have to be able to levitate or use double jump. Climb the "railing", sprint, double jump/levitate. You should be able to grab the block then. Loot the next chest, then jump to another balcony as marked. Jump down after you loot them.
TO LOOT THESE CHESTS YOU MUST KILL ANYONE NEAR. MAKE SURE THAT YOUR PAWNS ARE NEAR AND READY TO KILL A MIMIC.
Jump to the window as shown. Make sure to slide, or you will die from fall damage.
1,2 - CORPSES CONTAINING LARGE AMOUNT OF RC, UP TO 6000 EACH. LOOTING THESE IS IMPORTANT.
[After you kill Daimon]
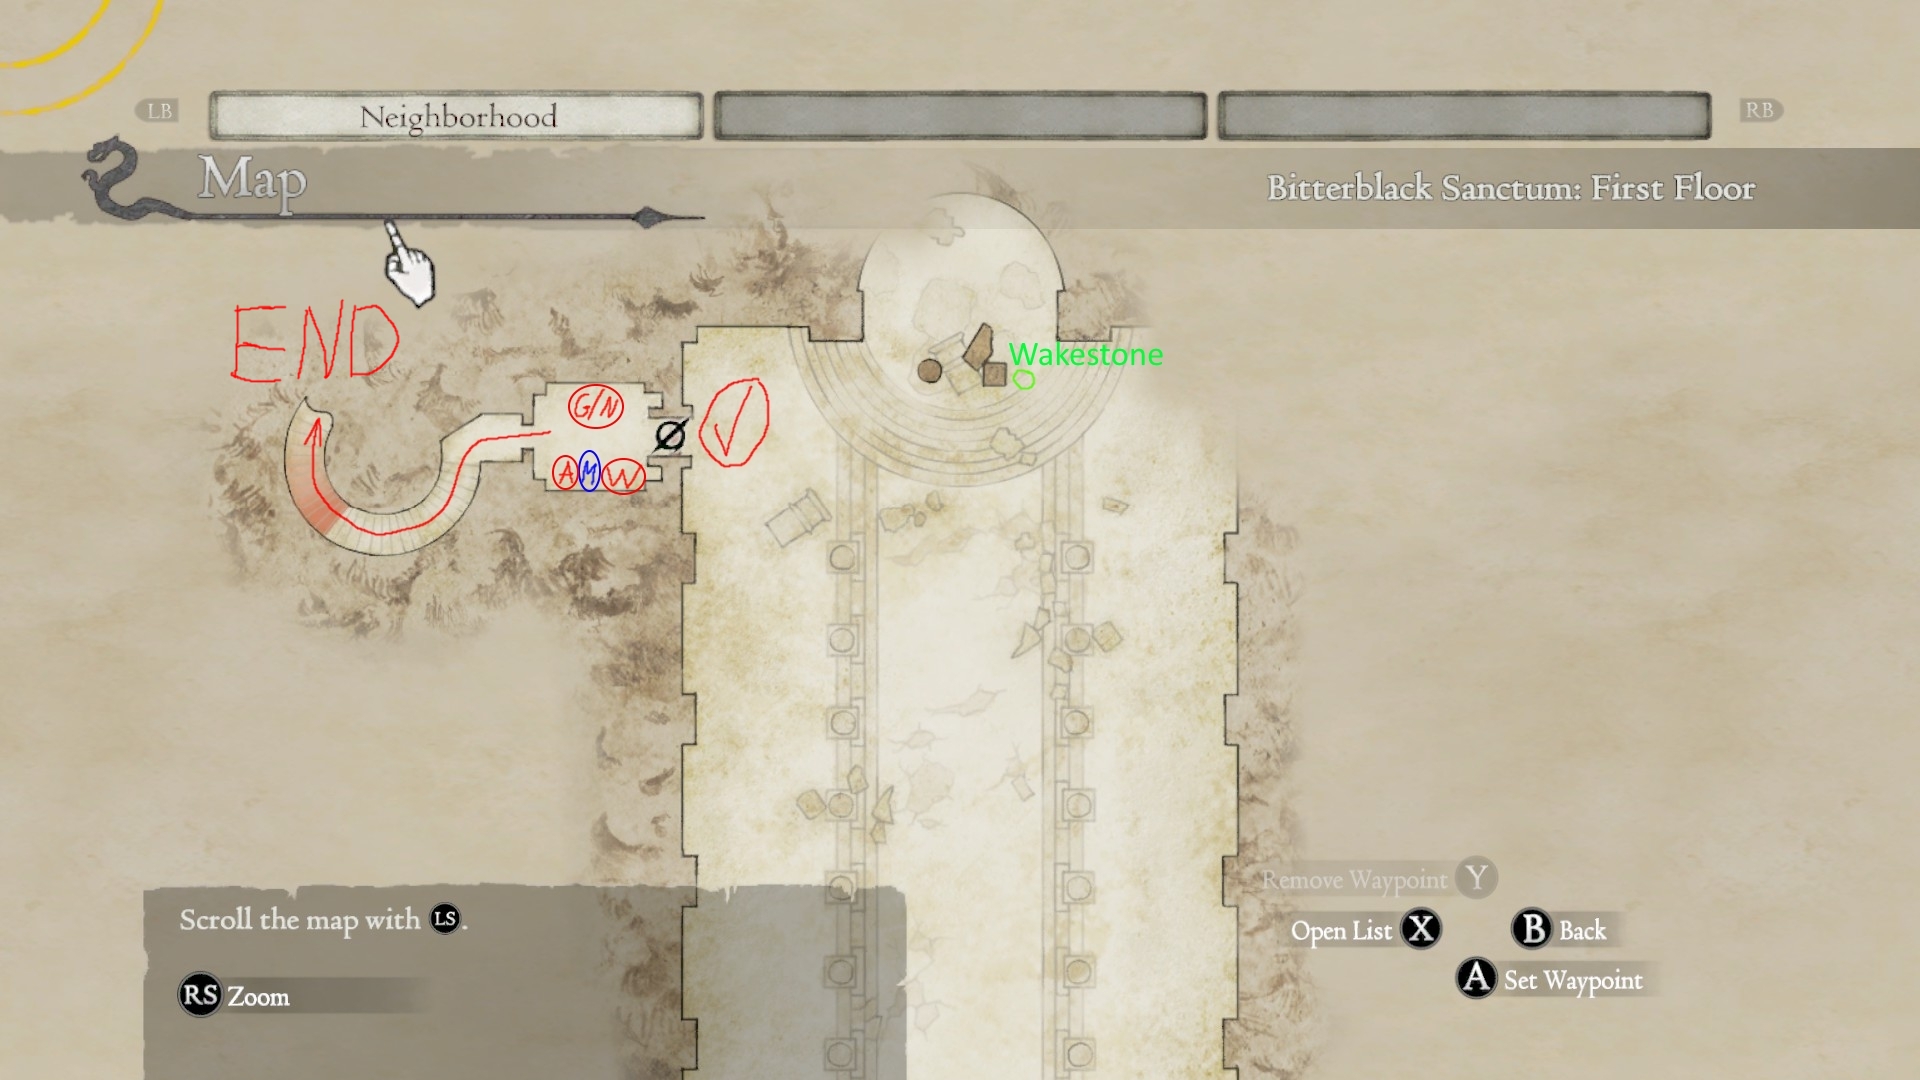
Go to marked save location, save, enter the room, loot the chests, Godsbane if not satisfied with the results.
All chests except "M" may contain 5/10 thousand RC.
Chests contain:
A - LVL3 Armor
W - LVL3 Weapon
G/N - LVL3 Gear(Pre-Daimon only)/Novelty
M - Moonbeam Gem
Daimon killing tips
Be under effect of 4 periapts that match your class (STR/MAG).
Most powerful skills can be found at the "General class tactics" tab.
Killing him rewards you with:
Total Base Exp of 360,000
Base Exp for First Form of 160,000
Base Exp for Awakened Form of 200,000
Exp can be increaced with weal, hard mode, fewer pawns, or by having pawns with lever lower than yours by 25+.
Vulnerable to Lowered Defense, Torpor (first form only), Poison and Tarred in oil.
The Awakened(2nd) Form is weak to Holy.
Melee users can climb his back and slash away. When he is using his fire attack you will have enough time to jump and grab onto his leg.
Daimon is vulnerable during his rift vortex, recovery after it and after being staggered when recovering. He will receive increaced damage.
Rift vortex drains your stamina. Hide behind columns. If there is none, try fighting near his throne and use it as a shield.
Method 4. LVL 100-200
If you are feeling that you can take on the whole world, there is one last method for you.
Spawncamp Death.
It WILL be difficult. You have been warned. Recommended level is at least 100, preferably have stunlocking abilities for easier farm. Wiki states that base exp awarded is 420,000 (nice) on normal/easy mode, 840,000 on Hard Mode. I was given 999,999 exp on the video. Also awards with its materials and cursed stuff.
All glitches for death farming have been fixed(At least I have failed every glitch known to me).
Except there is one trick. It is working in Pre-Daimon only. So, switch to hard mode, or reset the world anyhow you can.
Death always respawn at the same spot, over and over again, even after dying. All you have to do to make him spawn is re-enter the location.
Stock up with periapts, and give it a try.
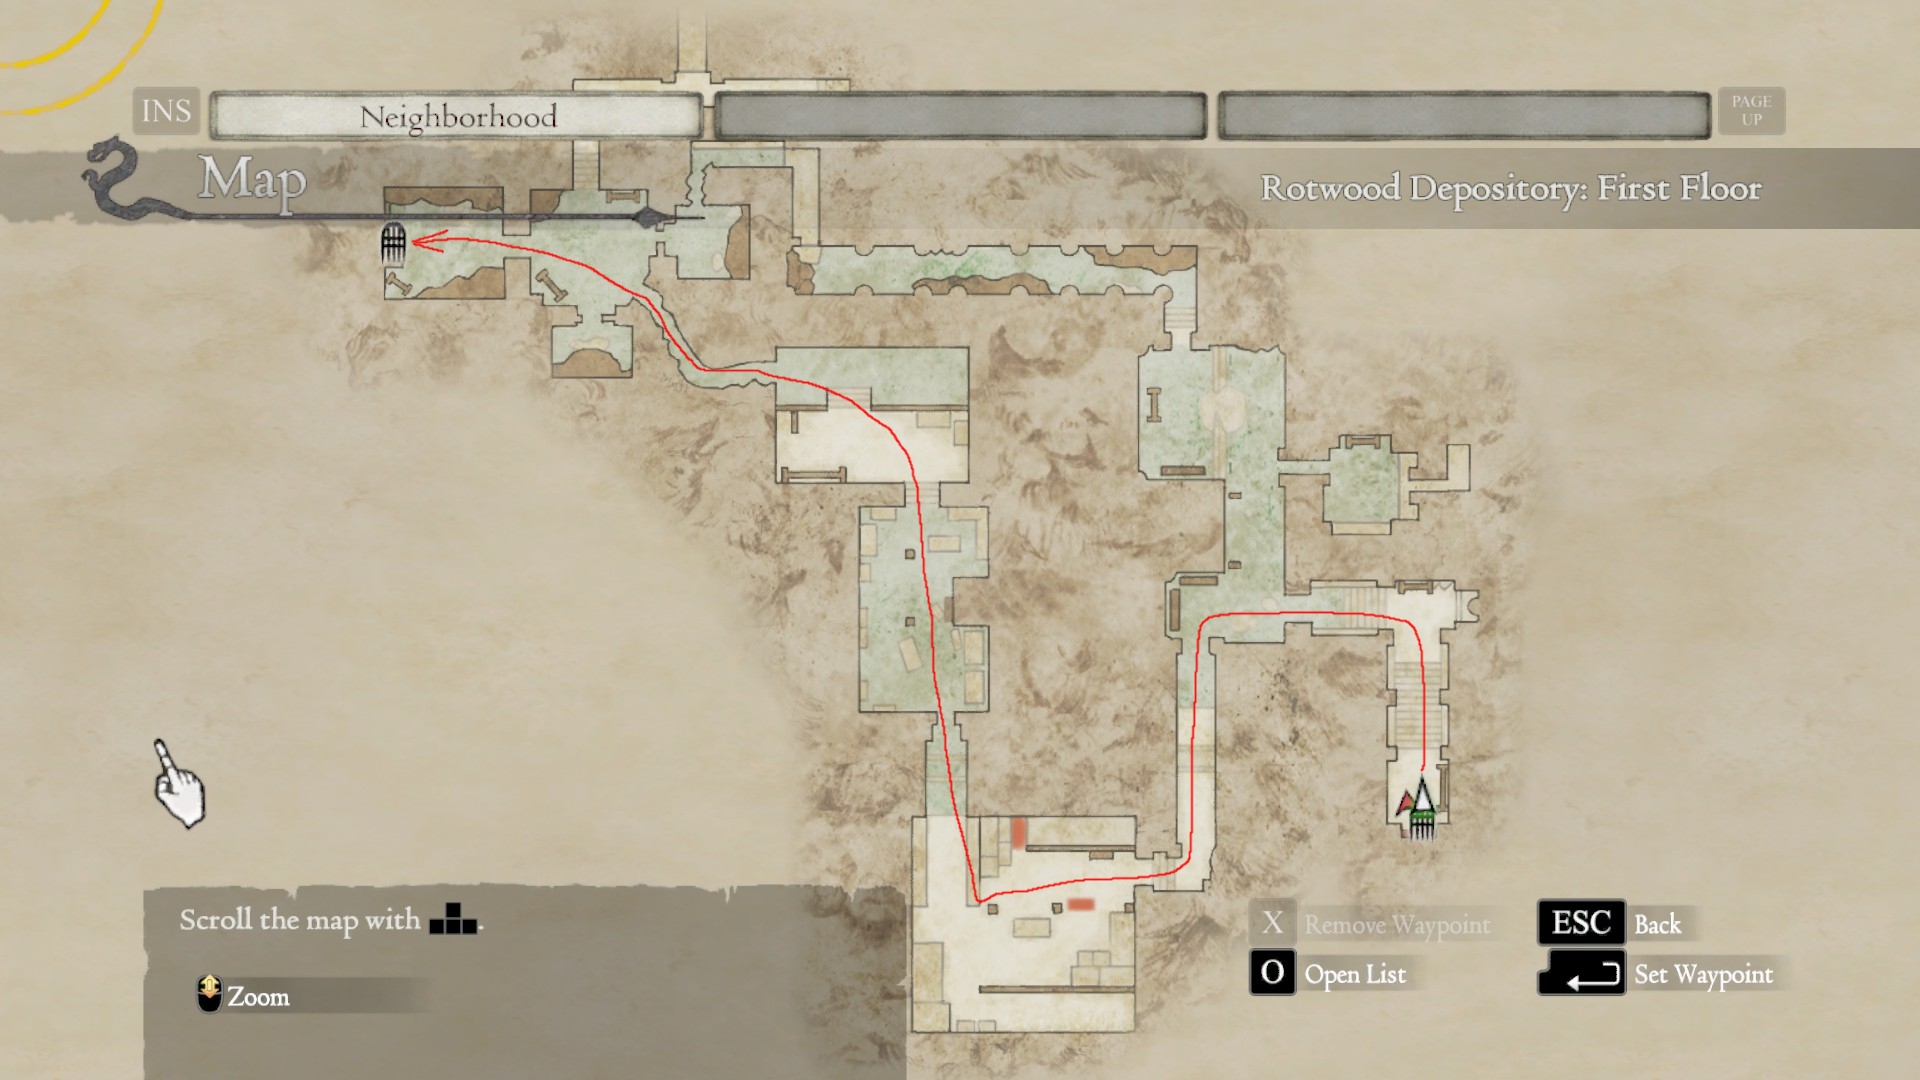
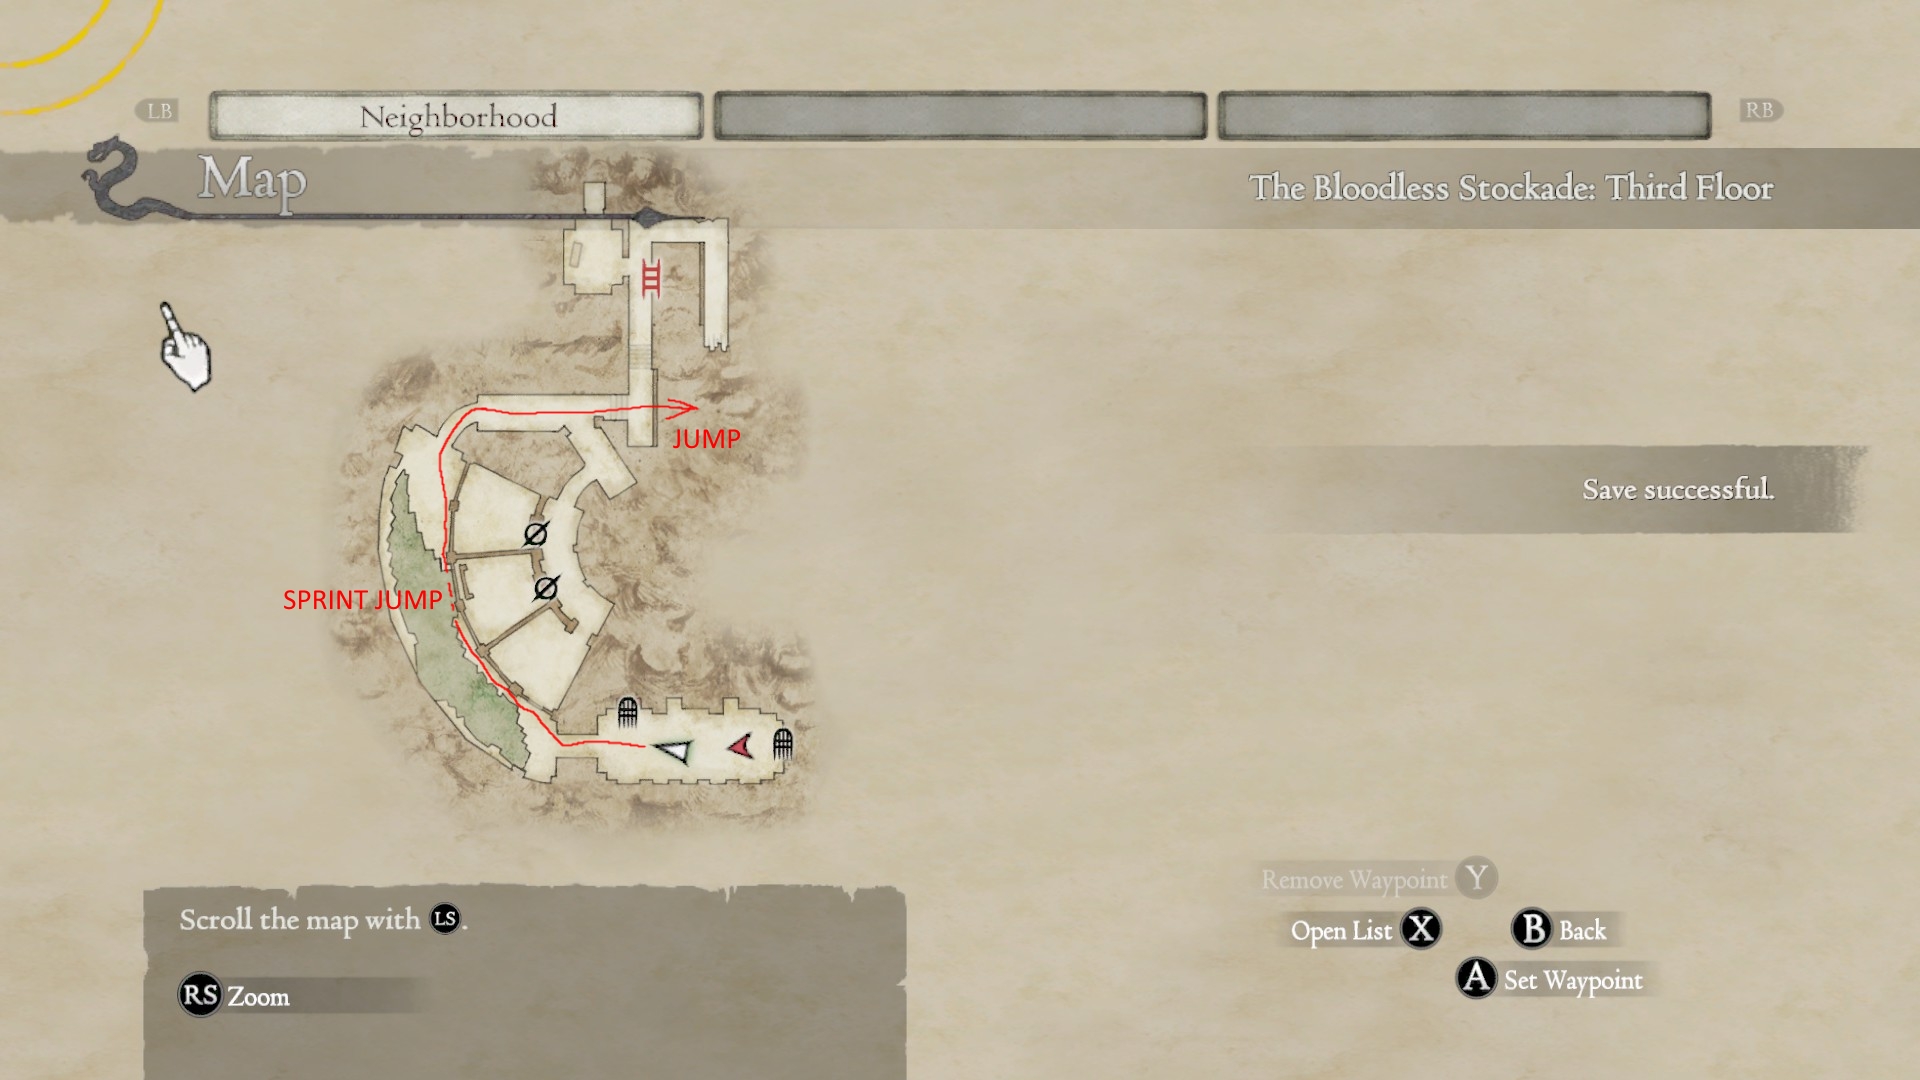
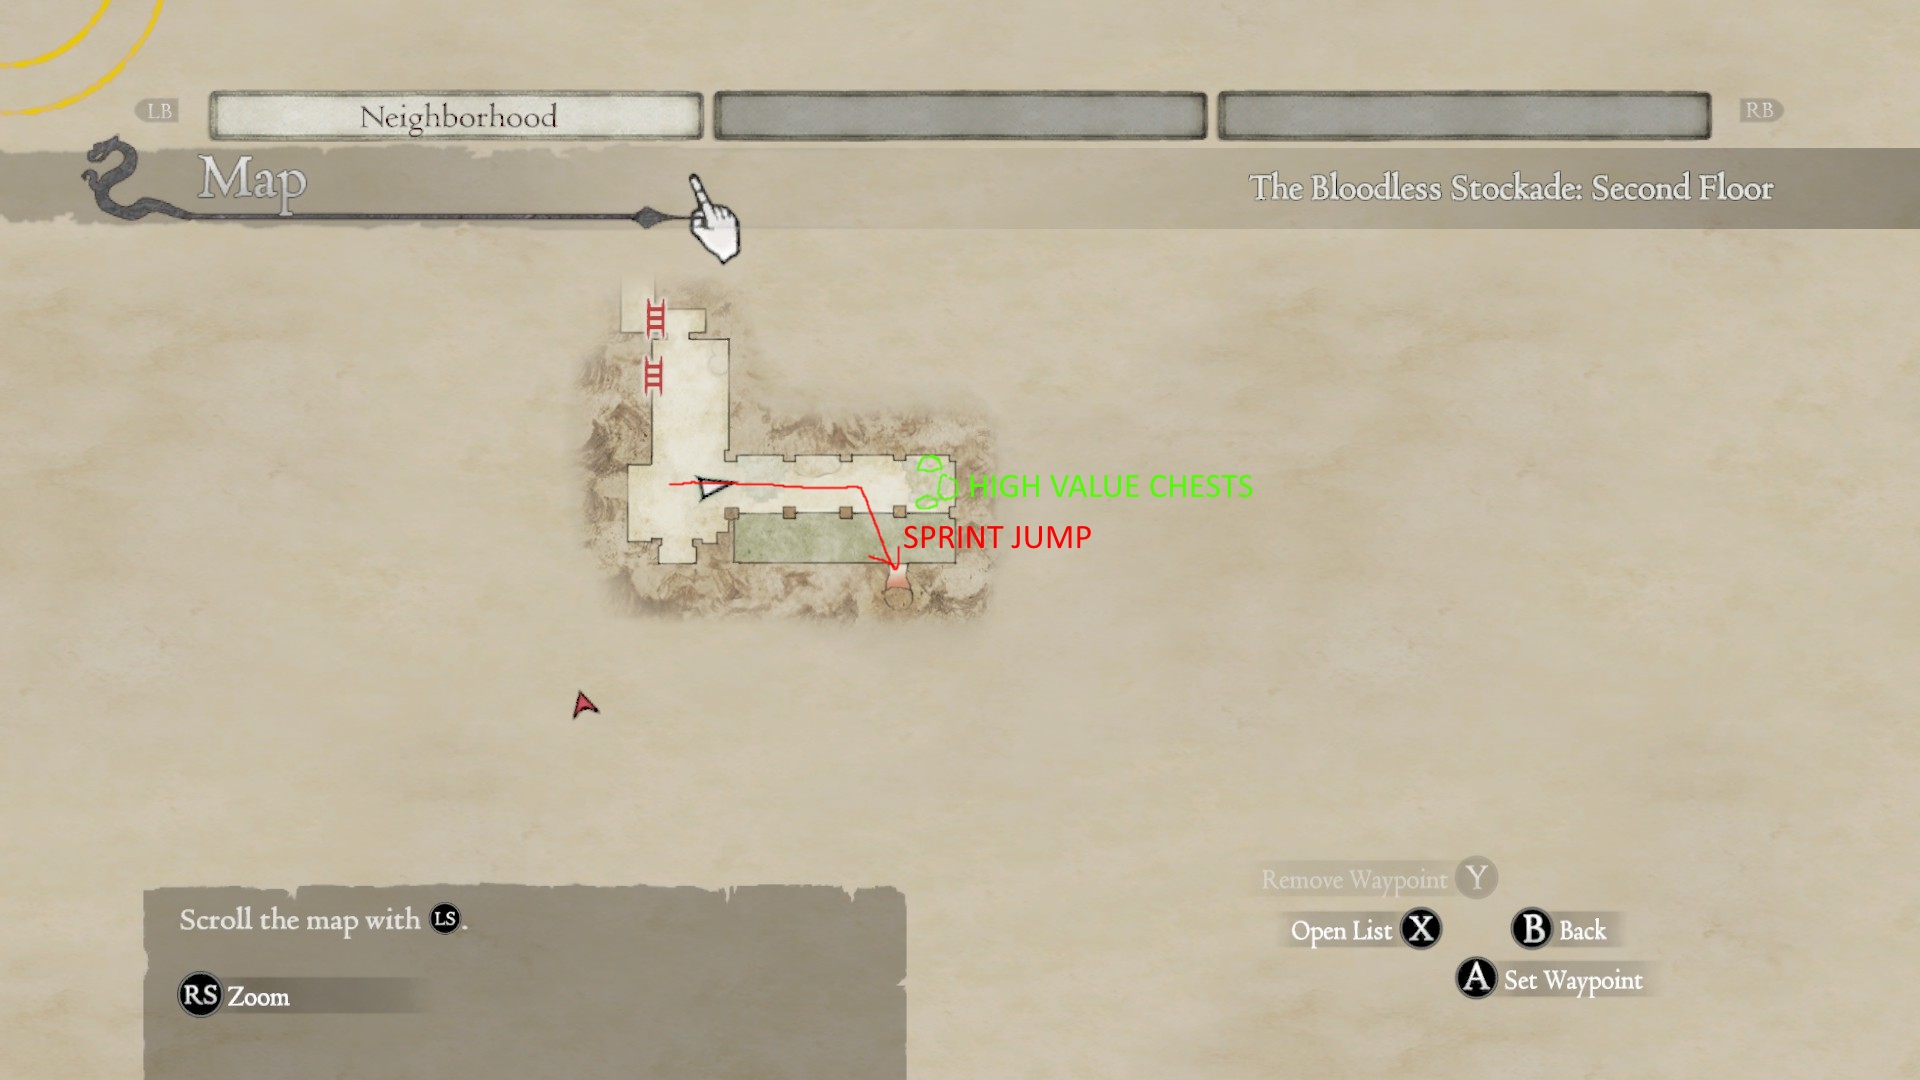
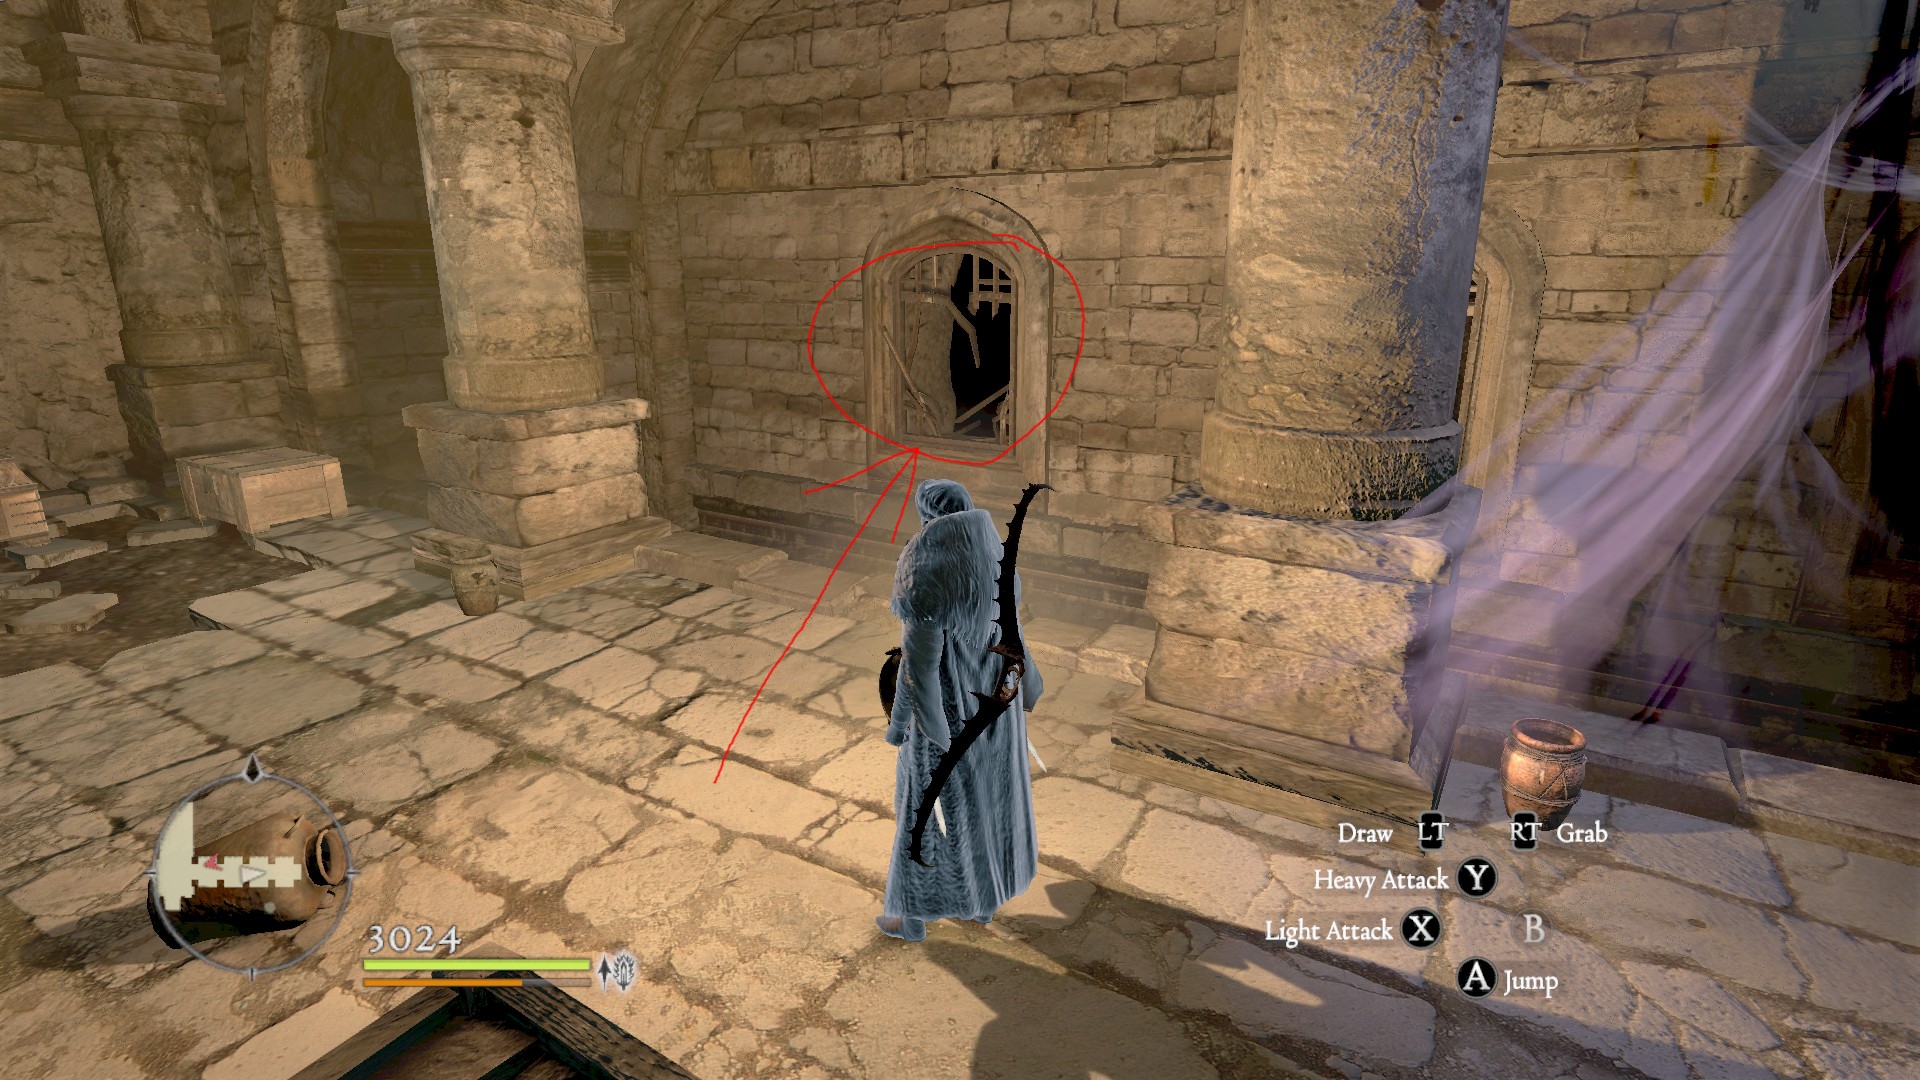
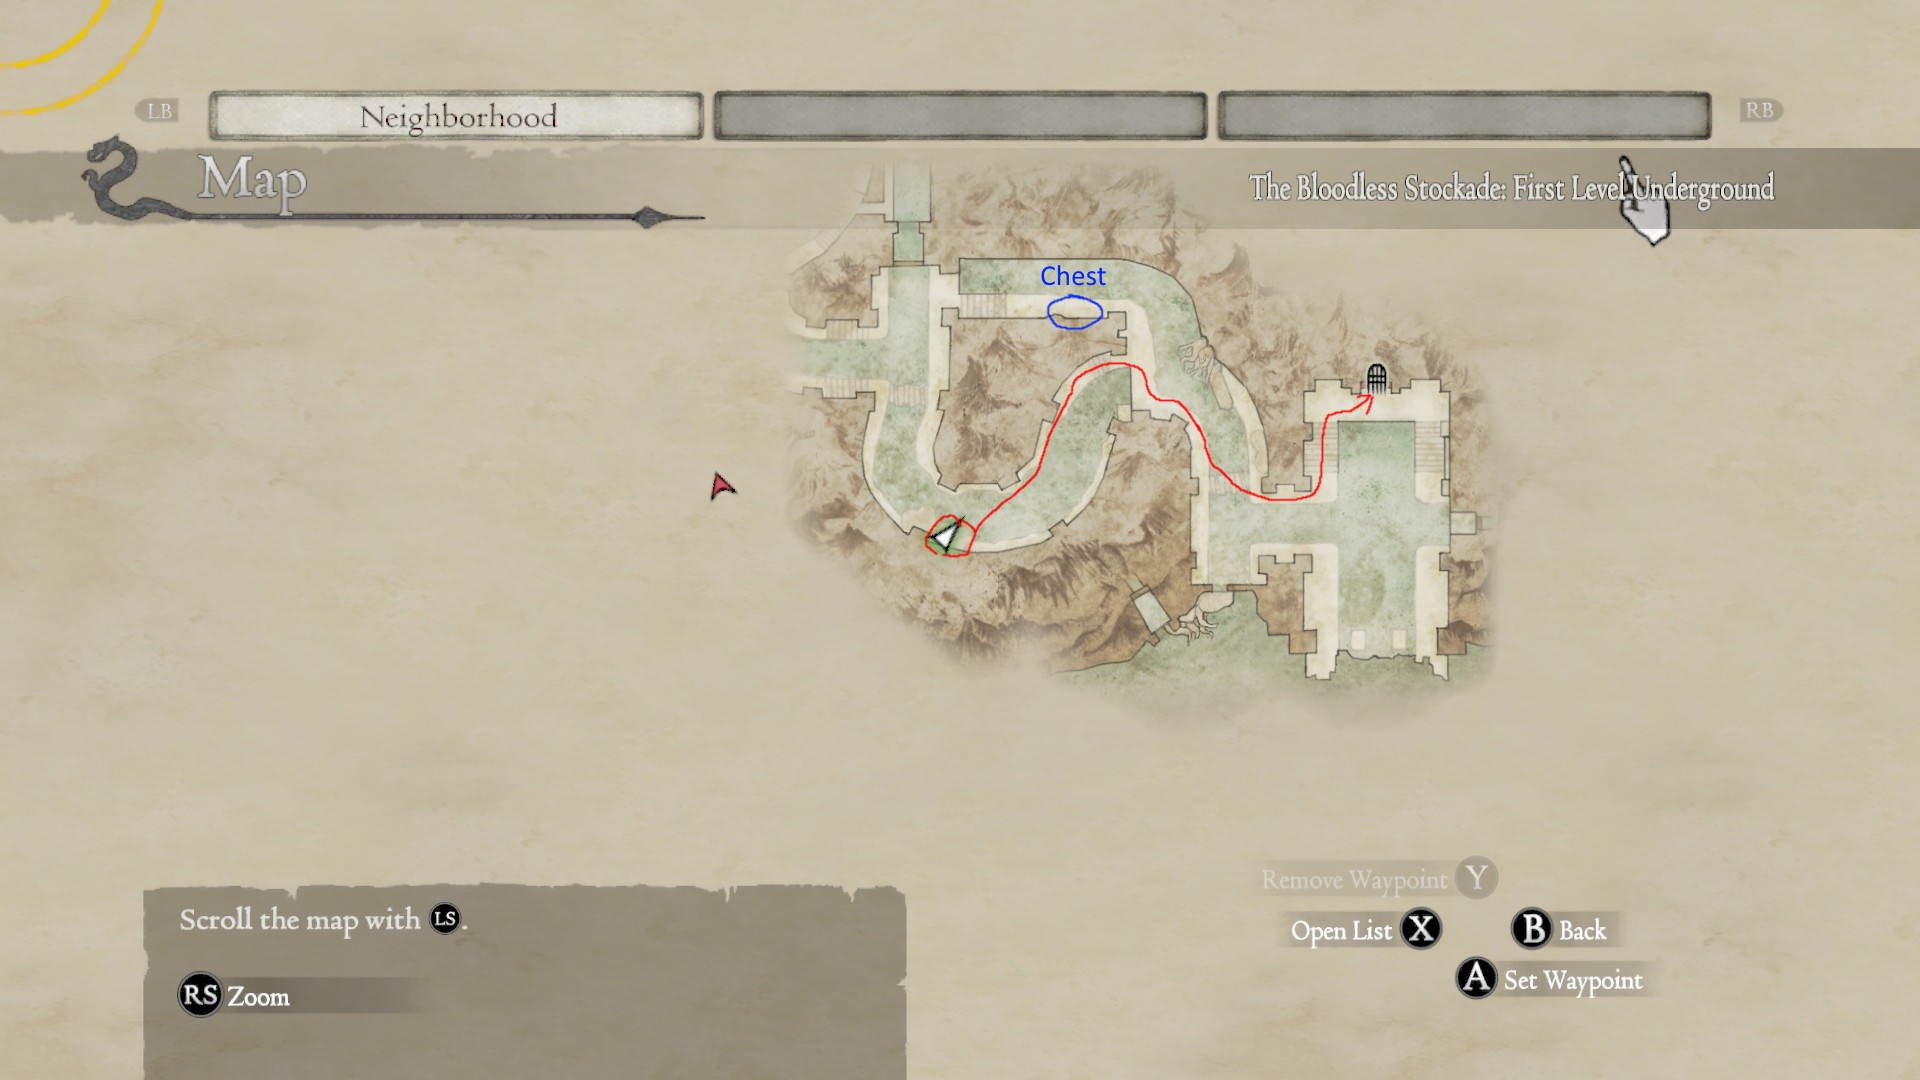
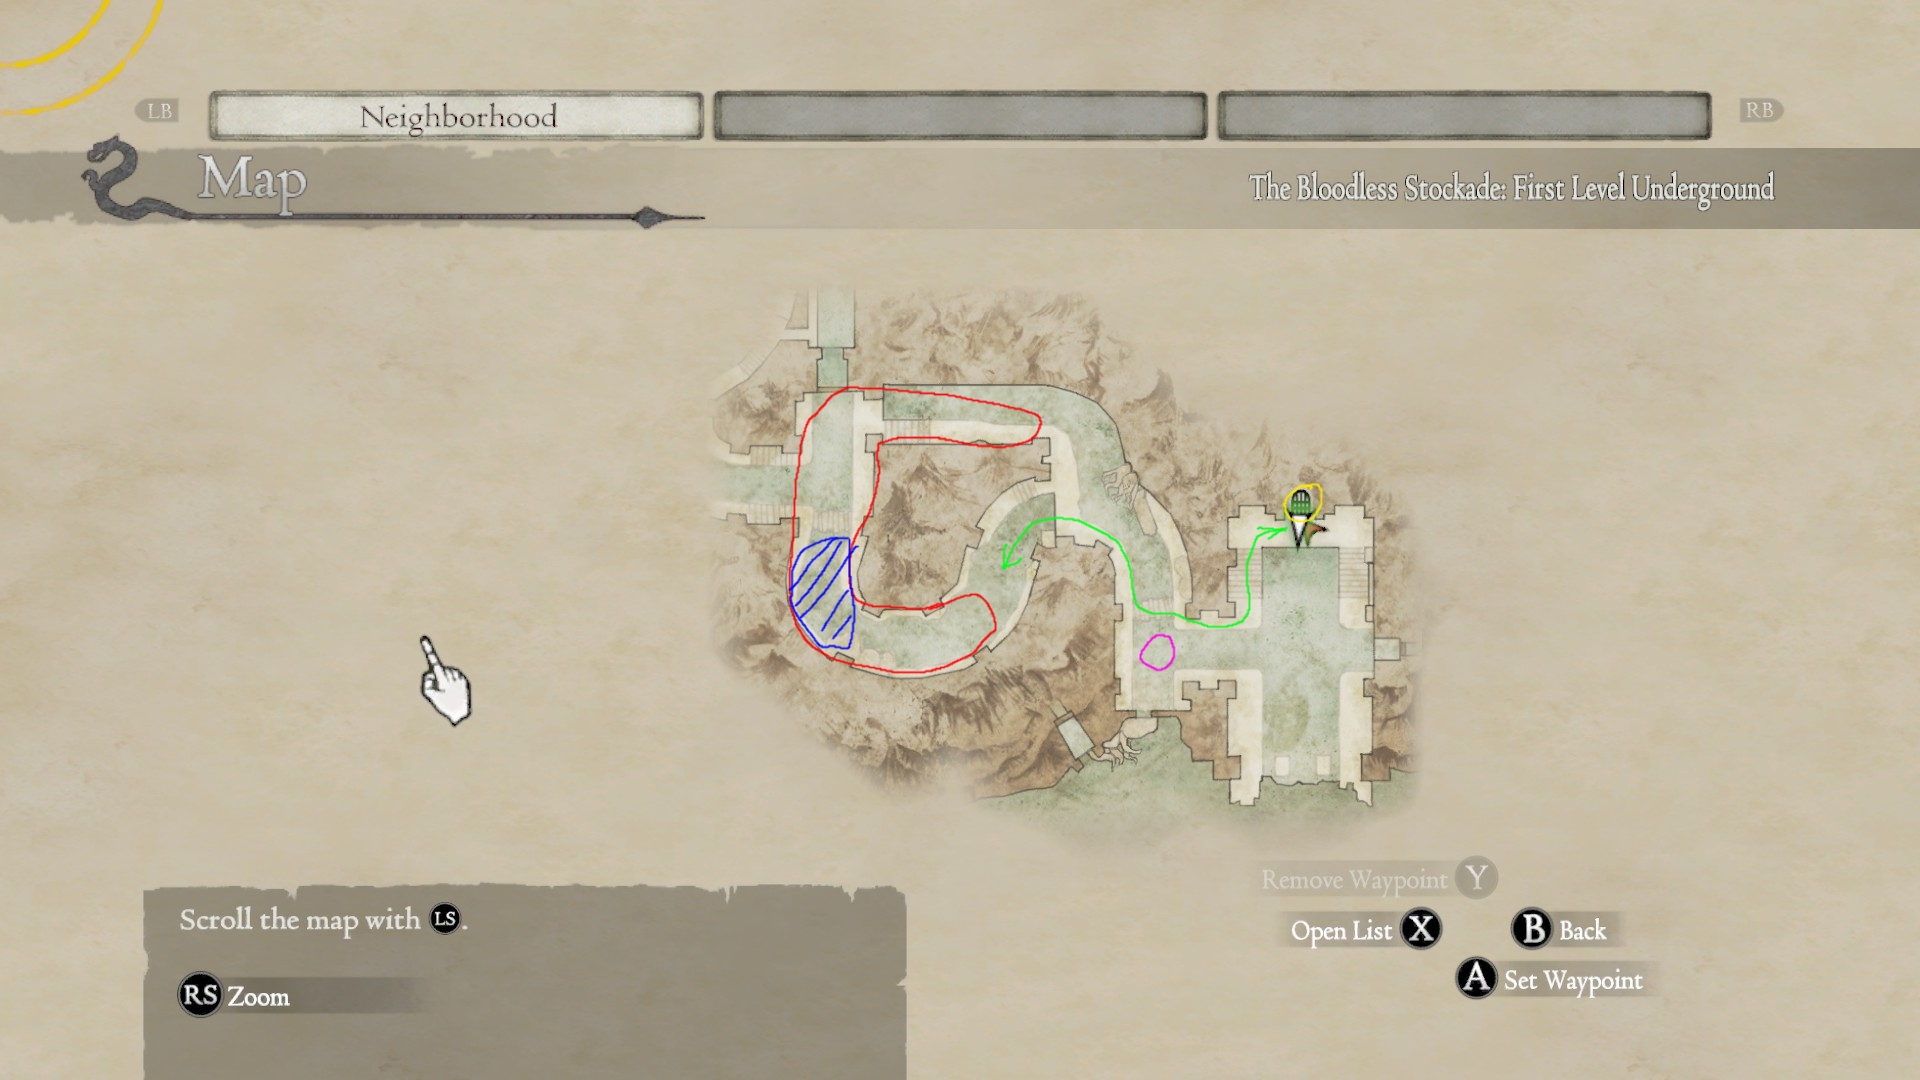
Go to Bloodless Stockade. RUSH TO THE YELLOW MARKED DOOR. Enter. Save Exit to Stockade.
You will hear Death's music. This means he's somewhere there.
Red area - Death's waypoints.
Blue area - Most likely to be Death's location if you'll rush.
Pink - Elder ogre. He is spawning there sometimes. You can kill him, but re-entering is faster.
After you've taken one Death's HP bar out, and it isn't stunned, it will leave. Then you'll have to re-enter. Death will be waiting in the same spots.
Last tipsIf you've came this far, you already know it.
Periapts, Blast Arrows, Focused Bolt, etc., staying out of attack range... Good luck.
Pawns won't do much good here. Discard them and receive more exp.
You can't kill Death with melee. Ranged only. Swap your class for something more fitting and you'll be able to farm Death and get better stat growth (which is dependant on current class, by the way).
Showcase
Extra Method 1. AFK Vocation Leveling.
Need to level up your vocation? Don't want to waste your time killing skeletons? Need to go AFK? This method is for you, then.
Requirements: Post-game, 3 pawns.
Go to Gran Soren. Speak to the Duke if you haven't already. Guards will from now on be aggressive in the noble quarters. That's what you need.
Climb a wall near the cathedral. Go AFK. Your pawns will kill infinitely spawning guards. Each kill gives you around 100 exp, but as the main goal is vocation leveling, each kill gives you +1 to vocation kill count. Every kill counts the same for vocation levels, be it a rabbit or a cyclops.
Example: you need X kills to get from V.LVL 1 to 2.
Extra Method 2. Easy Dragonforges And RC.
This method involves in killing the Dark Bishop/Cursed Dragon. Can only be done in Post-Daimon.
This might be helpful if you need to dragonforge something. Chances are very high.
Go to bitterblack island, use second shortcut. Go left, enter the arena. Use weal periapt. Kill the boss. You will receive exp for the Bishop and Dragon. Loot them, then go to the door that leads to skeletons. Remember this place. Go to skeletons, loot 2 rift crystals on the right side. Come back to the door. Looking at it from the arena, climb up at the left side of the wall that has this door in. Once you've climbed, go left. Proceed through the passage, loot 2 chests.
Use lifestone. Go to Gransys, sleep somewhere for 5 days. Come back and repeat.
Conclusion.
I hope this guide helped you overcome difficulties. Feel free to submit your thoughts in the comments, I'm still alive :) (2021) Share this guide to anyone who's having troubles with leveling.
Subscribe to my youtube channel for more Dragon's Dogma content (mainly speedruns): https://www.youtube.com/channel/UC2CAnez4-1hygkx_gwW2AaQ
Source: https://steamcommunity.com/sharedfiles/filedetails/?id=616899482
More Dragons Dogma Dark Arisen guilds
- All Guilds
- Dragons Dogma Dark Arisen Guide 10
- 100% Achievement Guide: Dragons Dogma - Dark Arisen
- MOD PACK(RUS) .
- An opinionated guide on what every pawn should have
- All Quest (Thai)
- Dark Arisen.
- Dragon's Dogma: Dark Arisen. Getting started 101 and "did you know's?"
- Dragon's Dogma: Dark Arisen - Liquid Vim Guide (Where to Find for Harvest)
- Dragon's Dogma: Dark Arisen - Beginners Tips