
Interface
Game Interface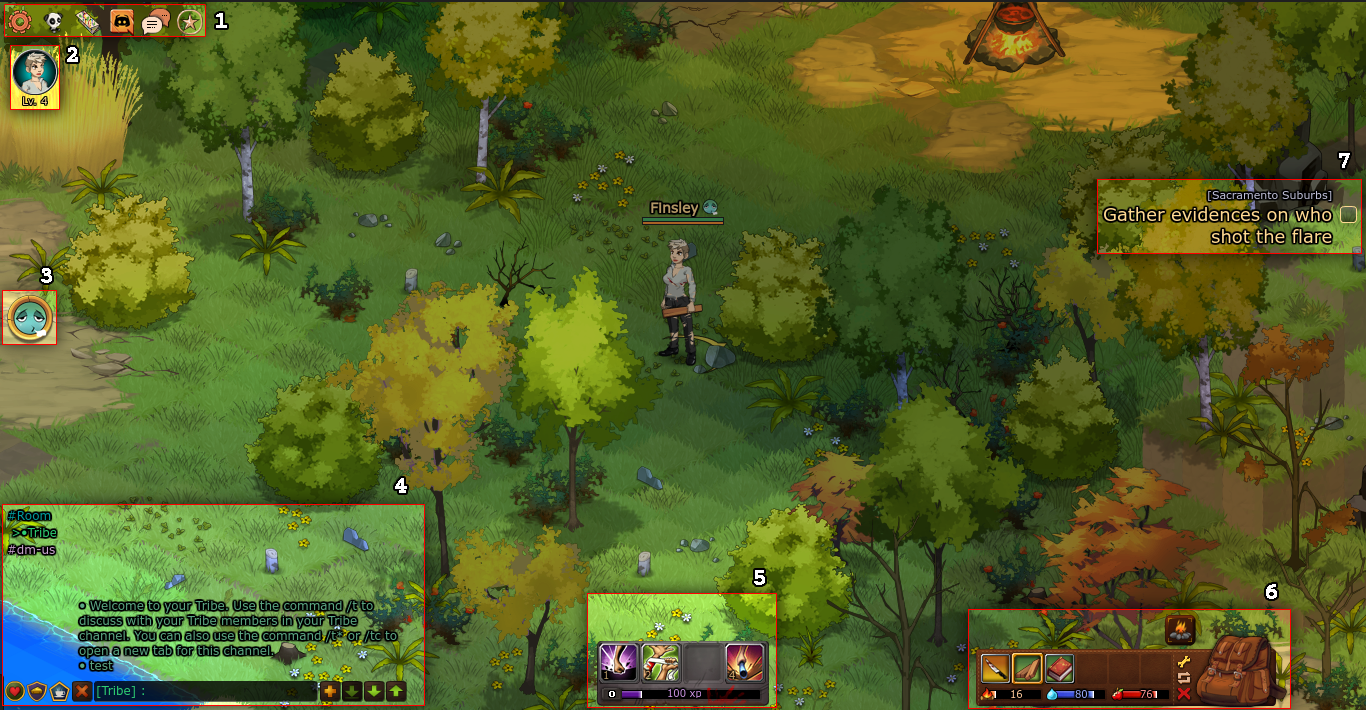 1. Settings, Information, Groups And Daily Quests
 Settings
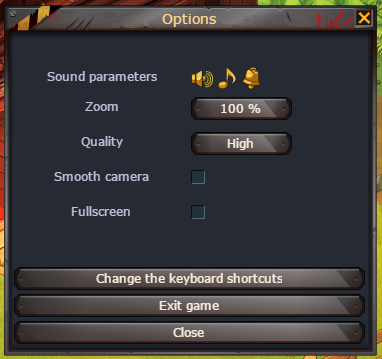
 Group Management


 Forums
 2. Character Profile
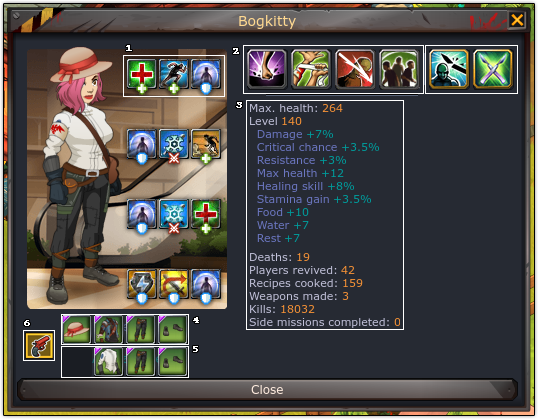 3. Effects
 4. Chat5. Skills And Experience
 6. Bag


 7. Missions
- Allows you to turn music and sounds on and off, change the quality, zoom, set the game to fullscreen, etc.
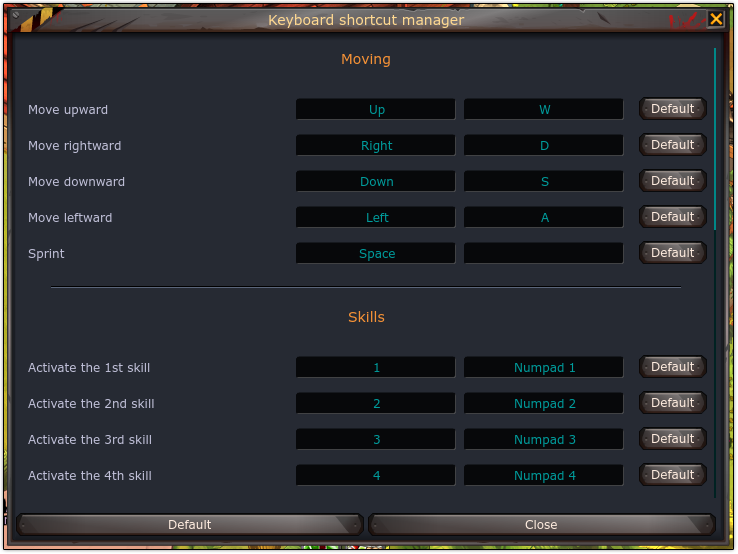
You can also access the keyboard shortcut manager from this window.
- From this window you can invite players to your group. A group can have up to 4 players in it.
Other players' character icons appear below yours when you're in a group, and when you're in the same zone as them you can see an arrow pointing where they are. When you create or join a group you automatically get added to a private chat where you and your group members can chat.
Zone information - You can see basic information of the zone you're currently in. The zone's name, how many players are in it, and how many infected.
Discord - Directs you to the official Dead Maze discord server. (http://discord.gg/deadmaze)
- Directs you to Atelier 801 forums.
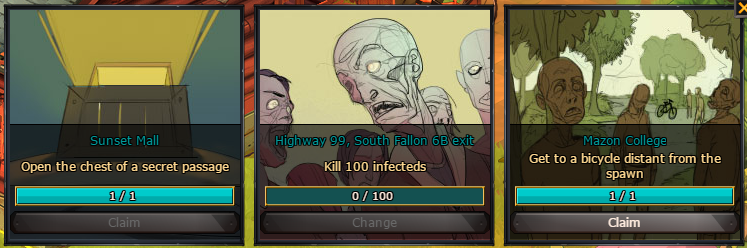
Daily Quests - You can see daily quests here.
Each quest will change daily and can only be completed once a day. You may change one of your quests once every 24h if you receive one you don't want to do.
Kits (explained in camp, sewing workshop)
Skills - You can have 4 active skills and 2 passive skills active at a time. These skills can be obtained by leveling up, by buying them on Lakeview, or completing research projects on the research workshop.
Player stats - Stats in white are the basic player stats everyone has, blue ones are bonuses that can be obtained by leveling up and they stack to a certain limit.
Equipment - You can equip clothes in these slots. Depending on the tier of the clothes and their quality you receive extra health points and slots to equip kits. Tiers, quality and kits are explained in the camp tab, on the sewing workshop section.
Appearance - Clothes can be equipped in these slots for purely aesthetic reasons. Kit bonuses don't count, and only clothes updated to exceptional quality can be equipped.
Suicide - In case you get stuck you can select this option to return to your camp. However, all your items will be left behind, so think twice before clicking this option.
These can be positive or negative and depend on how well you're fed, how tired you are, etc.
- Explained on Community Section
The skills with numbers are your basic skills, these can be chosen on your profile. If you press the numbers shown they will activate.
The skills on top are survivor equipment (explained below) skills and item skills. These vary depending on what equipment you have or the item you're holding.
To the bottom you can see how much experience you've gathered and your threat level. You fill this bar by killing infecteds. Every 700 experience points you get a threat level.
For every threat level your food and water bars get consumed quicker, and zombies do 5% more damage, but you also get a bonus 5% experience (if you have 700 exp you get 5% of that as a bonus, if you have 1400 you get 10%, etc). You also get better loot the higher your threat level is. The maximum threat level you can reach is 20.
Your bag is used to store items you gather in zones by opening containers, killing zombies, completing missions, etc.
1. Rest, food and water bars - Pay attention to these bars and try to keep them full at all times. Picking up items costs rest, and fighting costs water and food. If your food or water bars go below 40 you won't have a second chance if you die!
2. Options
Opens up the salvage menu, where you can salvage items on the go by just dropping them there. Picking up the resources obtained costs food or water.
Organizes your inventory.
3. Reputation and survivor marks - You can get these by completing daily quests, missions, leveling up (rep only) and doing research projects. They're used as currency and you can buy clothes (camp), blueprints, food, and weapons (lakeview) with them.
4. Fire and food - If the item you're holding is mostly made of wood you can make a small campfire with it, bear in mind you will lose the item when you do this, so don't make a fire with your favorite weapon. If you're holding food, you can eat it but it'll cost 10 rest points.
5. Inventory - You can carry a certain amount of items at a time, once your bag is full you can't pick up any more items, so you have to go back to your camp (which you unlock after a few missions) and salvage the items or throw some away if you want to get more.
6. Survivor equipment It's like clothing, but you can get these anywhere if you're lucky and they have certain effects (healing skill +30%, for example), skills. However, they're not permanent, if you die you'll lose them forever. For more information about survivor equipment, feel free to visit the Dead Maze wiki.[deadmaze.wikia.com]
Missions are shown on the right side of the screen. On top you can see the zone where the mission takes place (in the example picture, you have to go to Sacramento). A yellow arrow below your character will point at your target so you get an idea of where you have to go. However, this arrow doesn't show you the path, you'll have to discover that on your own.
Once you complete a mission you will automatically get the next one, until you complete all missions. You can have more than one mission active at a time.
Optional missions will have the word [optional] in them.
Community
 Friends
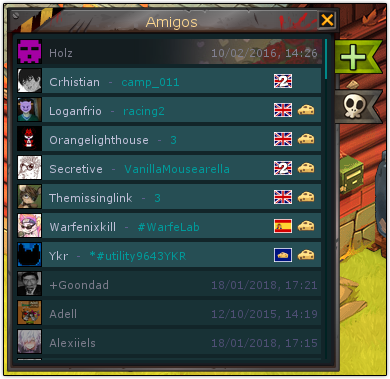
 Tribe
Tribe
 Café
Café


The chat is as simple as it gets, click on the text box, write something, press enter to send. But there are a few tricks to it and many cool things too.
- This button opens your friend list, you can add or remove players to both your friend list and your blacklist here. You can also see if your friends are online and what room, community, and a801 game they're in, or if they're offline you can see their last login date.
To add a friend click on the green +.
To access your blacklist click on the skull.
- This button opens your tribe. If you don't have a tribe it'll open the tribe creation window, where you can create one for 100 reputation.
Invite a player.
See the welcome message - This allows you to see the welcome message and change it if your rank has the proper permissions.
Ranks information - Rank names, permissions and order.
Change history - Who joined and when, who invited them, who changed the welcome message, who kicked who, etc.
Settings - Allows you to see the tribe's profile on the forums, leave the tribe, or set a map code for your tribehouse (Transformice only).
forum.
Enter the tribehouse - This currently only works on Transformice.
- A small, simple forum inside the game used for short-lived topics like "who wants to go on an expedition?" and questions like "how do I get precious ore?".
To the left you can see the topics, click on any to see the comments on the right side. The original post is marked in a different color.
You can like, dislike, or quote a post by clicking on the poster's avatar.
To comment, just scroll down until you see a text box.
To create a topic, simply click on the "create a new topic" button.
Close tab - If you're in a tab other than the main chat (a chat, your tribe chat, a whisper chat) you can close it by clicking this icon.
Use these to extend the chat, go to the newest message, go down, or go up respectively.
Useful commands:
/chat name - Create a chat. Anyone who knows the chat name can join. Popular chats are #sp and #dm-trade.
/t - chat.
/t* - Opens your tribe chat in a separate tab.
/c username - Whispers a player.
/c* username - Whispers a player in a new tab.
Shortcuts
Press "enter" when outside the chat to write something.
Press "t" outside the chat to automatically write /t or switch to your tribe tab.
Press "c" to reply to the last player that whispered you.
Press "shift" to switch to tabs with unread messages.
You can also click a player's name and you'll get a window with many options, so you don't need to memorize most of the commands:
Useful Links & Info
Below Are Useful Links To Help You With Your Dead Maze AdventureNeed Help?Original Forum guide by Bogkitty[atelier801.com]
Atelier 801[atelier801.com] - For Forums, Accounts, etc.
Dead Maze Forums[atelier801.com]
Dead Maze Wiki[deadmaze.wikia.com]
Dead Maze Discord[discord.gg]
This guide was written by Bogkitty (Atelier801 Forums), Published on Steam by Celeius (A801 Moderation Team)
Feel free to contact me (Celeius) in-game, on the A801 forums, or on Discord through the links above.
Source: https://steamcommunity.com/sharedfiles/filedetails/?id=1286586740
More Dead Maze guilds
- All Guilds
- INFORMACIN SOBRE KITS
- Bogeda Bay
- 100% Achievement Guide
- All Secret passage locations
- Dead Maze Guide 6
- Recommended Material Farm Location
- Dead Maze Tracker (Maps)
- Guide 5
- Guide to raising (and maintaining) threat level