
Starting Set-up Normal Difficulty
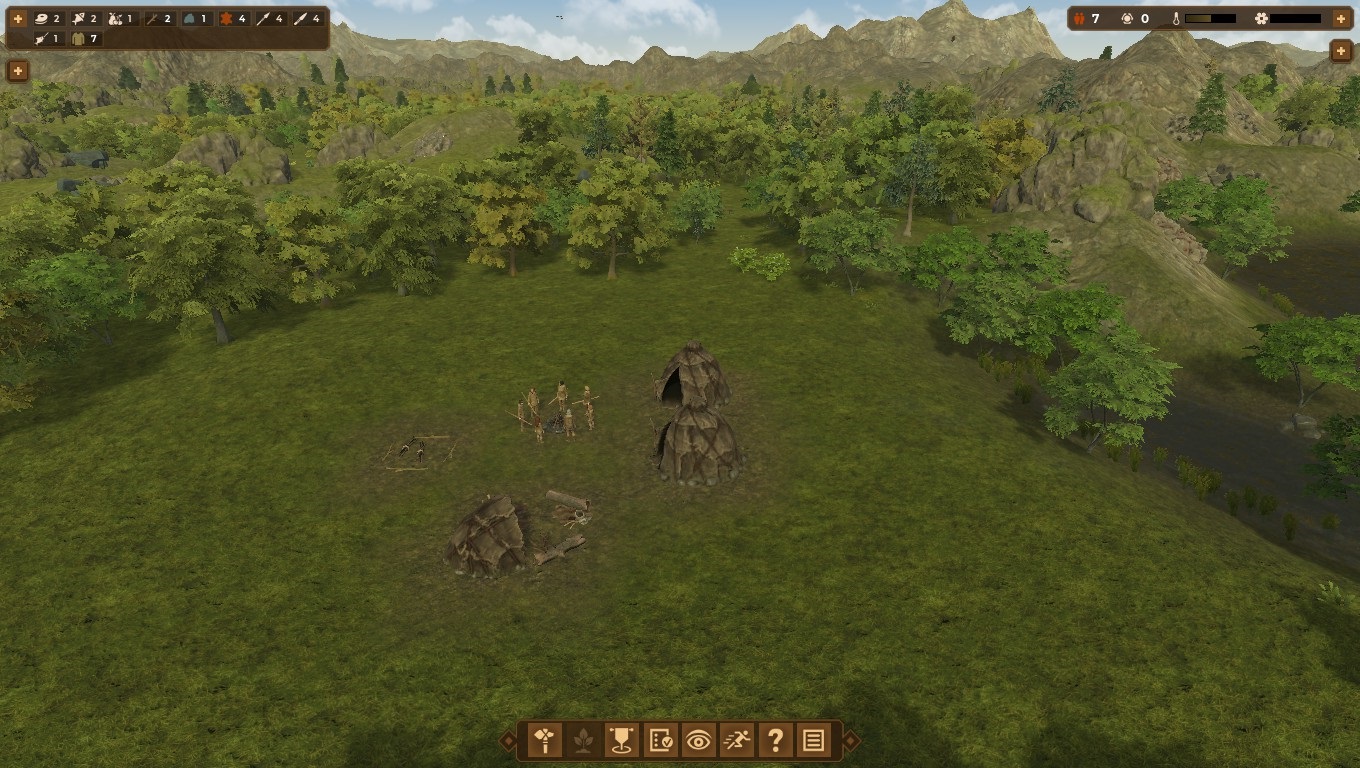
The normal starting position is a group of seven individuals in Early Spring.
1 older adult can wear 1 garment and carry up to 2 tools and 2 other items
4 younger adults can wear 1 garment and can carry up to 2 tools and 3 other items
2 children can wear 1 garment and carry 1 other item
You start with none of the Technological knowledge and a small supply of stores
You start with 3 tents each of which can sleep three and each of which have 4 inventory slots
You Start with 1 Crafting area
You start with 1 Woodpile
Pause the gameLook around the areas near the village. Keep in mind that you'll soon want to establish one or more work areas of each type but your first priorities should be some minimal stick collection and some food gathering. If there are any safe prey animals very near your village you might consider tasking two hunting parties of two members each to kill the nearest animals. Ideally of two different types.
Establish A Stick Collection Work Area
Establish one or more stick collection areas
Increase the worker limit to four but increase the initial upper limit on sticks to 25 (the default of 10 will be an early bottleneck)
Remember that Z and C may be used to adjust the size of the area to what is requiredUnpause the gameAs your hunters return, allow them to help with the stick retrieval if you're not yet up to 10 stick retrieved.
As soon as your villagers have gotten your stick inventory up to 6, place a Skin Drying Rack in your village and set the construction priority to high.
Remember that as soon as its built you'll need to set the production priority to high as well.
Establish a Fishing AreaOnce you have your first Skin Drying Rack built you should start fishing
It should cover two fishing spots (as close to the village hearth as possible)
Limit the workers to 1 but establish an infinite upper limit on raw fish.
Establish a Hunting Area or twoYou CAN make use of the hunting areas in the game without fear as they only flag prey that will flee rather than fight. In order to ensure more successful hunts, it's best to have two or three hunters respond to every report of nearby game. Animals that survive by fleeing tend to be swift and may well escape a single hunter. If you leave it to the automated areas, villagers will also grab spears or slings before they set out on a call to hunt.
Get Food Drying as your first TechHopefully if you've killed your first of two different beasts, built a skin drying rack, and gotten 10 sticks collected, you should be close to the 5 knowledge points that you need to unlock your first tech. Collecting 10 raw fish or killing another prey beast, should put you over.
As soon as you unlock the Food Drying tech, order the building of a Food Drying Rack and prioritize it.
Establish a Fruit/Nut and Berry Gathering areaHopefully, if all goes well you can establish this in the first summer and the fresh fruits and berries will allow you to get more meats and fish into your drying racks.
Be aware that nuts last a bit longer than fruits and berries so if there are any nut trees near your campsite you may wish to manually flag them for harvesting even if they fall outside your fruit and berry collection area.
Or you can establish additional work areas
Remember that Z and C may be used to adjust the size of the area to what is required
Establish a second Fishing AreaFish are available year round and make a great source of food for your people but the areas do get "fished out" so establishing each fishing area so as to allow access to two different fishing zones having 1 worker each will help minimize that problem.
Build an Extra TentOnce you have the requisite number of Dried Skins place an extra tent in your village. You should easily be bringing in enough food to support any humans that opt to join your village and the original complement of tents will only your starting population. Also the extra four storage slots may come in handy even before your population increases.
Establish 1 Flint Collection area This is actually the last of the immediately available work areas to establish (as close to the village as possible) Flint isn't needed immediately but it's nice to begin gathering it ASAP.
Leave the worker limit at one and initial upper collection limit at the default for nowRe-examine your area with an eye to huntingThe next bottleneck to clear up after sticks is dried skins and that requires hunting. Remember to try and hunt at least one of each of the easy prey animals so as to get the knowledge bonuses for each. There is also a bonus for the 10th of each species so keep that in mind as well.
With that in mind you might want to take a look at the sections
Animals in Dawn of Man.
Knowledge
Paleolithic Progress
Prepare for ExpansionI'm assuming that you've now got at least one of each type of work area set up. You've been on a few hunts and the knowledge points and supplies are starting to accumulate.
You tend to get new additions toward the end of winter so you should try and keep an eye on the number of available tent spaces you have. If you have the skins for it You might want to invest in additional tents as each contains storage spaces as well.
A well planned Paleolithic village should have:
Room for a 25%-50% population increase
A storage tent
2 to 3 Food Drying Racks
2 to 3 Skin Drying Racks
1 Skull Pole
1 or 2 wood storage areas
1 Stone storage areaAs you unlock additional Paleolithic techs you may also want
1 Leather Tanning station
1 Totem (seems to accommodate more people than the skull pole)
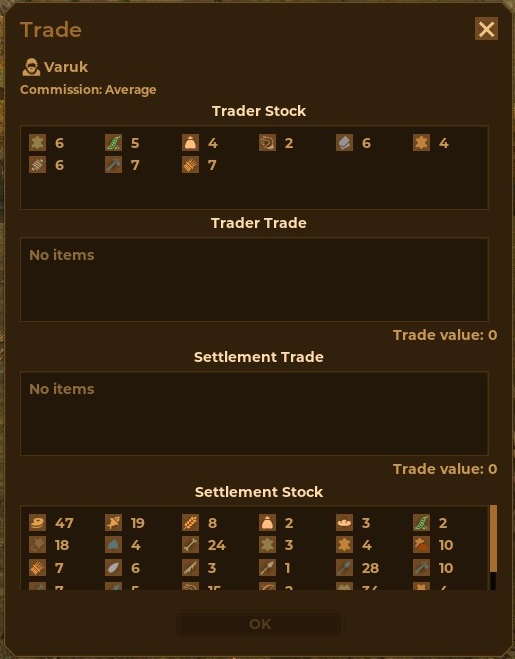
A word about TradersTraders will visit your village from time to time.
They represent a great way to improve the balance of your goods and possibly obtain some things you've not managed to unlock on your own.
They may also have technologies on offer that can be unlocked without your having to spend your hard earned knowledge points.
Traders charge a commission as you'll see in the trading screen. While many traders have low commissions some have high commissions which can greatly inflate the price of what you buy.
A Trade Commission Rate of Low is 30% ??
A Trade Commission Rate of Average is 40%
A Trade Commission Rate of High is 50% Be aware that traders will offer things that you cannot possibly use yet because their use requires technologies that you do not possess. e.g straw and pulses are no good to any civ that hasn't mastered the related techs
Some things that the traders offer CAN benefit your people even if the requisite techs have not been mastered.
I delayed leather processing and was short of raw skins as well. Trading excess food, older obsolete spears and harpoons for leather allowed me to have my village craft leather clothing that was cooler even though I'd not mastered Leather processing myself.
Remember that Traders will take obsolete weapons in trade. This should make it economically feasible to stockpile some old style weapons in order to get the "10 in stock" knowledge bonuses on weapons that you might otherwise just stop making.
Order of Unlocking Paleolithic TechnologyThe order of unlocking Paleolithic technology is up to you but I do strongly suggest getting the Food Drying Tech first. Having said that here's my suggested order and my reasoning.
Food Drying Building up food stores is always a good idea
The first Food Drying Rack you build will gain you a knowledge point - consider it a refundBone Tools Better quality weapons can be very helpful as they aid in hunting and will allow you to hunt some of the more dangerous beasts as you try to continue growing your knowledge base by getting hunting as many species as possible. Composite Tools Better than Bone tools and by now you should have the flint stores to take advantage of this one.
One odd exception though are Flint Spears. They offer no advantage over bone spears. Once I've gotten the knowledge bonus for making 10 of them, I turn off their automatic production and have my crafters switch back to bone spears so as to save the somewhat scarce flint for tools where it makes a difference. Spirituality Spirituality is helpful in that it allows you to build Totems which help improve your people's morale
The first totem you build also gives a knowledge bonus (another refund)Slings I left this one until after composite tools simply based on a shortage of dried skins.
Dog Domestication Dog Domestication is GREAT later in the game but isn't one that I'd rush. While dogs do help repel any invaders (including a possible Cave Bear or Cave Lion or Wolf attack during the Paleolithic era) serious attacks generally come later in the game and dogs can wait.Leather Processing Leather working is also good in that it allows you to tan leather for lighter summer clothing but some have issues with this one.
It used raw skins that I could dry and use for building additional tents.
I didn't seem to get a knowledge bonus when I built the Leather tanning station. (I may have just missed it) When you do go with this one, be sure to establish a tannin collecting work area. I understand that Tannin always has a trade value of 1 and can sometimes be a good trade item.
Managing Your Growing Village

To become really effective at managing your village, it's necessary to learn a bit about the management tools provided in-game
By clicking on the manage button you'll bring up a sub-menu with the following tabs:
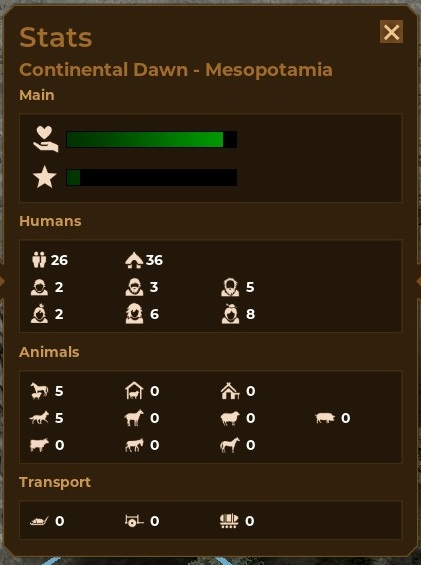
Stats - F2Stats shows at a glance the key statistics about your village. First shown are your village's relative prosperity and reputation. Both of these are factors in attracting traders and newcomers to your settlement.
Then is a section giving the numbers for your human inhabitants including total population & indications of how many you could house.
That's followed by a breakdown by age and gender
Then comes a summary of your domestic animals
Finally, there's a breakdown of how many of each type of transport you have available.
Resources - F3Resources gives a quick picture of how many of each type of resource you have on hand.
These are grouped into:
Food and Drink
Clothing
Materials
Tools
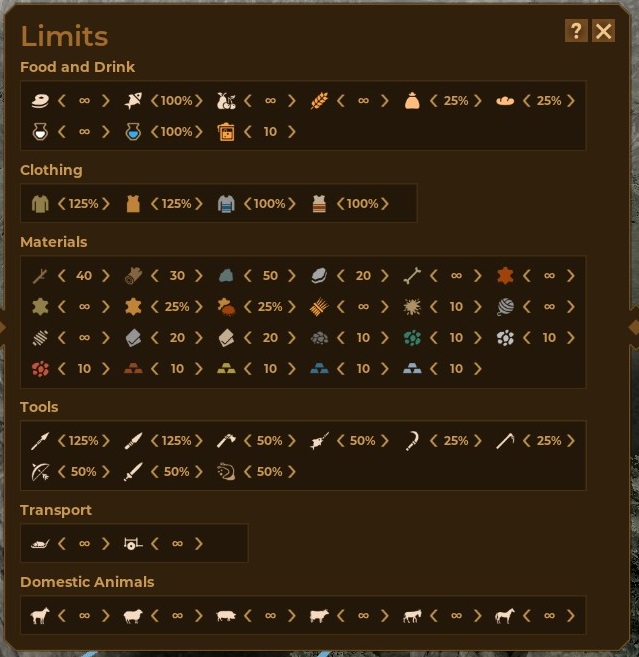
Limits - F4Each commodity that your villagers might produce in the game is subject to production limits that you control.
These limits may be set as
Infinite
A set number, 1,5,10, 15, 20, etc
A percentage of your your population
150%
125%
100%
75%
50%
25%
Charts - F5Population - This chart just presents a graph of your village's population. It reflects new arrivals either through birth or newcomers, and deaths, either from old age or mishap.
Food- This chart depicts the amount of food on hand. While it can dip from time to time it gives you a good idea as to whether your current villagers are producing enough or if a famine is in the offing. You will note that in my example there are two dips that were the results of my using excess foods as a medium in trades.
Domestic Animal Population - This chart shows the progress of your animal population.
Straw- This chart depicts the progress of your animal fodder. While domestic dogs feed themselves from table scraps and waste food, your herds require straw (and failing that grain) to prosper. Using this chart may help you decide that its time to cull the herds before an animal famine ensues.
Workload - While it's good to plan ahead too many scheduled tasks will result in lower morale and lower morale workers tend to work more slowly. At the same time it's not wise to have too many idle hands.
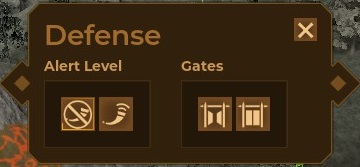
Defense - F6 The defense tab allows you to:
Issue an all-clear
Sound the alarm
Open the settlement gates
Close the settlement gates
Tech - F7 Tech is too complicated to cover here. See the guide index for a link to its own section.
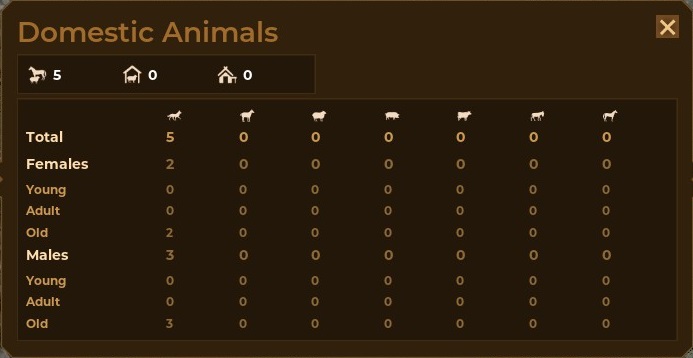
Domestic Animals - F8 The Domestic Animals tab allows you to check on the numbers of domesticated animals of each type your village supports.
For each breed you can see by gender the number of
Young
Adult
Old
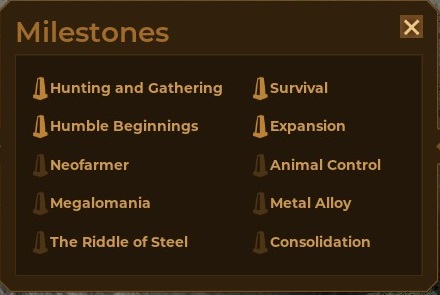
Milestones - 5The Milestones tab allows you to review how many of the ten milestones you've completed.
The hotkey for this is 5
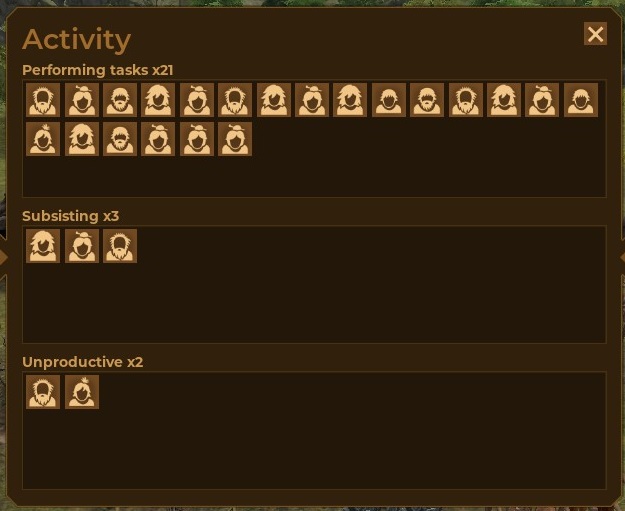
Activity - 6
The Activity panel allows you to keep track of all of your villagers.
The hotkey for this is 6
The Panel is divided into the following sections:
Performing Tasks - This section displays each villager that is actively engaged in a task.
Subsisting - This section displays each villager that is eating, sleeping, etc.
Unproductive - This section displays each villager that is not currently engaged in any productive workHovering over any of of the portrait icons will bring up the villager's name and the details of their activity
Left clicking will focus you on them.
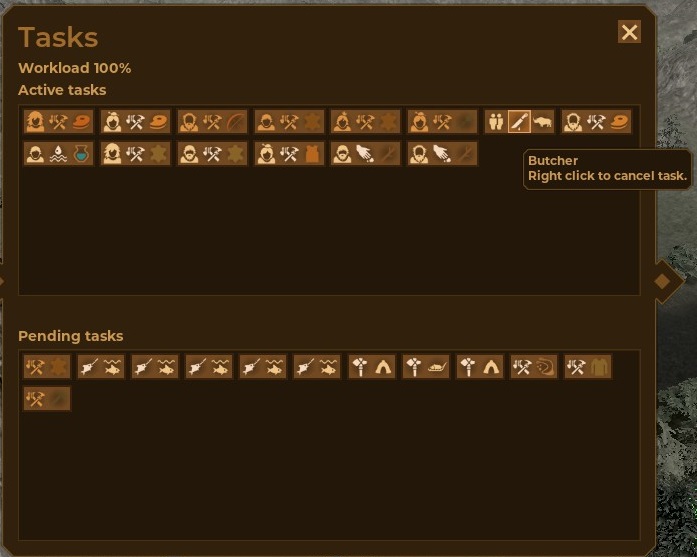
Tasks - 7The Tasks panel shows you all of the tasks currently underway and those that are queued up to be completed.
Left clicking on any of the active tasks will focus you on the person doing that task.
Right clicking on any task will cancel that task
This panel is great for finding lost hunters or for zooming in to monitor their progress.
Knowledge Progress - 8Knowledge progress is too complicated to cover here - see the guide index for its own section.
Mesolithic Management
The Mesolithic Era is opened with the unlocking of the Pottery technology (Requires 14 knowledge points)
Pottery technology allows the collection of water and its storage. Going to the banks of the river or lake and filling three pots of water and then storing it near the center of your village will improve the efficiency of your villages a bit by saving on commute times. Be sure and take advantage of this tech once you have it by establishing at least one work area where water will automatically be drawn. Since there's no shortage of water three people can be assigned to a the single closest source of water with no ill effect.
Order of Unlocking Mesolithic TechnologyAgain, the order of unlocking Mesolithic Technologies is up to you once pottery has been unlocked. In fact, unlocking Pottery can be done once you've accumulated all the necessary knowledge points (14) without unlocking all of the Paleolithic techs.
Having said that, be aware that in standard mode, the level of any raiders is controlled by the period which you're in. Unlocking JUST the key technologies in each era is possible but might put you at a slight disadvantage to your AI raiders.
After Pottery, All Mesolithic techs require 7 knowledge points each to unlock.
Polished Stone
Requires Composite Tools
Allows the construction of mill stones. At least one of these will be necessary if you wish to harvest grains and mill it into flour. Ancient querns are among the most common finds at archeological sites of the Mesolithic era.Archery
Requires Slings
Allows the crafting of bows, Bows have better hunting power and better fighting powerCereal Processing
Requires Food Drying
Cereals can feed people more efficiently than hunting and produce straw as a by product that can be used to feed domesticated animals later.
Cereal can be stored as Grain without any further preparation and last as long as cured meats or fishPulse Processing
Requires Cereal Processing
Legumes (Pulses) can be used to feed your people as well as cereal. While they produce no straw when grown, neither do they require processing into flour and baking into bread.Sledges
Requires leather processing
Sledges are manually drawn cargo transports that allow you to carry heavy loads or simply to carry more cargo.
Your villagers would prefer to transport heavy goods like log via sledges
Sledges will become extra valuable when going after larger game animals such as Mammoths and Wooly Rhinos which produce large quantities of meat, bone and skins.
Sledges are constructed rather than crafted
Neolithic Nightmares
The Neolithic Era is unlocked with Cereal Domestication which requires 15 Knowledge (and the unlocking of Cereal and Pulse Processing)
The Neolithic allows you to move still further from a hunter gatherer existence to a more stable agrarian one. But the Neolithic presents a few nightmares as to balancing the workloads of your villagers.
Some things to keep in mind when making this transition:
Cereal Grains can be planted in patches as large as 5x5 provided that the selected site is flat enough and free of other obstructions. It's best to start small and ramp this production up over time as large farm plots will cause your task load to spike at planting and harvest time.
Pulses offer the added benefit of being planted in the winter and harvested in the summer which allows you to level out the workload of your farmers who'll be busy in the spring and fall with planting and harvest cereal crops.
Straw seems to keep forever and it might be well to consider where you'll be wanting to place haystacks and stables as you begin to lay out your fields.
Order of Unlocking Neolithic TechnologyThe order of unlocking Neolithic technology is up to you once you've unlocked Cereal Domestication. Having said that here's my suggested order and my reasoning.
Cereal Domestication
This allows you to begin farming in a small wayPulse Domestication
This allows you to begin begin balancing the farmer's workload by adding Legumes (Pulses) into your crop mixMegalithism
Erection of at least one Menhir will give a chance to learn the ins and outs of this aspect of the game and will keep your people happier in the long run.Thatching
Thatching allows you to begin using the straw you'll be accumulating to make better homes for your villagers. Every tent you upgrade will allow 1 more villager than the tent it replaces and the goods stored within will last longer.
Be sure and set up an automatic mud collection work area or two as soon as you have this technology as you'll be needing mud in order to keep up with the conversion of tents to huts.
As each hut upgrade requires tearing down the tent it replaces don't go overboard with doing too many of these at a time.Flax Domestication
Flax is useful in weaving linen cloth that makes more stylish summer wear than leather outfits.
Flax shares the same growing season as your cereal crops so you'll need to coordinate and balance how much of this you grow so as to not overtax your farmers. Underground mining
You may be walking a good distance to find surface flint deposits at this point. Underground mining allows you to collect flint in underground mines that may be closer.Well Digging
As you expand your fields you may find yourself getting further and further from your water sources. Having wells available in-land may help both your farmers and your hunters who are having to range further afield as your agrarian efforts frighten game out of more developed areas. Weaving
Once you've accumulated a bit of linen you'll be wanting to weave it into linen cloth so as to make Linen outfits.
Unlocks the Weaver and the Outfitter structuresGoat Domestication
Allows you start domesticating Ibex and keeping goats.
In addition to meat and skins female goats provide milk
Unlocks the StablesSheep Domestication
Allows you start domesticating Mouflin and keeping sheep.
In addition to meat and skins, sheep provide wool which can be woven into warm winter outfits that are more stylish than skins.Stilting
Allows you to begin bridging rivers and lakes.
Raiders seem to prefer bridges so that may well be used to create bottlenecks even before any extensive defensive walls are erected.Pig Domestication
Pigs are somewhat redundant and some consider them optional preferring to advance to the Copper age before getting this tech for completeness.
Copper Age
Be aware that the Mammoth and the Wooly Rhino both go extinct in the Copper age so it's best to check on your Steam Achievements and your Knowledge progress before advancing to the Copper age in case you wish to do any late hunting of either species.
Animals In Dawn Of Man
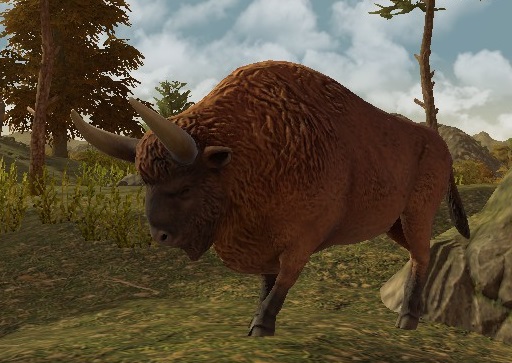
A healthy Ancient Bison in its prime may be dangerous to hunt.
The different species of animals in Dawn of Man vary as to the amount of danger they represent. Herbivores pose little danger unless attacked.
Predators will sometimes target men when they are hungry enough.
Many herbivores will flee whenever it's possible but some will fight when provoked. Often the most dangerous are mothers protecting their young.
It's also possible to hunt even the most dangerous animals in groups
Animals that may be too dangerous to hunt when they're healthy may make more tempting targets when they've become injured or are very young or very old.
A well-armed hunting party of 3 or 4 should be able to handle even some of the moderately dangerous beasts. - And they'll have to spend less time chasing them down.
Be aware that predators will sometimes take advantage of a "free lunch" eating your meat and spoiling their hides, so pay attention to what predators are in the area. It may be advisable to take out any minor predators before going after your main quarry.
Remember that holding down the H key while mousing over your villagers will select only those that are armed for hunting (spears, bows or slings)Table of Animals in The Dawn of Man
Fight or Domestic Yield Hunt Goes Animal Nature Flee Variety Sk/Mt/Bn Knowledge Extinct Bear Predator Fight 2/3/2 1 Cave Bear Predator Fight 3/4/2 2 Bronze Age Cave Lion Predator Fight 3/1/1 1 Bronze Age Wolf Predator Fight Dog 3/1/1 1 Ancient Bison Herbivore Fight 4/6/2 1 Bronze Age Aurochs Herbivore Fight Cattle 4/6/2 1 Bison Herbivore Fight 3/6/1 1 Mammoth Herbivore Fight 10/15/4 2 Copper Age Wooly Rhino Herbivore Fight 8/12/3 2 Copper Age Boar Herbivore Flee Pig 2/4/1 1 Deer Herbivore Flee 2/3/1 1 Ibex Herbivore Flee Goat 2/4/2 1 Megalocerous Herbivore Flee 3/5/2 1 Bronze Age Mouflon Herbivore Flee Sheep 2/4/2 1 Reindeer Herbivore Flee 3/4/2 1 Bronze Age Wild Donkey Herbivore Flee Donkey 2/4/2 1 Wild Horse Herbivore Flee Horse 2/4/2 1
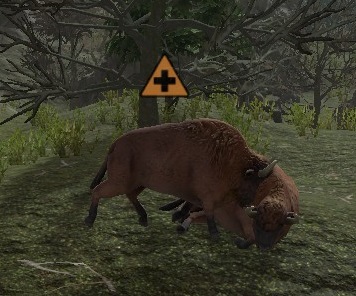
An old and unhealthy Ancient Buffalo
An old and unhealthy Ancient Buffalo may well make a safer target and still give you knowledge bonus associated with hunting a new species.
Knowledge
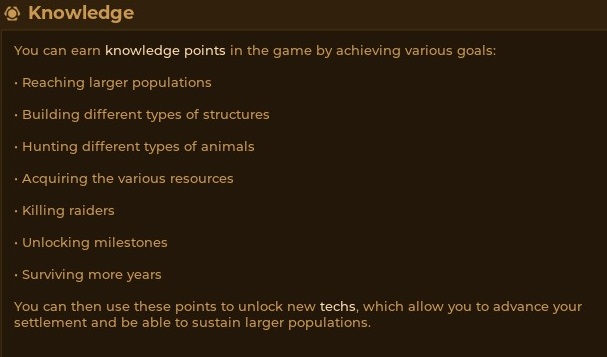


Knowledge is acquired in a number of ways and is required to unlock technologies.
Pressing "8" will bring up a display of your progress toward each of the knowledge awards.
Reaching Larger Populations
3 Knowledge is awarded for reaching a population of 10
3 Knowledge is awarded for reaching a population of 20/30/40/50...
3 Knowledge is also gained at the 25 population level?
Hunting Different types of AnimalsKnowledge is obtained by successfully hunting the first of each species
Cave Bear, Mammoth and Wooly Rhino are worth double
Knowledge is also gained at the 5th/10th/50th... kill
Acquiring ResourcesKnowledge is obtained by storing the 10th of each resource
Knowledge is also gained at the 100th/250th/500th/1000th
level
Surviving wintersKnowledge is awarded for each winter you survive
Building Various Structures Knowledge is awarded for the first of each type of structure you build
More knowledge is awarded for some structures e.g. The first Dolmen is +2
Knowledge is also awarded for the 5th of each type of structure
After reaching 5 no more Knowledge is awarded for each type of structure
Knowledge from killing Raiders 2 knowledge is awarded for killing your first raider
Other rewards are gained at 5/10/20/...
Knowledge from growing herds Apart from the Milestone bonus at 20 animals you get additional +1 bonuses at the 1/10/20/25/30... levels
Reaching Milestones
+2 Knowledge is awarded for the each of the ten milestones
Hunting and Gathering Milestone
Requires that you have three raw meat and three berries in storage
Survival Milestone
Requires that you survive two years
Expansion Milestone(This occurs WITH the population bonus for a total of six?) Requires that you have a population of 20
Neofarmer Milestone
Requires that you have unlocked
Cereal Domsestication
Pulse Domestication
Flax Domestication
Animal Control Milestone
Requires that you have a domesticated animal population of 20Megalomania Milestone
Requires that you have built a Stone CircleMetal Alloy Milestone
Requires that you have created 1 unit of BronzeRiddle of Steel Milestone
Requires that you have created 1 unit of steelConsolidation Milestone
Requires that you have a population of 100
Technology
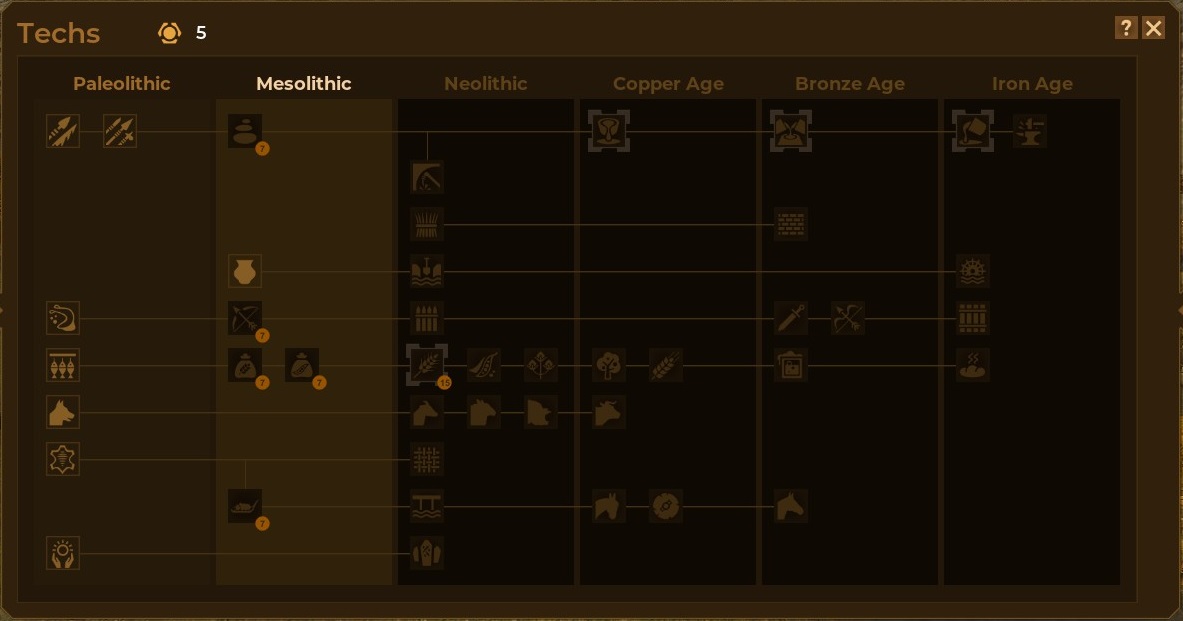
Knowledge is required to unlock technologiesThe hotkey to display the Tech Tree is F7
Paleolithic TechnologiesPaleolithic technologies cost 5 knowledge each and are:
Bone Tools
Composite Tools
Slings
Slings
Food Drying
Dog Domestication
Leather Processing
SpiritualityMesolithic TechnologiesMesolithic Technologies require that you first Master Pottery. This takes 15 Knowledge and will advance your civilization to the Neolithic Age.
The Mesolithic technologies (excluding Pottery) all cost 7 knowledge each and are:
Stone Polishing
Archery
Cereal Domestication
Pulse Domestication
Sledges
Knowledge Progress
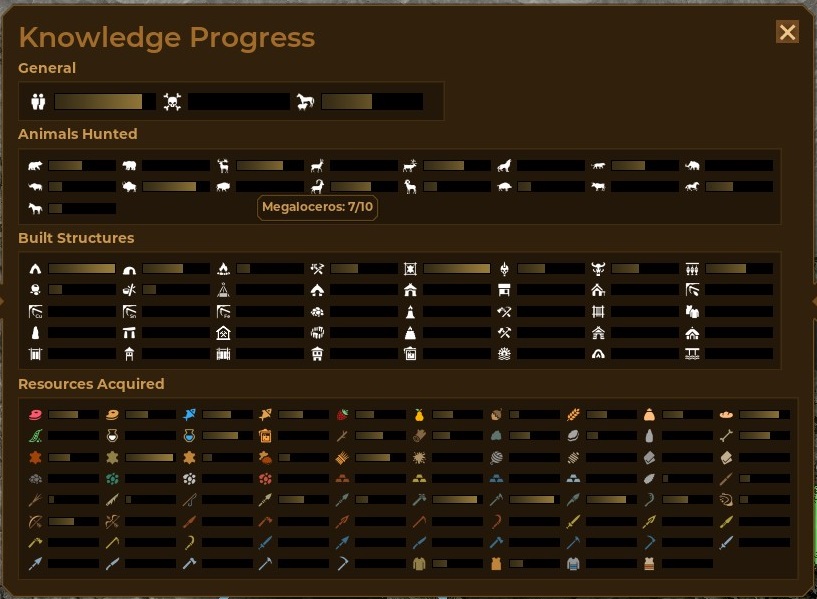
Knowledge Progress
This panel (hotkey 8) allows you to see just how far you've progressed toward each of the goals that will award knowledge points
By hovering your mouse over any of the indicators you will see your current progress and what the next goal is. (In the above example we've hunted 7 of the 10 Megalocerus needed t o get our next knowledge award
Goals are grouped into the following categories:
General
Population
Raiders Killed
Animal PopulationBuilt Structures
Animals Hunted
Resources Acquired
Clothing
They say that clothing makes the man.
In the Dawn of man there are several types of clothing
Clothing Type Warmth Style Durability Requires Skins 2 1 3 Dry Skin Leather 1 1 3 Leather Wool Outfit 2 2 5 Wool Cloth Linen Outfit 1 2 5 Linen Cloth
Hunting Weapons
Hunting Weapons in The Dawn of Man
Tool Type Ranged Hunting Fighting Requires Uses Duration Trade Wooden Spear Ranged 1 1 Stick 20 4 Bone Spear Ranged 2 2 Bone Stick 30 3 Flint Spear Ranged 2 2 Flint, Stick 30 6 Sling Ranged 2 0 Dried Skin 30 6 Bow Ranged 3 3 Dried Skin, Stick 40 8 Composite Bow Ranged 4 4 Linen, Stick 50 10 Copper Spear Ranged 2 2 Copper, Stick 30 6 Iron Spear Ranged 3 2 Iron, Stick 40 8 Bronze Spear Ranged 3 2 Bronze, Stick 40 8 Steel Spear Ranged 4 3 Steel, Stick 50 10
Other Tools
Here is a table for comparing the various (non-hunting) tools in the game.
Trade values are based on a Neolithic Trader
Not all values are known to me yet but some "upgrades" seem to offer no benefits
Tool Type Ranged Use Fighting Requires Uses Duration Trade Biface Melee Butchering 1 1 Flint 20 4 1 Flint Knife Melee Butchering 2 1 Flint, Stick 30 6 10 Copper Knife Melee Butchering 2 1 Copper, Stick 30 6 Bronze Knife Melee Butchering 3 2 Bronze, Stick 40 8 Iron Knife Melee Butchering 3 2 Iron, Stick 40 8 Steel Knife Melee Butchering 4 2 Steel, Stick 50 10 Wooden Harpoon Melee Fishing 1 1 Stick 20 4 Bone Harpoon Melee Fishing 2 1 Bone, Stick 30 3 10 Flint Sickle Melee Harvesting 2 1 Flint, Stick 30 6 Copper Sickle Melee Harvesting 2 1 Copper, Stick 30 6 Bronze Sickle Melee Harvesting 3 1 Bronze, Stick 40 8 Iron Sickle Melee Harvesting 3 1 Iron, Stick 40 8 Steel Sickle Melee Harvesting 4 1 Steel, Stick 50 10 Flint Pick Melee Mining 1 1 Flint, Stick 20 4 5 Copper Pick Melee Mining 2 1 Copper, Stick 30 6 Bronze Pick Melee Mining 3 1 Bronze, Stick 40 8 Iron Pick Melee Mining 3 1 Iron, Stick 40 8 Steel Pick Melee Mining 4 2 Steel, Stick 50 10 Flint Ax Melee Woodcutting 1 2 Flint, Stick 30 6 10 Copper Ax Melee Woodcutting 2 2 Copper, Stick 30 6 Bronze Ax Melee Woodcutting 3 2 Bronze, Stick 40 8 Iron Ax Melee Woodcutting 3 2 Iron, Stick 40 8 Steel Ax Melee Woodcutting 4 3 Steel, Stick 50 10 Bronze Sword Melee x 3 Bronze, Stick 40 8 Iron Sword Melee x 3 Iron, Stick 40 8 Steel Sword Melee x 4 Steel, Stick 50 10
Trees, Plants, And Crops
In The Dawn of Man there are a number of crops that you can plant as well as trees and plants that you can harvest. Mostly for food but also for other resources such as Tannin for Tanning Leather and Flax for making Linen for Stylish lightweight clothing
Fruit and Nut TreesThe game features Pear, Cherry and Service (think apple or quince) trees which all yield fruit in the summer. Fruit spoils quickly but can feed your villagers when its available allowing them to reserve meat, fish and grain for storage for winter meals. The game also features Nut trees which last a bit longer than fruits and bear in the fall.
Oak and Fir TreesOaks and firs provide tannin (used in curing leather) which can be harvested in the spring.
BerriesBlackberries, Blueberries, Raspberries and Strawberries grow wild and can all be harvested in the summer. Again, these spoil quickly but can be used to stretch your supply of longer lasting foods.
CropsOnce you've mastered plant domestication your people can eat more regularly and produce food far in excess of what can be gotten through hunting and foraging.
Cereal crops will also produce straw that can be used in construction and as fodder for any animals you domesticate.
Pulses (Legumes) can also be grown and while they do not yield straw (or store as long as grain) they have a different growing season, allowing your farm workers to maximize their yields while balancing their workloads.
Pulses (Chickpeas, Lentils, Peas, and Bitter Vetch) also don't require the extra steps of grinding flour and baking bread that the cereal grains do.
One final crop that you will find useful is Flax. Flax is used in the production of Linen which can be turned into stylish light weight summer wear.
Note: Fields can be laid out as large as 5x5 but that's actually a LOT when your population is below 50. Consider smaller fields to start. They can always be deleted and re-established when they are fallow. Too many large fields early on will cause you to have task spikes that will clog your tasks queue.
Crop Straw Other Bonus Plant Harvest Barley Straw Grain Extra Straw Spring Fall Rye Straw Grain Extra Grain Spring Fall Einkorn Straw Grain Hardy Spring Fall Emmer Straw Grain Extra Grain Spring Fall Bitter Vetch Pulses Winter Summer Chickpeas Pulses Winter Summer Lentils Pulses Winter Summer Peas Pulses Winter Summer Flax Linen Spring Fall
Odd Tips And Exploits
Though exploits may be nerfed at any time you might find some of the following useful at present.
Hiding the UI If you're like me you'll have set at least a few buildings to high priority. If you wish to do screenshots that omit these you can.
Control + Shift + K removes Markers
Control + Shift + U removes UI
The Steam standard F12 screenshot is supported.
Also (Print Screen) takes screenshots as .png files These are stored in a ...\Documents\DawnOfMan\Screenshots folder
Restocking RiversSaving, quitting and reloading a save will magically restock all your fishing areas and mud banks
Respawning AnimalsAnimals spawn in Early Spring and exactly where is a bit up to the random number generator. Saving your game at the very end of Winter may make it possible for you to "re-roll" the spawning on the odd chance you get a badly placed spawn.
Reorganizing Inventory slots in storageSelecting a tent and clicking on a commodity stored in it will cause those goods to be dumped on the floor of the tent. This can also be used on people sleeping in the tent if you wish to wake them early.
Tent with two slots used for a total of 5 bones
When the villagers put the stuff away again they might do better using less available inventory spots.
You might want to micro manage a child for this
Their slower gate and single slot won't be as big a handicapWhen dumped on the floor goods are easily available for right clicking in case you wish someone to pick up a particular item
While it would be GREAT if this slot clicking worked on sledges (and villagers) too, it doesn't
Rerolling for better Trader offeringsThe list of goods that trader brings with him is subject to the random number generator. If you save just before opening trade talks you'll have the opportunity to "re-roll" the trade items if you don't like the first set of offerings.
Here is the initial list of what was on offer when first opened
Here is the second time around. Note the technology on offer this time.
I've not seen any examples where the trader name or commission rate changed.
Trader Commission RateA Trade Commission Rate of Average is 40%
A Trade Commission Rate of High is 50%
Source: https://steamcommunity.com/sharedfiles/filedetails/?id=1674723684
More Dawn of Man guilds
- All Guilds
- Anbeginn der Menschheit - Probleme und Krisen meistern (German)
- Advanced Tips and Tricks for Dawn of Man
- Understanding the Dawn of Man
- 4H: A Guide on Animal Domestication
- Dawn of Man - Beginner's Tips, Tricks and Strategies
- Dawn of Man - Starting Tips
- Dawn of Man - Guide on Animal Domestication
- Dawn of Man - Advanced Tips and Tricks
- Dawn of Man - Starting Guide (Tips and Tricks)