
Introduction
Don't be intimidated by the *large* amount of details, here. Merely looking at the first couple of info-graphics will probably give most players a very strong idea of the shape of things. And probably make a big difference to how you approach mob farming. Then the rest is for referencing specific eventualities. Of which, I'm kind of trying to cover everything! 😵
I'm aiming to work up some more recommended designs. The bits I have shown are more illustrative, for now. But I hope players will be able to take this info to come up with unique builds of their own. Then maybe share those with us, too. 🙂
Mob Spawning Mechanics
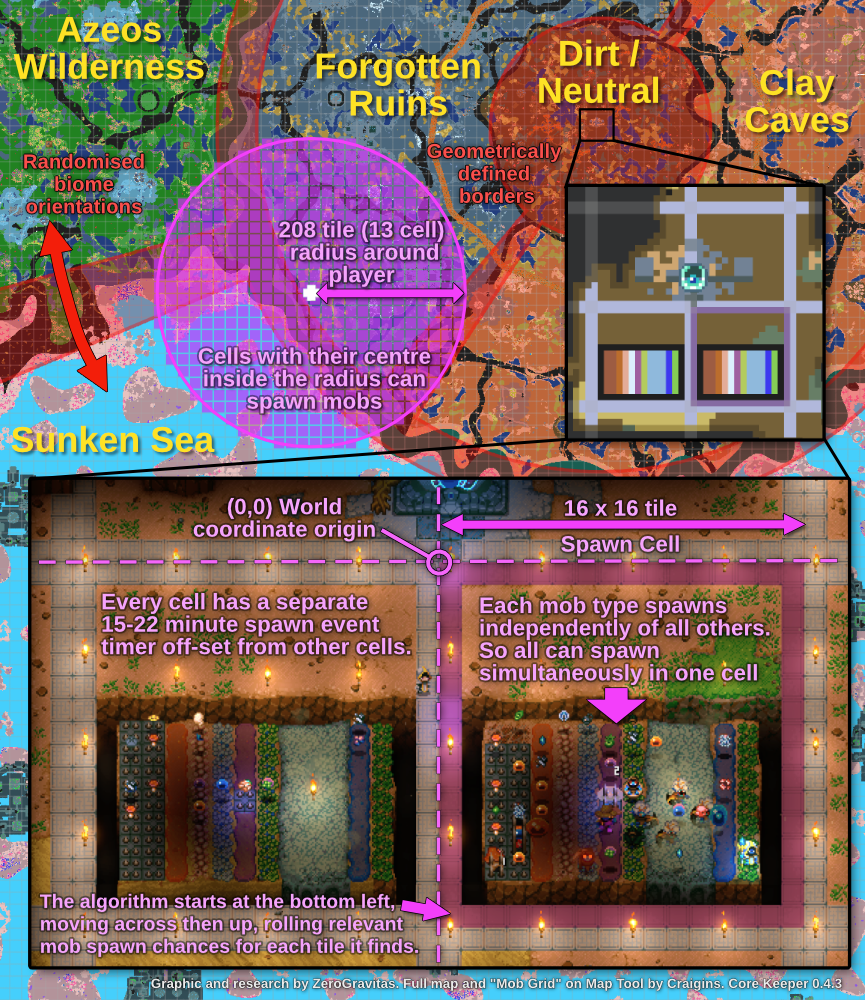
This is how the mob spawning algorithm currently works in Core Keeper 0.4.3. Discovered via weeks of careful in-game experiments (and one major dead-end). Understanding these basics will let you design drastically more productive farms.
Fully illuminated world map by Craigins. "Mob Grid" lines can be shown by Craigin's Map Tool[www.craiginsdev.com] for your map, updated in real time as you play (follow instruction there).
► Annotations in more detail:
(a) The world is divided up into 16 x 16 tile cells (of 256 tiles area), by the mob spawning algorithm.
(b) Only cells that have their centres within 208 tiles of the player's current position can receive spawn events.
(c) This is a roughly 13 cell radius. So ~530 cells can be active at the absolute maximum.
(d) The transition between cells is between tiles. And the origin of the world coordinate system is the bottom left corner of the default spawn location tile. From there you could manually measure out cell boundaries, without using the Map Tool website.
(e) Spawn events occur at a different time for every cell.
(f) Spawn events have a 15 minute interval by default, for cells in a new world, or a very isolated part of an old map. But this can rise to as high as 22 minutes. Which seems to be (from my limited testing) when more of the (64x64 tile) map chunks have been generated, by exploration, within the 200 tile radius around the player's current position.
(g) A spawn event looks at all the tiles in a cell, starting from the bottom left. Scanning right, then up to the next row.
(h) For each tile of valid spawn surface that it finds, it rolls the appropriate set of chances for the related mobs (see below).
(i) Every mob is treated separately. So that, many (or theoretically *all*) different types can be spawned simultaneously. Not reducing the chances at all for mobs from different surface types.
(j) Optimal farm design will try to maximise the number of different mobs spawned in every cell, within range of player.
(k) Biome borders are geometrically defined, ignoring the undulating canyons and contrasting ground type. The biome your character is currently stood in is always shown at top right of the full map. No name is shown (blank) for dirt/neutral biome, between the others. This is relevant for some spawn surfaces (explained below).
(l) The angle of the biomes is randomly assigned at world creation, so everyone's map looks different.
Spawn Surface Types And Alliances

Below - mobs are in rows according to the spawn surface type(s) they can come from. These are grouped and colour coded by which other mob types and bosses they are unable to hurt. I've called these 'alliances'.
Above numerical values were data-mined from game files, following an asset extraction guide by Cysidus (wikizet admin).
► Explanation of column headers:
• "Max Spawns per Event" - Most mobs are limited to have only 1 of that exact type spawned in any given event. Regardless of how many tiles of their spawn surface are present. Mold infected Cavelings are an exception with 4. Mushrooms with 2 (though not strictly a mob).
• "Min Tiles Req(uired)" - no mobs are permitted to spawn unless the algorithm finds at least this number of their spawn surface tiles in the current cell. Most commonly, this is 6 tiles. Note: strictly speaking, the 1 limit is actually 0. But, logically, nothing can spawn without at least 1 tile, anyway.
• "Spawn Chance per Tile" - these percentage odds are rolled for every mob type that can spawn, for each surface tile the algorithm finds in a cell, during a spawn event.
• "# Tiles for 90% Spawn Chance" - Because there are only 256 tiles in each cell, lower spawn chance mobs may need multiple cells full of their spawn to reach 90% chance. Across multiple, staggered spawn events, of course. 90% is an arbitrary guideline figure to aim for, that's 'good enough'. See full graph later on for finding all intermediate values!
Mob Drops

One might spawn mobs for skill farming or pure entertainment. But most of the time it's all about their sweet, sweet loot drops. Here they all are, at a quick glance. To help figure out which mobs and spawn surfaces are going to be most useful for what you are after:
Exact percentage drop chances for all these enemies are available via here on the wikizet wiki[corekeeper.wikizet.com] .
► Not shown in above table:
• Hive Mother Larva spawns (red variants) do not have any drops. Hence why their trophies come from the regular Larva (at a lower drop chance).
• Acid Larva can not be spawned like other mobs. To farm their trophy, you must create new worlds to explore their Hive sub-biome in The Clay Caves.
Mob Stats And Killability With Automation


How to kill the many mobs you've spawned is the second part of designing a farm!
It is important that this process is reliable, because there's no off switch for mob spawning, aside from being a long way away. So if your mobs stop dying, they can start accumulating pretty fast. Creating major fps reduction in a few hours, or less for the biggest of farms.
Even in normal difficulty worlds, most mobs can't be killed with a singe spike trap, alone. These, and the other automated damage sources took fairly heavy nerfs in the 0.4 update. So combination designs are needed.
Then, in hard mode, traps become virtually useless. So it's all about mob-vs-mob kill chambers. For which: health, damage, range, etc, become relevant factors in deciding which to use against the others. (In addition to the alliance groupings, above.)
To avoid further delays, I've published this guide before finishing up testing and filling in all the details, here:
► Notes:
• Acid can't kill even the weakest mobs (Shrooman) on it's own. But may help tip the scales, in conjunction with spikes and maybe drills, too.
• Poison is generally needed to block 75% of healing for the more robust mobs, like Mold Infected.
• "M" - stands for maybe or rather multiple traps (or drills); because the cool-down on spike traps is a ponderous 2.5 seconds, it's invariably more effective to have mobs walk around to activate many different traps over a much shorter timespan.
• Snare plants are only spawned by Gardeners (up to 5, total), when they are aggro'd and are next to (Wilderness) grass tiles. The Snare plants only attack players, not other mobs.
► Automation damage sources in more detail:
I probed the likely load-in range of Spike traps by sitting one in a small conveyor loop with Hunters on. They remain aggo'd on the trap for a while after it hits them, trying to shoot it once the conveyor moved them out of melee range. By lining this up in frond of a long open spawn (collection conveyor), I was able to see the range at which they stopped shooting me. (I observed their shots travelling to a range of 200 tiles, maximum.)
So, any build that relies on Spike Traps, to clear mobs, should not that they probably don't work at as far a range from player as does mob spawning. Probably 105 tiles, possibly a bit more. (Needs confirming via alternative techniques, to be sure.)
Tile Stacking Precedence And Spawn Blocking


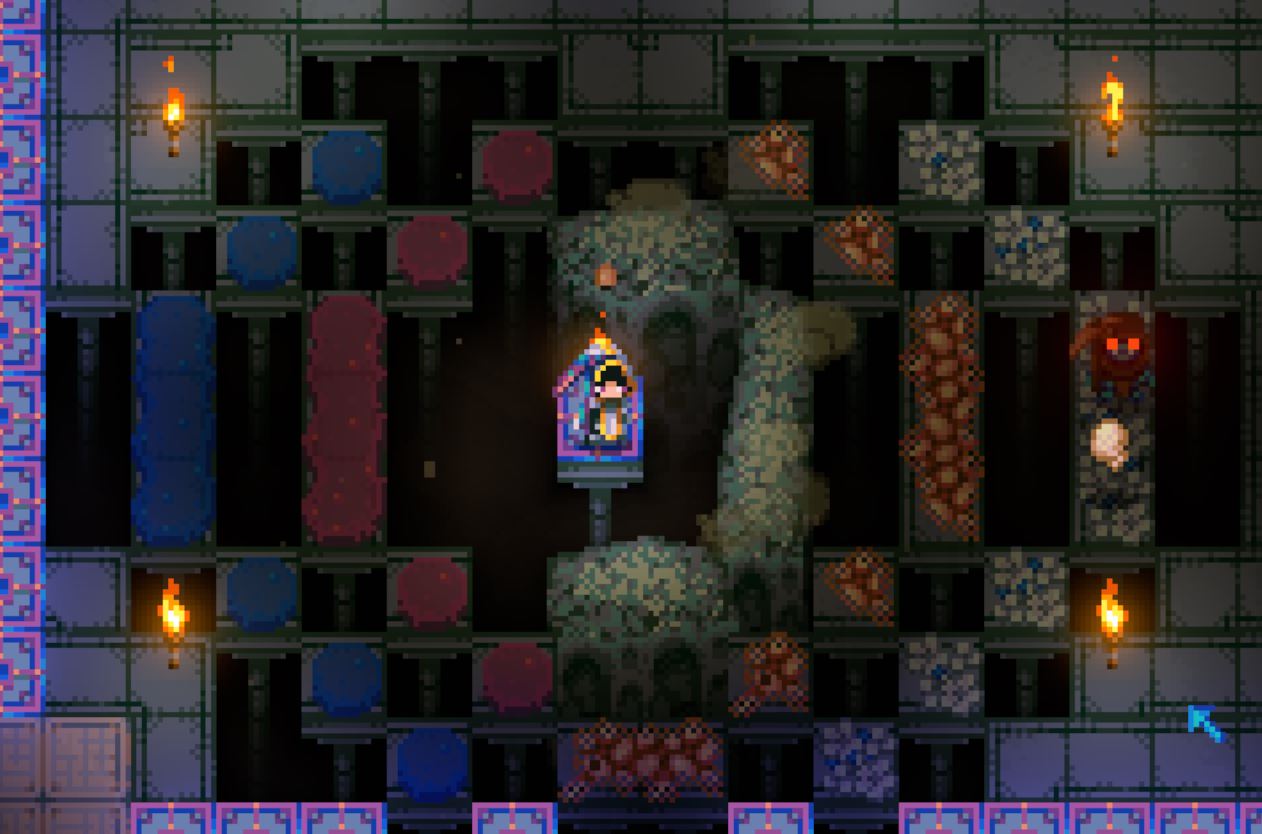
Only the topmost, visible, spawn surface type has any chance to spawn mobs. Those beneath are blocked. Butt the game is currently quite inconsistent about which other types of tiles will block spawns.
In general, those appearing on top of a spawn surface will block it. But there are several types, highlighted in red, that also block slime surfaces that appear on top. This can be useful, though. E.g. to have the poison effect with the risk of spawning purple slimes that might break things.
The debuffs, from the various slimes types, all work on mobs (and players) from under Spike Traps. but mostly not through Conveyors. Despite spawning mobs through, without impediment (thankfully). The current exception is acid, with will hurt mobs (not players) through conveyors. Although this is never enough to kill any mobs, on its own.
I've shown fences because players can walk along the top or bottom of a tile with a horizontal fence segment on it. If that has a slime type on it too, it appears the player is walking on the slime, but receives no rebuff from them. But I see no practical use for this.
Player character blocks all spawns within a 6 tile radius. So don't stand in the middle of your spawn area:
Graph Of Spawn Chance By Number Of Tiles

Here's a complete overview of all the different base probabilities for spawning each mob type, for every possible number of spawn surface tiles within a single cell (for those who like graphs):
Notes:
• The Caveling types that can also be spawned by regular ground tiles in their native biomes are listed twice, here.
• The curves are bunched up near the origin because many types have such a high spawn chance. And I decided against using a logarithmic scale, to be more accessible.
• The diamonds are plotted for the minimum tile limits. Many mobs types already have a very high spawn chance with just this minimum permitted. Hence the possibility for very compact farms of these base type mobs.
• See there's absolutely no benefit in going beyond ~15 tiles of spawn surface, for the base tier mobs; by this point they will be virtually guaranteed to spawn every time.
• For a good chance at each of the second tier of mobs (Red Slimes, Big Larva, Shaman, etc) one would need to dedicate most of a spawn cell to their surface type. But there's still a diminish benefit, for each additional tile. So it's still optimal to spread a limited number of spawn surface tiles out over as many cells as possible.
• This is especially true for low spawn chance mobs, like Brutes, Core Sentries, etc. E.g. 100 tiles of stone moss in a cell will give ~40% chance of a Brute, vs ~70% with a full 256 tiles. So having 2 cells with 100 tiles of Stone Moss, each, will give higher odds (~80%) of a Brute within 1 spawn event cycle. Split over 2 events at a different time in each cell.
Example Farms (WIP)
This section is an ongoing work in progress. I'm confident there are much more efficient designs for large, automated farms, using the above information. But I haven't gotten around to building these out to test them fully, as yet.
So, for now, these are illustrative examples only (not really recommended):
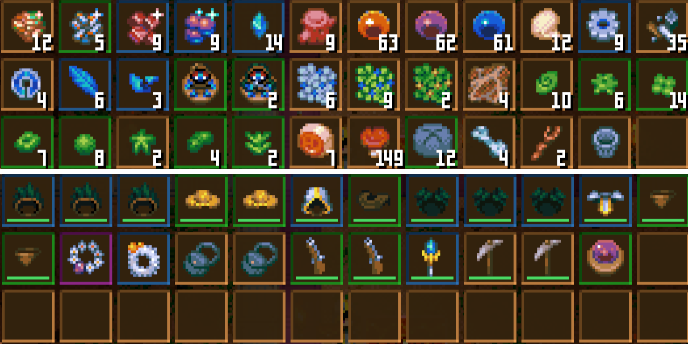
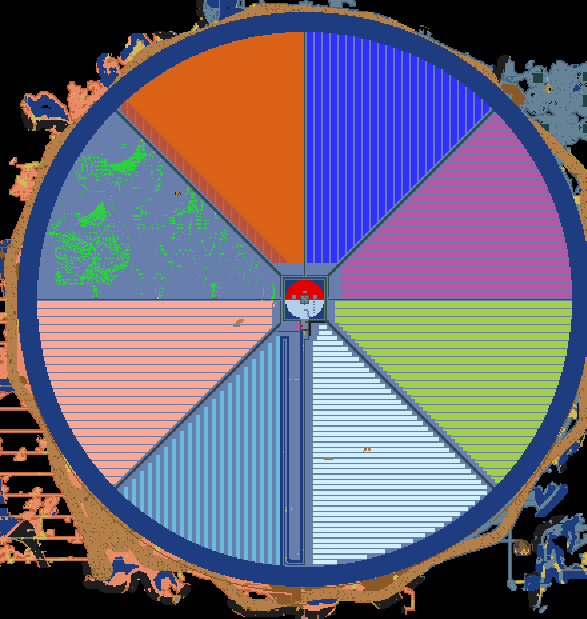
(i) Mini Mob-vs-mob Rainbow battle Farms:
The simplest possible farm exploiting the full capacity of the spawn algorithm. Like the two cells shown in the first infographic (top).
Spike Traps are needed to stop the mushrooms accumulating and blocking the Fungal Ground. But aren't otherwise necessary for killing mobs; this has the advantage of working the same in hard mode worlds. Where mob health and damage are currently both doubled up.
The disadvantages are that it scales up horribly, due to having to collect drops manually. Also, if a Caveling Brute spawns (unlikely but possible) they will rip up a lot of the other spawn tile types with their attack. A major design consideration for all farms. Especially those with conveyors.
These are all the drops from just under 9 hours of AFKing the two little rainbow farms in the top infographic. About 70 spawn events, equivalent to 17.5 hours on one cell, or 15 minutes on 70 cells. (Hunter drops rates seem unreasonably high, currently.)
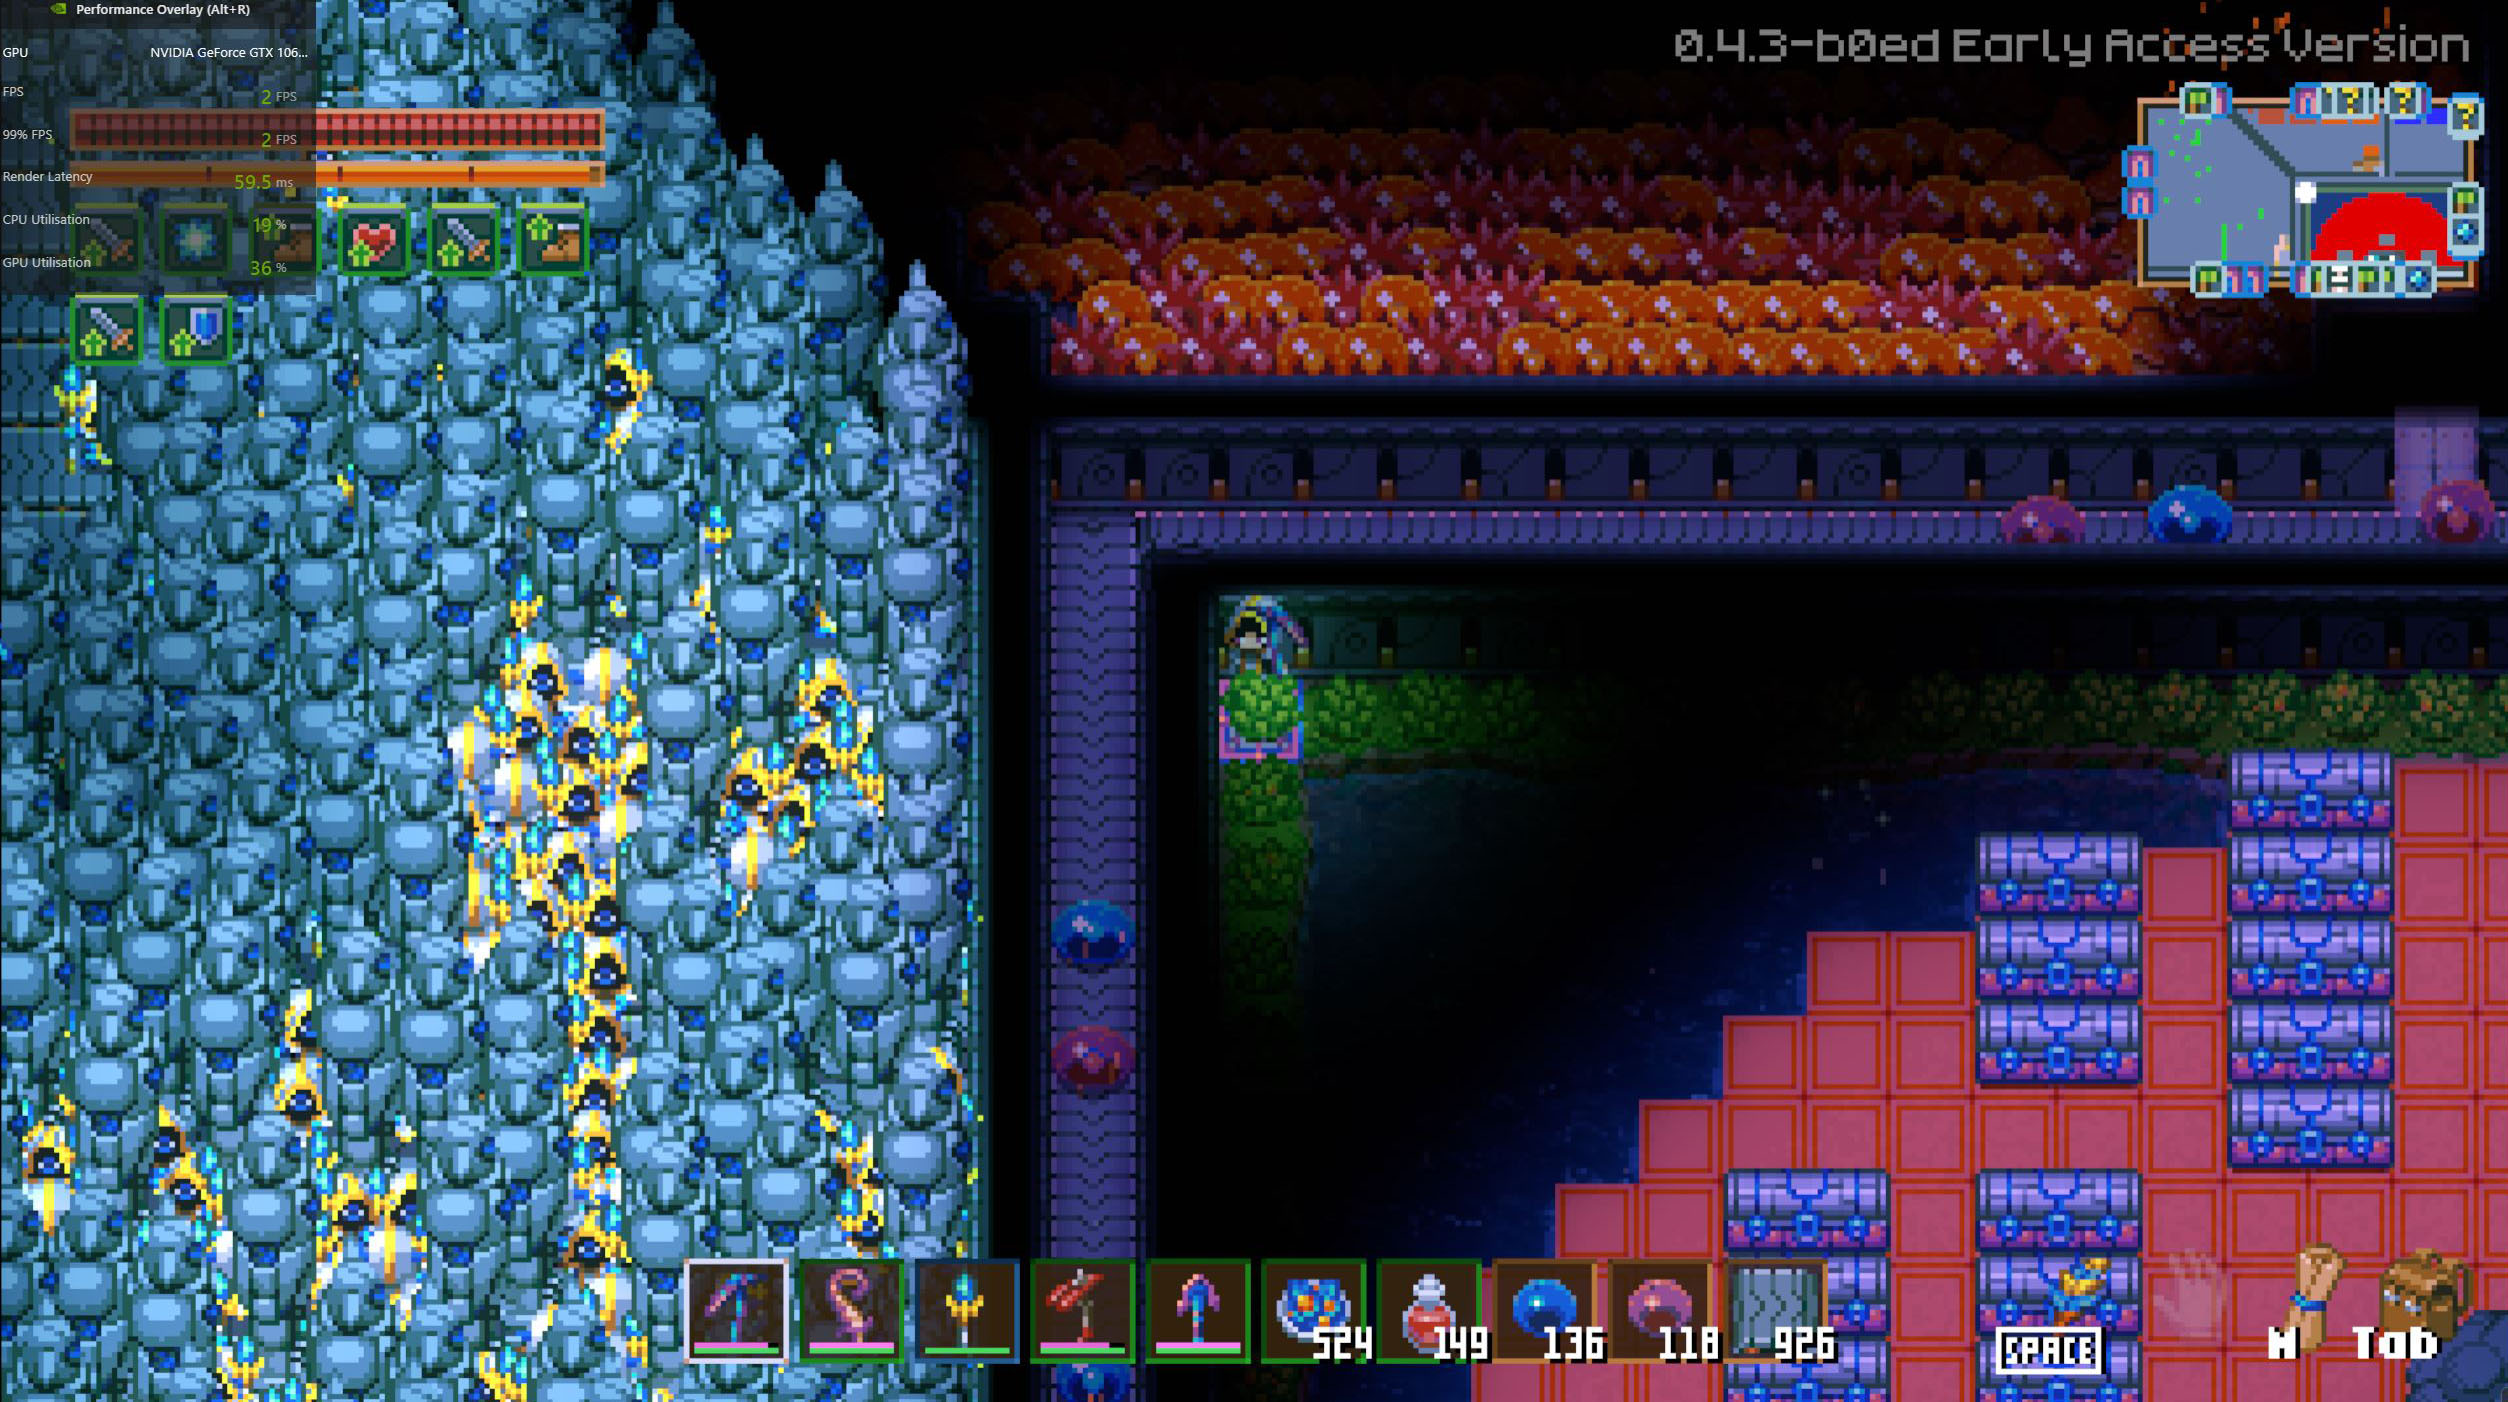
(ii) Full range mega-farm by KanSer:
He built this to make use of the full ~200+ tiles of maximum spawn range - the entire region from the core to Ghorm's slime ring! With many thousands of tiles of conveyors, to collect the mobs to a central collection point (Poison, spikes and fighting amongst themselves.)
But this was before I'd figured out the spawn cell mechanic. Hence it uses single spawn surfaces over very large areas. Which is extremely inefficient for the basic mobs, so not recommended.
In particular blue and purple slimes have no secondary tier of mobs, so anything past ~10 tiles of those slime tiles is pure waste. But his farm spawned plenty of the higher tier mobs from the other surface types.
KanSer kindly lent me his save to experiment on: I dammed up the mob collection conveyors to accumulate a huge number of mobs. This didn't appear to slow down the spawning of different mob types, though. Which gave me confidence that there is no overall mob cap on spawning more. Just grindingly slow frame rates that makes more = less. 2fps here!:
(iii) More to come, including:
Mob-vs-mob farms using the ranged attack of Bubble Crabs to kill (Stone Moss) Cavlings while they are still on a conveyor. Thus avoiding farm damage from Brutes and allowing Robot Arms to collect drops automatically, for feeding straight into an auto-sorting chest system.
Acknowledgements:
• Credit: Thanks to all those mentioned above, for help. Also to various Discord users who've hung out in the University Thread to discuss my findings and give feedback on my infographics, as I've slowly made each one.
• Fellow creatives: if this material inspires some of your content, I'd appreciate a quick shout-out and link back to this guide. 👍
My Core Keeper Guides On Steam:
https://steamcommunity.com/sharedfiles/filedetails/?id=2793169894 https://steamcommunity.com/sharedfiles/filedetails/?id=2797638499 https://steamcommunity.com/sharedfiles/filedetails/?id=2802836829 https://steamcommunity.com/sharedfiles/filedetails/?id=2806120066 https://steamcommunity.com/sharedfiles/filedetails/?id=2846860078
Source: https://steamcommunity.com/sharedfiles/filedetails/?id=2846860078
More Core Keeper guilds
- All Guilds
- Simple Symmetrical Wood Farm (Not Optimized)
- mid/late game slime farm + other drops
- Core Keeper Guide 900
- Vegan Chef Guide
- Core Keeper Guide 882
- The Most Complete Fishing Guide
- Como derrotar a Malugaz Bien izi pizi
- Core Keeper Guide 853
- Core Keeper Guide 843
- Spolszczenie do Core Keeper