Windows Settings
--Windows Settings--
There is a ton you can do in windows to maximize performance, but we will stick to the basics.
Hit the windows key and type Power plan --
Here you will see Balanced, High Performance and Power Saving - Choose High Performance
Hit the windows key again and press the cogwheel on the left side.
Navigate to the Game section and turn off Xbox GameBar.
Game mode: This has been improved alot and will help low-mid tier pc's
Hit the windows key and type Graphics and open the graphic settings tab.
If you are struggling with 100% CPU usage or have a low-mid tier pc enable the gpu acceleration.
Below that you can browse and locate Bloodhunt - SteamLibrary\steamapps\common\Bloodhunt\Tiger\Binaries\Win64
Add Tiger-Win64-Shipping.exe
Once you have done that you will be able to choose "High performance"
Hit the windows key and type Device Manager.
Under system devices there is a unit called "High precision event timer"
By right clicking and disabling this you might get better latency overall.
You can always undo by activating it in the same manner you disabled it if you run into issues.
Nvidia Control Panel
--Nvidia Control Panel Settings--
Adjust image settings with preview : 3rd option - Move the slider to the left, then press the 2nd option and let 3D Settings control the rest
Image Sharpening : Off (You can experiement with 10-20% on 1080p and
choose on the lower resolution option you get ingame)
Ambient Occlusion : Off
Anisotropic Filtering : Application Controlled
AntiAliasing - FXA : Off
AntiAliasing - Gamma correction : On
AntiAliasing - Mode : Application Controlled
AntiAliasing - Transparency : Off
Background Application MFR : Off
CUDA - GPUs : All and make sure it has your GPU selected
DSR - Factors : Off
DSR - Smoothness : Off
Low Latency Mode : Ultra (Ultra usually works okay and gives the best result, but it may vary depending on the game - experiment yourself(You can do this with game open)
Max Frame Rate : Off unless you struggle with Rivatuner as the Nvidia frame rate limiter is fairly close to Rivatuners stable framerate
Monitor Technology : If you have a variable refresh rate monitor G-sync will give you the smoothest framerate without capping your fps but will increase input latency by a small amount
Open GL Rendering GPU : Select your GPU
Shader Cache : Default is fine, but if you have a good amount of space i personally set it to 10GB to ensure it will never be full
Power Management Mode : Prefer Max Performance
Quality – Texture Filtering : High Performance
Threaded Optimization : Auto
Triple Buffering : Off
Vertical Sync : Off
Trilinear Optimization–Texture Filtering : On
--Under Adjust desktop size and position--
Scaling : Does not matter for Performance
But the option to perform the scaling on : Monitor rather than GPU for the best latency
Override scaling configured by game or software = Might work on some titles, others not ( Overall not a big improvement )
Game Configs
--Game Configs--
%localappdata% - Tiger - Saved - Config - WindowsNoEditor
https://pastebin.com/raw/tjyMRtHu
Here are the config options, open with Notepad (or text editor of your choice) just copy and paste.
It is marked which sections goes into which file, but if you're unsure.
These groups go into "GameUserSettings"
[ScalabilityGroups]
[/script/engine.gameusersettings]
[ShaderPipelineCache.CacheFile]
[D3DRHIPreference] ----- Note that this disables dx12 and forces dx11
sg.EffectsQuality=0 -- I recommend setting this to 3 rather than 0, makes seeing Saboteurs in stealth more easily.
VERY IMPORTANT:
FullscreenMode=1 should be 0 for True fullscreen
LastConfirmedFullscreenMode=1 should be 0
PreferredFullscreenmode=1 should be 0
In the Engine.ini section i recommend removing these lines below
bSmoothFrameRate=true
MinDesiredFrameRate=60
SmoothedFrameRateRange=(LowerBound=(Type=”ERangeBoundTypes::Inclusive”,Value=60),UpperBound=(Type=”ERangeBoundTypes::Exclusive”,Value=144))
DONT FORGET:
After making these changes and saving - right click and make them "Read Only"
Otherwise they will change back to default once the game has loaded or a patch has been added.
To undo : Uncheck "Read Only" / Verify the game files through the steam library
Game Configs 2
--Game Configs 2--
Windows key - %localappdata% - Tiger - Settings
Open DisplaySettings in Notepad.
This is what you will see.
{
"resolutionX": 1920,
"resolutionY": 1080,
"resolutionScale": 0.75,
"windowMode": 0,
"gamma": 0,
"frameRateLimit": 240,
"frameRateLimitOverride": 60,
"bEnableFrameRateSmoothing": false,
"bEnableVSync": false,
"fsrQualityLevel": 0,
"fsrSharpening": 0.20000000298023224,
"savedVersion": 1
}
frameRateLimit: If you are running 240hz you can cap your fps here for the least input latency
( Nvidia, Rivatuner,Gsync etc will improve frame times making it looks smooth, but increase input delay )
frameRateLimitOverride: This option caps the fps to 60 while browsing the map and choosing archetypes before a match, you can set this to
whatever you capped above or 0 if you're playing on unlimited.
For personal preference, does not impact anything else within the game
Experimental Config Commands
-- Experimental Config Commands --
Navigate to : %localappdata% - Tiger - Saved - Config - WindowsNoEditor and open Engine.ini in notepad.
Here are some commands you may experiment with.
PLEASE report back with results!
Add below this line : [/script/engine.renderersettings]
r.Streaming.Boost=0
r.Streaming.MipBias=15
r.Streaming.PoolSize=0
r.Streaming.LimitPoolSizeToVRAM=1
-- maximizes VRAM to be utilized as texture streaming pool but not more than available VRAM --
r.Streaming.DefragDynamicBounds=1
-- Defrag the VRAM --
r.Streaming.HLODStrategy=2
r.Streaming.FullyLoadUsedTextures=1
-- load things up on RAM then hold rather then streaming in and out --
r.bForceCPUAccessToGPUSkinVerts=True
-- As variable name says it's about CPU. CPU usage will go up about 5%~10% --
!!Do not use if you're struggling with high CPU usage!!
r.CreateShadersOnLoad=1
-- Reduce hitching, but use more memory --
r.Shaders.Optimize=1
r.Shaders.FastMath=1
r.UseShaderCaching=1
r.UseShaderPredraw=1
r.TargetPrecompileFrameTime=13
r.PredrawBatchTime=13
r.AccelPredrawBatchTime=0
r.AccelTargetPrecompileFrameTime=0
-- shader caching --
r.Streaming.FramesForFullUpdate=60
-- texture streaming update cycle frequency --
r.FinishCurrentFrame=0
--its most effective factor to your fps set this 0 for better Framerate or 1 for lower Frame latency--
Here is a full list, taken from an older PUBG optimization config.
Feel free to experiment!
Share results!
https://pastebin.com/raw/mEc7ibgA
ISLC
--Intelligent Standby List Cleaner--
Download link: https://www.wagnardsoft.com/content/intelligent-standby-list-cleaner-v1000-released
Once downloaded you can use this whenever you play a game.
Options within:
The list size is at least: Make this value 1024mb
Free memory is lower than: This is where values will be different for everyone, take your ram size and divide with 2.
For example if you have 16GB ram it will mean you have 16334MB / 2 = 8192 ( You do not need to as specific, you can get away with typing 8000.
8GB = 4000
16GB = 8000
32GB = 16000
And so on
Control Flow Guard
--Control Flow Guard--
Control Flow Guard (CFG) is a mitigation that prevents redirecting control flow to
unexpected location ( If you need specifics )
This is in some cases interferes with games or softwares.
Hit the Windows Key and type "Exploit Protection"
Once there you will see "System settings" and "Program Settings"
Anything related to CFG will be done in Program Settings and nowhere else, this is really important
so you do not open yourself to any of the nasty and unwanted stuff lurking on the internet.
Under the Program Settings tab we will add "Launch_Tiger" - Located in: SteamLibrary\steamapps\common\Bloodhunt
And "Tiger-Win64-Shipping" - Located in: SteamLibrary\steamapps\common\Bloodhunt\Tiger\Binaries\Win64
Once added you will be prompted with some settings.
Here you will scroll down and see "Control Flow Guard".
Press "Override System Settings" and make sure "On" is set to "Off".
You may then press apply!
IMPORTANT, Do not mess with any other setting in this tab other than adding these simple exceptions for games, any other changed may compromise or damage your system as a result.
But dont be alarmed, these exceptions are totally safe.
Steam Launch Commands
-- Steam Launch Commands --
-USEALLAVAILABLECORES
Self explanatory, will use all availible cores ( Would not recommend if your CPU is already running hot or 98+% usage.
Note that dx12 does this fairly well by itself, so if you dont have any problems while running dx12 this will probably not improve your performance.
-sm4
This supposedly makes the game use a different shader process, several years ago this forced the game to run dx10 instead of dx11 and make texture a bit more "simple", highly unlikely this works but give it a go
High Precision Event Timer
-- HPET --
HPET is the timer your pc uses ( No not related to your clock :D )
If you have done the ISLC step you will see your current timer resolution in the top right corner of ISLC.
If you have f.ex 0.4998 / 0.9984, basicly uneven numbers this will correct this and improve input latency and has been proven to increase the overall performance of games.
( Note that this is a hot topic and debated as to whether it actually does what tests show, this is because HPET is a synthetic timer, and the argument is that if you mess with that clock the results you see are not "real" )
Personally this is one the last things i do after a fresh windows install to complete my setup.
So how do we disable this?
Windows key - type "CMD" - Open as ADMINISTRATOR!
-- This will disable it --
bcdedit /deletevalue useplatformclock
( You will need to restart your pc after this )
-- This will re-enable it if you do not see any good result or run into issues --
bcdedit /set useplatformclock true
( Restart Pc )
For LAPTOP user.
-- Dynamic tick is a power feature on laptops, disabling this may improve performance --
bcdedit /set disabledynamictick yes
( Note this has no effect on desktop pc's )
Just to make sure there's no trace of this you will now hit the Windows Key - type "Device Manger"
Under "System Devices" you will see "High Precision Event Timer" - Right click and disable it.
( You can renable this at any time )
Here is a video showcasing results and explain how its done.
I do not own the rights to this video, all credits go to the creator:
TroubleChute
CPU Usage Fix
-- CPU Usage fix --
Credits goes to: Nobody, Keeper of Countdowns on the Bloodhunt discord
Download this video: https://cdn.discordapp.com/attachments/885119648155205662/970648838140489758/V_INTRO_INTRO_01.mp4
Navigate to : SteamLibrary\steamapps\common\Bloodhunt\Tiger\Content\Movies and paste the downloaded video in this folder ( replace = yes )
This will replace the intro with a black screen, you will still hear the sounds.
To undo : Verify the game in the steam library.
Pinned on discord regarding the intro videos.
-- Liquorice_Sharkmob --
Performance can be heavily affected when letting the intro video running.
To avoid this bug, please skip the intro video straight away!
Engine.ini V0.1
--This will change as long as i recieve data from you --
--So please message me on discord when you're done testing and include your pc specs!--
Note that there is more DX12 related arguments, so give DX12 a try aswell.
And play 3-4 matches and move around as much as you can!!
%localappdata% -Tiger -Saved - Config - WindowsNoEditor - Engine.ini
-- Replace everything with this --
https://easyupload.io/fi2mls <---- Engine.ini
-- Here are the default configs so you can easily go back with zero fuzz --
https://easyupload.io/x5qm4b <---- Default Engine.ini
-- IMPORTANT, make it "Read Only" --
-- If you run into CPU problems --
Remove : r.bForceCPUAccessToGPUSkinVerts=True
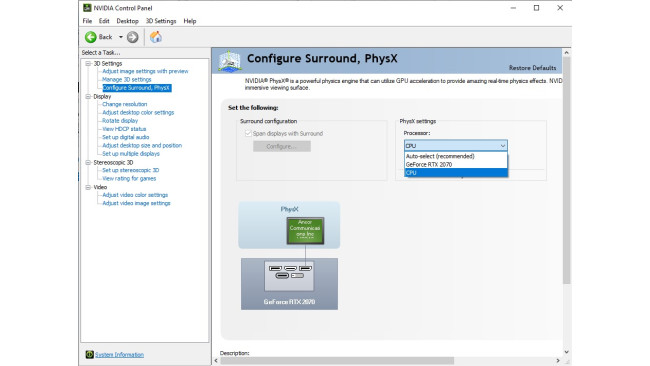
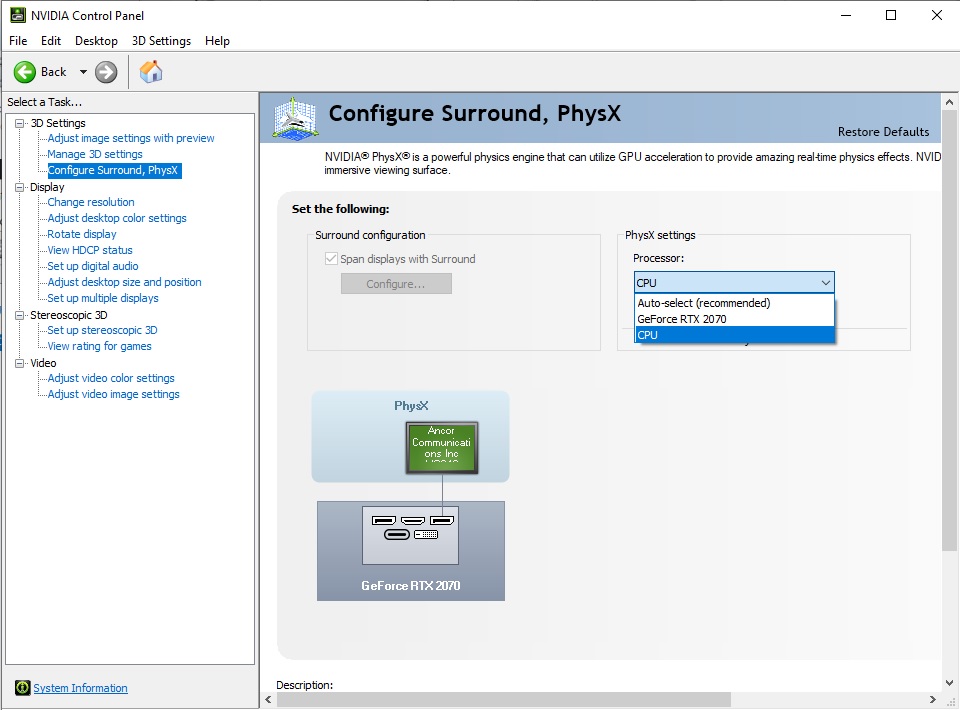
-- Additional option for Nvidia users --
Change your Physx setting to your CPU, if this increases the CPU leave it at default ( Auto )
Source: https://steamcommunity.com/sharedfiles/filedetails/?id=2806028626
More Bloodhunt guilds
- All Guilds
- How to Jerk Off Players in Elysium
- Unlimited Steam Points Exploit
- how to actually play the game
- Guide so you know what the is happening (Hunting Rifle Patch)
- Bloodhunt Guide 385
- HOW TO GET A WIN GUARANTEED!!!
- Bloodhunt Guide 367
- ? How to slide?
- ? How to move?
- Cheats For Bloodhunt [+Link]