
Preface
I hope this document can assist newcomers in quickly configuring a development environment and help experienced developers improve their work efficiency.
1. Initial Preparation
Install the Visual Studio Code (VSCode) editor.
You can download it here: https://code.visualstudio.com/Download
Run VSCode and click on the "Extensions" in the sidebar (shortcut "Ctrl + Shift + X").
You can search and install the language pack you need (e.g. Chinese/Russian).
Then, install the "Python" and "Pylance" extensions.
Install Python (version >= 3.8).
You can download it here: https://www.python.org/downloads/windows/
After installation, open a command prompt (press "Win + R", then run "cmd").
Install the "Bladex" package using the following command:
pip install Bladex pip is a Python package management tool, built into Python 3.4 and later versions.
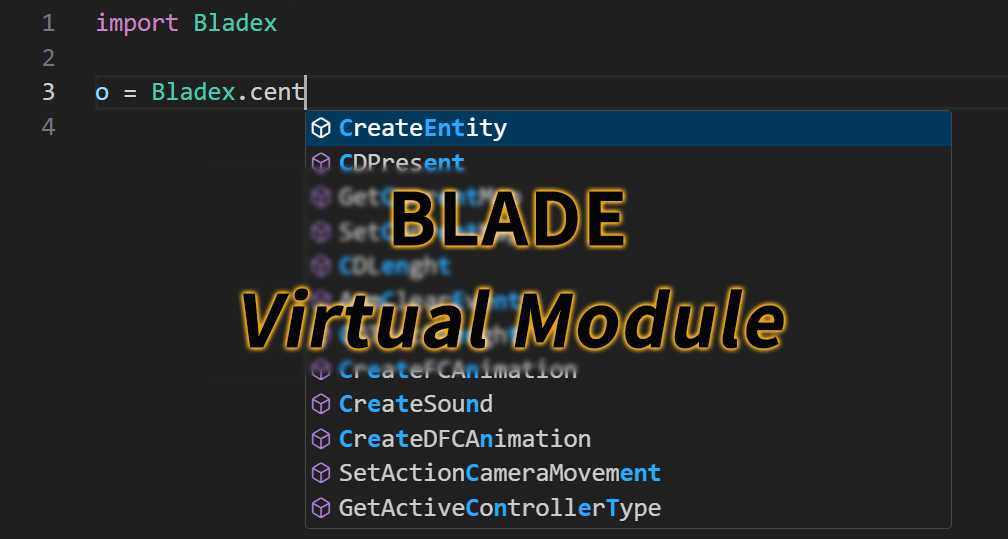
After completing these steps, you'll soon be able to enjoy Bladex's code autocompletion and type hints 🎉
2. 🚀 Getting Started
Drag the game's root directory into the VSCode window, which means adding the folder to the workspace and will be referred to as the project's root directory in the following steps.
Right-click on the project's root directory and create a folder named ".vscode".
Inside the ".vscode" folder, create a file named "settings.json" (the file's path should be "Blade of Darkness/.vscode/settings.json").
The content of the settings.json file is as follows:{ // "python.analysis.ignore": ["*"], // Enable type checking "python.analysis.typeCheckingMode": "basic", // Ignore certain error prompts "python.analysis.diagnosticSeverityOverrides": { "reportShadowedImports": "none", "reportUnboundVariable": "none", "reportOptionalMemberAccess": "none", "reportUnusedExpression": "none" }, // Additional module analysis paths "python.autoComplete.extraPaths": [ "${workspaceFolder}/Scripts", "${workspaceFolder}/Scripts/Biped", "${workspaceFolder}/Scripts/Combos", "${workspaceFolder}/Lib", "${workspaceFolder}/Lib/AnmSets", "${workspaceFolder}/Lib/Widgets", "${workspaceFolder}/Lib/PythonLib", "${workspaceFolder}/Lib/PythonLib/lib-tk", "${workspaceFolder}/Lib/PythonLib/DLLs", "~/AppData/Local/Programs/Python/Python39/Lib/site-packages/Bladex/__ext__" ], "python.analysis.extraPaths": [ "${workspaceFolder}/Scripts", "${workspaceFolder}/Scripts/Biped", "${workspaceFolder}/Scripts/Combos", "${workspaceFolder}/Lib", "${workspaceFolder}/Lib/AnmSets", "${workspaceFolder}/Lib/Widgets", "${workspaceFolder}/Lib/PythonLib", "${workspaceFolder}/Lib/PythonLib/lib-tk", "${workspaceFolder}/Lib/PythonLib/DLLs", "~/AppData/Local/Programs/Python/Python39/Lib/site-packages/Bladex/__ext__" ] }
"~/AppData/Local/Programs/Python/Python39" is the installation path for "Python 3.9.x". If you have a different version installed, you need to adjust the path.
Simply modify the "Python39" part, for example, py3.10 version is Python310, and py3.11 is Python311.
✅ At this point, you can enjoy code autocompletion for almost all modules!
Configuring Projects in Arbitrary Paths
If your project is not located in the game directory (e.g. "D:/MyProject") and is added to the workspace as a project folder,
simply copy the file "Blade of Darkness/.vscode/settings.json" to
"D:/MyProject/.vscode/settings.json".
Then, modify "${workspaceFolder}" to the absolute path of the game's root directory.
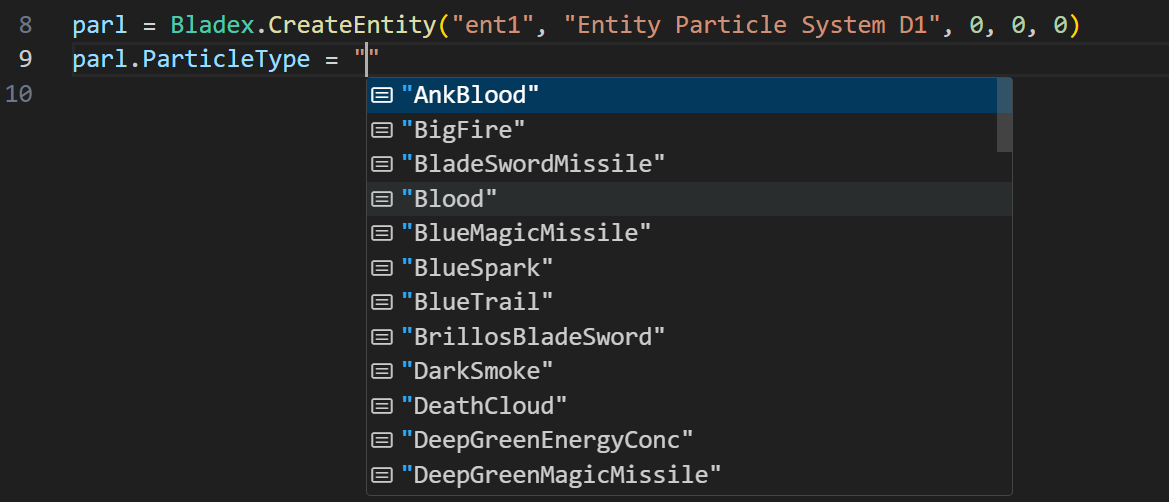
3. 🧩 Example Images
4. 💖 Further Enhancing The Coding Experience
Ignoring Error Prompts
Due to the use of Python version 1.5.2 in BoD, some outdated syntax is considered a syntax error by the IDE, such as the "print" keyword.
You can add a line to `settings.json` to ignore errors in all files. If you are using the settings provided in this document, simply uncomment it at the beginning of the file.
"python.analysis.ignore": ["*"],⚠ But this also means that the IDE won't warn you about issues like mismatched arguments.
Another way is to add an end-of-line comment "# type: ignore".
print "1" # type: ignoreThis will only affect a single line, or you can place the comment at the beginning of the file to ignore the entire file.
Formatting Your Code
A formatter can enhance the readability of your code, making it easier for future reading and modifications.
I use the `Black` and `autopep8` Python code formatters.
You can search and install the Black extension from the VSCode extension marketplace.
After installation, right-click in the editing window to configure the code formatter,
and then use the shortcut "Shift + Alt + F" to format the code.
However, Black cannot format documents with syntax errors.
For example, if the document uses the print "1" keyword instead of the print("1") function, it cannot be processed by the formatter.
Autopep8 can handle documents with syntax errors, but the VSCode Autopep8 extension cannot handle documents with syntax errors.
The solution is to use the command-line version of Autopep8. Here is how to configure a VSCode task to format documents with Autopep8:
Install autopep8 on the command line.
pip install autopep8In the project's root directory, create a file named ".vscode/tasks.json" with the following content:
{ "version": "2.0.0", "tasks": [ { "label": "Run autopep8 for Blade", "type": "shell", "command": "autopep8", "args": ["${file}", "-i"], "group": { "kind": "build", "isDefault": true }, "problemMatcher": [] } ] }
🎉 Done! Press "F1" to open the command palette, type "tasks", and then click on "Tasks: Run Task".
Select the "Run autopep8 for Blade" task to format the Python files.
This is equivalent to running "autopep8 file.py -i" from the command line.
If you want specific code to be exempt from formatting, you can use special annotations.
Use "fmt: off" and "fmt: on"
# fmt: off # The code here won't be automatically formatted. # You can freely write and arrange the code, and the formatting tool will ignore this part. var=1 # fmt: on # The code here will be formatted again.
5. 💡 Why Is Type Hinting Not Working?
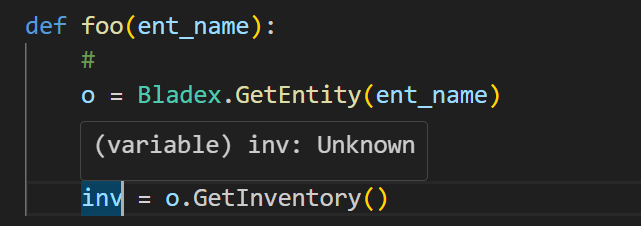
In the image, "inv" is an unknown variable, and the IDE cannot provide suggestions for its attributes and methods.
This is because the variable "ent_name" lacks a type annotation. Similarly, "o" is also an unknown variable, and the IDE cannot offer accurate hints.
To inform the IDE that "ent_name" is a string, you can use the following syntax:
def foo(ent_name: str):
But this is valid syntax in Python 3.x and newer versions; it will result in syntax errors in older versions.
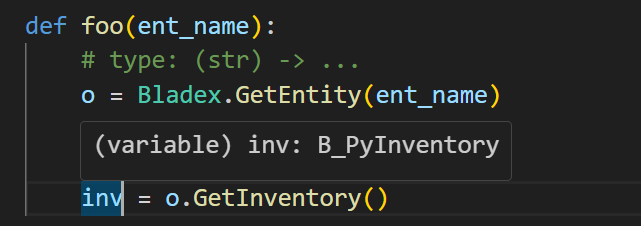
The solution is to use special comments, which should be placed at the beginning of the function body:
def foo(ent_name): # type: (str) -> ... o = Bladex.GetEntity(ent_name) inv = o.GetInventory()
Now the IDE can prompt the type normally.
Older versions of the Python interpreter will treat these as regular comments, but the IDE can analyze them.
PS: Maintaining good coding practices helps reduce errors and improve code quality.
6. VSCode Shortcuts
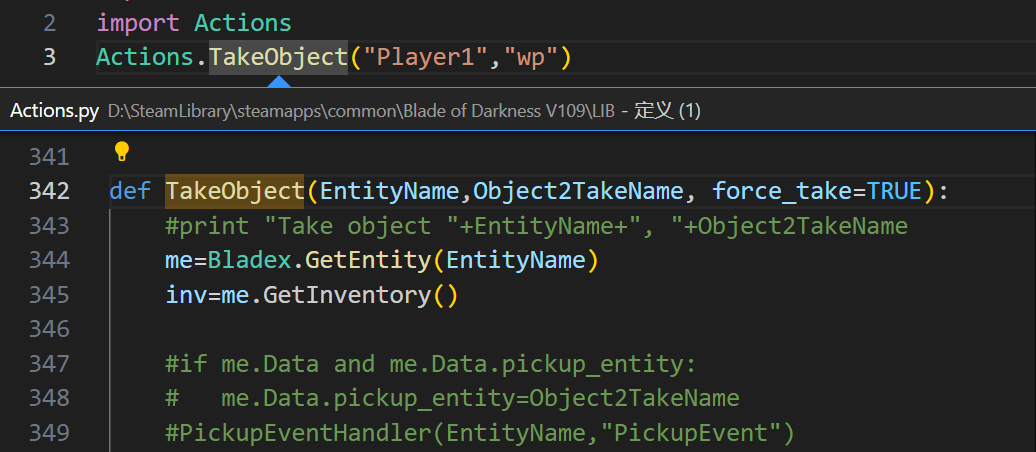
These shortcuts can help developers quickly reference function definitions or available values.
Trigger suggestions: "Ctrl + Space"
If there are keyboard input method shortcut conflicts, you can change the shortcut for the input method.
Trigger parameter hints: "Ctrl + Shift + Space"
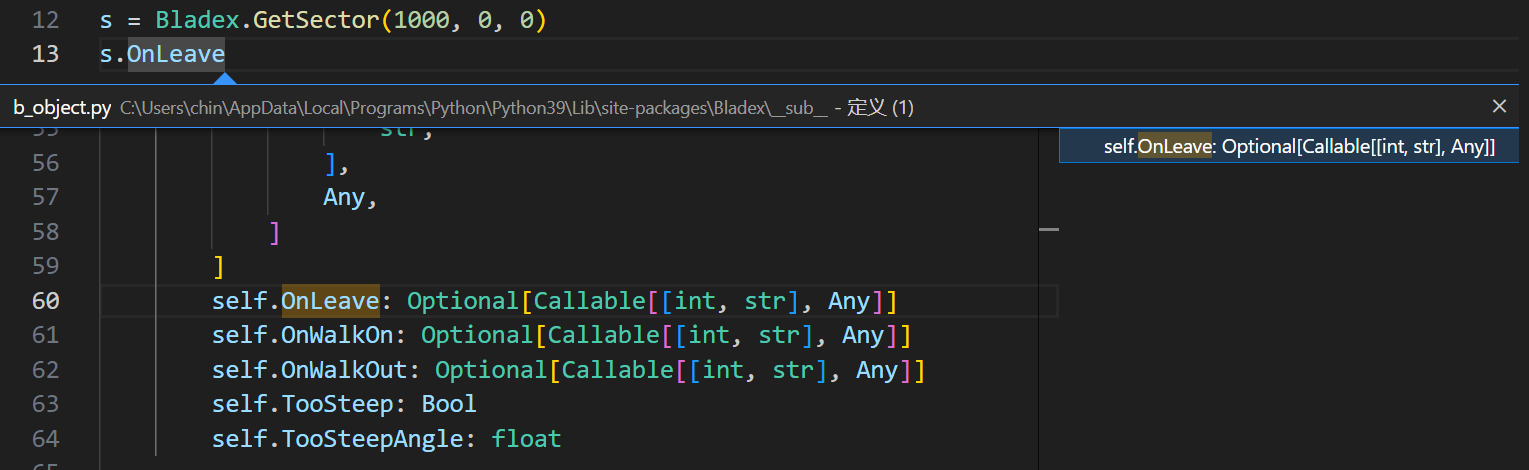
Peek definition: "Alt + F12"
Quickly browse other properties of an object.
Go to definition: "F12"
🔗 Links
Blade Virtual Module (Github Source code)[github.com]
This article is also published on the following websites:
My Blog[sryml.github.io]
ModDB
Source: https://steamcommunity.com/sharedfiles/filedetails/?id=3058700530
More Blade of Darkness guilds
- All Guilds
- Express Darkness Achievement
- "Blade Of Darkness" 8BiT
- | Changing characteristics
- Blade of Darkness Reforged - by xSFBx
- Disable HD Textures
- Blade of Darkness
- Official 2001 User Manual [ENG]
- Guide 66
- Gua para la traduccin al espaol sin errores