Introduction
I've always found the Scottish faction to be a straightforward relatively easy faction to play. The key to success when playing as Scotland is to be bold and aggressive especially in the early stages. Don't be defensive, don't divide your forces instead concentrate your forces and strike immediately, move quickly, don't pause in the first ten turns, keep moving. It's really not that difficult, in fact it's surprisingly easy.
Initial Strategy
This strategy is very simple. The objective is to capture London by turn ten. The shortest time I've taken London is five turns but it's usually between eight and ten turns.
This will.be done by concentrating and attacking with my entire army (all units, in a large stack, leaving no units in Scotland) from the Edinburgh region taking (in order) York, Nottingham and finally London. Inverness will be ignored at this time and will be the last settlement to be taken on the island.
Contrary to my usual faction strategy (other factions) this will be a completely military focus nothing substantial will be built maybe a port at Edinburgh otherwise everything else will be spent on units and mercenaries in the first ten turns. I intend to finance these units by looting English settlements.
The initial financial losses (mercs/recruitment/upkeep) will be recouped by plunder.
Scottish Armies
Starting Forces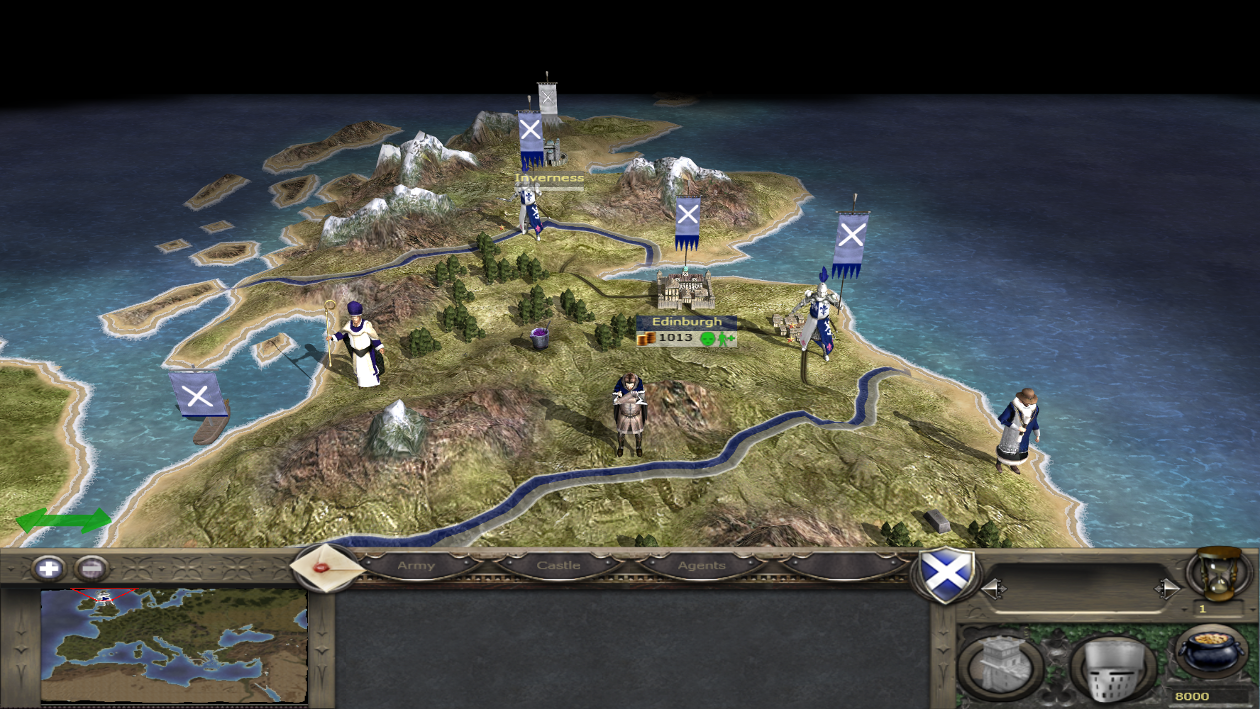
King Malcolm (6 Units), Edinburgh (Large Town)
Units: Generals Bodyguard, Spear Militia, Town Militia x2, Border Horse, Highland Archers.
Prince Edward (5 Units), Edinburgh Region (south)
Units: Generals Bodyguard, Spear Militia, Highlanders, Border Horse, Highland Archers.
Edmund Canmore (6 Units), Edinburgh Region (north)
Units: Generals Bodyguard, Border Horse, Highlanders, Spear Militia, Highland Archers x2.
Turn 1
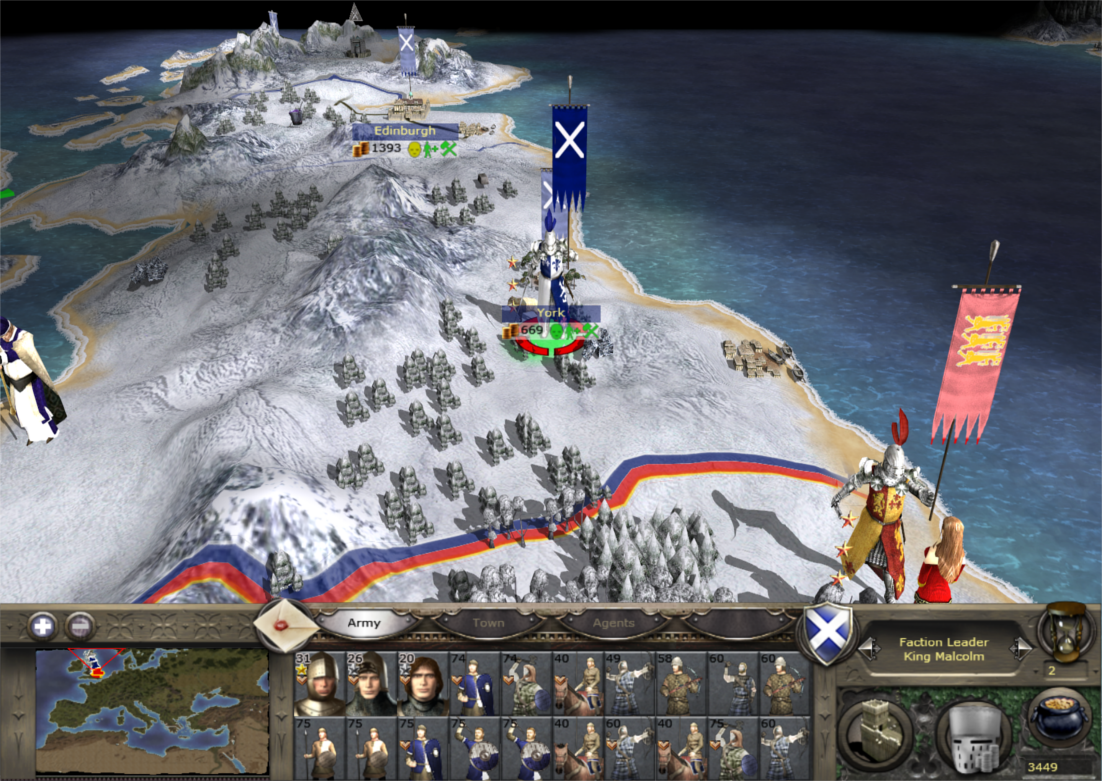
At the start of the game Scotland has three separate armies across the Edinburgh region. King Malcolm has a force of six units in the city itself, further north Edmund Canmore has an army of six units and to the south Prince Edward has a force of five units.
In total Scotland starts off with a total army of seventeen units. Importantly this faction has six (ready to use) cavalry units in the field at the start of the game with the added bonus of being in close proximity of each other. This is a crucial and decisive early advantage in the following strategy.
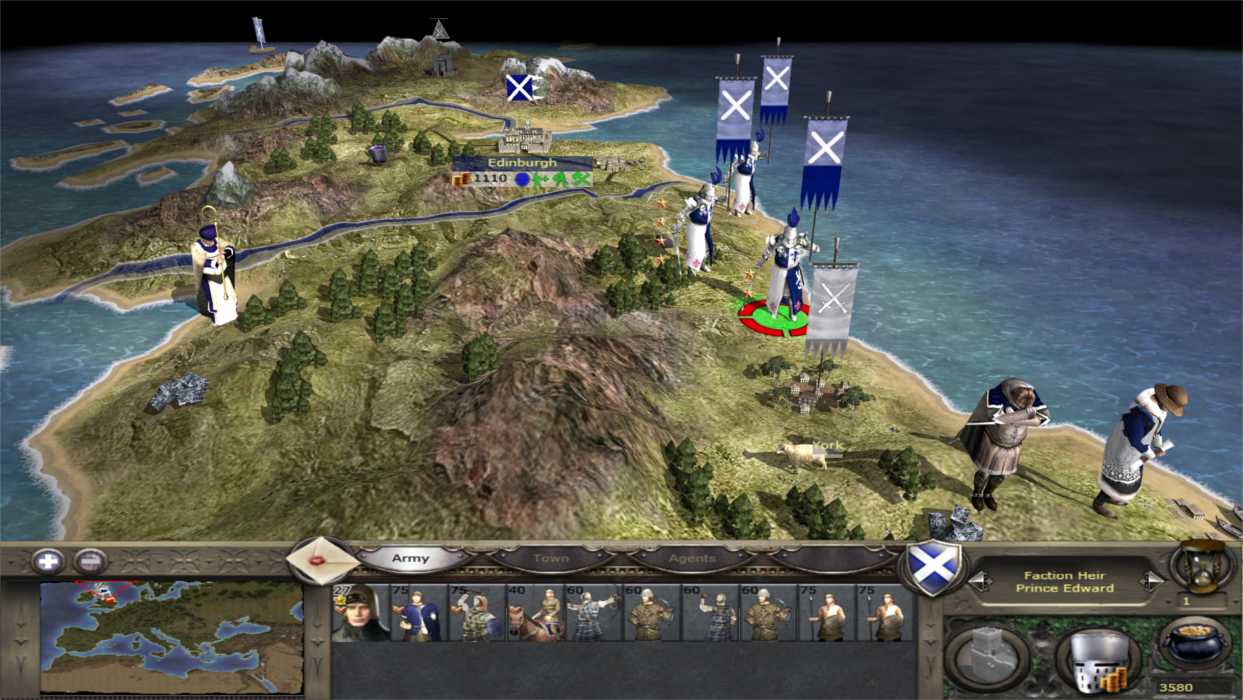
In order to achieve my primary objective of taking England within ten turns it is my intention to merge these units at York. The first move will be made by Prince Edward in the south, he will recruit the two local mercenary units in the Edinburgh region and will immediately march south down the east coast towards York acting as the spearhead of the invasion force recruiting the three local mercenaries in the York region bringing his force up to ten units.
At the same time the other two armies will quickly march all their units south leaving no units in Scotland and join up with the Prince at York. Two units of town militia will be trained at Edinburgh for the next turn. Turn one ends with Prince Edward just north of York with the other armies not far behind.
Turn 2
This turn begins with the three Scottish armies just north of York. These armies will merge outside of York before they attack. This should create a full stack of twenty units with two additional units in tow.
York has no wall so the settlement can be taken as soon as you arrive (very light casualties). After York's capture move the main stack directly south of York making sure to use all the movement points (it's important for turn 3 to get as far south as possible this turn). Leave the spare two units behind as a garrison. Sometimes the player has a council reward mission for York either gaining four units of Spear Militia at Edinburgh or 2500 Florins.
Turn 3
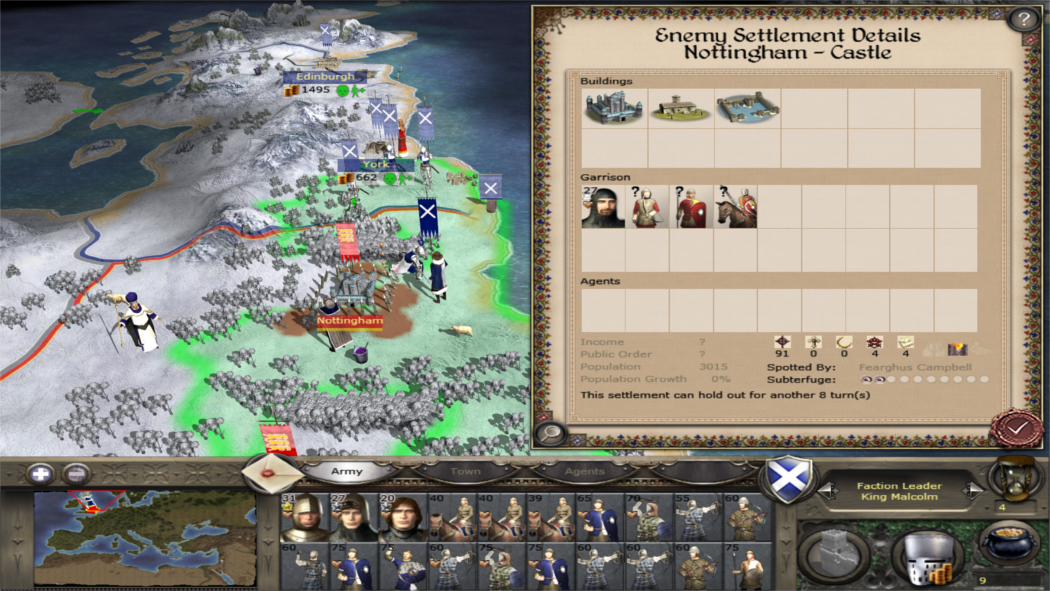
This is the turn the war with England begins. The objective is to beseige Nottingham castle thereby stopping unit production of cavalry in turn 3 and enabling it's capture in turn 4.
At this time In the Nottingham region there are two armies, Prince Rufus with his cavalry at Nottingham castle and a large field army of infantry further away. It is my intention (and it's crucial that I attack these armies separately) to stop these two linking up and also capture the castle denying England the ability to recruit cavalry units on the island. Therefore a rapid advance is essential.
King Malcolm further north in the York region is just a fraction out of range of besieging Nottingham this turn. However there is a way to ensure that the entire army besieges Nottingham this turn. As a whole the combined army is just out of range, but the cavalry is not. The problem is easily resolved by selecting a cavalry unit and sending it to besiege Nottingham, then select the main army and send it to merge with the cavalry unit. The result of the merger is that all units are now besieging Nottingham.
This is a useful tip to remember, if your army is just a tiny fraction out of range of besieging a settlement send cavalry ahead and remerge them at the target.
I finish this turn besieging Nottingham with a full army stack.
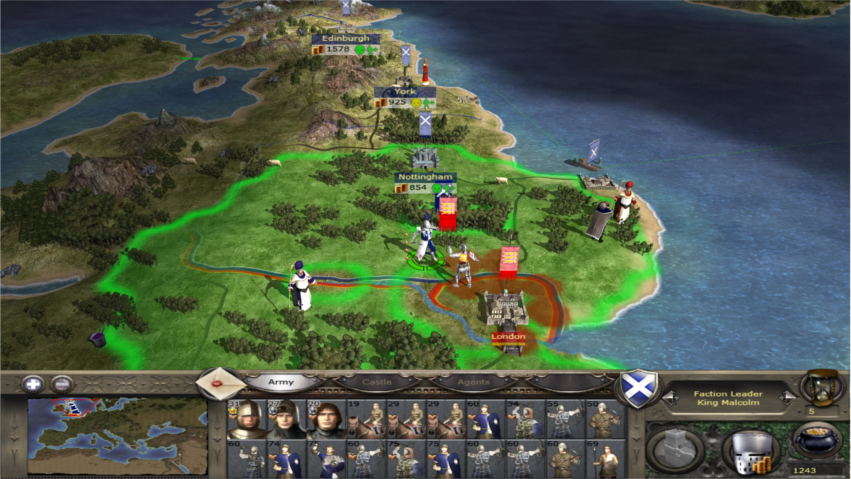
Turn 4
In this turn we find Nottingham castle beseiged by King Malcolm. The other English infantry army is either too far away in the west to get there in time or does not bother to attack the Scots at all and just hovers around the London area.
This is unfortunate for Prince Rufus at Nottingham as his paltry force proves no match for King Malcolms full army stack and the castle falls swiftly. After taking Nottingham the King's army will immediately pursue and hunt down the large infantry stack, leaving a garrison of one unit behind.
Turns 5 - 10
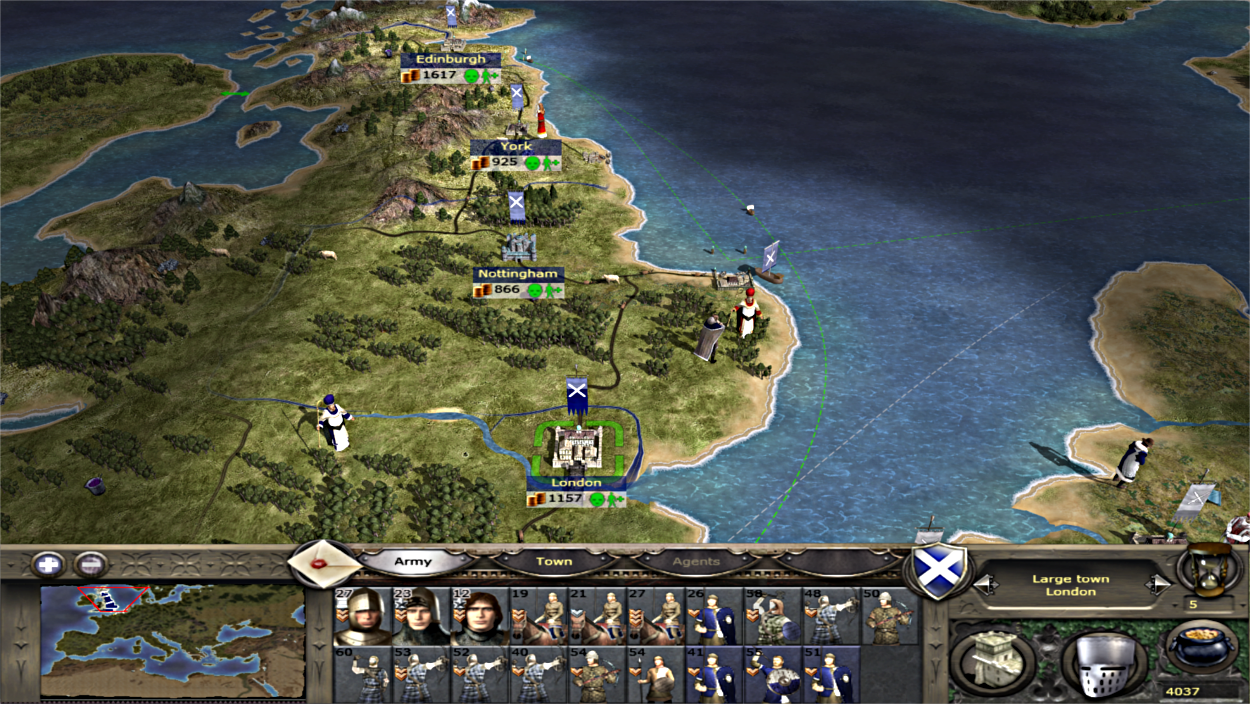
This is were the timescale get's a bit variable as it all depends on the location of the English Infantry stack and if they retreat from battle when attacked. It may take either one turn if they are in range or two turns to pursue and destroy them and then maybe an additional one-two turns to reach London depending on distance.
When I took London in five turns the infantry army was located just to the north of the city (in reinforcement range of the garrison). This meant that when I attacked from Nottingham I destroyed both the infantry field army and the garrison reinforcements. It was then just a case of walking into the city.
Obviously if this army is located to the west of Nottingham and they retreat it takes longer to pursue and destroy them and then march to London. Although achieving my primary objectives shouldn't take longer than ten turns.
After I've taken Nottingham and destroyed the cavalry there, the actual battle against the English Infantry stack is a one sided slaughter. This is because I have six cavalry units, three heavy cavalry bodyguard units and three Border Horse (light cavalry), the enemy has a measly one light cavalry unit and maybe a general at best. I also use my missile troops as infantry (ALT RMB for melee attack).
Once my cavalry outflank and get behind the enemy line they break and it's just a matter of running them down. As soon as I took Nottingham destroying their cavalry and denying them cavalry recruitment the infantry army was doomed.
The Pope
At this point of the game (turns 1-10), it's crucial that you maintain your attack, without halting, destroying all English armies on the island and reaching London asap. If the Pope demands that you stop, ignore him and take excommunication. It doesn't matter this early in the game there will be no Crusade against you and you will soon be reconciled when your faction leader dies.
Stopping will only allow England to recruit fresh troops and send reinforcements from Caen. It's vital that you keep the pressure on while you have the upper hand. The Pope does not matter at this time. Ignore him.
Conclusion
It makes sense for Scotland to do a "first strike" before England can build up substantial strong forces. Also having seventeen units close together and especially six cavalry units immediately available makes taking the initiative with an aggressive thrust into England a very attractive and viable option.
If Scotland plays it too defensively money will get very tight very soon due to the lack of settlements. So an invasion of England is not only an attractive military option at this time but a sensible economic one. The speed of the advance is crucial. Taking Nottingham castle is really the key to the victory. It's important to destroy their cavalry there before they can link up with their infantry and also deny England the ability to recruit more cavalry units on the island asap.
Speed is essential Nottingham must be besieged by turn three before England can recruit more cavalry. Starving English forces of cavalry on the island gives the Scots the advantage (they start off with six units) . It enables the Scots to quickly outflank and rout the English armies as they have very little/no cavalry protection.
Concentrating the Scottish forces into a full stack allows them to quickly overwhelm their opponent before they can assemble their own forces which in contrast are spread out across England. Having this large force means the Scots can quickly destroy these smaller armies in order one at a time. Also in battle the Scots should use their missile troops in melee swarming the enemy line with overwhelming numbers in combination with cavalry attacks to the enemy rear/flank.
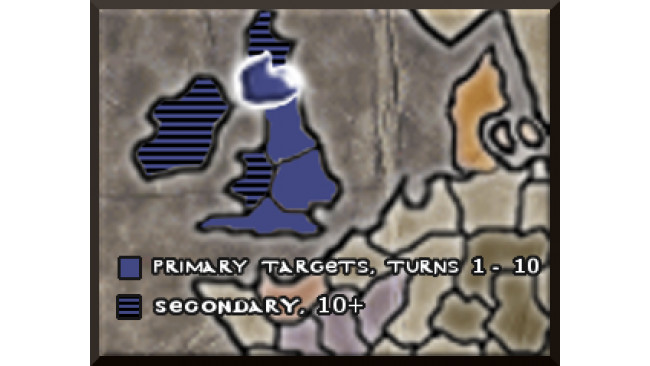
The immediate focus should be on the primary targets, York, Nottingham and London. London should be taken by turn ten at the latest. Only then should the player turn their attention to the remaining secondary targets. Controlling the island this quickly leaves the Scots in a very secure position and provides a solid foundation for further development and expansion.
More Wrath Of Santa Guides
https://steamcommunity.com/sharedfiles/filedetails/?id=876478247
http://steamcommunity.com/sharedfiles/filedetails/?id=516731929
https://steamcommunity.com/sharedfiles/filedetails/?id=1419870134
http://steamcommunity.com/sharedfiles/filedetails/?id=819119509
Source: https://steamcommunity.com/sharedfiles/filedetails/?id=1077314383
More Total War: MEDIEVAL II - Definitive Edition guilds
- All Guilds
- A Guide to All the Units I Can Remember
- / Ancillary ( )
- On Siege Battles
- export_descr_unit.txt explained
- /Units ( )
- Medieval 2 Windows support VISTA, 7, 8, 8.1, & 10
- The Mongol Invasion: A Guide For Every Faction
- A List of Land Units Across All Factions (TATW 3.2 Base)
- What causes the Baron's Alliance to form?
- Total War: MEDIEVAL II - Definitive Edition Guide 909