More The Witcher 3 Guides:
- Console Commands (Cheat Codes).
- Complete Achievement / Trophy Guide.
- Guide for Stutter Free Smooth Gameplay.
- Off Map Secret Chest in White Orchard.
- Combat Guide (Some Useful Tips).
- Gwent Card Collector Guide.
- Death March Walkthrough.
- Useful Tips and Tricks.
Complete Stat Summary Of Manticore Gear
Introduction
This guide saving you the time and hassle of doing the math. Also this short guide will include what this gear is best used for. The best part about this set is that it does not require enriched dimeritium ingots, enriched dimeritium plates and even infuzed slyzard hide. Meaning, you can easily craft this set without breaking your bank unlike all the other grand master set. Making things better the quest to obtain this set is much more easier than other grand master schools. Cat school grand master diagrams in particular are very hard to obtain due to the enemies that guard them.
Armor Stat Summary
- + 30 toxicity.
- 48 % damage resistance from monsters.
- 45 % elemental damage resistance.
- 45 % slashing resistance.
- 29 % piercing resistance.
Interestingly enough this set provides a nice boost on both critical damage boost and critical damage chance.
- 50 % critical damage boost.
- 10 % critical damage chance.
Wearing pieces of this set will grant you special school bonuses.
 Wearing
- 3 out of 6 Manticore gear pieces will grant you Critical hit chance and critical hit damage applying to bombs.
- All 6 Manticore gear pieces will increase the maximum number of charges for each alchemy item such as bombs and potions by 1.

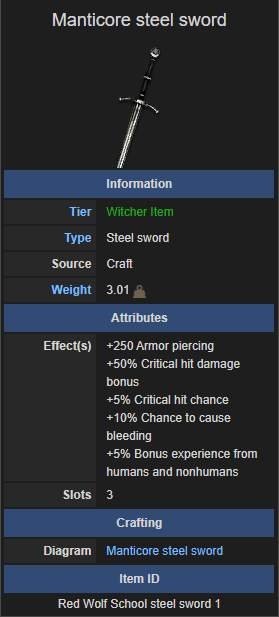
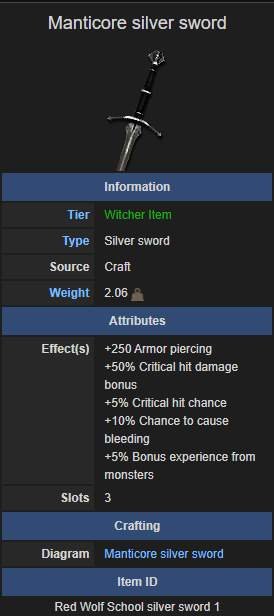
Swords

Specialty Of This Gear
For anyone starting Blood and Wine I always recommend to get this armor and craft it.
Reasons Being- Other grand master sets require enriches dimeritium ingots, enriched dimeritium plates and infuzed slyzard hides. All of which are ridiculously expensive to buy and craft.
- Manticore set is by far the cheapest to craft and require basic master crafted materials such as dimeritium which you will have by now, even if you don't it's much cheaper to buy them. So you get to enjoy grand master crafted end game Witcher gear for cheaper price with materials you already have and are easy to obtain.
- The quest to obtain Manticore School gear diagram is by far the easiest out of all the grand master witcher school treasure hunt quests. To give reference diagrams of grand master cat school gear are located in the middle of a large bandit out post (Hanse bandit out post that has well over 30 enemies + reinforcements from near by smaller bandit camps that come, they can easily overwhelm you with there numbers)
- This set significantly boosts both critical damage bonus and chance. Both the swords and armor give this massive boost.
How To Use This Set
At first glance you might think this set is for only Alchemy builds but that's not true.
- Since the armor set already gives you high toxicity threshold, so you don't have to invest in alchemy tree skills. Giving you more freedom to invest in swordsmanship and/or magic skills. Plus you can drink potions freely without worrying about toxicity killing you. You'll find your self using black blood quiet a lot in Blood and Wine as well.
- The armor gives you a nice boost on both critical damage chance and bonus. So no need to worry about you damage out put (DPS) falling behind.
- Since the armor is medium you can get the skill griffin school techniques which raise stamina regeneration and sign intensity significantly. Giving you more flexibility to use stamina consuming techniques such as signs, whirl and rend more easily.
- Wearing only the full armor set transfers the critical damage boost and chance to bombs. In blood and Wine you will come across relic weapons that even out class your grand master crafted Witcher swords. So you don't have to feel the need to wear the full gear, simply wear the full Manticore armor set and pick up better relic swords you find along the way. What's more the main enemies of Blood and Wine (vampires) are vulnerable to bombs.
- My preferred build uses the following skills; griffin school techniques, 2 magic skill tree skills (usually use Aard and Igni skills) and finally rest of the slots are filed with swordsmanship tree skills. Utilizing the high flexibility this set offers between high swordsmanship from critical damage and chance boosters, high sign intensity and stamina regeneration from griffin school technique skills and finally the high toxicity tolerance and bomb damage the armor gives.
Final Note
My preferred build is towards balance. I don't invest in alchemy skill trees because of the broken over powered builds you can make out of it. If you wish you can of course find those builds online and use them.
Source: https://gameplay.tips/guides/6237-the-witcher-3-wild-hunt.html
More The Witcher 3 Wild Hunt guilds
- All Guilds
- The Witcher 3: Wild Hunt - Off Map Secret Chest in White Orchard
- The Witcher 3: Wild Hunt - Useful Tips and Tricks
- The Witcher 3: Wild Hunt - Death March Walkthrough
- The Witcher 3: Wild Hunt - Combat Guide (Some Useful Tips)
- The Witcher 3: Wild Hunt - Console Commands (Cheat Codes)
- The Witcher 3: Wild Hunt - How to Respec or Repick Skills
- The Witcher 3: Wild Hunt - How to Survive in Death March (Tips and Tricks)
- The Witcher 3: Wild Hunt - Viper Venomous Gear Stat Summary
- The Witcher 3: Wild Hunt - Complete Achievement / Trophy Guide
