Intro
Hello, I assume you are here because you are a bit confused by all the dials and switches the engine settings have to offer. Well, you’ve come to the right place. Maybe. Here, I will explain which sliders are important, and what numbers to plug in for generally ok results (and other guides with more specific guides from other people), along with some common problems one may face.
Note, if you don't care about why things are done in a certain way, there's a tldr section down below.
[1] Engine
1) Making your engine
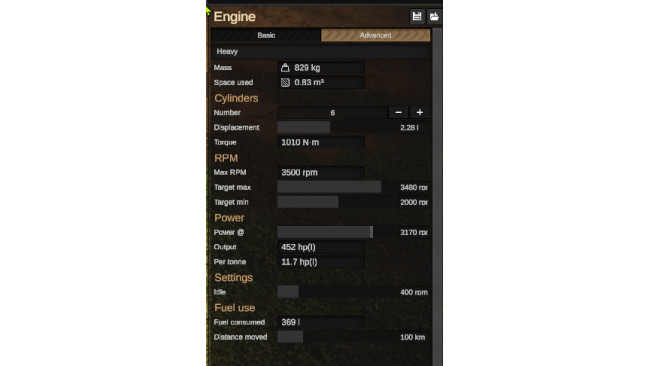
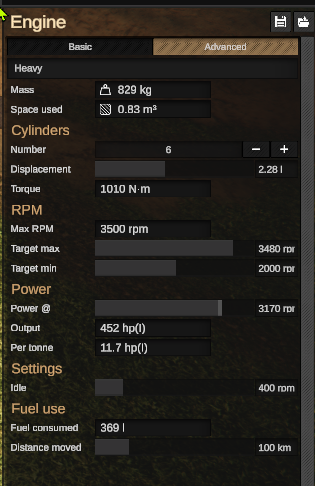
First thing you want to do is figure out what kind of engine you want. If you have a big enough tank, it is ok to just max out on everything and go from there. However, if you are more space constrained, the three things you want to look at are Cylinder count, Displacement, and Power@.
Cylinders show how many cylinders you have in your engine. Note that while the +/- buttons give you even numbers, you can manually type in an odd number. An odd number V-engine is a bit nonsensical, but its there if you want it.
Displacement shows the amount of volume a SINGLE cylinder has. So a 2L 4-cylinder = 1L 8-cylinder, both are 8L
Power@ tells you how much HP you have at a certain RPM. It DOES NOT affect your horsepower in any other way. It is only there as a measuring stick.
A good rule of thumb for hp per tonne at Max RPM is 25+ for quick tanks, 15-25 for medium speed, and around 8-15 will result in slow crawlers. Make your engine, and place or type the Power@ slider at Max RPM to check.
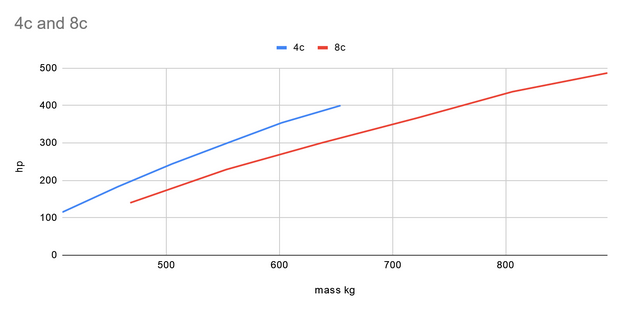
A note about engine design: If you are extremely space constrained, engines with a smaller cylinder count are more efficient power to weight wise. For example, a 8L 4-cylinder (2L x 4) engine takes up 554 kg, while you’re stuck with a 4L 8-cylinder (0.5L x 8) if you want to match 554 kg. An 8L 8-cylinder engine is around 720 kg. Though you do get more power out of the deal, you get a lot of weight.
A chart showing the mass and HP figures of a 4 cylinder and an 8 cylinder. Note that this does not cover all masses and engine sizes (only 2L to 12L), because i got tired, but the trend is the same all the way to max engine size.
Otherwise, squeeze as much engine as you feel like into your tank.
2) RPM adjustments
Ok, now that we’ve made an engine, you need to tell your driver how to use it. This is in the RPM section.
First, read the output of the Max RPM reading. The engine above has a max of 3500 RPM. You do not want your engine to go over this RPM, because that is the redline, and your engine will explode if you're over this region for too long. You can tell when you've redlined when your RPM indicator turns red while driving around.
To avoid this, go to your Target Max RPM, and make sure it is about 100 less than Max .
After update v0.110, you'll want to be 100 to 200 RPM less than Max, because there is new added power loss right at the redline. In this example, one should set Target Max to 3300. If your Max RPM is less than 1500, it might be worth setting the Target Max to only 100 less, because you want your RPM as high as possible to squeeze as much horsepower you can safely, and a low RPM engine doesn't have much to work with. You are slightly less likely to blow up your engine in v0.110, though upper range power is a bit more lacking now.
Next, a good rule of thumb for Target Min is about 50% to 60% of Target Max. So, 1700 - 2000 would be ok to start with.
3) Idle
This is the speed your engine sits at when you're not moving. This setting has only two minor effects.
One, acceleration from stationary is a tiny bit better.
Two, your fuel use while stationary is a bit higher. Unless you're gearing up for a 24 hour LeMans, this won't affect you. Putting it high is fine.
4) Fuel use
Like Power, this is also a measuring stick, but for figuring out how much fuel you need to travel a certain distance. Since no map is hundreds of kilometers long, this is of minimal importance. Carry enough fuel to go 50km (in the Fuel tab) and you’re fine.
[2] Transmission Tuning
Author's Note: Every transmission needs to be tailored for the tank and engine. The Era you are driving your tank in will change the cylinder limit, the displacement limit, Max RPM limit, and the output efficiency of your engine. This means a 12L 6-cyl in mid war will turn very weak in WW1. This may make it somewhat difficult to judge how the actual tank will perform while testing in the sandbox. One thing you can try is to check the stats of the engine you want to use in the correct era (Max RPM, hp/ton), plug in the Target RPM you would use there, activate the Infinite Volume cheat in the settings, then fill up the tank with extra ammo until you get the HP/ton about the same. Make sure the gear count is the same.
Alright, this is the hard part everyone struggles on.
If you aren’t gear limited, then the process will be fairly simple.
http://www.ingmarmatthis.nl/sprocket/gearcalculator.html
The link takes you to a decent transmission generator.
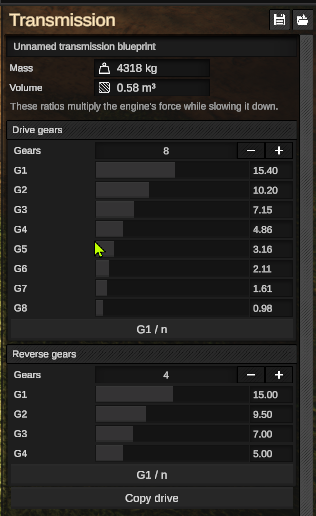
First, you’ll want to choose a first gear. This requires little time, since the only thing you need to see if it accelerates from a stop alright. Unless your tank is monstrously heavy, it should never need a first gear greater than 20. Most heavy tanks should be fine with something between 10-15, and lighter tanks can go from 10 below, sometimes even below 5. Start off with something a little high, then keep going down in intervals of 1 until it starts feeling sluggish, then go up 1 or 2. A very rough estimate you can use is to divide 60 with the tank’s Hp/ton, and use the number for your 1st gear. The final torque will vary a bit with the sprocket size, so some adjustments may be needed afterwards, but at minimum this will give you enough power to move well enough. A lighter tank can use 70 or 80 as a target (Ex. 60/ [15 Hp/ton] = 4).
Next, multiply Target Max RPM by 0.7 (Ex. 3000 * 0.7 = 2100) and use that for the Target Min in the calculator. We aren’t using the Target Min in the game itself because you want a little bit of overlap between the gears, to reduce the driver gear hunting as much. Stick in an arbitrarily low number for the final gear (0.5 for ex), and run the calculator. Input the gears into your tank, plop it in Sandbox Flat, and floor it.
Watch the speedo on the top left. Remember the last gear your engine can hit when it reaches its max speed. Get rid of all the gears you can’t reach, and adjust the last gear so that the engine stalls a few hundred RPM below your max. In most cases, you shouldn’t need more than 10 gears, because gears are heavy.
If you are gear count limited (say, the 3 gears you get in the WW1 era), then your ability to manipulate your gear ratios will be a lot more limited. The settings for Target Max, and final gear goes through the same process as before. However, you may want to use a Target Max x 0.6 setting for Target min in order to maximize the ratio range. For first gear, this is entirely based on how many gears you can fit. Plug in an arbitrarily large number into First gear, and input only the gears you can fit.
For reverse, unless you want to have the exact same gear count as forwards, keep the same first and final gear, then space out a few of the ratios in the middle. Reverse gears should be less than forwards unless you want to make a reverse tank.
If you’re using Clutch-brake, then there’s not much else to do but follow the instructions. Clutch brake is a little bit happier with narrow gear ratios, so experiment with Target min = Max * 0.75 or 0.8, if you have the space for the gears.
Note that as of v0.109 clutch brake steering has a weird property of needing a decent speed to be able to turn while going forwards, while reverse can do pretty tight turns with a very low G1 (larger ratio number). If you find yourself needing to make a quick turn, there’s a bastardized neutral turn you can do with the following key-presses: “S + A/D, release S, repeat”
If you’re using Twin, note that the driver can only turn when in Neutral, or in 2nd gear. As of v0.109, the driver is unable to only put one track in gear and the other braked, so a slightly more spaced out first gear will allow you to get out of first gear earlier for low speed turns. Not too much, this will slow your neutral turn a bit. This makes transmissions with less than 3 gears very difficult to use, especially reverse transmissions. At minimum, Twin needs two somewhat close gears for turning, and a final gear to prevent engine damage. A Clutch-brake can run, if inefficiently, on only a single gear
[3] TLDR
Engine: Lower cylinder counts are more space efficient, unless you really need more power, or you want to pretend to be using realistic looking engines, since Sprocket engines are extremely basic.
Set Target Max RPM to be ~50 to 100 less than Max RPM
Set Target Min RPM to ~%50 of Target Max
Set Idle RPM a little high, it really doesn’t matter much.
Power@ and Fuel sliders are both measuring sticks, and don’t affect actual power output in any way.
Transmission:
http://www.ingmarmatthis.nl/sprocket/gearcalculator.html
Find a final gear that the engine doesn’t redline via Sandbox flat testing, you will want it to be around 20% below Max RPM/redline. If it redlines, make the ratio smaller. If it stalls too early, make it bigger.
If you have more than 5 gears, Put in a Target Min that is roughly 70-75% of Target Max into the calculator, then put in an arbitrarily high first gear, and only input the gears you need (For ex, if you want 8 gears, use the final gear you found, then the next 7 lower gears; ignore the rest). If you have less than 5 gears, use 60-70% of Target Max to put into the Target Min in the calculator, repeat process with first gear.
For reverse, unless you want to have the exact same gear count as forwards, keep the same first and final gear, then space out a few of the ratios in the middle. Reverse gears should be less than forwards unless you want to make a reverse tank. Less gears save weight.
If you’re using Clutch-brake, then there’s not much else to do but follow the instructions. Clutch brake is a little bit happier with narrow gear ratios, so experiment with Target min = Max * 0.75 or 0.8, if you have the space for the gears.
Note that as of v0.109 clutch brake steering has a weird property of needing a decent speed to be able to turn while going forwards, while reverse can do pretty tight turns with a very low G1 (larger ratio number). If you find yourself needing to make a quick turn, there’s a bastardized neutral turn you can do with the following keypresses: “S + A/D, release S, repeat”
If you’re using Twin, note that the driver can only turn when in Neutral, or in 2nd gear. As of v0.109, the driver is unable to only put one track in gear and the other braked, so a slightly more spaced out first gear will allow you to get out of first gear earlier for low speed turns. Not too much, this will slow your neutral turn a bit. This makes transmissions with less than 3 gears very difficult to use, especially reverse transmissions. At minimum, Twin needs two somewhat close gears for turning, and a final gear to prevent engine damage. A Clutch-brake can run, if inefficiently, on only a single gear
[4] Bonus Talk: Suspension
Your suspension setup will affect how your tank behaves in different terrain. How it is affected will likely change as the traction system is reworked, because as is, it isn't very realistic. For one, tracks phase through the ground. As of v0.109, all tracks do is determine maximum grip, which depends on wheel size, wheel count, and wheel width. However, increased traction results in increased rolling resistance, decreasing top speed.
You will also want a somewhat soft spring setup. A too soft setup will result in bottoming out on hilly terrain. A too hard setup will result in wheels not compressing properly to touch the ground, reducing grip and making the tank have more trouble driving in a straight line. Spring power can only be adjusted with the torsion bar types. Look at the specific weight of your tank, the spring force should be above it somewhat. Increase the force until the tank just squats a little bit on its wheels.
Stronger springs = shorter bars/wider diameter
Softer springs = longer bars/smaller diameter.
Shorter bars save space, though longer bars may allow for greater wheel travel.
Damper is trial and error for every tank. There is a sweet spot where the tank will bounce the least. Test by accelerating and braking, or firing off your cannon, and see how much the tank shakes.
The sprocket size acts as a final multiplier to all your gears. Making it smaller increases torque, making it bigger increases speed. Hill climbs require both torque and grip.
Source: https://steamcommunity.com/sharedfiles/filedetails/?id=2604808864
More Sprocket guilds
- All Guilds
- Sprocket Guide 753
- Tiger 2 P
- Sprocket Guide 733
- T-72M2 Moderna
- Starter guide to Freeform!
- WW2 German Pack
- Challenger 2
- Strv103
- Cold War Third Reich Tank Pack
- M51 Super Sherman (W)