
Introduction
Hello, I'm kbiz. I thought I would provide some tips on Solasta that will hopefully benefit some of you. Even if you're a veteran of these types of games, I hope you'll find at least one nugget of useful information.
Advantage And Disadvantage
The most powerful variable in Solasta is Advantage. It's more powerful than any attribute bonus or magic weapon.
Advantage is simply rolling two 20-sided dice and taking the best result.
For example, consider your character has +6 Attack and is trying to hit an enemy with 13 AC. Without Advantage, you would need to roll a 7 to hit the enemy. Said another way, you would miss 6 out of 20 times. Your probability of missing is each time is 30% = 6/20. With Advantage, you would need to roll two misses in a row to miss. Your miss probability with Advantage becomes 9% = 30% * 30%. Your 70% chance of hitting without Advantage becomes a 91% chance of hitting with Advantage. That's better than attacking with a +4 magic weapon without Advantage.
You always want Advantage. And you can have it immediately at level 1 with Stealth.
The opposite of Advantage is Disadvantage. And it becomes important if you're actually getting attacked. Disadvantage takes the worst result from rolling two 20-sided dice.
For example, consider a Goblin has +4 Attack and is trying to hit your Fighter with 18 AC. Without Disadvantage, the Goblin would hit with a 14 giving it a 35% chance to hit. With Disadvantage, that probability becomes 12% = 35% * 35%. That's the same has having 22 AC without Disadvantage. If your Fighter is wearing Plate Armor without Disadvantage then with Disadvantage it's the same as wearing Plate Armor +4.
You always want enemies to have Disadvantage. The early way to create Disadvantage is Dodge.
Also, with Disadvantage you'll never receive a critical hit. With Disadvantage the enemy will need to roll two 20's for a critical hit. The odds of that are 1 in 400 or 0.25% = 5% * 5%. Expect a handful of critical hits on your melee fighter over the course of the entire game, not each encounter.
For this game it's not important to understand probability. It's important to understand you always want Advantage and you always want to your enemies to have Disadvantage.
My favorite ways to create Advantage and/or Disadvantage:
Stealth - characters attack with Advantage - best because it's costless and can last the entire combat
Blindness (level 2 spell) - gives Advantage to your characters and Disadvantage to enemies for 10 rounds (CON save)
Improved Invisibility (level 4 spell) - gives Advantage to your character and Disadvantage to enemies - no save required
Decisive Strike (Battle Cleric ability) - stuns and gives Advantage for one round (CON save)
Mind Twist (level 5 spell) - incapacitates nearby enemies and gives Advantage for one round (INT save)
Some other ways:
Dodge - creates Disadvantage for enemies - have your melee fighter Dodge while your other characters attack from range
Color Spray (level 1 spell) - one round only
Faerie Fire (level 1 spell) - save every round
Invisibility (level 2 spell) - one attack only
shove prone - one round only
dark environment - good for human enemies and beasts
stun, paralyze, hold, etc.
Surprise
Another extremely powerful variable in Solasta is Surprise.
Surprise occurs when you attack unaware enemies. The best way to do this to initiate combat with ranged weapons from Stealth.
With Surprise, your characters will most likely be able to attack twice before the enemy has a chance to react. This can be decisive early game.
With two actions, you can attack twice, you can hide and attack from Stealth, or you can buff your characters and then attack.
You always want to Surprise enemies. This means you always want to explore maps in Stealth. You can even Surprise enemies during encounters that occur immediately after a dialogue or after you open a chest. Just pause the game immediately afterwards and initiate combat before the enemies detect you. If you're in Stealth, the only time you can't Surprise enemies is during non-ambush random encounters.
The chance enemies are Surprised depends on the Stealth of the character that initiates combat. The DC is 1d20 + Stealth + Stealth modifiers. If you have Pass Without Trace, your Stealth modifier is +10. If you have Boots of Elvenkind, the DC is rolled with Advantage. If you have a Cloak of Elvenkind, the DC is rolled with Advantage, and the enemies roll with Disadvantage.
Your sneakiest character generally should initiate combat. That said, all your characters should be sneaky - high DEX and no heavy armor.
Stealth
Stealth is a game-changer. While in Stealth, you can't be attacked, you have Advantage on your attacks, your crit chance effectively goes from 5% to 10%, and if you're a Champion Fighter, your crit chance goes from 10% to 19%.
It's always better to attack from Stealth.
However, normally after each attack from Stealth, the enemy rolls a 1d20 + Perception check with Advantage and your character rolls a 1d20 + Stealth + Stealth Modifiers check to see if you remain hidden. Odds are you won't remain hidden. Expect to only attack from Stealth the first round. Maybe for a few rounds if you're lucky. And if you have metal armor, you roll your Stealth check with Disadvantage. You'll never remain hidden.
However, you can remain in Stealth during combat with two things:
Pass Without Trace (level 2 spell) - adds +10 to Stealth (Ranger/Greenmage/Druid)
And either:
Boots of Elvenkind - gives Advantage to Stealth checks
Cloak of Elvenkind - gives Advantage to Stealth checks, gives Disadvantage to enemy Perception checks
The Boots and Cloak of Elvenkind are available at the Antiquarians with Brotherhood influence - which you can have at level 4.
You don't need to be a Rogue to be stealthy. All your characters can do it. Just don't wear armor that gives Disadvantage to Stealth checks. I will talk about dexterity later, but Studded Leather +1 and a 20 DEX is comparable to Plate Armor so heavy armor is not necessary in this game. In fact, I only equip heavy armor on my melee fighter and only if I find Plate +1.
I'm sure all of you have tried Stealth only to have your Fighter's detection bar fill up so fast that you can't attack with Surprise. Oh sh!t! Stop moving everyone! Attack with Surprise! Nope. You just put yourself in a bad situation. The solution is to move one of your stealthy characters into position beforehand - preferably with battlefield vantage on higher ground. With Pass Without Trace, high DEX, and proficiency in Stealth, your character can be adjacent to an enemy outside of combat and they won't detect you. It's an easy way to scout a map. It's also an easy way to position your character ideally before combat. Your characters need to be stopped before they can attack and that can take a second or two in this game. With one of your characters in position, you can always initiate combat with them just before they detect your other characters. Always have one of your characters stationary and in position.
Is light a factor? If so, cast the Fire Bolt cantrip on all lightable objects and covered windows. Are there hanging crates, stalactites, or boulders? If so, you can damage the enemies before combat starts without fear of being detected.
If the enemies can't climb walls, position your character at the top of a ladder so enemies can't climb up. Position your characters where they can run around a corner or behind a column at the end of their turn and re-hide the next round if detected. Position your characters where it's difficult for an enemy to move and attack you the same round. Position your characters behind your melee Fighter if you have no other options.
The goal is to have your high AC melee Fighter draw aggro and tank everything (with or without Dodge) while your other characters attack from Stealth with ranged weapons and spells. It works. Spells like Scorching Ray and Guiding Bolt are made to be cast from Stealth. They will almost always hit. Everything hits when you have Advantage.
A melee Fighter executing Dodge works great at low levels. However, one of my favorite strategies later in the game is to cast Haste and Improved Invisibility on my melee Fighter and have everyone else attack from Stealth. Or just be invisible. Your Fighter will be a one-man wrecking crew.
If one of your characters has no chance of remaining in Stealth, keep them away from your stealthy characters. Otherwise the enemies will move to attack and detect everyone via proximity. If one of your characters will probably be detected if they attack from Stealth, consider skipping their turn, managing their inventory, moving to a better position, or casting a non-attack spell. The last thing you want to do is reveal yourself just before a long set of enemy turns.
If you do Stealth right, battles will be quick and easy, you won't waste spells or other consumables, and you won't get hit. Stealth takes some time to master though. I know I've messed it up every way possible before. In fact, I still mess it up sometimes.
If you hold spacebar while moving a character in Stealth during combat, you'll speed up movement.
Also, always explore with ranged weapons. It's much easier to attack with ranged weapons and then switch to a sword and shield if necessary at the end of the turn. Plus, a Heavy Crossbow is as good or better than any melee weapon - especially at low levels.
When I explore maps, I always have my Ranger cast Pass Without Trace on all my characters and Longstrider on as many characters as possible. Both spells last one hour - or an entire map if you conserve your consumable spells and abilities.
If you don't know where the campfire is, go slow and minimize spell usage. If you know, unleash the dogs of war. It's more fun and you can always rest afterwards.
And no, you don't always need to move in Stealth if you're party if filled with a bunch of badasses or if you know the maps intimately because you've played the game multiple times. But when you're playing the game for the first time and/or playing Ironman mode, it's smart to remember your ABC's - always be cautious.
Initiative
You always want your characters to attack first. Initiative is based on DEX. A high DEX will give you a moderate chance to attack first. However, what you want is the Eager for Battle feat. It gives you +1 DEX and Advantage on all initiative rolls. In my opinion, it's the single best feat in the game. I give it to all my characters at level 4.
Concentration
Solasta limits buffs by requiring Concentration to maintain a spell over time. You can't just stack tons of buffs on every character. It definitely makes you rank the value of each Concentration spell.
Every character should have a Concentration role. Here are the Concentration spells I use most of the time:
Cleric - Haste, Bless, Shield of Faith, Enhance Ability (Owl's Wisdom, Cat's Grace), Insect Plague
Sorcerer - Haste, Improved Invisibility
Fighter - Pass Without Trace (Cloak of Arachnida)
Ranger - Hunter's Mark, Pass Without Trace
A great spell that doesn't require Concentration is Longstrider (+2 Movement for 1 hour). Another one is Spiritual Weapon.
Before level 5, I typically use Shield of Faith or Bless. At level 5, it's Pass Without Trace on the entire party and Haste on both my Fighter and Ranger. At level 7, it's Haste and Improved Invisibility on my Fighter. Once I get the Cloak of Arachnida around level 7, I'm free to use Hunter's Mark at all times.
Owl's Wisdom is great to increase the knowledge level of your bestiary by giving Advantage to every Survival roll. Cat's Grace is great for disarming traps and opening locks.
Insect Plague is great for when you attack with Surprise. Expect enemies to suffer the damage 2-3 times.
Rest
Time is free in Solasta. If you have access to a campfire, use it as often as necessary.
If you don't have access, take short rests after battles to recover hit points and certain abilities. Also, if you don't have access to a campfire, use spells and abilities sparingly.
Rations are expensive, heavy, and unnecessary. I only carry rations until I get Goodberry from my Ranger at level 2 - which is usually within the first 10 minutes of gameplay.
Encumbrance
I pick up everything and the kitchen sink. Every rusty dagger. Every worthless heavy club. Every crumb. I'm too lazy to filter out the junk. I just want as much gold as possible to buy as many good items from the merchants and factions as possible.
With the Boots of Striding and Springing, 18 STR, and a Handy Haversack, you can carry 480 lb of junk with zero penalties. That's versus about 120 lb normally. That strategy works great until you get a Bag of Holding. I picture my Halfling Fighter like the hapless dog in the Grinch Who Stole Christmas struggling with the impossibly large bag of Whoville loot. Amazingly enough, her Movement is still increased from 5 to 6 while carrying all that junk. If necessary, I'll drop a bunch of armor at a location and pick it up before heading back to town.
Attributes
DEX is the most important attribute for all classes. It increases your ranged weapon hit chance and damage, finesse weapon hit chance and damage, armor class, initiative, all Stealth related rolls, and DEX saving throws.
DEX should always be the highest attribute or the same as the class primary attribute.
All your characters should have 20 DEX as soon as possible. It's a good idea to start with 19 DEX and increase it to 20 at level 4 with the Eager for Battle feat.
Spellcasters benefit heavily from their primary attribute - mostly because it increases the DC for all their spells. When you cast a spell, you want the enemies to fail their saving throw.
DC = 8 + Proficiency Bonus + Primary Attribute bonus.
For example, a Half-Elf Sorcerer can have 20 CHA at level 1 which is a +5 Primary Attribute bonus. Proficiency bonus is +2 at level 1, +3 at level 5, and +4 at level 9. So, your Sorcerer spells will have DC 15 at level 1, DC 16 at level 5, DC 17 at level 9, and DC 18 when you buy the CHA tome from the Antiquarians. Now consider casting Blindness on 5 enemies as a level 6 Heightened Metamagic spell causing the enemies to save with Disadvantage. All five enemies have a good chance of being blind for 10 rounds giving you Advantage and them Disadvantage on all attack rolls. Or you could just attack from Stealth with the same benefit.
In addition, Spell Attack bonus = Proficiency bonus + Primary Attribute bonus. This affects to-hit spells like Scorching Ray and Guiding Bolt.
When you reroll attributes during character creation it's fairly easy to start your spellcasters with 18-20's in both DEX and their class primary attribute (CHA/WIS/INT). Try to have both at 20 by level 8.
CON comes in third place. This is how I rank attribute value:
Fighter - DEX and STR, CON
Sorcerer - DEX and CHA, CON
Cleric - DEX and WIS, CON
Ranger - DEX, WIS, CON
One character should have a decent INT for skills. Not too important though.
Attack Bonus
Consider the Attack Bonus for a Ranger:
+2 Proficiency level 1
+1 Proficiency level 5
+1 Proficiency level 9
+3 16 DEX
+1 18 DEX
+1 20 DEX
+2 Archery Fighting Style
+1 magic bow/crossbow
+1 Herald of Battle (stand next to Battle Cleric)
+1-4 Bless
With Bless, you can potentially have the same Attack Bonus at level 2 as level 12 without Bless. Your level and magic items don't matter much. Advantage matters.
If you want to hit an enemy 90% of the time, attack with Advantage and Bless using a magic weapon.
Luck is probability taken personally. We all remember the strings of 1's and 2's during battle. It's total bullsh!t! The game is cheating! No, not true. People just remember the series of bad rolls and don't remember the series of good rolls.
Also, it's hard to see the value in a Halfling's Lucky trait. If you roll a 1 you get to reroll. It doesn't sound too valuable. But it is. It's like a small damage bonus. Just like you'll never receive a critical hit if the enemy attacks you with Disadvantage, you'll never critically miss with a Halfling. The odds are 1 in 400. In fact, your potential critical miss will most likely become a hit with a Halfling.
As a side note for the poker players out there, the odds of being dealt pocket aces in Texas Hold'em are 1 in 221 = 4/52 * 3/51. Again, you'll never critically miss with a Halfling or Advantage and you'll never be critically hit by an enemy with Disadvantage.
Armor Class
10 AC base
+5 20 DEX
+1 DEX tome (Antiquarians)
+1 Defensive Fighting (Fighting Style)
+1 Armor Master (Feat)
+1 Leather (+DEX bonus)
+2 Studded Leather (+DEX bonus)
+3 Studded Leather +1 or Leather +2 (+DEX bonus)
+5 Empress Garb Chain Shirt (+DEX bonus, Crafting, good on Sorcerer/Wizard or anyone else)
+8 Plate Armor (no DEX bonus)
+10 Dwarven Plate (no DEX bonus)
+2 Shield
+4 Shield +2 (Circle of Danantar)
+2 Bracers of Defense (can't be wearing armor, good on Sorcerer/Wizard)
+1 Cloak of Protection (Antiquarians)
+1 Ring of Protection (Antiquarians)
+1 Ring of Necromancy (Dark Tower)
+1 Ring of Abjuration (Fortress of the Shield)
+2 Ring of The Lord Inquisitor (side quest)
+2 Shield of Faith (level 1 Cleric spell)
+2 Haste (level 3 spell, potion)
+1 Herald of Battle (Battle Cleric)
+5 Shield spell (1 round only)
Consider the difference between Studded Leather and Plate Armor for a high DEX character. Studded Leather +1 with 20 DEX at level 4 is 18 AC. Plate Armor is 18 AC. Plate Armor +1 is 19 AC. Dwarven Plate is 20 AC. Studded Leather +1 on your Fighter with 22 DEX after reading the tome is 19 AC. Heavy armor only has a marginal benefit over light armor with high DEX characters. The problem with heavy armor is it ruins all Stealth opportunities for your party. So you get +1 AC and you lose Advantage on your attacks. It's better to equip all your characters with Studded Leather +1 or Leather Armor +2. Equip your high DEX Sorcerer/Wizard with the Empress Garb Chain Shirt and Bracers of Defense.
A high level Fighter with Leather +2, Defensive Fighting, 22 DEX, Armor Master feat, Ring of Protection +1, Ring of the Lord Inquisitor +2, Shield +2, Hasted, and next to a Battle Cleric will have a 31 AC. If your Fighter has Improved Invisibility, an enemy will never hit them.
A low level Fighter with Studded Leather, 18 DEX, Defensive Fighting, Shield, and Shield of Faith will have a 21 AC. Few low level enemies will hit them if the Fighter is executing Dodge.
The point is heavy armor has more costs than benefits - especially late game. Light armor with high DEX is better - all things considered.
The first thing I do in the game is equip all my armor wearing characters with Studded Leather - for Stealth reasons. And sure, if I find Plate +1 in Caer Lem, I'll equip it on my Fighter for a while.
Damage
Consider the potential damage for a Ranger:
1d8 Longbow or 1d10 Heavy Crossbow
+5 20 DEX
+2 Bracers of Archery
+1-4 Favored Enemy (situational)
1d6 Hunter's Mark (level 1 Ranger spell)
1d8 Lightbringer Longbow or 1d10 Stormbow
1d6 Fire/Corrosive/Flash arrows or 3d6 Tiger Fang arrows
3d6 Tiger Fang poison on bow
+1 Herald of Battle (standing next to Battle Cleric)
By far, the best weapons in the game deal some type of additional damage. If a normal weapon deals 1d8 dmg then an additional 1d8 dmg is like dealing double damage with every hit.
Ranged (DEX):
Lightbringer Longbow +1 - 1-8 dmg + 1-8 radiant dmg (9 avg dmg, 16 max dmg) (Stardust)
Stormbow +1 - 1-8 dmg + 1-10 lightning dmg (10 avg dmg, 18 max dmg) (Cloud Diamond)
Two-handed (STR, Martial):
Lightbringer Greatsword +1 - 2-12 dmg +1-8 radiant dmg (11.5 avg dmg, 20 max dmg) (Stardust)
Stormblade Greataxe +1 - 1-12 dmg + 1-10 lightning dmg (12 avg dmg, 22 max dmg) (Cloud Diamond)
One-handed (STR, Martial):
Dragonblade - 1-8 dmg + 2-12 fire dmg (11.5 avg dmg, 20 max dmg) (Shard of Fire)
Frostburn Longsword +1 - 1-8 dmg + 1-8 cold dmg (9 avg dmg, 16 max dmg) (Crystal of Winter)
Bear's Claw +1 - 1-6 dmg + 1-8 piercing dmg (8 avg dmg, 14 max dmg) (Purple Amber)
Punisher Battleaxe +1 - 1-8 dmg + 2-12 piercing dmg (11.5 avg dmg, 20 max dmg) (Slavestone)
Mace of Smashing - 2-12 dmg (7 avg dmg, 12 max dmg) (double dmg against skeletons) (Heartstone)
One-handed (STR/DEX, Martial):
Black Viper +1 - 2-9 dmg + 3-13 necrotic dmg (13.5 avg dmg, 22 max dmg) (Spider Queen Venom)
Whiteburn +1 - 1-6 dmg + 1-6 acid dmg (7 avg dmg, 12 max dmg) (Blood of Solasta)
One-handed (STR/DEX, Simple):
Souldrinker +1 - 1-4 dmg + 2-8 psychic dmg (7.5 avg dmg, 12 max dmg) (Soul Gem)
The best weapon in the main campaign is Black Viper, a one-handed finesse weapon. That means a high DEX character with a shield will do the most damage per hit. Switch to the Mace of Smashing or Dragonblade against the undead.
I prefer my melee Fighter fight with a one-handed weapon and a shield - especially during the early game and late game. The best one-handed weapons, two-handed weapons, and dueling weapons all have comparable damage per hit. Yes, you can get an extra attack with Dual Wielding, extra damage with Dueling, or a follow-up strike with a two-handed weapon, but it comes at the cost of your Bonus Action and/or AC. Advantage is more significant for damage. A 19% crit chance is more significant for damage. At that point, I would rather have the shield bonus than the marginal damage bonus from the other fighting styles - especially against the toughest enemies. And the marginal damage is not significant when you consider total damage per round from your party. That said, to each their own. Consider the availability of the best weapons during the game.
At the beginning of the game, I start with Heavy Crossbows and Rapiers. For my Fighter, I'll also buy a Great Sword and swap it with their Heavy Crossbow when advantageous.
Also, go to the Tower of Knowledge when available and pick up the recipes for Corrosive arrows and bolts. Stock up on a bit of Acid at the magic shop every time you're in town.
All poison arrows and bolts have weak DC so I only save the ones where enemies save for half damage. All others I just use immediately.
A Great Sword is better if you can reroll 1's and 2's. A Great Axe is better for Half-Orc and Barbarian extra dice damage.
Make sure you use the Mace of Smashing on skeletons.
Skills And Crafting
Skills can be confusing. For example, any character can pick locks. You don't need to be a Rogue. You don't need to be proficient with Thieves' Tools. All you need is to have a set of Thieves' Tools in that character's inventory. Sure, a high DEX and proficiency helps, but the thing that helps the most is, once again, Advantage. Cast Enhance Ability-Cat's Grace (level 2 spell) on any high DEX character for the best chance of picking a lock. And if you still fail, you have three more characters that can try. Yeah, the Knock spell is pretty worthless.
All the crafting skills only require one kit/beads per party. And you don't necessarily need proficiency in said kit/beads. This is what you need:
Poison items - proficiency in Poisoner's Kit, Medicine, or Nature
Potions - proficiency in Herbalism Kit, Medicine, or Arcana
Scrolls - proficiency in Scroll Kit or Arcana
Items - proficiency in Manacalon Rosary or Arcana
Arrows/Bolts - proficiency in Smith Tools
All you need is proficiency in Medicine and Arcana to be able to craft everything except for arrows/bolts. For arrows/bolts, you need to be a Fighter/Ranger/Rogue or have the Wanderer background.
A Half-Elf Fighter/Ranger/Rogue can easily select Medicine and Arcana as bonus skills and craft everything.
Crafting can't fail. Crafting will only take longer with a low skill level. The Periapt of the Master Enchanter available at the magic shop will expedite the crafting process of magic items. However, it's also easy to just sit around a campfire and eat Goodberry pie until crafting is complete.
Your Sorcerer should master all the CHA skills and your Cleric should master all the WIS skills. Some character should have a decent INT and be proficient in History and Religion.
In my opinion, the most convenient skills for everyone are Stealth, Athletics, and Perception.
There should be at least one character with the Academic background in your party so it's easier and faster to get the best items from the Antiquarians.
Craft Corrosive Arrows until you reach The Cradle of Fire. Then start crafting Flash Arrows. Craft poison arrows that do half damage with a successful save.
All the magic item crafting recipes are available at the Manacalon Ruins once you clear the area. Most of the primed weapons and armor are available from the Arcaneum once you have Brotherhood influence.
In the Lost Valley DLC, the Forge provides tons of recipes upon completion of their quests. Also, pick up the Moonflower, Storm Heather, and Dwarven Primrose every time you're in the Verdant Valley. Buy Refined Oil in the Verdant Valley. Pick up Storm Heather and Manacalon Orchid every time you're in the Swamp. Craft as many Haste potions and Invisibility potions as possible over the course of the game. Occasionally buy a Lily of the Badlands to craft Potions of Superior Healing. Craft the Maul of the Destroyer as soon as possible. Expect to craft and wield crossbows instead of bows.
Factions
The Antiquarians have magic items and attribute tomes. The Arcaneum has primed weapons and armor. The Circle of Danantar has magic weapons and armor. The Tower of Knowledge has scroll, poison, and arrow/bolt recipes.
Influence needed to access items from the factions:
Sympathy 11, Alliance 31, Brotherhood 51, Living Legend 81
Depending on the faction, you can gain influence by progressing through the game, completing faction-related quests, and by giving faction-related items to the factions.
Personally, I raise Antiquarian influence to Brotherhood as soon as possible. You can do so at level 4 before heading to the Dark Tower. I buy the Bracers of Archery, Cloak of Elvenkind, Boots of Elvenkind, Cloak of Protection, Dust of Disappearance, Slippers of Spider Climbing, and the Boots of Striding and Springing.
After you complete the Fortress of the Shield and all subsequent side quests, you should have enough items to raise the Antiquarians to Living Legend and the Arcaneum to Brotherhood. From the Antiquarians I buy the Ring of Protection and start to buy the attribute tomes in the following order: CHA, DEX, WIS, STR, CON, INT. From the Arcaneum, I buy items to craft the Lightbringer Longbow, Stormbow, the good Leather armors, Black Viper, and any other primed weapon where I have the corresponding gem.
You can reach Brotherhood influence with the Circle of Danantar after the Lava Forest by only giving them faction specific items. I buy the Shield +2 and Leather +2.
In the Lost Valley DLC, you'll eventually have to choose between the Forge and The Rebellion. Try to complete as many quests from each faction as possible before having to make a decision.
Feats And Attributes Bonuses
In my opinion, the best feat in Solasta is Eager for Battle. It provides +1 DEX and Advantage on all Initiative Rolls. Acting first in combat is one of the most powerful variables in the game. All your characters should take this feat at level 4. Also, see the section on Attributes as to why I like DEX sooo much.
The second most powerful feat is Armor Master. A higher AC is always better for all characters. I recommend taking it for all classes that wear armor.
However, before you take Armor Master, your character should have 20's in both DEX and their primary class attribute. This is especially important for spellcasters whose spell DC is based on their primary attribute. It's much more fun when enemies fail their saving throw.
Besides Eager of Battle and Armor Master, I tend to increase ability scores by two. Most other feats don't do much. Creed of Misaye and Follow-up Strike are worth considering. Maybe Hauler if you're a pack rat. Most other feats are situational.
Bestiary
Bestiary knowledge levels:
level 1 - Name
level 2 - HP and AC, challenge rating
level 3 - Attributes and damage
level 4 - Vulnerabilities (receives double damage)
Increasing your knowledge level is based on your Survival skill. Your Cleric should have the highest Survival skill. Explore with Enhanced Ability-Owl's Wisdom (level 2 spell) to increase the knowledge level as fast as possible. I'll typically cast Owl's Wisdom just before I kill the last enemy - especially when fighting the undead and elementals - which are my Ranger's Favored Enemies - providing extra damage per hit based on the knowledge level.
When you first encounter a new enemy or if the enemy remains unknown, you can increase your knowledge to level 1 with a successful Survival check at the beginning of combat. Otherwise your knowledge level increases at the end of the battle after a successful Survival check for each type of enemy.
Random Encounters
Random encounters can be very dangerous. Game balance does not seem to a consideration with random encounters. I had to fight a Warlord, 2 Beserkers, and a Cult Fanatic at level 4. I had to fight a Crimson Spider and two Crimson Spiderlings at level 4. I got surprised by 2 Remorhazs and a Remorhaz Offspring at level 9. Needless to say, those battles were very nerve wracking considering I always play Ironman mode. That's when you pull out all the stops and consume every powerful consumable in your inventory and pray to the dice gods. Yeah, I survived all the battles - with a certain degree of satisfaction I might add - but I learned a few things from the experience.
Always carry Invisibility potions and Haste potions. Travel slowly between the Fortress of the Shield and the Lava Forest - patience is a virtue. The last thing you want is to be surprised by a gang of unfriendly Remorhazs. They don't negotiate. You can't buy them off with baubles. They just want to eat you.
However, most of the time random encounters are a good way to try out different strategies. You can almost always expect to be able to fully heal before another random encounter. Just take note as to how close you are to your destination. You don't want to enter a new map with a depleted party.
Level
Like most games, the hardest part of Solasta is the beginning when you have a bunch of weak, unequipped characters. Caer Lem and the Manacalon Ruins are the hardest maps in my opinion. Not only do you have weak characters, but the campfires are few and far between so you have to fight 2-4 battles before you can rest at a campfire. My advice is to take it slow. Use Stealth. Scout the battlefield. Position your characters so they can't be attacked easily. Position them where they can re-hide behind a corner or column. Injure the enemies before battle by dropping boulders, crates, and stalactites on them. Light the battlefield if necessary. Attack with Surprise. Attack with ranged weapons (Heavy Crossbows and high DEX) instead of spells if possible. Turn your high AC melee Fighter into a dodgy dodger with Dodge.
Make it to level 5 alive. Power doesn't grow linearly with level. There is a massive power spike at level 5. You get a proficiency bonus to attack, skills, saving throws, and spell DC. You get spells like Pass Without Trace (Ranger), Haste (Sorcerer/Battle Cleric), Fireball (Sorcerer/Battle Cleric), and Lightning Bolt (Sorcerer). You can blind 2x enemies with a Heightened Sorcerer spell. Your fighter-types get an extra attack per round - and with Haste your Fighter can attack 5 times the first round with the Frostburn Longsword. You have access to the Antiquaran Brotherhood items. In fact, you could probably complete the game with a properly equipped level 5 party.
You can be level 5 after the Manacalon Ruins with a few random encounters under your belt.
At level 7 you get Improved Invisibility. Your Hasted Fighter with Improved Invisibility will have Advantage on all attacks and enemies will have Disadvantage on all attacks. No enemy debuffs necessary. With both Haste and Improved Invisibility, your Fighter will rarely miss, can't be targeted with spells, can't be critically hit (0.25% chance), have Advantage on DEX saves (against AoE spells), and get +2 AC. If your other characters can effectively attack from Stealth then nothing will stop you. On top of that, you will have crafted some of the best weapons by then.
At level 9 you get Mind Twist. Very few enemies have bonuses to INT saves and your Sorcerer's Heightened 18 DC spell will almost guarantee a group of incapacitated enemies.
You should cast Pass Without Trace and Longstrider on all characters at the beginning of every map. A Hasted Sylvan Elf can sneak across 18 tiles and still attack. That's nice.
As a side note, a Legendary enemy will never fail a saving throw so don't try. It's better to focus fire on them quickly with Advantage.
Difficulty
Do what makes you happy. Do what's fun. There will always be people that look down their nose at you if you don't play the hardest difficulty or if you roll your attributes instead of point-buy them. However, it doesn't matter. Personally, I beat the game on Cataclysm difficulty on Ironman mode with point-buy characters. And I died on my first attempt. Caer Lem is a b!tch. That said, I created this guide with a group of sweetly rolled characters on Scavenger difficulty so I could do it quickly, try different strategies without fear of death, take screenshots, and write down my thoughts as I went along. And I had a lot of fun doing it.
The goal should be to have 80 hours of fun with both the main campaign and Lost Valley. And then maybe jump down, turn around, and do it again in style. Why not? What's better than a good tactical RPG? WHAT???
Okay, sex, drugs, and rock n roll are all pretty good too. And maybe good food, drink, and conversation with a view...
Money, travel, knowledge...
Still, I like a good RPG.
Party Composition
If there is one thing people are passionate about it's party composition. Everyone has their favorite classes and races. Some people maximize power. Some people like to roleplay. Some people like to handicap themselves and die endless times going for the brass ring. There are strong arguments for most Classes, Sub-Classes, and Races. I'm not here to tell you how to create the best party because there are many good, viable party combinations. Instead, I'll tell you what I chose and why I chose it.
In general, you want a melee Fighter/Paladin/Barbarian, a Cleric/Druid, and a Sorcerer/Wizard. The last character is dealer's choice. I think a ranged damage Ranger/Fighter/Rogue fits into the last slot nicely.
I played all humans on my first playthrough. Wow, +1 to every attribute??? I'll take it! I didn't realize something as simple as light played such a huge role in this game. Yup, I certainly handicapped myself. Hello Disadvantage. But I still beat the game. A party of humans is totally doable, just not optimal. You have to give up one your three precious Attunement slots for a Ring of Darkvision, memorize Darkvision for your other characters, and learn all cantrips and spells that provide light. That said, on my second playthrough on Cataclym difficulty, all my characters had Darkvision. Ain't no one got time to roleplay humans on Cataclysm difficulty!
Sample Party - Part 1
Here is my lil group of scavengers:
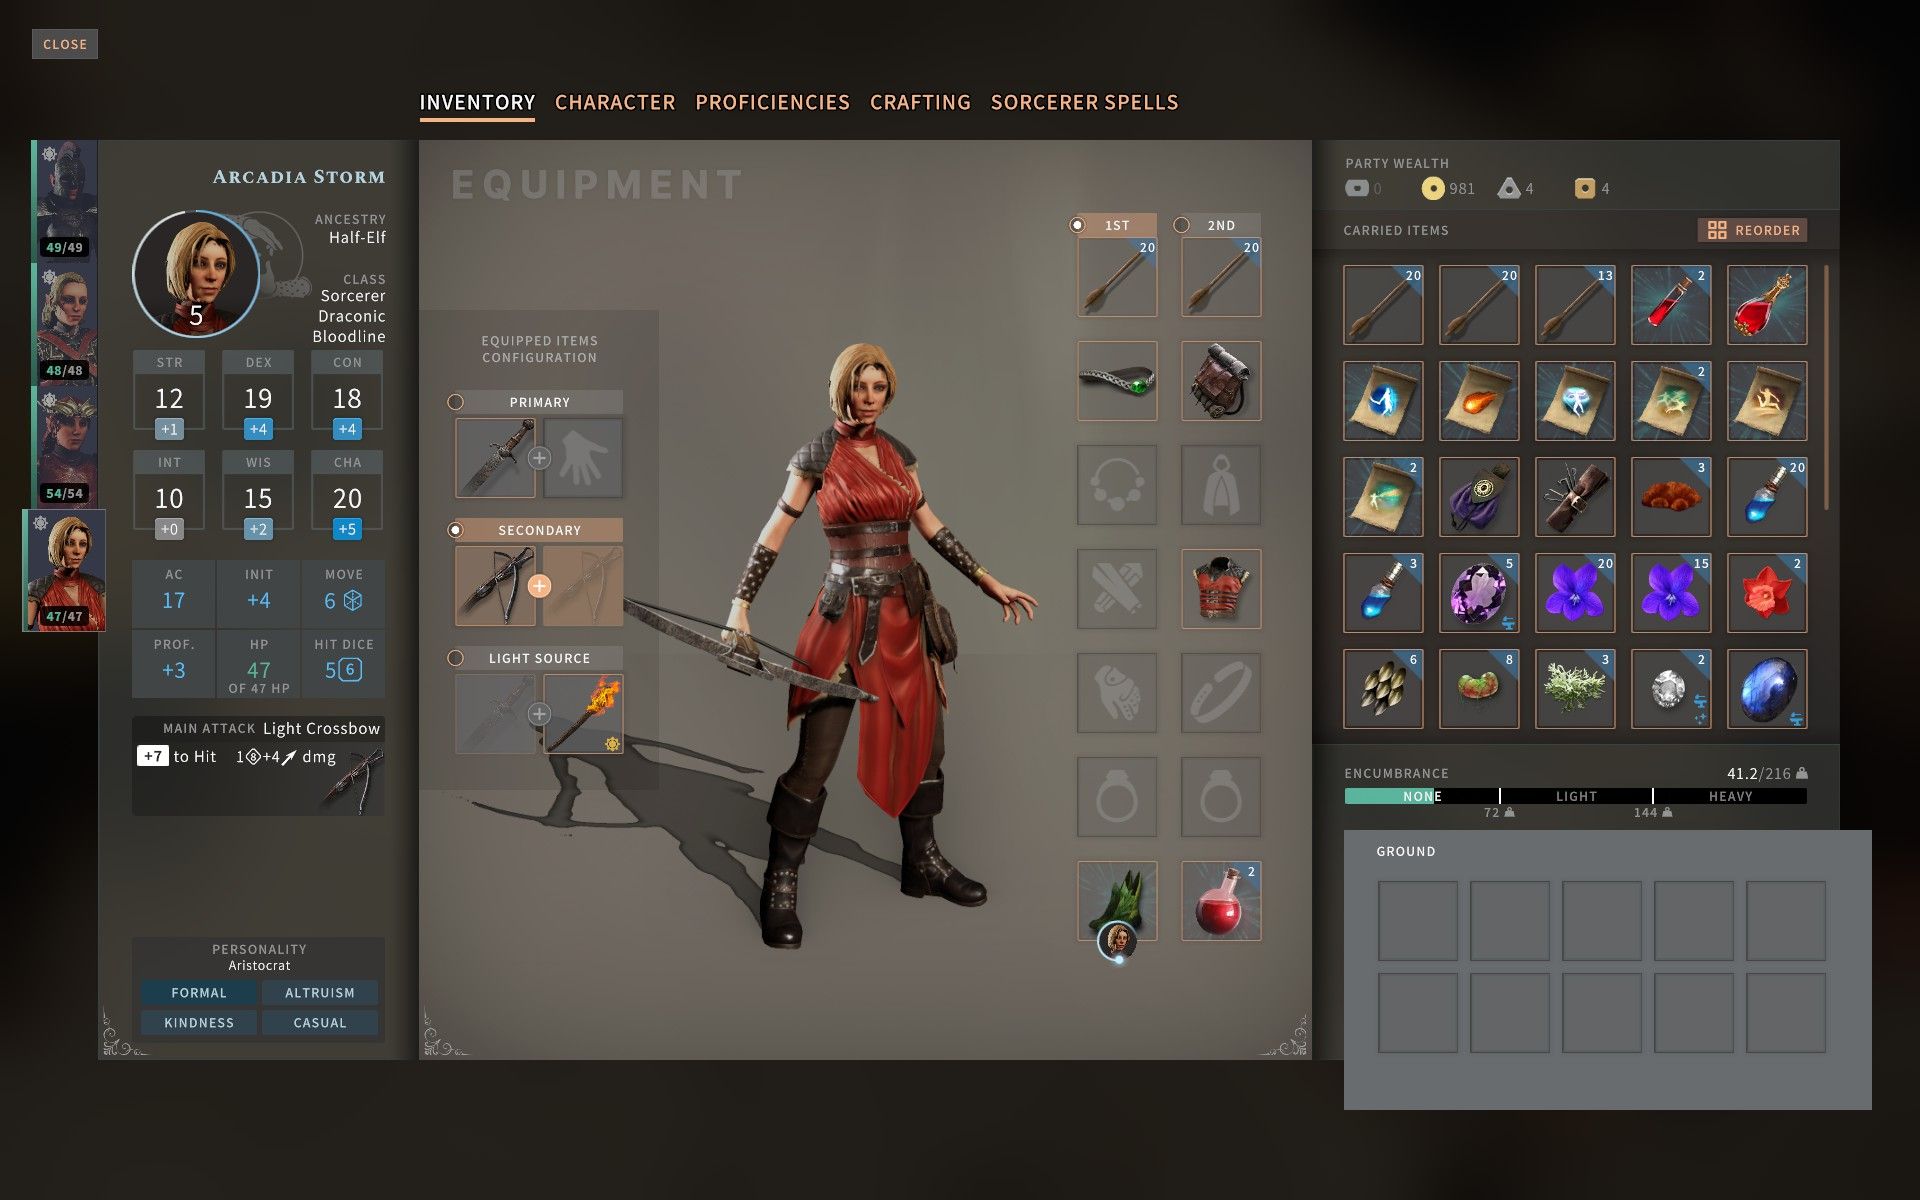
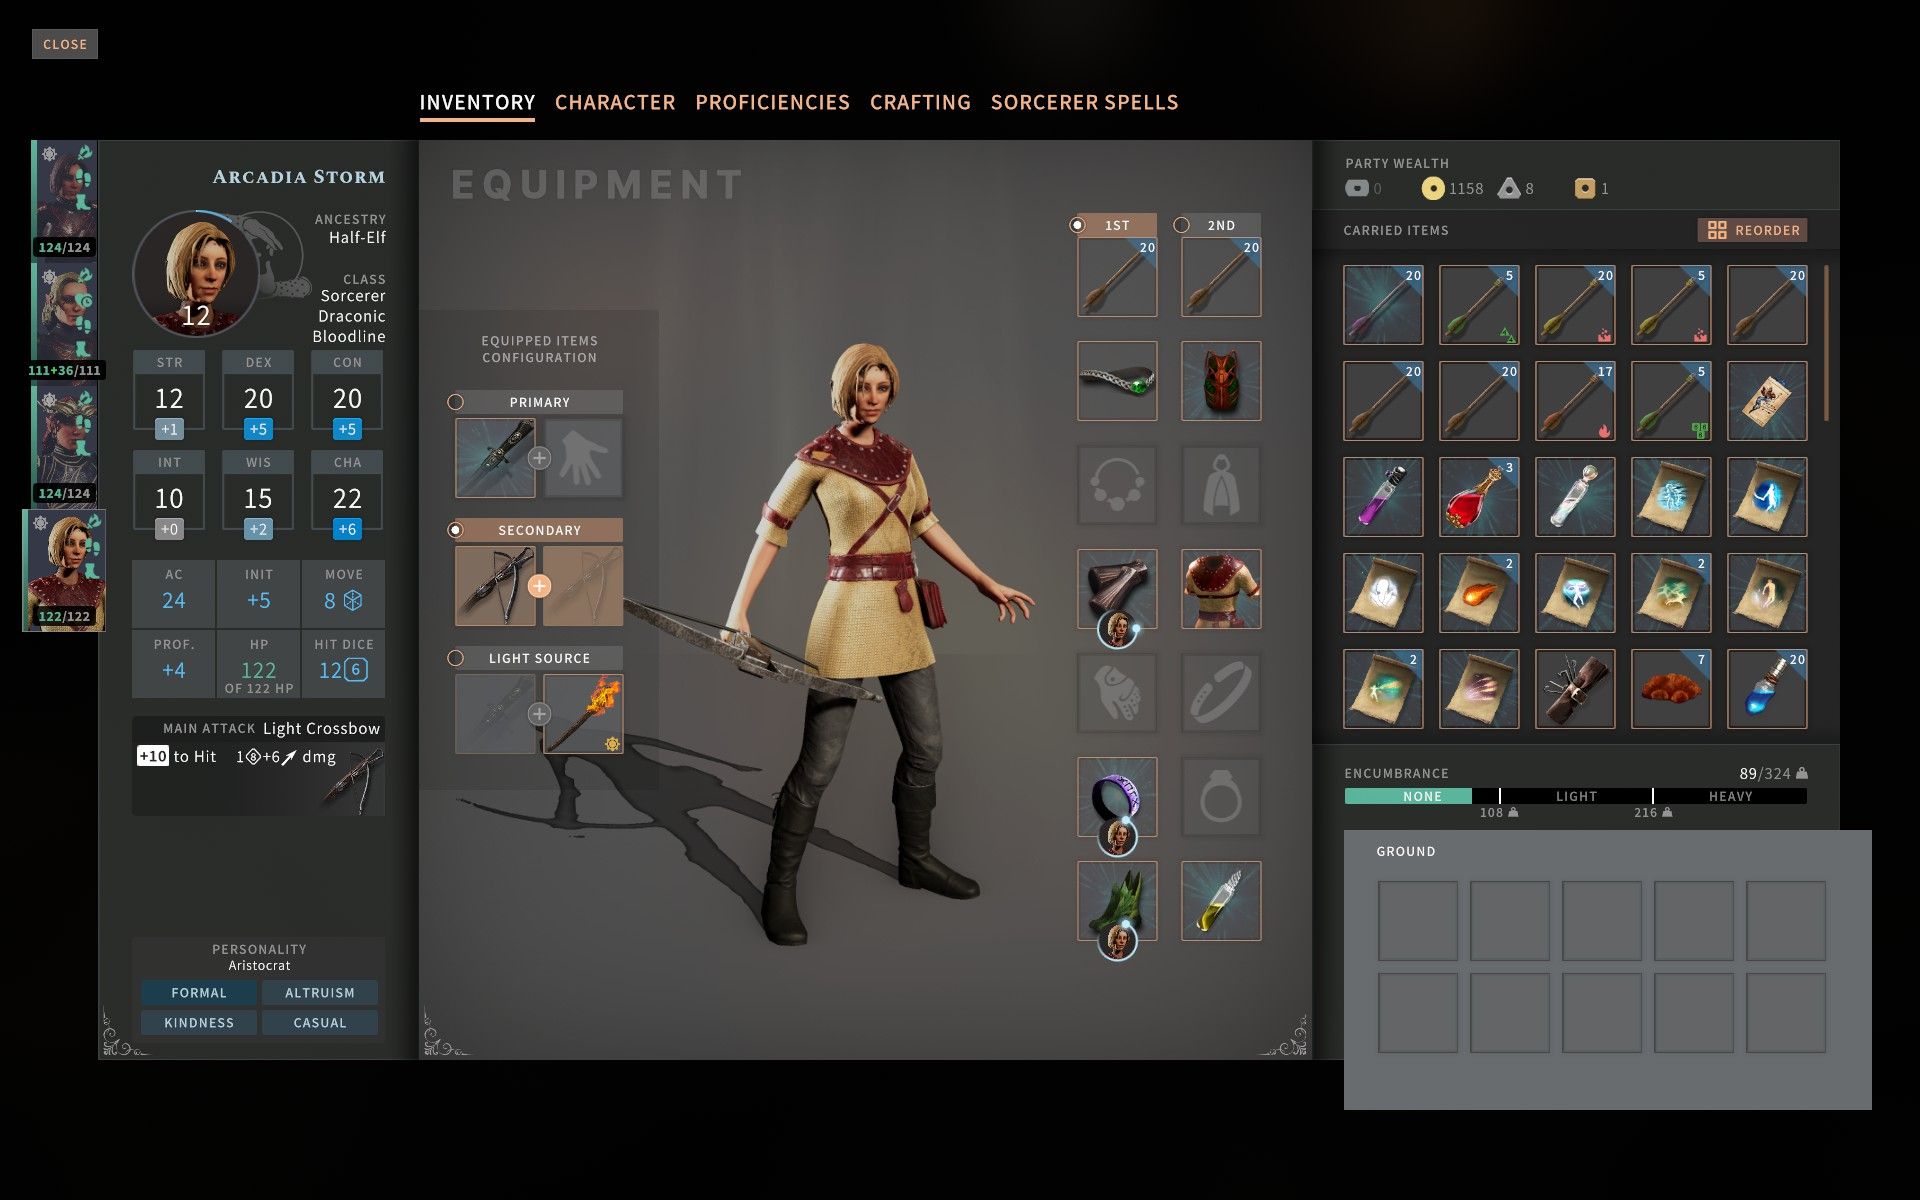
Arcadia - Sorcerer - Draconic (Fire) - Half-Elf - Aristocrat
For a Sorcerer, it's all about Metamagic. With Metamagic, it's all about Heighten. With Heighten, enemies save with Disadvantage. With Disadvantage, you can easily turn a 25% save chance into a 5% save chance. Why cast a spell if an enemy can successfully save against it.
In my opinion, the best Metamagic ability is Heighten. Empower, Twinned, and Distant are great too.
I chose Half-Elf because of the +2 CHA bonus and the two free skills. She started at level 1 with 20 CHA, 15 Spell Save DC, and +6 Stealth.
I chose Dragonic Bloodline for the great Origin spells and extra AC. Shield and Counterspell are quite useful. I chose Gold Dragon Ancestor so I could do more damage with Scorching Ray and Fireball.
I focused on all the CHA skills like Deception, Intimidation, and Persuasion. In addition, I chose Stealth, Arcana, and History.
For some reason in 5e, Sorcerers don't get Identify. I agree, it's a total pain in the ass. But I lived through the pain and realized it's not a big deal. Sure, you'll spend an extra 700 GP to identify items in the early game, but gold is fairly abundant and you can get a Wand of Identify from the travelling merchant, Goldentongue, as you make your way to Coparann
Feats:
level 4 - Eager for Battle
level 8 - Creed of Misaye
level 12 - +2 CON
Spells (ranked by value):
Level 1
Magic Missile - if you need the guaranteed hit for semi-low damage, this is your spell
Shield (Origin) - works very well against getting hit when combined with a high AC
Color Spray (early, early game) - good way to create Advantage for low level charactersLevel 2
Blindness - great way to give your characters Advantage and enemies Disadvantage for 10 rounds
Scorching Ray - great spell to cast Empowered at a higher level from Stealth
Invisibility - emergency spell to get characters out of harm's way
Misty Step (Origin) - rarely used bonus action spell that will move the caster up to 6 tiles away Level 3
Haste - one of the best spells in the game - an extra attack and +2 AC
Fireball - everyone's main AoE spell
Counterspell (Origin) - stops most enemy spellcasters from damaging your party
Fly - gotta get to every last chestLevel 4
Greater Invisibility (Origin) - one of the best spells in the game - Advantage to you and Disadvantage to them - for 10 rounds
Dimension Door - when you want to move through bars or walls or get an injured character to safety
Banishment - put that special enemy out of commission until you're readyLevel 5
Mind Twist - one of the best spells to buy your party that extra round to get the job done
Cone of Cold - high damage AoE spell
Hold Monster (Origin) - rarely used spell crowded out by better Concentration spellsLevel 6
Disintegrate - a Heightened Disintegrate will reliably do 70 HP dmg
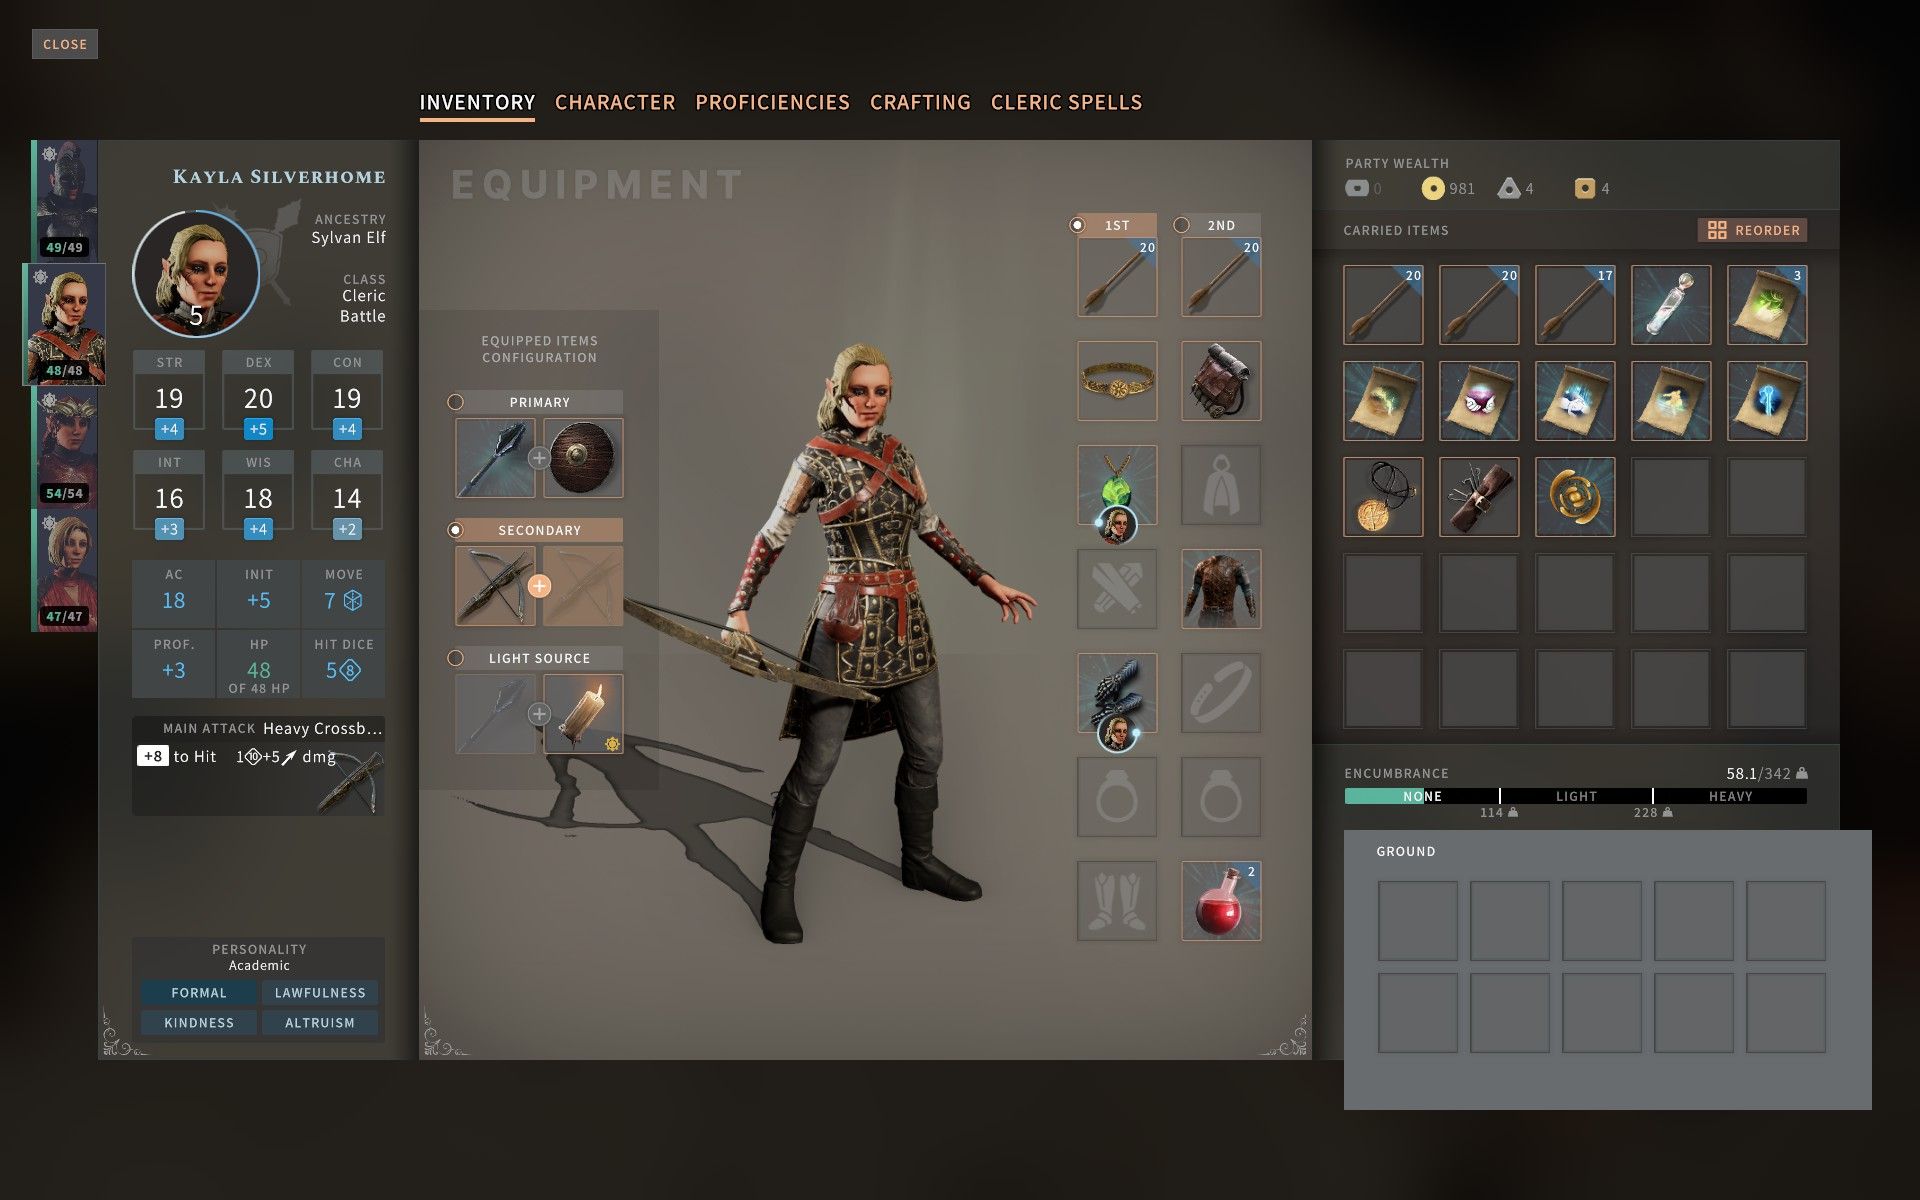
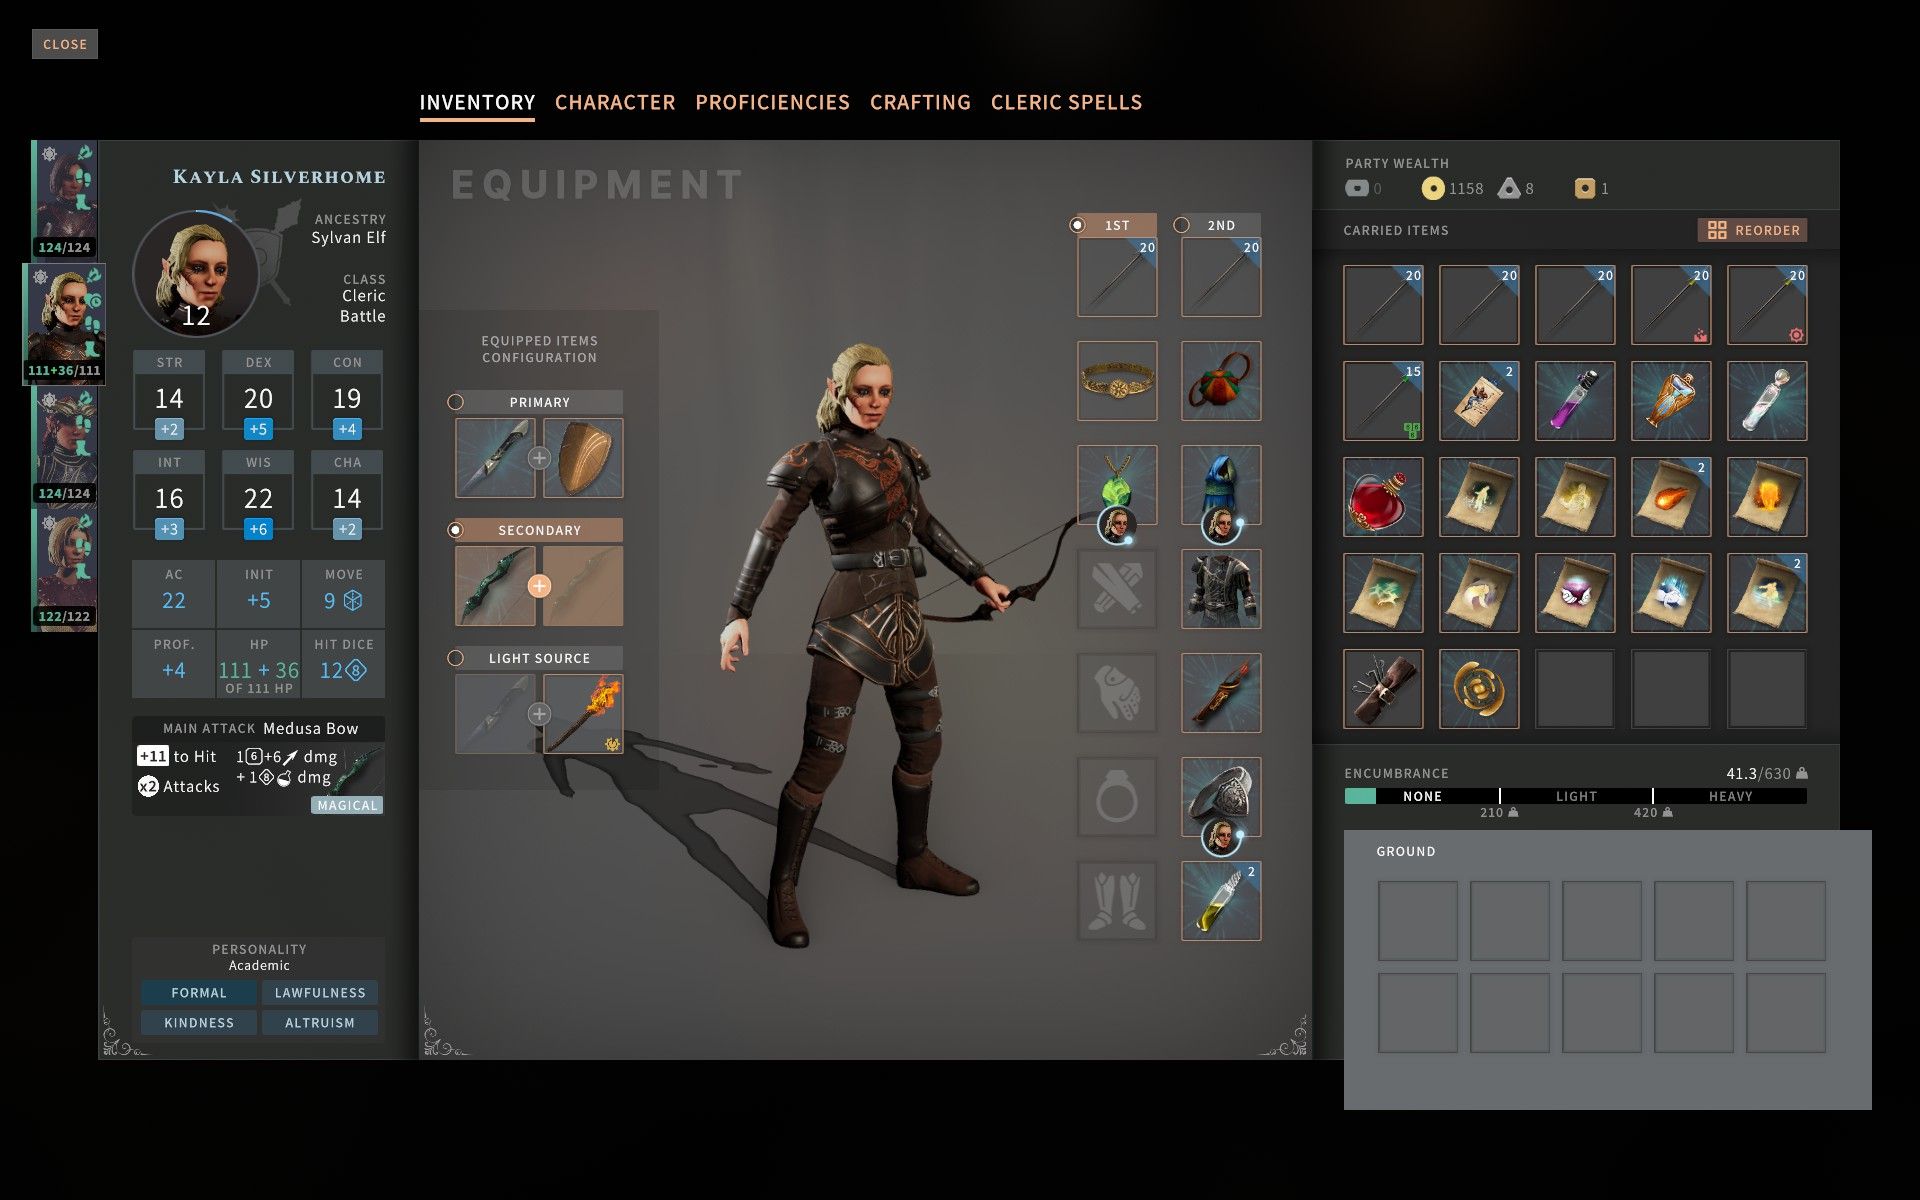
Kayla - Cleric - Battle - Sylvan Elf - Academic
Sometimes you just want to start a new game and not analyze every little detail. Well, it took me one playthrough to realize that Battle Clerics dominate all other types of Clerics. The list of reasons goes on and on. You can use Martial weapons, cast spells with a sword and shield, get Herald of Battle which gives bonuses to the Cleric and all adjacent characters, get bonus temporary hit points, attack twice per round, cast Haste and Fireball, and stun multiple enemies from range with Decisive Strike with 18 DC. Battle Clerics are the way to go. Accept no substitute.
I chose Sylvan Elf so I could start with 20 DEX. I also like the 7 movement - which becomes 9 with Longstrider - which becomes 18 with Haste.
Feats:
level 4 - Eager for Battle
level 8 - +2 WIS
level 12 - Armor Master
Spells (ranked by value):
Level 1
Shield of Faith - +2 AC for Dodge-happy Fighter - valuable for low level characters
Bless - your Halfling will never ever miss
Magic Missile - the go-to spell for guaranteed low-ish damage
Guiding Bolt - does good damage when cast at a higher level from Stealth
Inflict Wounds - great spell if you feel safe in melee combat at cast a higher level
Cure Wounds - great healing spell to cast at a higher level
Healing Word - emergency distant healing spell
Detect Magic - cast in town before you sell everything at Gorim'sLevel 2
Blindness - not a guaranteed success like a Sorcerer's Blindness, but still nice for backup
Spiritual Weapon - one of the few spells that doesn't require Concentration and does decent damage when coupled with Advantage
Enhance Ability - Advantage for WIS Survival checks and DEX lockpicking checks
Prayer of Healing - a good after-battle healing spell
Acid Arrow (Domain) - rarely used spell crowded out by better spells
Flaming Sphere (Domain) - never used spell because it requires ConcentrationLevel 3
Haste (Domain) - it's sooo powerful for a Cleric to Haste a second character or Haste your Fighter so your Sorcerer and cast Improved Invisibility on them
Fireball (Domain) - the only thing better than one Fireball per round is two Fireballs per round
Daylight - for Soraks and vampire-types
Level 4
Banishment - rarely used spell to remove an enemy from combat
Phantasmal Killer (Domain) - another rarely used Concentration spell
Stoneskin (Domain) - a never used Concentration spell that requires lots of GP in 5eLevel 5
Insect Plague (Domain) - a great Concentration spell to cast on a group of enemies if you have Surprise
Flame Strike - a great AoE Cleric damage spell
Mass Cure - emergency spell good for after your party suffers AoE damage
Greater Restoration - a never used emergency spell to remove most debuffs
Hold Monster (Domain) - a rarely used Concentration spell on hold one enemyLevel 6
Blade Barrier - a good Concentration spell with good damage
Heal - emergency spell that will get your Fighter back to full health after a couple critical hits
Sample Party - Part 2
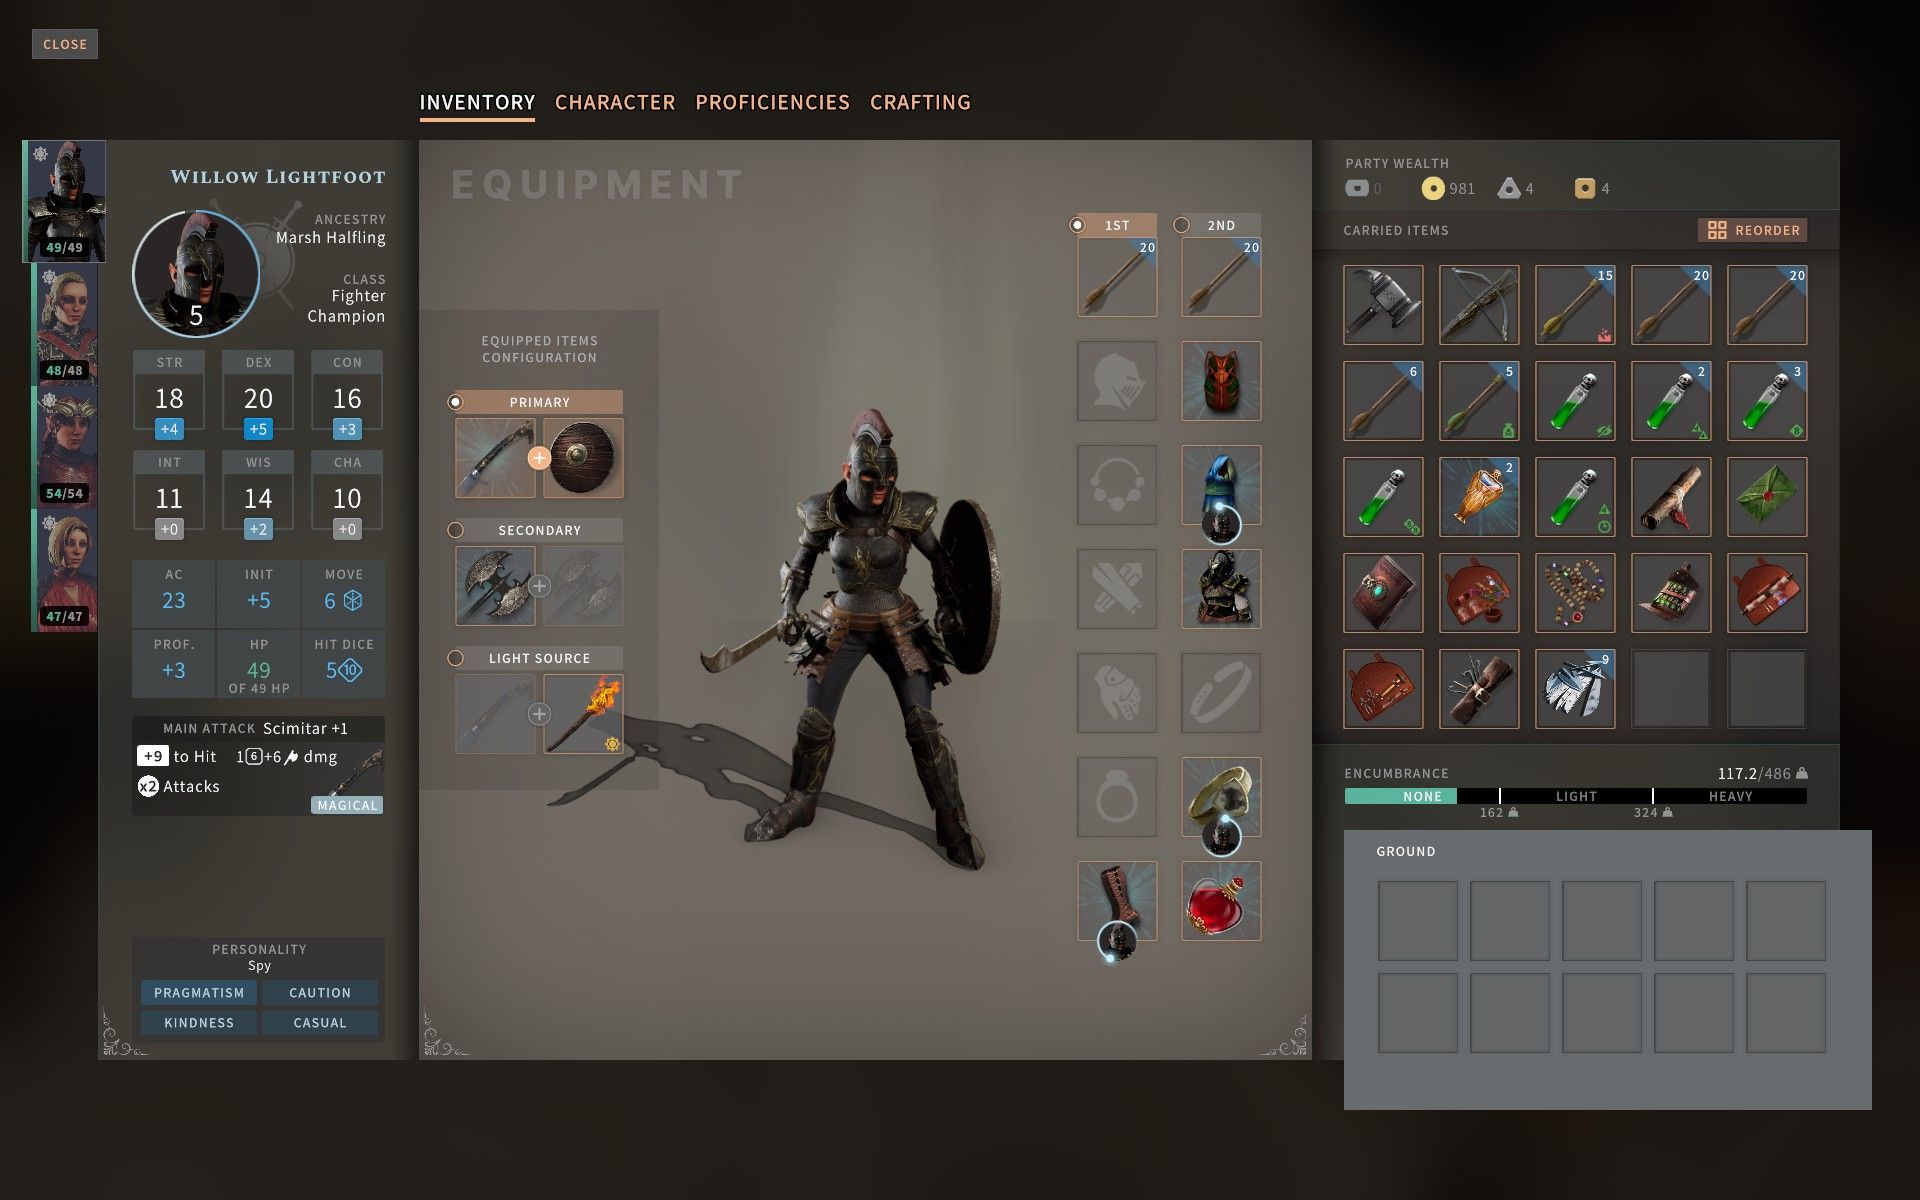
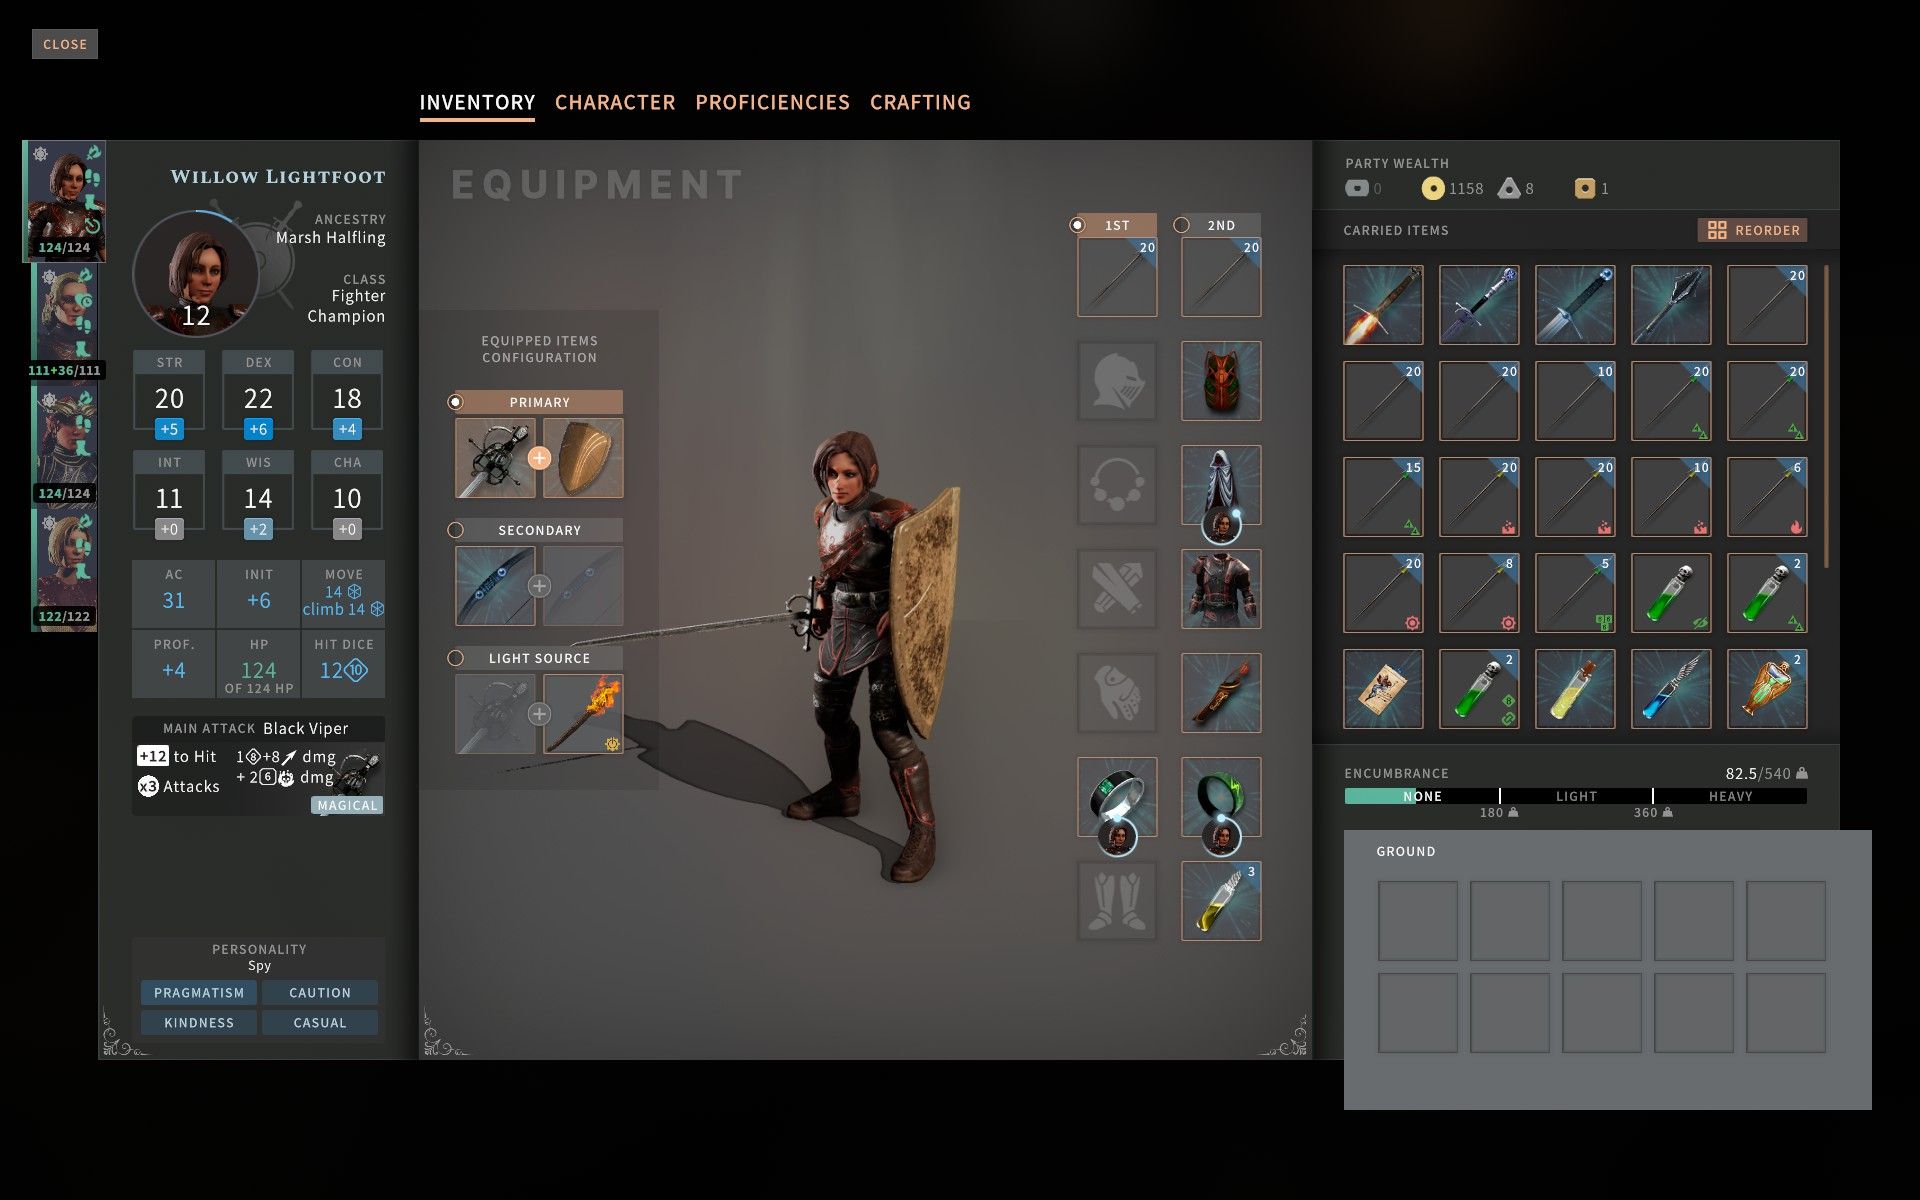
Willow - Fighter - Champion - Defensive Fighting - Marsh Halfling - Spy
I chose a Fighter because they are so versatile. They can burst a ton of damage with 7 attacks after every short rest with Second Wind and Haste. With Advantage, they have a 19% critical hit chance which equates to 20% extra damage that works great with stacking damage like applied poison and Flash arrows. They get an extra Feat/Ability boost at level 6. They can take Archery Fighting Style at level 10.
I chose a Halfling because they're Lucky. Almost all normal critical misses turn into hits thus giving them the highest hit chance thus giving them the highest weighted damage per swing. They can also move through almost all swarming enemies giving your spellcasters the perfect cluster of enemies for a Fireball. Plus, Halflings get +2 DEX so you can start with 19-20 DEX.
I prefer to equip my Fighter with Studded Leather or magic Leather armor instead of Plate so they can use Stealth with the rest of the party. There are plenty of other ways to increase AC. I prefer to use a one-handed weapon and a shield because the damage output remains relatively the same when you consider total party damage per round while your Fighter benefits immensely from +3-4 AC.
Feats:
level 4 - Eager for Battle
level 6 - +2 STR
level 8 - Armor Master
level 12 - +2 CON
Plan to Dodge at lower levels - especially on the highest difficulty. Plan to have your Fighter and Ranger both with Haste at level 5. Plan to have your Fighter have both Haste and Improved Invisibility starting at level 7. Plan to have your Halfling Fighter hit seven times in row with 1-2 critical hits thrown in for good measure starting at level 11. You know the cutscene that shows your critical miss with agonizing detail? Well, you can kiss that goodbye with your Halfling.
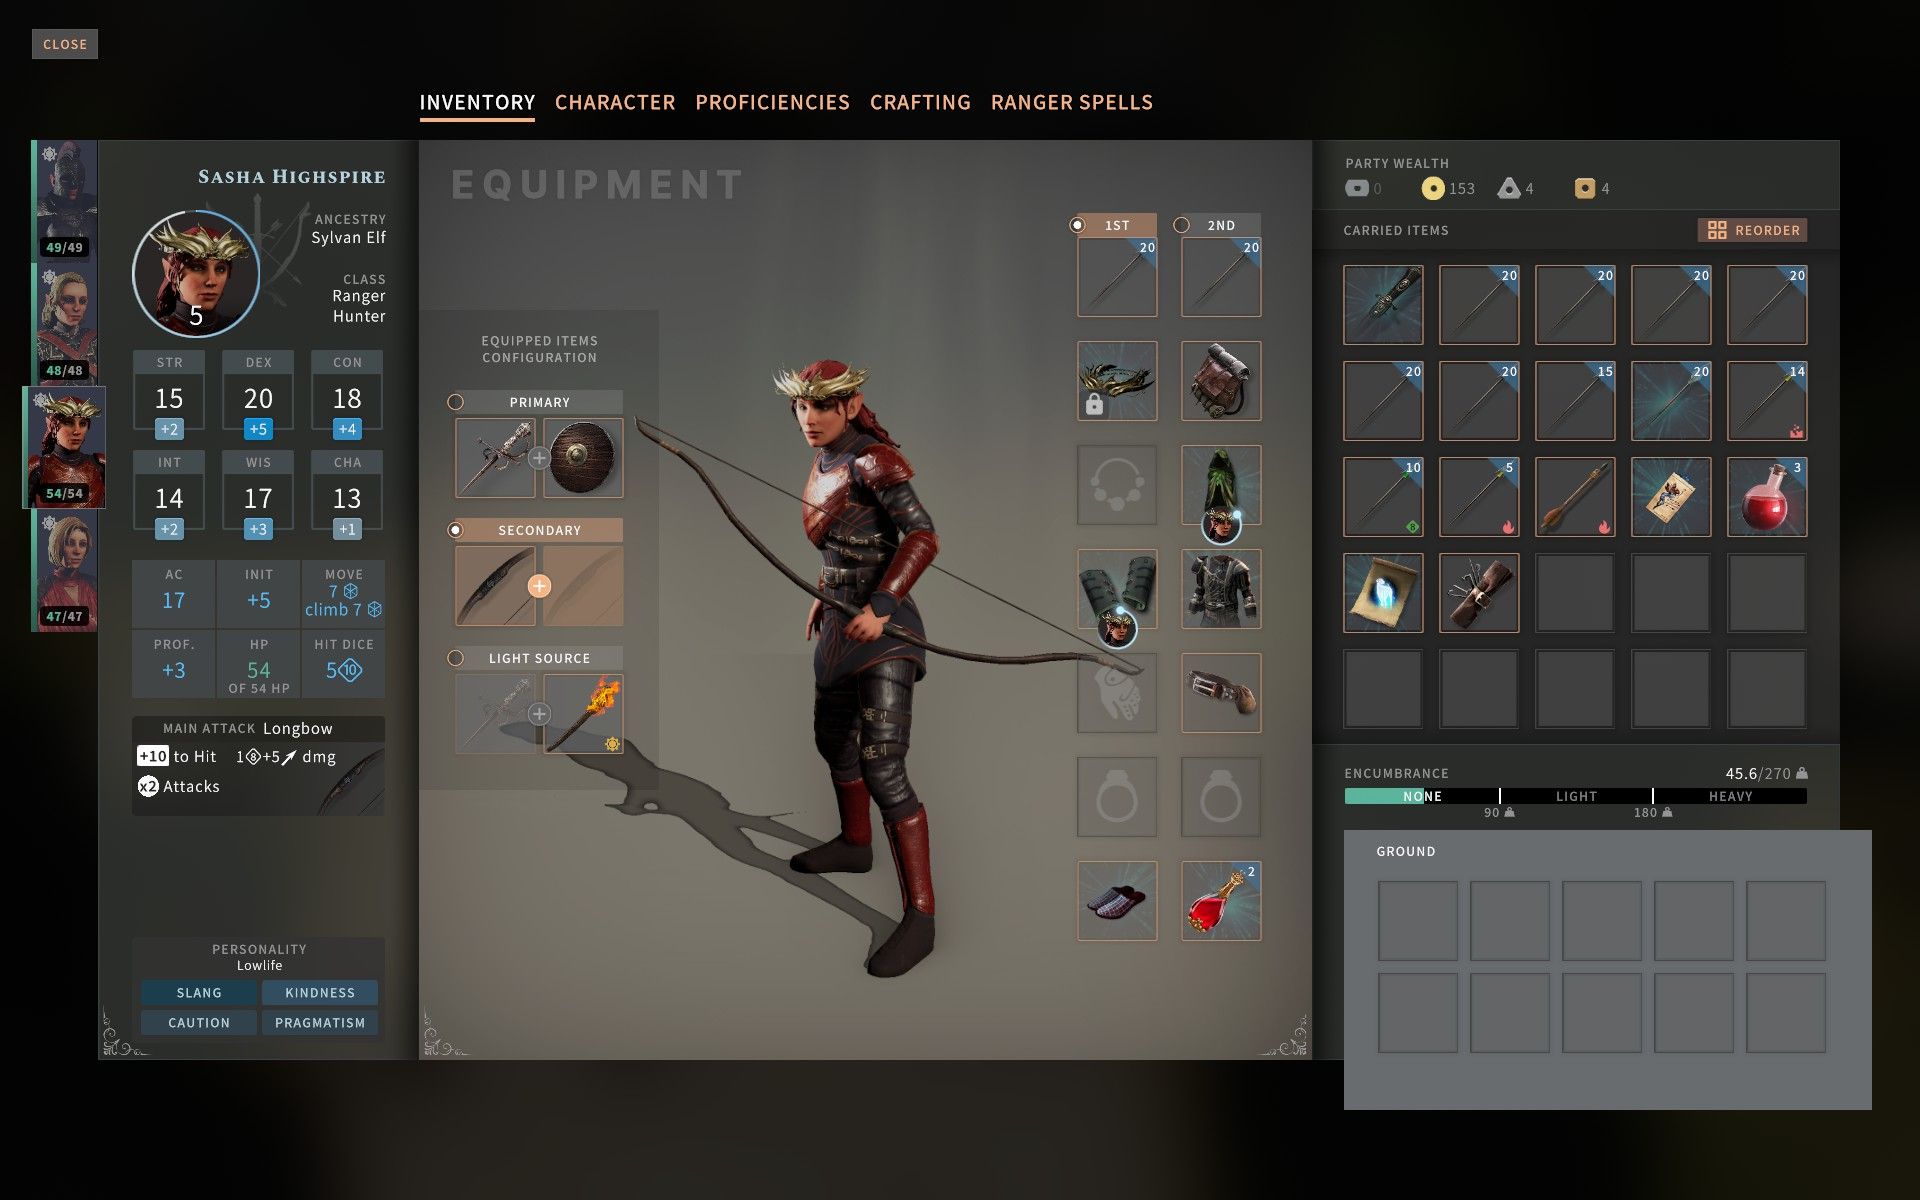
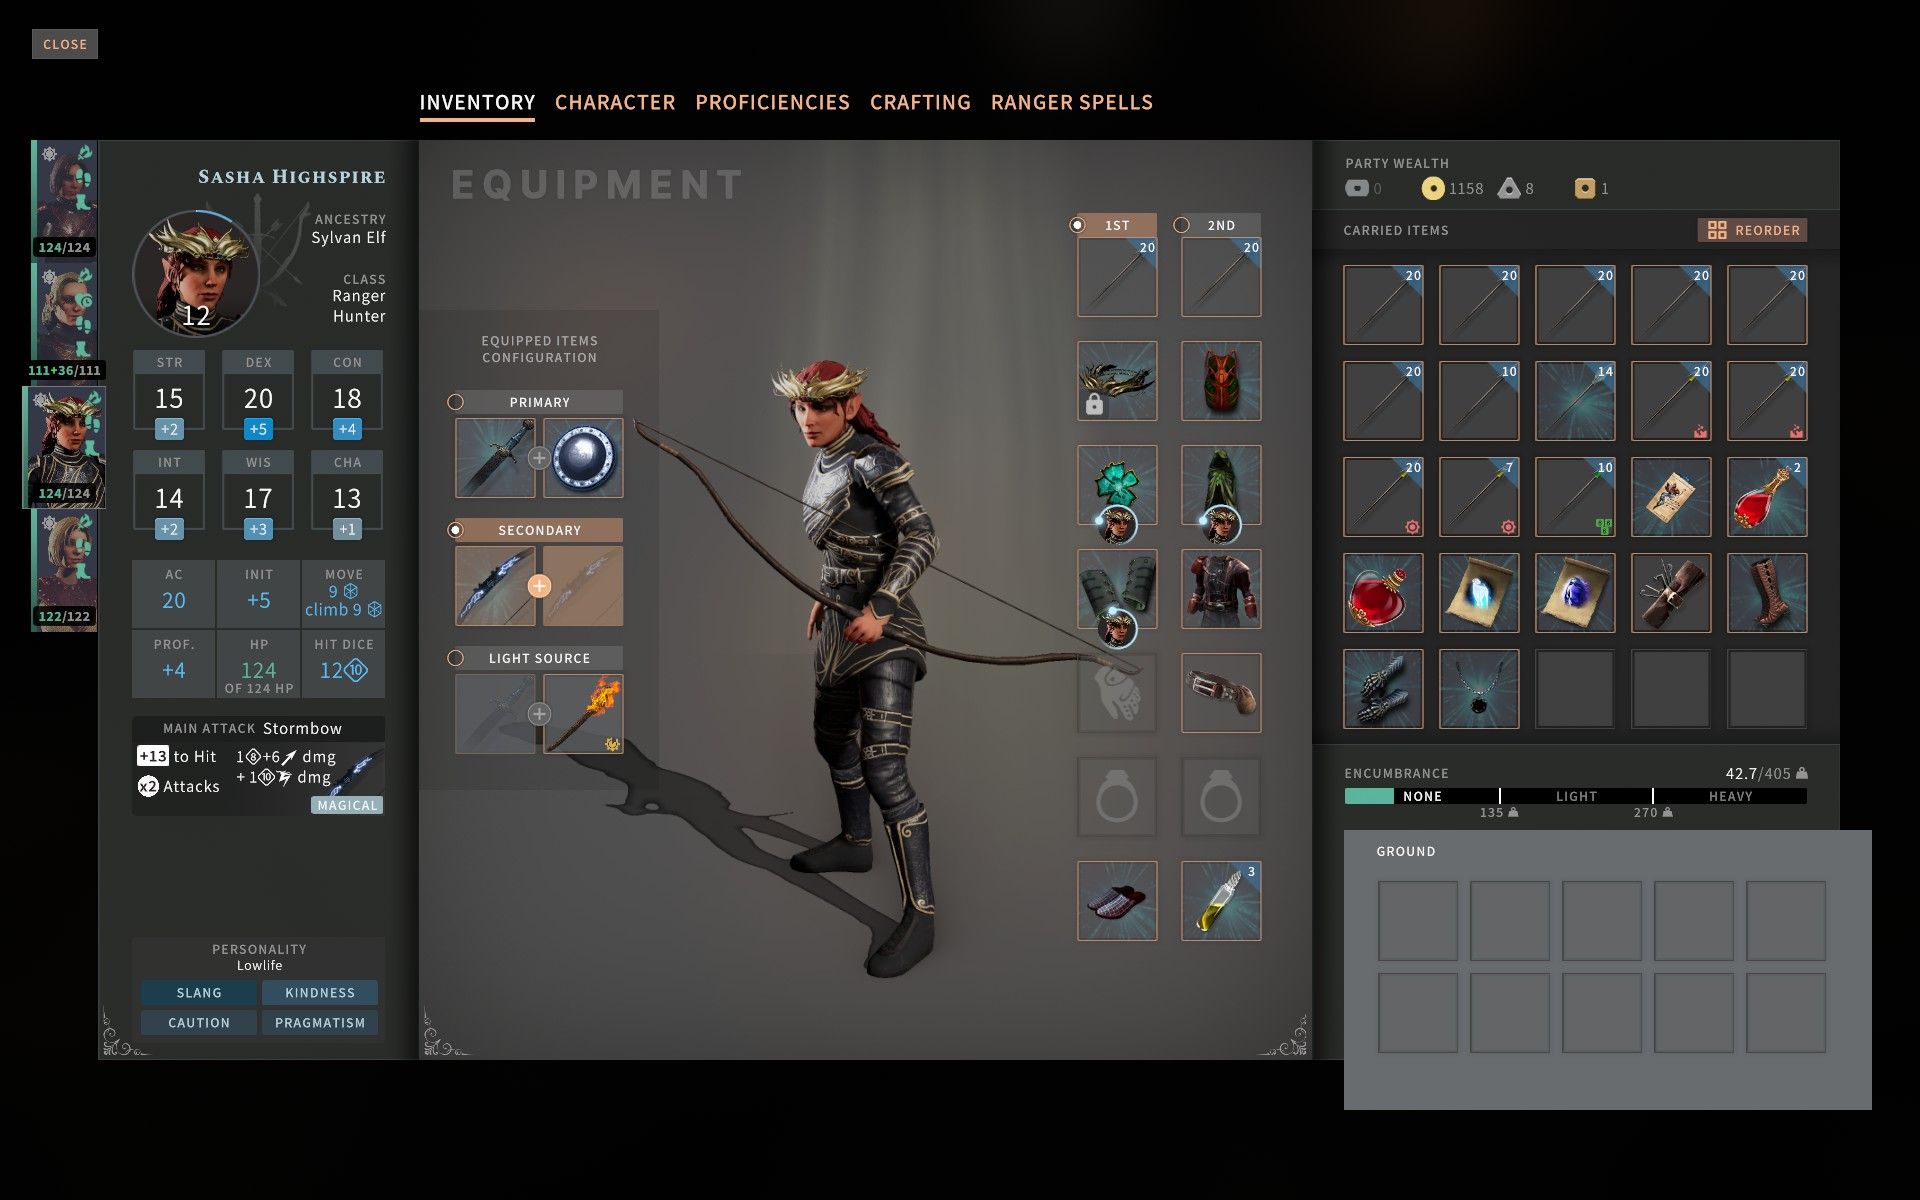
Sasha - Ranger - Hunter - Lowlife
I chose a Ranger because I wanted a character that can hit hard from a distance at low levels with high probability. Yeah, the Ranger is not the strongest at level 12, but by then it doesn't matter. It matters most early game and mid-game. At level 2, your Ranger hits basically for double damage with Hunter's Mark. At level 3, you get an extra shot if you can kill an enemy with Hunter Horde Breaker - and you always leave that death's door enemy for your Ranger. With Favored Enemy, you can do an extra 1-4 dmg against the ubiquitous undead and elementals. With Bracers of Archery, you get another +2 dmg. Then you can apply poison to your bow and use extra damage arrows. With Haste, you can reliably do all this extra damage at level 5 with 4 attacks and +11 Attack bonus. And in an emergency, they can tank with a sword, shield, and Dodge for a round or two.
I chose a Sylvan Elf for the +2 DEX and 7 movement.
See the Damage section for a breakdown on all the wonderful ways a Ranger can deal death from afar.
Then you can cast Goodberry at level 2 which negates the need for rations. You can cast Pass Without Trace at level 5 which is the game-changer spell for successful Stealth. Then you can cast Longstrider on all your characters later in the game at the start of each map. Yes, it's nice to have all your characters being able to move anywhere on battlefield - especially when coupled with Haste.
At level 7, Escape the Horde gives Disadvantage to attacks of opportunity and allows your Ranger to reliably move and attack.
As for Favored Enemy, picking the Undead is a no-brainer. Beyond that, it's a judgement call. I picked Elementals because there are a significant number of them in the game. However, Beasts is a good choice too because there are lots of them early game and that's when the extra damage matters most. Monstrosities is another decent choice.
Feats:
level 4 - Eager for Battle
level 8 - Armor Master
level 12 - +2 CON (No, not Uncanny Accuracy. You'll hit everything anyway.)
Spells (ranked by value):
Level 1
Hunter's Mark - the spell that you will cast over and over and over giving them 1d6 extra damage
Longstrider - gives your party that appreciated extra movement per round - potentially for the entire map
Goodberry - convenient spell that allows you to dump rations and craft anything on the spot
Cure Wounds - emergency healing spellLevel 2
Pass Without Trace - one of the best spells in the game what will almost guarantee Stealth success with the Cloak or Boots of ElvenkindLevel 3
Conjure Animal - rarely used spell to put some meat shields between you and the enemies
Wind Wall - rarely used spell with minimal value
Honestly, the best thing about level 3 Ranger spells is you can cast elevated Longstrider on 3 characters.
Sample Party - Late Game
Here are the same characters late game so you can see their equipment, attributes, stats, and backup weapons and consumables:
Arcadia - Sorcerer - Draconic (Fire) - Half-Elf - Aristocrat
Kayla - Cleric - Battle - Sylvan Elf - Academic
Willow - Fighter - Champion - Defensive Fighting - Marsh Halfling - Spy
Sasha - Ranger - Hunter - Lowlife
Misc
R-click and read all discovered books, scrolls, and notes. Sometimes they increase bestiary knowledge. Sometimes they give important clues.
Sell everything at Gorim's in Caer Cyflen. She pays the most and you can buy something back if necessary.
Stop Concentration spells at any time by clicking the upper right corner of your character's portrait.
Enemies seem to concentrate on clerics. Keep even your Battle Cleric off the front line.
Focus on spellcasters first, then weak enemies, then enemies higher in the initiative rank.
A Rogue is not necessary in Solasta.
Towards the end of a battle have your Cleric cast Owl's Wisdom to increase your Bestiary knowledge level.
ABC. Always be cautious. Move around in Stealth with a ranged weapon and switch to a melee weapon and shield at the end of your turn if necessary.
Don't try to make Legendary enemies fail a saving throw.
Carry a bludgeoning weapon for skeletons.
Buy Haste potions and Invisibility potions throughout the game if you have extra gold. When you need them, you really need them.
Hold down spacebar when you move and attack in battle to speed up the animations.
Always select the portrait instead of the character when applying spells so you don't accidentally mis-click.
Conclusion
I enjoyed making this guide. I've been asked multiple times to make guides and I finally made one. I hope I helped you in some way. That was my goal.
Source: https://steamcommunity.com/sharedfiles/filedetails/?id=2856634260
More SOLASTA Crown of the Magister guilds
- All Guilds
- (Un)finished Business Mod and Campaign(s)
- ( - )
- Vel Ode to Yendor Map [Spoilers]
- Crafting Guide (Video)
- WORLD OF ALAS - History of the Realm of Rongwen
- Thief is Over Powered
- Solasta 2023 Run Campaign
- In Depth Dive for achievements
- Vel's Getting Unstuck Guide - Cheating with the DM
- Solasta Palace of Ice Walkthrough Guide