Your World And You
Starting OutThe Map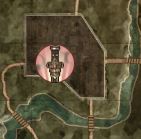
 Regions:
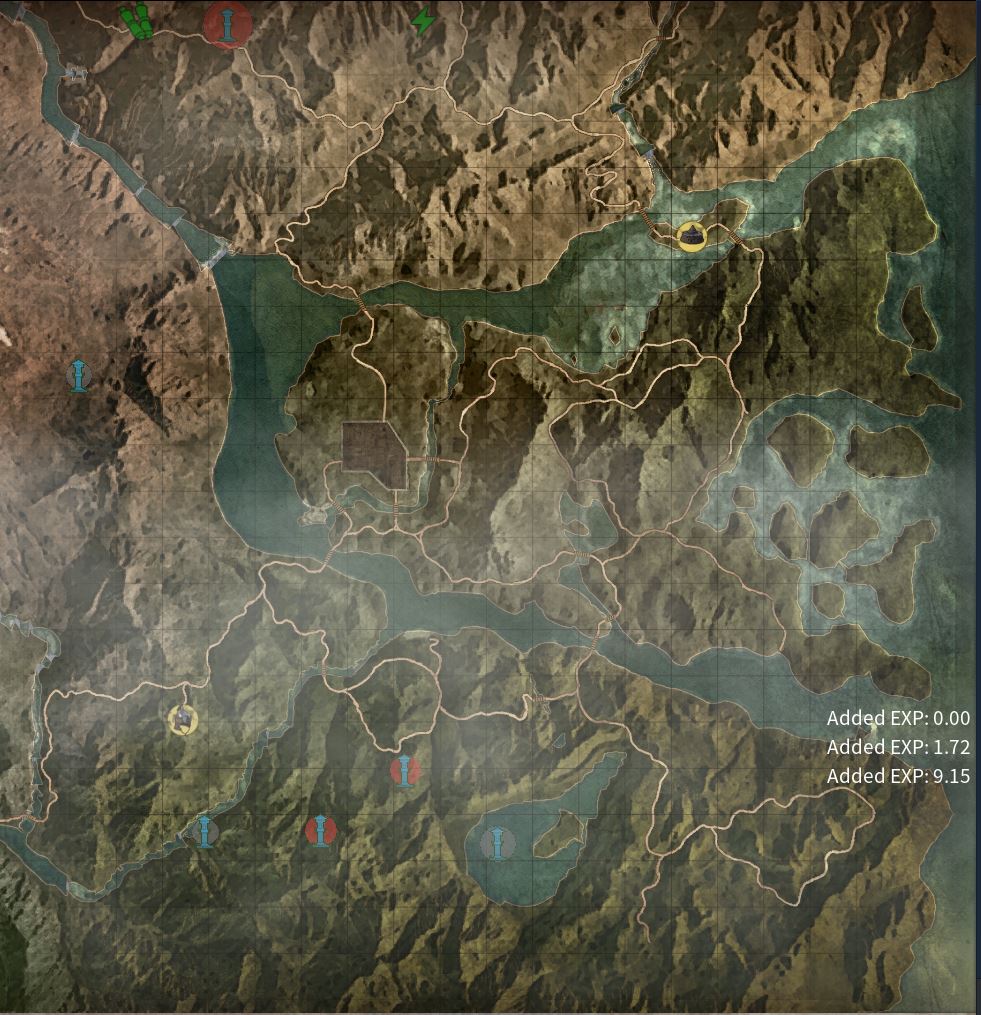
When you first create your character, you'll have your standard RPGesque ability to do some light customization, the tattoos in this game are amazing by the way and offer a nice variety. When you start off your character will be forced to be in a PvE server(county), this is to make sure players can get a feel for the game and their foothold in the world before they decide to make the switch, more on that later. Once you've decided on customization, its time to pick a server. To see how many people are in a server you can hover over the little diamond next to the county name, due to the game being pulled off steam because of a lawsuit some server pops are pretty low right now, but join whatever suits your play style.
Just a warning, this game is made by primarily Mandarin speaking people, and it looks like they just threw the dialog boxes into Google Translate and called it a day. Some things are very poorly translated. I've heard from friends that the non-English translations are even worse.
You will spawn naked, at the point of your choosing. If you're learning the game/unfamiliar with survival builder RPGs, I suggest doing the main quests at the top right corner of your screen. They will give you some fairly easy starter exp, some coin, and teach you the absolute basics.
If you're trying to bum-rush PvP, do those quests as quickly as possible, while making your way to the river bandit neutral camp in the middle of the east side of the map on a small island connected by two bridges, or the rebel neutral camp located to the north on a road, above a lake with a large island in it. I'll give more of a leveling guide in a lower section.
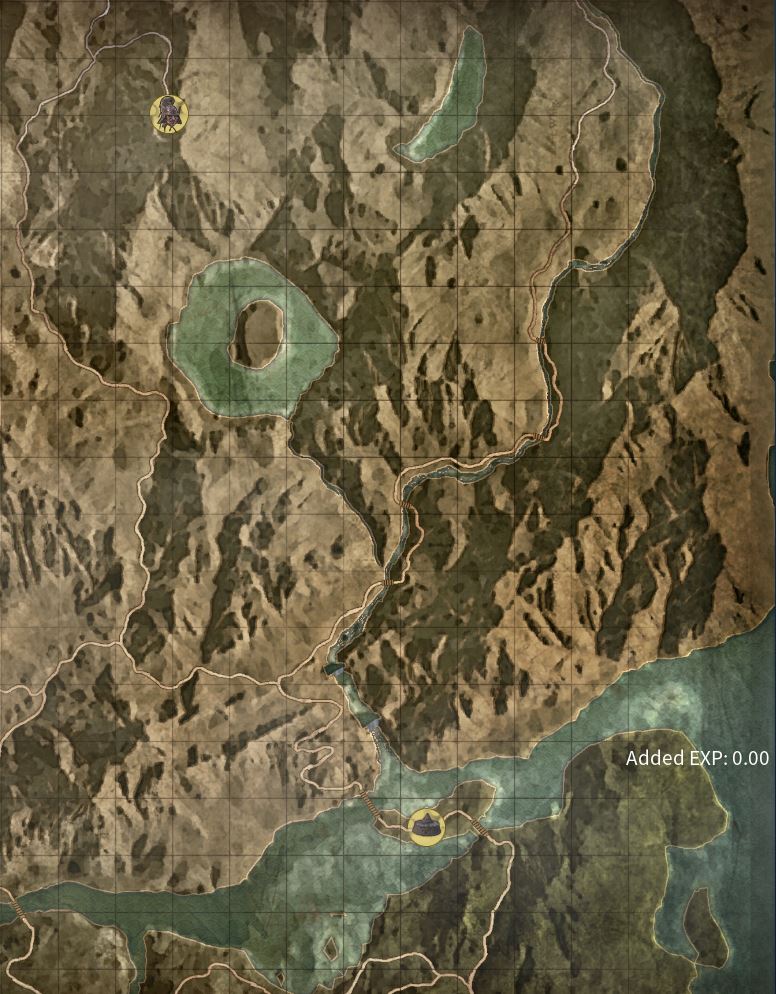
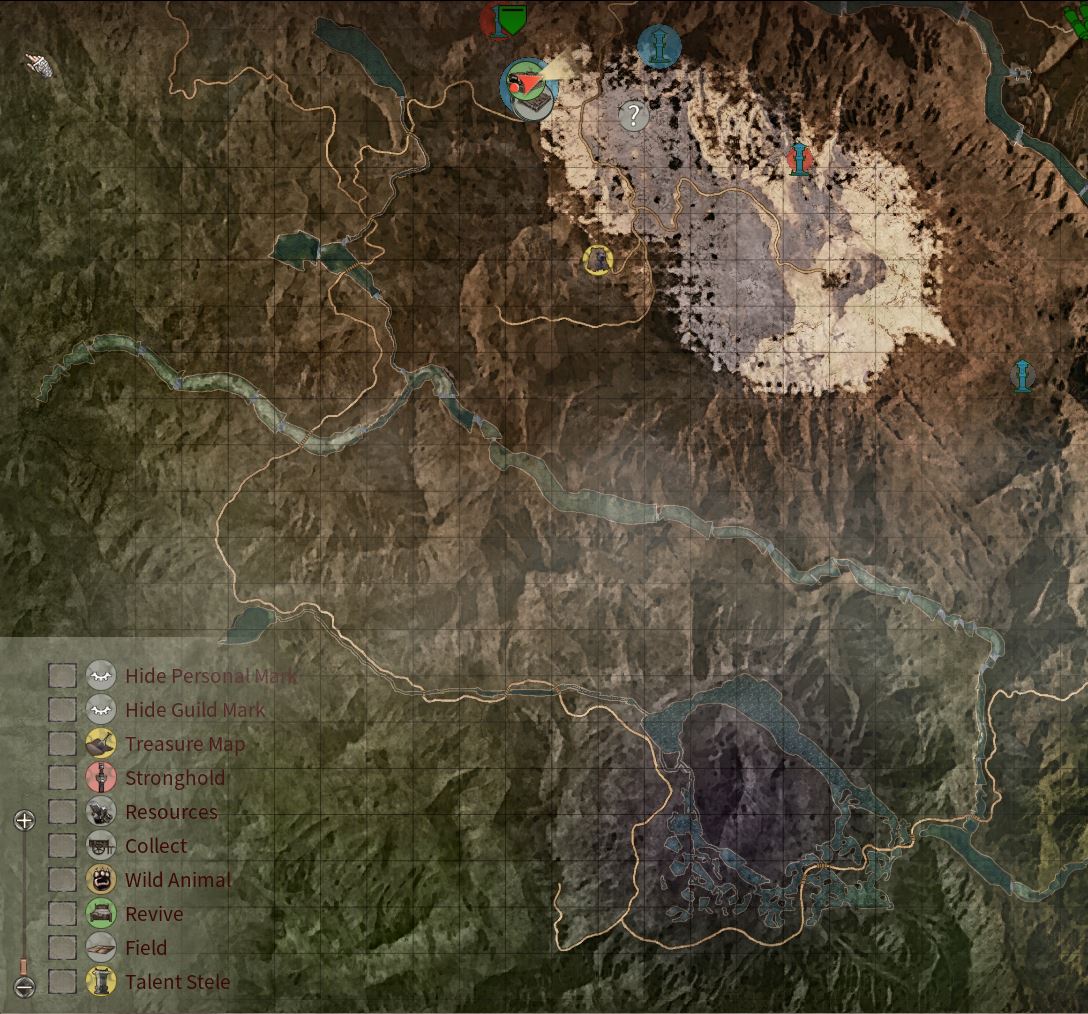
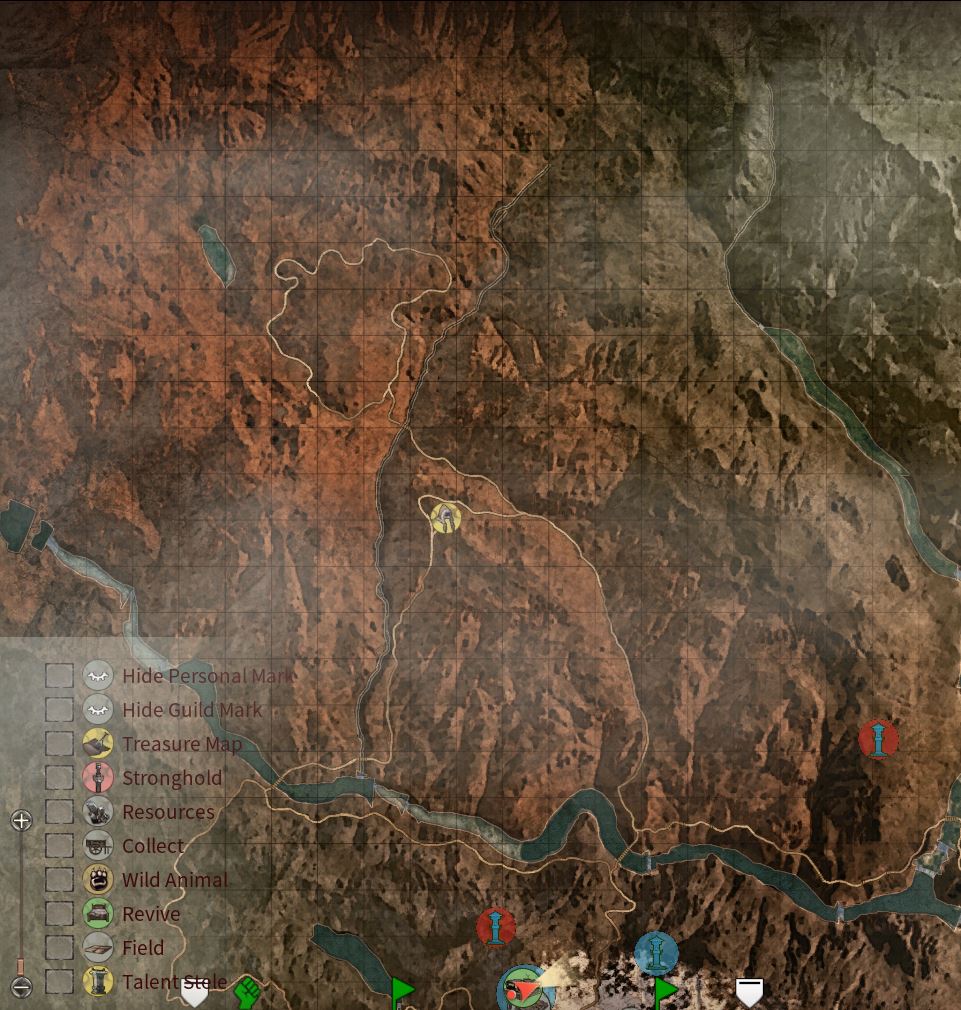
AS OF RIGHT NOW THE MAP WILL ALWAYS BE THE SAME
The map of Myth is divided into four separate regions, identified by the quadrant they're located in. Each quadrant has different resources, mobs, strongholds, and loot to gather along the way, some even have dangerous environmental factors that make traversing the region especially difficult if you're not prepared. The rule in myth is the further west you go, the stronger the mobs, and more plenty the resources, generally speaking.
The notable structures in the map are the Magistrate, a giant building on the eastern side of the map, and the various neutral camps that exist littered throughout on the roads.
Whoever controls the magistrate can run copper and iron ingots to the fortress to be made into up to 100k copper coins a day. They also collect taxes from everyone else in the area on the copper they pick up from npcs.
Neutral camps offer trainers to enhance your skills to the next cap once you hit the tier you're on now.
The cost increasing substantially per enhancement. 450-600 is 8500 copper coins, 600-750 is 25000 copper coins and 750-900 is 90000 copper coins. Some perks in the skill tree also require you to farm or buy treasure books and talent books too!
There are also secret underground caves filled with hostile NPCs that you can wall off and make your home, maybe even some underwater caves you have to discover ;)
The Northeast region is one of the default starter areas and also the safest region due to level of mobs and lack of environmental factors. It is your generic forest and mountains, with horses, bear, deer, foxes, wolves, boar and rabbits. These mountains hold a lot of ore and rocks that you will need for tools and gear and building a sturdy base.
This region is also home to the magistrate, a mid-level stronghold and how you can "own" the county as well as make a lot of money every day.
The Southeast region of the map is the other starter area and has more of a jungle aesthetic but maintains the same animals we'll see in the north (UP TO A CERTAIN POINT). This jungle contains a couple new things, but one key item called Notoginseng that you will need for medicine later. It looks like a small orange flower and typically grows near bushes/rocks that spawn normally on the map.
The Southwest region is connected to the southeast region via an extremely dangerous road and swamp area. Any aggressive mob in this area will most likely one hit any player below level 40, and to top it off there's an environmental factor called Miasma here. West beyond the swamp, we'll see a similar looking mountain/forest region here, however this region is home to near max level mobs and NPCs as well as an abundance of predators. A couple new predators you will have to take caution of are crocodiles that swim and lurk in the swamp, and tigers in the mountains/forests.
The Northwest region is a desert region with 40+ mobs and an environmental factor called heat, it's full of wolves and an abundance of four or so resources you'll need for midgame, as well as one or two you'll need for endgame. There are a lot of high level horses in this area to tame, as well as an abundance of wolves. New mobs include elephants in the desert, and rhinos along some of the rivers.
The Center region of the map, although small is an extremely dangerous area. It is a towering snowy mountain with max level mobs, end game resources, and some of the largest strongholds in the game right now. It is the only area with the cold environmental factor.
All environmental factors do is hit you with tick damage once your resistance runs out. Different items and armor will provide bonus resistances/ways to mitigate the damage
Resources And Mobs
ResourcesMobsThere are 7 different NPC factions, and 4 different tiers of raw resources. As you interact/kill NPCs your hostility with their individual factions will go up or down. The more hostile, the more likely they can be to attack you in the field and try and kill you.
For the resources, higher tier can be broken down into double its lower tier, this can be a way to mitigate travel/farming time if you choose to live/build in a higher tier region.
Farming in this game sucks, so they've added something called "Collects" (bad translation).
They are semi-autonomous resource gathering points. Located on the map at different areas, they have scaled levels with very strong mobs guarding them but can offer a way to ease your farming burden once cleared and controlled.
WoodUsing an axe you can chop down trees to get these resources, they are used in gear and buildings mainly
Branches (anywhere/spawns on ground)
Hardwood (anywhere)
Complete Wood (Northwest/Southwest)
Rare Wood (rare drop from Northwest/Southwest)
Bark (anywhere)
Resin (hardwood tree types)
MiningUsing a hammer you can harvest these resources from rocks that generate in clusters over the terrain, these rocks rest on top of the earth, not in it. They are used in early gear and mainly buildings/structures
Rubble (anywhere/spawns on ground)
Stone (anywhere)
Complete Stone (Northwest/Southwest)
Rare Stone (rare drop from Northwest/Southwest)
Sand (anywhere, yellow rocks are sandstone and will give some)
Clay (small brown piles of mud along rivers)
Gypsum (mined passively, found in ore and higher tier rocks)
PlantsUsing a sickle, or just picking from bushes as well as specialty looking plants/flowers that vary by region you can get these resources. They are used in crafting resources, as well as food & medicine.
Grass (anywhere)
Wildflowers (anywhere)
Low-Qual Flax (anywhere)
Peas (by the Magistrate)
Honeysuckle (small white flowered bush in the Northeast)
Knotweed (small red flowers along rivers)
Notoginseng (single orange flower in the south east)
Mullberry (Southwestern Bushes)
False Daisy (along the edge of the desert in the Northwest)
Clover (Center mountain bushes)
Dragons Blood (Swamp flowers)
Sand Onions (interior desert in the Northwest)
Dangshen (I currently don't know)
SeedsLow-quality seeds can be gathered by harvesting bushes, or their respective plant anywhere in the world as a rare drop. They are used to make self sufficient farms to grow your own crops with the "Plant" skill. As you level your plant, you will have a chance to get higher-tier seeds from the crops you grow.
Flax (used to make linen)
Wheat (used to make food)
Rice (used to make food)
Barley (used to make food/animal fodder)
Soybean (EXTREMELY USEFUL- OIL, FOOD, FODDER, MEDICINE)
Sorghum (used in wine and food)
Honeysuckle (used in medicine)
Knotweed (used in medicine)
Notoginseng (used in medicine)
False Daisy (used in medicine)
Clover (used in food/medicine)
Dragons Blood (used in medicine)
Sand Onions (used in food)
Dangshen (used in wine)
AnimalBy killing and skinning animals with a skinning knife (or axe if in a pinch) you can collect animal hide and resources. You can also raise animals as a passive farm in the mid/endgame so you won't need to hunt as much. These are used in a lot of gear and gear upgrades, as well as food.
Coarse Hide (all low level animals)
Fine Hide (low/mid level herbivores, especially predators)
Flawless Hide (mid level/high level herbivores, especially predators)
Rare Hide (rare drop from creatures that drop flawless hide)
Animal Fat (dropped from most larger animals, only predator that drops is bears)
Raw Meat (all animals)
Fur (foxes, deer, rabbits, wolves)
Bone (all animals)
Tendon (predators, animal pens)
Claw (predators, animal pens)
Sharp Claw (Big cats)
Horn (Male deer, rhinos, elephants)
Fish (fished via trap, or harpoons)
Toad (gathered by picking grass)
Scorpion (gathered by mining clay)
Locust (gathered by harvesting bushes)
OreDifferent ores will be used as you level up and move up the tech tree into stronger gear. Higher tier ore will be found in the more dangerous regions of the game. You will need to build the respective buildings to smelt the ore, and then the benches to craft the gear. There are large ore mines populated by enemies all throughout the map.
Copper (brown/green streaked rocks, Eastern half of the map)
Salt (large white piles of salt, 2 mines near magistrate)
Iron (dark blackish brown rocks, eastern half of the map and desert)
Coal (pure black rocks, north eastern half of the map)
Kaolin Clay (small individual white rocks, littered throughout the desert)
Saltpeter (pinkish white rocks, mines in the desert/south of the desert)
Brimstone (yellow rocks, usually near Kaolin clay rocks, littered throughout the desert)
Realgar (orange rocks, in the swamp biome by water)
Black Iron (bright greenish rock, desert mines)
Meteoric Iron (blueish black rocks, located in and around the mountain region)
Jade (greenish yellow rocks, western half of the map)
are divided into 7 different factions, but 6 of them are essentially the same thing with different outfits/advantages. Each faction will have 3 different types of NPC.
Common - Easiest to recruit, lower hp pool, stats more centered around farming/crafting.
Warrior - Average to recruit, larger hp pool, stats more centered around combat/charisma.
Leader - Hardest to recruit, massive hp pool, stats can be all around really good, but center around combat/charisma.
Vagrant - A reactionary mob that can be recruited passively by fulfilling their requests, at low levels they typically want low tier armor, some cooked food, or some smaller meds. Vagrant recruits seem to have good wisdom and physique skills. WON'T ATTACK ON SIGHT UNLESS HOSTILE OR ATTACKED FIRST
River Bandit - Hostile mobs that dwell on river encampments, these mobs can only be aggressively recruited. River Bandit recruits seem to be good at ranged combat, and two-handed type skills.
Rebel - Hostile mobs that camp in war areas and large forward operating bases. Rebel recruits are good at combat and charisma stats while leaning towards strength skills.
Yellow Turban Rebellion - Hostile mobs that dwell in some mines and small villages, Yellow Turban recruits seem to lean towards the agility tree skills, while typically having higher charisma stats.
Bandit - Hostile mobs that dwell in some mines and small villages/fobs, Bandit recruits specialize in the strength skill tree, and most have higher riding with some charisma stats.
Shanyue Tribe - Hostile mobs that dwell in some mines and large strongholds in colder/mountain areas, Shanyue tribe lean towards heavy armor and strength while usually having high taming and hunting skills.
Animals - Animals are divided into hostile, passive, and reactionary. Predators like wolves, bears, tigers, leopards, crocodiles, and panthers, will attack you on sight if you get to close. Reactionary animals like boars, foxes, rhinos, and elephants will wait until attacked to do anything, but will also attack hostile mobs. Passive are deer, rabbits, and horses, they will run if you get close. The more you kill/hunt, the angrier they will get. Eventually if hostility is high enough, packs of wolves will come an attack you.
Combat & AI
That's A Lot Of DamageTHE AI IN THIS GAME IS WACKThe combat in this game can be jank at times, but once you figure it out its fairly easy to use (and abuse). If you've ever played Mordhau, Chivalry, or For Honor, Myth's combat acts a bit like those games with directional swings and blocking. Myth also uses a momentum style system where depending on the direction and how fast you're moving, you can do more or less damage. Because of this system, some of the highest damage you can do is on horseback, multiplying your damage due to move speed and perks by a substantial amount, enough to where you can one tap other players in the same gear even. This damage buff also applies to movement speed on foot too though so you can do more damage if you just move forward as your weapon makes contact with your target. The reverse is also true, if you are backing up you will do less damage to the same target upon a proper hit.
Counter momentum is also a thing where if two players are riding at each other on horse back the damage multipliers will stack on both due to both players moving at higher speeds.
A big thing to note is that when you attack with your weapon, the entire weapon will have a hitbox, not just the blade. if you are stabbing someone w/ a spear and you are too close to them, you might not do your full damage due to the blade not hitting, but the shaft instead. You can tell when this happens if you do blunt damage instead of slashing or piercing.
THE DURABILITY OF A WEAPON IS BASED ON THE DAMAGE DEALT, NOT THE AMOUNT OF HITS
Foot-Soldiers
The game seems to operate on a basic combat triangle for on foot combat: One-handed beats spears (close the gap, swing away)
Spears beat two-handed (widen the gap, use your range advantage)
Two-handed beats one-handed (poise through the one handed and deal massive damage strikes)
However in most situations, one-handed looks to be king on foot due to stunlock and raw damage output. It also doesnt have to be as precise with the attacks compared to the slow swings of spears and two-handed. With one-handed you benefit from being able to wield a shield in your off-hand to help block attacks and make an opening.
Cavalry
On horse back there are 3 stats that matter in combat, speed, horse HP, and charge damage. Different perks will effect these 3 things, but generally the faster the horse, the harder you'll hit someone if riding at them. Higher Hp means your horse can stay up for longer in the fight, and higher charge damage means you can run into people to knock them down, as well as lance them with a spear.
Although each weapon will get a damage buff, spears are king on horse back, in both riding and polearm skill trees there are horse related damage buffs and advantages. Also you gain the ability on most straight spears to lower the weapon into a lance motion on the right side. This lancing attack can have a long cool down at earlier levels and can be hard to connect, but if you do you can obliterate most victims easily.
There are three different damage types, blunt, piercing, and slashing. Different structures and armors will take more damage depending on type, this is important to know in raids and PvP. Most weapons do piercing and slashing damage. Some structures may be weaker to stabbing with a spear over slashing.
Hunting Man-meatThe AI is busted on both ends of the combat spectrum. You honestly either have to kite one or two at a time with a spear, utilize the high speed and damage of a horse, or overwhelm with brute force and DPS from a one handed weapon.
Taking on an NPC in one on one combat can be suicide if you're not stronger then it or using one of those cheese methods. They're very easy to kite and poke to death, but due to have hitscan qualities on their range attacks (typically never missing a shot), as well as matching your stance at any given time even if they're mid-swing (they will block most spear attacks unless you aim at the feet when guard is high, or upper-body when guard is low). Play around and try to find your method.
Their pathing is simple enough to break where if you crouch behind a small structure like a crate or drying rack will force them to walk over to you one at a time around the object so you can avoid those pesky hitscan range attacks. If you do aggro multiple that are around your level I recommend you run away to reset them while putting objects between you, multiple using ranged attacks can kill you quickly. However a tip you can use is that they can hit each other with their range weapons, so if you put a body between you and the shooter you can make your own cover while dealing with them.
Furries BegoneAnimal AI is just as busted at times. They will follow you in a straight path at there top speed until they reach you. Some animals will just jump off cliffs even if they're not scared. The aggro range seems to be based on the animal and sometimes wont even register.
Most predators have 2 attacks. A jumping lunge that utilizes the movement speed damage increase and can wreck you if you don't dodge, and a standard standing still directional chomp.
Due to their power and speed tigers/big cats are the most dangerous. Leopards and panthers aren't too hard to kill on foot, but a tiger will kill you then your horse just to ruin your day. It's currently one of the hardest creatures to fight in game. They can't be out ran even on a max speed horse, and will usually 1-2 tap you.
The only safe methods we've found to fight one are to:
Immediately jump into a body of water (this forces the tiger to swim after you or swim to shore and makes it unable to attack)
Brush up against trees while you're riding to break the pathing of the tiger a bit and make it move laterally
Or lure the tiger into a bunch of boar (the boar will aggro the tiger hopefully and kill it before the tiger kills you)
Bear, wolves, and gators attack in the same way and are generally much easier to fight. Bear and gator being harder due to their large hitboxes, higher HP pools, and higher damage dealt.
A bear and gator can be successfully kited and circled on a horse, just make sure to move out of the way when it lunges and tag it with your spear as you do.
Wolves, leopards, and panther are the same way, but much easier to do on foot.
Find the sweet spot for the different animal types and adapt.
Most animal combat involves continually circling your opponent and attacking when they go for a lunge.
If taming a horse make sure you're not near steep cliffs because it could kill itself.
Boar/foxes will runaway when they reach a low HP threshold and gather other allies in the area and come back. If you attack 1 of them in a group of 4, all 4 will attack you. DO NOT UNDERESTIMATE A PACK OF BOAR.
Map Icons, Loot, Treasure
Say Map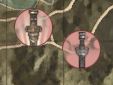 Securing The Bag
The map is littered with various locations that until discovered will appear as ? near you. Once you get close enough/enter said ? it will tell you on the map what it might be. These could range from farmland, to stronghold, to an animal den, etc. It's good to find out what they are regardless of what stage in the game you're at, as they'll help you gather resources and loot later.
Farmlands - These farmlands are typically occupied by passive vagrants or hostile bandits. They offer HUUUGE TRACTS of land that you can use to increase your planting and automate your farms with workers so you can grind other things. There are different types of farms based on what can grow nicely there, as well as different tiers of soil richness that can help provide higher crop out puts and higher quality crops.
Animal Dens - These are just high quantities of animals in one area, could be deer, could be foxes or boar, could be a trillion wolves chasing you down to the ends of the earth. Good for raising up your hunting skill, or catching multiple animals for your pens.
Resources - These are mines that are always filled with hostile NPCs, different mines will usually hold one type of ore and the mobs in them will drop the associated ore/ingot instead of the loot/treasure table. (Copper, Salt, Coal, Iron, Saltpeter, Jade, Black Iron, Meteoric Iron)
Collection Points - There are 4 different types of collection points on the map, a quarry which gives stone, a lumberyard which gives wood, a granary which gives crops, and a minefield which gives ore. All of these collection points will have a small amount of hostile NPCs guarding it, with one of them being a high level dragon border type. These will take a while to kill but once clear you can wall them off and put a building down and recruit to work and passively farm the associated resources! The NPCs drop the standard loot/treasure table.
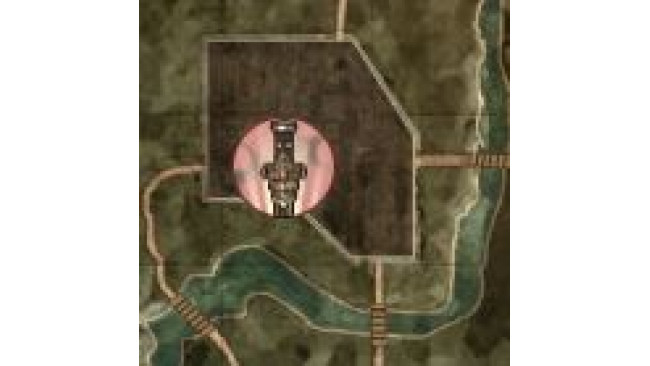
Strongholds - Typically camps only filled with hostile mobs that scale based on the region their in, usually have a treasure chest nearby, there are two types of strongholds in the world, normal and rare.
Neutral Camps - You should try and find at least one Neutral camp and get a bed down near it, this is because you will use it to transfer servers and good, as well as to enhance your skills once they hit a level cap. There are also traders withing that sell commodity goods you can trade to other camps for a profit and to lower your hostility modifier.
Perk Points - Perk points are small white statues that litter the map at various cool points, one could be overlooking a waterfall or lake, or on top of a mountain that's hard to reach. They're extremely useful as you need them for leveling up your talent tree later in the game so collect them when you see them!
The 2 Icons for strongholds, left is rare, right is standard
The loot and treasure in this game is a bunch of different items that are typically consumable or used to help speed stuff up. All NPC's will drop an amount of copper that scales with their level/difficulty in the game, as well as a loot table based on the NPC killed and the location of the enemy.
If you kill and enemy in a stronghold, the lower level enemies will drop armor fragments of their fraction, copper, and usually a low-tier raw or processed resource like salt, or linen. Sometimes they can drop some food or medicine that can be useful if you're in a bad spot.
Higher tier enemies will drop an armor fragment associated with their border tier. A gold border enemy will drop more gold, better raw/processed resource, and potential rarer tier goods, like a treasure key/map, or a quenching essence. A dragon border enemy will almost always drop a treasure key/map and give a large amount of xp.
Killing an enemy in a mine will give the copper, raw goods, ore/ingots of that mine, and maps/keys/quench essence.
Killing an enemy in an outpost/FOB will give you skill fragments as well as raw goods and copper.
These skill fragments can be used to give proficiency in the respective tree. So if im close to leveling up my taming skill, and don't want to go tame another horse, I can use a taming fragment to gain some proficiency and level up that skill.
Treasure maps and keys can be used to get treasure located on the map, or even spawn instanced dungeons filled with high level enemies and a whole lot of goodies. Some dungeons can be brutal so bring a friend or a tanky recruit to help.
These treasures can consist of scrolls to teach your warrior recruits different skills, increase their loyalty or increase their life force if they've died too many times, or even speed up their recovery time or forcibly recruit another person you have strung up. Keep in mind the item might say they give a potential recruit 1000 obedience points, but that person might need 50000 obedience points to convince. On higher tier units and higher level warriors it may not even make a dent in the time they spend on the rack.
The scrolls also have a very rare chance to be a crafting scroll. These are typically scrolls used to make the enemy armor with armor fragments, or if you're really lucky, a new siege weapon. 3 Armor scrolls is what you need to learn the armor set, or 6 of the crafting scrolls to have your warrior craft one for you.
Raids
Shadow LegendsI'm a PvP main, so I don't know what it looks like on PvE servers, but raiding in this game is a weird combination of Rust eco raids, and Ark siege raids. As you level and progress you'll unlock different tiers of tech, building material strength, and siege equipment. A basic guide to sieging will be below as well as the tiers of what can break what.
Rock/Hard Place
The siege defense of a building will determine what tier of weapon you need to break it if not using siege vehicles. As you place buildings and craft them you'll level your building skill and increase your max HP of your structures, making them harder to raid. A LOT of different prefabs like furnaces, workbenches, guild structures will have higher siege defense by default.
Wood Buildings have a siege defense of 15, which means anything in the bone tier and up can raid them, in a pinch you can use a stone hunting knife as they have the same siege strength of a bone weapon! Although inefficient this means any wood base is a pretty easy eco raid for even a one man. If you see a workbench that has too high of a siege defense and its on a wood foundation, take out the foundation and the structure on top will destroy. Clay Buildings have a siege defense of 35, this means bronze no longer works, we now have to craft iron or up if we want to eco raid, making a raid both more costly, and take longer.
Stone Buildings are a huge jump in your raid defense. Because the siege defense is 52, regular steel weapons wont even work, the raider must sharpen the weapon, or bring black iron to even damage the structure. This means stone is one of the biggest upgrades you can make to defend against a raid.
Metal Buildings are the last tier of buildings and have a defense of 65. Only the highest tier weapons, meteoric, can even damage them by default. The only other options are maxed sharpened black iron, or siege weapons.
If eco-raiding isn't your thing, you always can raise up your siege level and pull out a big old battering ram or catapult to tear through walls and ceilings. Keep in mind eco weapons take a very long time to craft, and are typically very resource expensive, but it might be cheaper to just level the base over poking through all the walls and doors. Scout your target before you make your decision.
Keep in mind that siege vehicles like the catapult and battering ram actually have very little mobility, so make sure to have a way to get to the base or hit it before you place it. Try and place it closer to the target. A couple squares will take 15 minutes to travel in one depending on the terrain.
As you use a siege weapon it loses durability. Most battering rams will have about 80ish swings in them, and take 10 minutes and a lot of resources to repair. A good option for raiding metal bases is actually flamethrowers, they can tear through a door quite quickly and with certain perks in the tree you can conserve on the expensive ammunition for them. But if you have the numbers a zerg could be more efficient depending on the base you're raiding.
A huge tip/trick is actually to use hostile NPC mobs to raid. They can be used against your enemy if you have a chance. I've heard this is the meta on PvE servers but didn't know how effective it was until it happened to us. While raiding an enemy base, we managed to jump over their exterior walls and get trapped inside. While inside their base our high animal hostility caused us to get attacked by wolves. The wolves ran to their front gate and within 10 minutes 5 wolves had torn down something that would've taken us 40 minutes to get through with proper siege equipment even. It was a lucky coincidence but a usable strategy.
Keep in mind you can foundation wipe people but the range before a wall falls is about 3 foundations deep, so its will take a while before a section of building tumbles. But if a base has a lot of verticality it might be more worth to target foundations then 20 separate doors!
Due to the recent buff, mulitple ballista will keep your base safer than anything else. Recruit an NPC with high siege and most people won't survive more than 3-4 shots, and since the AI is busted they almost never miss a shot.. Plus if you are being raided, a ballista can hit crazy damage on other siege weapons as well that the enemy might be using to destroy them quicker. You can also mount ballistas on a cart and have an NPC sit on it to protect you while you might be farming/roaming. They can be used as a budget raid weapon too but are far less effective then their counterparts.
Taming
A Crippling Gambling AddictionTaming horses in this game is a lot like gambling. You don't know what perks, buffs, or debuffs a horse might have until it's tamed. But there is a way to see figure out what quality a horse actually is, even if it's tedious, that way you can weed out the garbage, and keep the stallions.
The horses in this game have 4 tiers, each tier up means that their base stats are increased to a minimum amount. The stats include HP, Speed, Stamina, Obedience, and Carry Weight.
To give you a baseline, an amazing horse would have 89+ speed, which would make him 1000 move speed, or 3x the speed of a sprinting player.
The Horse Tier List
F Tier - Weak Horses are anything below 50 base quality, honestly just execute the horse and harvest its parts, then dismiss it. Should only be kept if you're stuck in the field or something.
C Tier - The next tier is literally just called Horse. Basic starter area horse, can be tamed with any reins, usually has green perks with maybe one blue if you're lucky. Good in a pinch but very easy to find a better horse.
B Tier - Fine horse is the next tier, a majority of mid game/endgame horses will sit in this tier, they can be very good, but they're not even close to the best horses you can catch. You need fine reins or better to begin taming this tier of horse. They take quite a while to tame if it's not your specialty. So be prepared.
S Tier - The final and best tier is the Heavenly horse, historically these horses actually had wars fought over them in China. It's wild. But these horses can only be tamed by advanced reins or better, so if the fine don't work you know. These horses usually sell on the market for a lot of money, or are used to breed better horses. IF BUYING A MALE HORSE CHECK TO SEE IF IT'S STERILIZED!Another tip for heavenly horses is how they look. A heavenly horses texture are actually higher quality/resolution. You'll see their muscle structure more defined and typically they have a full solid coat cover and finer haired mane. The higher quality the horse, the higher the resolution. Most heavenly horses are not spotted/painted, but very rarely they can be.
You can set up some auto-taming for horses, you just need an NPC working a stable and a whole lot of fodder. Ride the horse up to the stable you want to tame him in, and quickly get off and press and hold your use key on the stable, you should see the option to put away the wild horse. Once in the stable your NPC will slowly work on him to tame him. The higher the NPC's taming level the more efficient they'll be. It's better to close off an area attached to the stable first so getting the horse in is easier.
To add to the gambling you can also breed horses using a male and female horse to try and make a better one. Each time you do the horse will lose 100 life force, once it hits 0 the horse can no longer be resurrected if they die, and passed a certain threshold will begin draining its stats.
The gambling come from two things, the first being that even if the horses mate it seems like there's only a 30% chance to actually get a foal. No one knows the actual numbers because their hasn't been any kind of testing on it. But from the horses we've bred that's what it seems to be.
Remember to give the horse lots of fodder both while they're mating and while the horse is pregnant, both these processes will take 2 hours in total. If the horse does become pregnant, it can inherit traits and abilities from its parents. But it can also be born with new perks that could buff or damage the super horse you're trying to make. When you have a foal you can feed it xp pills as well as imprint on it to make it a stronger horse once it's grown. The imprinting could be requesting specific food, going on a walk, cuddling, etc. Much like Ark has imprinting this game mimics it with horses.
Recruiting & Arts
Building The HaremCall Me Sensei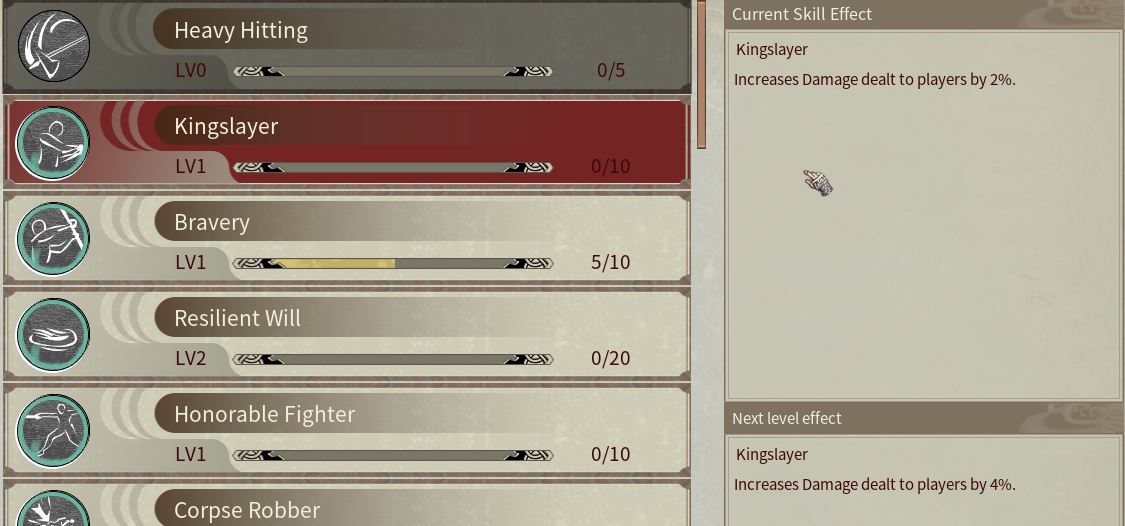
Recruiting people is essential to automation, by default you can only recruit people up to level 20. So if you want to get better fighters, workers, and crafters, you need to raise up your recruit skill. You can do this by abusing people you have strung up on a torture rack, both physically, and mentally. If you use the torture rack while a captive recruit is on it, you will begin telling them terrible jokes, and slowly break their spirit, thus raising your recruiting. Make sure you have a lot of food however as these jokes consume hunger due to how empty they are.
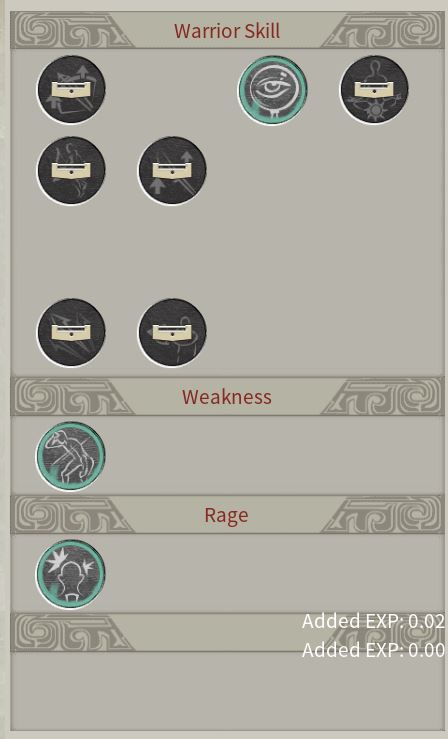
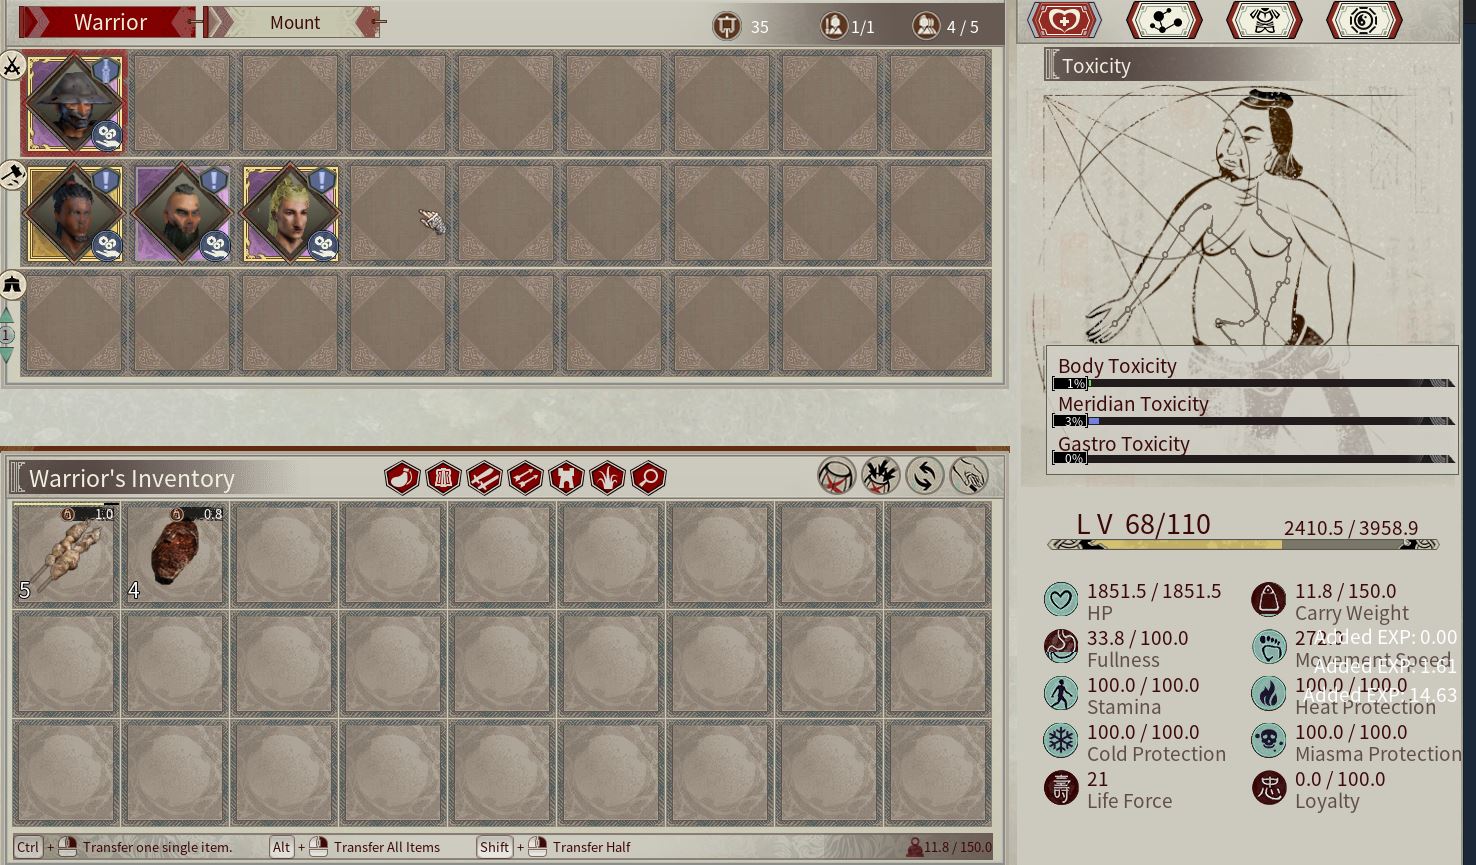
Once your recruiting is 450 you will be able to see exactly what you'll be getting out of a new recruit, you can do this via the monocular device made at a weapons bench. With this you can aim at any NPC in the world and see their stats. At 450 you'll be able to see their rage skills, weaknesses, and basic skill levels, so if you're looking for something specific its extremely useful. Certain NPC factions have better skills in a couple categories. That's covered in the bottom of the Resources & Mobs section. A good example would be that vagrants are better at working fields and mines or manning siege equipment.
Kind of like horses, taming an NPC can be a gamble, but unlike horses you can know what you're getting, so it comes with an advantage. As you raise your recruiting, you can deploy more warriors to help you in combat. By default this number is 1, but you can put people on benches and pull another out instead until you have the level for 2. Warriors do gain exp from crafting items, killing mobs, and just being in the world much like we do. Once tamed, check to see what your warrior has expertise in, this is essential to properly leveling their skills and can really help you out if you're after a specialist.
A lot of dragon border/gold NPCs might have some extra expertise points for you to use too! Although the most powerful with the highest stats, they typically take a long time to train, even with someone working the rack and extra food to speed it up. Keep in mind that higher tier torture racks/benches will speed up this process.
The treasure you find in the world will often be different scrolls called arts. There are three category of arts, all of them are good for you to learn and most will help you and your warriors, but some can have disadvantages. When you go to tame a warrior you can see their warrior skills using the monocle. You unlock these skills by learning the associated talents from arts in the world. Unlocking a skill might take 1 scroll, or 6. Depending on the what the skill does and how helpful it's deemed. A good art could be "Kingslayer" if you're into PvP, it makes it so your warrior does extra damage to players. But there are also arts like "Nightwalker" which increase your warriors move speed at night, but decrease stamina regen during the day, so they can sprint and swing less.
Regardless of what arts you learn, your warriors can't activate the skill without hitting the minimum requirements. That might be the warrior being lvl 55, or having 600 one handed skill, or both. It will say when you hover over it. Once those requirements are met, and the perk is learned by you, the warrior will automatically have that skill unlocked and be able to use it's advantages.
If you plan on using a warrior to their fullest potential, make sure to check those perks and skills to see what they might be best equipped with. Try and give them the gear that fits them.
If you plan on having multiple warriors in a building to automate your farm/crafting, I recommend getting their drill up, it will lower how quickly they consume food, and also increase their exp gain rates which is huge if you're trying to unlock a skill/level them up. Once drill is level 450 you also gain proficiency training bonuses too.
Keep in mind that if a warrior dies too much, or you don't actively manage their food, they will lose loyalty. If their loyalty is low enough, they will greatly decrease the xp they gain. The auto feeding will keep them alive, but they will not maintain proper loyalty levels and their skill and general leveling will tank. You can either pay them every day to maintain some loyalty, use items/treasure you buy/find in the world like ceramic pots or black jade bowls to increase the loyalty immediately, or if it's under 40 you can spam feed them pieces of food to get it up to 40.
Much like horses warriors can be traded to guild members, or bought/sold on the market.
Requests/Plug
Current RequestsAnimal Farms
Plant Skill
Base Designs
Thanks!
Thank you for reading this guide, please give it a thumbs up if it helped or you found the info you were looking for. I plan on updating it more over the coming weeks as the Wiki is an abysmal resource right now.. If you want anything added to it please comment on this and I'll do some research/consult with my guild ForceMajure.
I'm currently sitting at 400ish hours in the game, and my guild mates collectively are around 5kish. If you're having trouble in game or want to learn some cheesy skill farms, come hit me up on my twitch. If you have info you'd like in the guide tell me on stream!!
I stream fairly regularly and have been playing this game on stream lately. MY STREAM[www.twitch.tv]
Source: https://steamcommunity.com/sharedfiles/filedetails/?id=2690973808
More Myth of Empires guilds
- All Guilds
- Myth of Empires Guide 194
- Fix Markets not working behind NAT
- Official Modding Dev kit User Guide-02/06/2024
- Stele Location Map
- [Ru] . . [En] Horses.Awakening and skills
- Myth of Empires
- Myth of Empires
- Myth of Empires Guide 163
- Myth of Empires Guide 153
- How to disable TAA (Reduce blur!)