Overview
- Base Game Achievements : 25
- Virtuous Cycle DLC Achievements : 12
- Missable achievements: 2
- Approximate amount of time to 100%: 40-60 Hours
Introduction
Mortal Shell is a deep action-RPG that tests your sanity and resilience in a shattered world. Your adversaries spare no mercy, with survival demanding superior awareness, precision, and instincts. Possess lost warriors, track down hidden sanctums of the devout, and face formidable foes.
For this guide I will be dividing the the game into 3 stages of gameplay: Mortal Shells NG, Mortal Shells No-Hit NG and the Virtuous Cycle DLC. You may continue into NG+ and beyond if you wish or if you failed to get the 2 missable achievements from the regular NG playthrough, but otherwise it's not really necessary as you will have to start a fresh save file in order to get a few of the conflicting achievements.
The game progression recommended to take from Fallgrim is:
Shrine of Ash - Imrod. the Unrepentant
Crypt of Martyrs - Tarsus, the First Martyr
Seat of Infinity - Crucix, the TwicebornThis orders the areas and bosses from easiest to most complex, but once you're familiar with the game mechanics, enemy movesets and item locations you could breeze through each run in less then an hour, be it in the basegame or in the DLC.
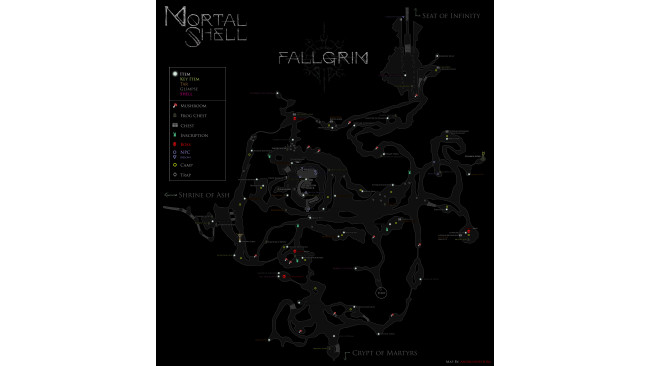
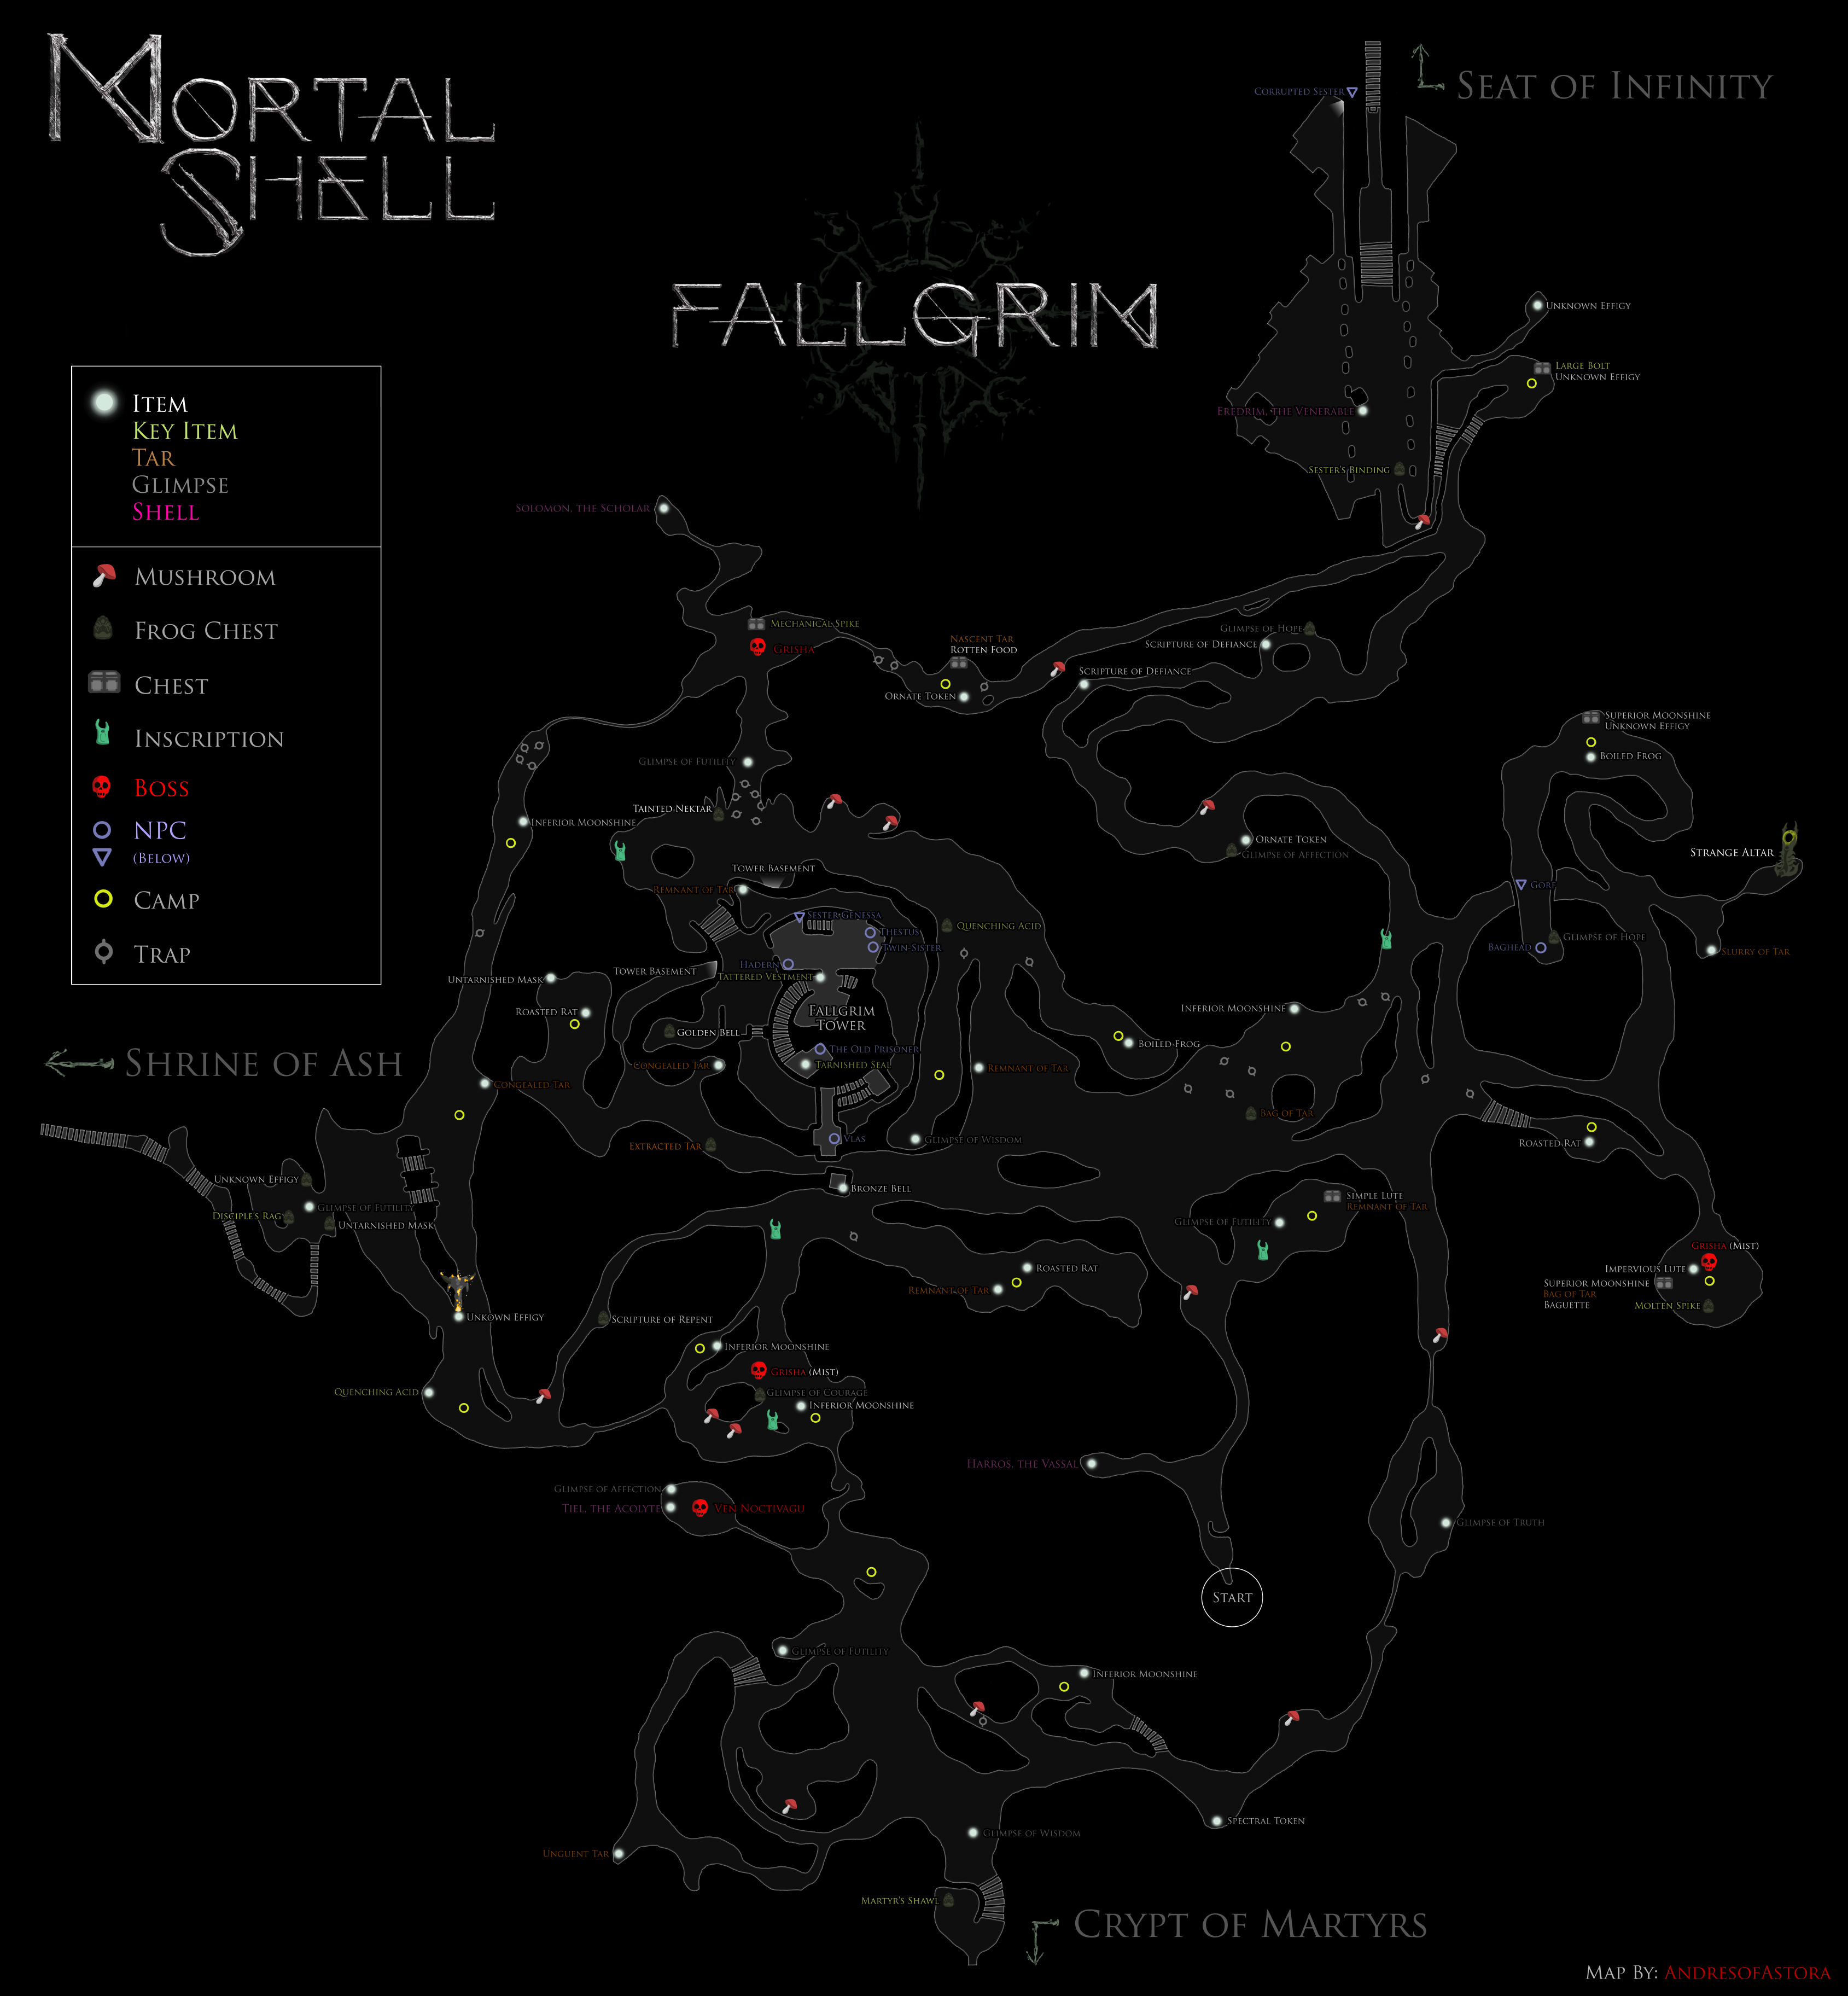
Make yourself familiar with the Fallgrim map as it's the only one that really matters in order to know where you're going, the rest of the maps are rather linear so it's not as easy to get lost.
Credits to AndresofAstora for the amazing map. If you want to see the rest of the maps you can click here to take a look at his guide which has them all included (except for the Crypt of Martyrs).
---------------Mortal Shell - NG [Part 1]---------------------------------------
For this part the focus will be achievement that are unmissable, obtained naturally through regular game progression, and those unlocked simply by interacting with objects in the game.
There are only 2 missable achievements that you must get before defeating Crucix, the third boss in the Seat of Infinity area. Make sure to find the 3 etchings and pick up the mango located in his area before defeating him, otherwise they will become unobtainable and you will have to go back for them in NG+.
Faded The Fire
Defeat Imrod, the Unrepentant.
Unlocked immediately after defeating Imrod, the Unrepentant in the Sanctum of Flame. Obtained naturally through game progression and is unmissable.
Martyr'd The Martyr
Defeat Tarsus, the First Martyr.
Unlocked immediately after defeating Tarsus, the First Martyr in the Martyr's Altar. Obtained naturally through game progression and is unmissable.
Tragic Loss
Defeat Crucix, the Twiceborn.
Unlocked immediately after defeating Crucix, the Twiceborn in the Shifting Archives. Obtained naturally through game progression and is unmissable.
Bring The Glands Back To Me
Bring a gland to Dark Father.
Defeat any boss and bring back its gland to the Old Prisoner in the Fallgrim Tower. Obtained naturally through game progression and is unmissable.
Felled The Glandfather
Defeat The Unchained.
Unlocked immediately after defeating the Unchained in the Fallgrim Tower. Obtained naturally through game progression and is unmissable.
Crossed The Threshold
Complete Mortal Shell.
Once the Unchained has been defeated this achievement will unlock after taking his gland and progressing into NG+. Obtained naturally through game progression and is unmissable.
Note - If you choose not to take his gland and wander back into NG you will have to defeat the Unchained again in order to take his gland.
Bars Tended
Become familiar with all items [Missable].
For this achievement you must find every item in the game and use each one a specific number of times to max out your "familiarity" with the items. Each time you use an item you will learn more about it and it will be more effective. There is one missable item, the Mango, in the Seat of Infinity area that must be collected before you defeat Crucix, otherwise it becomes unobtainable and you will have to come back for it in NG+. Once in NG+ you can run straight to any items you missed to familiarize yourself with them and unlock the achievement.
You can follow this[www.powerpyx.com] guide to find where each of the items is located and how many times you'll need to use them to max out your familiarity.
Seeker Of False Truths
Unlock all secret lore [Missable].
For this achievement, you must collect the 17 Etching collectibles. There is another collectible type called Inscriptions, but those are not required. There are three missable etchings in the Seat of Infinity area that must be collected before you defeat Crucix, otherwise they become unobtainable and you will have to come back for them in NG+. Once in NG+ you can run straight to any etchings you missed to grab them and unlock the achievement.
You can follow this[www.powerpyx.com] guide to find where each of the etchings is located.
Flesh And Instinct
Find your first Shell.
Find and awaken any of the shells. The first shell you will encounter is Harros, the Vassal which can be found immediately after exiting the tutorial. Occupying a shell for the first time will unlock this achievement.
You Seem Different...
Unlock all of the Shells in the game.
There are a total of four "shells" to be found in Mortal Shell that will count towards this achievement. You can use the map in the introduction to find all four of them quickly. Only Tiel, the Acolyte requires you to defeat the mini-boss Ven Noctivagu in order to awaken the shell, the rest can be rushed and awakened with ease. The Hadern shell is not required for this achievement.
Purrfect
Pet Vlas's cat.
Vlas can be found at the top of Fallgrim Tower by taking the stairs on the outside of the tower and winding up. Interacting with the cat sitting next to him will unlock this achievement.
The Good Times Are Killing Me
Jam with a brigand.
For this achievement you will need one of the three lute types in the game. The Simple Lute will likely be found first and can only be played a certain number of times before it breaks. The Impervious Lute will be found later or can be purchased from Vlas and can be used as many times as you'd like.
To unlock the achievement have the lute in your quick slot and use it when you're near an enemy who is sitting on the ground playing a lute of their own. You can be a pretty good distance away, so long as you can hear their music. If you get too close, they'll stop playing and stand up to attack. The achievement will unlock once you are both playing at the same time.
Brigand Life
Waste your life away with Baghead.
Baghead can be found in the Fallgrim area by heading right from the tutorial location, past Gorf the frog, and then up and around the sloping trees. You will need to have a Roasted Rat and Superior Moonshine in your inventory to give him then choose "yes" when he asks if you want to hang out with him forever, unlocking the achievement. You will receive an ending sequence and then load back into the game as if nothing happened without losing any progress.
---------------Mortal Shell - NG [Part 2]--------------------------------------
This next part focuses on eliminating certain enemies with a specific ability or under certain circumstances in order to unlock the achievements. These are rather simple tasks that once you know what you have to do can be completed almost instantly, though some will require you to spend a certain amount of tar and glimpses before being able to unlock the ability/equipment necessary to complete the kill.
Step Goal
Kill an enemy with a bear trap.
There are a ton of bear traps scattered around the Fallgrim area. Minor damage is done if you or an enemy step on one and it will leave you stuned for a few seconds as you break free and the trap gets re-armed. You can bait an enemy to step on one over and over until it dies, or hit them once or twice first to speed up the process as only the killing blow needs to come from the trap to unlock the achievement.
Is This A Sparta?
Kill an enemy by kicking them off a platform.
Each shell has an ability called "Recollection of Strength" that can be unlocked by spending 1,000 tar and 3 glimpses. This will allow you to perform a kick ability when you have at least one bar of resolve. Knocking an enemy down into an abyss with a kick will unlock the achievement, killing them with fall damage, however, will not count. There are many locations to unlock this achievement, a very obvious location is the enemy with its back to you looking out over a cliff on your way down to fight the Enslaved Grisha boss, but any cliffside enemy will do.
It's A Me
Kill an enemy with a hardened plunge.
Each shell has an ability called "Recollection of Knowledge" that can be unlocked by spending 2,500 tar and 15 glimpses. This will allow you to perform a Hardened Plunge by hardening as you are falling of a ledge, essentially doing a ground pound attack that will kill any normal enemy that happens to be below you, unlocking the achievement. There are a large number of areas in the game to get this done, especially around the Fallgrim Tower area where there are many cliffs with enemies nearby.
Nailed It
Kill two or more enemies with one shot from the Balistazooka.
The Balistazooka is, essentially, a large nail gun. To unlock the Balistazooka you need 8000 tar to purchase the "Tools" item from Vlas to be able to repair it inside Fallgrim Tower and you'll need "Large Bolts" to fire it. Once you have these, head outside the tower and aggro a bunch of enemies so they are following you, then equip the Balistazooka and go into aiming mode. Wait until two enemies are lined up and fire. The bolt will kill any normal enemy in its path in one shot, so if two were lined up the achievement will unlock.
Different Kinds Of Grisha
Defeat all the different versions of Grisha.
There are a total of three different Grisha to kill for this achievement. The first two are boss enemies, while the last appears as a normal enemy after Fallgrim is transformed and covered in fog. These can be found in the following locations:
1. Normal Grisha: Directly across from Fallgrim Tower from the door next to the Sester. This is your first mini-boss of the game.
2. Enslaved Grisha: Located in the Crypt of Martyrs, must be defeated in order to procede to the boss area.
3. Weakend Grisha: After delivering one gland to the Old Prisoner, Fallgrim will be covered in fog. Grisha will now spawn as regular enemies found near the entrance to the Crypt of Martyrs and in a camp to the south of Gorf.
---------------Mortal Shell - NG [Part 3]---------------------------------------
The last part of NG deals with the achievements that require you to farm out a certain number of resources or repeat an action a set number of times in order to unlock the achievements. While they may be obtained naturally as you progress through the game, it might be easier to just grind them and not have to worry about them later.
Fun Guy
Pick 50 mushrooms
You will find a large amount of Weltcap and Tarspore around the game world that count for this achievement. Grab any twinkling items on the ground you come across and this will unlock in no time.
Untarnished
Parry over 100 attacks.
To unlock the parry ability, you must free the giant prisoner inside Fallgrim Tower. This will give you the "Tarnished Seal" item, and allow you to parry. The parry in this game takes about a half-second to perform, as you actually grab the seal off your back and raise it to block the incoming attack. It will take some practice to get right. You can farm all 100 of these off the same basic enemy outside Fallgrim Tower if you'd like, or use it naturally in combat.
Sugar Baby
Spend over 50,000 Tar in the Vlas's Shop
Vlas can be found at the top of Fallgrim Tower by taking the stairs on the outside of the tower and winding up.
50k tar is actually quite a lot, but by the end of the game you should be very familiar with the combat and can kill enemies very quickly with a fully upgraded weapon. Grind out tar in the later areas and reset the enemies by talking to a Sester; rinse and repeat until you have enough tar and then go on a shopping spree. Check your item familiarity and purchase things you may need to use more of, and buy the Tools he has to create the Balistazooka for another achievement.
----------------Mortal Shell - No-Hit NG--------------------------------------
This is probably one of the more frustrating parts of this guide as the following achievements require you to be shell-less throughout the whole run and thus demand perfection when facing each boss. Tar and glimpses will be absolutely useless to you in this form and killing basic enemies won't do you any good either, so just focus on rushing each area and getting to each boss as fast as you can.
Face Off
Defeat Hadern in the tutorial.
You will only enter the tutorial and face Hadern in fresh playthroughs, so you can't cheese this in NG+ unfortunately, However, by this point you should be familiar with the game mechanics and once you know the moveset for this boss he is fairly simple. Achievement will unlock as soon as Hadern is defeated and you exit the tutorial.
Forever Alone
Beat the game without ever bonding with a shell.
For this achievement you will have to beat the entire game as your basic Foundling form that you start with in the tutorial, but for the purpose of knocking off multiple achievements in the same run, we will be using the upgraded Obsidian Dark Foundling form.
In your Foundling form, you will die in one hit from literally everything in the game. By this point you should be a bit more familiar with the layout of the game world and the patterns of the bosses so your main objective will be to beat ONLY the required bosses and run from EVERYTHING else. Since you can't upgrade your shells, tar is useless, healing items won't help, and fighting enemies will only lead to more frustration. The only items worth picking up are weapon upgrades.
Note: Make sure to complete this achievement together with the "Life is Suffering" and "The Nihilist" achievements to avoid having to go through another No-Hit run.
Life Is Suffering
Beat the game in obsidian dark form.
Obsidian Dark form is unlocked by interacting with the Strange Altar found through one of the crawl holes in the Fallgrim area to the east of Gorf. Accepting the offer at this altar will remove any shells you have collected and not allow you to access any shells for the rest of the game. You will now be in a variant of the Foundling form, but will still die in one hit to any attack like the basic Foundling form. The only special move you will have is the Hardened Plunge. The achievement will unlock upon collecting the gland from the Unchained and progressing into NG+.
The Nihilist
Renounce humankind.
For this achievement, you must interact with the Strange Altar mentioned in "Life is Suffering" to renounce all shells and accept Obsidian Dark form, thus unlocking the achievement.
----------------------The Virtuous Cycle---------------------------------------
The following achievements can only be unlocked after purchasing the Virtuous Cycle DLC. Once available, some achievements can be unlocked from the Main Game while other are exclusive to the Reverie. The Reverie looks identical to Fallgrim Tower in almost every way, albeit it looks hazy and dream-like. Weapons and Shells can be found in the same locations. To exit the Reverie and return to the Main Game, head down to the first floor and interact with the petrified statue of Sester Genessa.
Some Assembly Required
Transform the Axatana between different modes
The Axatana can be found by first acquiring all other Weapons after defeating the Hadern that holds them. Once all weapons have been acquired, Hadern can be found on the second floor of Fallgrim tower. Defeat him one last time to acquire his Shell. Speak to him once more and he will offer you the weapon. To unlock the achievement simply use the Transformation ability to change the weapon from Katana to Axe form. Can be completed in either the Main Game or in the Reverie.
Lute Hero
Max familiarity with all of the game's lutes
There are 3 lutes in the game that you will need to obtain, once you have them all you can sit down and jam with them for a bit until you have max familiarity with all of them to unlock the achievement. Familiarity be completed in either the Main Game or in the Reverie.
The first and easiest to find is the Simple Lute, which can be found by killing any brigand enemy that has a lute of their own and looting them afterwards. Alternatively, this lute can be purchased from Vlas at his store atop the Fallgrim Tower.
The second one, the Impervious Lute, is only obtained after defeating a specific brigand that can be found on the east-side of Fallgim in a camp to the south of Gorf, it's the same camp where the Grisha appears in the mist.
The last one, the Clockwork Lute, is only obtainable in the Virtuous Cycle DLC and will cost you a whopping 75,000 tar to unlock. With a bit of luck you can farm all the tar you need in one complete cycle if you loot and save everything till the end, if you're missing some tar just go back into a new cycle until you reach the 75k tar.
The Answer
Fully Upgrade Hadern's skill tree
To make Hadern appear first you must acquire all Weapons after defeating the Hadern that holds them. Once all weapons have been acquired, Hadern can be found on the second floor of Fallgrim Tower. Defeat him one last time to acquire his Shell.
To unlock the achievement you must max out all of Hadern's abilities, upgrades included, essentially making you purchase 20 abilities instead of the standard 10. Depending on which upgrades you choose, you would need a maximum of 25,600 tar and 159 glimpses if you choose the most expensive upgrade for each ability. This achievement can only be completed in the Main Game and will unlock after upgrading the last ability.
Master Of None
Acquire all 4 weapon Instincts for the Axatana in one cycle
In order to unlock the Axatana in the Virtuos Cycle, you must first collect an instinct with all 4 weapons. Basically you will have to do 4 runs, starting out with a different weapon every time, and collect at least one instinct with them. After unlocking the Axatana, this achievement will come naturally while playing with the Axatana in the Virtuos Cycle, the instincts are random so you have no way of predicting when you will find four you need. This achievement can only be completed in the Virtuous Cycle and will unlock after finding the last weapon instinct.
OP AF
Acquire 100 instincts in one cycle
Instincts are an upgrade mechanic unique to The Virtuous Cycle. When playing through this game mode, you do not retain any upgrades or abilities you've collected from the Main Game. Instead, you begin each Cycle with a blank template consisting of your chosen Shell, Weapon and Riposte type. In order to build up your character during a given run, you will need to collect Instincts.
Instincts are primarily obtained by interacting with the Pillars spread across Fallgrim and beyond. Pillars are sometimes guarded by enemies and will glow orange until all enemies in the area are defeated. Some Pillars glow yellow and require a Tar offering to unlock an Instinct while some are free to use. To unlock this achievement you will need to collect a total of 100 Instincts during a single run, if you search out for all the pillars and loot/kill everything in each map you should be able to get complete this by the time you reach the Seat of Infinity.
Gateway Drug
Spend 100,000 tar in The Virtuous Cycle
This one can feel a bit overwhelming at first, but when you take into account that all Tar consumables re-spawn every time you start a new Cycle you'll find that soon you'll have a stockpile of tar to spend. Additional, if you focus your glimpses into the "Retain Tar" upgrade from the shop you'll be able to keep more tar after each run.
Seedbearer
Return your first seed to Twin Sister
After defeating the 3 area bosses and all 4 Dark Shells you will have completed a run in the Virtuous Cycle and will be awarded a Seed of Infinity. Take this seed to the Twin Sister in the Reverie to Unlock the achievement.
Note: You can also complete the "Change of Heart" achievement by occupying the Hadern shell before turning in the seed.
Change Of Heart
Return a seed with Hadern in The Virtuous Cycle
Once you have completed a run in the Virtuous Cycle and obtained a seed, you will be warped back to the Reverie in your Foundling form. Head downstairs and occupy the Hadern Shell before turning in the seed to the Twin Sister to unlock this achievement.
Fashion Shells
Unlock all Shell Shades for The Virtuous Cycle
There are a total of 18 different shade that you will need to obtain in order to unlock this achievement. In order to unlock all the shades you will have to complete the following tasks:
Foundling Form Condition Super Meatboi Shade
Aurum Ascendant Shade
Obsidian Shade Reach the First Temple as the Foundling.
Reach the second Temple as the Foundling.
Complete a Cycle as the Foundling. Harros, The Vassal Condition Sun Vassal Shade
Burden Keeper Shade
Corrupted Shade Kill 60 Brigands with Harros.
Kill Vim 5 times with Harros.*
Complete a Cycle with Harros. Solomon, The Scholar Condition The Count Shade
KVLT Shade
Corrupted Shade Kill 40 Nocteserpers with Solomon.
Kill Ven Noctivagu 5 times with Solomon.**
Complete a Cycle with Solomon. Tiel, The Acolyte Condition Slytherin Shade
Serpent's Lust Shade
Corrupted Shade Kill 40 Slaves of Scorn with Tiel.
Kill Enslaved Grisha 3 times with Tiel.
Complete a Cycle with Tiel. Eredrim, The Venerable Condition Yellow King Shade
Anointed Butcher Shade
Corrupted Shade Kill 20 Faceless Cleriks with Eredrim.
Kill Grisha 5 times with Eredrim.
Complete a Cycle with Eredrim. Hadern, The Deliverer Condition Fool's Gold Shade
Crimson Herald Shade
Corrupted Shade Kill 100 enemies with Hadern.
Kill 10 mini-bosses with Hadern.
Complete a Cycle with Hadern.
* Vin can be found in the Monument of Ash, the second area in the Shrine of Ash.
** Ven Noctivagu can be found in the same cave where Tiel's shell was found in the Main Game.
There Can Only Be One
Beat all variations of the Dark Shells in The Virtuous Cycle
After defeating the 3 area bosses you will be taken to a flooded area to face off against a dark variation of Harros, Solomon, Tiel and Eredrim. You will first face off against on of the four shells, and after defeating him two more will awaken for a 2v1 fight. If you manage to survive the 2v1 then the last shell will awaken and this will be the final fight before completing the Cycle. In order to unlock this achievement you will have to complete four runs in which the LAST shell you face is always different. Here are some custom seeds that you can use in order to guarantee that the last shell is always different.
Harros, Eredrim & Solomon, Tiel = 185744
Harros, Eredrim & Tiel, Solomon = 832720
Solomon, Eredrim & Tiel, Harros = 767553
Solomon, Harros & Tiel, Eredrim = 720864
True Nektar
Return all seeds to Twin Sister and break the Virtuous Cycle
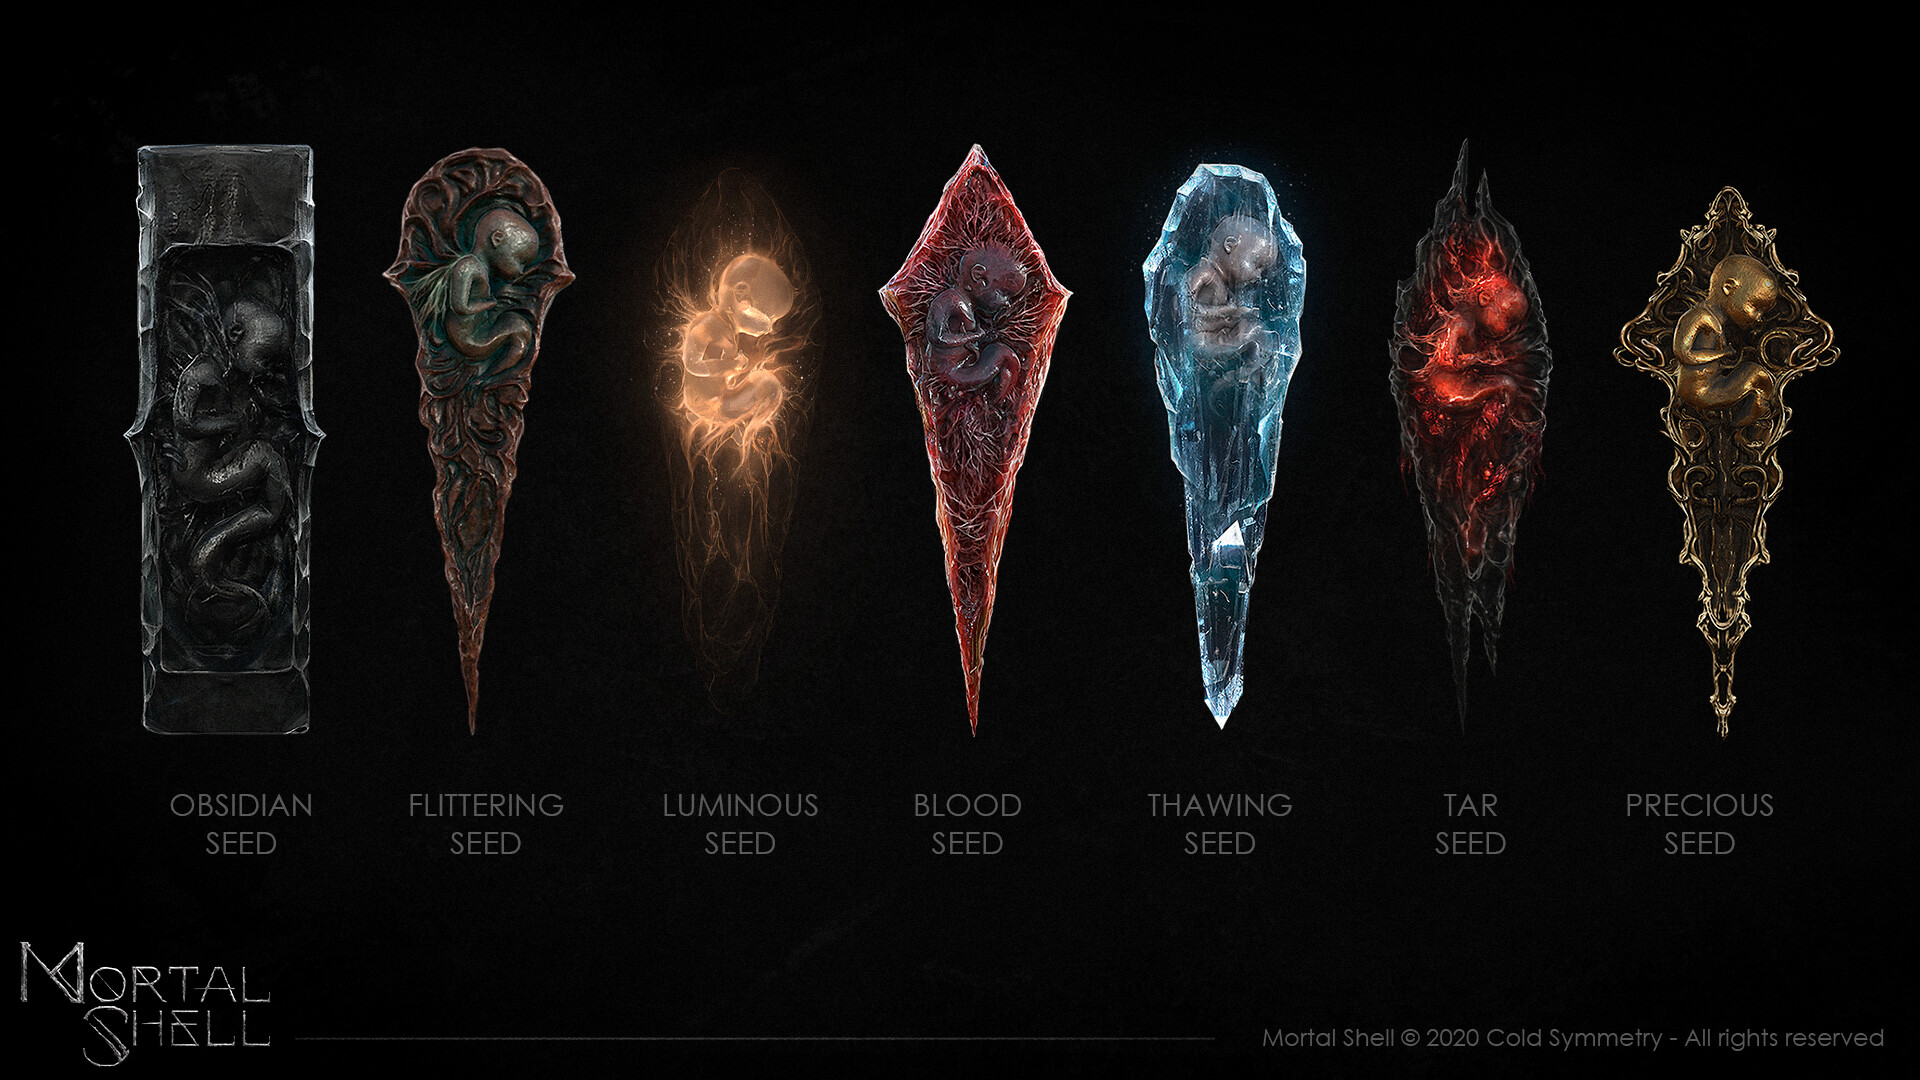
Once you have completed a run in the Virtuous Cycle you will be awarded a Seed of Infinity. Everytime you complete a cycle thereafter you will be awarded one of the following seeds:
The achievement will unlock after collecting all 7 seeds and turning them in to the Twin Sister.
No Lifer
Complete a run in The Virtuous Cycle with the Dark Form Obsidian Shell Shade
This achievement is not as hard as you would think. At this point, after having completed a no-hit run in the Main Game and unlocking the Dark Form Obsidian Shell Shade by completing a cycle in the Foundling form, this will be like a walk in the park. Finish a cycle once more while using the Dark Form Obsidian Shell Shade to unlock this achievement.
-------------------------------------------------------------------------------------------------------
Credits to The Pants Party[www.xboxachievements.com] for his amazing guide that served as the foundation for this work.
Source: https://steamcommunity.com/sharedfiles/filedetails/?id=2621324016
More Mortal Shell guilds
- All Guilds
- No Lifer Achievement
- Mortal Shell Maps
- Mortal Shell ()
- No more super blurry DLSS!
- Guide for the lost
- Complete Map
- Performance Tweaks
- Guide 4
- Update DLSS for Sharper Image Quality