Introduction
Greetings everyone. My Name is LaFlyingSpartan. Or Simply 'Spartan'. I am a Moderator and Beta tester for the game and am here to share with you Everything i know. (Or remembered whilst writing.) I will keep some Notes here for what needs to be added for the Future in case you come Looking for here, These have yet to be added.
Screenshots detailing The Main Island.
Screenshots detailing The Caves
To be honest just Screenshots, Always need more. Damn.
The Boss
Events
The Forgotten City.
A General Guide of Progression
Tool and Weapon Classes
Farming
In Depth Building
Closing
Notice and Spoilers Please bear in mind this Guide is based on the Release version and will subject to future change. I will update this Guide when i can. This is your warning that the Guide will have a lot of spoilers, I highly suggest you play the game first before reading this guide and Simply use it if you are looking for information, Or are stuck. I will attempt to hide Most spoilers in the Dedicated spoiler markers so view those at your own risk. Any Lore indications or world building ideas will not be explored in this guide as it will be purely based around Gameplay, Mechanics and Progression.
The UI
This section will Cover Lens Islands UI Across All of it's Menu's In a general Way, Including Camera Modes, What You'll see and how you will Interact. Further also going into explaining little parts and details in the UI for the Ease of the User.
Len's Islands UI Is simple, It's designed to be out of the way and out of the players view as best as it can in an isometric perspective whilst also providing you everything you need. We will cover the UI Here. In this section we will Cover the Backpack, Inventory management, Camera Options and Interactions in your Inventory. To bring up your Inventory press TAB
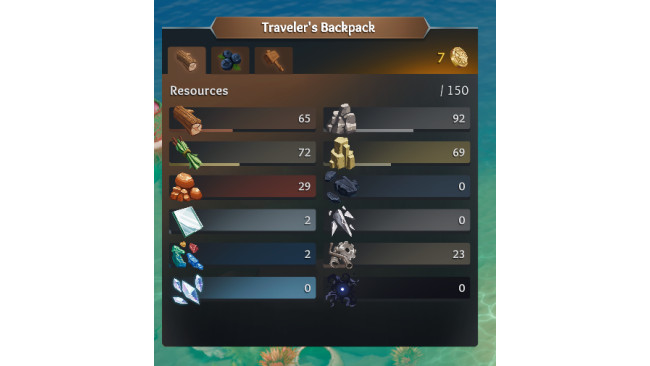
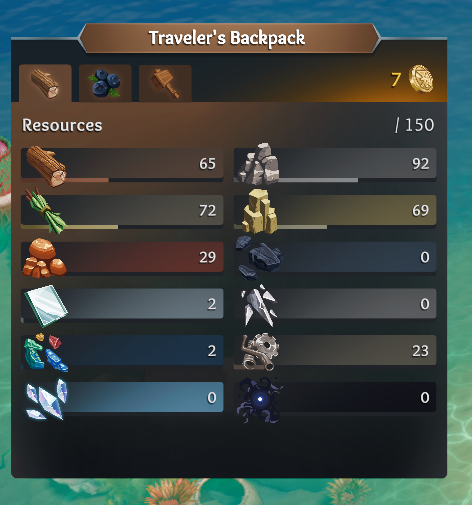
____________________________________________ This is the Resource section of your Backpack. Your backpack is the bread and butter of your inventory management. This section of your backpack displays what you carry, The White number at the top right (/150) Displays the Maximum you can carry with that Level of Backpack. Hovering over the Icons of the Resources tell's you what Resource is there and of course this section displays how much you can carry. Once you hit the limit in your backpack and are unable to carry anymore resources, The resources will remain on the ground till pick-up or a loading screen. With Len's Island having very few forms of Storage aside from your Backpack. Your management of your Resources can be crucial in ensuring you don't have waste in your Adventures.
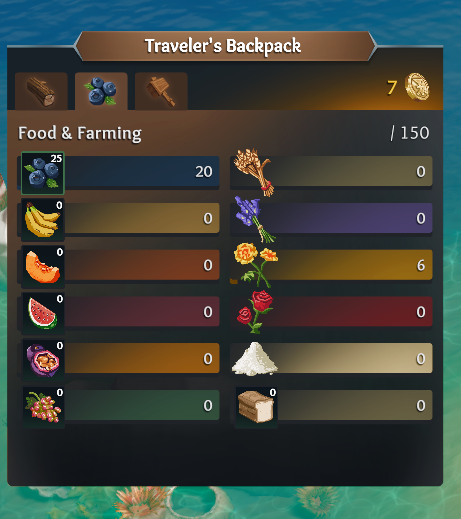
This is the Food and crop section of your Backpack. This includes anything farm related outside of building. In this menu you can drag out your Selected food stack in their assigned stack; The number displayed on the icon Represents how much you can drag into your Hotbar to the Max Stack. You can take food out your inventory no matter where you are as long as you have that Resource available. It follows the same item cap that the backpack carries and will increase on higher level backpacks.
Left(RRS) Right(RRS) Left(Food) Right(Food) Wood Stone Blueberries Wheat Fiber Limestone Bananas Lavendar Clay Coal Pumkin Marigold Glass Iron Shards Watermelon Roses Sapphires Salvaged Metal Passionfruit Flour Lightstone Dark Essence Grapes Bread The Building Menu. This is your section of your Backpack. This section has 4 Tabs that Go as follows.
General Building Tiles
Farming Based Tiles
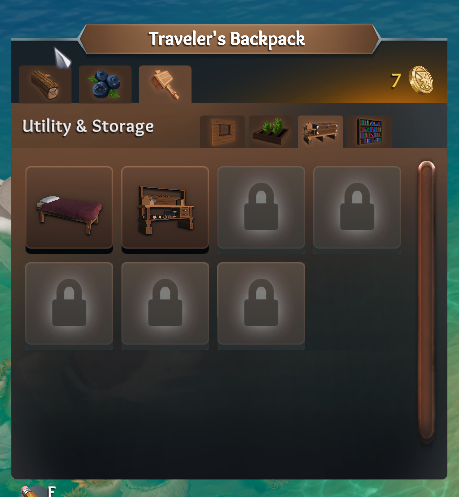
Utility & Storage Section
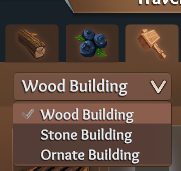
DecorationsThis Page in your Inventory displays the pages of your Building needs. These pages in all your building Sub-Menu's will have Lock Icons on them when you first start, This is because you haven't unlocked it yet. This can be unlocked using the Designated resource at a Workbench. There are different materials and ways you can build. The Three ways you can Build are
Wood
Stone
OrnateStarting with General Building Tiles, This will include Your Foundations, Walls, Roof Tiles, Windows, Fence's, Balconies and Other Odds and ends like that. These are the most basic and advanced of all your building ideas so do have fun exploring with these. (We'd also love to see you posting your Builds and Designs in the Discord!)
Onto Farming Based Tiles These are as they are titled, Farm based. This will include your necessities in order to make Farming as easy as Possible, Containing things from a Crop Plot all the way to a Water tower and Mill Which will help shape the way you Harvest and Craft in Len's Island.
Your Utility and Storage Tabs will contain also as they say, The first thing you will have unlocked in this Menu is the Bed. This is where you will Save and Sleep at (Outside of the Starter Raft which contained the Bedroll and Tool/Weapon Inventory.) Sleeping allows you to skip Nights which can help in speeding up the Plants in your Process for example. The other Important object in your Utility is the Work Bench Which will allow you to Research new unlocks for your Building Menu and craft new Equipment for your Len, This bench can be upgraded with the required amount of resources. Later in your Utility and Storage you have Weapon/Tool Storage and a Place to smelt resources and Cook Food And for your music Tastes, A gramophone is available so you can Enjoy the Lovely Music By 'Lars Erik Fjøsne-Eide'
Lastly Decorations Which contains the rest of your General building items. Of course these are filled with all the Decorative and Visually pleasing placeable objects for your Home. There's plenty enough items here to be able to find a match for any home created.
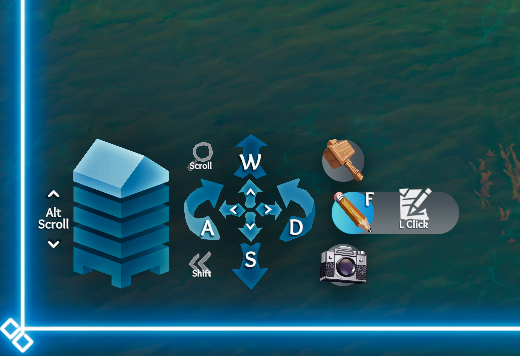
This is the Advanced Camera Menu. To access this open up your Inventory TAB And Press F (You may Also open the Menu and Click Screenshot mode to get this.) To open up into this window which will highlight your Screen with a Blue border. The major features this allows you to do is Rotate and Move your camera for Lovely Screenshots. It includes some effects built into the The Screenshot mode which is selectable there. This Camera mode allows you to get into a bit more advanced Building. Whilst Holding ALT and Scrolling on your Mouse Wheel you may Slowly cycle through the height Level of building layers. This includes Everything down to simply just the Floor. It allows you get more angles and Precise building in your Creations.
The last thing to include here is that if you Click on any placeable object you will bring up a little Menu. This is primarily used in your general building blocks for the game. This will allow you to upgrade to certain different forms of that block, Such as foundations upgrading from Wood to Stone Or even back to Wood. Your resources spent will be refunded and exchanged for the equivalent of what that original price of placing down that said object would of been.
The Island
This section will Cover Everything You will need to know about the Main Island your Len will Live on, Including Normal and Key Locations, What spawns here and things you will Run into.
The Main Island, The one you spawn on. The one you live on and ultimately the place you will thrive in your time on Len's Island. This island has a lot to offer you and Your Len for the time you spend here, It'll take up a fair bit time in spending here just as much as the Caves will so it's nice to get comfortable and acquainted with the Island. Learning it helps you not to get lost either and to earn a bit more in your adventures.
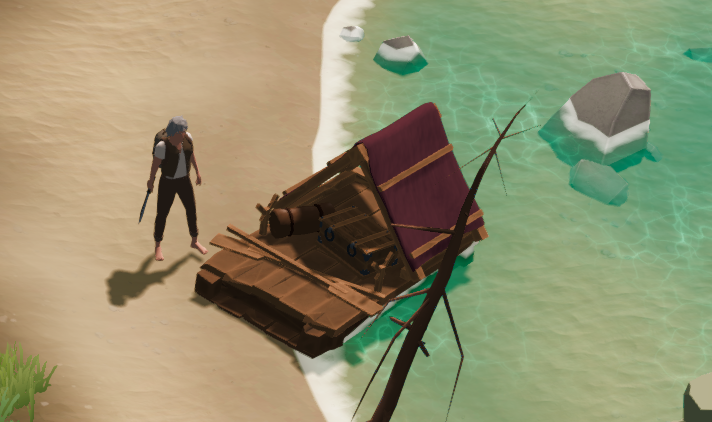
First Impressions When you first load into Len's Island you are Greeted to a warm Morning, The soft lap of the beach against the shore And your Len. Shoe-less and awaking on the Island from the Raft. This Raft is your start, It contains a Bedroll tucked into the inner left of it. It will allow you to sleep when the night comes and save at it when you need to; Next to it is a Small Item Box, This contains your starter items that will already be in your Hotbar but in case you loose them for some reason you can always return here to pick up a new one.
The Island contains a lot of Resources, You can see most of these resources in your Backpack Resource menu but not all of that is on the Island, I will list All the Items you can Find on the Island. Drops that are Underlined have a chance to drop but aren't Guaranteed.
Barrels - Drops Salvaged Metal
Bottles - Drops Glass
Wooden Chest - Drops Salvaged Metal, Iron Shards, Gold and Light Stone
Bushes - Drops Fibre
Fibre Plant - Drops Fibre in Abundance
Blueberries - Drops Blueberries
Marigold - Drops Marigold (Orange Flowers)
Lavender - Drops Lavender (Purple Flowers)
Roses - Drops Roses (Red Flower.)
Stone Node - Drops Stone, Iron Shards
Limestone Node - Drops Limestone
Clay Node - Drops Clay. Sapphires.
Tree's - 3 Sizes of Tree, Each size has more Health, Drops more Wood.All these resources can be found on the Island and A certain Resources only spawn in Certain Areas. For Example Limestone is Only found at Beach's or Slightly in the water And like most of this game, The fun and interest of it is Finding it on your own. (If Requests come in for me to add Certain Locations where Resources may spawn in more abundance i will do that.)
The Island is beautiful and Has many Key Areas that can be Beneficial to you if you choose to Return to them. On the eastern side of the Island there is a little Water walk which leads to a Smaller one. This Island contains the Following. Two Ankle-biters and an Abundance of Clay. And some Limestone This makes it good for those kinds of Resources without being too Dangerous
Towards the Top of the island In the North-West Is a Place called The Sandstone Alter In here you can find more Resources and more Rarer items too, Something you can't usually find around other Areas in the Island. The Area contains the Following 4 Ankle-Biters and 2 Boars. Multiple Barrels and Typically 2 Chests full of Goodies.
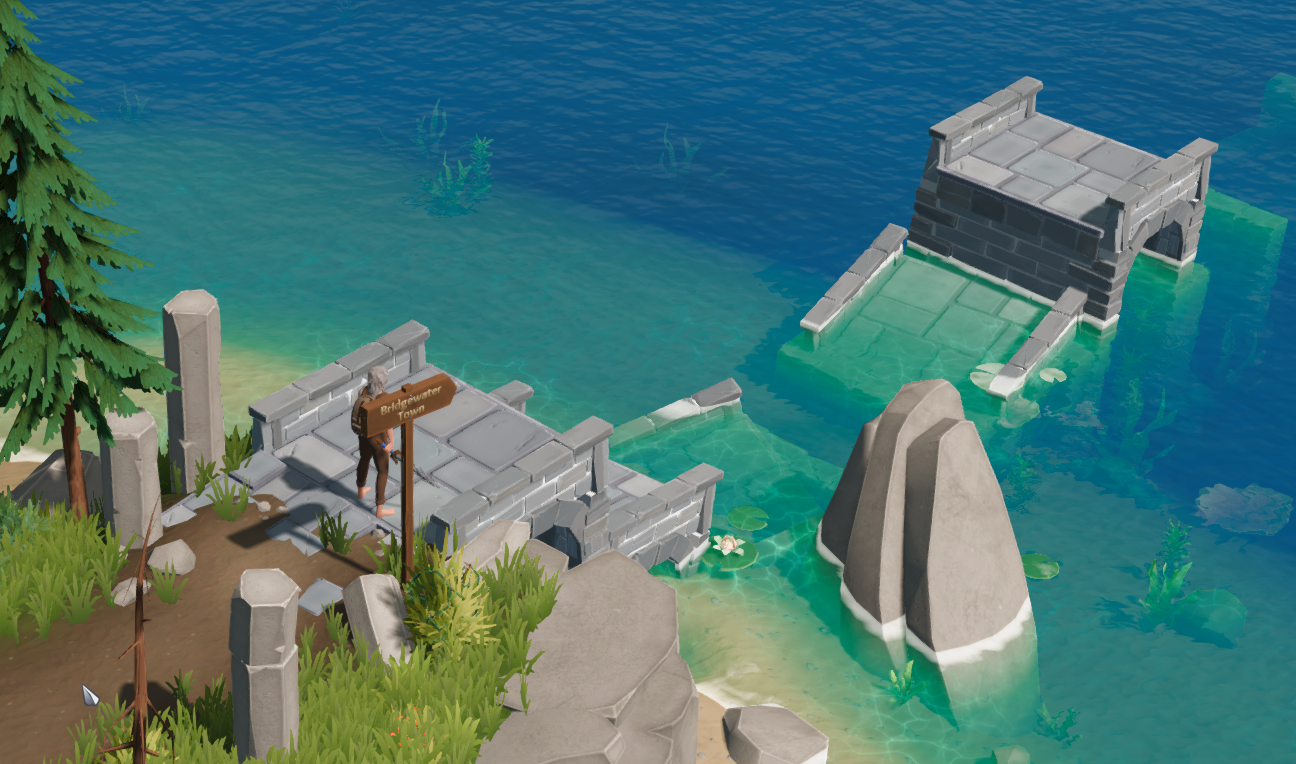
At the Very north, Very top of the Island there is a Broken Bridge. You can skip the first bridge by Jumping on the Rocks to the Right. When you get there you must Spend Resources to rebuild it and it Leads up to a High land Mini island. Up there contains a Broken down Ornate structure and 2 Barrels.
To the West there is What some Players may know as The 'Demo Island' and it's here where More things Exist for you to Find. You can find at the Farthest side of it in the West the Pirate Island Which contains a bit more Loot for you to find and Some Structures for you to Enjoy as well. With multiple ways to Traverse it can be a bit of an Enjoyable area to build around.
(Next part is a Little Secret, So i won't show any Details unless you choose to.) North of the 'Demo Island' Is The 'Lonely Island' Which holds a Skeleton and Sword called The Marlin Which is a great starter weapon you can acquire for free. Can also be reached by Swimming to the Border of the Map and it will reset you to the Island.
____________________________________________Moving onto the Key Areas of the Island, There are Three Key Points. One of these Points will be Redacted with a Spoiler. First the Broken Bridge at the North-East Side of the map which Leads to Bridgewater, The village on Len's Island. It's one of your Key Travel points as you will be going there quite a lot to interact with NPCs and Merchants.
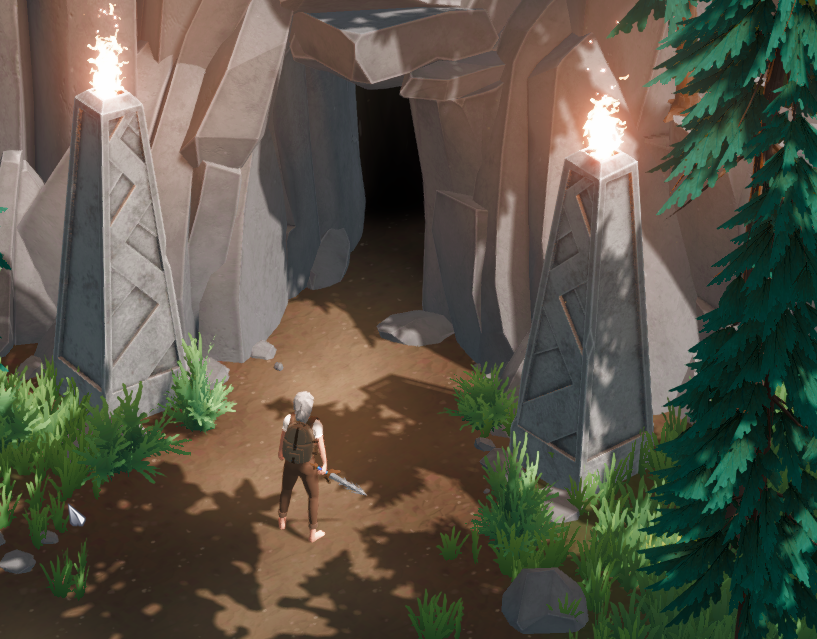
The Second place you will visit is the Cave Entrance, Sat In the Lower Centre Of the Map this is your Access to the caves. Allowing you to gather more Resources than what you can usually get on the Island. Let you Fight, Explore and Adventure. This is another Key Area you will spend a lot of your time in. I'd suggest getting familiar where this is, Especially early on in the game when you are running around in the dark it can be easy to loose your way.
And for the Last Area, Which is Redacted. You unlock this Entrance Later and it sits on the 'Demo Island' This area is unlocked when you are Much farther into the Caves and Unlock a Blocked Mineshaft, Upon repairing it this Entrance is unlocked to allow Safe Fast Travel for Key points in the Cave.
The Town Of Bridgewater
This section will Cover Bridgewater, The Town in Lens Island. It will go into It's NPCs and Merchants, What you can interact with here and what you will find and Expect here.
Ah yes, The town of Bridgewater. A lovely place that our resident Artist 'Daniel Ang'[www.danielangart.com] Drew for one of the many splash arts in the game. But here in this town you will find all you need for your Farmers Dreams, Your warrior hearts or your Gambling Problems. Each Merchant has their own charm to them and each Merchant sell's different produce and certain Merchant's sell equipment. Here's a short Explanation for each Merchant and What they sell before we move onto the Layout of that area of the Map. (Please excuse the lack of Screenshots from here on, I wrote most of this on a Terrible laptop whilst away and forgot to transfer the Screenshots over from my PC.)
The Lumberjack Sits close by the town Entrance and is a simple man, He is a simple man, he stands by his Wooden home and Sells you wood for cheap. And if you desire for some reason, You can sell him wood as well.
The Florist A Strangely Tinted lady that will sell you Some Pretty Flowers and Buy them from you as well. She sits in her little stand by the water front Close the the Smithy. Her shop has Lavender, Marigold and Roses for you to choose from.
The Farmer The Hard working farmers day is never over, Setting up a stall by a Produce patch She sells you all sorts of goods and Buys in produce for a Decent price. She'll happily trade for what you have and is especially fond of Bread, Buying and Selling Blueberries, Banana's, Grapes, [u[Passionfruit[/u], Watermelon, Pumpkins, Wheat and Bread.
The Witch The Witch is a Mysterious figure of the town, Some say she use to live in a House North of the Village. But it has long since been abandoned. Now she lives partially as a Tailor, Allowing you to buy new Pigments for your clothes in exchange for some Resources. She sells you a great Many backpacks But you can Swear the last backpack she sold you was whispering. She will kindly take Trade all the Lightstone and Void Guts you find in the Caves. She Buys Lightstone and Dark Essence, She sells Backpacks and Clothing Colours.
The Mason Every Village has its Dedicated builder and the Masonry up by the Mountainside houses this Villages Finest. Well, Only Mason. He's a happy and Dedicated man and is here to sell you all your constructing goods. He Sells Stone, Limestone, And Clay
The Druid A Sleepy old fellow with a Staff that never tips. He spends most of the day napping in his Chair and exchanging his Fine All Natural Equipment in exchange for Produce. I'm sure he Hangs out behind the Farmers market just to enjoy the Smell of the Fresh produce. He will sell you The Nature Set of Equipment.
The Blacksmith The hard working man who Bangs against Steel all day working to bring you the Best of Equipment. The blacksmith Works hard for his weapons and His Refined Equipment is certainly nothing to scoff at. He Sells The Refined Set, Iron Shards, Coal and Salvaged Metal.
The Fishermen The Fisherman and His captain sit by the Docks tending to their Stock. They sit in port looking to sell their Sea worthy weapons. From them you can buy a Sturdy set of Equipment. They sell the Fishermen Set and Glass.
The Pirate Arghhh! You'd often hear the Pirate call as customers passed his Bargh! Though a loud chap he is an Honest one. Selling you his Fine wares and even offering you Rounds of blackjack, Though he may complain about a Loss he always holds his end of the Bargain. He will sell you The Pirate Set and Play Blackjack With you.
The Travelling Merchant An odd man comes into Port and whilst most Villagers know him he Holds a lot of equipment not like the others. He Sells these Fancy and Strange Weapons and Arms but never shares where he got them from. What does it matter though? They work wonders against everything sometimes you even feel faster! In the end he seems like a Honest working man. He Sells you Sapphires and the Exotic Set.
These are the Core NPCs of Lens Island and the ones you will Currently Interact with the most. There are a few more NPCs sprinkled around Such as the Mayor that stands by the Town Bridge, But as of this Moment they just have Limited Dialogue and nothing really to interact for at this time.
There are a Few Things Sprinkled around the Town for you to interact with, Directly north from the Bridge Is a little Plot of Land you can Buy and build it. I'd suggest looking around the Village and the entire area itself for the Little bits Sprinkled around. (Next Contains some of those.) There is a Build-able Ladder in the North of the Town, You can skip Building this by Jumping on the Rock to the Right and Air Rolling Across. Loot and A note are Up there. Swimming out of bounds resets your Character to the Beach, Surrounded by Alcohol Bottles.[/spoilers]
The Caves
This Section will Cover everything to do with the Caves. Most things from here on won't have spoiler alerts as you would of Discovered most by now, Only a few things will be Spoilere'd so venture forth at your own risk. Here i will tell you what you will Find in the Caves, Resources and Enemies. What lurks Deeper and Little Tips to Help you along the way. It will be Split into Two Parts. First Half being the Caves, The other being The City
The Caves.
The Caves are a Mixed bag of Feelings, There's so much adventure Yet you will put caution behind every step. The feeling of getting new resources and the feeling of exploring the Dark unknown puts a lot on a Player. I wonder how you fill find it?
These Caves hold an abundance of new Resources for you to acquire. From new Foods that you can't find Naturally on the Surface to Iron Shards for you to Work on your Next weapon. Here is what you will find naturally down here. (Remember anything Highlighted only has a Chance Of dropping.)
Stone Iron Nodes - Drops Stone and Iron Shards.
Stone Coal Nodes - Drops Stone and Coal
Stone Nodes - Drops Stone and Iron Shards
Large Stone Nodes - Drops Stone and Iron Shards.
Lightstone Nodes - Drops Lightstone
Barrels - Drops Salvaged Metal
Small Crate - Drops Passionfruit And Grapes Medium Crates - Drops Fibre
Chests - Drops Salvaged Metal, Gold, Iron Shards And Lightstone
Lightstone Chest - Drops Lightstone.
Gold Lighstone Chest - Drops Lightstone in Abundance.
Enemies - Dark Essence.The Caves are filled with Many Resources and most Resource spawns won't be the same the next time you go in, Most of the placement in Lens Island is hand placed but when it Comes to Resources there is some RNG That comes into what Spawns and where it Spawns. No one trip will ever be the same for Resources and that is Especially prominent in the Caves. There are multiple Areas in the caves that are Abundant in Resource Nodes which are worth fighting through to conquer for the Extra resources. There's also a Lot of Monsters or 'Voids' and their spawners. Here are the different types of mobs you will encounter in the Caves.
Ankle-Biters - The Smallest of the Void Creatures. Very Small HP, Typically hunt in Swarms and attack with a small Lunge or Bite. Can Spawn from a Spawner.
Voidling - The general Void Creature, Small HP, Runs on all Two and Hops for an attack, Swings for an attack and Isn't too Dangerous but can be intimidating. Can spawn from a Spawner.
Void - A Large Void Creature, Very fast, Very healthy and Very strong. Can be fought without too much Fuss on its own but if Often paired with other Creatures which can make it a menace.
Name TBD (I refer to as Boar.) - Is the Large Void on the Island. Is Resistant to most Slash Attacks but takes normal Damage from Blunt and Pierce weapons. Very healthy, Very damaging if it catches you, Attacks are slow and lots of Openings.
Name TBD (I Refer to as Thunderbugs.) - The Thunderbug is a Slow and Has a medium Health pool. But what it lacks it makes up for in Damage, The Thunderbug Strikes you at Point blank for a lot of Damage, On its own it isn't too dangerous but is often paired with other Enemies making it a great support to Swarms. Very High Damage, and Reasonable health pool, An enemy to be cautious with.
Voidboar - The Big Boss at the End of the City section of the Caves. Voidboar has a Lot of HP, Being a Boss after all and Hits Reasonably hard. He has Two Phases, After loosing a Third of His HP He is imbued with lightning and Looses the Default 'Boar' Attack Set in Trade for a Custom Thunder set, His Basic Swing Sends an AoE Shockwave through the arena which you can Either Roll Through or Jump over. A Thunder Breath attack which can deal a lot of damage if you are caught in the Centre and its Charge attack which lets it catch up to Fleeing players. Can take a few attempts to beat.
When you first enter the caves You are greeted to a few Lamps, A broken bridge and Resource nodes to your Left. There is a Box Just next to the Entrance on the right so you are free to change your Equipment when you feel like it. Following the Broken bridge that you can Repair from the Other side for a small cost of Resources. You are free to explore the cave, There are a few Noteworthy Landmarks within the Cave. These landmarks are quite different from the Usual places you visit, Whilst i Won't give exact directions to these Landmarks i Will share some Details about them.
The Upper Quarry Was a Quarry that sits higher in the levels of the Cave, It has a a Few Resource Nodes and a Brazier that sits in the Centre that lights up plenty for you. Up to the tops of it has some Void Spawners.
Lower down There's another 'Lower Quarry' section that's not as detailed but Holds the most Resource Nodes, But also a lot of Ankle-Biter Spawners. With a few normal Voids Mixed in. Typically the tops of this area has a few Barrels as well.
There's a Section that brings you up to a Broken Down house after rebuilding a ladder, Some Resource nodes and Spawners there. Another Similiar one in the Cave without a ladder but Instead it's a little hidden and by a Jumping Puzzle with a few more Nodes and Spawners on the way.
There are a few More around in The Cave's but you won't encounter them as much as others And it's always good to leave a few for player's to find outside of the Guide, But of course if it's requested i will add every single one with the Short Descriptions of the Areas.
There are Many Interactables in the Caves for you to enjoy. This Falls into Things Such as
Lamps
Braziers
Lightstone Runes.
Notes.
All light sources, Lamps and Braziers you can light using Coal and they will stay lit forever, standing near a Brazier will heal you for (5) a Tick. Be wary that enemies can also heal from These Braziers so combat near them may not always work in your Favour. Lightstones on the other hand are Important to light, They will allow you to open the Gate for the Voidboar Boss passed the City Section.
This Next Section will be about the Second Half of the Caves known as the City, I'd suggest leaving this part out till you've first explored the Caves, Otherwise feel free to have at it Here.
The City
At somepoint during the Caves you will found a Place Titled The Forgotten City Which is the Spike in difficulty and progress in Lens Island. The City Holds More Resources than the First half of the Caves. Here's what to expect when Going into the City.
The City is Hard, It is infested with so Many Voids, traps and Loot. There are a few Major things to point out with the City. First of all being the Events. There are 3 Major Events in the cave Which i will Detail Here.
Event 1 - This Event is the First one you will encounter into the Cave, In this Event you will Run into a Few Large Voids, and 4 Voidling spawners. The Event is designed to first catch unprepared players off guard. You can quickly be Overwhelmed in this Scenario and Killed very quickly if you are caught in the Crowd of Voids. Here is How i suggest you Clear it. Immedietly run for a Close by Spawner. Spawn Swinging at it and then go for the other one, You should take Minimal Damage as the Voids are only winding up. Next Start Taking on another, if you feel you are taking too much damage attacking these Spawners then Slowly Kite the Enemies around the arena and Deal Damage to each spawner till they are all Dead, If you are carrying a large AoE Weapon this Strategy is quite effective, Faster Weapons can take out the Spawners quicker. So the choice is yours.
Credits And Thank You.
Special thank you to the Len's Island Dev team for allowing me access to their Game early and letting me post this guide. Please support the game By Purchasing it and Its Sound Track on Steam. As thees Passionate Dev's worked very hard on this Game.
Steam Game: Lens Island.
Thank you, User 'Vytalessence' For pointing out i Missed Roses out on the Island, Durr Me.
Source: https://steamcommunity.com/sharedfiles/filedetails/?id=2659283113