
List Of All Weapons
➥ UNSC Weapons MA40 Assault Rifle
M392 Bandit Rifle
BR75 Battle Rifle
VK78 Commando
MK50 Sidekick
CQS48 Bulldog
S7 Sniper Rifle
M41 SPNKr
Hydra
➥ Banished Weapons Pulse Carbine
Needler
Plasma Pistol
Energy Sword
Gravity Hammer
Mangler
Disruptor
Stalker Rifle
Ravager
Skewer
Shock Rifle
➥ Forerunner Weapons Heatwave
Sentinel Beam
Cindershot
ㅤ↳ UNSC Weapons
ㅤ︱MA40 Assault Rifle
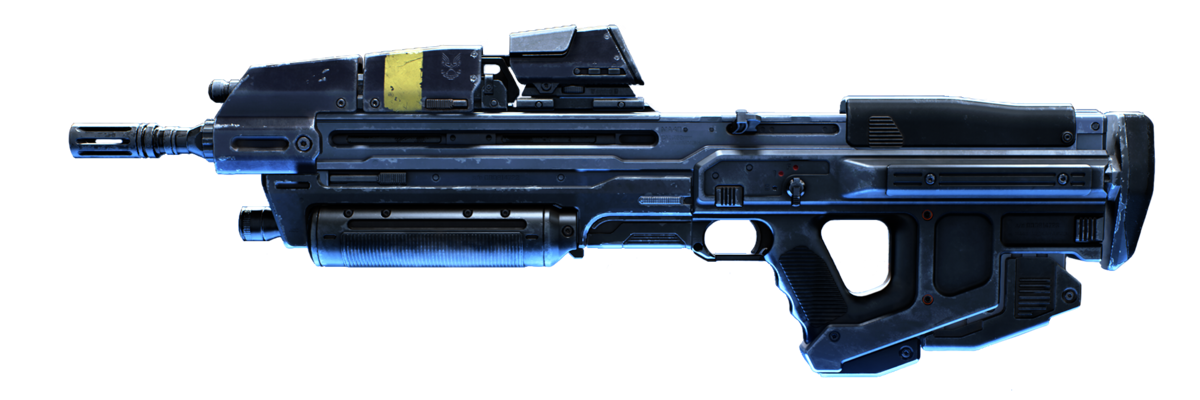
➭ Starter weapon for majority of modes (disincluding modes: Ranked Arena, Tactical Slayer, Fiesta).
➭ It has a 36 rounds in each magazine, with a high fire-rate.
➭ Mostly effective at short to medium range.
➭ Takes around 20 shots to body or 15 headshots to kill an enemy Spartan.
Note: Don't spray and pray. Considering the longer you fire, the more bullets spread in different directions. It is recommended to fire in short bursts to remain accurate.
Pros: The smaller maps such as Aquarius, Bazaar and Streets will benefit most from the use of the MA40 AR, since you will almost always be able to find a quick route into a short to medium range fight, and long range fights will be relatively rare unless you want to actively force them with specific weapons. You'll probably find it far more difficult to use the MA40 AR effectively on large maps which feature a lot of open space, such as Behemoth, but if you're restricted to using it you'll find it all the more important to know the map features, with a good idea of where you can take cover to encourage close range fights. One of the most obvious strengths of the MA40 AR is the high magazine count combined with a high rate of fire. This gives you enough ammunition which you can dish out at a great pace to save you in some tight spots, even if you're just praying and spraying. The extra few bullets that the MA40 AR provides and the rate at which you can fire them can make all the difference between winning and losing a fight against an opponent with fewer bullets and slower rates of fire.
Cons: Although it's possible to use the MA40 AR at long range if you don't have access to any other weapons in a particular fight, you'll soon find that it is outclassed by weapons which are intended for long range fighting, such as the VK78 Commando or or S7 Sniper Rifle. This doesn't mean that you should never attempt to fire at long range; if an opponent is low on health you may be able to hit them enough to finish them off. You can also fire in the direction of an enemy at long range for the primary purpose of suppressive fire, rather than with the intention to kill them being the primary aim. Ultimately, the best way to play effectively with the MA40 AR is to prefer fights at short to medium range. If you need to confront an enemy located in the distance, you can use map features to take cover and gradually make your way towards them as your energy shield recharges from incoming fire.
Mag Capacity 36/108 Ammunition Kinetic Zoom ✓
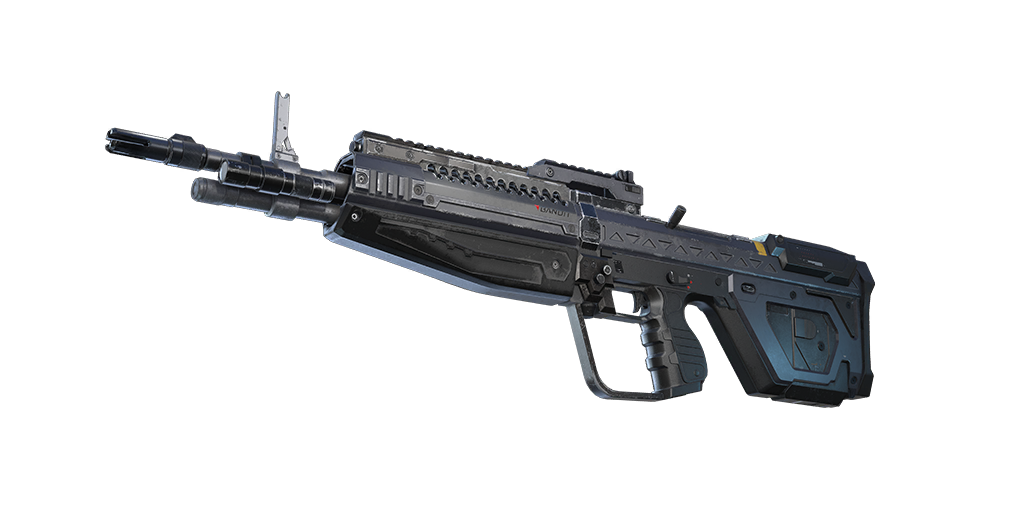
ㅤ︱M392 Bandit Rifle
---------------------------COMING SOON-----------------------------
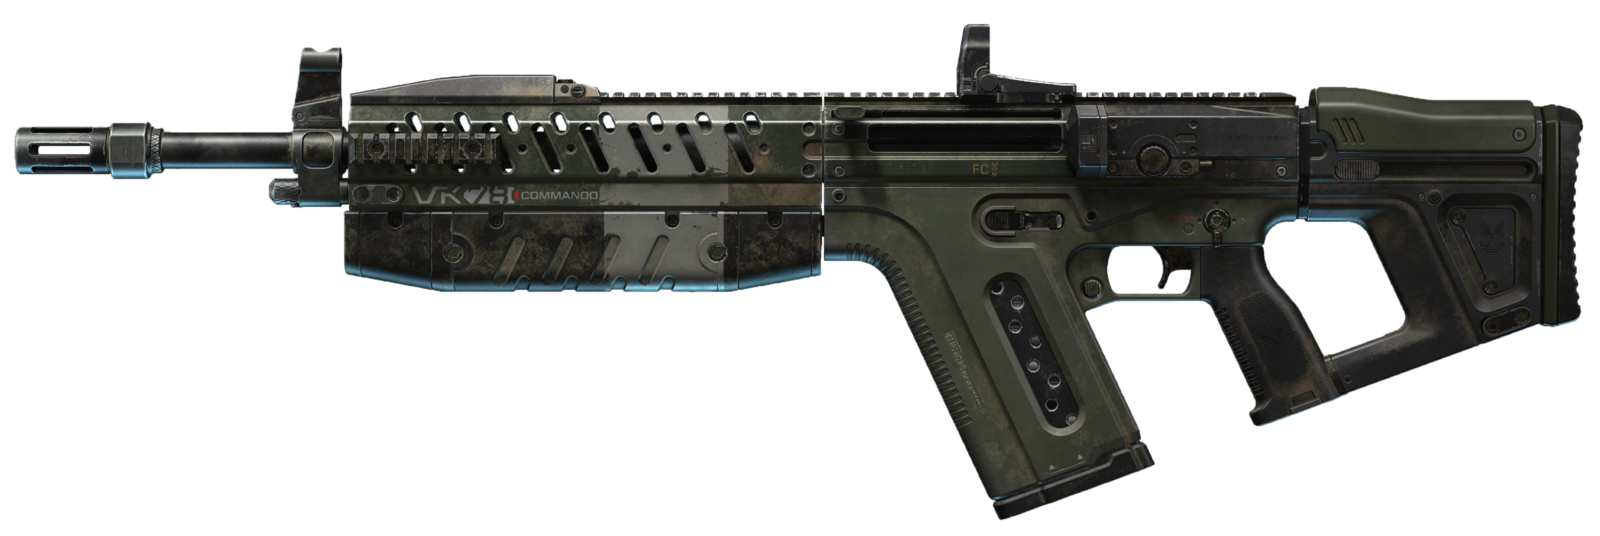
ㅤ︱BR75 Battle Rifle
➪ Starter weapon for Ranked Arena and Tactical Slayer.
➪ It has 36 rounds in each magazine, with a burst fire-rate.
➪ Mostly effective at medium to long range.
➪ Takes 7 burst shots to the body or 4 burst shots to the head to kill an enemy Spartan.
Note: Make sure to maintain full magazine as often as possible. I can't stress enough how often I wouldn't reload when I had my chance during breaks, and I'd get killed because I'd run out of ammo.
Pros: Although headshots are important for the fourth and final burst of fire on an opponent with the BR75, you don't need to aim for the head for the first three shots, at least if you begin the fight in a scenario where your opponent has a fully charged shield from the beginning. This is because the first three shots inflict damage to the energy shield, so even if you hit the head while the shield is active, you won't get the damage multiplier that you get from hitting the head of an opponent without the shield. As a general rule of thumb, it's a good idea to familiarize yourself with the visual effects which indicate when a shield has been "popped" (or destroyed). Whenever you see an enemy with a popped shield, one accurate burst from the BR75 to the head will kill them instantly, so it should be easy pickings so long as your aim is true. This makes it easy to keep track of exactly how much damage you've dealt with the weapon, and what is needed to finish the enemy off.
Cons: The BR75 is a fairly versatile weapon which shines in mid range fights where you can make use of map features between bursts of fire, but you may find that it struggles in some short range fights. This is because the burst fire creates a delay between shots, and if you're overwhelmed by multiple opponents there just isn't enough firepower to dish out in a short space of time. The best way to remain as effective as possible in short range fights with the BR75 is to make use of alternative weapons such as grenades and side arms. You should only need to use these when you can't put out enough fire with the BR75 in a short space of time. However, if you don't have access to any other weapons, you’ll have the best chances if you try not to panic and maintain a steady aim, since consistently accurate aim is rewarded with the BR75 perhaps more than any other weapon.
Mag Capacity 36/108 Ammunition Kinetic Zoom ✓
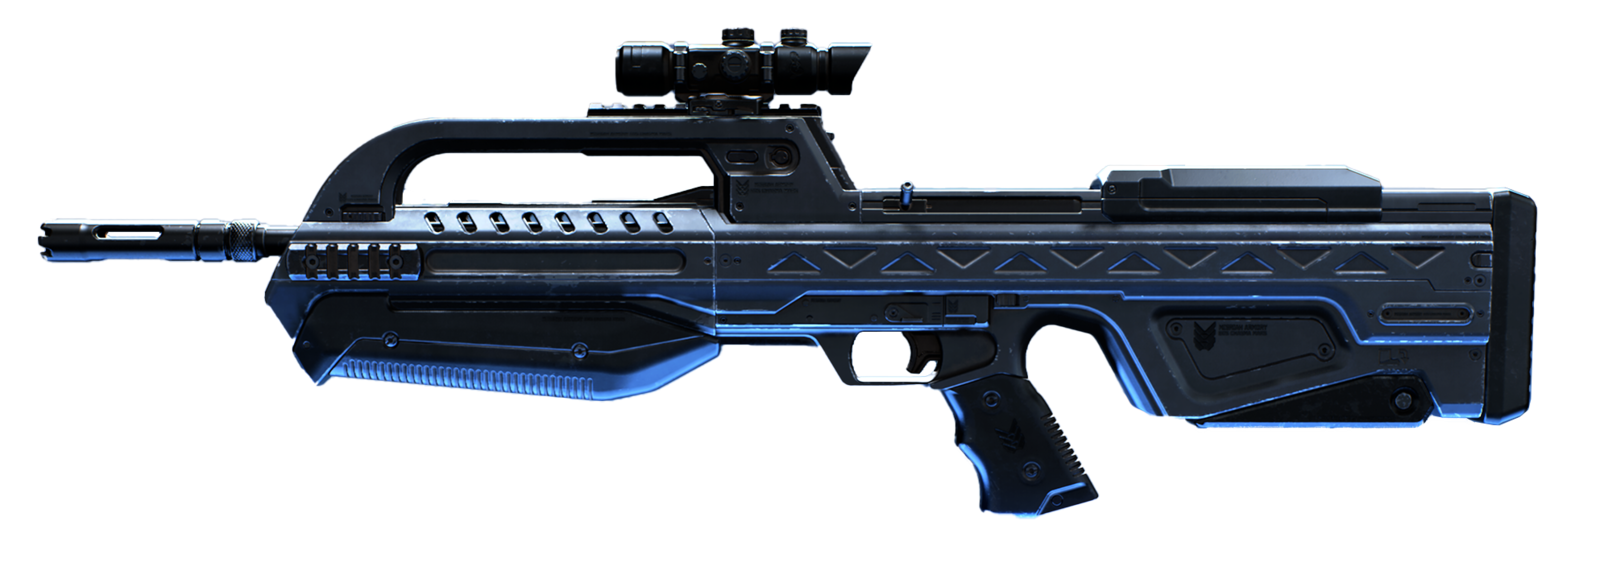
ㅤ︱VK78 Commando
➪ Semi-automatic rifle that has 20 rounds in each magazine.
➪ Mostly effective at long range.
➪ Takes 7 shots to either the body or the head to kill an enemy Spartan.
Note: You will experience some recoil while using the VK75, best way to maintain it would be quickly tapping the fire button rather than holding it.
Pros: As an accurate precision rifle with a decent scope, the VK78 Commando is most effective at medium to long range. If you can control the high recoil effectively, it's possible to take out multiple opponents with one magazine, especially if they’re weakened by grenades or other damage. The combination of a relatively slow rate of fire and high recoil make this a gun that you'll need to regularly practice with to bring out the best in it. Once you've got the hang of it and a feel for the weapon it's extremely satisfying to shoot opponents from mid to long ranges as you scope in and out with the rifle, making the most of its versatility. The lower magazine count forces you to make the most of every bullet, since opponents who wield weapons with larger magazines will have the advantage if you fail to aim accurately. Although the VK78 Commando is intended to be used at mid to long ranges in the best case scenario, it can be used at short range with just as much effectiveness.
Cons: The main drawback of the VK78 Commando is the smaller magazine size compared with other rifles, but if you hit your targets the superior damage and reasonably fast rate of fire for the VK78 can give you the edge. That being said, there will be numerous times when your aim is off or the movement of your opponent will make it difficult for you to hit them. In this situation a rifle with a larger magazine will always be more forgiving, giving you those precious extra bullets to spray before a reload is required. For this reason effective use of the VK78 Commando requires a relatively high level of skill in most situations.
Mag Capacity 20/60 Ammunition Kinetic Zoom ✓
ㅤ︱MK50 Sidekick
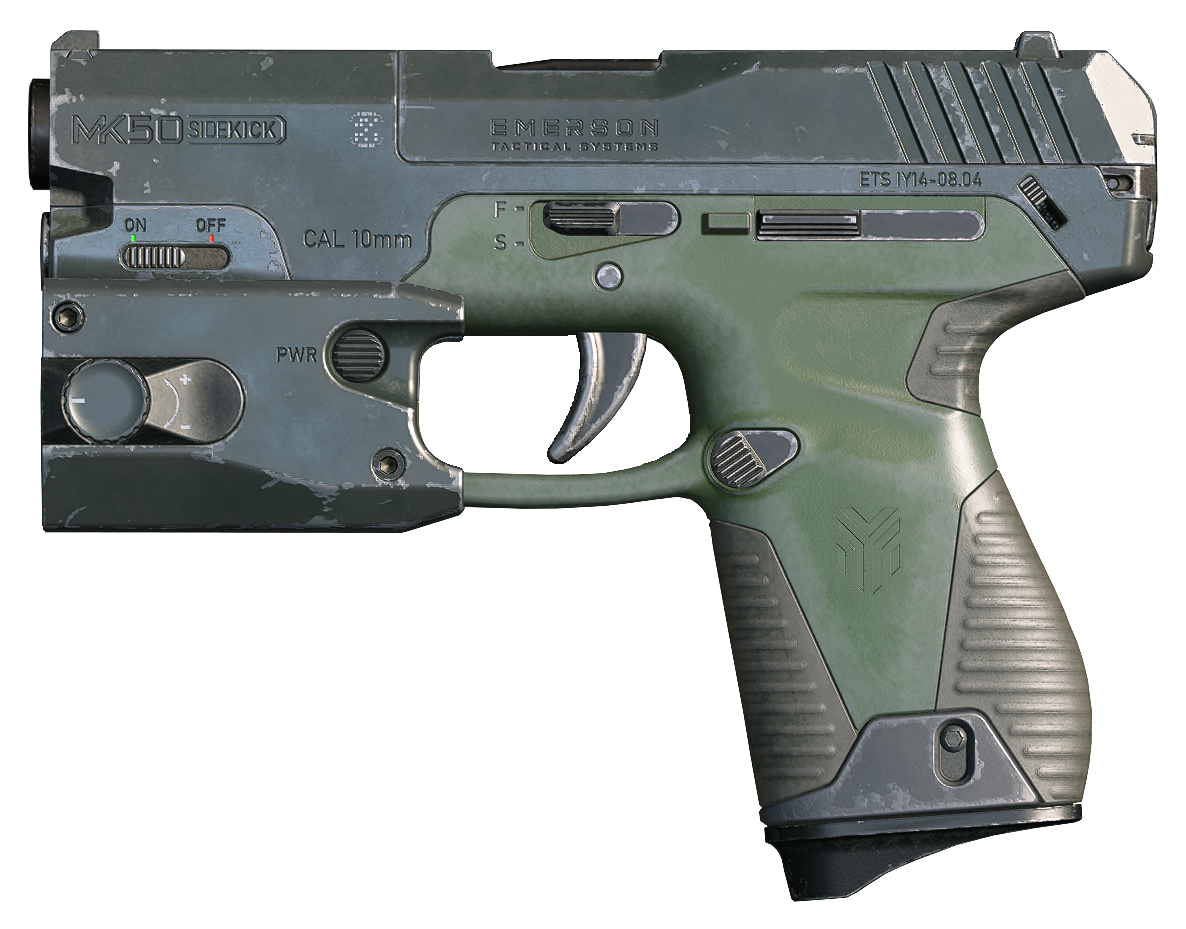
➭ Secondary starter weapon for majority of modes.
➭ It has 12 rounds in each magazine.
➭ Mostly effective at short to medium range, sometimes even long range.
➭ Takes 10 shots to body or 7 headshots to kill an enemy Spartan.
Note: Perform "Quick Draws" when you're running out of ammo in your primary weapon.
Pros: The MK50 pistol performs well in most situations, but it's arguably best used at short to medium range. The closer the enemy is, the easier you’ll find it to aim with this pistol. This is particularly true because the pistol actually has a considerable amount of recoil, something which can be difficult to handle when you’re attempting to aim at long range. That being said, the pistol can be used to hit enemies who are further away, especially with the somewhat limited scope capacity that is has, but you shouldn't expect the same level of success unless your aim is sufficiently accurate. As noted above, the best use scenario for this pistol is as a last minute method to finish off enemies once you’re out of primary ammunition. You'll often take the upper hand if you switch to the pistol rather than wait to reload your primary weapon.
Cons: The main weakness of the MK50 is the fact that there are much more powerful weapons on offer which are effective at short to mid range, such as the various assault and precision rifles, and the CQS48 Bulldog - Shotgun. In general, these will inflict more damage than the MK50, and will therefore be more effective in a one-on-one with either weapon. However, the chances of your starting a fight with the MK50 should be relatively low, since you’ll almost always have a primary weapon which you will use to inflict the initial damage to an enemy. If we consider the MK50 being used primarily as a side arm, it has very few weaknesses thanks to its fast response and rate of fire. The pistol will be consistently useful in short to mid range combat, but its usefulness diminishes the further away your targets are.
Mag Capacity 12/36 Ammunition Kinetic Zoom ✓
ㅤ︱CQS48 Bulldog
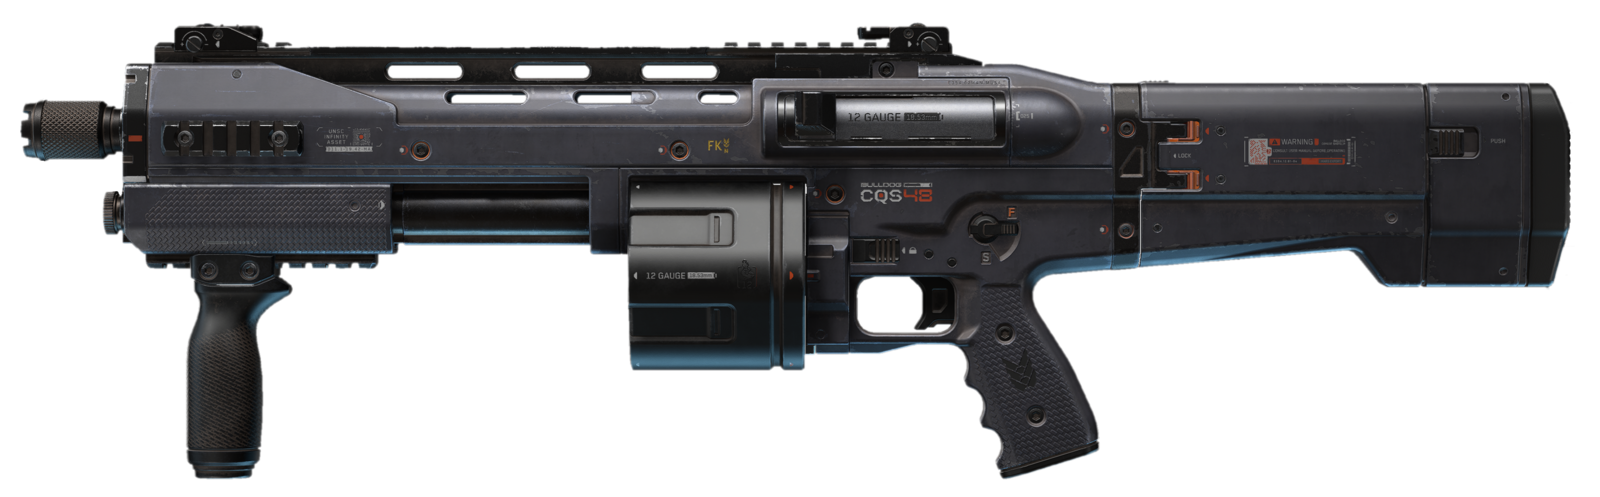
➭ It has 7 rounds in each magazine.
➭ Mostly effective at short range.
➭ Takes 2 shots to either the body or the head kill an enemy Spartan.
Note: It's advised to have an aggressive playstyle while using a Bulldog, thanks to the wide fire spray you don't need to focus on accurate aim.
Pros: The most effective use scenario for the CQS48 Bulldog is at close range. There's arguably no competition among other guns in terms of the capacity to inflict so much damage in such a short space of time. What makes it even more effective at close range is the fact that the ammunition is fired in a wide space in front of you, allowing you to hit multiple enemies with one hit if they’re close enough. In this way you can easily rampage through a group of enemies and quickly take them out, especially if you have the Overshield equipped, which essentially doubles the effectiveness of your shield by providing an extra layer of defence. As such a powerful weapon with a fast response time and rate of fire, the CQS48 is perfect for stopping opponents at critical moments in time-sensitive games like Oddball. You’ll also find it most useful on the smaller maps like Streets, Aquarius and Bazaar.
Cons: As the CQS48 is so effective in short range combat, it follows that it won't be as effective at mid to long range. This is particularly true of the CQS48 because as a shotgun, the spray of fire becomes essentially useless at mid to long range. If you try to hit an enemy more than say 10m away from you, most of the fire won't reach them, and you'll be lucky to hit them at all. For this reason you'll want to prioritize using this shotgun on smaller maps such as those mentioned above, and avoid using it on maps with a lot of open space such as Behemoth. You can still use the CQS48 as an effective secondary weapon reserved for close combat, but don't bother considering it to contest with rifles such as the BR75 or VK78 if there’s a reasonable distance between yourself and the enemy.
Mag Capacity 07/07 Ammunition Kinetic Zoom ✓
ㅤ︱S7 Sniper Rifle

➭ It has 4 rounds in each magazine.
➭ Mostly effective at long range.
➭ Takes 2 shots to the body or 1 to the head kill an enemy Spartan.
Pros: The main advantage that the S7 provides is the ability to kill an enemy in one hit from a distance. Although you can kill enemies in one hit with some melee weapons such as the Energy Sword and Gravity Hammer, both of these will leave you more exposed and vulnerable to being killed before you reach within melee range of an opponent. The S7 on the other hand allows you to find a position of cover on a map, where you can hide behind features such as rocks or building structures, and then briefly pop out to take out the enemy in one or two hits. If you know how to aim and position yourself well, this can make you a devastating force to contend with for any team, and they'll have trouble reaching you before you run out of ammunition. There's arguably no better weapon than the S7 for holding down a position and keeping the enemy at bay.
Cons: The weaknesses of the S7 Sniper Rifle are encountered primarily in close range combat, where you’ll have only 4 shots to deal with potentially numerous enemies coming at you from different directions. Given that you need to be accurate to make each shot count, the chaos of an attack at close range can make it difficult to aim steadily. A weapon with a higher magazine count such as the MA40 AR - Assault Rifle, or one which requires less precise aim in close combat such as the CQS48 Bulldog - Shotgun can be much more forgiving to the odd missed shot. With that said, as noted above: if your aim and movement skills are good, the S7 can still be effective at short range, especially since there’s still an aim reticle that you can rely on when unscoped, which isn't always the case with snipers in FPS games. Aside from this, the only thing you should be aware of when using the S7 is that the enemy will be alerted to your position by the presence of a bright light when you're scoped in, so you shouldn’t stay scoped in the same position for too long.
Mag Capacity 04/04 Ammunition Kinetic Zoom ✓
ㅤ︱M41 SPNKr
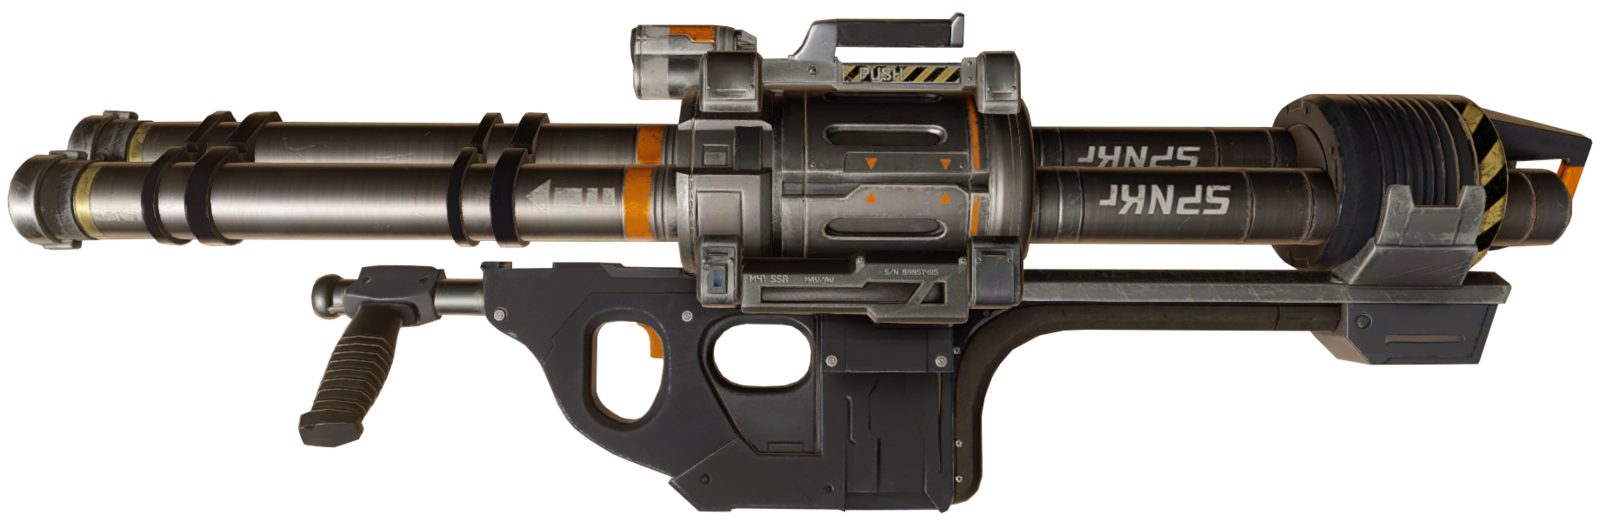
➭ It has 2 rounds in each magazine.
➭ Mostly effective at medium range.
➭ Takes 1 shot to either body or the head kill an enemy Spartan.
Note: To manage the low firing velocity of the rockets, you can alter the way you aim depending on where a target is located.
Pros: The main strength of the M41 SPNKR is its pure destructive power. It will kill pretty much anything in one hit, even if you miss the target but hit some aspect of the map nearby. The damage radius is about 5 metres, so you can easily kill an entire team of 4 who might be positioned close together for tactical reasons, such as during a game of Oddball. You should often encounter this situation on maps such as Streets and Recharge, where there are plenty of relatively contained spaces where a team might try to hold a tactical defence. However, one thing to note is that the damage will be reduced the further away from the impact an enemy is, so you may only injure those on the outskirts of the radius by destroying their shield or putting a large dent in it. This is especially true of any enemies who might have defensive power equipment such as Overshield and Drop Wall.
Cons: To counter the destructive power of the M41 SPNKR, it comes with a low ammunition count of just 2. In Ranked Arena games you'll only be able to use the first two rockets that you get loaded with the weapon, so you'll need to use them wisely by carefully considering how you can best put the weapon to effective use. As mentioned above, you'll arguably find it most useful when you need to disperse a group of enemies away from a defensive position. However, if the enemy knows that you have the M41 SPNKR, you'll immediately become a primary target. If you don't manage to make those effective shots, you've just wasted a life for nothing. Another weakness to consider is the relatively low velocity of the rockets, which can sometimes take too long to reach their target. If you're firing from close range this shouldn’t be as much of a problem, but if you're trying to hit a target far away in the distance, you could easily waste the rocket as the enemy sees it coming and moves out of the way.
Mag Capacity 02/02 Ammunition Explosive Zoom ✓
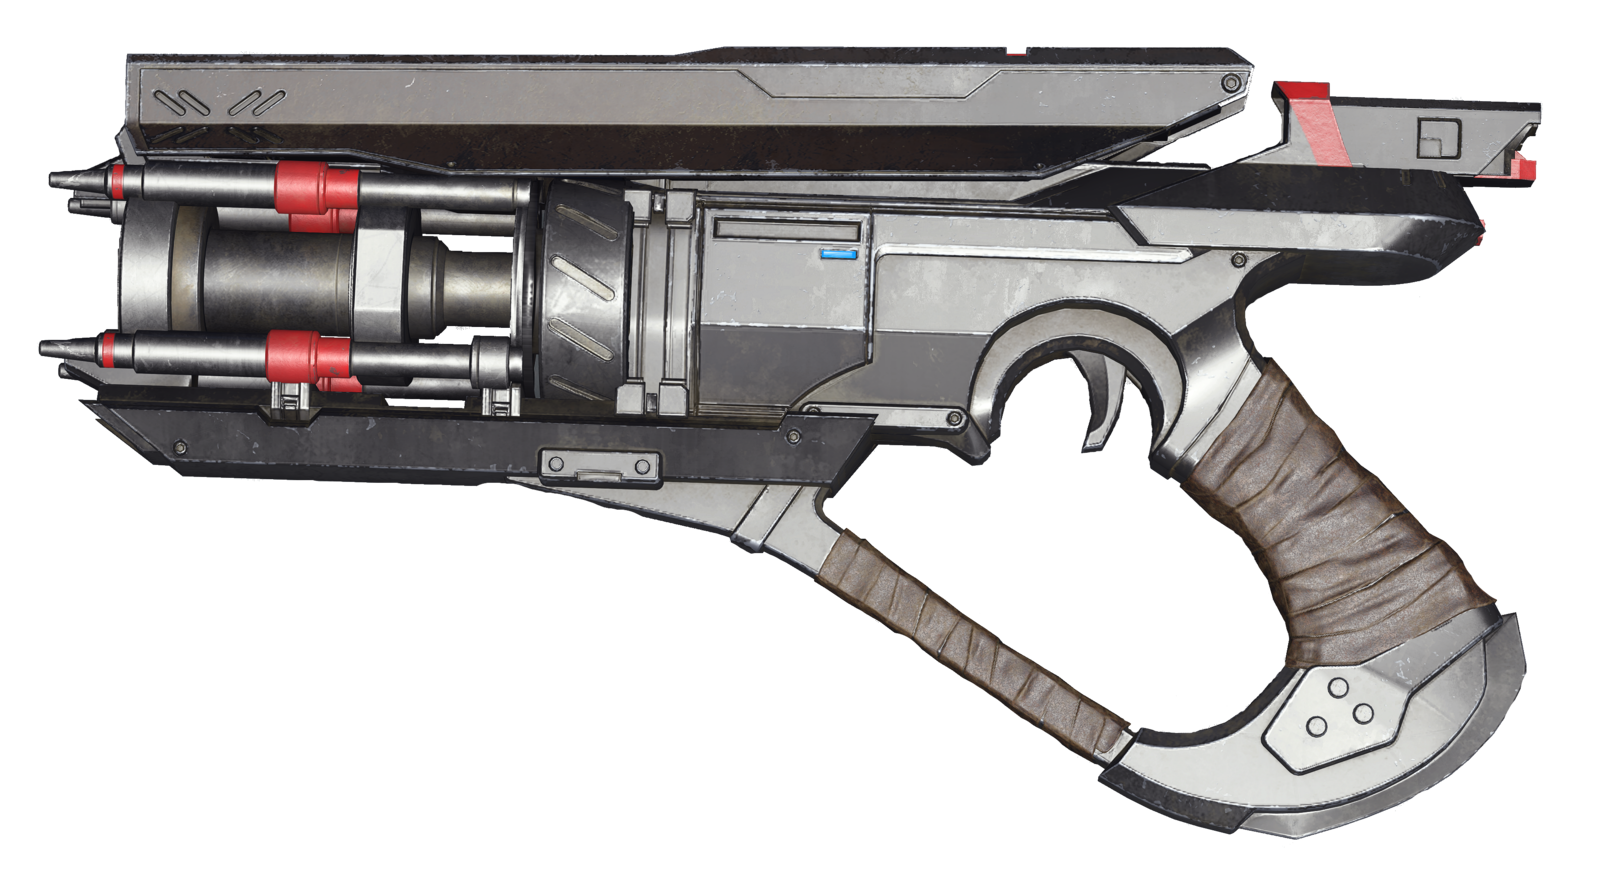
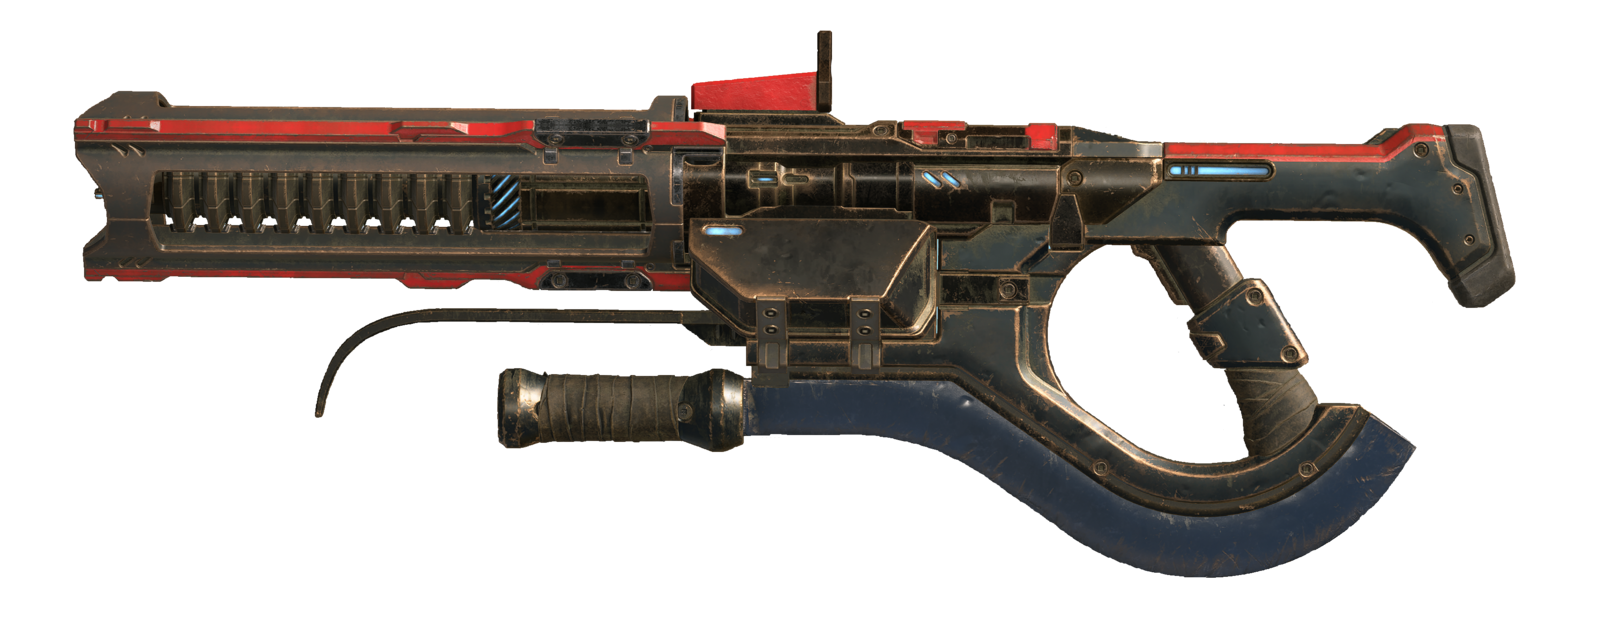
ㅤ︱Hydra
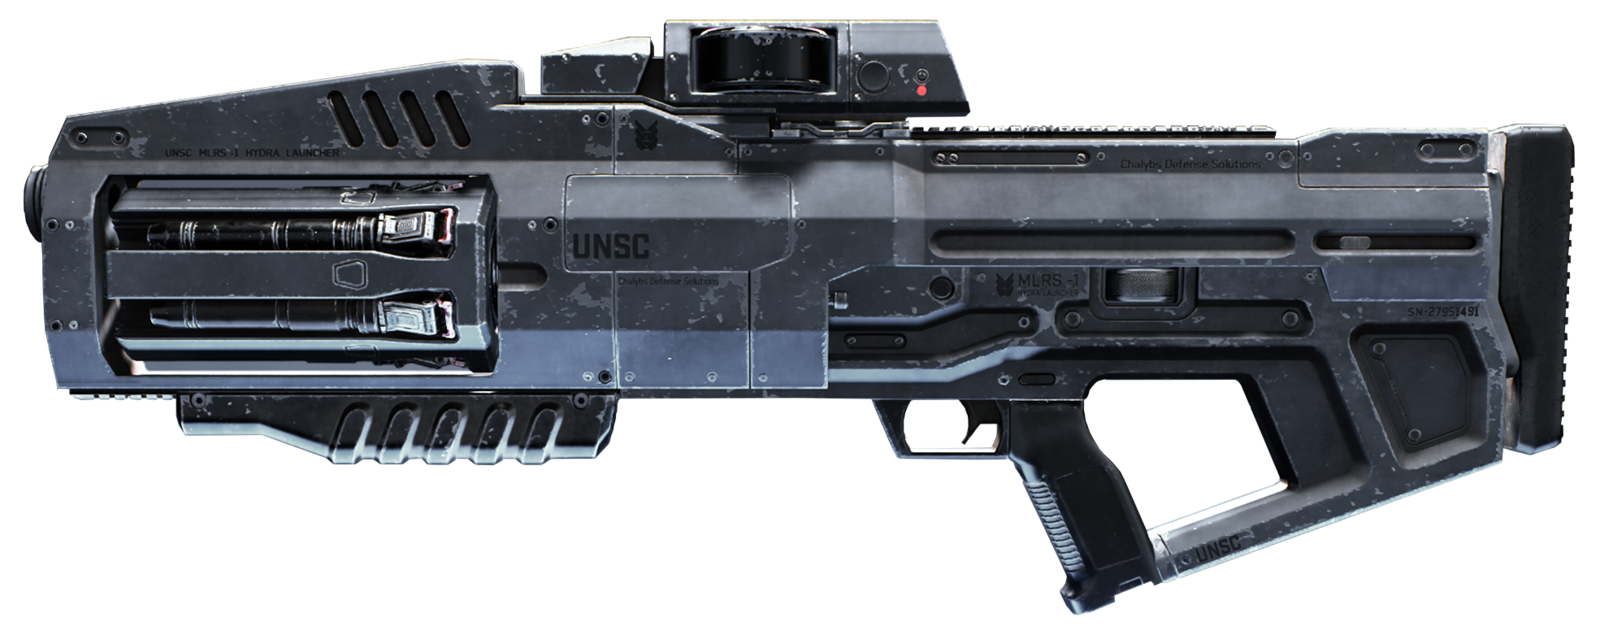
➭ It has 6 rounds in each magazine.
➭ It can be used at any range.
➭ Takes 3 direct hits to kill an enemy Spartan.
Note: The lock-on feature might deal less damage than regular shot, but it’s a great option when the enemy is at a long distance. Can also deal damage to Spartans by shooting at objects near them.
Pros: The main strength of the Hydra is arguably its ability to inflict a lot of damage in a relatively short space of time. In its default direct aim fire mode, it will take 3 hits to kill most opponents. In its guided missile alternative fire mode, it will take 4 hits to kill most opponents. As such you're going to be sacrificing damage or potential accuracy with either mode. If you have good aim you'll find the Hydra to be usefully destructive at most ranges, though it perhaps shines most in close combat situations where you need to kill or disperse a lot of enemies which are grouped together. As the projectiles hit an enemy, they will explode on impact and cause area of effect damage. If you're in the alternative fire mode where the missiles home in on targets after lock-on, this can be a reliably way to inflict some significant damage and distract the enemy while you try to find cover.
Cons: The weakness of the Hydra is primarily found in the difficulty to wield it. If you're using the default fire mode, it can be extremely tricky to hit specific targets, especially at a distance. This is because the projectile fires and takes a considerable amount of time to reach the enemy, so even if you aim accurately initially, you need to rely on the enemy to remain in position. If they know what they're doing, they can easily avoid most shots from a Hydra in the default fire mode. The alternative fire mode removes part of this problem, allowing you aim in the general direction of an opponent and then fire, sit back and wait for the projectile to be guided to them, but the opponent can still shake off the projectile by breaking line of sight with it, which can be easily done by briefly jumping behind a rock. Aside from the difficulty in wielding the weapon, the Hydra also has one of the longest reload times to reach full magazine capacity. This can leave you vulnerable in fights where there’s very little time to spare.
Mag Capacity 06/12 Ammunition Explosive Zoom ✗
ㅤ↳ Banished Weapons
ㅤ︱Pulse Carbine

➭ Each burst shot eats 4% of energy.
➭ Most effective at medium range.
➭ Takes 2 bursts to the head or 4 bursts to the body to kill an enemy Spartan.
Note: Don't overheat it. 5 consistent shots will overheat the weapon, but spacing these shots out will allow a lot more.
Pros: The Pulse Carbine is arguably most effective at medium ranges. This is because the tracking ability of the energy blasts ensures that most of the plasma will hit the target, even if they’re moving fairly frantically in front of you. However, for this to work you need to ensure that the first shot is fired with the aim reticle properly targeting the opponent, indicated by it turning red. If this is done you can kill most enemies in just 3 bursts of fire.
Cons: The weaknesses of the Pulse Carbine are arguably greater than its strengths. This is because the weapon is effectively rendered useless in short and long range combat. The primary reason is that the low velocity of the energy bolts makes them easy to avoid, especially if the initial hit is off target. You need to be very close to a target to make the shots land quickly, but even in this scenario the enemy could easily get the better of you by outmaneuvering you or using melee weapons. The use case scenario for this weapon is therefore fairly limited, and we wouldn’t recommend relying on it as a primary weapon. In most fights, with all else being equal, the more regular rifles such as the BR75 - Precision Rifle and the MA40 AR - Assault Rifle come out on top in terms of versatility and reliability.
Mag Capacity 100% Ammunition Plasma Zoom ✓
ㅤ︱Needler

➭ It has 26 rounds in each magazine.
➭ Most effective at close range.
➭ Takes 12 shots to kill an enemy Spartan.
Note: Shooting one bullet at a time will never really hurt the enemy Spartan, always shoot when the crosshair is red and hold your fire button.
Pros: The primary strength of the Needler is its damage output and the ability to strip shields from close to medium range. Although there's only 52 Bullets you’ll still be able to get a fair few kills as you'll only want to fire around 10-15 Needles at a single enemy because the explosive damage will finish them off. Another strength of the Needler is that it has inbuilt homing missiles which makes it a great choice for Spartans to struggle to aim.
Cons: Although the Needler may be good at taking down enemies quickly, it's biggest weakness is the very low magazine size of 52 Needles so you'll want make sure you only use the Needler as a Secondary Weapon alongside a BR75 - Precision Rifle. The main reason for this is that the Needler requires you to be relatively close to the enemy so it’s able to track them. This means the Needler is very weak at long range, so having the BR75 - Precision Rifle will allow you to engage in cross map gunfights.
Mag Capacity 26/26 Ammunition Plasma Zoom ✓
ㅤ︱Plasma Pistol
➭ It starts at 100% and eats 1% of energy.
➭ Most effective at close range.
➭ Takes one fully charged shot and 4 headshots or one fully charged shot and 14 body shots kill an enemy Spartan.
Note: Start a fight with a fully-charged shot, remove the enemy Spartan's shield and then perform "Quick Draws" and go for the headshot.
Pros: The primary strength of the Plasma Pistol is that if you fully charge it by holding down RMB until the white circle in the center of your screen is filled will unleash a Plasma Ball towards your enemy that instantly strips their shields. If assisted with other weapons or teammates then you can deal with it relatively quickly. You’ll also find that this weapon is good close to medium range but struggles at cross map gunfights.
Cons: Although the Plasma Pistol is strong at stripping enemies shields, it doesn't produce high damage, so unless you're fighting alongside a member of your team or using a strong primary weapon, such as the BR75 - Precision Rifle to finish off your kills, then you'll find yourself struggling to outshoot your opponent. Additionally, the Plasma Pistol will overheat if you continuously fire it which will leave you open to attack when it cools down. We wouldn't recommend relying on it as a primary weapon, as in most scenarios you'll find yourself struggling to out shoot enemies using weapons like the MA40 AR - Assault Rifle, BR75 - Precision Rifle and so on.
Energy Capacity 100% Ammunition Plasma Zoom ✓
ㅤ︱Energy Sword
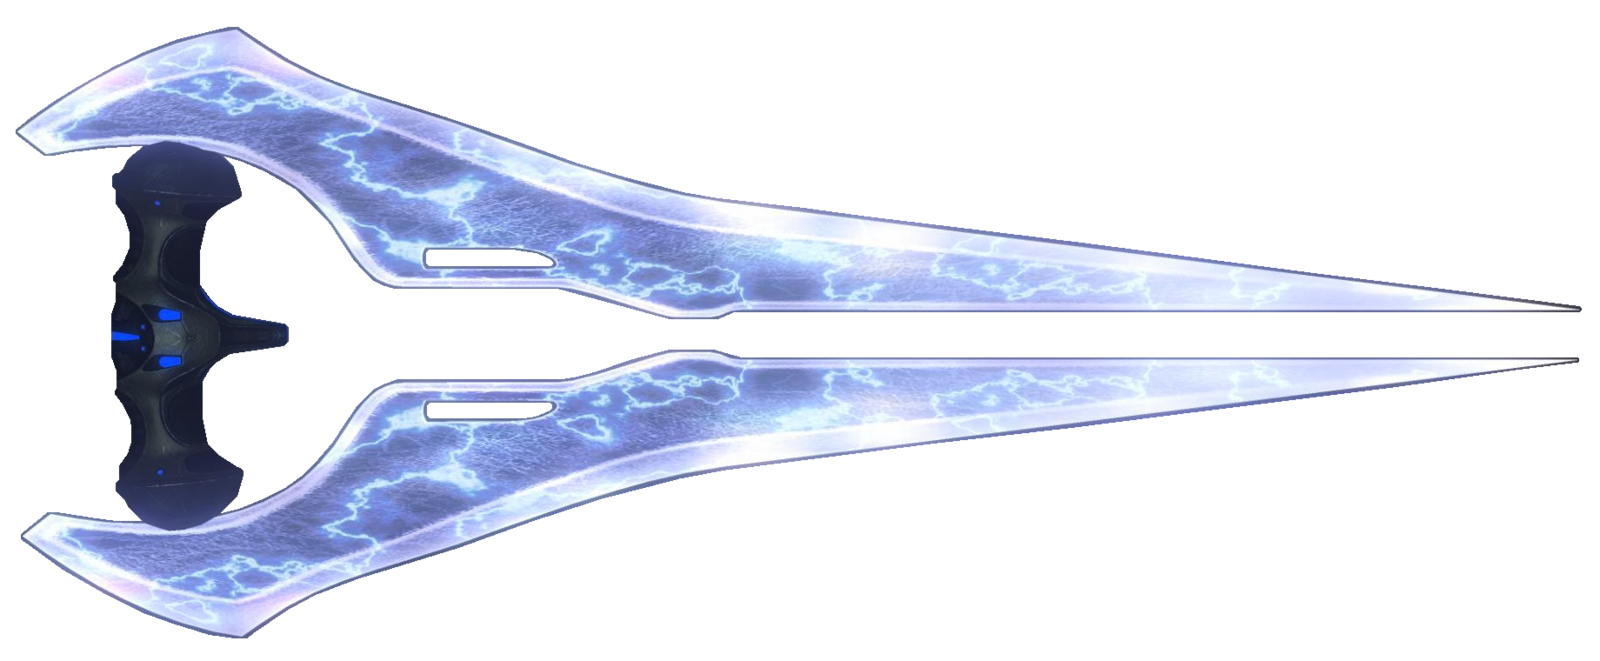
➭ Consumes 15% of its power each time you use it.
➭ Only effective at close range.
➭ Each slash will instantly kill an enemy Spartan.
Note: Always pay attention to your crosshair. When it turns red, you are in the allowed range to perform your movement.
Pros: One of the main strengths of the Energy Sword is that it can decimate most opponents, but you may find some trouble when coming head to head with other Energy Sword or Gravity Hammer Players. As the Energy Sword is a Melee Weapon you'll want to make sure you have something like the BR75 - Precision Rifle equipped so you can bait them with a regular weapon and switch at the last minute to the Energy Sword for an easy kill. Also, you don't want to be running around with the Energy Sword, as the other team will most likely focus on taking you down.
Cons: Although the Energy Sword can one shot opponents you'll notice it's biggest weakness comes with trying to close the gap. However, if you get close enough the Energy Sword will pull you towards the opponent. There's a few methods to closing the gap, such as running towards the enemy in a zigzag pattern to avoid giving an easy headshot or you can use the Grappleshot Equipment to pull you closer. Another Weakness of the Energy Sword is that it’s only useful for close quarters combat, so you'll want to have another weapon like the MA40 AR - Assault Rifle to deal with enemies from afar.
Energy Capacity 100% Ammunition Plasma Zoom ✗
ㅤ︱Gravity Hammer
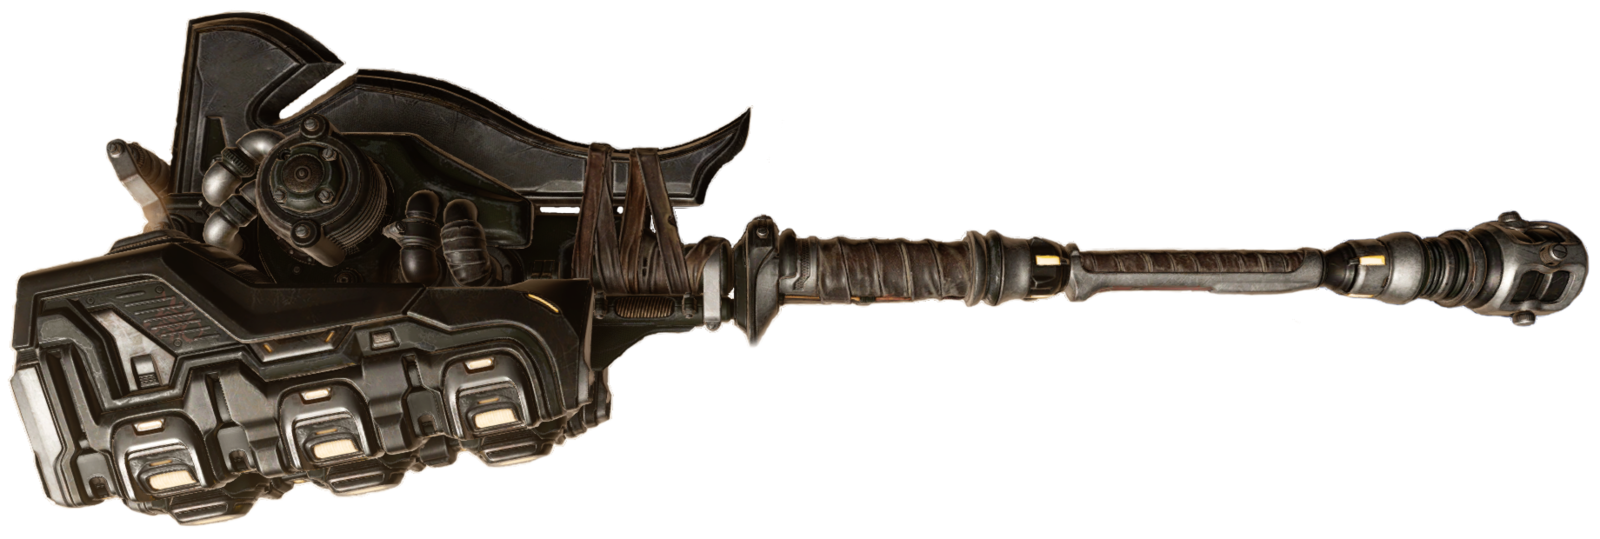
➭ 5% of the battery is consumed with every swing.
➭ Only effective at close range.
➭ To instantly kill an enemy Spartan, they need to be exactly 1 Spartan apart from you. If they are 2 Spartans apart, it will only break their shields.
Note: The Gravity Hammer is a slow weapon. Try to swing the hammer as soon as possible to avoid receiving damage from your enemies.
Pros: The most obvious strength of the Gravity Hammer is its massive damage output combined with its AoE damage capabilities. If you strike a direct hit on almost any enemy, they will die instantly from that one strike. An opponent with the Overshield can be killed in two strikes. For anyone else who isn't hit directly, but is instead hit by the AoE damage, they will usually take two hits to kill, depending on the distance from the original strike impact. In any case, if an enemy is within the damage radius of the AoE, it will almost always strip them of their shields if it doesn't kill them first, leaving them vulnerable to a headshot with any weapon. The Gravity Hammer is therefore effective in almost any combat situation so long as you can get within melee range without being killed first. It's great for solo play if you can avoid incoming fire, but it’s also great as a support weapon to weaken groups of enemies, so that your allies can finish them off in just a few shots once the shields are stripped.
Cons: The main weakness of the Gravity Hammer is that it leaves anyone who wields it extremely vulnerable to incoming fire, especially from a distance. If your opponent is effective with both movement and aim, they will usually have the advantage and be able to take you out before you reach them. You can avoid this is by running towards enemies while firing with a gun and using map features for cover, then switching to the Gravity Hammer towards the end of a fight or whenever you get within melee range. Another method to avoid incoming fire as you close in on a target(s) is use of the Grappleshot power item. You can use this to latch onto specific surfaces or even the enemy themselves, then quickly draw in on them and use the hammer before they have time to react. However, even when you're close to an enemy there is still a considerable wait between the moment that you execute a strike, and the moment it lands. This can be tricky to get the hang of, but once you do you should be able to time your attacks just right.
Energy Capacity 100% Ammunition Electromagnetic Energy Zoom ✗
ㅤ︱Mangler
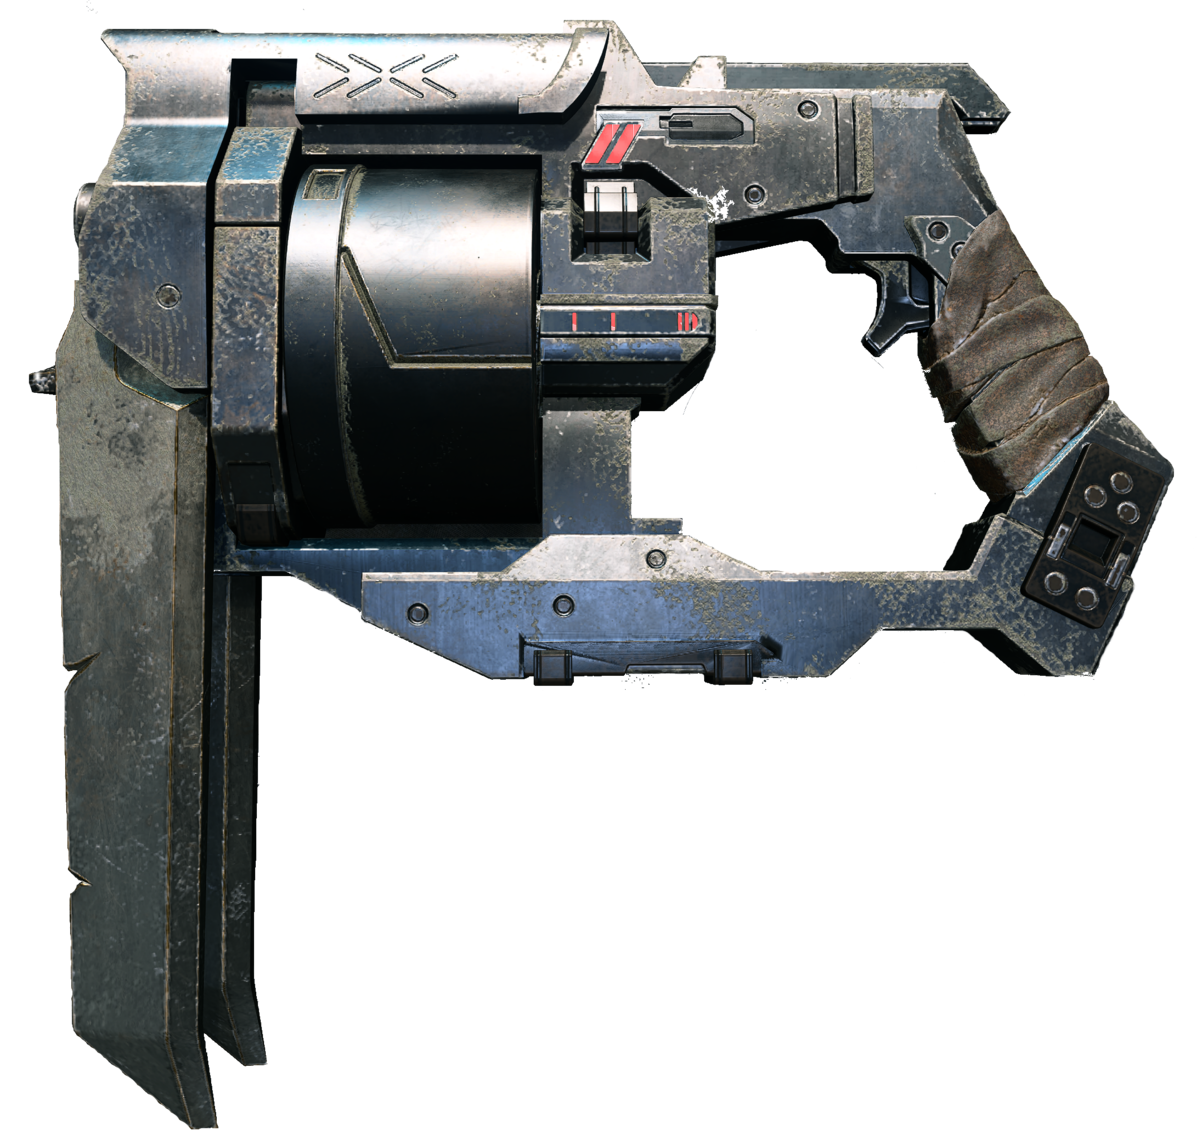
➭ It has 8 rounds in each magazine.
➭ Most effective at close to medium range, can be used at long range.
➭ Takes 3 shots to the head or 4 to the body to kill an enemy Spartan.
Note: This weapon has bullet drop, you should be aiming a bit higher because its bullets will go down as you shoot long-distant targets
Pros: The Mangler is a good choice for a secondary weapon for close to medium range combat but it’s also very capable at long range gunfights if you can get to grips with it’s recoil. If you're accurate then this weapon can take down most enemies a couple headshots, but if you aim for the opponents body then you’ll notice it takes multiple shots which will make you vulnerable if you’re fighting multiple people at once. You'll never want to use this weapon as a primary choice as its not effective against shields, but if you combine it with a plasma weapon then you’ll find yourself being able to take out people very quickly.
Cons: The biggest weakness for the Mangler is that it struggles to strip enemies shields, so unless you're navigating the map with your teammates you'll find yourself a major disadvantage as you’ll need to strip the enemies shields with an energy weapon and switch over whereas the enemy can just simple spray one magazine of the MA40 Assault Rifle. Another weakness with this weapon is that it only has a clip size of eight bullets, so if you don't have someone assist you with stripping the shields and you don't make every bullet count then you’ll find yourself vulnerable whilst reloading. However, this weapon can be reloaded really quickly which allows you to get straight back into the fight.
Mag Capacity 08/08 Ammunition Kinetic Zoom ✓
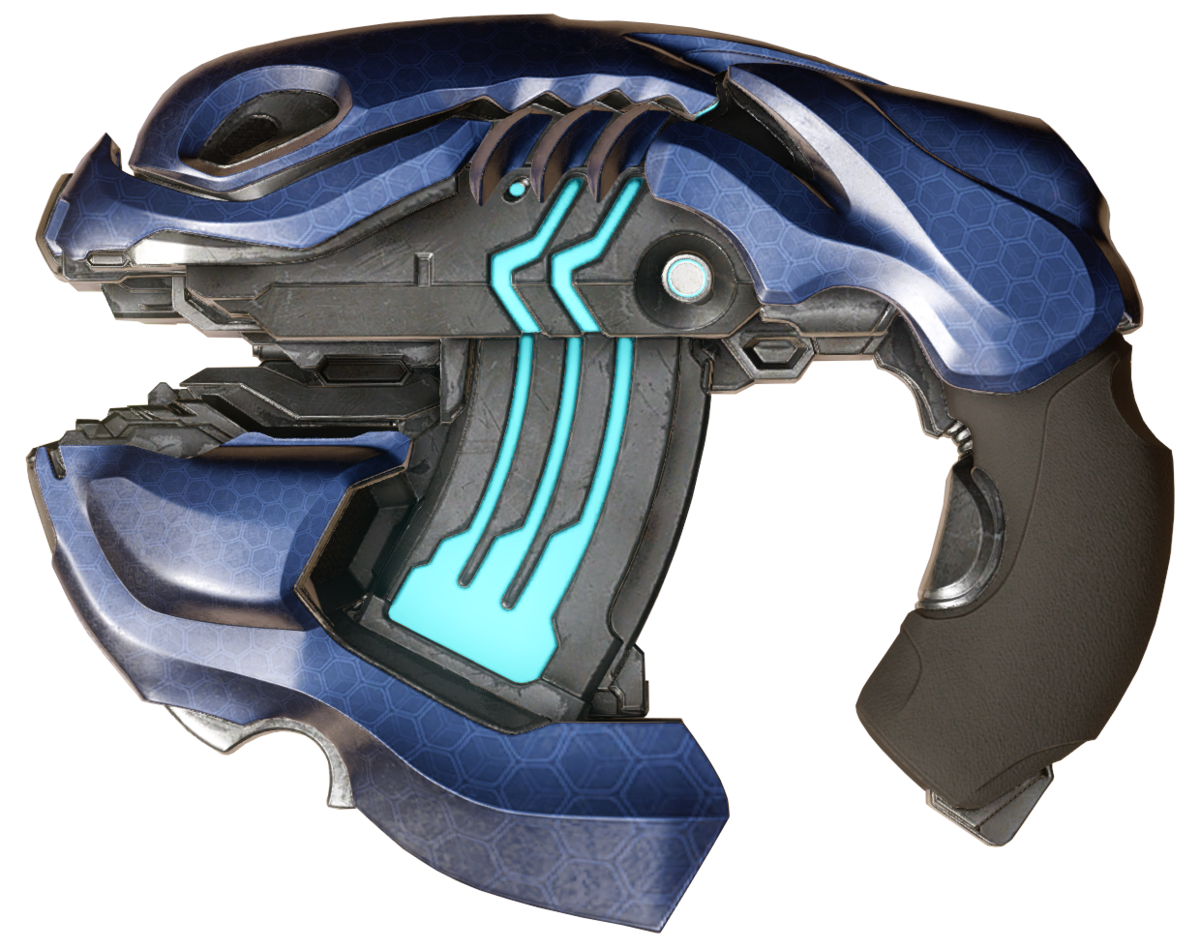
ㅤ︱Disruptor
➭ It has 10 rounds in each magazine.
➭ Most effective at close range.
➭ Takes 7 shots to the head or 10 shots to the body to kill an enemy Spartan.
Note: You can shoot one bullet at a time or hold the fire button and empty the pistol's magazine in a few seconds.
Pros: The Disruptor is arguably most useful as a support weapon against multiple opponents. This is mostly due to the fact that the damage can arc and be dispersed between enemies who are positioned closely together. If you manage to pop the shields of multiple enemies, the damage over time inflicted by the Disruptor will prevent their shields from regenerating for about 10 seconds. This makes any opponent extremely vulnerable to being finished off by pretty much any additional attack, or just by the damage over time from the Disruptor itself. If you're on your own and in a tight spot, you can try to quickly hit an enemy 3-6 times (depending on where you hit them) with the Disruptor, then run off to take cover. The DoT will almost always finishing them off as you find cover. In addition to its fairly powerful abilities against ground troops, the Disruptor is also capable of disabling vehicles, however this usually takes at least 6 - 7 shots on most vehicles, which is most of the magazine.
Cons: The main weakness of the Disruptor is the fact that it takes so many shots to kill an enemy. This means that it's not ideal if you're on your own against an opponent with a more powerful weapon such as the VK78 Commando - Precision Rifle or CQS48 Bulldog - Shotgun. All else being equal, facing off against these two with a Disruptor will almost always result in your death. While the Disruptor can be extremely effective as a support weapon alongside allies who have more powerful weapons, you'll find it difficult to come out on top in 1 vs 1 fights unless your general skill level is much higher than the opponent, allowing you to rely on them missing a lot. Even when it comes to vehicle disabling, the Shock Rifle is far more effective since it takes only two hits to disable a vehicle, while it takes 6-7 with the Disruptor.
Mag Capacity 10/30 Ammunition Shock Zoom ✓
ㅤ︱Stalker Rifle
➭ Each shot eats 3% of energy.
➭ Most effective at medium to long range.
➭ Takes 3 shots to the head or 5 shots to the body to kill an enemy Spartan.
Note: It can overheat and will require venting after seven shots in quick succession.
Pros: As a powerful rifle, the Stalker Rifle is effective at almost any range. This is particularly true because there's no bloom effect as you continue to fire with the rifle, as there is with the MA40 AR - Assault Rifle. As such you won’t be punished for continuously firing at targets in the distance, which means you can keep the pressure on targets without having to worry about how you intersperse your shots. There's essentially no other precision rifle which can match the speed of the Stalker Rifle, so if you hit all three shots and land the third shot as a headshot, you'll kill almost any enemy faster than they can kill you, with the possible exception of facing opponents with the CQS48 Bulldog - Shotgun, S7 Sniper Rifle, and M41 SPNKR - Rocket Launcher. If you want to make the most of the Stalker Rifle, you should aim to intersperse shots after three or four bursts. This will ensure that you avoid overheating the weapon, which will then require you to cool it down (effectively a reload), leaving you vulnerable during that time.
Cons: There are very few weaknesses to the Stalker Rifle, since it's such a powerful weapon which can be extremely versatile when used properly. However, it does require a high level of aim accuracy, and you'll need to achieve this while moving effectively through a map to avoid incoming fire from other types of guns, grenades, and vehicles. The need to be moving pretty much all the time will make it more difficult to aim accurately, especially with the scope. As a result it can take a considerable amount of time to become competent and effective with the Stalker Rifle, but once you do you'll find that it’s one of the best to use at all ranges.
Energy Capacity 100% Ammunition Plasma Zoom ✓
ㅤ︱Ravager
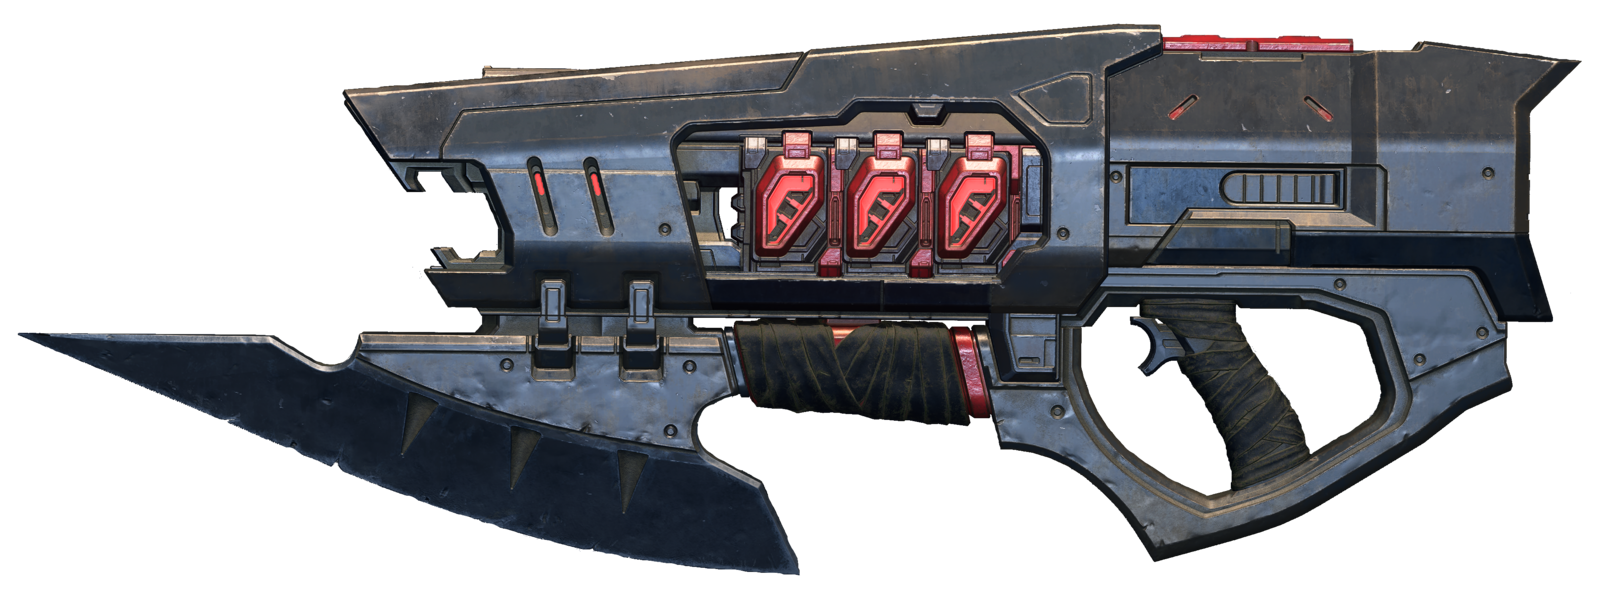
➭ Every shot fired will unleash 3 plasma shots and eats up 8-9% per burst.
➭ Most effective at close to medium range.
➭ Takes 3 direct burst shots to kill an enemy Spartan.
Note: Fully charged shots are most useful when shot at the ground. This is because it will bounce off a wall or other surface before creating a pool. The burning pool can also hurt you!
Pros: The Ravager is arguably best used as a support weapon in a cohesive team, primarily for the purpose of denying space. This is because despite its name, the Ravager doesn't actually do that much damage compared to other power weapons. It takes 3 - 4 shots of default fire to kill most opponents, and the charged shot will rarely kill an opponent without them being finished off by something else first. However, the charged shot does splurge out as large explosion which results in a large area being covered in fire. This should deter many opponents from running through it, especially if their shield has been popped, and is therefore useful when denying space. You'll find this weapon most useful on smaller maps with fewer open spaces, such as Aquarius, Recharge, and Streets. However, it has its uses on larger maps if you're with an organised group and you encounter a number of enemies in a more enclosed part of the map.
Cons: AS noted above, sadly the Ravager doesn't really live up to its name. It has relatively weak firing power in its default mode, and the alternative mode of a charged shot can waste precious moments while other players might have the advantage with a more precise weapon such as the BR75 - Precision Rifle or Stalker Rifle. The low velocity of the plasma globs can make it difficult to hit enemies at medium to long ranges, and even at close range the weapon is so imprecise that you may often miss shots which would be easy to make with other weapons, even if your aim is on point. Can't really recommend this weapon outside of very specific circumstances where you might want to look like you're causing chaos, or deny space with explosions and fire.
Energy Capacity 100% Ammunition Plasma Zoom ✓
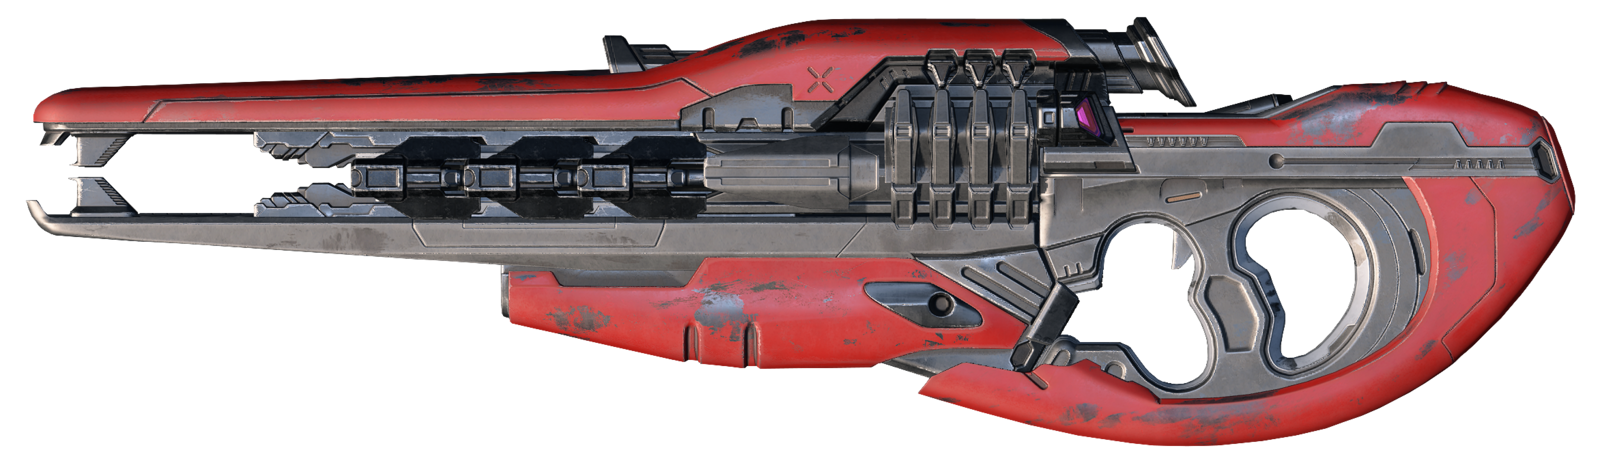
ㅤ︱Skewer
➭ It has 1 round in each magazine.
➭ Most effective at close to medium range.
➭ Takes 1 direct hit to kill an enemy Spartan.
Note: Certain vehicles can be destroyed with one shot: Mongoose, Ghost, Banshee, Wasp, and Gungoose.
Pros: The Skewer is a great secondary weapon choice and is best combined with something like the CQS48 Bulldog - Shotgun, so you can deal with opponents getting a little to close. This Weapon is better used a long range and shines on the larger maps, such as Behemoth and Highpower, as you'll have more time to line up your shots whilst the enemy is distracted. Additionally, the Skewer is capable of instantly destroying vehicles, so it's good to save a spike or two to deal flying vehicles on Big Team Battle if the enemy team acquires it.
Cons: Although the Skewer holds the potential to one shot both enemies and vehicles its biggest downside is that if you miss your shots then you'll find yourself very vulnerable to attacks, as it takes a couple seconds to reload. Another negative is you only have four shots with it, but if you have more ammo and you make them count, then it'll be pretty Overpowered. That's why its best paired up with something like the CQS48 Bulldog - Shotgun, so you can cover both long range and close quarters combat.
Mag Capacity 01/03 Ammunition Kinetic (Spikes) Zoom ✓
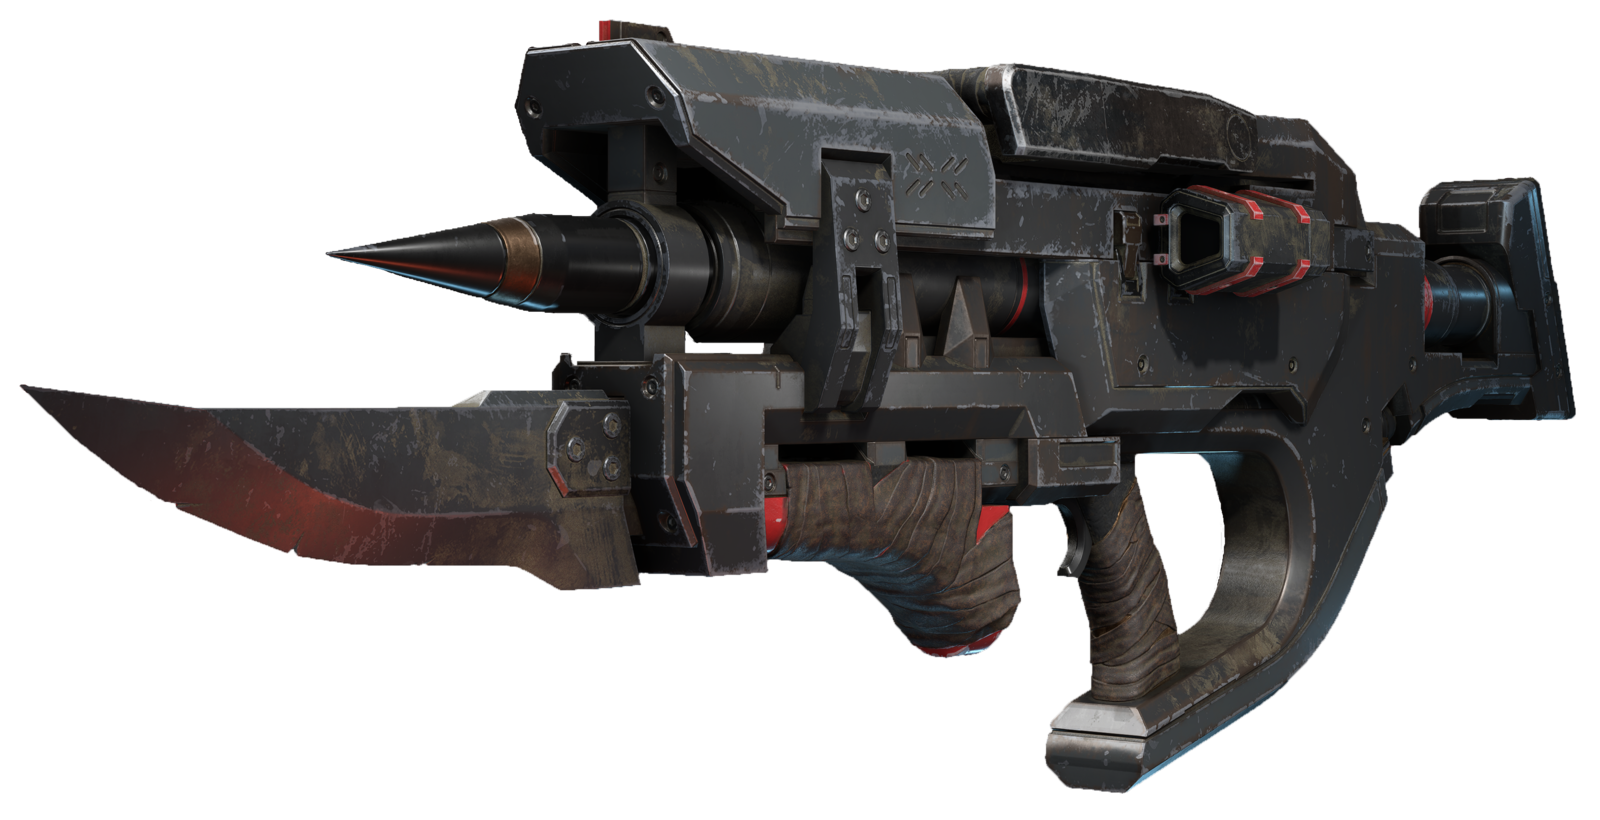
ㅤ︱Shock Rifle
➭ It has 12 rounds in each magazine, but eats 3 rounds per shot.
➭ Most effective at long range.
➭ Takes 1 shot to the head or 2 shots to the body to kill an enemy Spartan.
Note: This weapon has a chain lightning effect - if the enemy you are shooting is close to another one, a chain effect will deal damage to the second one.
Pros: The Shock Rifle can be an incredibly powerful weapon when used effectively. It gives you the ability to one shot enemies so long as you hit them in the head, and two shot them if you only manage body hits. The AoE (area of effect) damage that it can inflict to multiple enemies who are situated closely together also makes it a powerful support weapon, since one or two blasts can result in 2-4 players losing their energy shields, allowing others with more precise weapons such as the BR75 - Precision Rifle to quickly finish them off. In addition to its abilities to kill multiple enemies quickly or at least make them vulnerable, it also offers powerful capabilities to disable vehicles. One shot will apply a charge to the vehicle which lasts 10 seconds, giving you a 10 second window to hit the vehicle a second time in order to disable it. This can be incredibly useful to stop a fast moving destructive vehicle, but keep in mind that it will only be disabled for about 3 seconds.
Cons: The Shock Rifle is a powerful weapon with a lot of potential in competent hands, but perhaps its most significant weakness is that it can take some time to get familiar with the mechanics of the weapon, and even after you've used it for a while it can still be difficult to handle, mostly because the recoil is significant. The time elapsed between each burst of fire can also leave you vulnerable to attacks from opponents who have weapons with much faster response times, such as the MA40 AR - Assault Rifle or CQS48 Bulldog - Shotgun, although this is only a real concern in close range combat, since the Shock Rifle is superior at range. Aside from the difficulties with handling the Shock Rifle, the low magazine count can also be a potential problem. If you miss a number of shots in a tense battle, the low responsiveness of the weapon and the relatively lengthy reload time can give your opponent the advantage.
Mag Capacity 12/24 Ammunition Shock Zoom ✓
ㅤ↳ Forerunner Weapons
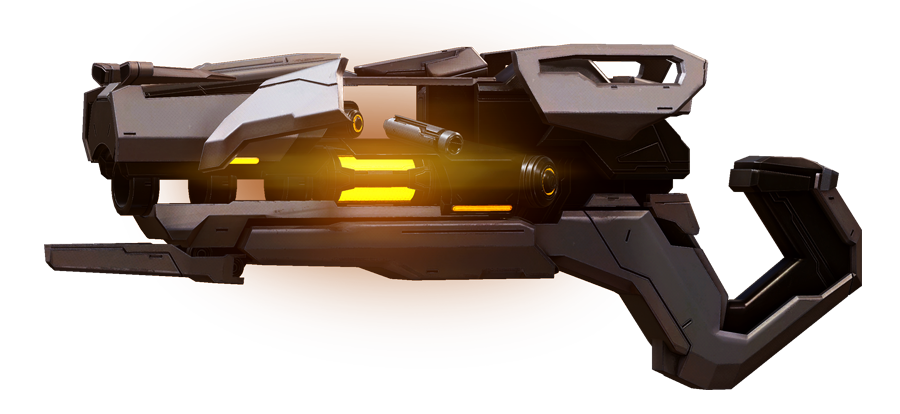
ㅤ︱Heatwave
➭ It has 8 rounds in each magazine.
➭ Most effective at close to medium range.
➭ Takes 2 shot to the head or to the body to kill an enemy Spartan.
Note: Has two modes - horizontal and vertical. Use horizontal when against multiple enemies and use vertical when against one.
Pros: The Heatwave Strengths comes from its different fire modes, as you'll be able to take on opponents in up close-quarters combat with the Vertical Mode and you'll find that the horizontal mode is better for multiple enemies in tight areas due to the bullets being able to ricochet of the walls. This Weapon Shines when you use something like Grappleshot or Thrusters to close gaps and then fire in Vertical Mode.
Cons: The Heatwaves weakness lies with it's low damage output, so it's best when its combined with something like the BR75 - Precision Rifle as you'll be able to use the BR75 to weaken them and then switch over to the Heatwave to finish them off depending on your distance. You'll notice that this weapon is better in close quarters combat, as if you try to fire from a distance you'll notice a majority of the bullets will bounce around and avoid the enemy. Unfortunately, you'll only get 16 bullets so it’s better to use a secondary, but that is to be expected with a Shotgun.
Mag Capacity 08/08 Ammunition Hardlight Zoom ✗
ㅤ︱Sentinel Beam
➭ It has 250 energy per reload, and it eats 50 energy per second when firing.
➭ Most effective at close to medium range.
➭ You need to hit precisely 1 second to the head or 1.5 seconds to the body to them kill an enemy Spartan.
Note: To help compensate for the recoil, try to hold or mouse down slightly to stay in place.
Pros: The Sentinel Beam is one of the most powerful weapons in Halo Infinite. It can eat through enemy shields incredibly quickly, and you can kill up to three enemies with one "magazine" round of the beam, so long as you're accurate the entire time that you fire it. The beam is powerful at any range, but you'll find it much easier to handle the recoil at short to mid ranges. You can also effectively trace the movements of enemies with the beam, as it acts as a useful indicator. The beam is so powerful that it can actually penetrate multiple targets, so if you happen to line up a shot on one person who has others standing behind them, the beam will damage all those in its path.
Cons: The Sentinel Beam performs least well at long ranges, since you need to be far more accurate to keep the recoil stable. This is arguably one of its few downsides, but if you're able to handle the recoil well it can also be useful at range. One thing you'll need to avoid is objects in front of the beam getting in the way of your target, especially if the target is in the distance. You'll find it more difficult to jump around other people and objects as you're firing the beam than you would with something like the BR75 - Precision Rifle. Any object which gets in the way of your target will result in beam "ammo" being wasted, and since the max capacity of 250 depletes fairly quickly, this is something that you'll want to avoid at all times. Other than managing recoil and obstacles, the Sentinel Beam is incredibly effective at melting away enemy forces, and has few downsides. However, the reload time is something to be aware of, which takes a good 3 seconds to reach max ammo.
Mag Capacity 250/250 Ammunition Hardlight Zoom ✓
ㅤ︱Cindershot
➭ It has 6 rounds in each magazine.
➭ Most effective at close to medium range.
➭ Takes 2 direct hits to kill an enemy Spartan.
Note: Beware of hurting yourself since the grenade will bounce one time before exploding.
Pros: The main strength of the Cindershot is the massive damage output that it offers, in conjunction with the relatively fast responsiveness of the weapon. This allows you to quickly kill multiple enemies, especially since it only takes two grenades to tear through their shield defences and kill them, even if the grenade explodes next to them rather than on top of them. The fast responsiveness of the weapon allows you to churn out the energy grenades rather quickly, which is useful if you're facing multiple enemies. You can easily overcome the odds with the Cindershot if you aim well, and especially if your opponents are bunched together. In a scenario where you're facing enemies who are hiding around a corner or in a particular room, you can switch to the alternative fire mode for the Cindershot by scoping, which allows you to direct where the energy grenade goes for a brief period as you guide it through the air. This can be extremely useful on maps such as Streets, where enemies will sometimes congregate in specific rooms, especially if they’re defending an objective during Strongholds or the ball during Oddball.
Cons: There are few weaknesses of note for the Cindershot. It's extremely effective in most situations, but it's probably least effective at long range combat. In this scenario you can easily struggle to guide the projectile towards the desired target, while you'll find it much easier at short to mid range. The guiding of the energy grenades can take some time to get used to, but once you've got the hang of it you should be able to guide the grenades to desired targets fairly consistently. This makes the Cindershot somewhat difficult to master, but once you do it can be one of the most fun and most effective guns in the game.
Mag Capacity 06/06 Ammunition Hardlight Zoom ✓
Ending Scene
Thank you for reading, I hope this will help some of y'all to understand how weapons work and improve your experience.
I will try to update guide frequently so it's always up to date.
If you have any suggestions or complaints let me know down in the comments.
Source: https://steamcommunity.com/sharedfiles/filedetails/?id=2688944931
More Halo Infinite guilds
- All Guilds
- How to get all 12 hidden skulls
- Interactive Map
- Halo Infinite Guide 1102
- how to shoot
- Remove & Skip Video Intro 4k (FASTEST LOADING)
- Xbox 360 Profile Website
- Ultimate Red vs. Blue Restoration Halo Infinite Guide
- how to zoom with your weapon in halo infinite real working (the easy way)
- How to shoot in halo infinite 100% working and accurate!!!1!1!!!!!!
- Halo Infinite Guide 1059