Notes
This guide is mostly adapted from AnarchistForPrez's missable guide[docs.google.com] , but aiming to remove any spoilers and remove anything that isn't too important.
This guide may occasionally include non-missable items, but it primarily for things that are permanently missable, so don't expect to find every important item here.
Other info is from Jegged's FF7 walkthrough[jegged.com] .
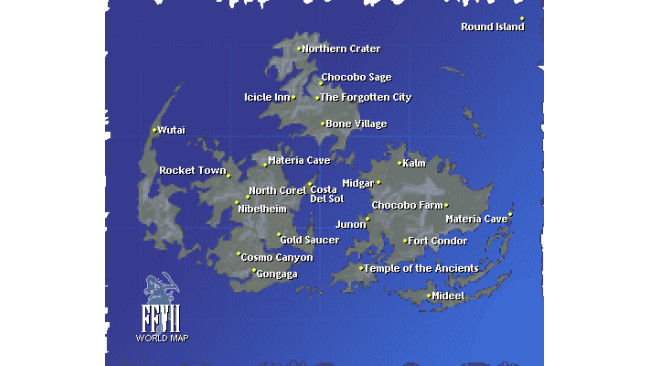
World Map
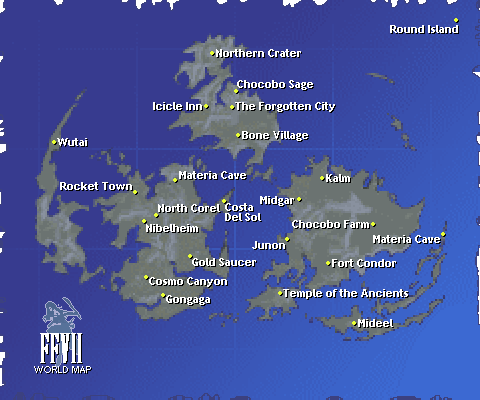
~ ~ ~ ~ ~ ~ ~ DISC ONE ~ ~ ~ ~ ~ ~ ~
Midgar: Sector 7 Slums
In the Beginner's Hall, make sure to grab the All Materia. The Beginner's Hall is in the same building as the Weapon's Shop, one floor above.
Midgar: Sector 5 Slums
There are five Turtle's Paradise Flyers in the game, and you'll get a special reward later if you read all of them.
The first one can be found inside the little boy's room that is in the east side of the town. Go upstairs to find the room and the flyer tacked to the wall.
Midgar: Wall Market
To guarantee that Cloud gets chosen by Don Corneo, you will need the following items:
Silk Dress
Blonde Wig
Sexy Cologne
Diamond Tiara
any Underwear
Makeup
For some items such as the wig or the cologne, there may be a chance to miss out on them depending on hell well you do or you dialogue choices, so make sure to save often.
Silk Dress:You will need any dress to progress the story, but for the Silk Dress, when Aerith is asked which type of dress to make for Cloud, respond with something "that feels soft" and "that shimmers".
Note: If you're using the Echo-S Mod or the Reunion retranslation mod, you should instead choose the options "Light" and "Shines".
Blonde Wig: In the Gym, defeat Big Bro in the squat contest. 14 squats should be enough to win, though it may vary.
Diamond Tiara: Make sure you have at least 210 gil. Enter the Materia Store in the lower potion of Wall Market and speak to the man lying down. He will ask you to get an item for him from the Inn. Head to the inn and spend 10 gil to spend the night. When prompted, buy the most expensive item from the vending machine for 200 gil. Give the item to the man at the Materia Store and he'll give you the Diamond Tiara.
Sexy Cologne: In the lower potion of Wall Market, enter the Diner (making sure you have at least 70 gil) and take a seat. Order any food, and when the server asks how your meal was, respond with "It was all right." You'll be given a Pharmacy Coupon. Take this to the Pharmacy (south of the Diner with the cat statue outside), and trade the coupon for the Digestive. Head to the upper section of Wall Market and enter the bar where the dressmaker was. Go to the bathroom door at the top left, and offer the person the Digestive. They'll hand you the Sexy Cologne.
Underwear: In the lower section of Wall Market to the right of the screen, there will be a man who will give you a Member's Card. Head right into the next area and use this to gain entrance to the Honeybee Inn. You have two options. Both will show you a creepy scene, though creepy in different ways:
Head into the Northwest to view an interesting cutscene, then speak to the woman to get the Lingerie. Make sure to speak to her before leaving the room, or you'll miss out on getting them.
Head into the Southwest to get a more ridiculous scene, then you'll be given the Bikini Bottoms.You can also take a peek in the two door on the east side of the room for some more scenes.
Makeup: Once you've obtained the Underwear, go to the Honeybee Inn changing room and request assistance from the girls to apply your makeup.
NOTE: There is still a chance Cloud won't be chosen despite having all these items, so be sure to save your game if this is the outcome you want.
Midgar: Sewer + Train Graveyard
In the Sewers, make sure to pick up the Steal Materia. You will be able to buy more later, but it'll come in handy before you're able to. Especially since...
In the Train Graveyard, using the Steal command (with a character who has the Steal Materia equipped) on the Eligor enemy will get you the Striking Staff weapon for Aerith. You'll be able to buy this later, but this is a way to get it much earlier.
Midgar: Shinra HQ
Take the main entrance rather than the stairs. You will find the 2nd Turtle's Paradise Flyer on the bottom floor at the back. There are two notices on the bulletin board, make sure you read the Turtle's Paradise one! This is one of two chances to see this in the whole game, so try to check it now. If you want to take the stairs rather than the main entrance, you can leave and do so.
After beating the boss on Floor 67, grab the Enemy Skill Materia that's on the floor. There are only four of these in the game, and they're very useful.
Not missable as you can buy it later, but you can one of Cloud's weapons early: Hardedge can be Stolen from the SOLDIER:3rd enemy.
You can also get Carbon Bangles very early by Stealing them from the Moth Slasher enemies.
Outside Of Midgar
Not missable as you can buy it later, but you can one of Barret's weapons early: Atomic Scissors (a short range weapon) can be Stolen from the Custom Sweeper enemies just outside Midgar.
Kalm
During Cloud's flashback in Kalm, choose "I jammed on it" on Tifa's piano, and you can learn a music sequence ("Do Re Mi Ti La Do Re Mi So Fa Do Re Do.")
Note: If you're using the Echo-S Mod or the Reunion retranslation mod, you should instead choose the middle option, "Yeah".
Using Playstation controls, and assuming you have X mapped to "Accept" and Circle mapped to "Cancel", it is as follows:
CIRCLE, SQUARE, TRIANGLE, R1+TRIANGLE, R1+SQUARE, CIRCLE, SQUARE, TRIANGLE, R1+CIRCLE, X, CIRCLE, SQUARE, CIRCLE.
If you return to Nibelheim on disc three and play the tune you will get a short scene.
Chocobo Farm
Speak with one of the Chocobos in the pen, and respond with "Wark". After doing a dance, the Chocobo will give you the Choco/Mog Summon Materia.
Mythril Mine
Make sure to pick up the Long Range Materia inside the mine. From the entrance, travel to the right side of the screen, around the corner and to the north. You can climb the vines on the left side of the next screen to find the Long Range Materia on the cliffs above. This isn't missable, but it's the only one in the game, and is very useful for your melee characters.
Not missable as you can buy it later, but you can one of Tifa's weapons early: Grand Glove can be Stolen from the Madouge enemy.
After Mythril Mine
In forested sections of the world map, you'll have a 1 in 8 chance to run into the "Mystery Ninja". Defeat her and choose the correct dialogue options to have Yuffie join your party.
DO NOT use the save point after beating her.
The dialogue options are as follows (Echo-S/Retranslation dialogue in parentheses):
"Not interested." ("I'm not interested.")
"Petrified..." ("...Sure.")
"Wait a second!"
"That's right." ("Right.")
"Let's hurry." ("Okay, let's get going.")
You can also one of Yuffie's weapons slightly early: Boomerang can be Stolen from the Formula enemies in the World Map near Junon. This isn't missable, as it'll become available for purchase in Junon's weapon shop.
Junon
You will get there Shiva Summon Materia here, though it will happen automatically, so it likely won't be missed. However, if your Materia inventory if full, it can be found later in Priscilla's room.
Grab the 2nd Enemy Skill Materia in Junon the first time you're there. It isn't missable, but if you want to master every enemy skill Materia, be sure to get it. It is located in a building off of the main street. Inside there are stairs leading down to a beginners hall, guarded by a Shinra Soldier. It is down those stairs.
Not missable as you can buy it (or find it in a chest) later, but you can one of Barret's weapons early: W Machine Gun can be Stolen from the Death Machine enemy.
Cargo Ship
You won't be able to get it straight away (even if you help her), but behind the disguised Yuffie you'll see another All Materia. A little while later once your team meets in the middle of the ship, head back to the cargo bay to pick it up.
You can Steal Shinra Beta Armor from the Marines on the ship. You can get these as a drop much later in the game, but this is an early way to get them.
Once you enter the engine room, before speaking to the person inside, climb the ladder and walk all the way across the catwalk. You'll find a weapon for Yuffie, the Wind Slash. This isn't missable, but by the time you can buy it (which will be much later), you will have better options.
After the boss encounter, don't forget to pick up the Ifrit Summon Materia lying on the ground. This is your only chance to get it.
Costa Del Sol
This isn't missable, but it should be noted that if you have the gil for it, you can buy the Beach House here. It will allow you to heal for free, but whether that is worth the 300,000 gil asking price is up to you, especially considering that partway through Act 2 you'll get a much more convenient way to heal for free, with no upfront cost.
Mount Corel
Not missable as you've been able to buy it since Junon, but you can one of Red XIII's weapons for free: Diamond Pin can be Stolen from the Bagnadrana enemy.
Gold Saucer
The 3rd Turtle's Paradise Flyer is at the Ghost Hotel in Gold Saucer. It resides inside the hotel's lobby next to the Item Shop's entrance.
Corel Prison
After taking the elevator up to the Chocobo Racing waiting area, make sure not to miss the Ramuh Summon Materia sitting in one of the stalls, because this is your only chance to get it.
Once you're back on the world map, add Tifa and Aerith to your party for an additional scene in the next area. Also note, to exit the buggy you have to press CANCEL. Sometimes you may have to press it twice.
Gongaga
Have Tifa and Aerith in your party when visiting Gongaga for an additional scene in the village. (If you've already started the Turk fight, that's fine. Just make sure to swap them out before heading into the village itself)
When fighting Reno and Rude, focus your attacks on Reno. The one you defeat will drop an item, and the other will flee (unless you manage to kill them in the same turn, which can be difficult). Reno drops the Fairy Tale staff for Aerith, while Rude just drops an X-Potion.
After fighting the Turks, take the north path to the village of Gongaga. Again, make sure Tifa and Aerith are in your party before going inside the house at the bottom right to view an additional scene.
Once you're done in town, head back to where you fought the Turks, and take the left path. There's a Deathblow Materia in this room. After picking it up, take the north path to reach the Meltdown Reactor. Once at the reactor, follow the path going to the right of the reactor and then interact with the broken reactor (where Scarlet was standing) to find the Titan Summon Materia.
Once you've left Gongaga and the Ruined Reactor, add Barret to your party before entering Cosmo Canyon (the next area you visit on the world map), as he will have unique dialogue when first visiting Cosmo Canyon if he's with you.
Cosmo Canyon + Cave Of The Gi
Before entering Cosmo Canyon, add Barret to your party, as he will have unique dialogue when first visiting Cosmo Canyon if he's with you. Your party members will split up, this conversation should take place before you all reunite.
The 4th and 5th Turtle's Paradise Flyers can be found here, though it's simpler to get #5 before #4.
The 5th Turtle's Paradise Flyer is also here. Go to the pub near Cosmo Canyon's entrance and head upstairs to the inn. Check out the wall next to the innkeeper's desk.
The 4th Turtle's Paradise Flyer is on the post inside the Tiger Lily Arms Shop. The shop is along the path that leads to Bugenhagen's house.
Also inside the Tiger Lily Arms Shop, you can head into the back room to have a special conversation with Barret. This will become unavailable once you speak to Bugenhagen.
Not missable, but it's worth nothing that the Materia Shop here sells HP Plus and MP Plus Materia. In the room with the sealed door, take the bottom-middle exit and speak to the shopkeeper a few times to wake him up.
After entering the Cave of the Gi with Nanaki and Bugenhagen, climb down and enter the next room. You should see a blue support Materia sitting on a ledge. It is the Added Effect Materia. You can get to it from the next room. Don't forget to grab it.
Nibelheim
You can unlock another secret party member here. After finishing the scene in the Shinra Mansion basement, you can unlock the Safe upstairs. There are hints to the safe code to the left of the Mansion entrance, but the combination will always be:
Right 36 - Left 10 - Right 59 - Right 97
NOTE: If you go past the number you're aiming for (for example, making the counter show 37 instead of 36), you'll have to try the entire combination again.
Defeat the boss when the safe opens and pick up the Odin Summon Materia that it leaves behind. Pick up the Key to the Basement from the safe, then head back to the basement.
Part way along the pathway to the library is a wooden doorway at the top of the screen, enter it and examine the coffin.
When prompted, say "Talk about Sephiroth." and finish the dialogue.
Once the man goes back into his coffin, interact with it again.
When prompted, ask "Who are you?", and after more dialogue he'll go back into his coffin.
The man will stay in the coffin now. Finish your business in the basement (you probably won't need a guide on how to find the green Destruct Materia), then head back upstairs. Vincent will join your party.
Mount Nibel
This is your first of three chances to learn the Enemy Skill "Trine", though as you only have two out of the four Enemy Skill Materia found in the game, you can only learn it with those two for now.
To Learn Trine:
Make sure both Enemy Skill Materia are equipped.
When fighting the Materia Keeper, make sure it hits the party member(s) holding the Enemy Skill Materia with Trine (without them being killed by it)
You should now have Trine on your two Enemy Skill Materia.
When you come to the set of numbered pipes, instead of going down them, instead go down on-foot and set up the ladder so you can easily return. There's a door to the left with some items, and once you've returned to the pipe room, take Pipe 2 for Tifa's Weapon "Powersoul", and take Pipe 4 for another All Materia
Rocket Town
Talk to the old man standing in front of the Item Shop, and when he asks you to look at the rocket, do so. This will get you the Yoshiyuki weapon for Cloud. You can't do this later in the game.
The weapon shop is also selling the Shotgun for Vincent, but only for a limited time. If you want one, get it now.
IMPORTANT NOTE: See the next section about preventing a softlock.
Gold Saucer Revisit
After leaving Rocket Town, you'll want to head to the Weaponsmith's House, and then back to the Gold Saucer by going through North Corel. But before entering North Corel (and during your Gold Saucer revisit)...
SAVE OFTEN AND IN DIFFERENT SLOTS during the second visit to the Gold Saucer. A sequence with Cait Sith near the end of the visit can occasionally result in a softlock.
When following Cait Sith, make sure to pay close attention to where he goes. Following him exactly may help prevent it.
Going through the correct door can be a little tricky with the controls, so be careful not to accidentally enter the wrong one.
The path is:
Battle Square
Speed
Wonder
Chocobo
Chocobo Racing Building
Weaponsmith's House
This can be done at any time, but it's most useful (although much more difficult) before the end of disc one. It's optional and potentially a little time consuming, but worth it.
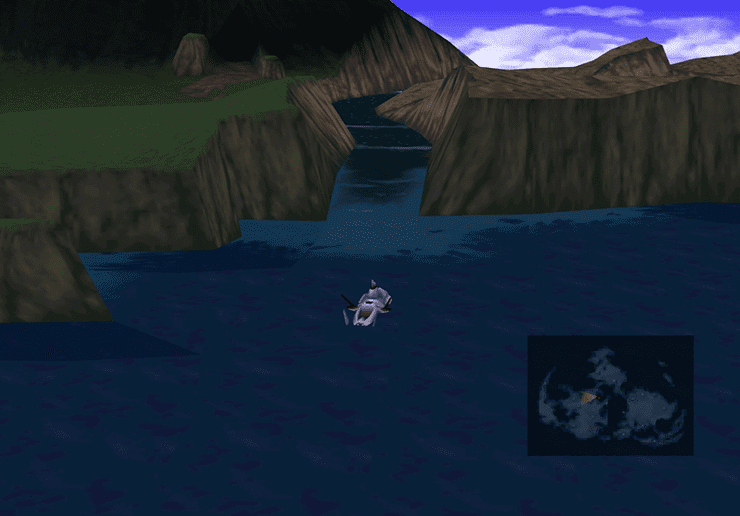
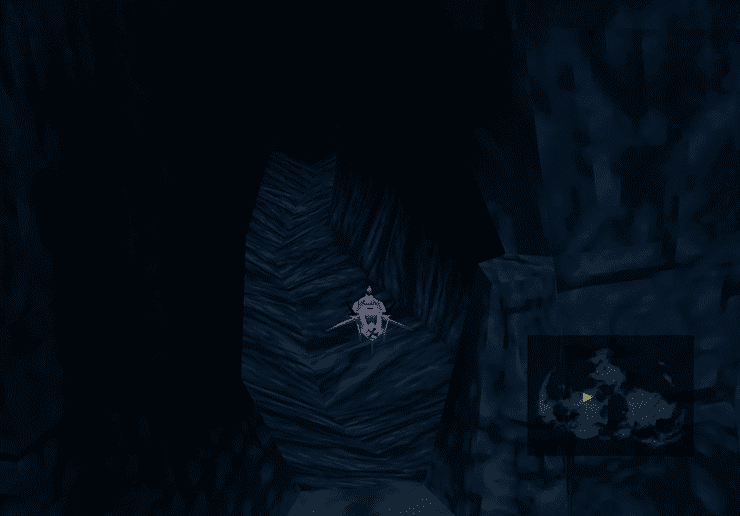
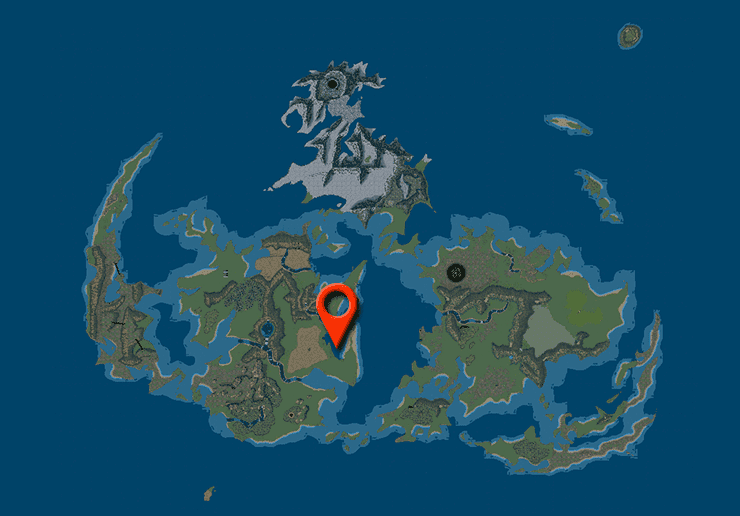
Take the buggy (assuming you haven't moved it, it should be back at Nibelheim), and drive it to Costa del Sol. Make sure to actually drive the buggy into Costa del Sol, don't enter on-foot. Spend 100 gil at the docks ride the Cargo Ship across the ocean to Junon. Exit Junon the way you originally entered earlier in the game. If you drove the buggy into Costa del Sol, you should have it when you enter the world map. Drive the buggy across the river near the large forest.
There is a cave there with a sleeping old man. If you talk to the old man, he will give you game statistics, number of battles, number of escapes. If you talk to him when the last two digits of your number of battles fought are the same (255 or 433, for example) he will give you either an accessory (if they're even) or Mythril (if they're odd). You want the Mythril.
Ride the buggy back into Lower Junon (again, not on-foot) and pay the guard 10 gil to ride the elevator to Upper Junon. Take the Cargo Ship back to Costa del Sol, and exit to the world map. If you entered Junon correctly, you should have the buggy again. There's a house near Gongaga, owned by a Weaponsmith (the one who sold the Keystone). If you have the Mythril, ask him to talk about something else and he'll bring up that he needs it. Offer it to him and open the small safe in the upper hall, and *NOT* the large chest on the lower floor. A great limit break for Aerith called "Great Gospel" is inside.
Temple Of The Ancients
 NOTE: Also After The Red Dragon Boss, Make Sure To Remove Aerith's Armor, As She Will Leave The Party For A While, And Due To The Game's Programming, The Armor She Was Wearing Will Be Deleted. Any Materia/Accessories She Has Equipped Will Be Fine, However.
Along the main temple path is the Luck Plus Materia. This is the only one in the game, so get it now.
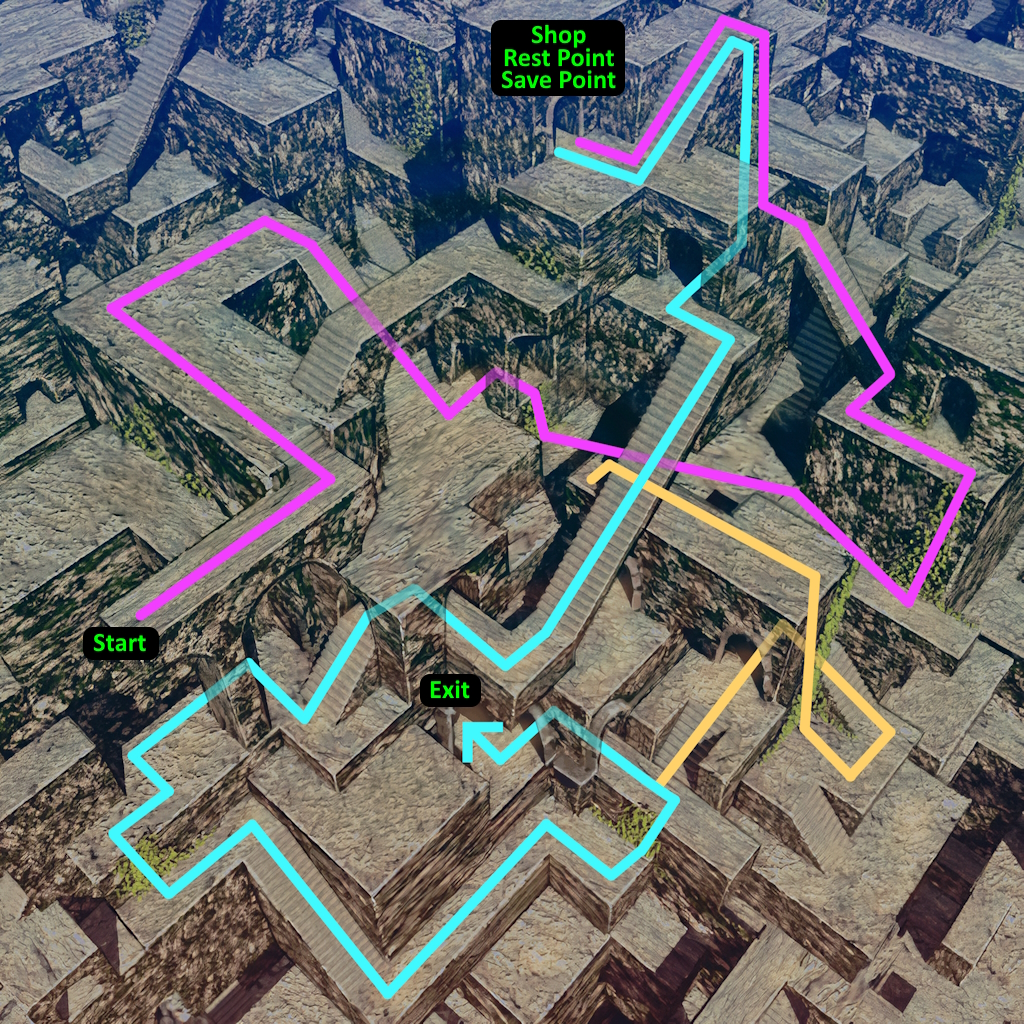
For instructions on how get this as well as other items through the main temple path, see the image below.
Follow the Pink Line to the save room, picking up all the items on the way.
Then follow the Cyan Line, picking up items until it breaks off at the Yellow Line.
Follow the Yellow Line to the end to pick up a Luck Plus Materia
Head back on the Yellow Line in the opposite direction to the Cyan Line
Follow the Cyan Line to the exit.
You should've found a Trident for Cid, a Mind Source, a Turbo Ether, the Rocket Punch short-ranged weapon for Barret, and the Luck Plus Materia. There's a chest in the middle that's unobtainable at the moment, so carry on to the exit.
The Morph Materia can be found near the falling rocks puzzle.
When you reach the Clock Puzzle, go through Hour Room IIII (IV) to get the Princess Guard. Then go through Hour Room V to get the Ribbon. Until very late in the game, this is your only chance to get the powerful Ribbon accessory, so you should make sure to pick it up here.
Room VII contains a Trumpet Shell weapon for Cait Sith, and Room VIII contains a Megalixir.
Make sure to get knocked off the clock by the second hand. You'll enter a fight with some dragons, then find yourself in front of a chest with the Nail Bat weapon for Cloud.
After fighting the Red Dragon, grab the Bahamut Summon Materia. Make sure you pick this up, as collecting it is required to get an even more powerful summon later.
Wutai
NOTE: There are two parts to Wutai. You can do them both now, but if you want to get Trine on all of your Enemy Skill Materia (you currently have 2 out of 4 Enemy Skill Materia), you should leave the second part until you have all 4 Enemy Skill Materia (which you'll have by the middle of Disc Two). Part Two of Wutai involves Yuffie climbing the Pagoda and fighting the bosses there, so don't do that yet if you want Trine on all four.
If you reach a point late in Disc Two (The main revisit to Midgar ) without doing this first visit to Wutai, it will be skipped, and you'll instead only be able to do the second visit's quest.
Once you've had the cutscene with Yuffie before entering Wutai, make sure not to save over a previous game. Save in a new slot!
Enter the Item Store, it's the northern-most house, next to the save point. Open the chest to obtain the MP Absorb Materia.
You'll find the 6th and final Turtle's Paradise Flyer in Yuffie's basement. Check the banner on the wall outside the trap room.
Read the sign outside the Turtle's Paradise to officially start the quest for the fliers, and then head inside and speak to the man behind the counter toclaim your reward!
When climbing the Da-chao Statue, you'll see a passage inside a cave that's blocked by flames. You won't be able to access this until later in the game, so ignore it for now. You can however pick up the Dragoon Lance for Cid in the cave.
After completing the first part of Wutai, it'll take you back to the World Map. Even if you're leaving Wutai's Second Part until later, you should head back in. The cats blocking the house below Yuffie's have now moved, allowing you to get the HP Absorb Materia within. You also now able to check out Wutai's Weapon Store, which has some strong items.
<hr>
Around Wutai on the world map, you can Steal the Adaman Bangles from the Adamantaimai enemies. This is the only way to get them.
I'd recommend leaving Wutai now if you want to get Trine on all four of your Enemy Skill Materia. If you're sure you don't want that, you can instead continue in Wutai and climb the Pagoda.
You're still able to get Trine on two of your Enemy Skill materia (if you don't already have them):
Progress through the tower, until you've defeated the fourth boss "Staniv".
Equip Yuffie with any Enemy Skill Materia that hasn't already learned Trine (if you've already learned it on one of them back at Mount Nibel). Make sure to NOT equip any Enemy Skill Materia that does have Trine, as it will prevent you from getting it on the others.
In the fifth boss battle, make sure Yuffie gets hit by (but isn't defeated by) the move Trine.
You should now have Trine on your two Enemy Skill Materia.
Bone Village
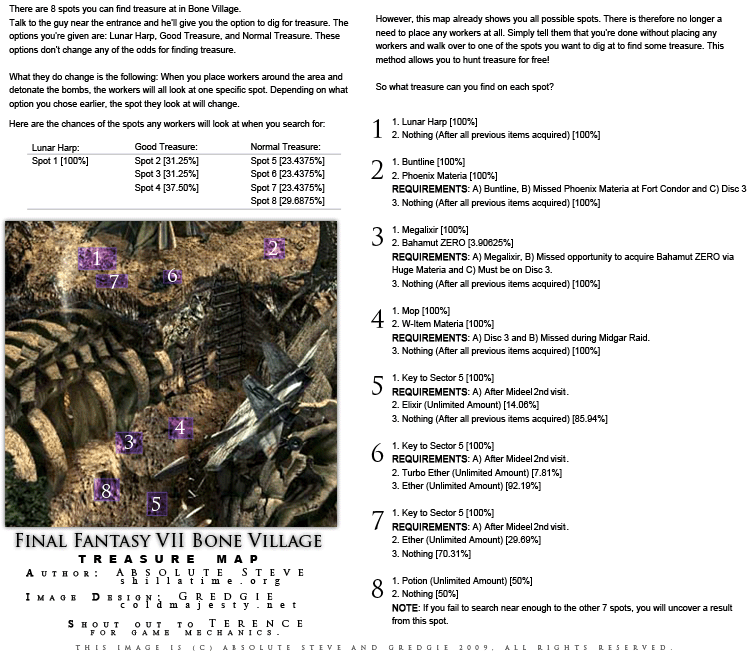
There aren't missable, but here is a visual guide to the Bone Village digging sequence.
Once you enter the Sleeping Forest, you will see a piece of red Materia appears and disappears, floating through the forest. Either be really quick or try to predict one of the next places it will reappear and add it to your inventory. This is the Kjata Summon Materia. Proceed to the end of the forest once you have obtained it.
City Of The Ancients
When you come to a set of three paths, take the left pathway. You'll find a room with a save point. Go past that, then into the big round room with the crystal in the center. Open the chest on the lower floor to get the Aurora Armlet.
Go back to the beginning and take the right pathway. In the house, get some rest to view some dialogue and make the third Enemy Skill Materia appear behind one of the beds. This isn't missable, but just good to get as soon as possible to make sure you get Trine on it.
~ ~ ~ ~ ~ ~ ~ DISC TWO ~ ~ ~ ~ ~ ~ ~
Icicle Inn
At the Icicle Inn area, make sure to enter the second building from the left to view the three films that fill in some background to the Ancients, Jenova, the Weapons and Aerith. This is not permanently missable, just cool background.
When riding down the mountain, take the right path, then the left.
Great Glacier
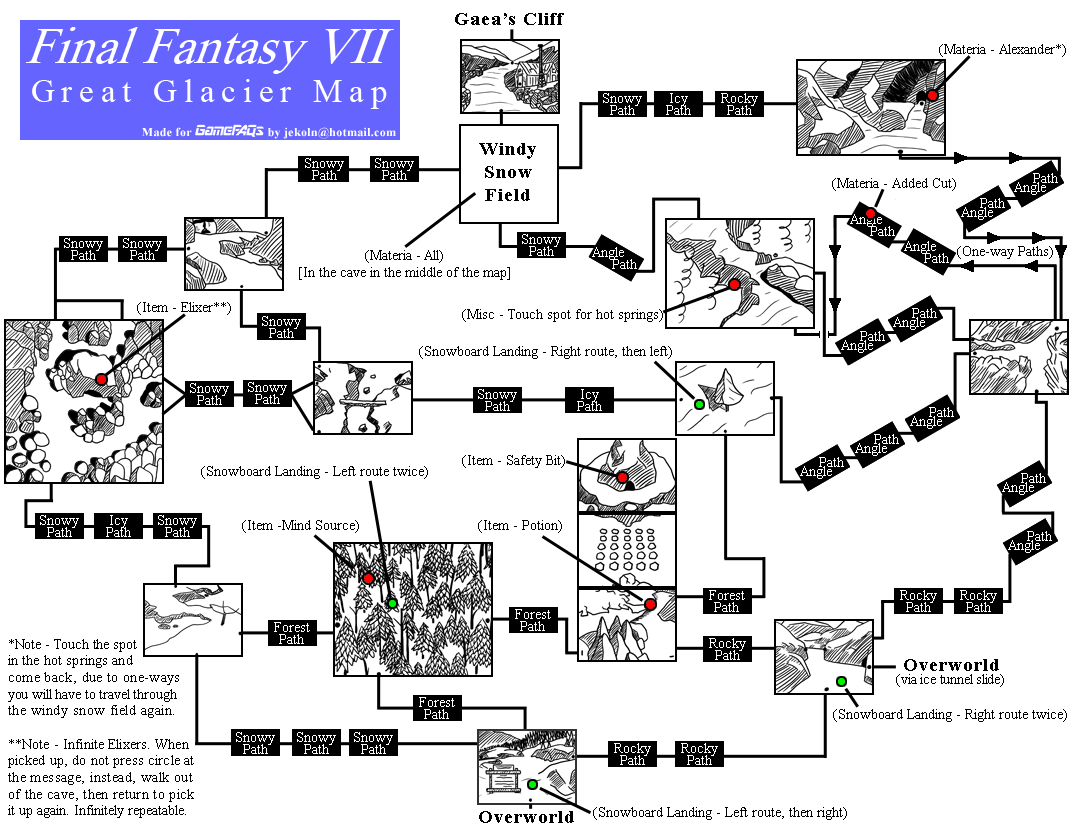
Find and touch the hot springs. Then locate the cave with the blue woman (in the cave labelled "Materia - Alexander" on the map above) Once you reach the area where you place down markers, it can be found by going northwest. The woman will fight you for trying to touch her with “hot spring hands.” When she dies, she'll drop the Alexander Summon Materia.
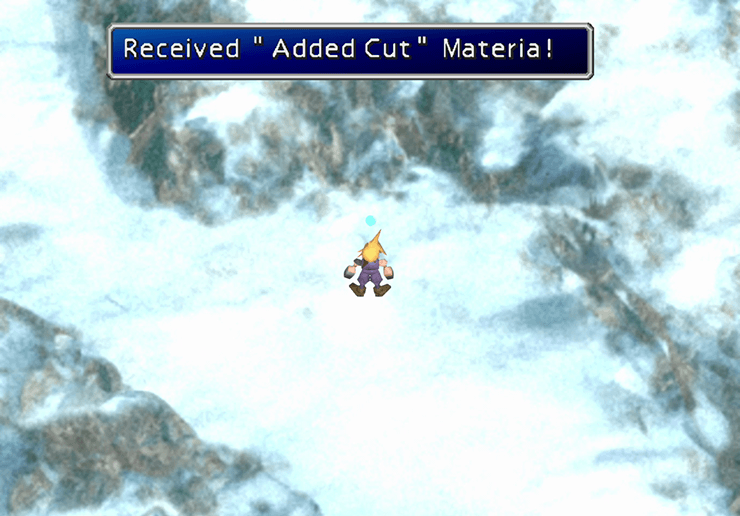
On a nearby path there is the Added Cut Materia. Note that it's on a one-way path. When you're in the right room, it may be a little hard to see due to the Materia orb being blue. Getting these can be confusing and time consuming in this maze. If you pass out and are taken to the cabin, you can head back downhill into the maze again!
Gaea’s Cliff
This is your second of three chances (or final chance if you completed the Wutai Pagoda) to learn the Enemy Skill "Trine", though as you only have three out of the four Enemy Skill Materia found in the game, you can only learn it with those three for now.
To Learn Trine:
Equip your party members with any Enemy Skill Materia that hasn't already learned Trine (if you've already learned it on one or two of them back at Mount Nibel). Make sure to NOT equip any Enemy Skill Materia that does have Trine, as it will prevent you from getting it on the others.
Equip one of your party members with the Manipulate Materia. Cait Sith came with this when he joined your party.
Encounter a "Stiva" enemy and use "Manipulate" on it.
Make sure Stiva hits the party member(s) holding the Enemy Skill Materia with Trine (without them being killed by it)
You should now have Trine on your three Enemy Skill Materia.
When you climb up the first wall in the Great Glacier, you’ll enter a cave. The second Ribbon is in a chest in a hidden room. In the second room, take the exit to the left of where you came from. It'll bring you back into the first room. Cross the bridge south of you, but keep heading right to enter a secret room with the chest.
The blue dragons inside the cave drop Dragon Armlets, which are great armor for this part of the game.
Whirwind Maze Crater
In the room with the Save Point (and a cutscene with the Highwind airship), keep an eye out for the Neo-Bahamut Summon Materia lying on the ground. It's slightly hidden behind a rock. Make sure you pick this up, as collecting it is required to get an even more powerful summon later.
If you have any Background Upscale mods or FPS Limit mods enabled, you may want to disable them for the wind puzzles in the next few rooms. There are three wind barriers in total, two before the next save point, one after. That said, the third one is just before an important cutscene, so if you want 60fps and upscaled backgrounds for that, you'll want to turn those mods back on at the next save point
Keep an eye out for the MP Turbo Materia and a chest containing the Poison Ring. Both of these are one-time offers. They are easy to find on the path immediately after defeating the Major Boss.
Junon (Disc Two)
There's nothing much missable here, but once you leave Junon, you should go back in and check out the shops, as they now carry a bunch of equipment that was previously only found in chests or dropped/stolen from enemies.
The same goes for Costa del Sol, which also has new items in stock.
Finally, before continuing to Mideel, head to the Chocobo Ranch and pick up some Mimett Greens from Choco Billy.
World Map (Small Revisits)
Now that you have the Highwind, you should take a few detours before continuing on to Mideel.
Firstly, the shops in Junon and Costa del Sol both have new equipment, as well as older equipment that was only available in chests or from enemies.
You can travel to the Chocobo Sage's House in the Icicle Area on the Northern Continent.
Speak with the green chocobo on the bottom floor to obtain the fourth and final Enemy Skill Materia.
You can also get started on Chocobo Breeding here if you want. It's optional, but obtaining the following Chocobo will allow you to access caves that contain certain items:
Blue Chocobo - Quadra Magic Materia
Green Chocobo - Mime Materia
Black Chocobo - Both of the above items, as well as HP <--> MP Materia
Gold Chocobo - All of the above items, as well as Knights of the Round Summon Materia.
Go back to Nibelheim and get the Elemental Materia from her piano. It doesn't matter what you said or did in Cloud's flashback all the way back in Kalm.
Go back to Rocket Town and enter the Weapon Store. There will be a Forth Bracelet inside a chest here.
Finally, go back to the Chocobo Ranch and purchase some Mimett Greens from Choco Billy. These are a surprise tool that will help us later.
Return to Cosmo Canyon (you won't be able to park the Highwind directly outside due to the mountains, but that's fine) and take the rightmost ladder behind the bonfire up to the Item Shop. The rope inside is now gone, letting you access the other room. You'll find the Full Cure Materia in here, as well as some other useful items.
It isn't necessary to talk to him, but Bugenhagen in Cosmo Canyon should give you vague directions on where to go next for the main story.
That said, now that you have all four Enemy Skill Materia, you can revisit Wutai to do the second part of the questline there. Cloud only has one minor line of dialogue, so you're not missing out on much by not having him in your party for the Wutai revisit.
Wutai Pagoda
If you haven't already completed the second part of the sidequest in Wutai, now is a good time to go back, seeing as you should now have all four Enemy Skill Materia.
NOTE: Cloud only has one minor line of dialogue here, so it doesn't matter if you do it while he isn't in the party.
To get started, put Yuffie in your party and head inside the large pagoda in Wutai.
To get the Trine Enemy Skill at the Wutai Pagoda:
Progress through the tower, until you've defeated the fourth boss "Staniv".
Equip Yuffie with any Enemy Skill Materia that hasn't learned Trine (if you've already learned it on at 1-3 of them back at Mount Nibel). Make sure to NOT equip any Enemy Skill Materia that does have Trine, as it will prevent you from getting it on the others.
In the fifth boss battle, make sure Yuffie gets hit by (but isn't defeated by) the move Trine.
You should now have Trine on all four of your Enemy Skill Materia.
Finishing this sidequest will get you the Leviathan Summon Materia, as well as Yuffie's Level 4 Limit Break "All Creation".
Mideel
Talk to the Hyperactive Kid in each shop/area you encounter them in. You'll find them in the Item Shop, the Weapon Shop, and the Materia Shop (but not the Accessory Shop). If you speak to them in all these places, they'll show up as a merchant when you return on Disc Three.
Following the Hyperactive Kid, you'll find a small chocobo chick. Feed it the Mimett Greens (they may be mistranslated as Samolen Greens or Mimmet Greens) you bought.
Then select "Tickle behind his ears" (or if using Echo-S/Reunion Translation, instead select "Tickle his neck") to receive the Contain Materia.
In the Weapon shop there's a door at the back. Check it out and it won't open. Go to the walkway around the Accessory shop and walk until you hear a slight creak. Examine it and find a key. Grab it and take it back to the door. Try to use it. You'll break it, but tell the truth and apologize to the store owner. You'll get the Curse Ring.
Mount Corel
Save before doing anything in Mt. Corel. Make a save on the World Map to be safe, but there should be another save point on the railroad tracks you can use. Consider bringing Barret here, though that's purely for very minor story purposes.
Make sure you don't crash the train. You'll lose the Huge Materia and you won't get a free Ultima Materia. If you do crash, you should reload your save..
The huge Materias allow you to create Master Materia, containing all of the respective category of Materia (i.e. Master Summon, Master Magic and Master Command.), and obtain a powerful Summon later in the game.
You can Steal Warrior Bangles from the Eagle Gun enemies aboard the train. This is the only way to get them.
Before leaving North Corel, speak to the woman on the far left of town to get Barret's Level 4 Limit Break "Catastrophe"
Fort Condor
Save before doing the Fort Condor minigame.
To get the Huge Materia, you need to do one of the following:
Win the Fort Condor Minigame
Lose the Fort Condor Minigame, then beat the boss that appears.
Making yourself lose the minigame then beating the boss is probably the easiest option at this point, but if you lose to the boss too, make sure to reload your save.
After winning, take the door to the right to head up the top of the mountain and grab the Phoenix Summon Materia.
You can't return here.
The Huge Materia (required to obtain a powerful summon later) is missable, but if you don't get the Phoenix Summon materia, you can find it in Disc Three at Bone Village.
Mideel (Revisit)
When you first fight the boss here, you can obtain another Curse Ring by Stealing it.
Midgar (Disc Two - Short Revisit)
Go to Midgar and a man outside the gate says that he lost his key. It can be found at Bone Village. Dig it up by following a more detailed guide.
Once in Midgar, you can get Tifa's Ultimate Weapon Premium Heart (that has no Materia slots) by bringing Tifa and Cid to the malfunctioning security turret in Wall Market.
You can buy the Sneak Glove Accessory for 129,00 gil from the man at the tank in the Wall Market Weapon Shop.
You can also see something strange inside the church. But otherwise, there's not much to do here.
Nibelheim (Disc Two Revisit)
This Is Optional, But VERY Important To The Story.Return to Nibelheim with Cloud and Tifa.
Visit Tifa's bedroom and play the piano again. You'll want to play the melody you learned all the way back in the Kalm Flashback.
Using Playstation controls, and assuming you have X mapped to "Accept" and Circle mapped to "Cancel", it is as follows:
CIRCLE, SQUARE, TRIANGLE, R1+TRIANGLE, R1+SQUARE, CIRCLE, SQUARE, TRIANGLE, R1+CIRCLE, X, CIRCLE, SQUARE, CIRCLE.
Playing this melody will show you a letter addressed to Tifa, as well as unlock her Level 4 Limit Break "Final Heaven".
Revisit the basement laboratory of the Shinra Mansion and Cloud will have a long flashback.
Junon Underwater Reactor
You are able to Steal Shinra Alpha Armor from the Underwater MP enemies.
After fighting the boss that Reno summons, but before entering the submarine, Make sure to open the three chests in this area. One of them contains the Leviathan Scales, which let you obtain the items below. The other chests contain the Battle Trumpet weapon for Cait Sith, and the Scimitar and Cid. These are permanently missable.
Save as soon as you can inside the submarine. You don't want to lose out on the Huge Materia.
Submarine Exploration
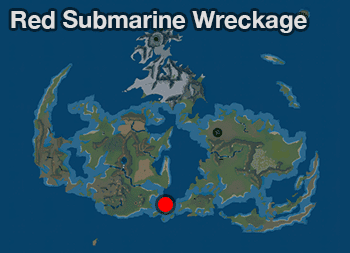
After destroying the Red Submarine, Cloud will suggest leaving the Huge Materia for now and just heading to Junon. Ignore him. There's a few things you'll want to do underwater.
Note: If you find a large green enemy underwater, it's probably best to ignore it for now, as you'll likely be too weak to fight it at this point. Every time you resurface and submerge again, it'll change location.
Find the wreckage of the red submarine in the southern-most area. If there's a large green enemy guarding it, simply resurface and then go back underwater. It should have moved.
Make sure to take the submarine's Huge Materia, as it is required in order to get a very powerful summon later.
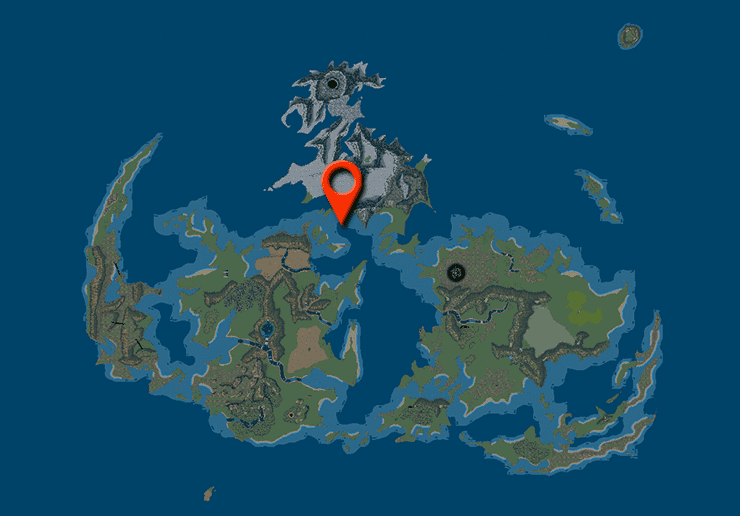
There's a key item underwater you'll need soon for the story, so you may as well grab it now.
Head to the area shown below and submerge. You'll find the Key in a small cave.
Take the sub to the area shown below, near Costa del Sol.
Submerge near where the river flows into the ocean and you should find a cave nearby. Resurface when you reach the end of the cave and then exit your sub.
Once you're back on land, add Vincent to your party and enter the cave covered by the waterfall. After the cutscene, you'll be back outside. Finish 10 random battles with Vincent in your party. When you head back into the cave you'll obtain Vincent's ultimate weapon Death Penalty and his Level 4 Limit Break, Chaos.
Sunken Gelnika
Minor note: The Sunken Gelnika is known as the "Sunken Guernica" in the Echo-S/Reunion Translation
Using the Shinra Sub, head to the area south of Costa del Sol and east of the Gold Saucer, and submerge.
If the Emerald Weapon is blocking the Sunken Gelnika (and assuming you don't want to fight it, as it's a very high level), you can simply go back to the surface then go back underwater to make it move.
Grab the "Heaven's Cloud" weapon for Cloud in the hallway, and the Double Cut Materia in the room to the right of the save point. In the room with the Double Cut Materia, there's a chest hidden behind some pipes at the top left of the lower floor. Inside you'll find Yuffie's Ultimate Weapon, the Conformer.
If you go to the Sunken Gelnika before the end of Disc Two, you can fight Rude and Reno. You can steal the Ziedrich from Rude, and Touph Ring from Reno. If you want them, try to steal them here. There is one other opportunity to get them both (but the fight can be skipped if you've completed the Wutai questline, along with the items), and the Ziedrich alone can be stolen at another point.
In the Cargo Hold, you'll find the "Spirit Lance" for Cid, the "Outsider" weapon for Vincent, Cid's Level 4 Limit Break, "Highwind", as well as the Hades Summon Materia.
You can Steal the following Armor and Accesories:
Fire Armlets from the Unknown enemies.
Aurora Armlets from the Unknown 2 enemies.
Bolt Armlets from the Unknown 3 enemies.
Water Rings from the Serpent enemies.
Wutai (Disc Two - Short Revisit)
Return to Wutai, head to the Da Chao Statue and go inside the cave. Use the Leviathan Scales to get past the flame wall blocking the cave. Use the Leviathan Scales again to get rid of the rest of the fire. Afterwards, you'll find Yuffie's ultimate weapon Oritsuru, and the Steal-as-Well Materia.
If you haven't already, make sure to finish climb the Wutai Pagoda with Yuffie in your party, as mentioned earlier in the guide. Check out the "Wutai Pagoda" section for more info.
Junon Airport
There's nothing noteworthy here. You'll just be told to head to Rocket Town for the final piece of Huge Materia.
Rocket Town (Disc Two)
Save before entering Rocket Town. This is the final missable Huge Materia.
You have another opportunity to steal the Ziedrich from Rude here. This is the last chance to get it, unless you choose to do an optional fight later (which depending on how you want the story to play out, you may choose to skip).
Another Huge Materia can be missed here. Missing it will lock you out of a very powerful summon later. The code for the Huge Materia in the rocket is "ACCEPT, SWITCH, CANCEL, CANCEL".
(Assuming you use X for "Accept" and Circle for "Cancel", the code is X, SQUARE, CIRCLE, CIRCLE) If for some reason that doesn't work, try swapping X and Circle.
If you miss this, you’ll never get the powerful Summon Materia, and you should reload your save.
As you leave Rocket Town, Red XIII will suggest going to Cosmo Canyon. But before you do this, head back into Rocket Town and speak to the man in front of the Item Shop three times to get Cid's ultimate weapon Venus Gospel.
There is also a Fourth Bracelet in a chest in the Weapon Store. This isn't missable, but it's a great piece of armor.
Cosmo Canyon (Huge Materia)
If you've collected all four pieces of Huge Materia, and you have both the Bahamut and Neo Bahamut summons, you should head to Cosmo Canyon.
Head to the Observatory, then enter Bugenhagen’s contraption from the entrance on the main floor and speak to him to continue the story.
Examine the Blue Materia and choose "Get closer..." to recieve the Bahamut ZERO Summon Materia, the most powerful summon in the game.
City Of The Ancients (Revisit)
Nothing of note in the City of the Ancients, but once you leave, a boss fight will appear on the World Map.
Steal the Rising Sun from the boss. It's not exceptional, but it is one of a kind.
Once you've defeated it, you should be aware that this is the final point you'll be able to do the first part of Wutai's quest if you haven't already. The second part (where Yuffie fights the battles in the Pagoda) will still be available.
Midgar (Disc Two - Main Revisit)
In the Sector 8 Underground, after following Cait Sith down the ladder, you will find the Aegis Armlet armor, the Starlight Phone weapon for Cait Sith, and the Max Ray weapon for Barret. These are all one of a kind, and you cannot return here. When you have what you need, exit through the door next to the save point.
In the train tunnels, run all the way to the end of the tunnels (going towards the camera, not away) and you'll find the W-Item Materia (also known as the "2x-Item" Materia.
On the way to the Shinra Building you’ll be stopped by the Turks. If you've finished the first Wutai sidequest, you can choose whether to fight them or not. If you do fight them, Reno, Rude and Elena all have rare items for stealing: Touph Ring, Ziedrich and Minerva Band, respectively. If you haven't already got the Ziedrich or the Touph Ring, this is your last chance.
Keep taking the right paths until you reach Room 1 in the tunnels to get Shinra HQ, instead of heading south to progress the story, go inside and check the Item Shop on the second floor. You'll find the Pile Banger and Master Fist in two chests.
If you didn't get the Turtle's Paradise Flyer back in Disc One, this is your last chance to get it.
On Floor 63, you'll find the Grow/Glow Lance for Cid, and in a locker on the 64th you'll find Cait Sith's ultimate weapon, HP Shout. There's also the "Behemoth Comb" for Nanaki if you take the stairs. Once you're done in Shinra HQ, go back to the tunnels, then in Room 8, take the left exit.
IMPORTANT: After you beat the Proud Clod/Proud Clad boss, head to the next save point and make sure to add Barret to your party. When you climb the stairs in the rain, you'll find his ultimate weapon, Missing Score in a chest. It's nonexistent when he's not in your party and it’ll be something else instead. After picking it up, you can go back down and switch to any party members. For example...
Vincent and Red XIII have history with the upcoming boss, so for story purposes feel free to add them to your party.
This is also your last chance to Steal Shinra Alpha Armor from the SOLDIER:1st enemies.
~ ~ ~ ~ ~ ~ ~ DISC THREE ~ ~ ~ ~ ~ ~ ~
Cosmo Canyon (Nanaki/Red XIII)
Before climbing down the ladder to the Northern Crater, return to the Cosmo Canyon observatory with Nanaki in your party to finish off his story and gain his ultimate weapon, Limited Moon.
Northern Crater
Do Not Use The Save Crystal As It Can Sometimes Bug Your Game.Go down the crater with a team of Cloud, Cait Sith, and Vincent. Equip them with any Materia you want, as you will be unable to access other characters Materia soon.
Instead, travel back to the Highwind if you want to save.
The party you have here and the paths you send your party members down depends on what items you want to get. The choices I'd recommend are further down, but first a warning about a PERMANENTLY MISSABLE enemy skill.
The Dragon Zombie enemy will only use the Pandora's Box skill ONCE PER PLAYTHROUGH, as only the first Dragon Zombie you encounter will use it. If it uses it and you don't get it on your Enemy Skill Materia, or if it even attempts to use it and it doesn't have enough MP, it will NEVER USE THE SKILL AGAIN, and you will have to reload your save to get it.
They should only appear on the RIGHT path, so if you follow my party choice recommendations below, you shouldn't encounter them until you've gone down to the bottom of the cave and gone back up to the Highwind to heal/change party/save. But just in case, I'll put it here instead.
Make sure you've equipped your party with all four Enemy Skill Materia. Then, when you encounter the Dragon Zombie, use an Elixir on it to cast death, and then it should retaliate with Pandora's Box. If you fail to get the Enemy Skill, you will have to reload a save if you want to try again.
When your party splits up at the left and right paths, send Tifa to the Right, and everybody else to the Left.
At the next split path, send the party as follows:
Cloud: Down
Barret: Either
Nanaki/Red XIII: Up
Yuffie: Up
Cait Sith: Either (Down if you want him in your party)
Vincent: Down (Down if you want him in your party)
Cid: Up
At the bottom of the Northern Cave, you can talk to your party members to receive the items they picked up. Again, do not use the Save Crystal as it can sometimes bug your game. (It SHOULD be fine in the final area, as it's mostly areas where your party splits up that it bugs. But better safe than sorry).
Choosing "Let's get going" is a point of no return, so don't do that yet if you want to get the following items.
Go back up to the top of the cave but DO NOT TAKE THE RIGHT PATH that Tifa took if you're trying to get the permanently missable Enemy Skill mentioned above. Head back to the Highwind to heal, save, and choose your party for the final battle.
On your way back down, you can pick up the items on the three pathways if you haven't already. Note that you can Steal the Gigas Armlet armor from the Gigas enemies.
Back down at the bottom of the Northern Cave, choose "Let's get going." and finish the game!
Source: https://steamcommunity.com/sharedfiles/filedetails/?id=3149942537
More FINAL FANTASY VII guilds
- All Guilds
- Double Phoenix Materia Glitch/Exploit [DISC 2]
- Los 10 BUGS ms LOCOS de FINAL FANTASY VII El Custo
- Final Fantasy VII
- [DE] 7th Heaven 2.0 - Alles rund um 7th Heaven !!!
- Cria de chocobos
- AHK scripts for w-item dupe and super dunk, added tifas piano
- INFINITE STAMINA IN YOUR CHOCOBO
- MAP Overview
- Jak powikszy swoj materi!
- Final Fantasy VII - Walkthrough (ITA - PS1 version)