Want to start in a Snow Planet? What about an Oceanic one? Or are you willing to test yourself in a Lava Planet? Now you can! This is a simple guide to teach you how to pick any Starter Planet you wish in Empyrion.
How To Pick Any Starter Planet Whatever You Wants
Introduction
Warning! This works in Alpha 11.5 and early version.
This method also tries to give the least spoilers about your galaxy, since it's inevitable to work on some files (just a few, I promise). In fact, you'll be only looking into the planet's names and types until you find the one you wish to start with.
Before we proceed, please, note: I'm not teaching how to build a Scenario, and I'm not altering a planet's ore composition or available POIs either. You're just going to start in a planet type you like. It means the game will give you what it is programmed to give. For instance, first I tried landing on a Temperate Planet (default) and the game gave me some starting equipment and no armor. Then, when I tried a very difficult Lava Planet, I spawned with only a Bottle of Water, but I had a Medium Armor on (probably to endure the temperature for some time). As I said, I just set the starting planet up; the game programming did all the rest.
For this guide, I'll assume we're going to pick a "Hoth Experience" (Star Wars fans, rejoice!), so we'll go with a "Snow" starter planet.
You'll also need:
- Empyrion - Galactic Survival.
- Empyrion - Dedicated Server.
- Wordpad (present in Windows) or Notepad++.
I'm going to assume you know nothing (or almost nothing) about the game's dedicated server, so in the next section I'm going to teach you how to configure it. In case you already have it installed, just skip to the following section "Picking the Starter Planet".
Still, anytime we edit a game file, use Wordpad or Notepad++ and remember: Backup original files before messing with them.
First Steps: How To Configure Empyrion - Dedicated Server
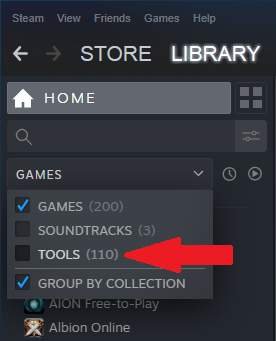
In your Steam Library, look at the upper-left side. There is a drop-down menu where you can see "Games". Click there to expand it and check "Tools" too (check the image below). Your library will update to accommodate all game tools which come free with your games. Scroll down until you find "Empyrion – Galactic Survival Dedicated Server" and install it.
After you installed it, open Windows Explorer and find the server installation folder (it is usually on "(…)Steam\steamapps\common\Empyrion - Dedicated Server").
The first file you need to set up is "dedicated.yaml". This will set the basic server configuration.
Inside "dedicated.yaml", look for this:
ServerConfig:
Srv_Port: 30000
Srv_Name: (can be anything, I suggest a one-word name)
Srv_Password: (anything you like)
# Srv_MaxPlayers: 8
In this part, if there is any "#" in front of "Srv_Password", just delete it.
After you do this, scroll to the bottom of the file and look for this:
GameConfig:
GameName: (insert here the same name of your server to keep things simple)
# Determines name of the save game
Mode: Survival
# Survival or Creative
Seed: (type some random numbers)
# The seed determines how the world is procedurally generated - the same seed means the same world
CustomScenario: Default Multiplayer
# Enable custom scenario. Name of custom scenario from folder Content\Scenarios
Now you can save the file and close it. Then navigate to this folder:
(…)\Steam\steamapps\common\Empyrion - Dedicated Server\Content\Scenarios\Default Multiplayer
Once you find it, open "gameoptions.yaml" and take a look. Here you'll find options for your server, which is using the game's Scenario "Default Multiplayer". Remember: if you selected a different "CustomScenario" in the last step, navigate to the correlating folder instead.
In this file, alter whatever you wish, according to your tastes. I like to alter this options:
AutoMinerDepletion: True # default value
GroundedStructureSpawn: False # default value
(…)
DespawnEscapePod: False # default value
RegeneratePOIs: False # default value
In short, this options make auto-miners deplete ore fields, let's you spawn anything without the need of a built structure under it, preserves your escape pod forever and stops POIs from regenerating. As I said, this choices are a matter of personal choice, and I do like this because it makes the game seems more realistic to me – just a matter of opinion. Do as you see fit.
Once you're done, go back to:
(…)\Steam\steamapps\common\Empyrion - Dedicated Server
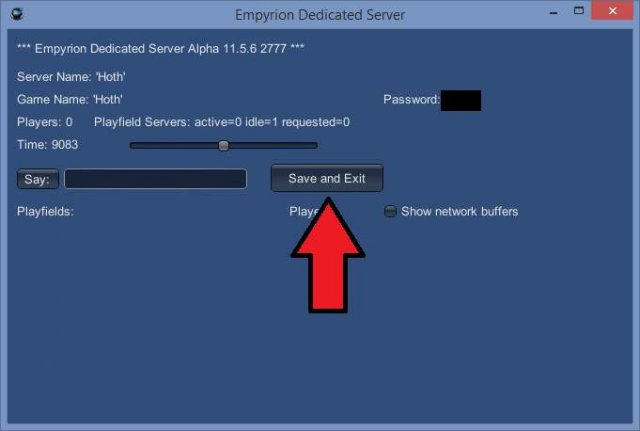
…and run "EmpyrionDedicated.cmd". It will start the server and create a savegame for it. It's name will be the one you set in "dedicated.yaml" file. Wait for the server to completely load. It can take a while and you'll know it's done when you see a button "Save and Exit" appear (check the image below).
Now the server has created your galaxy and we are ready to pick our starter planet. Click "Save and Exit".
Picking Your Starter Planet
Ok, now we have a brand new galaxy created by the Dedicated Server so we can pick our starter planet. If you don't know how to create a game using the server, read the last section "First Steps: how to configure Empyrion - Dedicated Server". If you know how to initiate a new game using the Dedicated Server, just do it and come with us from this point on.
Navigate to this folder:
(…)\Steam\steamapps\common\Empyrion - Dedicated Server\Saves\Games\(your game name)\Templates
Inside this folder, you'll find all the planets and other areas names inside the game (also know as "Playfields"). Some are just names (the Planets), but there are also "Orbits", "Moons" and "Asteroid Fields". We want you to focus on the Planets only (the random names without any complement).
Choose at random any planet and look into its folder. Inside each folder you'll find a file named "terrain.ecf". Open it, as usual, using Wordpad or Notepad++.
The first line of the file shows:
{ Material Name: (something)
This is the type of the planet. In this example, we wish to start in a Snow planet, so it should be written "Material Name: Snow". Keep searching each planet's "terrain.ecf" file from the different folders until you find the one. Write the name of your planet down; you'll need it later. In this example, let's imagine we found a planet named "Aestornia".
Now, navigate back up a folder and access "Sectors" folder:
(…)\Steam\steamapps\common\Empyrion - Dedicated Server\Saves\Games\(your game name)\Sectors
You'll see a file named "sectors.yaml". Open it. This is a big file, so it'll be easier to use the Find tool. Look for "# Aestornia" (in my example, in your case, remember to use the planet name you wrote down).
What you'll see will be info the game reads about your game. Look for this:
Playfields
['0, 0, 0', Aestornia, Aestornia]
['-8599, 9235, 492', Aestornia Moon, Aestornia Moon]
['0, 0, 0', Aestornia Orbit, Aestornia Orbit]
The first line is about the planet; the second, about its moon; and the third, about its orbit. Add "true" at the end of any one of this lines to set it as your starter place. Since we are going for the planet, add "true" into the first line, like this:
Playfields
['0, 0, 0', Aestornia, Aestornia, true]
Save and close the file.
Now, it's time to reload the server once more. Access:
(…)\Steam\steamapps\common\Empyrion - Dedicated Server
…and run the file "EmpyrionDedicated.cmd". When it's done loading (i.e., when you see the "Save and Exit" button), minimize the server.
Checking If It Worked
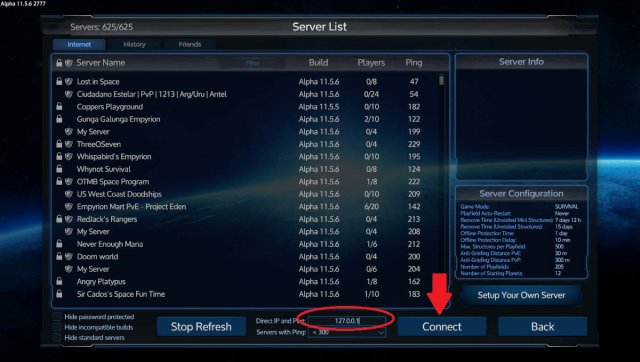
Now, time to load Empyrion. Run the game and in its main screen, select Join Game. In this section, you'll see on the lower part of your screen a blank field. Supply your local IP (127.0.0.1) so the game connects to the server running in your own PC. Note: your server WON'T be listed in the general server list because you are the one hosting it. You must use the local IP (127.0.0.1). Check the image below.
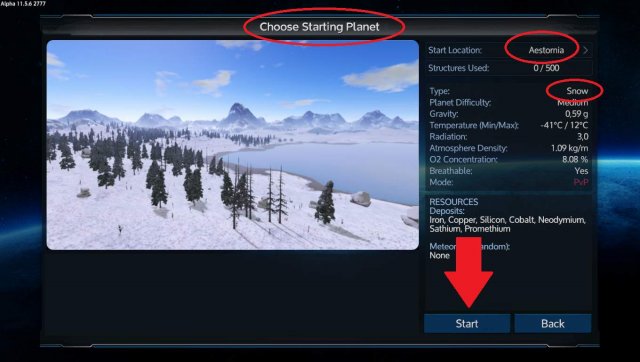
This will bring you to the first screen of the game, where you select your starting planet. Scroll through the various options and… you'll find our Snow Planet as a Starter Planet!
Be sure to hit Start button so the game can create a file to link you to this save game (important when you read this next and last section of this guide).
Before You Jump Into The Game
Ok, before you jump into the game, some quick and important considerations.
Note on the last image that this "initial" game comes with Neodymium, Sathium and Promethium deposits. This happens because, as I said at the beginning, we are bound to what the game dictates. We just added a starter planet, but we didn't alter the "Snow Planet Profile". Since Snow Planets were intended to be discovered later, don't blame me if they are too difficult, if enemies are strong or if there are rare resources available. To keep things simple, we are using the planets as they are provided by the game, ok?
Last but not least, at this point you have a choice about what to do with your savegame. Since you started the game and were "linked" to this save, you can now move the files to the Single Player game if you wish. If you didn't start the game, Empyrion (single player) wouldn't be able to load your game, even if you place it in the right place. So, now choose:
You may keep playing using the Dedicated Server. Pros: no additional file moving. Con: you will be using your PC processing power to keep the Server open alongside Empyrion game; and you'll have to keep playing by loading the server and, then, Joining the Game on Empyrion using your 127.0.0.1 IP.You may transfer the savegame from the local server to an online one you keep, so you can continue playing with friends. To do so, just copy your savegame folder (located inside server's "Saves" folder) to your online server.You may stop using the Dedicated server and transfer the game to Empyrion SinglePlayer. Pro: only one software running, you save some of your system resources.
Con: almost no one, except it's singleplayer and you need to move one additional folder (which can be bad for the lazy ones among us). If you choose to do so:
Open your Dedicated Server savegame folder, located in:
(…)\Steam\steamapps\common\Empyrion - Dedicated Server\Saves\Games
The should be one (or more) folders here, each with a savegame name. Copy that one we just created.
Open Empyrion savegame folder, located at:
(…)\Steam\steamapps\common\Empyrion - Galactic Survival\Saves\Games
Paste here your savegame.
In case you did this, remember: when you wish to play, load Empyrion game and instead of clicking "Join Game", choose "Resume Game" instead. We just moved the save to a "single player" status, and you must load it as such.
Source: https://gameplay.tips/guides/6517-empyrion-galactic-survival.html
More Empyrion - Galactic Survival guilds
- All Guilds
- Empyrion - Galactic Survival - Totally OverPowered Brewery, Secrets Revealed
- Empyrion - Galactic Survival - Beginners Tips and Tricks
- Empyrion - Galactic Survival - Solar Power 101 (A How-To Guide)
- Empyrion - Galactic Survival - Starter Planet Guide
- Empyrion - Galactic Survival - How to Restore SV's and Why You Need This
