Disclaimer
Guide Summary This game requires three full completions in order to get all of the achievements.
The first playthrough is designed to get all the achievements asides from all endings.
The second and third playthrough are designed as shortest paths in order to obtain the final two ending achievements.
This game does NOT require you to obtain all spells, weapons, etc as in previous Souls games, but will require you to acquire various legendary spells, equipment, and ashes.
The only two questlines you need to worry about are Ranni's and Sellen's questlines. There are other questlines that involve achievements, but those are automatically unlocked as you progress in the game and do not require you to actually do anything.
Notes Due to this game being open world as well as a majority of items not being required in this game, the walkthrough is going to be lighter than my usual guides since reaching various areas aren't as important anymore.
Key items that assist with progressing the storyline will be listed, but key items such as Golden Seeds and Sacred Tears will not be called out.
Missable
As with all souls games and its new game system, nothing is truly missable. So this listing merely points out all the important turning points of the game that may lock you out of a potential achievement.
Make sure to not kill Fia prior to fighting Lichdragon Fortissax for the boss achievement
Make sure to not to give Ranni the Amber Draught in Seluvis' questline if you need Ranni's ending, Age of the Stars, and the Dark Moon Greatsword
Make sure to get the Bolt of Gransax in Leyndell, Royal Capital before setting the Erdtree on fire with Melanie at the Forge of the Giants after the Fire Giant
If you're looking for the Lord of Frenzied Flame ending, after inheriting the frenzied flame at the end of the Subterranean Shunning Grounds, make sure not to use Miquella's Needle at arena where you fight Dragonlord Placidusax as this will permanently lock you out of the Lord of Frenzied Flame ending.
Walkthrough: Limgrave
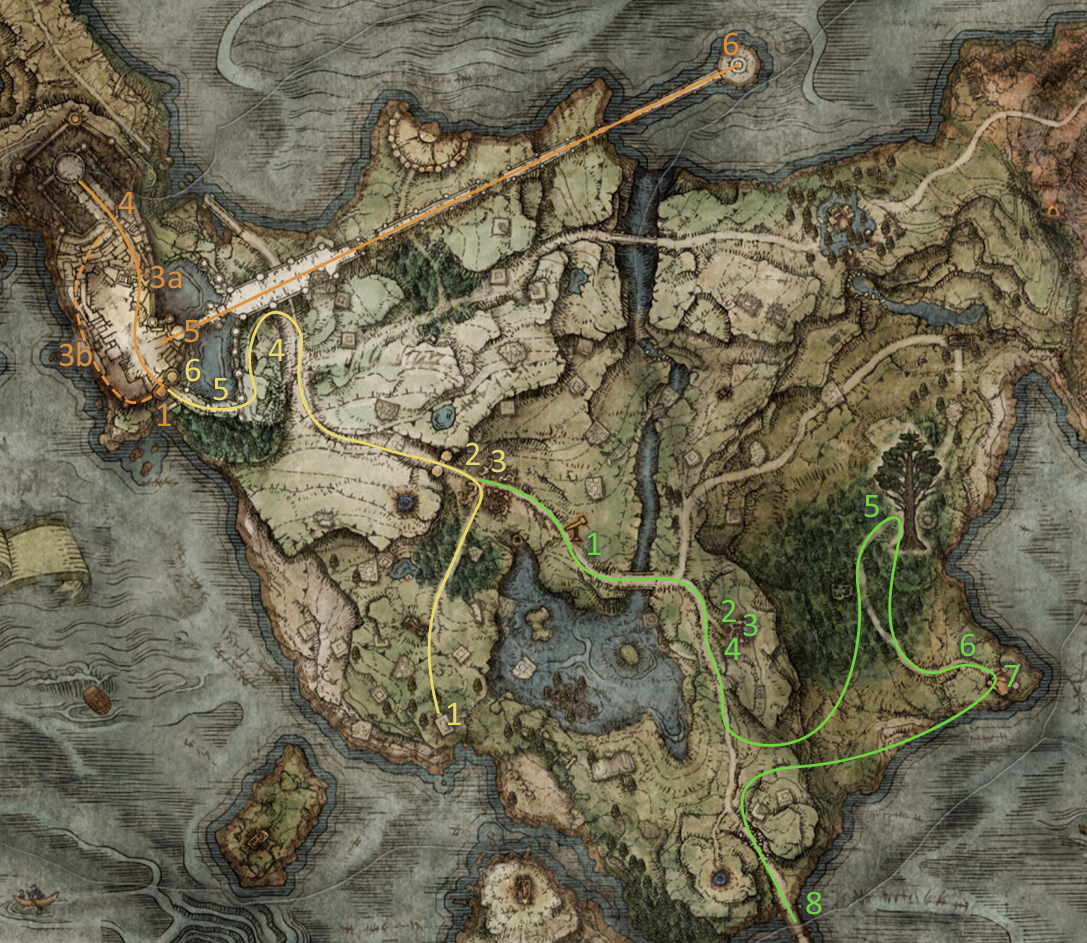
West Limgrave Once you exit the Tutorial, you'll be in Limgrave.
Head north to the Gatefront Site of Grace, if you talk to Melania here, she will grant you the ability to level up at any grace.
Map Fragment: Limgrave, West | Should be in the Gatefront Ruins at the junction just east of the site of grace.
Then head west through to Stormhill. If you continue the northern path that curves left, you'll eventually reach the entrance to Stormveil Castle.
Boss Fight: Margit, the Fell Omen
Margit, the Fell Omen Defeated Margit, the Fell Omen Continue to reach the Main Gate of Stormveil Castle
Stormveil Castle Provided you haven't rested at a grace outside of Limgrave, then the Stormveil Main Gate Site of Grace will be the first opportunity that Melania will take you to the Roundtable Hold which serves as a Nexus.
Roundtable Hold Arrived at Roundtable Hold Return to Stormveil Castle as needed.
There's two paths to take here, you can either send it through the main gate by taking up Gatekeeper Gostoc's offer which takes no longer than 5 minutes, or you can take the safer approach that could take hours.
Boss Fight: Godrick the Grafted
Shardbearer Godrick Defeated Shardbearer Godrick After defeating Godrick, there's a path between the grace before Godrick and the Main gate heading east guarded by a Lion Guardian. Take this path and take the bridge to a teleport which takes you to the Divine Tower of Limgrave.
Active Godrick's Great Rune at the top of the divine tower.
Great Rune Restored the power of a Great Rune
East Limgrave From the Gatefront site of grace, head east along the road and across the bridge. Take the fork south and you'll see some ruins guarded by plants to your left which is Waypoint Ruins.
Locate the stairs in the ruins and dispatch of it.
Boss: Mad Pumpkin
Sidequest: Sellen | Exhaust her dialogue until you accept to become her apprentice.
Map Fragment: Limgrave, East | Head to the Minor Erdtree in Limgrave to the east and you'll enter Mistwood
Head to Fort Haight which is located southeast of the Minor Erdtree in the area.
Key Item: Dectus Medallion (Left) | Located in the highest tower in the fort
Exit the fort and head south to the Bridge of Sacrifice
Walkthrough: Weeping Peninsula
 Leonine Misbegotten
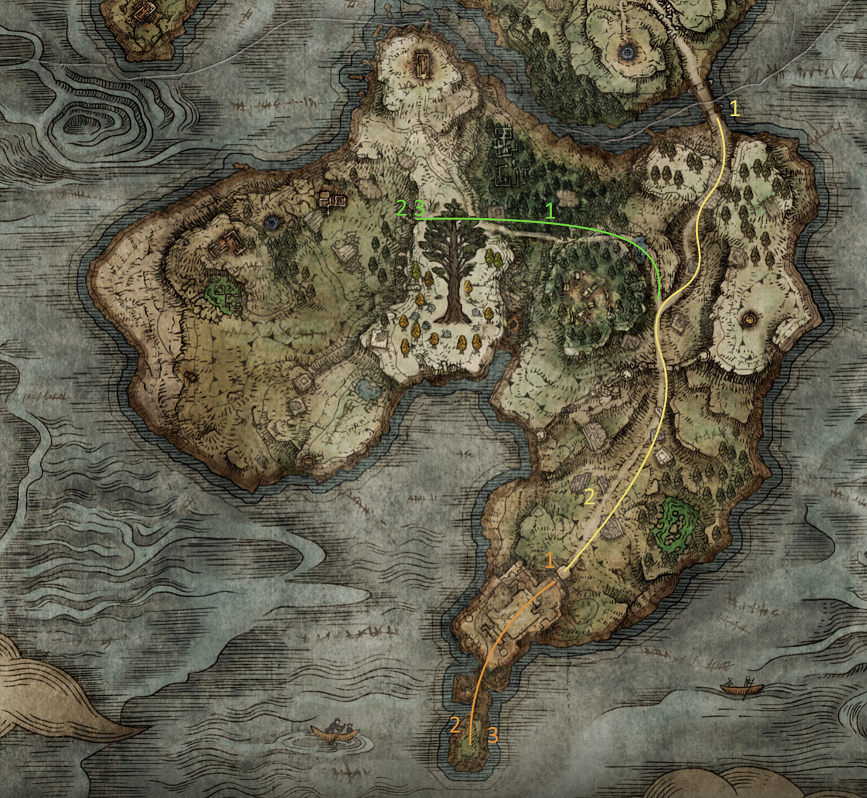
Weeping Peninsula You can enter the Weeping Peninsula from Limgrave by heading south to the Bridge of Sacrifice
Map Fragment: Weeping Peninsula | Take the southern road all the way down towards Castle Morne. On the way there, you'll see the Map Fragment on the west side of the road where an archer Golem is shooting at you from the Castle.
Castle Morne Head to Castle Morne at the southern end of the Weeping Peninsula
Boss:
Legendary Armament #1: Grafted Blade Greatsword | Dropped from Defeated the
Tombsward Catacombs The entrance is located just north of the Minor Erdtree on the Weeping Peninsula
Defeat the Cemetery Shade
Legendary Ashen Remain #1: Lhutel the Headless | Dropped from Cemetery Shade
Walkthrough: Liurnia Of The Lakes
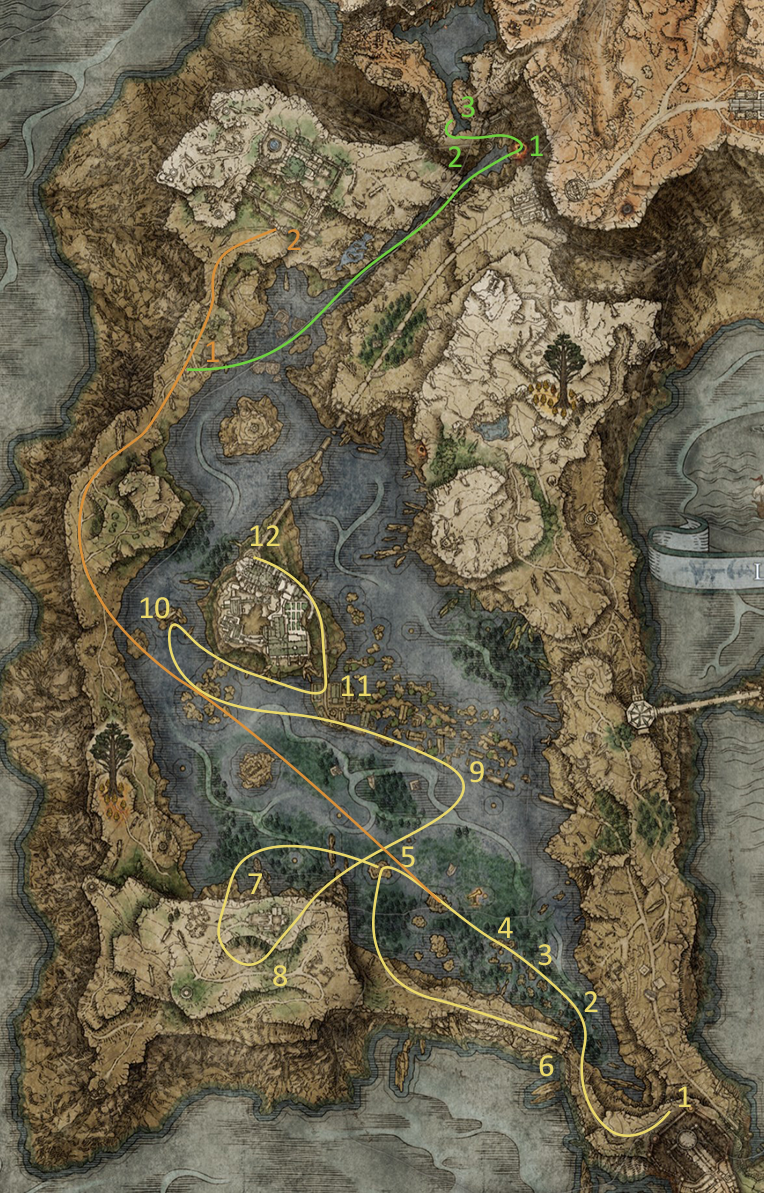
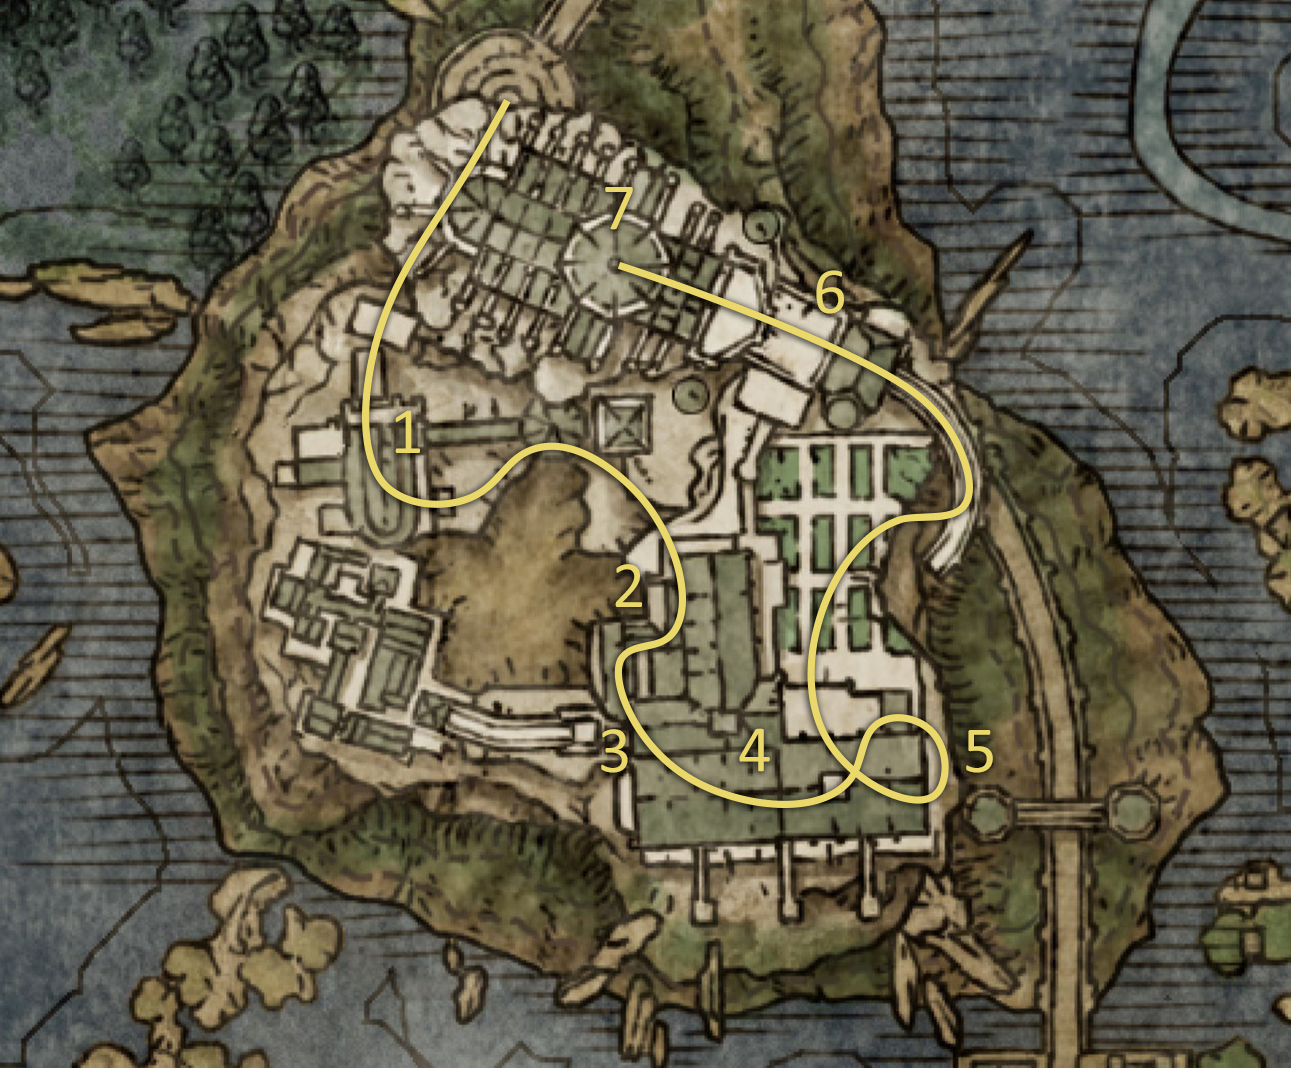
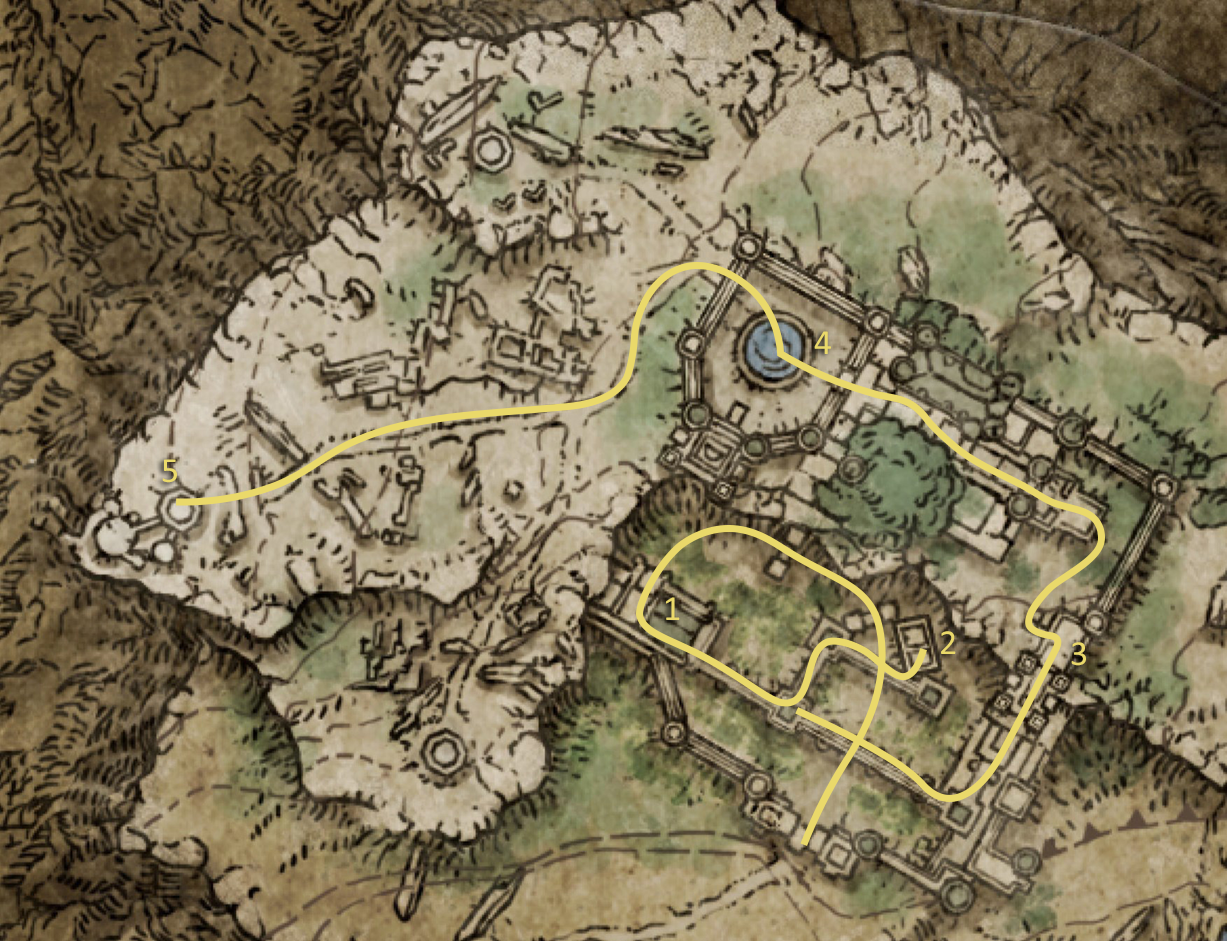
Liurnia - Part 1 You'll start at the Lake-Facing Cliffs grace.
Map Fragment: Liurnia, East
Head north to the Laskar Ruins which you'll want to touch the grace.
Head northwest to find a Laskar Ruins itself and touch the teleporter to be warped directly to South Raya Lucaria Gate site of grace, touch the grace here and return back to the Laskar Ruins site of grace.
Head northwest to get a quick grace as a checkpoint: Scenic Isle
Legendary Spell #1: Flame of the Fell God | Boss Reward from Malefactor's Evergaol
From the Scenic Isle grace, head west and under the large plateau to your southwest to find the Village of the Albinaurics.
Key Item: Haligtree Secret Medallion (Right) | Given by Albus who is disguised as a pot prior to the large bridge in the Village of the Albinaurics.
Map Fragment: Liurnia, North
Key Item: Academy Glintstone Key | Head northwest to find Glintstone Dragon Smarag who is guarding the key.
Return to the South Raya Lucaria Gate with the key in tow to enter.
Make your way to the Main Academy Gate site of grace.
Raya Lucaria Academy Take the lift up and go up the steps to enter the Church of the Cuckoo. Through the doorway to the left is your first grace: Church of the Cuckoo.
Afterwards, head straight along the path until you reach a giant water wheel lift. Take the lift up, and drop off at the top and enter the building for your second site of grace: Schoolhouse Classroom
Follow the hallway and take the steps up to reach the next boss.
Boss Fight: Red Wolf of Radagon
Red Wolf of Radagon Defeated the Red Wolf of Radagon Legendary Talisman #1: After the fight, take the exit north and go right and jump off the balcony to a ladder that will take you to a chest above the Red Wolf of Radagon fight
From here, head out to the courtyard again, and take the staircase to the right where there's a rolling ball trap. Proceed and take the elevator up.
Boss Fight: Rennala, Queen of the Full Moon
Rennala, Queen of the Full Moon Defeated Rennala, Queen of the Full Moon
Liurnia - Part 2 Map Fragment: Liurnia, West
Continue until you reach Caria Manor
Caria Manor Head in the courtyard and follow the path until you reach the first building and the first grace: Manor Lower Level
Legendary Armament #2: Sword of Night and Flame | When traversing the walkways up top, take the left at the fork and then drop down to the building to the north to find this in a chest in the building.
From the fork again, go straight and continue until you get your next grace: Manor Upper Level
Boss Fight: Royal Knight Loretta
Royal Knight Loretta Defeated Royal Knight Loretta Sidequest: Ranni | After the boss, head up to Ranni's Rise and talk to Ranni beginning her questline for one of the endings.
Ruin-Strewn Precipice Make your way through the ravine in northern Liurnia
Boss Fight: Magma Wyrm Makar
Magma Wyrm Makar Defeated Magma Wyrm Makar Take the lift after the boss area to gain access to the Altus Plateau and rest at the first site of grace in order to start Radahn's Festival: Abandoned Coffin
Walkthrough: Caelid
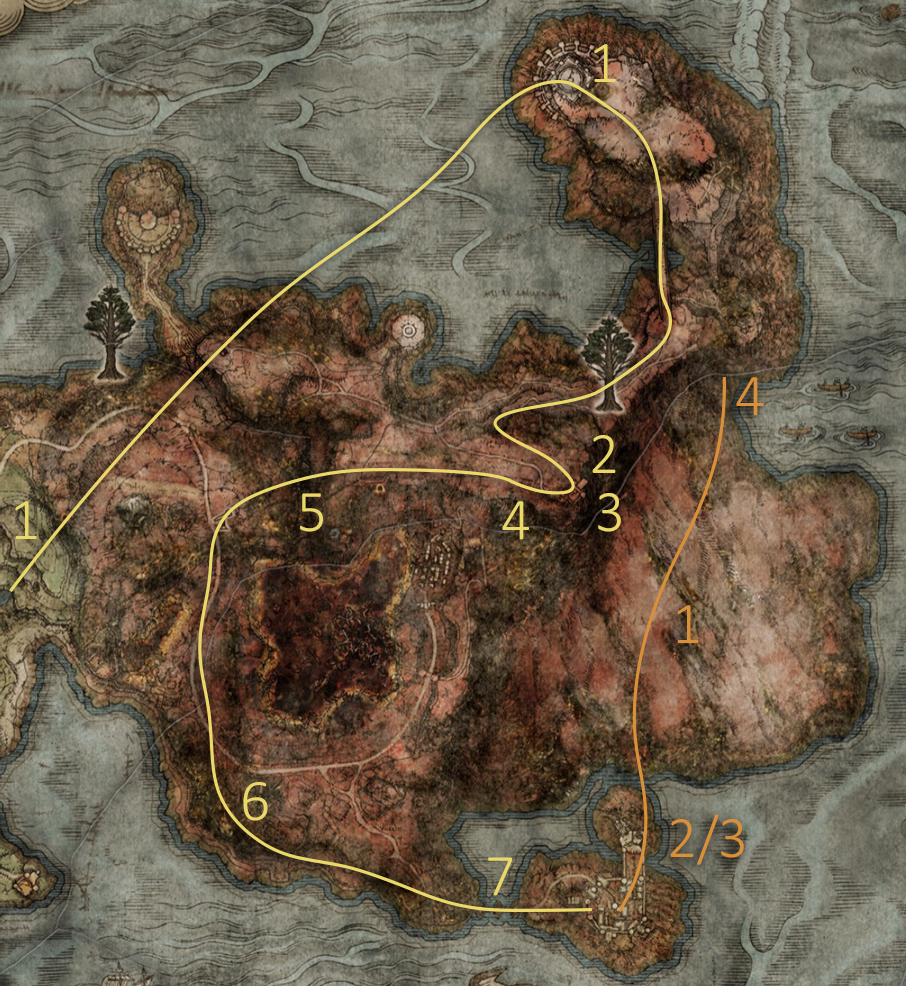 Shardbearer Radahn
Caelid Take the waygate near the Third Church of Marika in East Limgrave as this will teleport you to the northern side of Caelid
Key Item: Dectus Medallion (Right) | Located at the top of the eastern tower
Legendary Talisman #2: Radagon Soreseal | From the roof, drop down into the middle opening and you'll reach it after traversing the wooden walkways
Legendary Spell #2: Greyoll's Roar | Greyoll is here, and you can either kill him or kill five other dragons. Then head to Cathedral of Dragon Communion to trade dragon hearts for the incantation
You can get to the lower level by hopping the gap or simply access Caelid from Limgrave normally
Legendary Spell #2: Greyoll's Roar | Cathedral of Dragon Communion | Trade for Greyoll's Roar
Continue to Redmane Castle
Redmane Castle Boss Fight: Starscourge Radahn | If the Festival is not active, activate any site of grace in the Altus Plateau (this walkthrough does so in the previous section) Defeated Boss Fight: Misbegotten Warrior and Crucible Knight | Only available when the Radahn Festival is not active
Legendary Armament #3: Ruins Greatsword
Legendary Ashen Remain #2: Redmane Knight Ogha | Boss Reward in War-Dead Catacombs which is only accessible from Radahn's boss arena
Walkthrough: Siofra River & Nokron
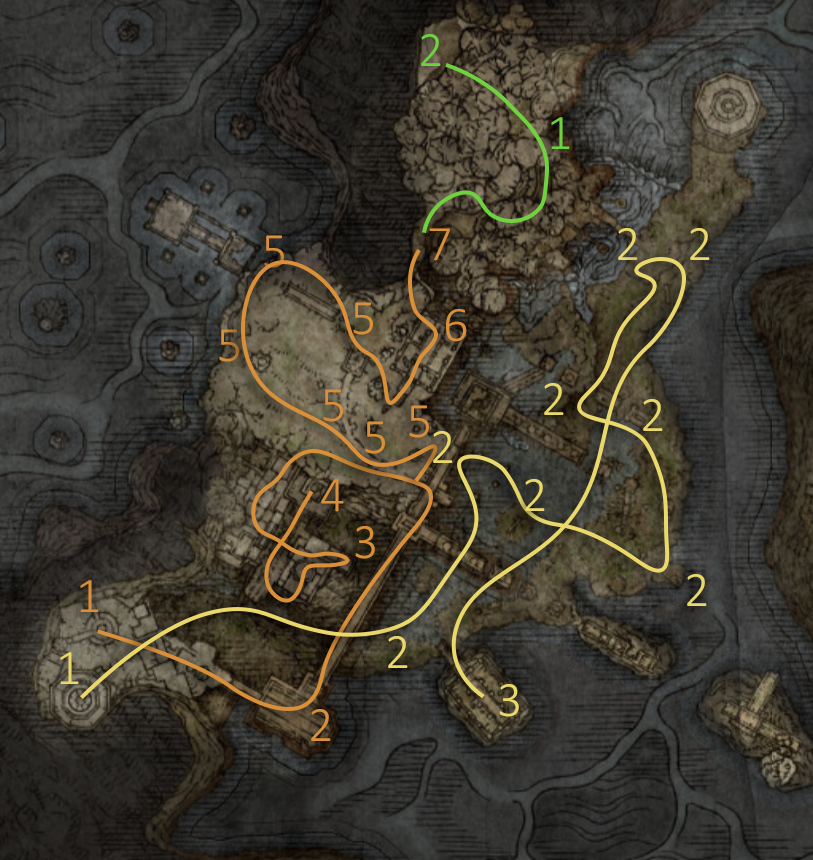
Siofra River Enter the area from the Siofra Well in Limgrave just under the Minor Erdtree
Light up the 8 Hallowhorn Braziers to unlock the boss area
Boss Fight: Ancestor Spirit
Ancestor Spirit Defeated Ancestor Spirit
Nokron, the Eternal City After defeating Starscourge Radahn, one of the fallen stars will hit Limgrave just southwest of the Minor Erdtree, descend the rock paths to enter Nokron.
Boss Fight: Mimic Tear
Mimic Tear Defeated Mimic Tear Legendary Ashes #3: Mimic Tear Ashes | This is behind an imp seal
Sidequest Ranni: Fingerslayer Blade
Light the 6 Hallowed Brazier
Boss Fight: Regal Ancestor Spirit
Regal Ancestor Spirit Defeated Regal Ancestor Spirit Head to Siofra Aqueduct
Siofra Aqueduct Boss Fight: Valiant Gargoyles
Valiant Gargoyles Defeated Valiant Gargoyles Enter the coffin to gain access to Deeproot Depths
Walkthrough: Altus Plateau
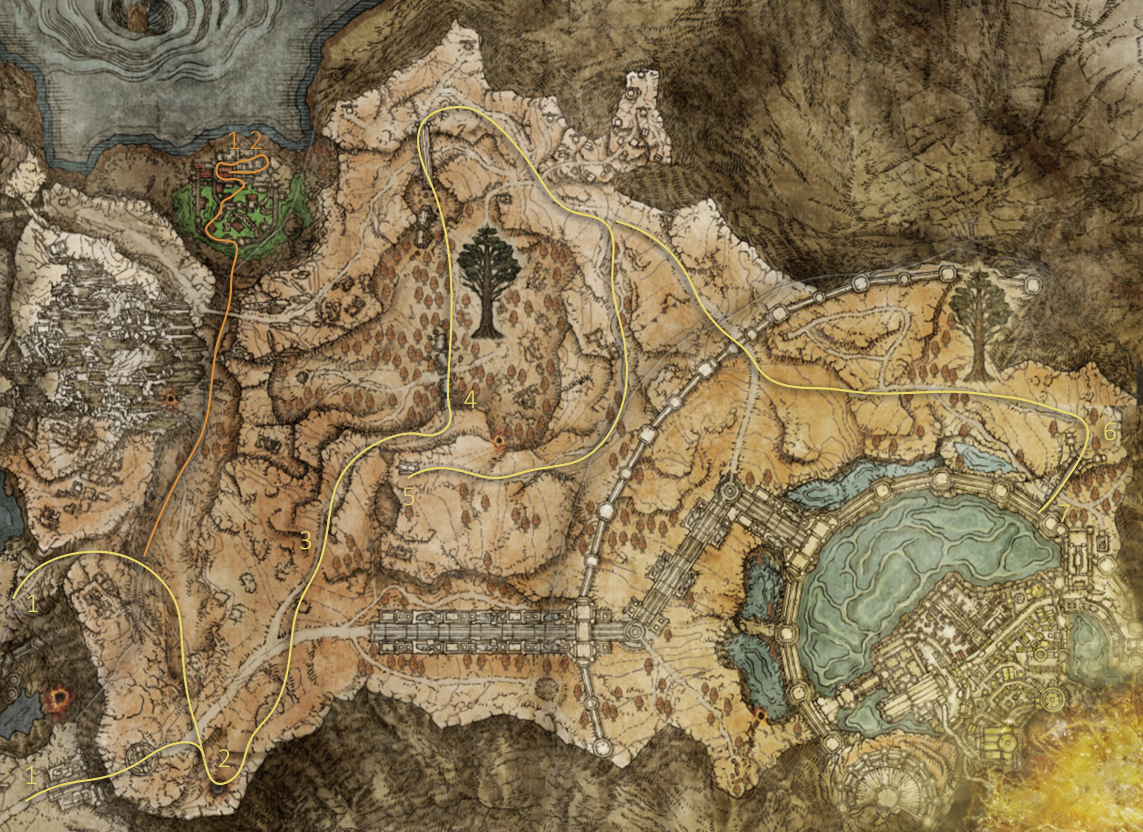 Elemer Of The Briar
Altus Plateau You can enter here either through the Grand Lift of Dectus or through the Ruin-Strewn Precipice which the guide takes you to.
Legendary Talisman #3: Godfrey Icon | Boss Reward for Golden Lineage Evergaol closed by an Imp seal gate
Take the waygate to cross the broken bridge
Map Fragment: Altus Plateau
Legendary Ashen Remain #4: Ancient Dragon Knight Kristoff
Boss Fight: Draconic Tree Sentinel
Given you have two great runes, you'll have access to Leyndell, Royal Capital
The Shaded Castle Boss:
Legendary Armament #4: Marais Executioner's Sword | Dropped from Defeated
Walkthrough: Mt. Gelmir
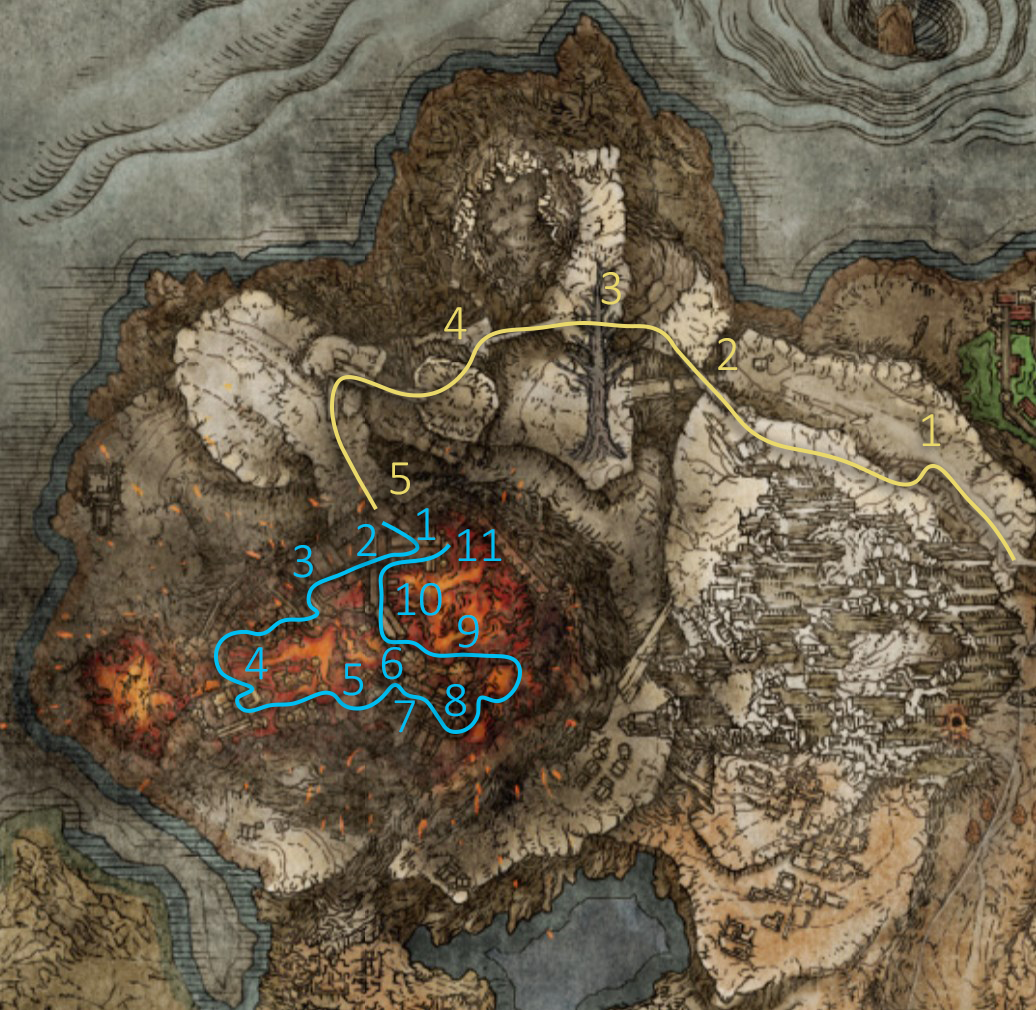
Mt. Gelmir Take the ladder up near the second encounter of the Abductor VIrgins
Cross over the rock bridge to the north
Traverse several ladders up
Cross the bridge to a site of grace: Ninth Mt. Gelmir Campsite
Head up the spirit spring jump and head west and south to Volcano Manor
Volcano Manor Once here, talk to Tanith and join the Volcano Manor crew to get the Drawing-Room Key
Enter the first room on the right and the back right corner is an illusory wall.
Continue the linear path until you get the Prison Town Church site of grace
Cross the rooftops and over the bridge and make your way through the building from the left and at the bottom is the next grace: Guest Hall
Exit outside and go straight east until you see a staircase to the right. Take that path and take the cage elevator up.
Once up, go ahead and flip the switch to connect the bridge.
Boss Fight: Godskin Noble
Godskin Noble Defeated Godskin Noble Take the lift near the grace up and go straight out the building and jump off the balcony.
Follow the narrow path up and go towards the tower where you'll find an Abductor Virgin
Enter the building underneath and take the ladder up and continue down the hallway.
Open the door, and continue up the stairs and out the door to find a waygate. Take the waygate.
Boss Fight: Rykard, Lord of Blasphemy
Shardbearer Rykard Defeated Shardbearer Rykard Make sure to talk to Bernahl after defeating Rykard to ensure his invasion in Crumbling Farum Azula. He's in the dining room near Tanith, instead of going the first door on the right, take any of the doors on the left except the first.
Walkthrough: Leyndell, Royal Capital
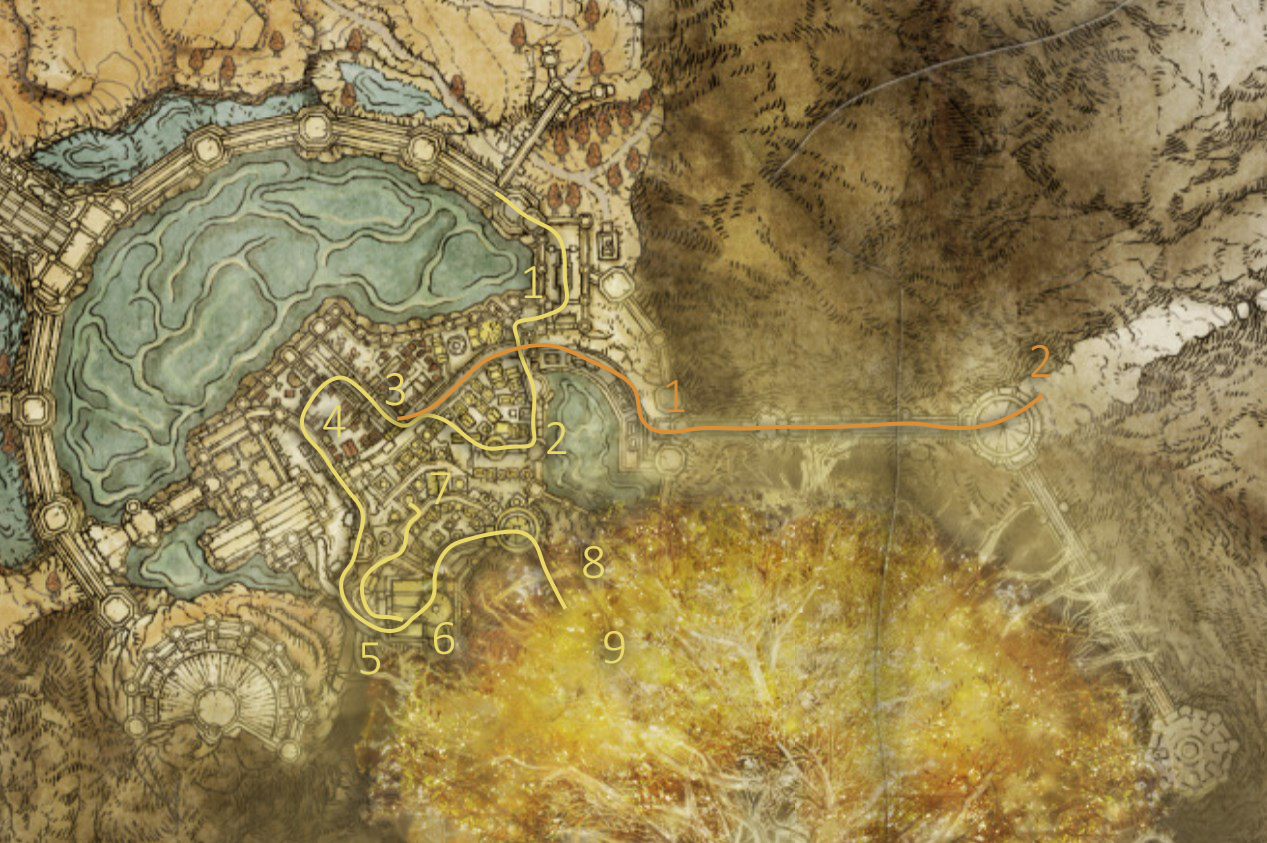
Leyndell, Royal Capital From the Capital Ramparts grace, continue the linear path until you reach the next grace: East Capital Ramparts
Continue the linear path through the battlement until you can descend an elevator.
Make your way through the city through the main road to the next grace: Avenue Balcony
Head northwest and take the dragon's wing to a walled pathway that goes straight south.
Go up the tree branches until it takes you to a gold fog gate
Boss Fight: Godfrey, First Elden Lord (Golden Shade)
Godfrey, First Elden Lord Defeated Godfrey, First Elden Lord Legendary Armament #5: Bolt of Gransax | After the fight with Godfrey, take the western doorway down the stairs to an elevator and take the elevator. Take the following stairs and you should see a giant spear piercing the side of the wall to your left, the item is on the spear, so you'll need to jump down to get to it.
Boss Fight: Morgott, the Omen King
Shardbearer Morgott Defeated Shardbearer Morgott After the fight, head up to the trunk of the Erdtree to inspect the seal and then go back to rest at the grace.
To the Forbidden Lands From the Avenue Balcony site of grace, take the main road to the east and take the stairs to a giant lift.
Cross the bridges and down the elevator to the Forbidden Lands
Walkthrough: Return To Liurnia & Miscellaneous
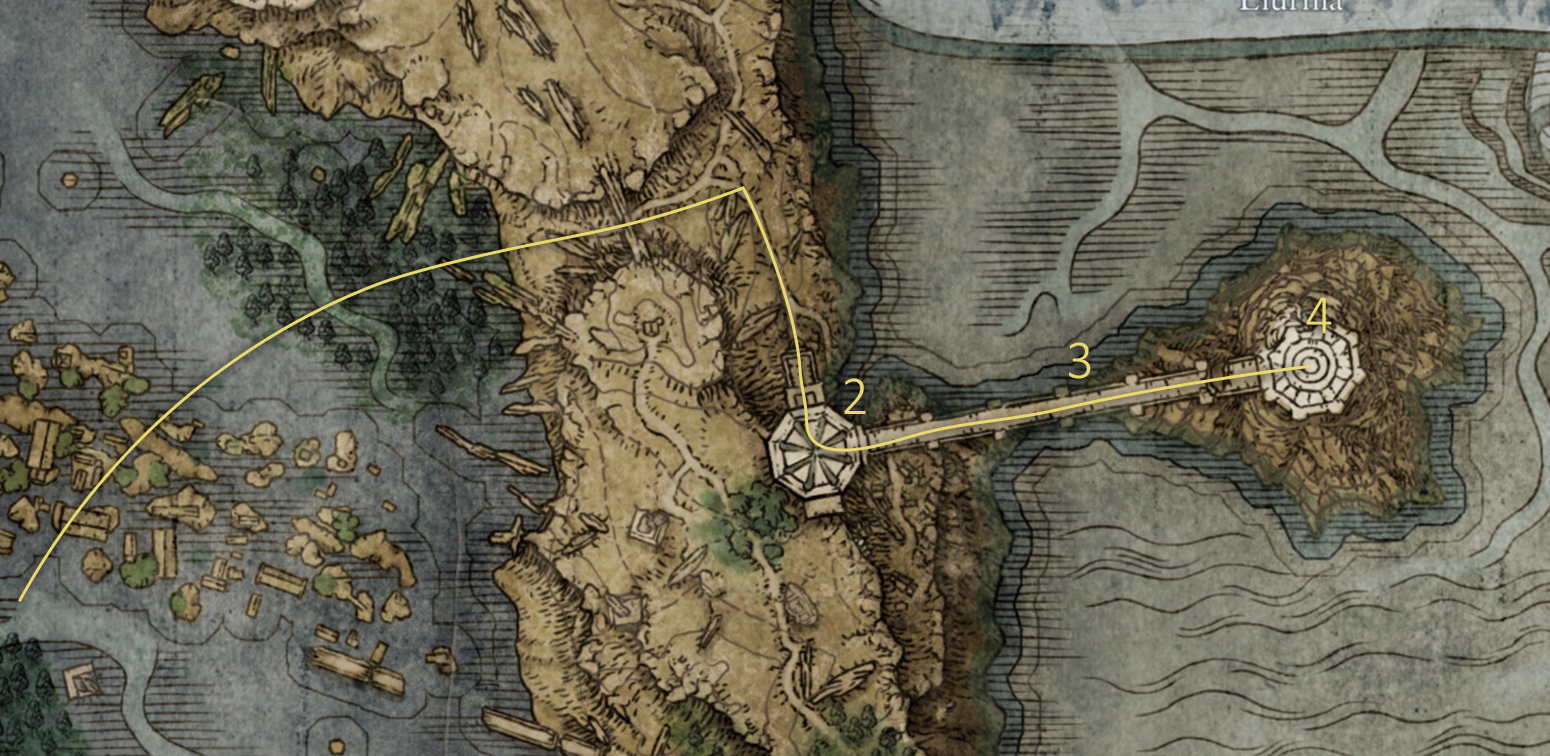
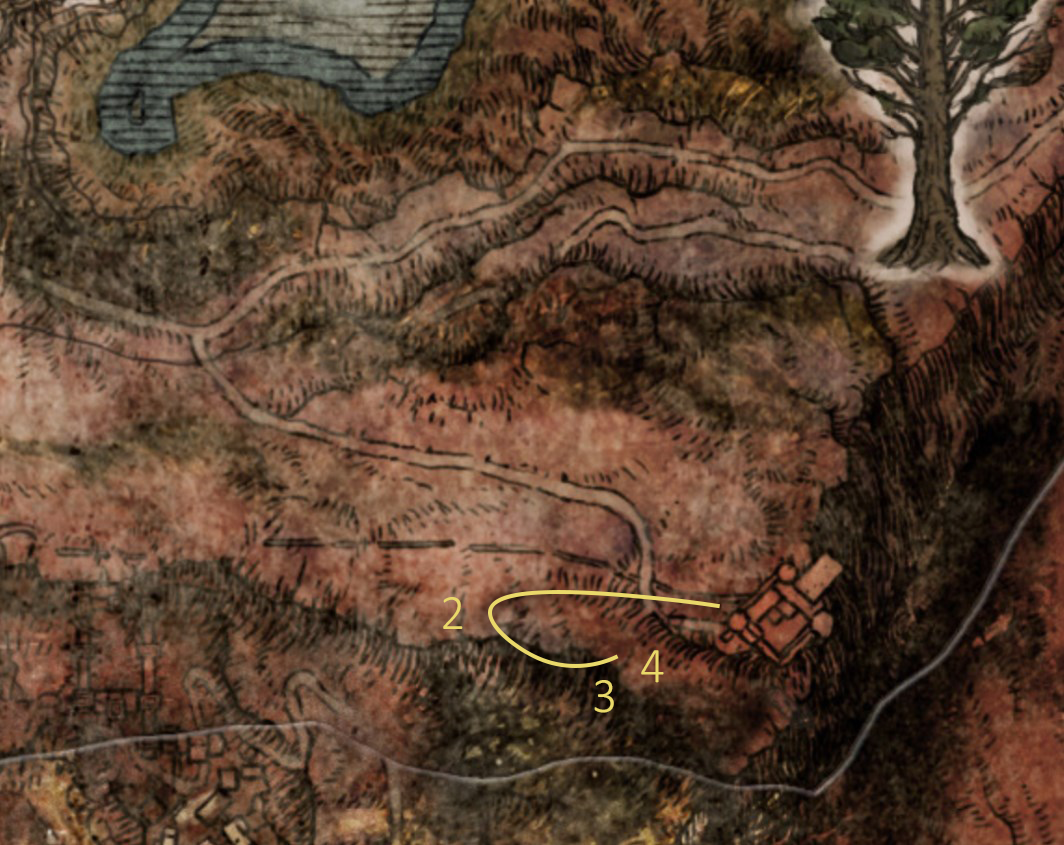
Liurnia Sidequest Ranni: Give the Fingerslayer Blade to Ranni and receive the Carian Inverted Statue
Head to Carian Study Hall and place the Carian Inverted Statue on the altar near the beginning
Boss Fight: Godskin Noble
Key Item: Cursemark of Death | At the top of the Divine Tower, required key item to fight Lichdragon Fortissax in Deeproot Depths
Sellen's Questline With Comet Azur, head back to Sellen in Waypoint Ruins. She'll give you Sellian Sealbreaker
From Fort Faroth, head west and there should be a spirit spring you can drop down on.
Head back to the east and there is a fake wall hiding Sellia Hideaway (it's directly behind the giant headstone
Legendary Spell #4: Stars of Ruin | Free Master Lusat in Sellia Hideaway in Caelid
Walkthrough: Ainsel River & Deeproot Depths
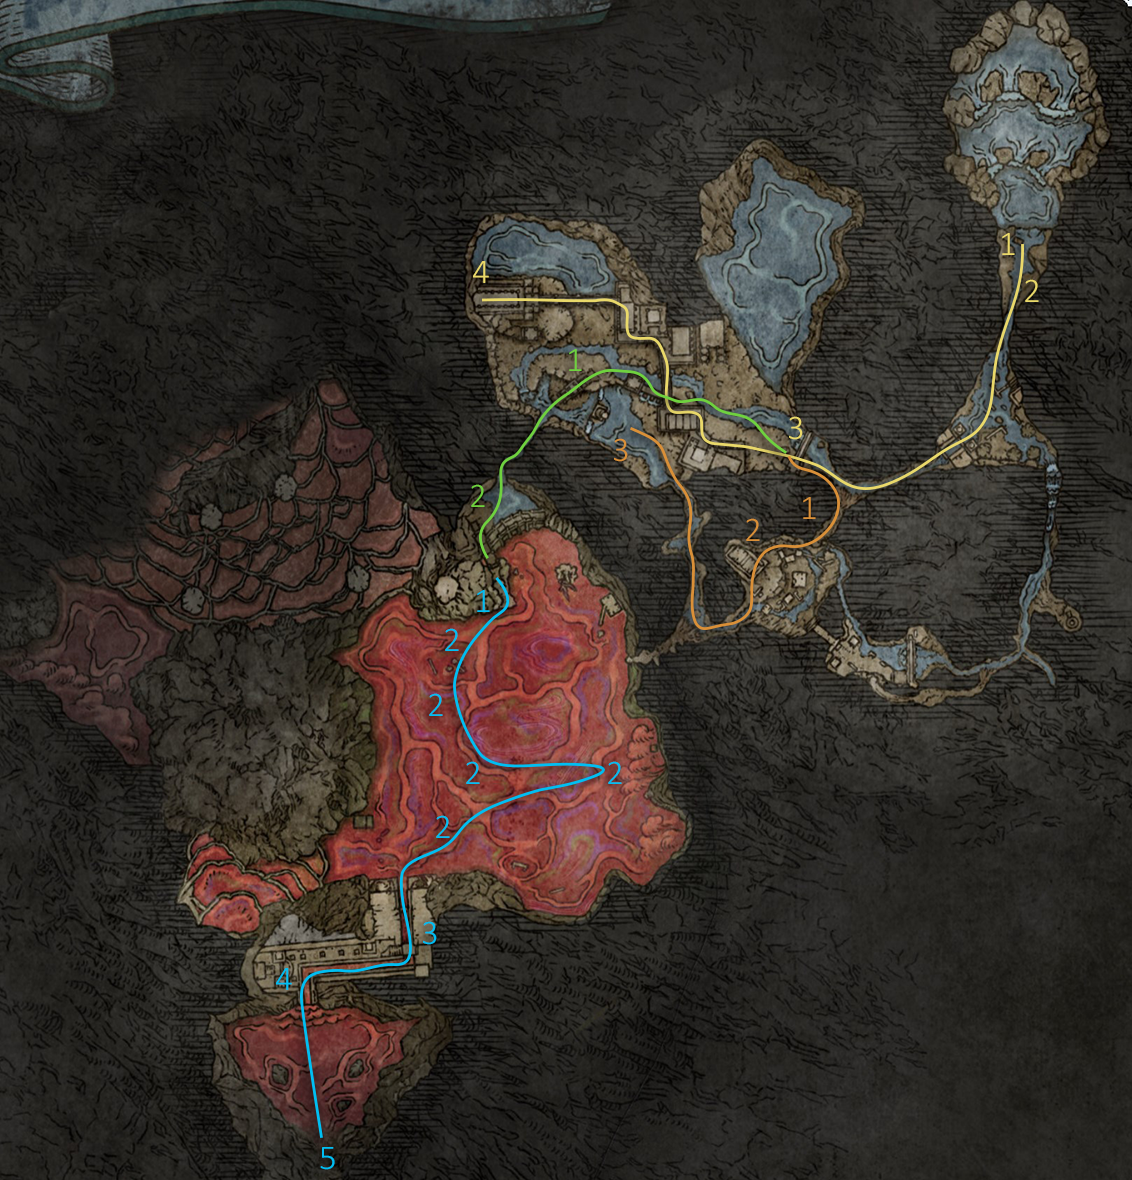

Ainsel River - Moon of Nokstella Sidequest: Ranni | From Renna's Rise, you should be able to find a Miniature Ranni Doll
Sidequest: Ranni | At the site of grace, talk to Ranni until she responds and tasks you to fight the Baleful Shadow here
Continue until you reach the Nokstella, Eternal City grace that'll be used for the next two sections
Legendary Talisman #4: Moon of Nokstella | Continue the upper path until you reach a room with a chest with the talisman
Ainsel River - Dragonkin Soldier of Nokstella From the Nokstella, Eternity City grace, backtrack and take the other fork.
Map Fragment: Ainsel River
Boss Fight: Dragonkin Soldier of Nokstella
Dragonkin Soldier of Nokstella Defeated Dragonkin Soldier of Nokstella
Ainsel River - Path to Lake of Rot From the Nokstella, Eternity City grace, head west and take the lower path this time until you reach the elevator
Sidequest: Ranni | Continue the path below until you reach the entrance of the Lake of Rot where you'll encounter a Baleful Shadow. Defeat it in order to get the Discarded Palace Key
Lake of Rot Map Fragment: Lake of Rot
There are platform buttons that will raise some platforms for you to walk on. They're technically optional if you have enough items to get through the Scarlet Rot pool.
You'll eventually reach a site of grace: Grand Cloister
Follow the path down on the right and follow the river lake until it drops off at a coffin. Take the coffin.
Boss Fight: Astel, Naturalborn of the Void
Astel, Naturalborn of the Void Defeated Astel, Naturalborn of the Void After the fight, you'll most likely have a sealed doorway. This will be tackled in the next section.
Deeproot Depths Area is accessed either from Frenzied Flame Proscription or at the end of Siofra Aqueduct in the coffin after defeating Valiant Gargoyles.
Legendary Spell #5: Elden Stars | Head over into a cave full of ants, and at the end of the tunnel is the incantation on a body
Map Fragment: Deeproot Depths
Traverse up the tree branches until you can drop off to the grace to the left.
Boss Fight: Fia's Champions
You must have the Cursemark of Death (obtained in the previous step). Give her the Cursemark of Death, continue her dialogue until you can enter the Deathbed Dream.
Boss Fight: Lichdragon Fortissax
Lichdragon Fortissax Defeated Lichdragon Fortissax
Walkthrough: Moonlight Plateau
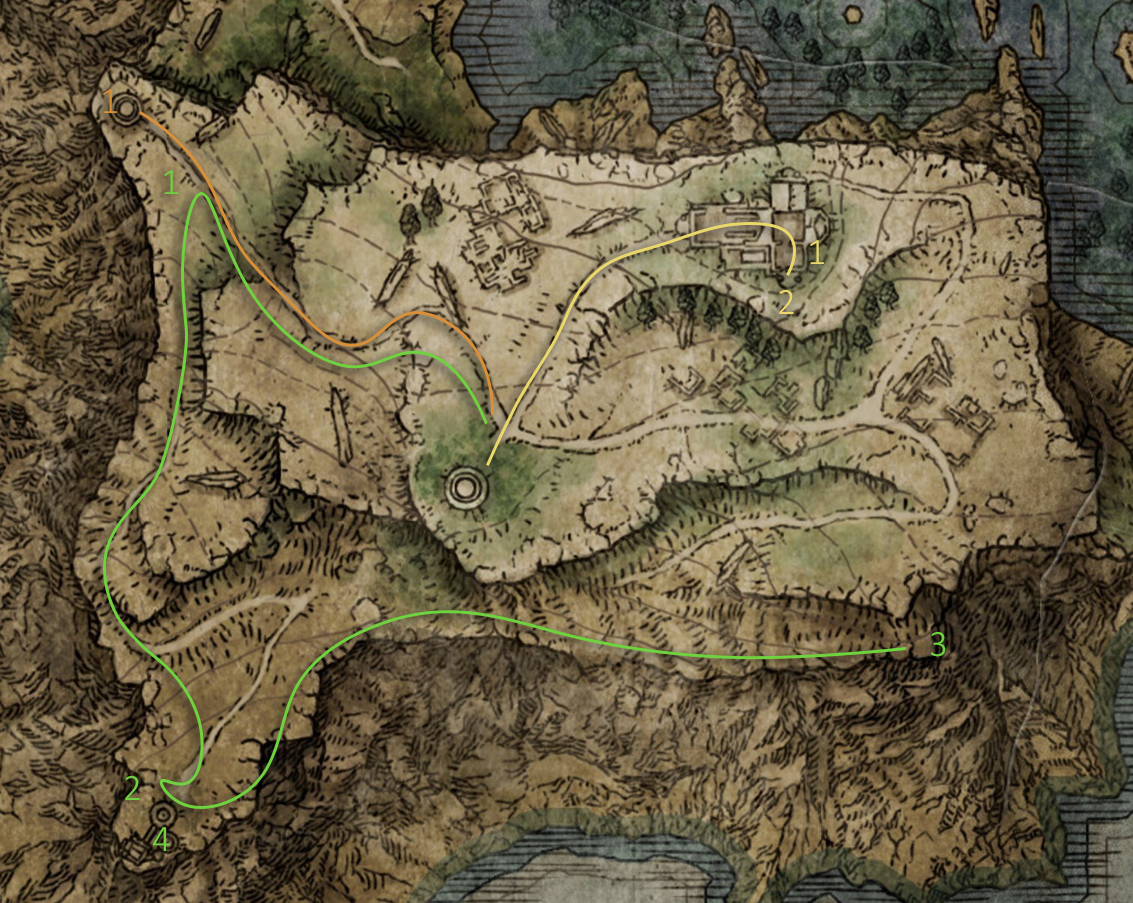
Raya Lucaria Academy Sidequest: Ranni | With the Discarded Palace Key from Ainsel River, teleport to Rennala and open the locked chest to get the Dark Moon Ring
Lake of Rot Teleport to the grace where you fought Astel, Naturalborn of the Void
Go north and take the lift up to the Moonlight Plateau in Liurnia
Moonlight Plateau - Sidequest: Ranni Sidequest: Ranni | Head to the Cathedral of Manus Sellus and go underground to find Ranni. Give her the ring.
Legendary Armament #9: Dark Moon Greatsword | On the ground after Ranni disappears
Moonlight Plateau - Black Knife Tiche Legendary Ashen Remain #5: Black Knife Tiche | Boss Reward from Ringleader's Evergaol
Moonlight Plateau - Ranni's Dark Moon At the spirit spring, the wise beast is flying through the sky. There's a chance this wise beast accidentally dies on its own.
The next wise beast is on the ledge of the cliff
The final wise beast is on a plateau between the cliffs
Legendary Spell #6: Ranni's Dark Moon | At the top of the rise once you've removed the seal
Walkthrough: Forbidden Lands
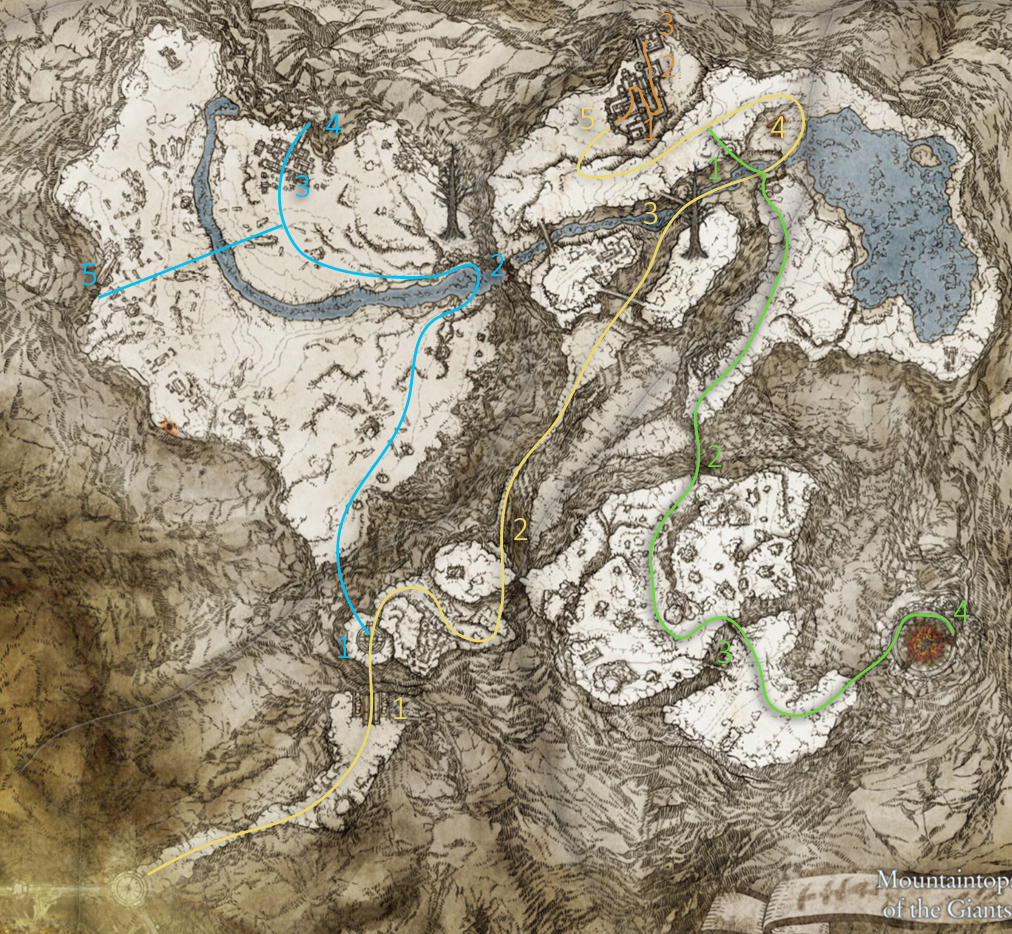
Mountaintops of the Giants Make your way to the Grand Lift of Rold, you'll also be greeted by a Black Blade Kindred. Take the lift up.
Follow the path and you'll reach a narrow pathway.
Continue the path until you reach a frozen river
Head east until you can climb the cliffs to the north
Castle Sol Legendary Armament #6: Eclipse Shotel | Located in the Church of the Eclipse on the altar
Boss Fight: Commander Niall
Commander Niall Defeated Commander Niall Key Item: Haligtree Secret Medallion (Left) | Used to reach Consecrated Snowfield
Mountaintops of the Giants Legendary Spell #7: Founding Rain of Stars | Heretical Rise - There's an invisible pathway from the broken bridge which you'll see based on the frost on the roads, it's primarily a straight with curved ramp up to the balcony to the left.
Head south and cross the chain
Boss Fight: Fire Giant
Fire Giant Defeated Fire Giant
MISSABLE WARNING: Make sure you have the Bolt of Gransax from Leyndell, Royal Capital before accepting Melina's request at the forge. As this will become missable then.
Make your way up to the Forge and across the limb for a grace and talk to Melina
Erdtree Aflame Used kindling to set the Erdtree aflame You'll want to make your way to the first site of grace once you get teleported.
Consecrated Snowfield Return back to the Grand Lift of Rold, you'll now be able to Hoist the Secret Medallion to access the Consecrated Snowfield
Legendary Armament #7: Golden Order Greatsword | Boss Reward at the end of the Cave of the Forlorn
Head to the town of Ordina, Liturgical Town | You'll need to enter the Evergaol, then light up 4 statue-like torches to break the seal to the waygate.
The waygate will teleport you to Elphael, Brace of the Haligtree and take the first site of grace.
Return to the Consecrated Snowfield and take the portal to Mohgwyn's Palace and take the first site of grace
Walkthrough: Mohgwyn Palace
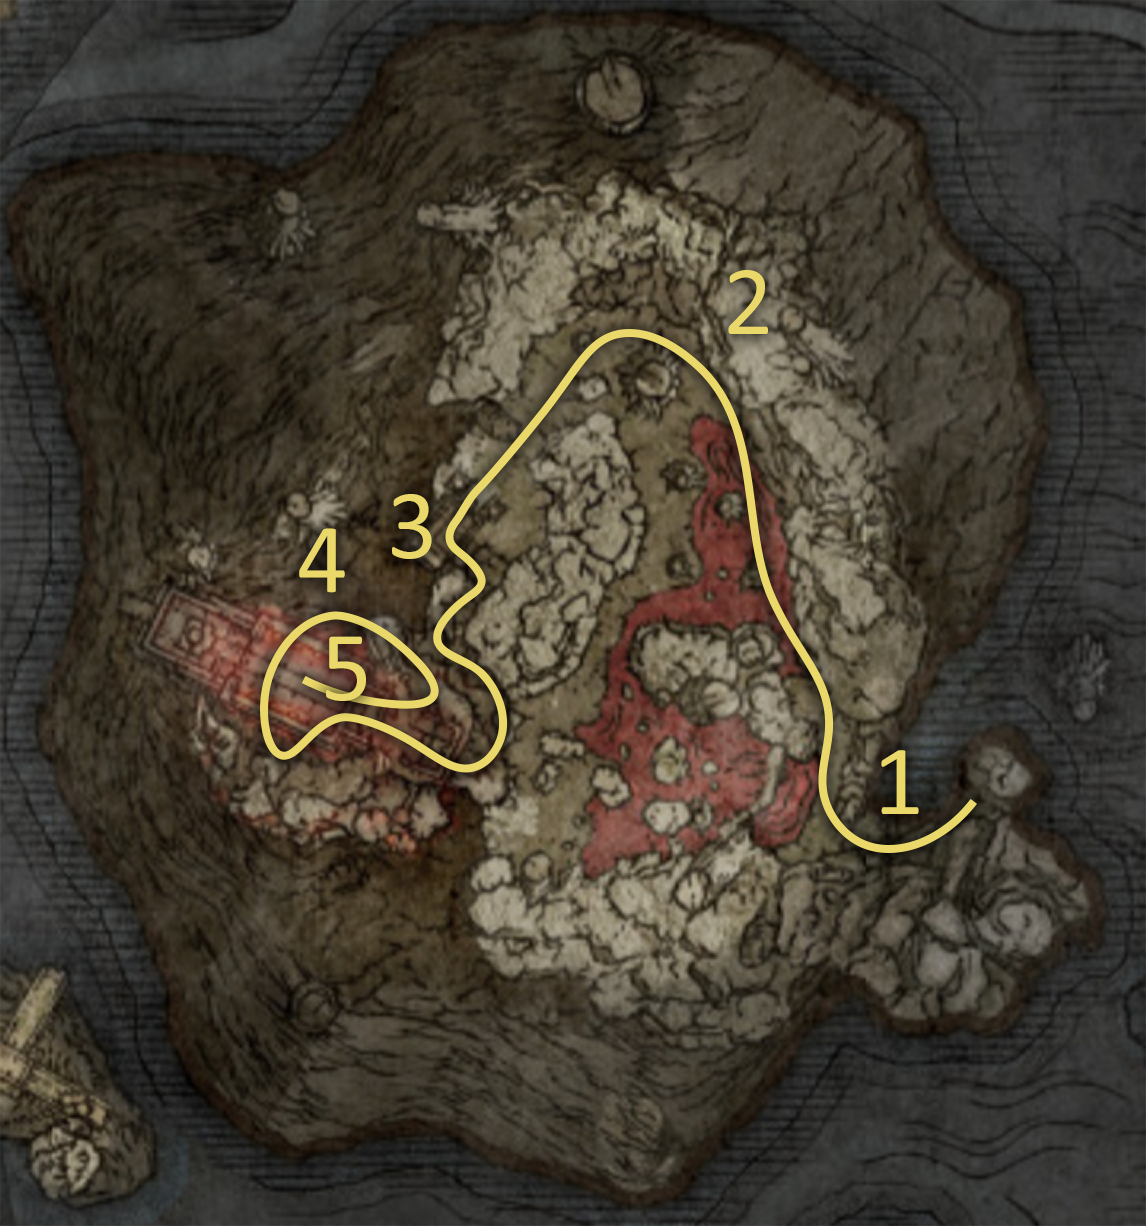
Upon entrance, you'll find yourself at the first grace of the area very shortly, also one of the most well-known grinding spot for runes: Palace Approach Ledge-Road
Make your way down the path and if you hug the right wall, it'll lead to the right path
Map Fragment: Mohgwyn Palace | Located near the site of grace
Head up the path and inside into the dark. At the end of the cave, you'll meet your next grace: Dynasty Mausoleum Midpoint
Boss Fight: Mohg, Lord of Blood
Shardbearer Mohg Defeated Shardbearer Mohg
Walkthrough: Elphael, Brace Of The Haligtree
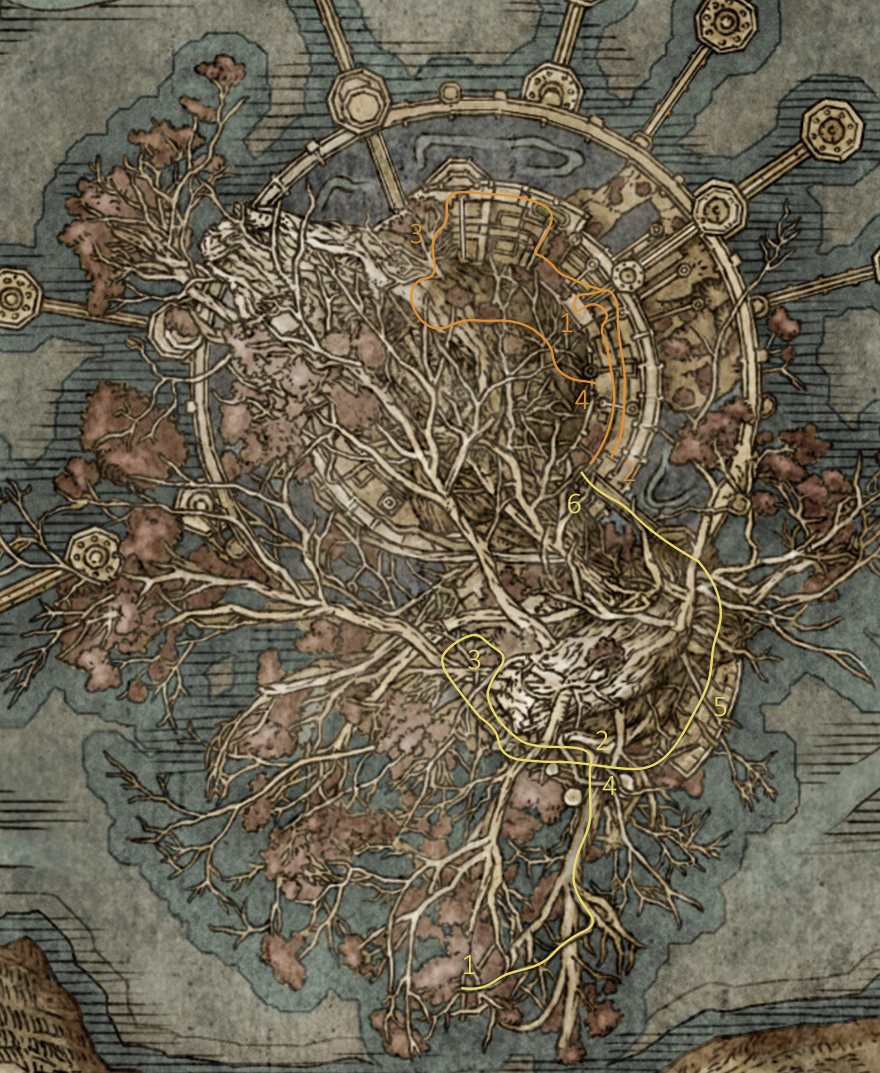
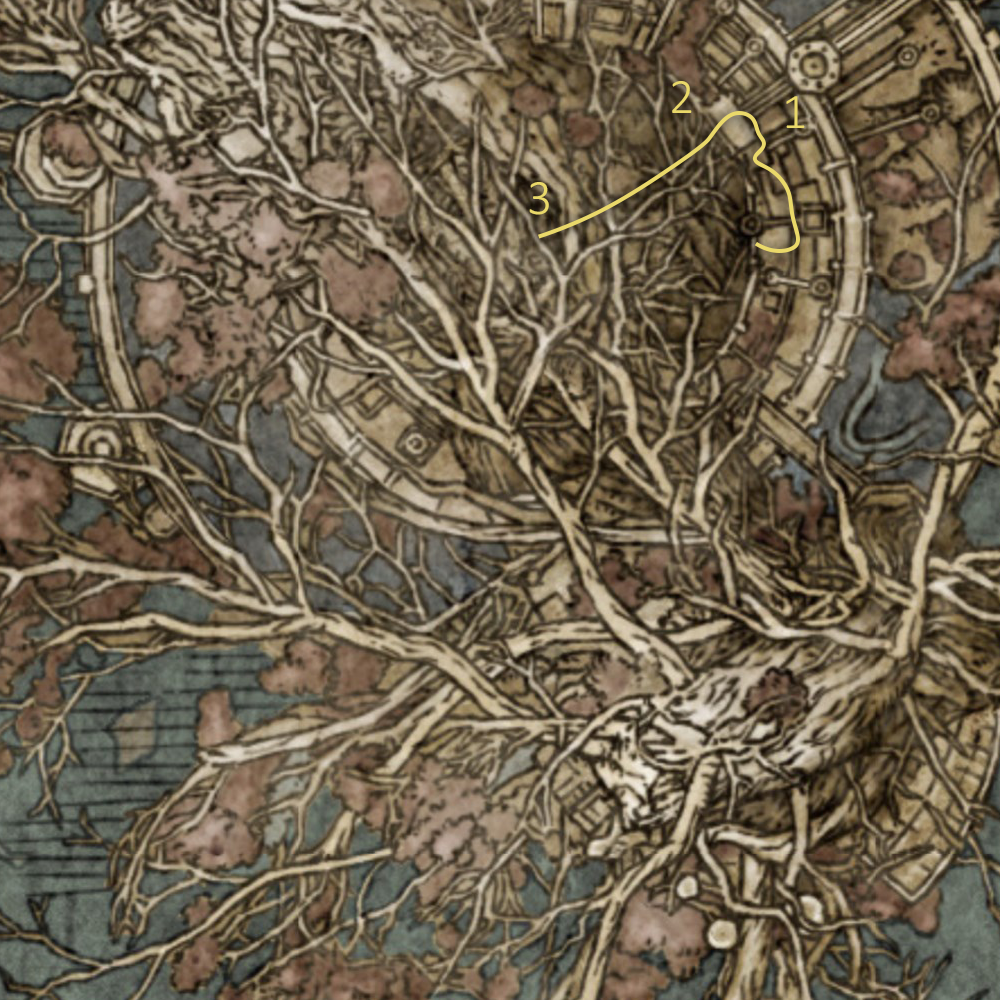
Haligtree - Part 1 Enter here from the Consecrated Snowfield in Ordina, Liturgical Town
Continue down the main branch under a large envoy and go down the ladder to a grace: Haligtree Town
Continue the linear path northeast until you make a u-turn to the left to reach your next grace: Haligtree Town Plaza
Continue southeast under the Haligtree Town site of grace until you reach an elevator back to it.
Boss Fight: Loretta, Knight of the Haligtree
Loretta, Knight of the Haligtree Defeated Loretta, Knight of the Haligtree Continue to the tower, take the elevator down and cross the bridge to your next grace: Prayer Room
Haligtree - Part 2 Legendary Ashen Remain #6: Cleanrot Knight Finlay | From the Prayer Room grace, continue north until you see a platform with a gazebo and a crimson scarab. There is a chest in the adjacent room.
Legendary Talisman #5: Marika Soreseal | In an imp seal room directly the patrolling Putrid Avatar guarded by several Royal Revenants
Head north past the Putrid Avatar guarding a doorway and several ballistas to get o the next grace: Haligtree Roots
Head down the linear path through the hallway, then the center of the haligtree with pools of scarlet rot to get to your next site of grace: Drainage Channel
Haligtree - Part 3 Legendary Talisman #6: Dragoncrest Greatshield Talisman | From the grace, follow the tree branch and you'll see a building to your north. Take the support beams and tree branches to navigate to the roof and jump into a square hole and into the rafters to find a chest guarded by
Head to the bottom floor of the building, and go downstairs to an elevator.
Boss Fight: Malenia, Blade of Miquella
Shardbearer Malenia Defeated Shardbearer Malenia
Walkthrough: Crumbling Farum Azula
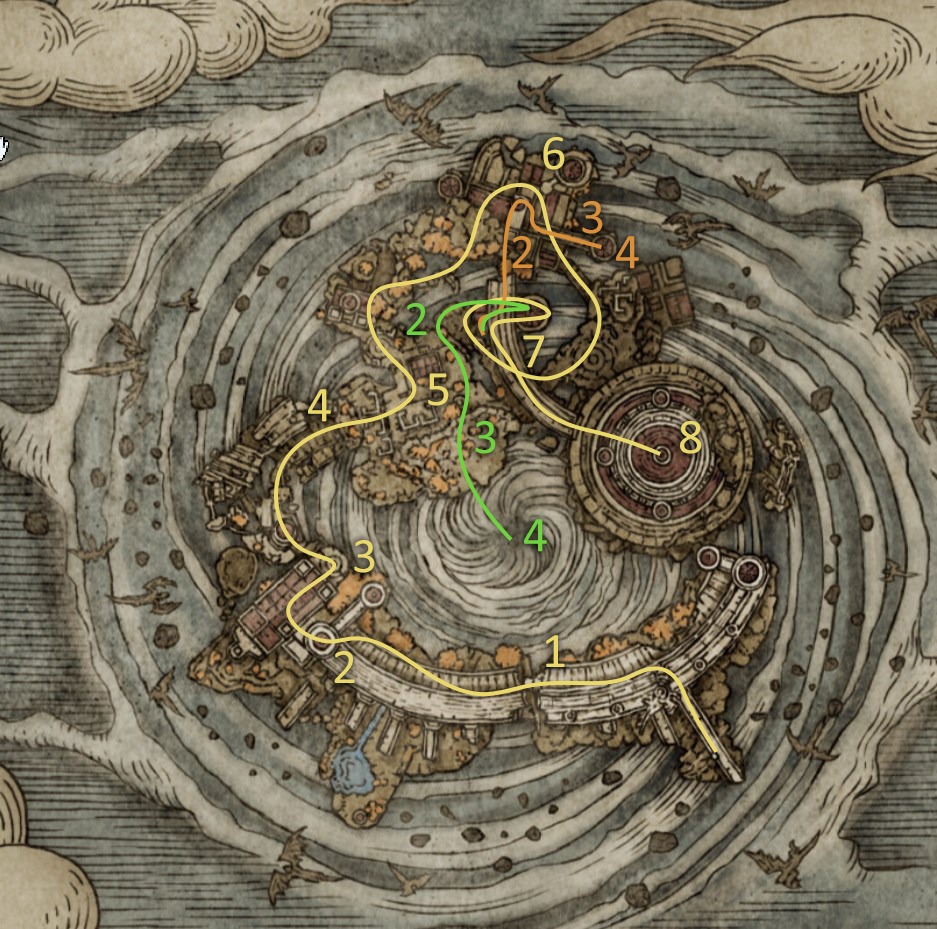
Crumbling Farum Azula - Main Route Upon arrival, drop down and head west until you reach your first grace: Crumbling Beast Grave
Continue west to your second grace: Crumbling Beast Grave Depths
Head through the next building and out the front door to your third grace: Tempest Facing Balcony
Head across the the floating rubble until you spot your next grace to the north: Dragon Temple
Boss Fight: Godskin Duo
Godskin Duo Defeated Godskin Duo From the boss arena, head north down the stairs and traverse the ruins. Take the small doorway to the right to traverse more floating rubble then go straight to find a Crucible Knight. Your next grace is to the right of the Crucible Knight jumping off a ledge: Dragon Temple Rooftop
Continue on the rooftops through stormhawks and ancient dragon lightning. Progress towards the dragon, and take the right behind the dragon and cross the fallen gazebo as a bridge. Enter the building and take the elevator up for your final grace: Behind the Great Bridge
Boss Fight: Beast Clergyman & Maliketh, the Black Blade
Maliketh the Black Blade Defeated Maliketh the Black Blade
Crumbling Farum Azula - Cleanup Route From the Beside the Great Bridge site of grace, head up the stairs and go north towards the broken end of the bridge.
Follow this path down some small steps and a ladder to a bridge to a tower.
Legendary Armament #9: Devourer's Scepter | Dropped from Bernahl. You must have exhausted his dialogue in Volcano Manor after defeating Rykard
Legendary Talisman #7: Old Lord's Talisman | In the chest in the tower
Dragonlord Placidusax From the Beside the Great Bridge site of grace, head down the elevator and out the doorway.
On this platform, head to the west end and you should see a spot to drop off on the south side. Follow this path all the way down.
At the bottom, you should see a flat area where a statue in the ground would have been. Lie down there.
Note: After this cutscene, you'll enter the area where you can use Miquella's Needle to undo the effects of the Frenzied Flame. WARNING: Using this will make the Frenzied Flame ending missed permanently.
Boss Fight: Dragonlord Placidusax
Dragonlord Placidusax Defeated Dragonlord Placidusax
Walkthrough: Subterranean Shunning Grounds
Two ways to get here:
1. Give a seedbed curse to the Dung Eater in the Roundtable Hold to get the Sewer-Gaol Key that allows you to open the entrance when you're in Leyndell, Royal Capital.
2. Drop down the sewer hole when you're in Leyndell, Ashen Capital.
Subterranean Shunning Grounds In the main hallway with the omens, you'll find the first site of grace: Underground Roadside
From the gate head northeast, and drop down the hole after two omens. Take the sewer pipe tunnel.
Jump over the first hole. At the first fork, continue straight. Jump over the second hole. At the next fork, take the right path through a metal gate. You'll be met with an omen on top of a ladder.
Once up the ladder, open the gate on the right to create a shortcut back to the grace. Then continue forward at the doorway.
You'll be in a circular room now. Instead of taking the stairs down, drop down a level to your left first, then descend those steps.
Continue the linear path until you reach a ladder. Don't take the ladder, turn around and take the path under the stairs.
For the time being, there's only way to walk, until you reach a room with an omen and a ladder. Take the ladder up and go through the doorway to open the shortcut right back to the grace again.
Head back to the bridge, and take the pipe path. At the dead end of the pipe, drop off and head towards the doorway. You'll be back in the same room with the ladder and the omen again. Kick the ladder to unlock the shortcut.
Now jump into the hole in the pipe. There will be a rat, follow the rat which takes you to the first left at the fork. Then follow it through the pipe and drop into the first hole where you'll find a commoner trying to back stab you.
Open the door if you wish, but you'll want to take the other path. Drop down the ladder, and you'll find a room with jars. Proceed past the room and take the next elevator down and you'll arrive at a grace: Forsaken Depths
Boss: Mohg, the Omen
Mohg, the Omen Defeated Mohg, the Omen After the boss fight, if you attack the wall behind the altar, it's actually an illusory wall which takes you to the Three Fingers.
Make your way to the bottom of the pit by dropping down the beams, then dropping from the coffins on the sides until you get to the floor which falls through.
NOTE: If you're going for the Lord of Frenzied Flame ending, then remove all your armor. If not, then you can return back as this area will lock you out of the other endings.
Walkthrough: Leyndell, Ashen Capital
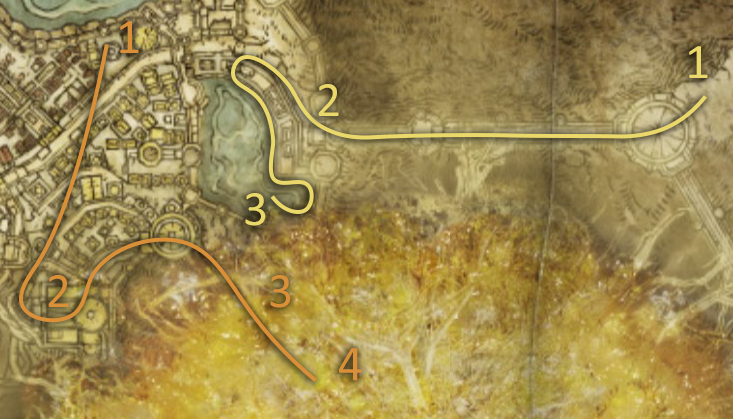
Forbidden Lands From the Forbidden Lands site of grace, make your way back into Leyndell which is now laid in ashes through the two elevators.
After making it down to the main elevator entering Leyndell, you'll notice an ulcerated tree spirit roaming (there's actually three). The talisman is in the pit to the far left.
Legendary Talisman #8: Erdtree's Favor +2 | If you traverse down the stairs and hug the left wall the entire way, you can avoid all the tree spirits.
Leyndell, Ashen Capital From the site of grace that you were warped to after fighting Maliketh, head south towards the Erdtree Sanctuary area where you fought Godfrey, First Elden Lord (Golden Shade).
Boss Fight: Sir Gideon Ofnir, the All-Knowing
Boss Fight: Godfrey, First Elden Lord & Hoarah Loux
Hoarah Loux, Warrior Defeated Hoarah Loux, Warrior This is your last chance to handle any activities you need to do regarding endings.
Boss Fight: Radagon of the Golden Order & Elden Beast
Ending #1: See Endings
Roundtable Hold You'll still have access to the world post ending scene. In order to reach New Game+, you can visit the lost grace (giant round table) at the Roundtable Hold
Walkthrough: NG+ And NG++
Elden RingFeel free to alter this run to adjust it to the endings you selected in previous runs as well as picking up anything you may have missed in the first playthrough. Note: there are many ways to get to the Royal Capital and I've listed some, but feel free to use any route you wish.
Playthrough Requirements Gain access to the Leyndell, Royal Capital.
In Leyndell, Royal Capital, defeat Godfrey, First Elden Lord and Morgott, the Omen King to remove the Seal to the Forbidden Lands.
Defeat the Fire Giant in the Mountaintops of the Giants and head to Farum Azula
Defeat the Godskin Duo and Maliketh, the Black Blade to return to Leyndell, Ashen Capital
Defeat the final 3 boss fights
Royal Capital - Route 1 Obtain two great runes. Highly recommended to be Godrick and Rennala.
Reach Altus Plateau. You can use the Abductor Virgin at the bottom of the Academy to teleport to Volcano Manor or simply access the Grand Lift of Dectus with the two halves of the medallion from Fort Haight in East Limgrave and Fort Faroth in Dragonbarrow
Enter the Royal Capital from the back entrance guarded by a Dragonic Tree Sentinel on the northern side
Royal Capital - Route 2 Trigger the Radahn Festival by either accessing any Site of Grace in Altus Plateau or by progressing Ranni's Quest
Defeat Radahn
Head to Nokron and defeat the Valiant Gargoyles to reach Deeproot Depths.
Defeat Fia's Champions at the end of Deeproot Depths to access the teleporter to Leyndell, Royal Capital
NG+ Complete the game with the second type of ending you haven't finished.
Ending #2
NG++ Repeat your steps in NG+ and complete the game using the third type of ending you haven't finished.
Ending #3 Obtained all achievements
Sidequest: Sellen
Note: This side quest will only take you as far as you need for any related achievements and not the full length of the side quest.
Find Sellen in Waypoint Ruins in Limgrave
Obtain Comet Azur from Primeval Sorcerer Azur in Mt. Gelmir
Show Comet Azur to Sellen back in Waypoint Ruins to receive the Sellian Sealbreaker
Legendary Spell #3: Stars of Ruin | Free Master Lusat in Sellia Hideaway using the Sellian Sealbreaker
Sidequest: Ranni
This questline is required to finish to the end in order to get the Age of the Stars ending.
In Liurnia of the Lakes, after completing Caria Manor, visit Ranni's Rise to start her quest. Talk to the three people in the rise as well: Iji, Blaidd, and Seluvis
Defeat Starscourge Radahn in Caelid to gain access to Nokron
Obtain the Fingerslayer Blade in Nights Sacred Ground in Nokron
Hand the Fingerslayer Blade to Ranni and receive the Carian Inverted Statue
With the statue, head to the Carian Study in East Liurnia and flip the Hall.
Head to the Divine Tower of Liurnia and obtain the Cursemark of Death
Return to the Three Sisters, but head to Renna's Rise this time. Take the waygate to Ainsel River Main and loot the Miniature Ranni doll nearby.
Rest at a grace and talk to Ranni three times.
Defeat the Baleful Shadow in the area to receive the Discarded Palace Key
Head back to Rennala in Raya Lucaria and open the locked chest next to her to get the Dark Moon Ring
Head back to where you defeated the Baleful Shadow and continue this area into the Lake of Rot.
At the end of the area, defeat Astel, Naturalborn of the Void.
After the boss, take the elevator up to Moonlight Plateau.
Head to the Cathedral of Manus Sellus and go underground to find Ranni and give the Dark Moon Ring
Legendary Armament #9: Dark Moon Greatsword
Beat the final boss
Summon Ranni for the ending.
Legendary Armaments
Legendary ArmamentsAcquired all legendary armaments
Note: You can play in co-op and get these weapons dropped for the achievement.
#ArmamentLocation1Grafted Blade GreatswordDefeat Leonine Misbegotten at Castle Morne2Sword of Night and FlameChest in Caria Manor accessed through the walkways and dropping down rooftops to a ladder3Ruins GreatswordDefeat Misbegotten Warrior and Crucible Knight at Redmane Castle while the Radahn Festival is not live4Marais Executioner's SwordDefeat Elemer of the Briar at The Shaded Castle5Bolt of GransaxMISSABLE: Must be done prior to lighting the Erdtree at the Forge of the Giants. After fighting Godfrey and from the Erdtree Sanctuary site of grace, head west and take the elevator down. Go down the stairs, then look left at the giant bolt spear that you jump down onto. The item is on the spear halfway up.6Eclipse ShotelOn the altar of the Church of the Eclipse in Castle Sol7Golden Order GreatswordBoss Reward in Cave of the Forlorn in the Consecrated Snowfield8Devourer's ScepterDefeat Invading Bernahl in Crumbling Farum Azula after defeating Rykard and talking to Bernahl at Volcano Manor or defeat him at Warmaster's Shack9Dark Moon GreatswordComplete Ranni's Questline and give her the Dark Moon Ring on the Moonlight Altar Plateau
* The number corresponds in the order the guide will take you and you can also do a find in the guide for them in this specific order.
Legendary Ashen Remains
Legendary Ashen RemainsAcquired all legendary ashen remains
#Ashen RemainLocation1Lhutel the HeadlessBoss Reward in Tombsward Catacombs on the Weeping Peninsula2Redmane Knight OghaBoss Reward in War-Dead Catacombs at the northern end of Radahn's Boss Area3Mimic TearIn a chest behind an Imp Statue Gate in Night's Scared Ground in Nokron, the Eternal City4Ancient Dragon Knight KristoffBoss Reward from Sainted Hero's Grave on Altus Plateau5Black Knife TicheBoss Reward in Ringleader's Evergaol on the Moonlight Altar Plateau6Cleanrot Knight FinlayIn a chest in Elphael, Brace of the Haligtree. After the Prayer Room site of grace, head west until you see a Gazebo with a Crimson Scarab. Head west onto the branches to a room with the chest and a Knight
* The number corresponds in the order the guide will take you and you can also do a find in the guide for them in this specific order.
Legendary Sorceries And Incantations
Legendary Sorceries And IncantationsAcquired all legendary sorceries and incantations
#Spell/IncantationLocation1Flame of the Fell GodBoss Reward from Malefactor's Evergaol2Greyoll's RoarAfter defeating Greyoll, trade 3 Dragon Hearts at the Cathedral of Dragon Communion3Comet AzurMt. Gelmir - Talk to Primeval Sorcerer Azur4Stars of RuinSellen's Questline - Free Master Lusat in Sellia Hideaway5Elden StarsLoot in Deeproot Depths after the Ant Cave6Ranni's Dark MoonMoonlight Plateau - Chelona's Rise7Founding Rain of StarsHeretical Rise - Mountaintops of the Giants
* The number corresponds in the order the guide will take you and you can also do a find in the guide for them in this specific order. These are also tagged as Legendary Spell in the walkthrough.
Legendary Taslimans
Legendary TalismansAcquired all legendary talismans
#TalismanLocation1Radagon IconBoss Reward in Tombsward Catacombs on the Weeping Peninsula2Radagon SoresealOn a corpse in Fort Faroth in Caelid3Godfrey IconBoss Reward in Golden Lineage Evergaol4Moon of NokstellaNokstella chest5Marika SoresealHaligtree in an Imp Seal Room under the patrolling Putrid Avatar6Dragoncrest Greatshield TalismanHaligtree in the rafters above the elevator to Melania7Old Lord's TalismanIn a chest in a tower near the Beside the Great Bridge site of grace in Crumbling Farum Azula8Erdtree's Favor +2In the pit next to ulcerated tree spirits in Leyndell, Ashen Capital
* The number corresponds in the order the guide will take you and you can also do a find in the guide for them in this specific order.
Miscellaneous
God-Slaying ArmamentUpgraded any armament to its highest stage
There's two paths to getting this achievement:
Level up a regular weapon to +25 using Smithing Stones. With Smithing Stones, it costs 2/4/6
Level up a special weapon to +10 using Somber Smithing Stones
Endings
Age Of The StarsLord Of Frenzied FlameElden LordThere are 6 total endings to Elden Ring, 2 of which are specifically required with the remaining 4 counting for the remaining ending achievement. You can only get one ending per playthrough.
Age of StarsPre-requisite Do NOT progress Preceptor Selvulis' quest and administer the Amber Draught to Ranni
Do NOT inherit the Frenzied Flame at the bottom of the Subterranean Shunning Grounds. If you did, use Miquella's Needle at Dragonlord Placidusax's arena
Requirements Complete Ranni's Questline: See Sidequest; the last step is giving Ranni the Dark Moon Ring from the chest next to Rennala
Defeat the final boss, summon the blue summoning sign Achieved the "" ending
Pre-requisite Defeat Morgott, the Omen King
Defeat Mohg, the Omen
Warning: This ending will lock you out of any other ending unless Miquella's Needle is used at Dragonlord Placidusax's arena which will then permanently lock you out of this ending
Requirements Warp to where you fought Mohg, the Omen at the Cathedral of the Forsaken grace.
Behind the altar here is an illusory wall that will lead you down a pit with a yellow ember scorched doorway. Remove your armor in order to open the door.
Talk to the Three Fingers to inherit the Frenzied Flame.
Defeat the final boss
Achieved the "" ending
EndingsPre-requisite Do NOT inherit the Frenzied Flame at the bottom of the Subterranean Shunning Grounds
Requirements Defeat the final boss, and do anything but summon the blue summoning sign if you've completed Ranni's quest
Achieved the "" ending
Source: https://steamcommunity.com/sharedfiles/filedetails/?id=2785187510
More ELDEN RING guilds
- All Guilds
- Elden Ring
- How To Beat Elden Ring Without Dying
- Position des 8 Piliers brasier de la Siofra
- Alternative / goth female character preset
- Elden Ring Hakknda Bulabileceiniz Her ey Kapsaml Rehber
- EN OP GREATSWORD BULD ! !
- How to finally quit Elden Ring for DS2
- How to create Dante DMC on Elden Ring/Como criar o Dante do DMC no Elden Ring
- ELDEN RING Guide 2344
- How to beat elden ring in 50 easy steps from a 250+ hours experienced player
