Hero Selection & Outfitting
The following build and recommendations are strictly with the Darkest Dungeon quests in mind.
Upgrade the Stagecoach as soon as possible. This provides several bonuses, including:
--wider selection of available classes
--larger number of heroes / week
--possible higher hero starting level (which gives free learned skills and equipment)
After collecting desired achievements, it is not necessary to recruit heroes of every type; recruit only those that have a practical use in your party builds. Antiquarians might be useful in the early game for quick access to trinkets, but afterwards, their usefulness is dependent on how effectively you can use them against stronger and stronger enemies.
For a full roster of 30 heroes, I recommend having 2 of each hero class, except the following:
--4 Arbalests / Musketeers
--4 Vestals
--3 Plague Doctors
--3 Lepers
--3 Bounty Hunters
--can do with only 1 Highwayman and 1 Crusader (default Dismas & Reynauld)
Prioritize Heroes with the following Positive Quirks, and lock these Quirks in with the Sanitarium. Remove all Quirks that penalize these bonuses:
Ranged Heroes:
Fated ACC
Unerring DMG
Eagle Eye CRIT
Natural Eye ACC
Natural Swing ACC
Melee Heroes:
Evasive DDG
Precise Striker CRIT
Tough HIT
For Any Hero:
Eldritch Slayer ACC / CRIT (for the Darkest Dungeon quests)
Quick Reflexes SPD
Hard Skinned PROT
Deadly CRIT
Eldritch Hater DMG / STRESS (for the Darkest Dungeon quests)
Irrepressible VIRT
Unyielding DTHBLW
Luminous SPD, DDG
Fight the Shrieker beast in the Weald as often as possible to gain Corvid Quirks such as
Corvids Eye ACC / Scout
Corvids Grace DDG / MOVE Resis
Fight the Thing From the Stars in the Color of Madness DLC to gain Quirks such as
Prismatic Isolation, unique Quirk, +25% Debuff Resist
Don't bother locking in area-specific Quirks unless you want to build an anti-area team (+scouting and -stress are best Quirks for this).
Team-Building Exercises
One of the single best all-around team builds I have discovered is (from left to right)
4 Arbalest / Musketeer
3 Arbalest / Musketeer
2 Vestal
1 Bounty Hunter
Equip the Arbalests or Musketeers for DMG, Vestal for 2nd-slot HEAL, and Bounty Hunter for damage and survivability (DDG, HP, DMG, SPD). The Arbalest and Musketeer benefit from most damage-increasing trinkets, especially class-specific ones. Equip the Vestal with the Profane Scroll and either another healing Trinket or a Martyrs Seal. Give the Bounty Hunter a Wounding Helmet, Berserk Charm, or another Trinket that gives SPD.
With this build, Mark targets with the Bounty Hunter first thing every turn. With luck, the two Arbalests / Musketeers will be able to kill at least 1 "light" enemy per round, and gain a damage and accuracy bonus against large or heavy enemies. The Bounty Hunters MARK power also reduces enemy PROT and gives him a SPD bonus. You will probably have to spam healing with the Vestal, but if you have some breathing room, use her Dazzling Light or Illumination powers.
Special Teams
These teams get a special name when equipped in the right order; I do not know if this special configuration gives any actual bonus, or just cosmetic. From left to right:
4 Plag 3 Vest 2 High 1 Crus = "Red Hook"
4 Plag 3 High 2 Vest 1 Crus = "Tricky Glory"
4 Vest 3 Plag 2 High 1 Crus = "The Usual Suspects"
4 Grav 3 Occt 2 Abom 1 Hell = "Les Miserables"
4 Occt 3 Grav 2 Abom 1 Hell = "Heavens Devils"
4 Jest 3 Grav 2 High 1 Bount = "The Guilty"
4 Grav 3 Jest 2 High 1 Bount = "The Mercenaries"
4 Anti 3 Vest 2 Lep 1 Crus = "Seekers of the Grail"
4 Man 3 Vest 2 Lep 1 Crus = "Belle and the Beasts"
4 Vest 3 Plag 2 Grav 1 Lep = "The Strays"
4 Grav 3 Vest 2 MAA 1 Hell = "Charlie's Angels"
4 Arba 3 Hound 2 Shield 1 Bount = "Alpha Strike"
General Boss Tips
The boss is always in the room that is furthest from your starting position; you can count the number of rooms away from your starting position to at least narrow down where the boss will be.
Progress straight towards the boss, avoiding as many side battles as you can along the way.
Camp in the room immediately before the boss, and use your most powerful camping skills (such as Bounty Hunter +DMG skills). Make sure to use a "Prevent nighttime ambush" skill to be sure you won't be weakened by battle right before the boss.
Bosses are always at least 2 squares large**, so anti-large abilities and high single-target DMG abilities are helpful.
**the only exception to this, sort of, is the Flesh in the Warrens, which takes up 4 single-slot spaces, making it vulnerable to certain AoEs.
The Necromancer In The Ruins
The Necromaner does consistent DMG, and can summon reinforcements of the Bone variety (ex: Bone Rabble, Bone Courtier).
The Prophet In The Ruins
The biggest threat the Prophet poses is that he can literally bring the ceiling down on your heads. As once of his actions, he will prophetize doom on 1-2 random spaces in your lineup, and at the end of the round, big chunks of the ceiling will fall on those spaces. These can be dodged, but the chunks seem to have high accuracy, so you'll need very high DDG to counter this.
The Prophet is blocked by 3 rows of pews. By destroying these pews,
Rewards Upon Defeat
For each slot of pews you destroyed in the battle, you will receive 1 hefty reward item worth a LOT of gold!
For defeating the Prophet himself, you will get at least 1 Trinket, sometimes 2 low-level Trinkets.
Lastly, if you have the Crimson Court DLC, you will receive 1 Blueprint to build Districts back in the Hamlet.
The Swine King In The Warrens
DO NOT HIT WILBUR! Just, do not. Not until the Swing King is dead.
If you are so foolish as to prioritize Wilbur (and it can be tempting, what with his MARK power), the Swing King gets a free massive attack against the hero who targeted Wilbur. This occurs each time Wilbur is targeted, regardless of how many actions the Swing King has left on his turn.
The Flesh In The Warrens
The tricksy thing about the Flesh is that each of its 4 incarnations will morph at the beginning of each combat round. This may necessitate a change in your tactics, since one of the flesh-stalk slots may be vulnerable to BLEED one round, then have high PROT and BLEED resistance the next round. (If you've already inflicted BLIGHT or BLEED, though, it stays with that slot even after that slot morphs.)
You should be alright with a team that can reach any slot with damaging powers, or those with good AoEs, such as Plague Doctor and Houndmaster.
The Hag In The Weald
Bleed is a fairly effective tactic against the Hag - she has comparatively low resistance to it, and she will take Bleed damage on each of her actions (she acts twice in a round).
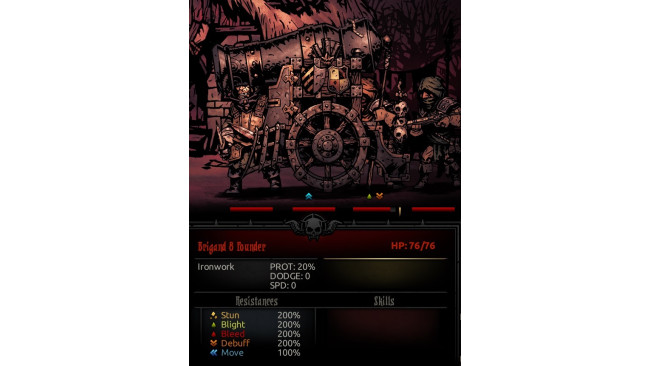
The Cannon In The Weald

Abilities & Attacks
BOOOOOOOOM!!, deals INCREDIBLE DMG to all heroes at the end of a combat round, if triggered by the Brigand Matchman
Reinforcements
Summon Brigand Matchman
Battle Tactics
The Cannon itself is basically immune to all debuffs, including Blight & Bleed. It would take an absurd degree of specialization to make it vulnerable to these attacks, so you are better off focusing your damage on the Brigand Matchman, who is much more vulnerable.
The Cannon requires the Brigand Matchman enemy to fire; if you take out the Brigand Matchman, the Cannon can never use its BOOOOOM!! ability, thus saving your heroes a lot of DMG and grief. However, the Cannon will summon a Brigand Matchman for free at the end of every round - you must then keep killing a new Matchman every turn before he can act. You should have at least 2 heroes who can reach the back spot in the enemy lineup to consistently hit the Brigand Matchman.
If brigands are killed, the Cannon will also summon reinforcement Brigands for free.
It is theoretically possible to keep the Brigand Matchman Stunned with a ranged power, such as that used by the Plague Doctor or human-form Abomination. If you feel you don't have the damage - or you're just getting unlucky with the damage - try stunning.
To actually destroy the Cannon itself, you must take its medium-to-high PROT into account. Marking it is a good idea, especially with a MARK that removes PROT, like the Bounty Hunters MARK ability. If you're fairly lucky, the Cannon will summon weaker Brigands as reinforcements, so you could ignore the regular Brigands and focus on the Cannon and the Brigand Matchman.
IF THE BRIGAND MATCHMAN IS ALLOWED TO USE "FIRE IN THE HOLE", THE CANNON WILL FIRE AT THE END OF THE ROUND WITH THE "BOOOOOOOM!!", DEALING INCREDIBLY HIGH DAMAGE TO ALL HEROES!!
The Siren In The Cove
Like many bosses, the Siren has a special power to remove one of your heroes from your lineup - but unlike other bosses, the Siren instead turns the targeted hero to her own side. Luckily, these heroes tend to use their more supportive skills, rather than their combat skills. For example, if the Siren pulls over an Arbalest, the Arbalest will most often use her healing skill, rather than her powerful attack skills. However, there's still the chance of using the attack skills if the Siren is doing fine on hitpoints and buffs - or if the targeted hero simply doesn't have any HEAL or BUFF powers.
The Crew In The Cove
Sing a jaunty tune, me lads, and well-prepare to die!
For in the dark and wet ahead a devious crew I spy!
With gun and blade we'll rip and tear, a battle to be fought!
But look ahead and think, me lads, rather perhaps we ought
To cringe and cry and weep and wail, and cower in our boots!
But ponder for a moment, lads, the piles and piles of loots!
The Collector
The Collector is a random hallway battle found in potentially any area, but is seemingly most common in the Ruins and the Warrens.
The major danger of The Collector is that it summons 3 minions. It may summon any combination of these three minions, but no more than 2 of the same kind at once (at least from what I've observed):
Vestal Head - can heal like your Vestal's Divine Grace ability, and buff The Collector or allied Heads
Man-at-Arms Head - can Guard or buff The Collector or allied Heads
Highwayman Head - deals high damage with high Bleed chance, like your Highwayman's Open Vein ability
Abilities & Attacks
Show Collection, medium STRESS attack against 2 random heroes
Life Steal, medium DMG, and heals the Collector for a medium amount. If the targeted hero dodges this attack, the Collector does not heal
Collect Call, summon 3 Heads on the first use of this ability, and 1-3 Heads to replace fallen Heads on successive uses
Battle Tactics
Deal as much damage to the Collector up front as you can. If you can surprise it, stack Blight & Bleed on it, Mark it, debuff it if you can, etc. In spite of the danger that The Collectors summons pose, I would say focus all your efforts on defeating The Collector, because once it dies, all its summoned Heads die as well.
Rewards Upon Defeat
Frequently, the Collector drops a "Head of..." item, which grants powerful bonuses based on the Head item dropped. However, these Head items dramatically increase STRESS damage taken by the hero equipped with these items.
The Collector also has a medium-to-high chance of dropping rare gems worth 2,500 gold each.
The Shrieker
A unique mini-quest that rarely occurs as a weekly event. You will receive a warning from the Town Crier that the Shrieker is active this week, and you can choose whether to hunt it down in the Weald. You can choose to skip this quest.
Battle Tactics
I have read that the Shrieker automatically flees at the end of 4 rounds of combat, so if you can hold out that long, you will win by default (getting all related quest rewards). I read in the same guide that you should focus your attacks on the Shriekers Nest, because this will get you an additional Trinket at the end of the battle. I cannot confirm whether this is true from personal experience.
I do know that the Shrieker does high damage with decent CRIT & BLEED chances, so heroes who have PROT or DDG to deal with the CRIT, and BLEED cure are needed.
Rewards Upon Defeat
If you drive the Shrieker off or by some miracle kill it, you will receive 2 Trinkets, often Trinkets that you may have lost when heroes died on a quest.
The Brigand Vvulf
A thoroughly annoying and tough side-quest that rarely occurs as a weekly event. You can choose whether to combat the Brigand Vvulf, or skip the quest. However, if you skip this quest, the Vvulf will DAMAGE RANDOM BUILDINGS IN THE HAMLET, meaning you will have to spend more heirlooms to repair & upgrade these buildings!!
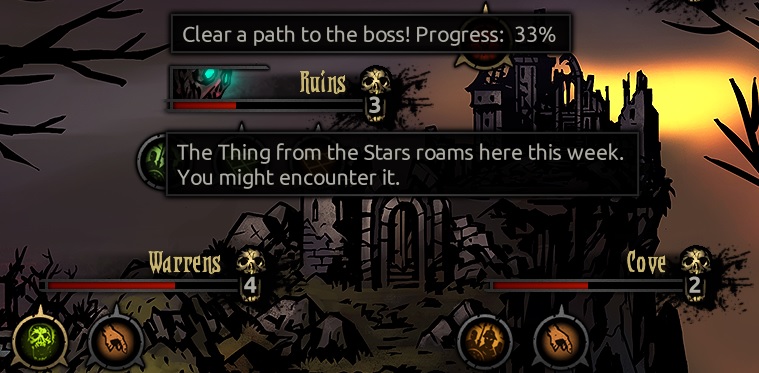
The Thing From The Stars

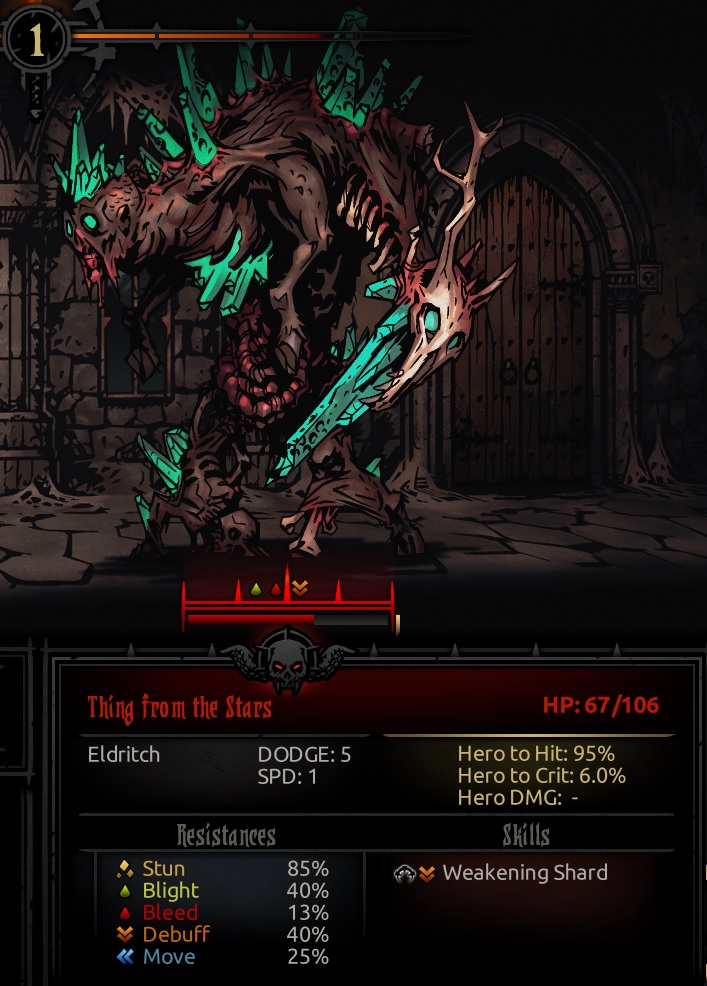
As shown the first time you encounter The Thing From the Stars:
The Thing From the Stars (TFS) is only available if you have purchased The Color of Madness DLC, and only if you have enabled this DLC in your campaign. You will see a warning sign above a region map, next to the region name.
If you venture into that region during that week, you might encounter TFS in a hallway battle.
Abilities & Attacks
Transfixing Shard, STRESS damage, powerful debuff
Vorpal Strike, high DMG, high STRESS attack
Phase Gnaw
Paralyzing Shard, low DMG, high STRESS & Stun attack
Return to the Stars, summons a Crystalline Aberration (as seen in the Farmstead quests)
Triggers at the end of each combat round & does not use up an action!
Cures TFS of all negative effects, including Blight, Bleed, Mark, and debuffs
Grants TFS 80% Protection
Battle Tactics
The Thing From the Stars (TFS) seems to be vulnerable to both Blight and Bleed, and takes damage from these effects on each of its actions (it acts twice per turn). However, TFS is highly resistant to Stun. When using Return to the Stars at the end of each combat round, TFS cures itself of all negative effects, so use high-SPD heroes to apply Blight & Bleed before TFS can act.
Rewards Upon Defeat
One advantage of facing TFS is that it drops at least 25 Comet Shards upon defeat, and potentially a rare Trinket and gold.
One of the heroes who survives facing TFS may develop a Positive Quirk, such as
Prismatic Isolation, unique Quirk, +25% Debuff Resist
The Shuffling Horror
You fight the Shuffling Horror only if you sacrifice a Torch provision to the Red Orb Shrines, or if you foolishly wander around too long at 0 Light level.
The Second Darkest Dungeon Quest
Thankfully, for this quest, the quest locations are fixed.
Make sure 3 of your 4 heroes are equipped with the Talisman of the Flame Trinket. Equip the Talisman on the 2 front-line heroes, and give the third Talisman to either a Houndmaster or Man-At-Arms (a hero that can Guard the last hero who does not have a Talisman).
I prefer Houndmasters over Man-At-Arms for this quest due to the Houndmasters high DDG, which can be improved with Trinkets such as Protective Collar and Ancestors Coat. Spam Guard on whichever hero does not have the Talisman for stacking bonuses to the Guarding hero and effective immunity to Revelation for all 4 heroes.
Stack anti-bleed and anti-blight (and PROT, if available) on your tank or front-line damage-dealer hero; stack HEAL, VIRT, or anti-DTHBLW on your healer.
For this quest, I managed to complete it after three attempts with: 4 Arbalest 3 Vestal 2 Houndmaster 1 Bounty Hunter, with 3, 2, and 1 equipped with the Talisman. I did lose the Arbalest to blight before reaching the 3rd Iron Crown, but managed to out-damage the final Templar to complete the final room. I camped a room or two before each Iron Crown room.
The Third Darkest Dungeon Quest


The quest description comments - it speaks the harsh but honest truth. You have to be very lucky to make this a short(ish) quest, and by this point, you should know that you can't count on luck alone.
Load up on Bandages, Antivenom, Food, Holy Water, Torches, Medicinal Herbs, and Laudanum (all of which you should easily be able to afford by now). You get exactly no loot for doing this quest, so your entire inventory space should be full of necessities. You will NOT need Shovels or Skeleton Keys.
It is hard to predict how and when you will take STRESS, so use Laudanum sparingly. When I attempted this quest, my Houndmaster started with 50% stress for reasons I can't explain. (He went mad.)
----
----
As you can see, the path to the quest location is fairly simple; the problem lies in fighting enemies in the hallways between each room. On the hallways that lead into the quest location (and often, other hallways around the map), you will find a Mammoth Cyst (large enemy that does heavy damage and blight) and a Polyp (tricky small enemy).
These little [expletive deleted].
Though not marked on their abilities list, they will use "Teleportation" on your entire group of heroes, which, of course, teleports you to another random room (occupied by "light" enemies) somewhere else in the Darkest Dungeon. You will have to fight to clear that room of enemies, and then track your way back towards the quest location in the center. If you are lucky (heheheh), you will end up close to a path you have already cleared. I recommend fighting your way back to the path you have already blazed towards the quest location, because 1) these hallways and rooms remain clear, and 2) if you fight the same Mammoth Cyst and Polyp that teleported you in the first place, they keep whatever damage they suffered in your first (or second, or third) battles.
The only way to avoid being teleported is to kill the Polyp before it can use any of its abilities (besides Teleportation, it has a HEAL, a STUN, and a STRESS). This takes a lot of good luck with your ranged damage-dealer such as an Arbalest or Musketeer (and Marking it helps); killing the Polyp also forces the Mammoth Cyst to use one of its two actions to Summon another Polyp. The trade-off is that this will reduce the damage you are doing to the Mammoth Cyst, meaning you will have to survive turns and turns of its high damage and blight attacks.
Camp regularly (after each teleportation fight-room, for example); that's why they give you 4 campfires. If you do use a Houndmaster, save the Dog Treats for your fight with the Cyst and Polyp that will get you access to the quest location. You automatically scout after each room, and the dungeon layout is the same anyway, so use your camping skills to HEAL, buff, and de-STRESS.
Upon entering the quest location, you will fight at least one Templar (and maybe some other enemies), which thankfully does NOT have the "Revelation" ability this time around.
The End Of All Things
"In the grotesque, pulsing heart of evil, we beheld the truth of the world and the minds beyond it. We gazed long, and we weep still."
**SPOILERS**SPOILERS**SPOILERS**SPOILERS**SPOILERS**SPOILERS**SPOILERS**
This final step in your journey is a comparatively easy quest (or at least, significantly less frustrating than the third Darkest Dungeon quest).
STAGE 1
The boss summons copies of itself, which come in two forms: a "Perfect Replica" and "Imperfect Replica". Destroy the Imperfect Replicas a minimum of five times to complete this stage. Most of the attacks by any Replica deal Stress damage, and since this is the final quest, heroes might not get a VIRT chance; they may always end up Afflicted.
STAGE 2
The boss is protected by 3 slots of Absolute Nothingness which, while they cannot be affected by anything, also do not have any attacks or actions. The boss will move around, so having a team that can hit any block with damage is very useful. In spite of the comparatively low resistances of the boss, no BLEED, BLIGHT, or STUN abilities I tried ever affected it. Occasionally, a DEBUFF would get through.
STAGE 3
Surprisingly, the only serious "damage" the final incarnation of the Heart of Dark is its "Come to Your Maker" ability, which automatically kills one of your selected heroes. This ability is used at least twice, and possibly more. (Thankfully, I defeated the boss before it used it more than two times.)
Prepare at least two of your four party members to be sacrificed with The Heart of Darks "Come to your Maker" ability. At that stage of the fight, DMG, CRIT, and marks are probably more useful than healing, since few of the attacks do high damage.
You have all certainly gone mad by now, so stress is only a factor if it causes a Heart-Attack. Self-healing or small heals are useful for keeping your heroes alive, but you might consider risking to stay at Death's Door if you have a Martyr's Seal equipped, for the accompanying bonuses.
I think "Come to your Maker" has some disturbing theological or metaphysical implications...
Provisions
TORCHES
DO NOT EVER run around the dungeon for more than one hallway with 0 torchlight. This has a chance of spawning the eldritch thing that haunts the red-orb shrines...
Activating Torches just before entering a room, or just before a battle (as opposed to spending them just whenever you run below your threshold of happy light-time-ness) seems to both help conserve them, and give an extra chance to surprise monsters waiting within the room. Try to keep the torch no less than 40% and no greater than 75% for increased loot, but still a decent chance of good effects / lesser bad effects.
FOOD
Food is used up periodically to feed your heroes as they wander around in a dungeon. I have noticed that your heroes are hungrier more often when they backtrack in halls that they have already explored. A minimum of 4 food is used per feeding (1 for each hero, unless the hero has a Quirk or Trinket that affects amount of Food eaten). Food is also used during camping - using 2 food will keep your heroes alive, but cause STRESS. Using 4 food gives some small healing and no penalties. Using 8 food heals your heroes by a significant amount, and heals 5-10 STRESS per hero.
Food can also be used to heal 2 hit points per unit, per hero, when used outside of normal feeding times & camping. You can only use a maximum of 4 Food in this way, per hero, per battle fought.
MEDICINAL HERBS
An extremely useful provision in almost any dungeon. In addition to using it on specific interactive items (see "Making Money" section), it can be used to clear almost any debuff, including debuffs from some camping skills.
FREE PROVISIONS
Arbalests / Musketeers give you 1 free Bandage each
Plague Doctors give you 1 free Antivenom each
Making Money
Credit for this strategy goes out to the random internet, where I was reading up on "how to survive and make money in Darkest Dungeon". There are numerous other guides to money-making strategies on Steam and the internet.
1) Keep torchlight at about 50% (or less, if you can bear the pain). This improves the amount of loot you receive from a victorious battle or successful use of a curio.
2) Use Provisions to protect yourself from curios (see list below). This will prevent negative effects, and give your heroes extra loot or a buff.
3) Have a high Scouting chance (with Quirks, heroes such as Bounty Hunters, Grave Robbers, Houndmasters, and Highwaymen, or camping skills on these heroes). This lets you avoid fights you don't profit from, and lets you find curios, quest locations, and secret rooms.
If you want to maximize your loot, here's one idea: Clear out the dungeon & complete your main objectives. Bring tons of torches so you can keep the light high for +Scouting and surprise chance. DO NOT USE most interactables throughout the quest.
Once your main objectives are done, backtrack through the dungeon and go after all the interatables you skipped. Lower your torchlight to anywhere between 1-50%. Use torches sparingly, just enough to keep light above 1% so it does not go Pitch Black. (If you have no torchlight at Pitch Blackness, there is a small but significant chance of summoning The Thing That Haunts the Red Orb Shrines.) You can voluntarily lower torchlight by holding SHIFT + clicking the torch icon at the top of the screen. This lowers torchlight by 25% per click.
The downsides to this strategy are that it takes a long time to backtrack, even through a small dungeon. You will also be taking more STRESS at lower light levels.
PROVISIONS & CURIOS LIST
Use Medicinal Herbs on:
Animal Carcass (Weald)
Fish Carcass (Cove)
Coral (Cove)
Iron Maiden (Ruins)
Alchemy Table (Ruins)
Banquet Table (Warrens)
Moonshine Barrel (Warrens)
Dinner Cart (Warrens)
Use Holy Water on:
Troubling Effigies (Weald)(hit-or miss for a good or bad Quirk or (de)STRESS)
Pristine Fountain (Weald)
Fish Idols (Cove)
Eldritch Altar (Ruins)
Altar of Light (Ruins)
Ash Urns (Ruins) (guaranteed at least 1 gemstone)
Confession Booth (Ruins)
Bone Piles (Warrens)
DO NOT USE Holy Water on Skin Totems / Skin Racks (Warrens).
Use Skeleton Keys on:
any "Locked" chest or item
Locked Display Cabinet (Ruins)
Sarcophagi (Ruins)
any secret room chest (guaranteed 1-3 spectacular gemstones)
Use Shovels on:
Giant Clams (Cove)
Barnacle-Encrusted Chests (Cove)
Shallow Grave (Weald)
any blockages in any area
Use Bandages on:
Spiderwebs (Weald)
Mummified Remains (Weald)
Rusty Cleaverboards (Warrens)
Use Antivenom on:
Old Trees (Weald)
Brackish Tide Pools (Cove)
DO NOT USE Torches on:
Red Orb Shrines in any area (unless you want a tough fight)
Book Piles or Book Cases (causes stress & may inflict a negative Quirk)
Interactions - Ruins
Holy Shrine
Success w/ Holy Water = +30% damage buff until camp
Interactions - Warrens
Bone Piles
Success = +DMG buff
Moonshine Keg
Success = +DMG, +ACC, +CRIT buff
Success w/ Medicinal Herbs = +30% DMG buff
Dinner Cart
Success w/ Medicinal Herbs = tons of food + 1 other provision
Makeshift Dining Table
Success w/ Medicinal Herbs = extra food & provision
Interactions - Weald
Pristine Fountain
Success w/ Holy Water = heal a large amount of STRESS damage
Shallow Grave
Success w/ Shovel = a few gemstones
Spiderwebs
Success w/ Bandages = a few gemstones
Interactions - Cove
Fish Carcass
Success w/ Medicinal Herbs = a few gems and food
Fish Idol
Failure = -DDG debuff on hero
Success w/ Holy Water = +DMG buff on hero
Barnacle Encrusted Chest
Success w/ Shovel = heirlooms, gems, provisions
Coral
Success w/ Medicinal Herbs = may reduce a lot of STRESS, or MAY remove a Negative Quirk
Ship's Figurehead
Success = +HEAL done buff
Positive Afflictions (Virtures)
Stalwart, heals for a tiny amount on each attack
Negative Afflictions (Madnesses)
Abusive
frequently inflicts more STRESS on allied heroesFearful
+2 SPD
+10 DDG
-10% HP
-25% DMGHopeless
-10% HP
-5 DDG
-3 SPD
-5 ACC
-15% Resist BLT, BLD, Debuff, Disease, Move, and Trap DisarmIrrational
frequently inflicts light STRESS on allied heroes
randomly interacts with Curios
randomly changes position in battle
may PASS on their turn
Crimson Court DLC Overview
The first thing a player should realize about Crimson Court DLC is that most of it is annoying. It is easy to find a list of all the things this DLC adds, but those things which affect your "daily life" in Darkest Dungeon (assuming you have activated all parts of the DLC), include:
new passageway fights that give more opportunities for stress, damage, death, and contracting the Crimson Curse a new curio - giant Throbbing Cocoons, which when activated spawn a team of 2-4 Crimson Curse enemies. These spawn in passageways in all other dungeons. You do not need to activate them, but if you do, you have a good chance of summoning a Gatekeeper a new dungeon - the Courtyard. There are numerous guides on how to survive in this new dungeon, as well as combating the new bosses you face, so I will only be covering certain aspects of this new dungeon in The Courtyard, Enemies and Bosses section new trinkets! Specifically for fighting Crimson Curse enemies or the Curse itself, these trinkets can be dropped as rewards from battles, or as the reward for finishing a quest. You can also obtain the powerful "set trinkets" by 1) defeating the Crocodilian, 2) exchanging blood to Shrews in The Courtyard, 3) defeating a Courtyard boss, and 4) completing a Courtyard quest
The Crimson Court DLC also comes with new "Districts" you can construct in The Hamlet. The Districts DLC can be activated separately from other Crimson Court DLC. Most Districts provide useful buffs to specific heroes, so those are usually worth building. (Though if you find yourself not using a certain hero much, you might want to skip the buff, since constructing Districts can get expensive.)
The Courtyard, Enemies And Bosses

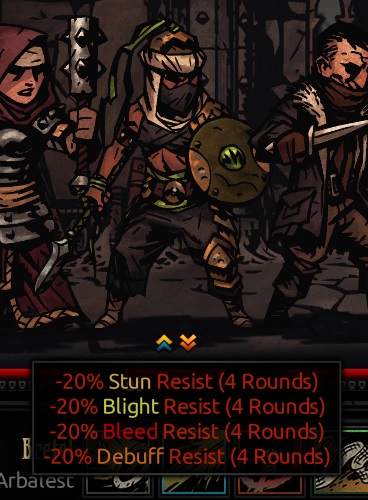
The Crimson Court is full of new and aggravating enemies - some have high DDG, some have decent PROT, most inflict STRESS, and some inflict high damage and stuns. Most of them have a chance to inflict BLEED, and the giant mosquitoes can inflict the Crimson Curse, which causes penalties to SPD, BLIGHT resist, BLEED resist, and max HIT until treated with The Blood.
The Blood has a small chance to drop from Crimson Court enemies (especially those that have hit your heroes with The Thirst power), rare drops from other battles or curios, can be obtained in batches from The Courtyard quests, and can be generated in the Hamlet thanks to the Sanguine Vintners district.
If starting a new playthrough, but do not want to face The Courtyard yet, build the Sanguine Vintner district when you have a spare Blueprint (obtained after defeating a region boss in any of the regions, including the Courtyard itself. These include the Hag, the Necromancer, the Siren, the Swine Prince, the Baron, etc.). The Sanguine Vintner gives you 2 vials of The Blood each week, which stacks, meaning that you can stockpile The Blood before facing Courtyard quests and having too many heroes afflicted with the Crimson Curse, and not having enough The Blood to go around.
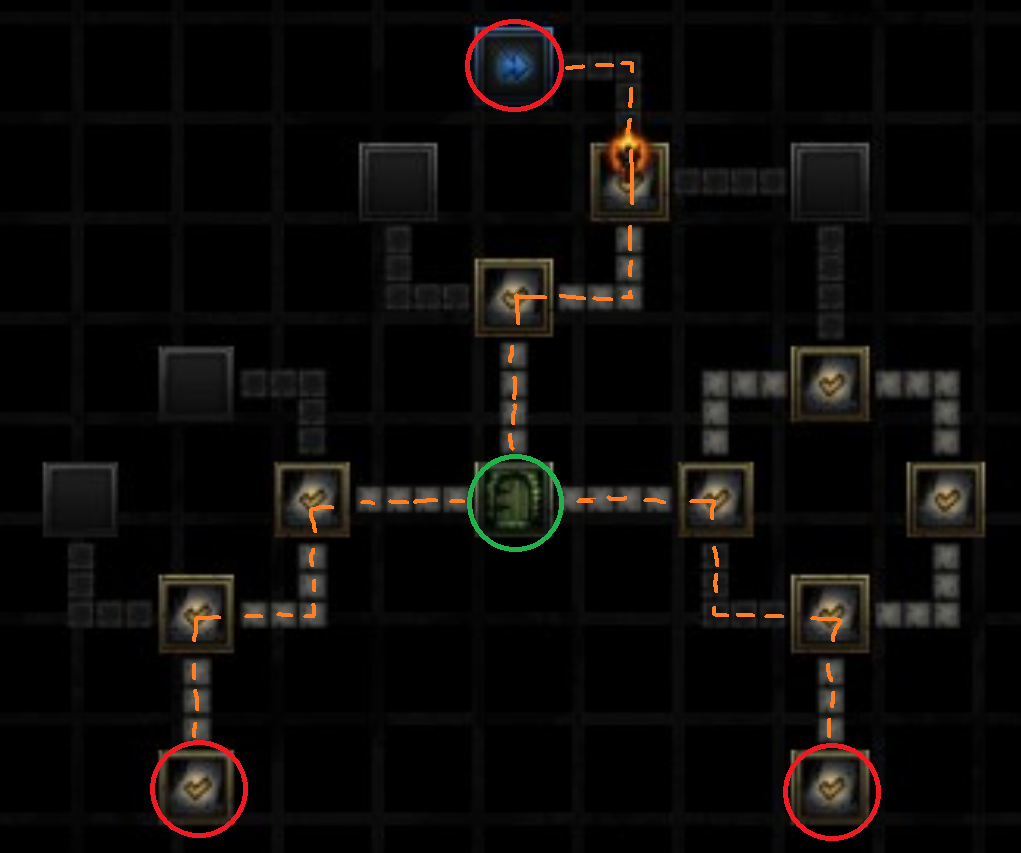
The Baron
Rooms marked in red circles are where I found keys
Roomed marked in orange circles are locked doors
The blue arrow shows where I entered a Fog Bank and where it teleported me to
Defeating the Baron (and maybe other major bosses) in the Courtyard removes the Crimson Curse from all heroes who suffer it. In addition, it may very well resurrect some heroes who have perished in the Courtyard. During my first fight with the Baron, I lost my Arbalest; when I got back to the Hamlet, however, not only was I not down a hero (29 of 30), I had somehow gained 2 extra heroes (by best guess, a Bounty Hunter and a Man-At-Arms), putting my roster at 32.
The Color Of Madness - Enemies
Since you face many enemies with a STLTH power, AOE attacks are extremely useful.
AoE heroes include:
Leper
Plague Doctor
Houndmaster
Shieldbreaker
HIghwayman
Gleaming color = fight beasts & unholy
Farmhand = medium HP, low DDG, high BLIGHT resist, low SPD, low MOVE resist
Sow the Seeds = low DMG + medium STRESS
Ceaseless Labor = low DMG
Can counterattack when hit, once per hit
Pause from Labor = medium heal on self
Plow Horse = high HP, 15% PROT, low DDG, high SPD, high STUN resist, very high MOVE resist
Paw the Ground = give self STLTH, move to the back
Trample = low DMG to all heroes, shuffle party
Bestial Scream = high STRESS
Rearing Strike = medium damage, can stun & bleed
Crystalline Aberration = low HP, no DDG, negative SPD, impossible to STUN, extremely high BLD resist, cannot be debuffed, NO BLT resist
Explosive Undoing = low DMG to all, Horror for 3 turns on all
heals attacker when hit with a killing blow
Foreman = high HP, 15% PROT, no DDG, low SPD, high BLT resist
No Trespassers = medium DMG, marks target
Stir the Rabble = buff on ally of Foreman, grants +BLT chance, +BLT duration, +3 SPD, and Riposte
Scarecrow = medium HP, high DDG, medium SPD, high STUN resist, impossible to BLD, medium DEBUFF resist, starts w/ STLTH, disappears if the only enemy left??
Flail the Crops =
Haunting Revelation = low DMG, medium STRESS
Sleeper's Herald
always has Riposte for medium damage
Reality Bend, medium STRESS, debuff for
can teleport group to a treasure / curio chamber
Source: https://steamcommunity.com/sharedfiles/filedetails/?id=1756132323
More Darkest Dungeon guilds
- All Guilds
- Darkest Dungeon Guide - The Ruins
- Darkest Dungeon - How to Cheat (Changing Hero Stats)
- Darkest Dungeon - Hidden Achievements (Color of Madness DLC)
- Darkest Dungeon - Crimson Court Detailed Maps
- Darkest Dungeon - Beginners Guide (Tips and Tricks)
- Darkest Dungeon - Harvest Run Prepare Guide
- Darkest Dungeon - How to Get the Shadows Blur Together Achievement
- Darkest Dungeon - Curio Guide (Color of Madness DLC)
- Darkest Dungeon - Guide to Stuff Courtyard Plus, Darkest Plus and Farmstead Plus