Intro
CCSE, short for Cookie Clicker Script Extender, is a modding framework for Cookie Clicker, which basically allows you to make mods easier, and extends mods' functionality.
What you need:
- Cookie Clicker on Steam
- Internet connection
- Basic knowledge of programming, preferably on JavaScript
- Basic knowledge of how to use the Steam Workshop
Step 1: Create The Mod Folder
Before even starting to write the code we gotta make a folder for it.
To do so:
1.Open Cookie Clicker
2.Go to Options(Top Left Button on the center panel)
3.Scroll down to the "Mods" section
4.Click "Manage Mods"
5.Click "Open /mods folder"
6.Once the folder is opened go to the "local" folder
7.Create a new folder with any name you want, for the sake of this tutorial I will call it "tutorialMod"
8.Open your newly made folder
Congratulations! You just created a folder for your mod.
Step 2: Create Info.txt
There are 2 very important files, that must exist in every mod.
- info.txt: Contains information about the mod, version of the mod and game, author, date it was created, and dependencies(About them later)
- main.js/main.ts: Is the main file of the mod, this is the thing that Cookie Clicker will inject as a mod.
Let's start with info.txt:
1.Create info.txt in your mod's folder
2.Fill it in with this template:
{
"Name": "Tutorial Mod",
"ID": "unique id must be put in here",
"Author": "Your Name",
"Description": "Description of the mod",
"ModVersion": 1.0,
"GameVersion": 2.043,
"Date": "2/01/2022",
"Dependencies": ["CCSE"],
"Disabled": 1,
"AllowSteamAchievs": 1
}
Feel free to change everything apart from Dependencies, GameVersion and AllowSteamAchievs.
Please notice that the ID of the mod must be totally unique, otherwise the game will just not load our mod if there is another mod with the same ID.
I, personally make the ID this way: "fl1pnatic (Mod Name)"
The only dependency is CCSE, because we will be using it to make our mod.
We need dependencies, so the game can actually run the mod, because if we use functions that don't exist in the base game or our mod - it just won't work.
What we are basically doing, is telling the game: "Hey, Cookie Clicker, here is my mod, but it needs this mod to work, so please tell the user ,that they need it in order for the mod to work.
Step 3: Create Main.js
For the simplicity, we will be using JavaScript, the same language Orteil used to make Cookie Clicker. There is also TypeScript, which is also used as a replacement for JavaScript, but it's a bit harder.
1.Create the main.js
2.Fill it in with this example code:
if(tutorialMod === undefined) var tutorialMod = {};
if(typeof CCSE == 'undefined') Game.LoadMod('https://klattmose.github.io/CookieClicker/CCSE.js');
tutorialMod.launch = function(){
isLoaded = 1;
}
if(!tutorialMod.isLoaded){
if(CCSE && CCSE.isLoaded){
tutorialMod.launch();
}
else{
if(!CCSE) var CCSE = {};
if(!CCSE.postLoadHooks) CCSE.postLoadHooks = [];
CCSE.postLoadHooks.push(tutorialMod.launch);
}
}
Now, let's figure out what does this code even do.
if(tutorialMod === undefined) var tutorialMod = {};
Creates a variable of tutorialMod, so we can assign functions and other properties to it.
if(typeof CCSE == 'undefined') Game.LoadMod('https://klattmose.github.io/CookieClicker/CCSE.js');
Usually used for the browser version, if CCSE is not installed then it loads the CCSE version for Web.
**WARNING**: You need the Workshop version of CCSE for the mod to work, because the version that is imported is not meant to be used on Steam.
tutorialMod.launch = function(){
isLoaded = 1;
}
Creates a new function called "launch" under our tutorialMod variable. And also declares the variable "isLoaded" which is equal to one. This code is executed once CCSE is finished loading, to prevent any errors occuring, because CCSE is not loaded by the time our mod tries to execute stuff.
if(!tutorialMod.isLoaded){
if(CCSE && CCSE.isLoaded){
tutorialMod.launch();
}
else{
if(!CCSE) var CCSE = {};
if(!CCSE.postLoadHooks) CCSE.postLoadHooks = [];
CCSE.postLoadHooks.push(tutorialMod.launch);
}
}
Waits before CCSE is loaded, and then loads our "launch" function.
Step 4: Make The Mod Itself
For this tutorial mod we will be making a button, that, once pressed:
- Turns on Steam Achievements
- Gives us the "Hardcore" achievement
- Turns Steam Achievements back off.
Open main.js and create a new function called "optionsMenu"(You can call it however you want, but it's always recommended to name stuff the way that will makes sense later)
You can do so by writing this code
tutorialMod.optionsMenu = function(){
}
What we need to do - Is return an HTML line of code, that we can then pass to the "CCSE.AppendCollapsibleOptionsMenu" function, but about it later.
Let's create a variable named hStr.
You can do so by writing this line of code:
var hStr = ;
For this tutorial we need to go INSIDE the CCSE source code, to find the functions we need.
So open it[klattmose.github.io] up.
Because we need a button, let's just search for it.
Press Ctrl + F and input "Button".
Let's analyze!
The first thing we see when we search for "Button" is "// Game.storeBulkButton"
Just from the name, we can understand, that this is not the button we need. Because it's supposed to be used in the "Store" section.
Let's press enter, until we are passed this function.
Next thing we see is "ActionButton", and this is what we need. On click, this button will execute any function we need.
So let's put it in our code, but first, we need to actually format it.
Add ' '<div class="listing">' + '</div>' before the semicolon in our hStr variable. So it should look like this:
var hStr = '<div class="listing">' + '</div>';
Now let's add an ActionButton:
var hStr = '<div class="listing">' + CCSE.MenuHelper.ActionButton("", "Unlock Hardcore Achievement") + '</div>';
But as of now it won't actuallly do anything. That's because we didn't put anything in the "onClick" property, which is the first thing this function accepts. The second thing is the display name of the button, which will be actually displayed to the user.
So, let's make it actually do stuff.
Create a new function for unlocking the achievement. You should already know how ;)
Now, in this function, let's add this line of code:
Steam.allowSteamAchievs = true;
What it does, is tell the game, to allow Steam Achievements to be awarded, because, by default CCSE is turning this ability off.
Now, let's use the "Game.Win();" function. This function is responsible for awarding the player with achievements.
Game.Win("Hardcore");
And now, let's turn off the Steam Achievements, by changing the variable back to false
Steam.allowSteamAchievs = false;
Then, just add the function you created to the ActionButton.
In my case it will be CCSE.MenuHelper.ActionButton("tutorialMod.unlockHardcore();", "Unlock Hardcore Achievement")
Now, one important thing. For the "optionsMenu" function to actually work, we need to make it return the HTML string we made.
Just add this code to the bottom of the function, and we are done with it:
return hStr;
But even now, the button won't show up. This is because we didn't make it appear.
We need go to CCSE Documentation[klattmose.github.io] . And scroll down until we see What can you do with CCSE?[klattmose.github.io] .
We need the "CCSE.AppendCollapsibleOptionsMenu" function.
This function, as the name suggests, Appends a collapsible options menu to the "Options" tab.
And from the same documentation we can see that it accepts these 2 parametres: "title" and "body"
While "title" is self-explanatory, what does "body" mean?
In HTML, "body" is the collection of stuff that is visible to the user. For example: buttons, text, background, e.t.c.
Because we created a function that returned an HTML string earlier, we can use it as the filler for the "body" parameter.
Go back to your "launch" function and add this line to the bottom of the function:
CCSE.AppendCollapsibleOptionsMenu("Tutorial mod", tutorialMod.optionsMenu());
Just a reminder: It all depends on stuff that you, yourself named.
And guess what? It still doesn't work.
But this time, is because the mod doesn't try hard enough to append this options menu.
Let's return to the CCSE Documentation[klattmose.github.io] , because we need to find a function that will PUSH our function that appends the collapsible options menu.
And it is right there:
Game.customMenu.push()
Let's add it like this:
Game.customOptionsMenu.push(function(){
CCSE.AppendCollapsibleOptionsMenu("Tutorial mod", tutorialMod.optionsMenu());
});
Conclusion
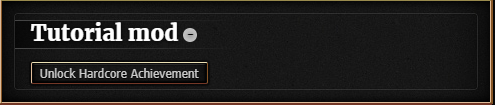
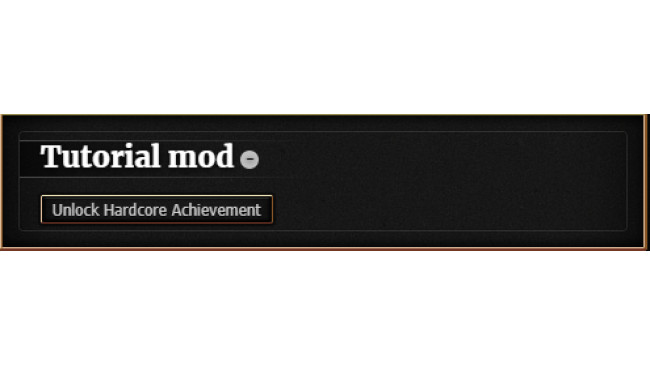
If you followed along the guide correctly then the end result should look like this:
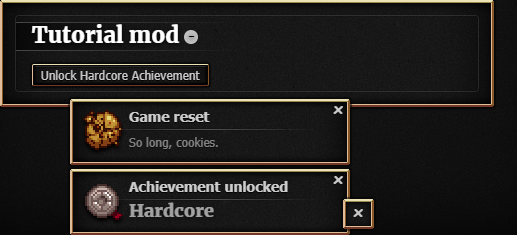
And if you click the button it should display this:
I hope you learned something new, and this guide helped you a bit with understanding how to mod this game.
Also, please hear me out. DO NOT upload this mod to the Workshop.
It doesn't deserve to be there. Add some more functionality before you even think about uploading it to there.
Please correct me in the comments, if I made any mistakes.
Source: https://steamcommunity.com/sharedfiles/filedetails/?id=2704879740
More Cookie Clicker guilds
- All Guilds
- Como Cerrar el juego y jugar algo de verdad
- Logros para empezar con buen pie
- HOW TO CLICK COOKIE!?!?!???
- Save 100%, todos as conquistas, upgrades e prestiges V2.052
- The Definitive console command guide
- (endgame)
- How to click a cookie(ultimate guide)
- All achievements 1 click
- how to play
- How To Click The Cookie