Changelog
Updated for v0.8.127
The Factory has been released!
A few tweaks to feats and equipment, notably nerfing SMGs Reaction +%
A proper step-by-step walkthrough for a combat focused Murder-Hobo, including a bonus section on how to side with Mercy with a Charisma 4 build!
Added Merchant inventory list at end of guide
Updated helmets to have correct stats
Updated and revised the combat and quest XP gains section
Updated skill checks and associated SP gains, most of which are now +20SP
(Soon) Some notes on game mechanics and some interesting quirks therein
(Todo) The Factory itself, the Factory is still being built so I'm going to hold most of the walkthrough there until it is finalized to avoid having to revise it multiple time
Updated for v0.8.103:
Added Quest and Combat character exp thanks to Pladio!
Added several new items from update, updated names of some items
Several new or modified loot locations requiring skills
Initial Version:
Attributes
Skill Checks
Quests
Equipment
First Playthrough Tips
Whenever you recruit a new follower make sure to Tag their skills as they start with zero tagged skills
Heroic feats can only be taken at character creation and require 10 in their respective attributes, you can only ever have 1 Heroic feat
Consumables, especially grenades, are incredibly effective, if expensive
The skill system is use by doing, using skills will give you skill experience points that will level up skills but do not impact character level
Character XP, as distinct from skill XP, is gained by completing quests and combat, and allows characters to level up granting access to more feats
Easy quests and combat award as much as XP as hard quests and combat, doing the easier stuff first is going to make your life easier, if something is too hard come back later
You can heal using Medkits in the Party Screen, or pay $ to Sarah in Medbay
Activate energy shields/gadgets before combat at the cost of 2AP, there is no impact on initiative
Yellow skill checks for Speech skills (Persuasion, Streetwise, Impersonate) allow for partial success and partial XP skill gain, leveling up a skill with a yellow skill check will count as a success. Yellow skill checks for non-Speech skills can not be passed but can be retried
Thermal vision counteracts the effects of smoke grenades, so if you have Thermal 45% on your goggles/helmet then firing at range into Smoke (low-grade) which normally would penalize you 50% THC will only penalize you 5% THC.
F5 quick-save, F9 quick-load
TAB to highlight interactable objects, can be toggled on/off in settings
The amount of armor on enemies varies body party to body part, if someone seems to tough to kill, 8+ armor, they likely have a different part of their body that is less heavily armored and is more susceptible to damage, used Aimed shots to target those body parts
Quick Links
The guide has gotten too big with the addition of the step-by-step walkthrough and Steam guides don't support intra-link so here are a few text tags to search for if you want to jump to that section.
New "Step-By-Step", how to complete Chapter 1 with more information than you will possibly need.
WALKTHROUGH_STEP_BY_STEP
Original "Walkthrough", a list of skill checks in Chapter 1 and a list of succinct quest walkthroughs
WALKTHROUGH_BAREBONES
Equipment Compendium
EQUIPMENT_COMPENDIUM
Character Attributes
Implants can boost all attributes except Constitution and Charisma by +1 allowing most stats to reach 11 with implants
Strength
ValueMelee Extra DamageArmor HandlingRecoil Control40-00050-12361-24671-26982-481292-51015103-51218114-71421
Melee Extra Damage applies additional damage to each melee attack
Armor Handling reduces all non-AP penalties from armor
Recoil control adds accuracy to burst and double shot attacks
Unlocks Armored Warfare feat with Strength 8 Reduces the AP penalty on each piece of equipment by 1, Armor Handling +5Unlocks Berserker feat with Strength 8 Attack AP cost -1, +1 Minimum Damage, Aimed attacks disabledUnlocks Heavy Hitter feat with Strength 8 Melee Stagger +15%, Critical Damage +15%, Knockdown attack accuracy +10Unlocks Controlled Burst feat with Strength 8 Bursts and double shot cost 1 AP less to useUnlocks Juggernaut feat with Strength 10 Natural DR +1, Melee Graze Damage +4, Knockdowns become stagger
Constitution
ValueHit PointsMax Implants 43015352640374548505955610607
Unlocks Bionic feat with Constitution<10Max implants +1Unlocks Healing Factor feat with Constitution 10Regeneration +2, Stats healed by 1 point / turn
Dexterity
ValueAction PointsEvasionInitiativeReaction 4 12 8 0 8 5 13 9 6 9 6 14 10 12 10 7 15 11 18 11 8 16 12 24 12 9 17 13 30 13 10 18 14 36 14 11 19 15 42 15
Evasion reduces enemy accuracy
Initiative determines turn order in combat and stealth
Reaction determines % chance of reacting with an attack to enemy movement or misses
Unlocks Artful Dodger feat with Dexterity 6 Evasion +10, Evasion +20 when HP < 7Unlocks Gladiator feat with Dexterity 8 Melee Reaction +20, Melee Graze +10, Melee Graze Damage +2Unlocks Gunfighter feat with Dexterity 8 Ranged Reaction +20, Ranged Graze +10Unlocks Fast Runner feat with Dexterity 10 Evasion +5, Movement does not prompt reaction attacks
Perception
ValueEvasionInitiativeReactionBase Accuracy 4 8 0 8 50 5 9 4 9 55 6 10 8 10 60 7 11 12 11 65 8 12 16 12 70 9 13 20 13 75 10 14 24 14 80 11 15 28 15 85
Unlocks Critical Thinker feat with Perception 6 For each Critical Strike skill level, Critical Chance +1%, Critical Damage +3%Unlocks Opportunist feat with Perception 8 Reaction +5, Reaction hits add Stagger (-4AP)Unlocks Precise Strike feat with Perception 8 Melee Aimed +10, Melee Critical Strike +5%, Melee Flurry Attack Accuracy +10Unlocks Sharpshooter feat with Perception 8 Ranged Aimed +10, Ranged Penetration +10Unlocks Dodge This feat with Perception 10 Aimed +10, Graze +10, Grazes do +3 Damage
Intelligence
ValueTagged SkillsExtra Character Experience 4 1 0 5 1 5 6 2 10 7 2 15 8 3 20 9 3 25 10 4 30 11 4 35
Tagged skills advance at double the rate of untagged skills
Character experience, as distinct from skills XP, advances character level
Unlocks Mastermind feat with Intelligence 10 Extra feat every 3 Levels starting at Level 2, +50% Skill Learning Rate
Charisma
ValueInitial DispositionMax Followers 4 -1 1 5 0 1 6 0 2 7 1 2 8 1 3 9 2 3 10 3 3
Initial disposition impacts all Speech challenges
Unlocks Sergeant feat with Charisma 7-8 Party members, exclusive of PC, Accuracy +5, Critical Chance +5%Unlocks Captain feat with Charisma 9, overwrites Sergeant feat Party members, exclusive of PC, Accuracy +10, Reaction +20, Critical Chance +5%Unlocks Cult Leader feat with Charisma 10 Party earns +20% extra experience, Followers gain +1 DR
Character Skills
Weapon Skills
Bladed
Blunt
Pistol
Shotgun
Rifle
SMG
Each level in a weapons skill adds +5 Accuracy with attacks with those weapons
Critical Strike
Each level adds +1% Critical Strike Chance and +10 Takedown Damage
Evasion
Each level adds +5 Evasion, Evasion reduces enemy hit chance
Armor
Each level adds +2 Armor Handling, each point of Armor Handling reduces the evasion, initiative, and reaction penalties for each piece of armor you wear.
Sneak
Every other level reduces Noise by -1 (activities during stealth, like movement or takedowns generate Noise that increases enemy alertness), Sneaking by +5 (your sneaking value determines what tiles are white/green/orange/red when sneaking)
Biotech
In addition to being used to extract implants, each level of Biotech increases the efficacy of Medkits by +5, Medkits heal for 5HP at Biotech 1
The below skills are used for skill checks and do not impact character stats or have passive effects
Computers
Electronics
Persuasion
Streetwise
Impersonate
Lockpick
Steal
All skills range from 1-10, in future updates combat skills will have specializations which will require leveling beyond 10.
The number of skill points to raise a given skill increases rapidly, while any character should be able to raise almost all skills to 3 during Chapter 1 it will become increasingly difficult to level skills beyond 3, and top levels will require skill tags in order to hit skill level 10 by the end of the game.
Skill Level SP Requirements
1: 0
2: 40
3: 80
4: 240
5: 440
6: 800
7: 1280
8: 2040
9: 3240
10: 5200
Murder-Hobo Walkthrough, Introduction
Navigation Tag : WALKTHROUGH_STEP_BY_STEP
One thing that was notably lacking from my first guide was an actual step-by-step walkthrough, so I made one! Incidentally the research required also gives us a handy-dandy guide on where to acquire almost all items, and a couple of round-about ways to achieve goals such as siding with Mercy as a Charisma 4 Murder-Hobo with no tagged speech skills, good times!
Mr. Smelly Murder-Hobo, a Walkthrough
This is a beginner focused guide that will show you a character archetype that you can use exactly or as a rough guide for a combat focused character that will do a minimum of speech checks (unless you want to side with Mercy at the end of the Pit, see bonus section on that) and will rely on Faythe as your skill-bot to handle things like Lockpicking, Computers, Electronics, and Sneaking. Evans or Jed will be your trusty combat companion, I prefer Evans but you’re free to use either one, or both if you are willing to invest in Charisma 6 for the extra squaddie.
This guide is not hyper-optimized for a perfect run
The guide aims to have a reasonably gentle difficulty curve, while there are optimizations that very experienced players could make in terms of picking up +Crit% weapons earlier or distributing EXP in a slightly different way this guide does not require many heroic feats of combat to get through. Feedback is of course always welcome! But we’re not going to try and convince you to go pick up the Long Arm of the Law (+10% crit, so good!) in Hydroponics first thing :) And yes I know we should probably always pick the Educated feat first for optimal long-term growth, but the earlier fights are easier without it and this guide is trying for reasonable difficulty.
A couple of explanatory notes so I can use abbreviations everywhere.
XP - Character XP, controls levels of your characters, has zero bearing on your skills but allows you new feats which are a hugely impactful part of your build. Mostly evenly divided among your teammates, though some quest XP rewards appear static awarding the same amount to each team member regardless of team size. For the purposes of this guide I have not tried to back calculate and standardize XP for every encounter, the XP values you’ll see will typically reflect a three person party split, except for very early on when you are solo for one encounter and then a duo with Evans for a bit before recruiting Faythe.
SP - Skill Points/Skill XP, technically there is a thing called Skill Points already which is what you use at character creation, but I’m ignoring that because SP is one character shorter and less confusing than SXP when talking about skill gains. SP helps you develop skills and has no bearing on character level.
Gaining SP in Talking - Broadly speaking failing a speech (Persuasion, Streetwise, Impersonate) check will still award you 10SP in the relevant skill, passing checks typically but does not always award more SPs. This is unique compared to other skills which do not award SP for failure. We’ll be picking up a few stray Streetwise SPs in the walkthrough since we need to reach Streetwise 2 in order to make Faythe into a Master Thief.
MHW, Character Creation And First Steps

Let’s get started, meet your Murder-Hobo!
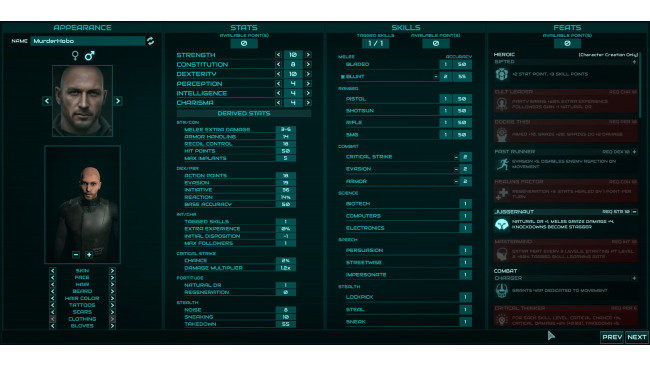
We’re optimizing for melee combat potential here with maxed Strength, Dexterity, and high Constitution. 10 Strength allows us to pick the Juggernaut Heroic Feat which makes us tankier, hit harder, and become immune to knockdown which makes fights with Frogs much, much easier. We’re going to tag our primary weapons skill, Blunt, and put our 4 free Skill Points into Blunt, Critical Strike, Evasion, and Armor.
Crit Strike and Evasion are examples of skills where you need to keep the skill leveled in order to be able to keep earning SPs, unlike Armor which will level up more when your Evasion fails. Evasion SP is awarded for evading, so if you don’t level it early you’ll follow behind the curve of your enemies accuracy and eventually never dodge. The plus side is that your Armor will increase nicely, but since one of the main strengths of the Armor skill is decreasing Evasion penalties we should aim to keep both high.
Alternatives: If you want to run Blades you don’t need to tweak anything else. If you want to go ranged you’ll want to shift your Strength into Perception to unlock the Dodge This heroic feat and make you eligible for the better ranged feats later. If you want to run a talker then wait for the talker guide, this build and sequence of events are not good for a talker, same goes for optimized combat/talker true hybrids who will need a very different distributions of stats and skills to succeed.
Over-Optimizer Note
If you want to side with Mercy at the end of the Pit you’ll need to put one point into Streetwise and one point into Persuasion as well as follow a hilariously complicated route to earn enough talking skills fast enough to persuade Mercy. See the bonus section at the bottom of the guide for how to do so.
Early Goals Overview
Gain some valuable combat XP, level Streetwise to 2 to unlock Faythe’s Thief Trait, and acquire the Squad Leader implant early (+1 party size) allowing us to have both Faythe and either Jed or Evans on the team as early as possible. Doing so will put Faythe on the cusp of Level 4 in time for the Factory, Mr. Hobo and Evans will be mostly through Level 3 by the time the Pit ends.
Starting Out
You start with $1,000 , a basic ranged (pick SMG for bonus +reaction %) and melee weapon (utility bar for a Blunt focused character), some exceedingly insufficient armor, 8x Medkits and some ammo for your ranged weapon.
Your neighbor outside your apartment will offer to train you in Lockpicking (+40SP, which will level you from 1->2) for $200. This is a reasonable deal considering all the great stuff behind locked doors but we’re going to skip it for now because NPC companion Faythe will be our master thief.
MHW, The Quest For The Holy Grail
The Holy Grail
First head to Whiskey Jack’s Tavern and talk to Tanner. Receive the Damaged Energy Pistol, Keycard A2 (quest item for the Armory), and access to the location, Armory. Don’t go to the Armory yet! It’s a dangerous place and we’ll go there later.
Tanner will suggest you speak to Evans at Abe’s General Store if you’d like some backup, sounds like a great idea! Head to the store, talk to Evans, and agree to back him up in the upcoming fight.
We don’t have any speech skills tagged, but we’re still going to try the speech checks because we can pick up partial SP for failure and we need to get to Streetwise 2 quickly.
Talk to the hostile goons, try the Streetwise 2(+40SP for success, +10SP for failing) option, and fail it, to gain +10 Streetwise SP, we’re now at 10/40SP to get to Streetwise 2. Then murder them because combat SP is great!
If you’re having difficulty with the fight you can search the Northeast section of town for a store labeled “General Store”, it’s next to the Courthouse. It sells a Warhammer for $800 which will still be a primary weapon by the end of The Pit and is a good investment. Builds focused on other weapons can find similarly relevant deals at the various shops.
Enemy Combatants:
Gun Thug: Camp Knife, Gatling Gun, Protective Vest, Protective Sleeve
Gun Thug #2: Plugger, Utility Bar, Smart Glasses, Worker Jacket
Difficulty: Easy, even with an initiative penalty from talking you should still go first initiative-wise
Tactical Notes: Focus fire one enemy at a time, this should be a fairly easy fight with your combat focused build.
Gain +90XP and then +60XP for resolving Abe’s problems.
But don’t talk to Abe yet! One of the quirks of speech skills is that if you gain enough SP while failing a check to level up the relevant skill you will be considered to have passed the check! So we’re going to wait until we’re at 30/40 Streetwise SP to come back and chat with Abe.
Evans will join your party if you like, this is generally a good thing unless you’re running solo for the challenge.
REMEMBER TO TAG HIS SKILLS ASAP
People generally build him with Rifles or Pistols, and Crit Strike but feel free to experiment! On this run I built him into a crit-striking-second-winding sniper and he generally performed well.
Head outside to talk to Braxton, who wants you to help him take over the Pit. You can choose to join him or not, you can change sides later, this starts the Crossroads quest. You should ask for some $$$ with Streetwise 3, you’ll fail but you’ll get +10 Streetwise SP putting us at 20/40.
Head to Medbay and speak with Sarah. Sarah sells Medkits, stims, implants, and can heal your party up in exchange for $. She will also train you once in Biotech for free, giving you +40 Biotech SP, leveling up Biotech to 2 which makes Medkits a bit more effective and will let you handle all Biotech checks before the end of the Pit.
Sarah will also give you a quest, Little Shop of Horrors, which will give you access to more implants as well as a small reward depending on how you resolve the quest. This quest is how we gain the very important Squad Leader implant (which will let us recruit an extra NPC companion), but we’re not ready to tackle it yet.
Head next door to The Church of the Elect and talk to Solomon. He will give you the quest Lamb Among Wolves, to free a captured deacon of the church, he will mark the location The Drain in Camptown on your map.
Just Northeast of the Church is a Lockpick 2(+20SP) door, once we get Faythe we’ll come back and open it to begin our Stealing streak across The Pit thanks to our new best friend Jia (who certainly is not a con-woman and will not makes our lives harder later, no sir).
If you haven’t yet feel free to buy an upgraded Gear Mace or Warhammer from merchants in the Pit, the Warhammer while pricey at $800 is the only two-handed blunt weapon you’ll find in the Pit, you’ll be able to pick up lots of other weapons and armor as we go but the Warhammer will stay with you all through Chapter 1.
Heal up if needed (using the Party screen and your initial Medkits) since we’re about to pick a fight.
Directly in front of your apartment is a locked gate and two loiterers. Head on in, and fail your Streetwise 2(+40SP pass/+10SP fail) check, we’d rather have the combat xp anyway! This puts us nicely at 30/40 skill points to Streetwise 2 which is what we need.
Kill the two jerks and receive +45XP (assuming you have Evans, receive +90XP if solo)
Enemy Combatants:
Spike: Suicide Special, 9x 9mm, Camp Knife, Protective Vest
Bulldozer: Truncheon, Worker Jacket
Difficulty: Easy
Tactical Notes: With a combat focused build, a good weapon, and Evans this fight should be quite easy. Bulldozer is the more dangerous of the two so focus him down despite his tankier nature.
Head on back to Abe’s and pass the Streetwise 2 check (+10 SP for failing, but this puts us to skill level 2 which means we pass!) for an extra $50 on top of the 25 rounds of 9mm and 5.56 he supplies you with, and perhaps a small sense of shame for extorting good old Abe who loves you like he loves his children.
MHW, For Faythe And Justice!
We could use some money, XP and combat SP before recruiting Faythe so let’s head to the Courthouse and beat up some poor guilty man. The Courthouse is in the Camp Town section of the map and functions like an arena. This area is entirely optional but since we’re combat focused we’ll be completing every fight here in Chapter 1. Talk to the Chief Justice and agree to prosecute one John Doe.
Enemy Combatants:
John Doe: Camp Knife, Bulldog, 6x 9MM, Protective Vest, Worker Jacket
Difficulty: Easy, just rush him and kill him.
Tactical Notes: He’s just one man.
+45 XP for defeating John Doe at the Courthouse, congratulations Assistant Prosecutor Murder-Hobo, Esquire.
A Matter of Faythe
Time for us to help out Faythe, heads over to Earl’s Jobs.
The first job Earl gives you is to play bodyguard for a con artist named Chance. Find Chance in front of Boone’s Moonshine and accompany him to the meeting. There are two ways this encounter can go down, the hard way and the easy way. Unlike most of the choices we’re going to make later on we’ll actually stick with the easy path right now.
Talk to Chance, follow him to the meet, and then tell the scary Grangers that you can help them find their parts. This will unlock the Chapter 2 Quest Deep Diving. Return to Earl for no reward, since your client was kidnapped, but opening up our route to acquire Faythe.
Overly-Optimized Note
If you really want to you can fight the Grangers, they have some nice gear, but you’ll be locking yourself out of Deep Diving and it is basically impossible at this point, you’ll need to go grind a bunch of combat encounters and better gear elsewhere to have a chance. So don’t do this if you’re following this guide.
Enemy Combatants:
Gideon: 10x 9mm, Toothpick, Howler, Common Respirator, Protective Vest, Granger Coat, Worker Boots
Melee Granger: Machete, Bowler Helmet, Half Mask, Protective Vest, Worker Jacket, Worker Boots, Protective Sleeves
Shotgun Granger: 10x Shells, Toothpick, Gatling Gun, Bucket Helmet, Common Respirator, Protective Vest, Traveler Coat
Allied Combatants:
Chase: x6 9mm, Toothpick, Rounder, Protective Vest, Bucket Helmet, Scav Jacket, Worker Boots
If you do kill the Grangers you receive +45XP (for a two person party), and if Chance survives Earl rewards you with +$250 and an additional +60XP
Talk to Faythe and she and Earl will lay out the plan. Gain +60XP for your trouble which should level you up to character level 2! Give yourself and Evan new feats.
Overly-Optimized Note
The Educated feat is quite good and is definitely the better long term play since you’ll be earning more XP for most of the game as well as having a second tagged combat skill, but it makes the early game much harder, so for guide purposes we’re going to stick with basic combat boosters.
I chose the Warrior feat for my murder-hobo since it juices your Evasion and accuracy which are weak for me right now. Evans got Rifleman since his accuracy is still pretty mediocre, he’ll eventually pick up Second Wind and Fast Draw and a crit strike boosting feat later.
Remember that Streetwise 2 we oh so carefully cultivated? Now it’s time to cash in!
Head with Faythe to the meeting site and try to talk your problems out despite the fact that you are a murderous lump of hobo meat who would normally charge into combat, doing so will allow you to unlock the Thief or Assassin feats for Faythe.
Work through the dialogue tree starting with the Streetwise 2 option and avoid killing Lazarus Foley early as tempting as it is. Faythe will kill stealth Foley and then you can pick up a few extra SP in Streetwise/Persuasion talking to the remaining thugs, or you can attack early to snag an initiative bonus against the thugs. Do not under any circumstance give them $1000, that’s your money not theirs. Your party will likely have enough initiative anyway so I generally pick up the extra skill points, +10SP per speech prompt even if the skill check fails.
If you're running a talker character then solving your problems peacefully will award an extra +20 bonus SP to all speech skills.
Beat the remaining goons for +45 XP and some loot!
Enemy Combatants:
(Deceased) Lazarus Foley: Toothpick, Howler, Diver Helmet, Smart Glasses, Ballistic Vest, Traveler Coat, Flashbang (low-grade), Raider Boots, Scav Armguards
SMG Henchman #1: Toothpick, Flyapart, Battle Bowler Helmet, Ballistic Vest, Scrapper Coat, Raider Boots, Shield Armguards
Melee Henchman #2: Truncheon, Bucket Helmet, Smart Glasses, Common Respirator, Reinforced Ballistic Vest, Gunslinger Jacket, Worker Boots, Protective Sleeves
Pistol Henchman #3: 6x 9mm Ammo, Camp Knife, Rounder, Protective Vest, Worker Boots, Shield Armguards
Difficulty: Medium if you save the Stasis grenade for later, Easy if you use it
Tactical Notes: Faythe has an expensive and rare Stasis Grenade ($750), you can use it at the start of the fight to lock down the two goons on the right hand side to make the fight a cake walk or, if you’re feeling lucky, you can save it for more interesting fights later. Faythe is squishy and basically unarmored so don’t feel bad if you need to use the Stasis Grenade to make the fight easier and keep her alive. Evans can pick up the dead Mr. Foley's Howler at the start of the fight o replace his Bolter, it's a huge upgrade.
Faythe will automatically talk to you after the fight, and assuming you let her kill Foley you’ll be able to unlock one of two feats for Faythe, Assassin or Thief. If you tell her you shouldn’t have made her do that and there are better ways to handle men like Foley she’ll become a thief. If you reinforce to her how murdering people is the right solution for all problems she’ll become and assassin. While murdering people is in fact the correct solution to all problems, that’s your job, not Faythe’s.
Thief Feat: -1 Noise Generation, +1 to Lockpick, Sneak, Steal skills
Assassin Feat: Bladed +10 THC, +5% Critical, Penetration +10, Takedown +15
I run her as a Thief since the Sneak, Lockpick and Steak buffs are immediately useful. If you’re going to have her focus on combat than Assassin is obviously the right choice, though I think the Noise decrease on Thief makes her a better takedown artist overall.
If you’re not running a low Charisma character feel free to add Faythe to your party right now, if you are running a low Charisma character like me we’ll need to do a little more murdering to make room in our party.
Near Warehouse E4 (where you just killed a bunch of people) you’ll see a Lockpick 2(+20SP) door, we’ll leave that alone for now but we’ll be back with Faythe in the party!
MHW, Come In Squad Leader
Acquiring the Squad Leader Implant (from people who don’t deserve it)
Return to Earl for $600 and +60XP assuming you kept Faythe alive, which was the whole point of taking the job, if you didn’t, scroll back up and read that section again.
My build only has room for one NPC compansion currently thanks to Charisma 4, we’re going to go complete the Little Shop of Horrors quest to gain the Squad Leader Implant, but be warned it’s a tough fight!
Before we murder some more people we should upgrade our armor with gear from the Foley fight and make an investment in a grenade a Smoke Grenades ($150, available at Cole’s Gadgets and other fine retailers) specifically will seriously hamper ranged opponents while making life just a bit trickier for your melee monster, the upcoming fight is a great time to use one.
Head to The Drain, and walk up to the guard guarding the cargo container, step inside and then
use the Biotech knowledge picked up from Sarah to pass the Biotech 2 check and gain +20 Biotech SP. Then pick a fight with a bunch of bad men by refusing to back down for any reason during the dialog.
Alternatively, if you don’t need the Squad Leader implant you can choose to take a basic implant and walk away, but don’t you deserve something nice for yourself?
This is your toughest fight yet so don’t be surprised if you need a reload or two or consumables. Grenades like Smoke, Flashbang, and Gas are hugely useful here as the enemy combatants have low stats and minimal resistances. If you truly need to you can temporarily swap companions to Faythe to grab her Stasis grenade from inventory before swapping back to Evans.
When you win your fight you’ll earn +45XP and some delicious loot, as well as picking up a Mummified Head (Squad Leader).
Enemy Combatants:
Manfred: 5x 9mm Ammo, Machete, Howler, Maintenance HUD, Reinforced Ballistic Vest, Scrapper Coat, Raider Boots, Shield Armguards
Scav #1: Machete, Protective Vest
Scav #2: Camp Knife, Boomstick, Protective Vest, Protective Sleeves
Guard : Tommy Gun, Camp Knife, Bowler Helmet, Protective Vest, Worker Jacket, Worker Boots
Jimmy: 9mm Ammo, Springer, Camp Knife, Protective Vest
Difficulty: Hard at this point in the game, grenades make it doable.
Tactical Notes: Manfred is the main offensive threat but also has the toughest body armor and high HP, the Guard’s SMG is also dangerous to you right now given your limited armor, try using grenades to blind or poison your enemies.
Let’s head back to Sarah at Medbay to turn in our quest, don't forget to ask for a reward!
If you chose not to fight and just took a basic implant (because you are a coward) you’ll receive: 3x Medkits, 1x Regen Stim, +60XP
If you returned the Squad Leader implant to Sarah (like a hero) you’ll receive: 5x Medkits, 3x Regen Stims, and +60XP
Wait, we’re returning the implant? We’re not keeping it? Sadly no, your monkey-brained goon lacks the requisite intelligence and training to extract an ancient implant from a mummified head so Sarah is going to do it for us, and then charge us $900 if we want it back :(
You probably don’t have that much money right now, but we do have some slightly used protective equipment and weapons that we don’t need. Obviously keep the best stuff for yourself, and remember Faythe is joining us soon, but sell off everything else at 10% of value to merchants to get to $900. I ended up at $901, I spent a good chunk of the game with $1 to my name. If you’re a bit shy on cash you can sell your damaged energy pistol for $100, we’ll pick up another one later at the Courthouse and you likely won’t need two given how scarce energy cells are.
After buying the implant, use the machine in the Medbay to install it, then return to Whiskey Jacks to pick up Faythe. Welcome to the team skill-bot Faythe!
With her high Intelligence and Educated feat Faythe has 4 skills to tag! Since I’m running a combat monkey I use her as our skill-bot, tagging Computers, Sneak, Lockpick, Electronics. You can also build her into a reasonable ranged combatant but her poor Strength and general squishiness usually precludes a melee based path for her if you’re running a more balanced party with some skills on your PC.
Use the party panel to swap all your specialist skills over to Faythe so she can start training up into a master thief. Your murder hobo will be the only one currently qualified for Biotech, but everything else can go to Faythe.
MHW, And There's Jed Too, I Guess
Enter, Jed
There’s one more potential ally to find in the Pit, his name is Jed and he sure loves shotguns. We won’t have room for everyone in our party at once with only Charisma 4 and the Squad Leader implant but there’s a decent quest attached to Jed so we might as well go grab him now. He’s a significantly stronger combatant than Faythe with solid starting equipment so feel free to sub him in for a fight or two if you need the extra firepower.
Head over to Whiskey Jack’s bar and talk to the bartender. He’ll ask you to find Jed Walker and collect his debt during the quest Debt Collector. Head to Boone’s Moonshine in Camptown. Boone can point you towards Jed, living in an apartment near the Drain, and also give you the quest Moonshine to retrieve some algae from Hydroponics, we’ll head there later.
Jed’s apartment is near the drain across from the container we went into for Little Shop of Horrors. Head on in and let’s talk to ol’ Jed.
You have a few options here.
Kill him, this the quick and easy route but even for combat monsters it’s not the most efficient. If you do kill him you receive +30XP(three person party now that Faythe is with us) and his gear. But if you leave him alive you can get into a better fight and then take his gear later, win/win! Also if you kill him you won’t get a reward from Whisky Jack since Jed is broke and has no credits to pay. But if you do kill him head back to Whisky Jack for no reward and +60XP, you monster.
Enemy Combatants:
Jed: 18x Shells, Double Trouble, Utility Bar, Assault Armor, Scrapper Coat, 1x Regen Stim, 1x Aggro Stim, Heavy Boots, Shield Armguards
Difficulty: Easy
Tactical Notes: He's just one man without a helmet, barring a series of lucky crits on his side you'll be fine
Talk to him with Reputation:Combat or Persuasion 2 (+20 SP) and you can make a peaceful approach. If you can’t pass the initial checks you can still salvage your discussion with Streetwise 2(+20 SP) which you should have by now. Gain +30XP for resolving things peacefully. He’ll then ask you to join him in talking down Black Will, sounds like fun!
Talk to Jed again when you’re ready for a fight and you’ll head to the confrontation with Black Will.
You can try and con Black Will into giving up his cash without a fight by impersonating an officer of the local law, in this case a member of the Regulators. This option is only available if you haven’t completed Crossroads by killing Braxton, which you likely have not by now.
Impersonate 2(+20SP)->Persuasion 3(+10SP)->Impersonate 3(+10SP).
Completing the quest this way awards +30 XP, and an additional +20SP to all of your speech skills, Streetwise, Persuasion, and Impersonate. Note that the Regulator Badge you can steal from Regulator HQ doesn’t seem to do anything here.
Or you can embrace your inner murder-hobo and charge in killing everyone inside!
Fun fact, Black Will does not wear a helmet, do with that information what you will. He does have the Tough Bastard feat though which caps your crits against him at 5%.
You receive +30XP for killing Black Will and his crew.
Enemy Combatants:
Black Will: x4 9mm Ammo, Machete, Piper Jack, Fancy Ballistic Vest, Traveler Coat, Heavy Boots, Shield Armguards
Melee Thug: Truncheon, Bucket Helmet, Smart Glasses, Assault Armor, Raider Boots, Raider Armguards
Rifle Thug: 7x 5.56 , Toothpick, Bolter, Maintenance HUD, Protective Vest, Traveler Coat
Difficulty: Easy with Jed backing you up
Tactical Notes: Just make sure not to let Faythe get squished by the melee bruiser. I suggest headshots on Black Will, the rifleman in the back is fairly ineffective with his Bolter.
After killing Black Will and his gang you can either:
Honorably receive $1200 from Jed, which you will then (mostly) pay back to Whiskey Jack. Return to Whiskey Jack for a net reward of $250 and 2x Regen stims, 1x Aggro Stim and +60XP.
Or you can kill Jed and keep all the money, but lose Jed as a companion, +30XP for killing him in combat. You will automatically gain the $1200 and can loot Jed. Return to Whiskey Jack for +60XP and keep all the hard earned lucre.
If you don’t have room for Jed in your squad (and he is alive) you can recruit him, “borrow” all of his equipment, and he’ll happily wait for you back at Whiskey Jack’s, it's a hard life in a colony ship.
Jed’s comes in at level 3 so you won’t be adding new feats to him any time soon. Just be sure to tag his skills, I suggest Shotgun and Critical Strike or Evasion ASAP.
MHW, Faythe The Master Thief
Training Up Your New Master Thief Faythe
Return to the Church and head Northeast to the Lockpick 2 (+20SP) door, Faythe should have the skills to open it, and meet your new friend Jia who is an honest and straightforward person with a business proposition for you, the quest called Pick a Pocket Or Two.
Jia will teach you the art of the Steal for free, training your PC in Steal for +40SP raising you to Steal skill 2. I keep Faythe as my designated thief for future-proofing purposes, some skill checks combine Sneak and Steal, but you can also use your PC to do all the Stealing we’re about to do.
We’re going to need Steal 3 to complete Jia’s quest so lets do some training/robbing people.
Hit the following locations in order to raise Steal to 3.
Abe’s Shop - Steal 2 (+20SP), 12 .45 ammo
Armor Trader - Steal 2 (+20SP), Maintenance Hud
Gunsmith - Steal 2 (+20SP), 12 9mm
General Store (next to Courthouse) - Steal 2 (+20SP), 20 shotgun shells
Completing these heists will level you up to Steal 3 enabling us to hit our next targets. You can also stop by Regulator HQ and with a Sneak 3 Faythe go and steal a Regulator badge, it only awards +15 Sneak SP and no Steal SP, but it seems thematic, and we’ll need that badge later.
Hit & Kill Store (next to Earl’s) - Steal 3 (+20SP), Gas Grenade (low-grade) , Flashbang (low-grade)
Medbay - Steal 3 (+20SP) 2x Medkits , 1x Regen Stim, 1x Aggro Stim
And finally we can hit our mark Samson who hangs out at Engine Fuel Bar in Camptown.
Samson (Engine Fuel Bar) - Steal 3(+20SP), Smart Key, 20SP
Return to Jia with Samson’s Smart key. Follow her to the locker.
Surprise! A turret is waiting for you. It is immobile, so very easy to hit and fires in bursts so put your most armored chap up front, it will shred lightly armored peeps like Faythe.
Enemy Combatants:
Turret: 50x 9mm
Difficulty: Easy
Tactical Notes: No targeted shots, just bash/shoot until dead, you just need to survive the opening burst.
Once the turret is defeated, +30XP and you can deal with Jia.
You can push her for extra credits and no XP, or let her keep her half of the credits and receive some XP, there may also be some quests later down that line with her, currently unknown, I chose to split the money in case Jia turns out to be useful later.
$240 credits + 60XP, Jia sticks around in her home and will train you in Steal
Or
$480, Jia disappears
Don’t forget to loot the turret for 9mm ammo and the nearby container for some great armor!
The container in the locker has: The Grinder, Heavy Ballistic Vest, Ballistic Helmet
Faythe should level up to 2 here, so let’s talk about feats for her.
I chose to build Faythe as a stealth specialist so her first feat was Prowler, to be followed by Ghost at level 3, this allows her to cleanly complete all of the stealth sequences in Chapter 1. While not optimal from a min/max perspective, as total SPs are better from combat than assassinating people from stealth, I find the sequences fun so I built Faythe to complete them. Reasonable alternatives include Tough Bastard so she doesn’t need as much baby-sitting during combat or a ranged feat to turn her into an adequate marksman.
Conveniently we are now near the previously locked Lockpick 2 (+20SP) container from the Faythe fight, let’s have Faythe crack that door open!
Oops. Looks like there’s a Lockpick 4 box inside, we’ll come back later. One day box, one day….
MHW, Cleaning Up The Outskirts And Courthouse
If you walk back towards town from the turret you’ll pass by an open doorway, might as well see what’s inside! Turns out it is some bad people from the Factory beating up on poor Hank.
You can try and resolve things peacefully with Impersonate 2 (+10SP pass or fail), then Streetwise 2 (+10SP pass or fail) , then Streetwise 3 (+10SP pass or fail). Successfully doing so will award an additional +20 SP to Streetwise, Persuasion, and Impersonate as well as +30 XP. If you’re not playing a pure talker you may be better off killing them and taking their stuff. If you want to collect the SP for talking skills you’ll take an initiative penalty, up to you.
If you kill them you receive +30XP and some loot!
Enemy Combatants:
Pistol Thug: Pepperbox, Camp Knife, Bowler Helmet, Ballistic Vest, Worker Boots
Shotgun Thug: 4x Shells, Utility Bar, Street Sweeper, Worker Jacket, Raider Boots
Difficulty: Medium, potentially high initial burst damage
Tactical Notes: The pistol user has very high initiative and can potentially kill a lightly armored character on the first turn so tuck Faythe into the nearby cover.
Talk to Hank who is cowering in the corner. He will offer you the 2nd part of the quest for Mysterious Stranger, and ask you to take out a group of thugs. No peaceful solutions here I’m afraid, we can kick in the door, or sneak in and start assassinating. We’re actually going to come back and do this a bit later once Faythe has some more sneaky skills because it’s fun to do stealth sequences!
Look to the Northeast of the thug’s camp where Hank is standing, there’s a Lockpick 3 (+20SP) door! Head inside then use the computer on the wall to pass a Computer 2 (+20SP), and extend the bridge. Open the door to find a Computer 4 check that we can't pass yet. We’ll come back later once Faythe has become a master hacker.
Return to your apartment and have Faythe open the Lockpick 2 (+20SP) container nearby for:
Piper Jack, 10x 9mm, Worker Boots, Flashbang (low-grade). It’s not much but every penny helps.
There is also a Lockpick 2 (+20SP) container just south of Old Earth Emporium : 8x Medkits, 25x Shells, 25x .45
Your neighbor outside your apartment will offer training to your team-mates for $200 but the extra +40SP in Lockpick is not currently needed for Faythe to unlock everything in Chapter 1.
At this point you’ve got decent gear, a few character levels and a small party to work with so there are plenty of directions to go, feel free to go off and explore the Armory or Hydroponics if you wish. You can also start the final quest of The Pit, The Crossroads if you like but I’m choosing to clear out a few more optional fights first for the combat SP and gear.
Dispensing Justice for Fun and Profit
Return to the Courthouse to continue your career as an Assistant Prosecutor.
Courthouse Fight Two - The Three Dalton Brothers
These guys shouldn’t be much of a problem for you at this point as weak and ill-equipped as they are, +30XP for dispensing justice.
Enemy Combatants:
Frank Dalton: Camp Knife, Worker Jacket, Worker Boots
William Dalton: Camp Knife, Bowler Helmet, Worker Boots
Emmet Dalton: Truncheon, Protective Vest, Heavy Boots
Difficulty: Medium
Tactical Notes: Set up behind the barricades on your side so they waste a turn running to you, they're lightly armored so you should be able to burst down one per turn.
Courthouse Fight Three - Hard Ben
Pronounce your sentence on Hard Ben and receive +30XP.
Enemy Combatants:
Hard Ben: 10x Shells, Truncheon, Street Sweeper, Maintenance HUD, Ballistic Vest, Energy Shield Mk1, Worker Boots, Protective Sleeves
Difficulty: Easy
Tactical Notes: Ben is a tougher nut to crack but he’s not the brightest man. It’s pretty easy to goad him into spending his Action Points running into cover on the left hand side by running up to him in the first round.
The Energy Shield gadget is a real prize, put it on someone and watch them not die as much! This equipment occupies the Gadget slot and when activated at the start of or during combat it provides energy shield based HP for the wearing character. The shield will regenerate a few points every round and will run indefinitely unless it is “cracked”, if the shield reaches 0 hp it will stay off for the rest of combat. Important note, you can’t use melee attacks while the shield is engaged, so either put it on a ranged attacker like Evan or be prepared to turn it off when you are within melee range
We’ll take a quick break from the Courthouse since the next fights can be quite tough for under-geared parties.
We’re going to head to the Armory soon, but before we do we need to pick up a few things.
Go to the Outer Gate at the far SW of The Pit and use the terminal to ride the elevator up. Look to the southwest for a control room. Faythe can pass an Electronics 2 (+20SP) check to open the door, then Lockpick 2(+20SP) to open the locker. The two lockers have three electronic modules, we’ll need them in the Armory.
Head to the Power Station and talk to Zeke inside. Faythe can pass an Electronics 2 (+20SP) check here and you’ll receive the quest Clean Air Act, you need to retrieve a filter from Hydroponics.
While you’re here check out the back door of the Power Station for a Lockpick 3 (+20SP) or Computers 2 (+20SP) check to open, and some free electronics modules from the broken terminal Electronics 1 (+10SP) and basic armor, Work Goggles and Protective Sleeves.
Now that we’ve got a bit of gear we’ll head to the Armory to check things out there. Spoiler alert, lots of murdering.
MHW, Armory Part 1
From the entrance head south a bit and examine the large crate, the control booth won’t operate for you until you do, then head north to the small control booth.
In the control booth use an Electronics module and two checks, Electronics 2 (+20 SP) and Computers 2 (+20 SP) to move the large crate. Extract the Dexterity implant from the body behind the crate, Biotech 2 (+40 SP). Free implants are the best implants! If you want to you can head back to Medbay and use the implant machine to install it before continuing into the Armory.
Head over to the cracked open door and prepare to meet the most terrifying foe in Chapter 1, frogs, big frogs. These nasty little demons want to bite your legs off and then chomp on your face so good leg armor and helmets are essential. Luckily they’re squishy and unarmored so bursts and shotguns can clear them out quickly. Some frogs, Spitters, spit poison at range so make sure you have Toxic Resistance via face masks on everyone, you need 6 Toxic Resistant to negate the Spitter’s poison entirely, unfortunately the Biolab Gas Mask with this quality is deep into Hydroponics.
The first encounter with frogs can be stealthed past or fought. I chose straight combat for the combat SP and the loot on the nearby corpse.
Stealth: No loot. +30 XP, +35 Sneak SP.
Combat: +30 XP and loot from corpse
Enemy Combatants:
Bullfrog 1, Bullfrog 2, Spitter. No loot on them, they’re frogs.
Nearby Corpse Loot: 1x Regen Stim, 6x .45, 3 Medkits
Difficulty: Easy with some Toxic Resistant and good boots. A juggernaut PC is particularly well-suited to dealing with Frogs since he can’t be knocked down.
Tactical Notes: Frogs are fast and hit hard but are squishy. Position yourself towards the back and let them come to you. They’re not tacticians so they’ll generally attack whatever tank you put in front.
Head into the next room. Dead-ahead is an Electronics 2 (+20 SP) door. With a Lockpick 2 (+20 SP) chest.
Chest: Utility Bar, Safety Helmet, Rope
The next room has an Electronics 1 (+10 SP) broken panel to strip for an electronics module and a chest with 10x 5.56.
Crawl through the vent to pick up 2x Regen Stims from the chest, then head back to the previous room. There’s a nasty fight with some scary frogs continuing down that path but we’ll do it much later.
The next encounter has stealth and combat options, no diplomacy. There is also an alternate route involving using an empty elevator shaft in the southeast of the Armory to bypass this encounter but we’re not going to do that because it would deprive us of loot.
Your entire party can stealth past the scavs to the elevator even without extra points in Stealth as long as you take off your heavy armor, but that would give up precious combat XP!
Stealth: +30 XP, 40 Stealth SP, no loot, no joy in murder-hoboing some hapless scavs.
Instead lets enter in stealth, get into a good position, then murder the scavs! The default combat position is at the door, which is not the best for melee peeps, so we can use a few turns to sneak closer to them and then start combat when we’re ready to rush them.
For killing your enemies you receive: +30 XP, and loot.
Enemy Combatants:
Pistol Scavenger: 3x 9mm, Camp Knife, Bulldog, Bowler Helmet, Ballistic Vest, Worker Boots, Shield Armguards
Rifle Scavenger: 5x .45, Camp Knife, Old Betsy, Reinforced Ballistic Vest, Worker Boots, Raider Armguards
Difficulty: Easy
Tactical Notes: Use stealth to sneak a bit closer to them so you waste fewer AP getting into range with them.
Head down the elevator. There is a crate that can be opened with Juggernaut or 3 party members. Inside is a Power Cell MK2 for upgrading gadgets, as well as 5 Power Cells.
We can use the Power Cell MK2 to upgrade one of your gadgets.
Upgrading Gadget Components
Find whoever you put your Energy Shield gadget on and click the little gear icon on it. Doing so will enable you to swap out the power cell raising the shield’s initial HP from 15 to 25. You can also use this power cell later in other gadgets like the Distortion Shield or Cloaking Device to extend their duration from two turns to three. Parts are always swappable so don’t worry about adding in things as soon as you get them, you can pull them out later assuming you don’t sell the Power Cell MK1 that came out.
There is yet another barely cracked open door just beyond, get ready to deal with Sharpface.
There are three available paths for dealing with Sharp Face, talking, stealthing, and the correct choice of murdering.
If you want to sneak past then you’re probably out of luck because Faythe won’t do this particular job for you as your PC is unwilling to hand over the key to the Armory to someone he met a few hours ago. If you do have the skills, your goal is to reach the vault door beyond Sharpface and watch the fireworks, there is a Lockpick 4(+20SP) door on the right hand side that makes this possible. Sneaking past Sharpface and crew is worth +60 Sneak SP
If you want to talk your way past you’re going to need a combination of Streetwise and Persuasion in the 3 to 4 range with decent Charisma, see the dialog tree in the quest breakdown section if you need help navigating the large dialog tree.
You can also talk to Sharpface with the intent of scaring off some of his friends by brandishing your Reputation:Combat which should be high enough by now. Doing so will remove two opponents from the fight, but that would mean two fewer bodies to loot and sources of combat SP to harvest, so we’ll skip straight ahead to the killing people apart.
Enemy Combatants:
Melee Raider: Gear Mace, Bucket Helmet, Smart Glasses, Reinforced Ballistic Vest, Worker Jacket, Raider Boots, Shield Armguards
Back Rifle Raider: 10x .45, Toothpick, Old Betsy, Face Mask, Reinforced Ballistic Vest, Raider Armguards
Sharp Face: Toothpick, Howler, Protective Vest, Scrapper Coat
SMG Raider: Utility Bar, Flyapart, Maintenance HUD, Protective Vest, Traveler Coat, Shield Armguards
Pistol Raider, 6x 9mm, Toothpick, Bulldog, Battle Bowler Helmet, Face Mask, Reinforced Ballistic Vest, Traveler Coat, Raider Boots, Shield Armguards
Difficulty: Hard with the full complement of enemies, you start off surrounded and they have solid equipment for this point in the game. Medium if you use your combat reputation to scare off two of them.
Tactical Notes: If you’re having difficulty then a smoke or flashbang here can make a huge difference against the mostly ranged attackers. See that chevron over Sharpface? He has the sergeant feat which buffs his allies, he also doesn’t wear a helmet, you know what to do!
Once Sharpface's crew is neutralized, via combat, sneak, or speech, you receive +30XP and whole bunch of loot from the corpses!
If you didn’t stealth through there is a Lockpick 4 (+20SP) door to the side where the melee enemy started that is now useless except as a source of Lockpick XP.
MHW, Armory Part 2
Electronics 2 (+20SP) to open another side door on the left hand side. There is a chest in the area beyond.
Chest: Heavy Boots, Scavenger Goggles
To the left of the Armory door is a broken panel, Electronics 1 (+10SP) and an electronic module.
Time to open ze vault!
Use the control panel in front of the giant vault doors to unveil your prize and head up to the panel in front of the reactor to update your very first quest, The Holy Grail.
After that, head southeast and open the Lockpick 3 (+20 SP) door. Extract the Strength implant from the corpse Biotech 2 (+40SP), which should put you at Biotech 3 if the same person has done both implant extractions). Biotech 3 increases Medkit effectiveness and may be used in the future for other extractions.
Examine the crate in the room for an override module, Zeke at the Power Plant could use this during Power to the People.
Use the computer, well let Faythe use the computer, to pass a Computer 2 (+20SP) check to gain your choice of one of four training tokens! Your choice here. My combat skills were already coming along nicely so I chose the infiltration token for Faythe to start juicing her stealth skills.
Head back to the fusion reactor and check out the locked crate to the northwest. Open it with a Lockpick 3(+20SP) check and open up the Armory Reactor Crate.
Armory Reactor Crate: 2x Stasis Grenade, 1x Pulse Grenade
The Stasis Grenades can win most fights on their own but are hilariously expensive at $750. The Pulse Grenade has a huge AOE that knocks out all gadgets in the area, and I’m assuming will damage robots/turrets in the future but doesn't appear to currently.
There’s a Computer 4 check managing a forcefield, we’ll be back for that one.
Head into the storage area to the southwest. The unlocked large container contains an Energy Vest, this is a unique armor that provides a 40HP shield at the start of combat, but it also takes up your gadget slot, has high Armor penalties, and has weak damage resistance once the shield is down. I mostly used this if Faythe was getting one shot in difficult fights since it gives you a chance to run her away from the fight.
There is a Lockpick 5 large container that has an energy rifle, we’ll be back for that. An orange crate has a wonderful Tactical Vest. A Lockpick 3(+20SP) crate has a Pulse Capacity MK2 for the Energy Shield gadget which raises the shield regeneration rate from 3 to 4 points per turn.
Armory Equipment Locker #1: Energy Vest
Locked Armory Equipment Locker #2: Energy Rifle
Armory Equipment Crate: Tactical Vest
Armory Small Crate: Pulse Capacitor MK2
Examine the crates with sufficient Perception (>=8) to find 10 energy cells, party members can help here so having Evans along will guarantee success, but Faythe will not.
MHW, Hitting Level 3! Feats Are Great!
Exciting News Everyone! We’re about to hit Level 3
Head back to the Pit and talk to Tanner, for +60XP and orders to travel to the Habitat through the Factory to learn more about the machine in the Armory. Don’t do that yet! It’s expensive and you’ll miss oodles of stuff left in Chapter 1.
We’re so close to character level 3 so lets do a quest or two to put us over the top before we tackle Hydroponics.
Head to the Power Plant, and turn in the override module to complete Power to the People for +60XP which should put you at Level 3. Then try to help Zeke with his technical problems, fail the Computer 2 or Electronics 3 checks, and let Faythe do it for +40 Electronics SP. Persuasion 3(+10SP) will let you wring some cash out of him +$300.
You should now be level 3 on your PC and Evans with Faythe not far behind, enjoy your new feats!
Mr. Murder-Hobo should continue down his hitting things with a heavy stick path and pick up something like Basher to help counter-act his poor Perception. Evans can pick up Fast Draw to increase your tactical options by having a super high initiative in later fights, or Critical Thinker to try for more Second Wind fueled murder chains. Once Faythe hits level 3 I would add Ghost for a stealth specialist to complement her Prowler feat from before. If running her as a combatant then pick up the appropriate feat, you can buy and install the Bionic Eye implant for +1 Perception for her if your preferred feats are Perception based.
MHW, Hydroponics Part 1
We’re about to head to Hydroponics but we’re going to do one unethical thing first. Kick Faythe out of the party, don’t worry we’ll be back for her shortly. We just don’t want her to be privy to the conversation we’re about to have with Carlos at the top of Camp Reid in Hydroponics.
Head to Hydroponics, and walk east to the first tower, go inside and talk to Carlos. He’ll update you on what you need to do to complete Moonshine, retrieve some bioreactor parts from a broken tower, and offers you the quest Eviction Notice to deal with some nearby scavs in Delta Tower. If Faythe is with you she’ll ask you not to harm any of the scavs in Delta, she will also open up a peaceful resolution if she is in the party. If you don’t want to have to break any promises to Faythe then leave her behind when talking to Carlos, and again when clearing out Delta Tower via violence.
Head back to Whiskey Jack’s, pick up Faythe again, and head back to Camp Reid. Go down the platform elevator and look left for a Sneak 3(+30SP) check to burgle the living quarters, your reward is 2x Regen Stims and 3x Medkits. There does not appear to be an option to murder the sleeping botanists, which is good because they likely have no loot and would not provide any combat SP thus making their death pointless.
Travel down to the bottom of the tower and to the right to encounter foliage, beyond which are frogs.
Sneak past for +30XP and +70 Sneak SP or, fight them for +30XP and no loot.
While I would normally fight everything that moves this is one of the few optional stealth sequences that is a straight trade-off between Sneak SP and combat SP and Sneak is harder to get right now so I tiptoed past them with just Faythe. If you choose to fight here’s what you’re dealing with.
Enemy Combatants:
2x Bullfrogs, 1x Spitter
Difficulty: Easy at this point for you, but quite hard for people who go straight to Hydroponics early.
Tactical Notes: Same as Armory frogs, Toxic Resistance Masks and burn them down quickly with bursts.
Move along the path, let Faythe work her magic with the terminal to pass a Computer 2(+20SP) check, or shove it aside with high STR which awards no SP.
To the southwest is a difficult combat encounter with many frogs, we’ll come back later, but feel free to try it out if you’re feeling over-confident.
Move along the path and pop into the cracked open door to the east to pick up the air purifier parts for Clean Air Act from the tower, Electronics 1 (20SP). Come back out and check out the greenhouse unit. With sufficient Perception you will notice a frog about to bite you, otherwise the frog will just come out and bite you. It’s one frog, you can take it. Inside is a pack of x15 Shells once the frog is gone. +30XP for defeating the mighty lone frog.
Enemy Combatants:
1x Bullfrog
Difficulty: Easy, arguably the easiest fight in the game
Tactical Notes: Don't let it bite your face
Along the path there is an inviting alcove on the right hand side, it contains an entirely optional combat encounter with an extremely annoying creature called the Creeper. This fight is optional, and hard, and can be completed whenever you like so if you find it too challenging just come back later.
Defeating the Creeper is worth +30XP and some loot on the dead body behind him.
Enemy Combatants:
The Creeper
Difficulty: Hard
Tactical Notes: It generates its own poison gas/smokescreen cloud for two turns at the start of combat, can grab and reel in your characters, and will leech 10HP with its melee attack. You also can’t target its legs despite it having so many legs or its head despite clearly having a fleshy knob thing. The key in this fight is to quickly burst it down with high initiative in the first round or wade into melee, counteracting the poison cloud with thermal vision and toxic resistance.
Dead Body: Biolab Gas Mask, Scav Armguards, Scavenger Goggles, Scav Armor
Continue past the inviting alcove and walk through the foliage to the northwest.
MHW, Hydroponics Part 2
Climb up the ladder to pick up a free Rusty Doomsayer, one of the finer shotguns on offer right now. Enter the tower, check the corpse for a Pepperbox and 2x Smoke (low-grade) grenades.
Examine the elevator, have Faythe fix it with Electronics 2(+20SP), this is a one way trip but that’s okay, you can always climb up later with Jed and a rope or a Strength >= 7 PC. At the top level of the tower are two corpses. One is being eaten by a plant, but the other one of the corpses contains an exceedingly useful Maintenance Training Token for Lockpick, Electronics, and Computer skills, super useful!
Head down one level, strip the broken panel with Electronics 1(+10SP) for an electronics module.
To get across to the decrepit tower containing the Bioreactor Parts we either need to summon a greenhouse unit with Computers 3(+20SP) or leap across the gap with Dex >= 7. The Computer check gives us SP so let’s do that.
Cross to the other tower, head up one level if you took the Computer route. Pick up the rope from the crate in the southwest of the top floor, and the Bioreactor Parts for Moonshine from the defunct bioreactor.
Head down the shaft using the rope to return to ground level.
Time to turn in some quests!
Talk to Carlos at Camp Reid to turn in the Bioreactor Parts for +60 XP, there is an optional Persuasion 3 (+20SP) check at the end to get him to agree to try and work with the Keepers in the Factory. He also gives you a Biolab Gas Mask and the Algae shipment for Boone for the quest Moonshine.
Return to Boone at Boone’s Moonshine in Camptown and turn in the algae for +60XP and either $1k or a Combat Training Token for Crit Strike, Evasion, and Armor. Money is tight but I still took the token, taking the money is reasonable if you’re short, though you should have accumulated a bunch of gear to offload to merchants by now.
Head over to the Old Earth Emporium in Camptown to cash in your accumulated training tokens.
Use the Maintenance token on Faythe/your skill-bot and the Combat Training Token if you have it on your best fighter, 80SP per skill category for the tokens. Don’t forget to use the extra training token from the Armory console as well.
Return to Zeke with the Air Purifier to complete Clean Air Act for +60XP and a request to find a Forcefield Emitter, which does not currently trigger a quest but likely will once future content drops.
With the boost from the Maintenance Training Token Faythe should be at Computers 4, and Lockpick 5, which means we can do some more scavenging!
MHW, Scavenging And More Justice!
Hit the following targets with your new skills.
Armory:
Lockpick 5 (+20SP) locker in the storage room on Level 2, contains the Energy Rifle and 10x Energy Cells.
Terminal to the left of the fusion reactor, Computers 4(+20SP) to drop the forcefield and retrieve the Cloaking Field gadget which is a phenomenal piece of gear. The Cloaking Field will turn the user invisible for 2 turns (3 with an upgraded power cell) during combat or stealth sequences. It makes a great emergency button during combat since enemies won’t target invisible party members, and allows for double-takedown stealth kills in Sneak sequences.
The Pit Outskirts:
Lockpick 4 (+20SP) container near warehouse E4 we found so many moons ago: Bulldog II
Computer 4 (+20SP) forcefield to the far north of the outskirts where we extended a bridge long ago: Scavenger Goggles, Half Mask, Scav Helmet, Explorer Coat.
Note the AP malus on the Explorer Coat, it’s great armor but heavy as heck, this penalty can be counteracted with the Armored Warfare perk.
Clearing the Courthouse
We’ve got a few optional combats to finish up before we start on the final quest of Chapter 1, Crossroads. Let’s head to the Courthouse to finish dispensing justice!
Courthouse Fight Four
+30 XP for completing and loot
Enemy Combatants:
Sharpshooter: 5x .45, Camp Knife, Old Betsy, Work Goggles, Protective Vest, Heavy Boots
Basher: Truncheon, Bucket Helmet, Maintenance HUD, Face Mask, Ballistic Vest, Traveler Coat, Raider Boots, Shield Armguards
Grinder: Camp Knife, The Grinder, Bowler Helmet, Scanner, Face Mask, Scav Armor, Worker Boots, Raider Armguards
Difficulty: Medium, the enemy is well armed and armored but so are you by now.
Tactical Notes: Everyone here hits hard and the Sharpshooter starts well positioned behind some crates. If running a double ranged plus one melee party I generally set up far back behind the crates in your deploy zone to force the Basher to run towards me. Popping a smoke in the middle of the arena can weaken the offensive output of the Shartpshoot and Grinder but they have some Thermal Vision on their equipment so they’ll still hit you. Burn down the Basher and then pick apart the shooters once he is down.
Courthouse Fight Five
+30 XP and amazing loot
Enemy Combatants:
Clayton: Machete, Perception implant, Damaged Energy Pistol, Pepperbox Mk2, Bucket Helmet, Maintenance HUD, Common Respirator, Scav Armor, Distortion Field, Scavenger Boots, Scav Armguards
Melee Goon: Chopper, Bucket Helmet, Work Goggles, Face Mask, Heavy Ballistic Vest, Scrapper Coat, Heavy Boots, Protective Sleeves
Sniper Goon: Camp Knife, M16, Battle Bowler Helmet, Scav Armor, Gunslinger Jacket, Heavy Boots, Shield Armguards
Difficulty: Hard, your enemy is skilled and has great equipment
Tactical Notes: Courthouse Fight Five is tough no doubt about it, but there are a few quirks that make it solvable. Solomon Clayton has two shots with his energy pistol, after which he has a short range pistol he will need to run across the map to use. Leverage this by popping an early Smoke Grenade and position back behind the barricades to make him waste his shots and force the melee goon to run towards you. The second quirk is that the enemy sniper will almost always want to throw a flashbang on his first turn at your ranged units, even if your snipers have run away from the fight, this will cause the enemy sniper to give chase and stand out in the middle of the arena.
After completing Courthouse Fight Five you will be approached by Harbinger who will offer you a quest, The Outcast, to kill rogue mutant Knurled Top in Mission Control (Chapter 2). If Jed is with you he will add some commentary to the job and warn you not to kill his friend Knurl.
MHW, Some Assorted Killings
Now that Faythe has some stealth feats and a Sneak of 3, and a cloaking field to boot, we can do some triple dipping in the quest Lamb Among Wolves. Head over to the Drain in Camptown and look for a closed door to the northwest.
First we’re going to talk to McNeil, then sneak into his house, then kill him, getting precious SP for each phase.
First, talk to him, as you are a reasonable and rational murder-hobo. You’ll fail the check, choose to walk away, but we’ll be back.
Streetwise 2 (+10SP) -> Streetwise 4(+10SP) or Persuasion 3(+10SP)
If, for some reason, you have been upping your speech skills and you succeed you’ll receive an extra +20 SP in Streetwise, Persuasion, and Impersonate, as well as freeing the deacon for +30XP.
Next we’re going to sneak into his house, look for an open window next to the door, send only Faythe. Make your way over to the locked door Lockpick 2(+20SP) open it and talk to the Deacon to earn +20 Sneak SP. If you want to end things peacefully, escort Faythe and the deacon to the marked location near the windows and exit. If you do so you’ll earn +50 Sneak SP and +30 XP for freeing the deacon.
But we’re here to triple dip into this quest so once you’ve freed the Deacon smack that “Enter Combat” button, the deacon will jump out the window and your goon squad will bust in to beat some heads. Earn +30 XP once combat is over.
Enemy Combatants:
(Sgt) McNeil: Camp Knife, Howler, Work Goggles, Ballistic Vest, Traveler Coat, Scavenger Boots
SMG Diver: Camp Knife, Flyapart, Maintenance HUD, Protective Vest, Traveler Coat, Heavy Boots
Melee Diver: Utility Bar, Common Respirator, Protective Vest, Worker Jacket, Worker Boots
Difficulty: Easy
Tactical Notes: These guys don't believe in helmets and have mediocre equipment for this point in the game.
Return to the Church and turn in the quest for +60XP. We’ve already found Hank, our Mysterious Stranger referred to by the next Church quest, so let’s go help him out.
Back to the Outskirts of the Pit to where Hank is still patiently waiting. You can kick down the door for a straight combat experience, or you can sneak up a ladder in the back if you want Faythe to pick up a little Sneak/Critical Strike SP. Going strictly by the numbers you’re usually better off fighting in combat if you want to level Critical Strike since takedowns only award 10SP and 10 Sneak SP, but I like doing the stealth sequences so let’s at least start with that.
Send Faythe in via stealth for a free +15 Sneak SP just for entering. A stealth oriented Fatyhe with a dagger in hand should have no trouble taking down the lone sentry in the backroom. There is a Lockpick 2 (+20SP) door to open leading out to the front room. Using stealth feats, cloaking device and a knife you can clear the whole building with Faythe, you can also leave one alive and trigger combat if you want your other party members to get in on the fun.
If you want to kill everyone from Sneak you’ll need to use the Cloaking Field to get a double takedown on the thugs standing next to each other. With the field on you are invisible, even if you takedown someone in otherwise plain view, so you can takedown a thug, end your turn, then take down the next thug so long as your invisibility is still on, it’s great! And will probably be nerfed at some point.
+30 XP for killing the gang. There is a Lockpick 3 (+20SP) weapons crate with an Old Betsy on the counter.
Enemy Combatants:
Shotgun Thug: Utility Bar, Gatling Gun, Face Mask, Protective Vest, Worker Boots, Protective Sleeves
Rifle Thug: Camp Knife, Howler, Bucket Helmet, Scavenger Goggles, Ballistic Vest, Traveler Coat, Heavy Boots
Melee Thug : Gear Mace, Battle Bowler Helmet, Common Respirator, Protective Vest, Worker Jacket, Worker Boots, Protective Sleeves
SMG Thug: Camp Knife, The Grinder, Scav Helmet, Scanner, Common Respirator, Reinforced Ballistic Vest, Raider Boots, Raider Armguards
Difficulty: Medium for a straight up fight, Easy if you’ve whittled down their numbers with Sneak takedowns
Tactical Notes: Sneak is obviously the major variable here, anyone you kill in stealth can’t shoot back. If you want a straight up fight then prioritize the two goons on the left, the goon in the backroom will need one turn to get to you.
Return to Hank to complete Mysterious Stranger for +60XP and a Disruptor MK2, for use in your Distortion Field, it further reduces enemy accuracy when hit in melee and damages them a bit more.
Return to the Church for a bit of Church reputation, no further reward for your good deeds.
Now we’re going to go indulge in some froggy genocide because those guys are jerks, and incidentally have some loot for the taking.
MHW, All Frogs Must Die
Armory Frogs
Head back to Level 1 of the Armory, pass through the air vent where you looted a crate earlier on and approach the foreboding door to pick a fight.
Enemy Combatants:
Psyker Frog: Frog Brain
Bullfrog: Nothing
Bullfrog #2: Disruptor Grenade
Spitter: Nothing
Difficulty: Hard, the Psyker frog is a very effective debuffer
Tactical Notes: This fight features a Psyker frog, little threat on its own but it will debuff your AP for 3 turns which may let the little ones chomp you up. Good boots, high accuracy, and distortion shields help a lot in this fight. If frogs knock you down they stop chomping on your boots and start in on your face so make sure to wear a helmet. Toxic resistance against the Spitter remains important.
+30XP for killing the frogs, as well as a Disruptor grenade from one of them as unlikely as it may seem. There is also a human corpse nearby with some loot.
Human Corpse: Smoke Grenade (low-grade), Flashbang (low-grade) 5 Medkits
In the back is a Lockpick 3 (+20SP) trunk with: 4x Regen Stims, 3x Aggro Stims
Colony Ship doesn’t tend to give you vendor trash items, that Frog Brain is actually part of a hidden quest, let’s head over to Hydroponics to turn it in and to tackle the 2nd more difficult frog fight.
Head to Hydroponics Camp Reid, 2nd Floor and speak to Maryam. Turn in the frog brain for a Neural Booster Shot (+10% Neural Resist, foreshadowing!) a quest Head Hunter to get more brains in Chapter 2, and a Steal 3 (+10SP) opportunity for Faythe to grab a Power Cell MK2 for your gadgets. Maryam will also now offer to train you or a party member (+40SP) in Computers for $200.
Head down to the bottom of Camp Reid, then through the bushes to the east as if you were heading to the Bioreactor Tower but then head south to the large cage containing many frogs, time to do some exterminating!
Enemy Combatants:
3x Bullfrog
2x Spitter
Psyker Fog: Frog Brain
Difficulty: Hard
Tactical Notes: A slightly harder version of the Armory fight, there is an extra Spitter and the ranged frogs are a bit further away.
+30XP for slaying the frogs as well as access to a corpse with a phenomenal rifle.
Human Corpse : Long Arm of the Law, .45 Ammo, Distortion Field
Over-optimizing note
Long Arm of the Law has +10% crit chance, to super optimize we would pick this up earlier to increase our Critical Strike SP gains in combat, but it’s a very hard fight early on.
We’ve got one more task to clear out before we start in on the Crossroads, dealing with the Scavs in Delta Tower Hydroponics.
There’s a peaceful solution involving Faythe, let’s walk through that before we get to the actual murder-intensive solution we’ll implement.
The peaceful way
To peacefully solve your problem, bring Faythe to the Delta Tower and let her talk to Morgan.
Persuasion 3 (+10SP) -> Streetwise 3 (+10SP) or Persuasion 4 (+10SP)
When that tactic fails you can Impersonate 3 (+10 SP) using your stolen Regulator badge, which leads to Streetwise 4(+10SP) or Persuasion 3(+10SP)
Solving the problem this way awards +30XP, keeps Faythe happy and also awards a bonus +40 SP to Persuasion, Streetwise and Impersonate. Thanks to the huge Disposition boost from using Faythe even a Charisma 4 PC can succeed here as long as he has Streetwise 3. This route also leaves Morgan alive, which may have repercussions in the future. If you talk your way through don’t forget to open the now unimportant door locked with Electronics 3(+20SP). Then head back to Camp Reid to turn in Eviction Notice for +60XP and 5x Energy Cells.
You can also “peacefully” solve the problem without Faythe with a high combat reputation, but you don’t get the bonus speech SPs at the end so probably better to use Faythe assuming you can pass the Streetwise 3 task.
The sneaky/fighty way
There is also a stealth option and combat option to discuss, if you’re going to try these routes make sure to leave Faythe back at base, bring Jed, he seems helpful.
You can kick in the front door if you want, but your position will be suboptimal. A better notion is to sneak in the back even if you have zero Sneak proficiency on your kill team.
If you want to skip combat you’ll need to pass an Electronics 3 (+20 SP) to open the door, then turn off the machine, everyone dies, +70XP and all the loot you can carry.
Otherwise, position yourself in the side corridor for combat and let them funnel in one by one to die.
Enemy Combatants:
3x Bullfrogs
Melee Scavenger : Truncheon, Scav Helmet, Maintenance HUD, Common Respirator, Scav Armor, Welding Boots, Scav Armguards
Morgan: Toothpick, The Grinder, Scav Armor, Scrapper Coat, Heavy Boots
SMG Scav: Toothpick, Old Stanley, Scav Helmet, Scavenger Goggles, Face Mask, Scav Armor, Scav Jacket, Scavenger Boots
Shotgun Scav: Shells, Toothpick, Street Sweeper, Safety Helmet, Common Respirator, Ballistic Vest, Scrapper Coat, Heavy Boots, Shield Armguards
Difficulty: Hard for a frontal assault, Medium if using clever positioning from stealth
Tactical Notes: A frontal assault does set you up next to Morgan for a quick kill on him to remove the Sarge feat he is buffing his team with, but it’s still a harder fight surrounded by frogs.
+30 XP once everyone is dead regardless of the cause.
If you did kill everyone then go ahead and drop Jed back off at home, grab Faythe and bring her back to Hydroponics Delta tower to open the Electronics 3 (+20SP) door. Then head back to Camp Reid to turn in the quest Eviction Notice for +60XP and 5x Energy Cells. Don’t worry if Faythe is with you at this point, she’ll pretend not to hear you just murdered everyone.
We’ve done a lot of work to get this far but every single frog in Chapter 1 is now dead, great job! With our important froggy genocide done we can finally move onto the conclusion of Chapter 1, Crossroads.
MHW, And So We Come To The Crossroads
There are two primary routes through this quest along with a hidden-ish choice near the end. Your primary decision is to side with Jonas, the Pimp, or Braxton the militant ex-Church lawman. The decision is up to you and will have significant long-term repercussions.
Either way you’re going to go talk to Jonas at the Promised Land. While you’re there you can choose to side with Jonas or Braxton. Here’s a quick overview of what those choices lead to.
Jonas: Steal some disruptions cores to turn into grenades (sneak, combat, talking), persuade or kill Mercy (talking, stealth, combat), assault Regulators HQ (combat) or defend the outer gate (Electronics + Computers)
Braxton: Kill off one of Jonas’ lieutenants (talking, stealth, sneak), persuade or kill Mercy (talking, stealth, combat), assault Promised land (combat) or defend the inner gates (talk or combat + Electronics for turret assistance)
We’re going to take a look at siding with Jonas first before looking at Braxton’s quest-line.
MHW, Crossroads Jonas Part 1 - Ace Up Your Sleeve
Crossroads (Jonas)
Talk to Jonas, Streetwise 3(+40SP) to extract $300 from him. +60XP for completing the first part of Crossroads, next is Ace Up Your Sleeve. Jonas is going to need an edge to take down the Regulator militia and he has correctly deduced that extremely powerful grenades can be that edge.
Head to Cole’s Gadgets, Cole will direct you to Isaiah Davis who lives next to the Engine Fuel Bar.
There are a surprising number of possible iterations to dealing with Isaiah, and at this point they should all be quite easy so do what your heart tells you to do. Assuming of course that your heart tells you to gain some free Streetwise or Sneak SPs before murdering him in cold blood as we suggest here.
If you want some Sneak SP then send Faythe into the backroom via a vent, open the chest with Lockpick 2(+20 SP) plus a bonus +20 Sneak SP for retrieving the cores from a lockbox.
At this point you can walk back out the vent for +30 Sneak SP.
You can also takedown Isaiah for +10 Critical Strike SP, +10 Sneak SP and then either leave via the vents for +20 Sneak SP, or smash the “Enter Combat” button to pick a fight with the two goons hanging out around his door.
You can also initiate combat immediately after stealing the cores from the back room, trading the Crit Strike and Sneak SP against more combat SPs from fighting Isaiah.
Taking the stealth route will preclude you from talking to Isiaih or picking a fight if you leave via the vents.
Alternatively you can try talking to him .With Critical Strike 3(+20SP) you can open your conversation with a dagger to the heart, killing him this way allows you to walk into the backroom to grab the cores but you don’t receive Sneak or Lockpick SP this way. You can also talk to Isiash using Streetwise 2(+10SP) then Streetwise 3(+10SP) to get that SP, say you’ll return with the money instead of paying him, and then do the Critical Strike or combat path afterward. You can also just pay him his $50 for the cores, which will give you an immense sense of self-satisfaction at helping a down-on-his-luck man as well as a bonus of +20 SP to Streetwise, Persuasion and Impersonate. You can not sneak in to steal the cores after talking to Isiah since he will then have the cores on his person.
Enemy Combatants:
Isiah: Shells, Utility Bar, Boomstick, Ballistic Vest, Worker Jacket
Melee Thug : Toothpick, Bowler Helmet, Protective Vest, Worker Jacket
Pistol Thug: 9mm, Camp Knife, Suicide Special, Ballistic Vest, Protective Sleeves
Difficulty: Easy
Tactical Notes: They’re a bunch of underfed ill-equipped idiots, like you were back to level 1, does level 1 scare you now? No? Good.
Regardless of your choices here, acquiring the cores is worth +30 XP, head back to Cole’s to turn in the cores, receive 1x Disruption Grenade, then return to Jonas to turn in Ace Up Your Sleeve for +60XP. Next up, Lord’s Mercy.
MHW, Crossroads Jonas Part 2 - Lord's Mercy
Lord’s Mercy
Lord’s Mercy plays out in a very similar way for both the Jonas and Braxton paths. On the Jonas path if you fail to persuade Mercy initially Jonas will arrange for you to be able to bypass the gate guard on your return. On the Braxton path if you fail to persuade Mercy Braxton will send three of his Regulators with you to take Mercy out, and also allow you to Critical Strike 4(+40 SP) the gate guard.
Over-Optimized Note
Several hours of research have yielded a technique for Charisma 4 no-speech-skills-tagged murder-hobos to resolve things peacefully see the special section later on siding with Mercy as a murder-hobo!
Lord’s Mercy (Jonas)
Head to Mercy’s Fort in Camptown. The guard will let you in to discuss terms with Mercy, this is your one chance for a peaceful resolution so get ready to screw that up.
You can pickup some free speech SP here, but you’re not going to be able to persuade her to peace with Jonas unless you have Persuasion 3 and Streetwise 4 going into the conversation. If you do have that, and you want the option to side with Mercy at the end of The Crossroads, you’ll want to take the following talking route:
“Whose side” -> Streetwise 2(+10SP) -> Streetwise 3(+10SP) -> Persuasion 3(+10SP)
I know it doesn’t have a Streetwise 4 check there, but you seem to get the extra tiny bit of Disposition needed by passing the Streetwise checks with a higher than needed skill.
Solving this quest diplomatically will award the standard +30XP as well as +40 bonus SP points in Streetwise, Persuasion, and Impersonate.
Assuming you fail your attempt at diplomacy you can choose to kill everyone where they stand or tactically retreat to come back and kill everyone later.
Enemy Combatants:
(Sgt) Mercy: Johnny Reb, Spitfire, Enforcer Armor, Scav Jacket, Distortion Field, Enforcer Leg Armor, Shield Armguards
Balcony Sniper: x10 .45, Old Betsy, Bowler Helmet, Maintenance HUD, Reinforced Ballistic Vest, Scrapper Coat, Raider Boots, Shield Armguards
Melee Mercy’s Guard: Toothpick, Bucket Helmet, Ballistic Vest, Traveler Coat, Shield Armguards
Pistol Guard: x12 9mm, Bulldog, Scav Helmet, Smart Glasses, Scav Armor, Gunslinger Jacket, Worker Boots, Shield Armguards
Shotgun Guard: x10 shells, Gatling Gun, Bowler Helmet, Maintenance HUD, Ballistic Vest, Worker Jacket, Worker Boots, Protective Sleeves
Entranceway Guard: x10 9mm, Howler, Bucket Helmet, Smart Glasses, Reinforced Ballistic Vest, Scrapper Coat, Raider Boots, Shield Armguards
And, if you decide to pick a fight with Mercy while her guards are standing there you also need to deal with:
Rifle Regulator Guard: .45, Camp Knife, Old Betsy, Scav Helmet, Ballistic Vest, Traveler Coat, Heavy Boots, Shield Armguards
Rifle Regulator Guard #2: 9mm, Camp Knife, Plugger, Bucket Helmet, Smart Glasses, Protective Vest, Traveler Coat, Heavy Boots, Shield Armguards, Heavy Boots
On the Jonas path Mercy's Gate Guard will not fight you under any circumstance, but he will fight during the Braxton variant of the same mission
Mercy Gate Guard: 9mm, Howler, Battle Bowler Helmet, Protective Vest, Traveler Coat, Worker Boots, Shield Armguards
Difficulty: Very Hard if you start a fight after failing the conversation checks, you’re surrounded by enemies with significant firepower. Hard if you tactically retreat and then come back, you will not start off surrounded. Difficulty scales down rapidly if you manage some stealth takedowns before starting the fight.
Tactical Notes:
Mercy is rocking heavy armor and a Distortion Field along with a potent SMG, your melee combatants are better off trying to take down her henchmen until her shield wears off in two turns. Try to target weak points in enemy armor, this will vary enemy to enemy. Otherwise this is just another tough fight that you will likely need some consumables to pass through, smoke highly advised given the volume of shots coming at you early on if you choose the surrounded start.
Once everyone is dead loot the Lockpick 4(+20SP) locker for some goods:
Mercy’s Fort Locker: x30 9mm, x20 .45, x20 5.56, 2x Regen Stim, 1x Aggro Stim, 1x Flashbang (low-grade)
If you kill everyone gain +30 XP then return to Jonas to report your success to complete Lord’s Mercy for +60XP.
If you choose to retreat you’ll need to return to Jonas, report your failure, then return to Mercy’s fortress. Talk to the gate guard, this will remove him from the upcoming combat (he is a combatant in Braxton’s version of the fight) and allow you to pass.
“Stealthing” Mercy’s Fort (Jonas or Braxton)
You can of course choose to immediately leave stealth and enter combat upon entering the fortress and this isn’t a terrible idea, you won’t start out surrounded and you’ll be able to use your long-range rifles to pick off enemies as they emerge from the fort. If so refer to the above section on killing everyone.
If you enjoy these stealth sequences and have a stealth optimized Faythe or PC then we have a few options on how to proceed.
Working through the exact routes to success is left as an exercise to the reader but I will add some helpful information to get you started.
Assuming you have any stealth feats on Faythe (and you take off any armor with Sneak penalties) taking down the outermost lone guard should be trivial. It is also quite easy to simply walk past the guard duo in the entrance hall and takedown the solo melee guard in the main room. There is a lone sniper on the balcony that can be reached by stronger (Strength >= 6) characters by climbing the pipe, but we can also deal with him by opening the Lockpick 2(+20SP) door and sneaking up behind him.
Depending on how invested in Sneak, relevant feats, and Critical Strike you are you may or may not be able to takedown Mercy from stealth. Making noise from walking around and assassinating people will slowly raise her awareness level, which will increase the required takedown damage. If you can’t, no big deal you’ve already taken out half her goons without firing a shot, simply reposition your forces and engage in a much much easier fight.
If you can takedown Mercy you’re left with just the guard duo in the entrance hall to deal with, the Cloaking Device may be helpful here.
You’ll receive a variable amount of bonus Sneak SP depending on how many guards are left alive when you finish the stealth sequence. If you kill only Mercy (which is really really hard and should be worth an achievement) then leave you’ll receive +70 Sneak SP. For each guard you stealth kill you’ll receive -10 Sneak SP from the bonus at the end, but you also get +10 Sneak SP from taking them down so that’s a wash, and takedown also award +10 Critical Strike SP as well as delicious loot. Clearly we should kill everyone and take their stuff if we want to be the best murder-hobos we can be.
Regardless, remember to open the supply locker detailed above and grab the goods before leaving the fort.
Return to Jonas and let him know Mercy has been dealt with, wrapping up Lord’s Mercy for +60XP.
MHW, Crossroads Jonas Part 3 - Defend The Gates
Crossroads Finale (Jonas)
After resolving the Mercy issue Jonas will have one final choice of tasks for you to accomplish. If you’re not much of a fighter you’ll be tasked to Defend the Gates which can be solved with talking, Electronics + Computer, or an easier fight than the alternative. If you are a stone-cold murder-hobo you’re going to be roped into All-In, taking down Braxton inside his Regulator’s fortress.
Defend The Gates (Jonas)
If you lack the necessary murderyness for one of the toughest fights of Chapter 1 you’ll be defending the upper gates of the outskirts to prevent Regulator reinforcements from interfering in the main assault.
If you’d prefer to defeat your enemies before they even get their foot in the door then head down to the control room just south of the gate. Assuming Faythe can pass an Electronics 3(+20SP) and Computer 3 (+20SP) check, and you have at least two electronics modules on you, you will resolve the situation with no fighting or talking. +60XP for fixing the gate electronics, +90XP for activating the decontamination protocol. You can choose to intentionally fail the Computer 3 check if you’d prefer to fight the Regulators, you still keep the Electronics SP and bonus XP for fixing the gate.
If you’d like to talk your way through you’ll need talk skills at about skill level 5, doing so will enable you to turn the reinforcements around. If your talking skills fail, but you’ve got a high combat reputation you may still be able to pass the check by threatening them +60XP for your diplomacy skills /intimidation.
You can also try diplomacy or tech-wizardry, fail, and get into a good old-fashioned fight with the Regulator reinforcements from a solid tactical position. +30 XP for murdering them in honorable combat.
Regardless of your tactical choices, return to Jonas for another +60XP and congratulations on helping him secure The Pit.
Enemy Combatants:
(Sgt.) Martinez: 10x 9mm, Camp Knife, Howler, Scav Helmet, Work Goggles, Heavy Ballistic Vest, Scrapper Coat, Heavy Boots
Shotgun Regulator: Shells, Double Trouble, Diver Helmet, Smart Glasses, Ballistic Vest, Traveler Coat, Heavy Boots, Shield Armguards
Melee Regulator: Combat Knife, Diver Helmet, Work Goggles, Fancy Ballistic Vest, Scav Jacket, Raider Boots, Raider Armguards
Rifle Regulator: 14x .45, Camp Knife, Old Betsy, Scav Helmet, Smart Glasses, Common Respirator, Ballistic Vest, Gunslinger Jacket, Heavy Boots
Difficulty: Medium, well-equipped enemies but they need to charge into your meat-grinder.
Tactical Notes: Martinez is the primary threat here, he has the Sergeant feat as well as superior skills. This should be an easy fight for a combat-focused party given that you are given an easy to defend choke-point on the map.
MHW, Crossroads Jonas Part 4 - All In
All-In (Jonas)
If your murder-hobo-fu is strong you’ll be tasked with besting the beast in his lair. Chat with the bartender Caleb for a free x50 9mm as well as access to a stims and ammo store. Return to Jonas when you’re ready to proceed.
It’s on to Regulator HQ to take down Jonas!
There are two phases to this fight, an initial ambush in the bottom floor, a break to heal and reload, and then a fight with Jonas and his men on the top floor. Any friendly guards that survive phase 1 will come to the top floor with you. Also of note, any friendly guards that die in phase 1 or phase 2 are lootable, Red Beard in particular has a very expensive Disruption grenade if he should unfortunately die in glorious combat. I expect there will be no survivors on either side at the conclusion of phase 2 of combat, and full pockets for your party.
You will receive allied guards in inverse proportion to your party size.
If your friendly guards just so happen to die in Phase 1 or 2 this is what you would find on their corpses, unlike in the Promised Land fight you will have plenty of time to loot after combat so you don’t need to do in combat looting:
3 Companions in Party = 2 Friendly Guards:
Red Beard: 9mm, Utility Bar, Howler, Ballistic Vest, Gunslinger Jacket, Disruptor Grenade, Enforcer Leg Armor, Shield Armguards
SMG Guard: Tommy Gun, Camp Knife, Battle Bowler Helmet, Reinforced Ballistic Vest, Traveler Coat, Heavy Boots, Shield Armguards
2 Companions in Party = 3 Friendly Guards:
All above plus Shotgun Guard: Shells, Gatling Gun, Camp Knife, Bowler Helmet, Smart Glasses, Face Mask, Reinforced Ballistic Vest, Traveler Coat, Raider Boots, Raider Armguards
1 Companion in Party = 4 Friendly Guards:
All above plus Rifle Guard: Utility Bar, Howler, Battle Bowler Helmet, Ballistic Vest, Gunslinger Jacket, Raider Boots, Protective Sleeves
Solo PC = 5 Friendly Guards:
All above plus Pistol Guard: 9mm, Camp Knife, Pepperbox, Scav Helmet, Maintenance HUD, Fancy Ballistic Vest, Scrapper Coat, Heavy Boots, Shield Armguards
Phase 1 : Barroom Brawl
Kill everyone, receive +30 XP
Enemy Combatants:
SMG Regulator: 9mm, Camp Knife, Plugger, Scav Helmet, Work Goggles, Common Respirator, Ballistic Vest, Traveler Coat, Heavy Boots, Shield Armguards
Pistol Regulator #1: 9mm, Camp Knife, Bulldog, Scav Helmet, Work Goggles, Common Respirator, Ballistic Vest, Traveler Coat, Heavy Boots, Shield Armguards
Pistol Regulator #2: 9mm, Camp Knife, Springer, Scav Helmet, Work Goggles, Common Respirator, Ballistic Vest, Traveler Coat, Heavy Boots, Shield Armguards
Shotgun Regulator: Shells, Camp Knife, Double Trouble, Scav Helmet, Work Goggles, Common Respirator, Ballistic Vest, Traveler Coat, Heavy Boots, Shield Armguards
Rifle Regulator: .45, Camp Knife, Old Betsy, Scav Helmet, Work Goggles, Common Respirator, Ballistic Vest, Traveler Coat, Heavy Boots, Shield Armguards
Rifle Regulator #2: 9mm, Camp Knife, Howler, Scav Helmet, Work Goggles, Common Respirator, Ballistic Vest, Traveler Coat, Heavy Boots, Shield Armguards
Difficulty: Hard, but mitigated by your allied guards
Tactical Notes: Focus fire on one enemy at a time if possible and round the table or bar to mitigate their cover advantage. Otherwise this is a straight-up bloodbath.
Phase 2: Kill Braxton
Kill everyone, +30 XP for your deeds.
Braxton has captain feat, energy shield and heavy armor, but no helmet, but he does have Tough Bastard capping your crit chance against him at 5%
Enemy Combatants:
(Captain) Braxton: Bowie, 5.56, M16, Maintenance HUD, Enforcer Armor, Traveler Coat, Energy Shield MkI, Military Boots, Shield Armguards
Rifle Regulator: 5.56, Bowie, Pipe Dream, Scav Helmet, Work Goggles, Heavy Ballistic Vest, Scrapper Coat, Guard Boots, Shield Armguards
Shotgun Regulator: Shells, Toothpick, Rusty Doomsayer, Scav Helmet, Work Goggles, Heavy Ballistic Vest, Scrapper Coat, Guard Boots, Shield Armguards
Melee Regulator: Truncheon, Ballistic Helmet, Reinforced Ballistic Vest, Scav Jacket, Guard Boots, Shield Armguards
Difficulty: Very Hard, you’re likely down several allied guards and Braxton is a tough hombre with the Captain feat (+10 Accuracy, +20 Reaction, +5% Critical Chance) boosting his allies.
Tactical Notes: You start in an unenviable tactical position. With Braxton’s Captain feat boosting the Reaction % of his allies walking straight into his office will lead to eating a lot of extra shots, at which point the Melee Regulator will start beating on your snipers. The Regulators are also packing some Thermal Vision and Optical Resistance so Flashbang and Smoke Grenades will only be partially effective. The use of a Disruptor or Stasis Grenade is warranted here to make your way into the office after dealing with the Melee Regulator. And Braxton doesn’t wear a helmet, what’s with all these leaders not wearing helmets?
Once everyone is dead then Lockpick 2 (+20SP) the back door, then Lockpick 3(+20SP) the trunk.
Regulator HQ Trunk: Scanner, Pipe Dream, 50x 5.56
Return to Jonas for +60XP and congratulations on freeing The Pit from Regulator influence!
MHW, Crossroads Jonas Part 5 - Mercy's Gambit
Mercy’s Gambit (Jonas)
Of course, if you managed earlier to convince Mercy to side with Jonas then there is still one more outstanding issue to resolve, who is going to actually rule The Pit now that Braxton is dead?
It's Jonas, Jonas is going to rule The Pit because Mercy won't turn on him like she will turn on Braxton. So that's that.
MHW, Crossroads Braxton Part 1 - Hired Thug
Crossroads (Braxton):
Talk to Jonas the lawless pimp and tell him off, we need Braxton to bring this town to order so return to him for your marching orders and +60XP.
Your first task is to remove one of Jonas’ lieutenants, a man by the name of Samuel in the quest Hired Thug. Go talk to Manny at Manpower Staffing Solutions, next to the Old Earth Emporium.
With Persuasion 3 (+40SP) or Streetwise 3(+40SP) you can get Manny to agree to loan you some troops for the warehouse assault, as well as +30XP for being persuasive. The troops themselves cost $300 and are probably not worth for actual combat but make sure to pass the check for the SP and XP. Note: Hiring the troops and bringing them into the Warehouse to back you up will award a Disposition bonus if you take the talking route for this quest.
Head to Warehouse C9 in the Outskirts.
If you hired troops from Manny you can ask them to come in the front door with you or tell them to wait until you break stealth. You can also get them hopped up on Aggro Stims, though I didn’t see what impact it had. They are fairly miserable troops, comparable to what you would fight in your first few combats, the shotgun recruit didn’t even bother to load his gun before the fight! (A bug report was submitted).
You can kick in the door if you’d like to talk/fight. Or you can sneak in the back if you’d like to sneak/fight.
Talking-wise, Streetwise 3 (+10SP) then Streetwise 4 (+10SP) or Persuasion 4(+10SP) to get his own men to shoot him in the back, then you can kill the remaining two troops or let them go. If you fail to talk them down you take an initiative penalty in the resulting combat.
Sneaking-wise, entering the vents awards +15 Sneak SP, anyone with reasonable Sneak or a cloaking device can easily takedown all three men.
Enemy Combatants:
(Sgt) Samuel: 9mm, Camp Knife, Bulldog, Enforcer Armor, Traveler Coat, Flashbang (low-grade), Heavy Boots, Shield Armguards
SMG Thug: Flyapart, Bucket Helmet, Ballistic Vest, Worker Jacket, Protective Sleeves
Rifle Thug: 9mm, Toothpick, Bolter, Smart Glasses, Protective Vest, Traveler Coat
Difficulty: Easy at this point, they’re not particularly well-equipped or skilled
Tactical Notes: Samuel has the Sergeant perk and good body armor, but like all good leaders refuses to wear a helmet.
Once your problems with Samuel are resolved, receive +30XP.
For completeness sake if you want to get your hired meatshields killed so you can loot them this is what you will get, but it’s certainly less than the $300 you paid for them.
Friendly Shotgun Meatshield: Shells, Camp Knife, Boomstick, Protective Vest, Bowler Helmet, Worker Jacket, Boots
Friendly SMG Meatshield: Camp Knife, Flyapart, Protective Vest, Battler Bowler Helmet, Worker Jacket, Boots
Friendly Pistol Meatshield: 9mm, Truncheon, Suicide Special, Protective Vest, Bucket Helmet, Protective Sleeves, Worker Boots
Return to Braxton for next steps and +60XP.
MHW, Crossroads Braxton Part 2 - Lord's Mercy
Lord’s Mercy (Braxton)
Very similar to Jonas’ version with a couple of tweaks. If you want to persuade Mercy to support Braxton with Charisma 4 you’ll need Streetwise 4 and the following sequence. Refer to the bonus section on how to achieve Streetwise 4 on a murder-hobo build this if it is important to you.
Talking sequence: “And yet”->Streetwise 3(+10SP)->Street2(+10SP)->Street4(+10SP)
Persuading Mercy will award you the standard +30XP, as well as +40 bonus SP in Streetwise, Persuasion, and Impersonate
Otherwise you can pick up some free talking SP and then either immediately fight them or tactically retreat and come back with reinforcements.
Braxton sends 3 Regulators with you as backup when you return to Mercy’s Fort. Instead of just letting you in you now have to handle the Gate Guard. Critical Strike 4 (+20SP) will disable the guard and allow you and the Regulators to stealth in or initiate combat with an initiative bonus. You can let a party member perform the crit strike as well but they don’t appear to gain SP. If you lack enough crit strike the Regulators will talk to the Gate Guard and kill him when combat begins in Mercy’s compound.
You can also loot the gate guard when you’re done, normally you leave him alive on the Jonas route.
While of course we frown on allowing your allies to die just so you can loot them here’s what the three Regulators carry.
Friendly Rifle Regulator #1: 9mm, Howler, Ballistic Vest, Smart Glasses, Scav Helmet, Gunslinger Jacket, Heavy Boots
Friendly Rifle Regulator #2: .45, Camp Knife, Old Betsy, Ballistic Vest, Shield Armguards, Scav Helmet, Traveler Coat, Heavy Boots
Friendly SMG Regulator: 9mm, Camp Knife, Plugger, Protective Vest, Smart Glasses, Bucket Helmet, Traveler Coat, Heavy Boots
Otherwise stealth and combat scenarios play out the same, refer to Lord’s Mercy section in Jonas branch above, when/if you break stealth your Regulator allies will join you.
After completing Lord’s Mercy for +30 XP, return to Braxton for another +60XP.
MHW, Crossroads Braxton Part 3 - You Shall Not Pass
Crossroads Finale (Braxton)
After resolving the Mercy issue, Braxton will have one final choice of tasks for you to accomplish. If you’re not much of a fighter you’ll be tasked to You Shall Not Pass (Braxton) which can be solved with talking supported by Electronics, or an easier fight than the alternative. If you are a stone-cold murder-hobo you’re going to be roped into All-In (Braxton), taking down Jonas inside the Promised Land.
You Shall Not Pass (Braxton)
Lockpick 3 (+20SP) the nearby chest for 50x 9mm. Inspect the turret and load the 9mm ammo into it. You can take the ammo back if you’d rather not have the turret fight, or if it blows up during the fight. Head up the stairs and pass the Electronics 2 (+20SP) check to retrieve the targeting module. Head back down to the turret and Electronics 4 (+20SP) to install the module.
An active turret will make the dialogue options easier as well as provide an ally if/when fighting breaks out.
If you’d like to talk it out you should probably know the following.
The Impersonate 3 (SP 10) check has a huge negative hit on Disposition if failed, this can cause you to fail to talk the crowd of out of fighting even with a turret backup, so generally you would take the non-skill locked option and go from there into a Persuasion 4(+10SP) / Streetwise 4 (+10SP) and then into a Persuasion 5(+10SP)/Streetwise 5(+10SP) choice, then falling back to firing up the turret if you want to resolve things peacefully.
While you can go directly to firing up the turret you can squeeze out a bit more talky SP if you take one of the other gambits first, and then fire up the turret when you inevitably fail, you’ll still be able to pass the final set of talky turret checks, just don’t fail the first Impersonate 3 check.
Gain +30XP for resolving your differences peacefully, +20 bonus SP for Streetwise, Persuasion, Impersonate.
You can of course extract some talky SP by deliberately failing the Impersonate 3 check and then firing up the turret, this will bring you into the combat sequence but with an extra 50SP of talky SP for your trouble.
With three Regulator allies (and likely a turret) you shouldn’t have much trouble dispersing this ill-equipped rabble. Of course the turret is currently bugged, so while it will draw a lot of fire it won’t actually shoot anyone, oops.
Enemy Combatants:
Red Beard: 9mm, Utility Bar, Howler, Protective Vest, Worker Jacket, Worker Boots
Freeman #1: Shells, Utility Bar, Gatling Gun, Smart Glasses, Protective Vest, Gunslinger Jacket
Freeman #2: Truncheon, Reinforced Ballistic Vest, Raider Boots, Raider Armguards
Freeman #3: 9mm, Camp Knife, Rounder, Protective Vest, Traveler Coat, Worker Boots, Protective Sleeves
Freeman #4: 9mm, Camp Knife, Flyapart, Bucket Helmet, Reinforced Ballistic Vest, Scavenger Boots
Freeman #5: 9mm, Camp Knife, Bolter, Scavenger Goggles, Protective Vest, Worker Boots, Shield Armguards
Freeman #6: 9mm, Camp Knife, Piper Jack, Battle Bowler Helmet, Protective Vest, Worker Boots
Difficulty: Easy with your Regulator allies, Super Easy if the turret actually starts working
Over-Optimizing Note
If you can not bear to see a single piece of loot lost then you’ll need to get your uncontrolled Regulator allies killed, run everyone up the stairs and to the right near the table, the mob should kill off the three Regulators for you, though they don’t always win. With the latest combat SP system you should receive offensive and defensive SPs for Free(wo)men that die even if you don’t hit them with anything before the Regulators kill them. Feel free to still send pot shots their way to farm Crit Strike XP from successful Crits.
Friendly Regulator #1: .45, Old Betsy, Battle Bowler Helmet, Protective Vest, Traveler Coat, Heavy Boots
Friendly Regulator #2: 45, Old Betsy, Bowler Helmet, Protective Vest, Traveler Coat, Heavy Boots
Friendly Regulator #3: 9mm, Tommy Gun, Bucket Helmet, Ballistic Vest, Traveler Coat, Worker Boots
Friendly Turret that doesn’t fire because it is bugged: 50x 9mm.
SillyOver-Optimizing Note
The Swing attack of a two handed hammer can be used to target allies to make sure they die, if there is a stubborn Regulator sticking around, just make sure to kill him before the last enemy falls.
Once everyone is dead, receive +30 XP and your loot.
Automatically return to Braxton for +60XP, congratulations on freeing The Pit from Jonas!
MHW, Crossroads Braxton Part 4 - All In
All In (Braxton)
Super important note for everyone, turn on “Automatically Heal Party” in the party screen to make sure you heal between Phase 1 and Phase 2, unlike the Jonas version you won’t get a chance to save and heal between phases.
Over-Optimizing Note
For people trying to over-optimize their looting, you won’t have time to loot during Phase 1 so you’ll need to do combat looting of enemies and allies to maximize your loot. This is not worth it, but it’s there if you feel compelled to. Any allies that survive phase 1 and die in phase 2 will be lootable after Phase 2 is complete, and they will carry their inventories forward if you use them to combat loot during Phase 1.
You will be joined by Martinez and a variable number of Regulator guards based on your party size.
Three NPC Companions = Two Allied Regulators
(Sgt) Martinez: 10x 9mm, Camp Knife, Howler, Heavy Ballistic Vest, Work Goggles, Scav Helmet, Scrapper Coat, Heavy Boots
Melee Regulator: Combat Knife, Raider Armguards, Fancy Ballistic Vest, Work Goggles, Diver Helmet, Scav Jacket, Raider Boots
Two NPC Companions = Three Allied Regulators
As above plus:
Rifle Regulator #1: 20x 9mm, Camp Knife, Howler, Shield Armguards, Ballistic Vest, Smart Glasses, Scav Helmet, Scrapper Coat, Heavy Boots
One NPC Companion = Four Allied Regulators
As above plus:
Rifle Regulator #2: 20x .45, Camp Knife, Old Betsy, Shield Armguards, Ballistic Vest, Maintenance HUD, Diver Helmet, Scrapper Coat, Heavy Boots
Solo PC = Five Allied Regulators
As above plus:
Rifle Regulator #3: 20x 9mm, Camp Knife, Howler, Shield Armguards, Ballistic Vest, Maintenance HUD, Scav Helmet, Scrapper Coat, Heavy Boots
Enemy Combatants:
Guard #1: 9mm, Camp Knife, Plugger, Bucket Helmet, Maintenance HUD, Face Mask, Ballistic Vest, Traveler Coat, Worker Boots, Protective Sleeves
Guard #2: 9mm, Camp Knife, Springer, Bowler Helmet, Smart Glasses, Face Mask, Ballistic Vest, Gunslinger Jacket, Worker Boots, Protective Sleeves
Guard #3: 9mm, Camp Knife, Springer, Bucket Helmet, Smart Glasses, Face Mask, Ballistic Vest, Traveler Coat, Worker Boots, Protective Sleeves
Guard #4: 9mm, Camp Knife, The Grinder, Bucket Helmet, Smart Glasses, Common Respirator, Ballistic Vest, Traveler Coat, Worker Boots, Protective Sleeves
Guard #5: 9mm, Camp Knife, Howler, Battle Bowler Helmet, Ballistic Vest, Gunslinger Jacket, Worker Boots, Protective Sleeves
Guard #6: .45, Camp Knife, Old Betsy, Bucket Helmet, Maintenance HUD, Face Mask, Ballistic Vest, Worker Boots, Protective Sleeves
Difficulty: Hard, you’re charging a fortified position and will lose men along the way
Tactical Note: Allies will be under your control, so you can choose to hang back and exchange potshots if you think you’ve got a range advantage over the defenders, generally only advised if you’re running a party with some expert riflemen as the Regulators themselves are mediocre shots. If you want to charge forward then smoke grenades can cover your approach.
+30 XP when your enemies are dead.
Assuming you set your party to auto heal and auto reload you, but not your surviving allies, will be in tip top shape for Phase 2. Any debuffs from Regen or Aggro stims will dissipate and gadgets will reset.
Phase 2 will allow for looting afterwards so don’t worry about trying to combat loot, though surviving allies will disappear at the end of combat, so if you need their gear….
Enemy Combatants:
(Sgt) Jonas: .45, Bowie, Webler, Enforcer Armor, Scav Jacket, Energy Shield Mk1, Guard Boots
Caleb: 9mm, Toothpick, 400 Credits, Longslide, Smart Glasses, Protective Vest, Gunslinger Jacket
SMG Guard #1: 9mm, Camp Knife, Tommy Gun, Smart Glasses, Reinforced Ballistic Vest, Traveler Coat, Regen Stim, Scavenger Boots
SMG Guard #2: 9mm, Camp Knife, Plugger, Bowler Helmet, Common Respirator, Ballistic Vest, Traveler Coat, Worker Boots, Protective Sleeves
SMG Guard #3: 9mm, Utility Bar, Tommy Gun, Scavenger Goggles, Scav Armor, Traveler Coat, Raider Boots
SMG Guard #4: 9mm, Camp Knife, Plugger, Bucket Helmet, Maintenance HUD, Common Respirator, Ballistic Vest, Worker Boots, Protective Sleeves
Doorman: Gear Mace, Assault Armor, Scrapper Coat, Raider Boots, Raider Armguards
Difficulty: Hard, while the troops in Jonas’ office will take a turn to get to you, it's a lot of people to kill in a short amount of time before you’re overwhelmed. Consumables are strongly recommended.
Tactical Notes: Like all great leaders Jonas has the Sergeant feat, and doesn’t wear a helmet. He does have an energy shield. The Doorman is the tankiest tank you’ve faced so far, even without a helmet he has 3/2/2 resistances on his head thanks to Juggernaut (also can’t be knocked down), a Sub-Dermal implant, and what I’m assuming is the True Grit feat for the +1 Ballistic resistance. Most of your enemies are decent shots and your Regulator allies will likely die quickly.
Once everyone is dead, receive +30 XP and lots of loot.
Return to Braxton for +60 EXP, and with that the Pit is complete with Braxton in charge.
MHW, Crossroads Braxton Part 5 - Mercy's Gambit
Mercy’s Gambit (Braxton)
Unless of course you manage to convince Mercy to join Braxton’s side during Lord’s Mercy. Help her kill Braxton and she takes over the Pit, kill her and Braxton shows up afterwards to pat you on the back.
+30 XP for killing Mercy, then +60XP for completing The Pit on Braxton’s side.
Enemy Combatants (Fight Mercy):
(Sgt) Mercy: Johnny Reb, Spitfire, Enforcer Armor, Scav Jacket, Distortion Field Mk1, Enforcer Leg Armor, Shield Armguards
Mercy’s Pistol Guard: Camp Knife, 9mm, Bulldog, Scav Helmet, Scav Armor, Gunslinger Jacket, Worker Boots, Shield Armguards
Mercy’s Shotgun Guard: Shells, Toothpick, Gatling Gun, Bowler Helmet, Ballistic Vest, Worker Jacket, Worker Boots, Protective Sleeves
Mercy’s Rifle Guard: 9mm, Toothpick, Howler, Bucket Helmet, Reinforced Ballistic Vest, Scrapper Coat, Raider Boots, Shield Armguards
Difficulty: Hard, comparable to what you would face in the surrounded scenario of Lord’s Mercy, but you can start your allies behind the bar for a cover advantage.
Tactical Notes: You should have had a chance to heal and reload, and any surviving Regulators will join you for the fight.
Enemy Combatants (Fight Braxton):
(Captain) Braxton: Bowie, 5.56, M16, Maintenance HUD, Enforcer Armor, Traveler Coat, Energy Shield MkI, Military Boots, Shield Armguards
Rifle Regulator: 9mm, Camp Knife, Howler, Scav Helmet, Work Goggles, Ballistic Vest, Scrapper Coat, Enforcer Leg Armor, Shield Armguards
Shotgun Regulator: Shells, Toothpick, Rusty Doomsayer, Scav Helmet, Work Goggles, Heavy Ballistic Vest, Scrapper Coat, Guard Boots, Shield Armguards
Melee Regulator: Truncheon, Ballistic Helmet, Reinforced Ballistic Vest, Scav Jacket, Guard Boots, Shield Armguards
Rifle Regulator #2: 5.56, Pipe Dream, Enforcer Helmet, Ballistic Vest, Scrapper Coat, Enforcer Leg Armor, Shield Armguards
Rifle Regulator #3: 5.56, Bowie, Pipe Dream, Scav Helmet, Work Goggles,Heavy Ballistic Vest, Scrapper Coat, Guard Boots, Shield Armguards
Difficulty: Medium, Mercy’s forces while not quite up to Braxton’s team should easily shift the balance of power to your side.
Tactical Notes: Braxton’s initial force’s disposition lets you capture Braxton + 2 of his riflemen with a single Stasis Grenade, that can turn this fight into a cakewalk. You can position Mercy & crew but they will control themselves during combat, I suggest putting them in front of the bar and your team behind the bar. Mercy does not need to survive combat, she was magically revive at the end even if struck down.
Remember as always that dead allies can be looted at the end of combat. Mercy will magically return from the dead if killed during combat, you have to combat loot her in order to steal her gear while she is temporarily dead during combat.
+30 XP for the combat, +60XP for putting Mercy on the throne of The Pit, onto the Factory!
MHW, Special Supplement, Persuading Mercy
I originally thought that siding with Mercy in The Pit would be impossible for a Charisma 4 Murder-Hobo, but I was wrong! It's not optimal for a pure combat build because it gives up several good encounters but its doable with one point in Streetwise and Persuasion at character creation and no tags. It is also hilariously convoluted and nothing a normal person would do.
Jonas' Mercy Sequence:
Point into Streetwise and Persuasion at start to bring both to 2
Talk to Junkies use Streetwise 2
Get Jed quest, talk to Jed, don't try to Persuade, use Streetwise 2
Go to Abe's, Persuasion 2 the thugs, Streetwise 2 Abe, Streetwise 3 Braxton (this pass should check if you're doing it right)
Side with Jonas Streetwise 3 check
Get cores from Isiah using Streetwise2 + Streetwise3, actually pay him to get bonus talking SP
Do Earl quest #1, don't try to fight Grangers :)
Faythe quest, Streetwise 2 into Streetwise 3, Impersonate 3, Persuasion 3, you'll fail the dialog and have to kill them but that's okay, pretty easy fight if you bothered to upgrade weapon or armor on PC, also Evans can grab Howler from dead Lazarus Foley.
Make sure Faythe takes Thief feat, or if she goes Assassin then tag Sneak and go get Sneak up to 3 to steal Regulator Badge
Switch out Evans for Faythe
Have Faythe steal Regulator Badge from Regulator HQ
Get Moonshine quest to open Hydroponics
Get Scavs quest from Carlos
Talk to Morgan, any options that include Faythe being there and starting with Persuasion 3 check seem fine.
Boom, bonus talking SP from solving Delta tower peacefully
It is important to note that you need to enter into the conversation having Streetwise 4 and Persuasion 3, if you level up to that during the conversation it won't work. My hypothesis is you get more disposition for over-shooting a skill check or that the "fail but level up so actually pass a check" part of speech skills awards less disposition.
Streetwise is 4 Persuasion is 3 Impersonate is 2, and Mercy is solved with the following sequence:
“Whose side” -> Streetwise 2(+10SP) -> Streetwise 3(+10SP) -> Persuasion 3(+10SP)
Can convince Mercy to side with Jonas as a smelly hobo. Definitely some sub-optimal stuff in terms of quest XP for the party since you won't have done the Squad Leader implant quest yet, but it's possible!
And! You can get Mercy on Braxton's path with Streetwise 4 and no Persuasion!
You can follow a similar route to the Jonas, the tweaks being we don't try to tank the dialog in Lamb Among Wolves, instead with Streetwise 3 we go:
Lamb Among Wolves dialogue choices: "Doesnt want a cut"->Streetwise 2->Streetwise 3
That plus talking to Manny using Streetwise puts us to Streetwise 4 before Samuel so we can choose to diplomacy or murder him, and then we're at an easy Streetwise 4 for Mercy.
We're also incidentally at Impersonate 3 and Persuasion 3, which is a lot for Mr. Murder Hobo.
It is important to note that, as with the Jonas case, you need to enter into the conversation having Streetwise 4. If you level up to that during the conversation it won't work. My hypothesis is you get more disposition for over-shooting a skill check or that the "fail but level up so actually pass a check" part of speech skills awards less disposition.
Dialogue choices for Mercy to side with Braxton : "And yet"->Street3->Street2->Street4
Siding with Braxton and persuading Mercy to support him will unlock the semi-hidden outcome of having Mercy rule The Pit if you help her kill Braxton.
Again this took way too long to figure out and no one sane would do it, but it's possible!
At least until they change the skills XP again and everything falls apart :)
Chapter 1 Skill Checks - The Pit, Hydroponics, Armory
Navigation Tag : WALKTHROUGH_BAREBONES
Steal
Training - From Jia at the start of “Pick a Pocket or Two”, 40SP
Steal 2 - Abe’s store, 20SP
Steal 2 - Gunsmith’s store, 20SP
Steal 2 - Armor trader store, 20SP
Steal 2 - General store, 20SP
Steal 3 - Hit & Kill store, 20SP
Steal 3 - Medbay, 20SP
Steal 3 - From Samson in Promised Land, 20SP
Steal 3 - From Maryam after delivering the Psyker frog brain, 10SP
Lockpick
Training - From Xavier outside home apartment, 40SP
Training - From Basic Maintenance token found at top of Hydroponics tower, 80SP
Training - From Infiltration Token, 80SP
Lockpick 2 - Locked chest near home apartment, 20SP
Lockpick 2 - Jia’s door near Church, 20SP
Lockpick 2 - Storage container in front of Old Earth Emporium, 20SP
Lockpick 2 - Door during Mysterious Stranger quest, 20SP
Lockpick 2 - Equipment case behind broken door on Level 1 of Armory past frogs, 20SP
Lockpick 2 - Locked door during “Lamb Among Wolves”, 20SP
Lockpick 2 - Unlock box containing cores during “Ace Up Your Sleeves”, 20SP
Lockpick 2 - Unlock electronic module storage above Outer Gate, 20SP
Lockpick 2 - Unlock Braxton's storage door, 20SP
Lockpick 2 - Unlock door to balcony in Mercy's Fortress, 20SP
Lockpick 2 - Outskirts Loot Door, 20SP
Lockpick 3 - Unlock crate in Armory supply room, 20SP
Lockpick 3 - Unlock Braxton's storage case, 20SP
Lockpick 3 - Gun case during Mysterious Stranger quest, 20SP
Lockpick 3 - Lockpick door to training room in Armory, 20SP
Lockpick 3 - Lockpick equipment crate in Armory next to generator, 20SP
Lockpick 3 - Lockpick side door on bottom floor of the Armory, 20SP
Lockpick 3 - Equipment case in Mercy’s fortress, 20SP
Lockpick 3 - Ammo trunk during “You Shall Not Pass”, 20SP
Lockpick 3 - Back room of Power Station, 20SP
Lockpick 3 - Outskirts extending bridge door, 20SP
Lockpick 4 - Equipment case in the Armory first floor in the room with the Psyker frog, 20SP
Lockpick 4 - Outskirts Loot Chest past Lockpick 2 Door, 20SP
Lockpick 5 - Lockpick equipment locker in Armory in Supply Room, 20SP
Biotech
Training - From Sarah in Medbay, 40SP
Biotech 2 - Examine heads in quest “Little Shop of Horrors”, 20SP
Biotech 2 - Remove implant from the body behind the heavy crate in the Armory, 30SP
Biotech 2 - Remove implant from the body in the training room in the Armory, 30SP
Computers
Training - Maryam after turning in Psyker Brain after turning in psyker frog brain, 40SP
Training - From Basic Maintenance token found at top of Hydroponics tower, 80SP
Computer 2 - Conversation with Sharp Face in the Armory, 20SP
Computer 2 - Unlock training token console from training room in the Armory, 20SP
Computer 2 - Open backroom of Power Station, 20SP
Computer 2 - Discussion with Zeke after returning Override Module, 20SP
Computer 2 - Use the computer at the Armory train station to move the heavy crate, 20SP
Computer 2 - Move old hydroponics car in Hydroponics, 20SP
Computer 2 - Extend bridge in Outskirts, 20SP
Computer 3 - Use the computer in Hydroponics tower to call a service car to get to Tower Alpha, 20SP
Computer 3 - Initiate decontamination during "You Shall not Pass (Jonas)", 20SP
Computer 4 - Lower forcefield in Armory, 20SP
Computer 4 - Lower forcefield in Outskirts past extending bridge, 20SP
Electronics
Training - From Basic Maintenance token found at top of Hydroponics tower, 80SP
Electronics 1 - Remove parts from the console in the upper Armory, 20SP
Electronics 1 - Remove parts from the console in the lower Armory, 20SP
Electronics 1 - Remove parts from the console in the Hydroponics tower, 20SP
Electronics 1 - Remove air purifier parts from abandoned tower in Hydroponics, 20SP
Electronics 2 - Examine frog pacifying machine during "Eviction Notice", 20SP
Electronics 2 - Fix the control panel in the lower Armory, 20SP
Electronics 2 - Initial conversation with Zeke in Power Plant, 20SP
Electronics 2 - Replace the dead module in the Armory’s train station computer, 20SP
Electronics 2 - Conversation with Sharp Face in the Armory, 20SP
Electronics 2 - Remove targeting module from broken turret during “You Shall Not Pass”, 20SP
Electronics 2 - Fix the door above the Outer Gate in the Pit, 20SP
Electronics 2 - Activate the decontamination panel in the Armory, first room with frogs, 20SP
Electronics 3 - Replace fault module during "You Shall not Pass (Jonas), 20SP
Electronics 3 - Override the safety protocols in the elevator in Hydroponics, 20SP
Electronics 3 - Discussion with Zeke after returning Override Module, 20SP
Electronics 3 - Fix the control panel past the initial frogs in the Armory, 20SP
Electronics 3 - Unlock side door in Delta Tower to access strange machine, 20SP
Electronics 4 - Fix the turret during “You Shall Not Pass”, 20SP
Persuasion
Training from Crisis Intervention Token, 80SP
See quest list for Speech skill checks
Streetwise
Training from Crisis Intervention Token, 80SP
Streetwise 2 - Discussion with Spike, 40SP
See quest list for Speech skill checks
Impersonate
Training from Infiltration Token, 80SP
Training from Crisis Intervention Token, 80SP
See quest list for Speech skill checks
Critical Strike
Takedowns from stealth award 10SP for Sneak and Critical Strike
Training from Riot Control Token, 80SP
Critical Strike 2 - Kill Spike near the Food Vendor, 20SP
Critical Strike 3 - Kill Isaiah during “Ace Up Your Sleeves”, 20SP
Critical Strike 4 - Kill Mercy’s Guard during “Lord’s Mercy”, 20SP
Sneak
Takedowns from stealth award 10SP for Sneak and Critical Strike
Training from Infiltration Token, 20SP
Enter the gang hideout via stealth during "Mysterious Stranger", 20SP
Free the Deacon via stealth during "Lamb Among Wolves", 20SP
Successfully retrieve the Deacon via stealth during "Lamb Among Wolves" without alerting the guards, 50SP
(UNDER REVIEW) Disable the frog pacifying machine from stealth during "Eviction Notice", 70XP
Steal the cores from the lockbox via stealth during "Ace Up Your Sleeves", 20SP
Escape using stealth during "Ace Up Your Sleeves" without alerting Isiaih, 30SP
Assassinate Mercy during "Lord's Mercy" -10SP per guard killed, 70SP
Sneak past the frogs in Hydroponics, 20SP
Sneak past the frogs in Armory, 35SP
Sneak past the scavs on the first floor of the Armory, 40SP
Sneak past Sharp Face and crew on the 2nd floor of the Armory, 60SP
Sneak into Samuel's warehouse during "Hired Thug", 20SP
Sneak into outskirts warehouse during "Mysterious Stranger", 15SP
Sneak 3 - Steal some medical supplies from Hydroponics Living Quarters, 30SP
Sneak 3 - Steal a Regulator badge from Regulator HQ, 15SP
Rifle
Training from Urban Pacification Token, 80SP
Bladed
Training from Urban Pacification Token, 80SP
Evasion
Training from Urban Pacification Token, 80SP
Blunt
Training from Riot Control Token, 80SP
Armor
Training from Riot Control Token, 80SP
Chapter 1 Quest And Combat Exp
From what I have seen so far, the 90 XP rewards, encounter XP, are divided among active party members while the 60 XP rewards, quest XP, are awarded to every party member. There is one exception which is activating decontamination procedures during Defend The Gates, that award +90 quest XP.
Deal with thugs in Abe’s shop during Neighborhood Watch. +90XP and then +60XP.
Deal with Spike and Bulldozer in The Pit: +90XP
Courthouse Fight One - John Doe: +90XP
Courthouse Fight Two - Dalton Brothers: +90XP
Courthouse Fight Three - Hard Ben: +90XP
Courthouse Fight Four - Black Hand: +90XP
Courthouse Fight Five - Clayton : +90XP
Kill Grangers during Easy Money : +90XP
Complete Easy Money with Chance alive: +60XP
Start Damsel In Distress : +60XP
Beat thugs during Damsel In Distress: +90XP
Complete Damsel in Distress with Faythe alive: +60XP
Optional fight during Little Shop of Horrors: +90XP
Complete Little Shop of Horrors: +60XP
Kill or persuade Jed during start of Debt Collector: +90XP
Kill or persuade Black Will during Debt Collector: +90XP
(Optional) Kill Jed after dealing with Black Will during Debt Collector: +90XP
Return to Whiskey Jack to complete Debt Collector: +60XP
Kill the turret during Pick a Pocket or Two: +90XP
Split the money with Jia during Pick a Pocket or Two: +60XP
Kill, persuade, or sneak by McNeil during Lamb Among Wolves: +90XP
Report success to Church during Lamb Among Wolves: +60XP
Kill or persuade the first two thugs during Mysterious Stranger: +90XP
Kill gang during Mysterious Stranger: +90XP
Return to Hank during Mysterious Stranger: +60XP
Kill or sneak by first set of frogs in Hydroponics: +90XP
Kill or sneak by first set of frogs in Armory: +90XP
Kill lone frog hiding in greenhouse unit in Hydroponics: +90XP
Kill Psyker frog group in Armory: +90XP
Kill Psyker frog group in Hydroponics: +90XP
Kill the Creeper in Hydroponics: +90XP
Kill or sneak by scavs on top floor of Armory: +90XP
Kill, sneak by, or persuade Sharpface in the Armory during Holy Grail: +90XP
Return to Tanner after finding the fusion reactor during Holy Grail: +60XP
Return override module to Zeke during Power To The People: +60XP
Return air purifier to Zeke during Clean Air Act: +60XP
Return bioreactor parts to Carlos during Scavenger: +60XP
Return algae to Boone during Moonshine: +60XP
Kill, sneak by, or persuade scavs during Eviction Notice: +90XP
Return to Carlos during Eviction Notice: +60XP
Side with Jonas or Braxton during Crossroads: +90XP
Acquire the cores during Ace Up Your Sleeve: +90XP
Return to Jonas during Ace Up Your Sleeve: +60XP
Kill or persuade Mercy during Lord’s Mercy: +90XP
Return to Jonas/Braxton during Lord’s Mercy: +60XP
Fix the gate electronics during Defend the Gates: +60XP
Persuade Martinez during Defend the Gates: +60XP
Activate decontamination protocol during Defend the Gates: +90XP (note this is a quest XP reward, which isn’t split like encounter XP, this is the only non-60xp quest XP I’ve found so far)
Kill Martinez during Defend the Gates: +90XP
Return to Jonas during Defend the Gates: +60XP
Kill Regulators on ground floor during All In (Jonas): +90XP
Kill Braxton during All In (Jonas): +90XP
Return to Jonas during All In (Jonas): +60XP
Persuade Manny during Hired Thug: +90XP
Kill or persuade Samuel during Hired Thug: +90XP
Return to Braxton during Hired Thug: +60XP
Kill or persuade mob during You Shall Not Pass: +90XP
Return to Braxton during You Shall Not Pass: +60XP
Kill Jonas’ exterior guards during All In (Braxton): +90XP
Kill Jonas during All In (Braxton): +90XP
(If Mercy is alive) Kill Mercy or Braxton during All In (Braxton): +90XP
Return to Braxton/Mercy during All In (Braxton): +60XP
Chapter 1 Quests - The Pit, Hydroponics, Armory
The Holy Grail
Main quest line, travel to the Armory and unlock it with the keycard
Go to Whiskey Jack Bar
Travel to the Armory
Travel to level two of the Armory by:
Use a rope on the elevator shaft to travel to level two
Kill the scavs at the top of the working elevator
Sneak past the scavs at the top of the working elevatorGet past Sharp Face and crew
Sneak past his crew
Fight his crew
Persuade Sharp Face to let you pass
Reputation Combat to remove two thugs from the fight, leads into Streetwise 4 conversation chain
Electronics 2
Persuasion 3 or Streetwise 3 or Computers 2
Streetwise 4
Streetwise 4 to convince him reality is a lie
Charisma 8 Persuasion 4Talk Option 1
Streetwise 3
Persuasion 3
Streetwise 4 to convince him reality is a lie
Charisma 8 Persuasion 4Computers 2
Persuasion 3 or Streetwise 3
Streetwise 4
Streetwise 4 to convince him reality is a lie
Charisma 8Persuasion 4Unlock the Armory door with the keycard
(Optional) Run for itUse the control panel near the generator
Return to Tanner
Find out more about the strange machine, continued in Chapter 2
Neighborhood Watch
Optional quest started from The Holy Grail
Talk to Evans at Abe’s Store
Deal with Thugs
Kill them
Streetwise 2 or Persuasion 2 to resolve peacefully (Optional) Receive a reward from Abe, Streetwise 2 to increase your reward with Abe
Leave the store and talk to Braxton, Streetwise 3 to gain $ from Braxton
Clean Air Act
Speak to Zeke at the Power Station
Retrieve parts for the air purifier from Hydroponics
Return to Zeke, leads to Power to the People
Power to the People
Zeke needs an override module to upgrade the power grid
Retrieve the override module from the locked training room in the Armory
Return to Zeke, Streetwise 3 for $300
Debt Collector
Collect a $1,200 debt from Jed Walker for Whiskey Jack
Talk to the bartender at Boone’s Moonshine to find out Jed is near The Drain
Handle Jed
Kill him
Persuasion 2 or Reputation Combat to resolve things peacefully
Streetwise 2 if those failDeal with Black Will (Optional) Deal with Black Will
Kill him
(If Braxton is alive) Impersonate 2
Persuasion 3 or Streetwise 3
Impersonate 3
Streetwise 4No current use for Regulator Badge but future content notes indicate it may work in the futureReturn to Whiskey Jack with the cash (-$950, +health hypos)
Pick a Pocket or Two
Steal Samson’s key, he is in the Promised Land
Return to Jia
Open the shipping container, kill the turret inside
Agree to split the money ($240 + XP) or demand the entirety of the stash ($480)
Little Shop of Horrors
Starts with Sarah in Medbay, retrieve implants from a corpse dealer in the Pit
Get the implants from Jimmy in Camptown
Take a Datajack or Ocular implant and walk away, OR fight for a Squad Leader implant
Return to Sarah and be able to purchase the relevant implant(s) for $500
Lamb Among Wolves
Speak to Solomon in the Church, convince the diver McNeil to release the Church’s deacon
Pay McNeil a visit in Camptown
Deal with McNeil
Kill McNeil and crew
Sneak in through the window
Persuade McNeil to work with the Church
Talk Option 1
Streetwise 2
Persuasion 3
Streetwise 4Talk Option 2
Persuasion 2
Streetwise 3Streetwise 2
Streetwise 3If McNeil is dead or you used stealth, then unlock the deacon's door (Lockpick 2)
Return to the Church
Easy Money
Speak to Earl at the Jobs!!! booth
Talk to Chance in front of Boone’s Moonshine
Offer to find the part for the Grangers, leads to "Deep Diving"
Fight the GrangersReturn to Earl, $250 if the Grangers are killed and Chance is (surprisingly) alive
Deep Diving
Decide to work for the Grangers and find a Control Module
Find a Control Module (Chapter 2)
Damsel in Distress
Speak to Earl at the Jobs!!! booth after completing the quest Easy Money
Talk to Faythe
Deal with Foley
Kill them
Distract them so Faythe can kill Foley. Letting Faythe kill Foley will allow her to unlock the Assassin or Thief feats.
Streetwise 2
Walk away without the key or kill the thugs for the key
Convince the thugs to give up the key
Streetwise 3
Impersonate 3
Persuasion 3Streetwise 4
Persuasion 3Attack with bonus InitiativeReturn to Earl for $600 (if Faythe is alive)
Moonshine
Speak to Boone at Boone’s Moonshine
Retrieve an algae shipment from Hydroponics, speak to Carlos at Camp Reid in Hydroponics
Carlos needs you to retrieve the parts for a bioreactor from an abandoned Hydroponics tower
Return the parts during “Scavenger”
Return to Boone for either a combat training token or $1000
Mysterious Stranger
Find Hank being accosted in the outskirts by two thugs
Agree to follow him to the gang hideout
Kill the gang
Kick in the front door, then kill them
Sneak in the back door, then kill themReturn to the Church
Eviction Notice
Speak to Carlos in Hydroponics he wants to convince a band of mercenaries to leave a Hydroponics tower, if reason fails then use force
Deal with the Scavs in Delta Tower of Hydroponics
Fight the scavs
Sneak into the back vents
Fight from stealth
Electronics 3 to open the side door, disable the machine to kill the scavsIf Faythe in the party the scavs can be persuaded to leave
Persuasion 3
Persuasion 4
Streetwise 3If you have a Regulator badge you can bluff them into leaving
Impersonate 3
Persuasion 3
Streetwise 4
Scavenger
Break into Tower Alpha to retrieve the bioreactor parts
Get to the second floor of Tower Alpha
Electronics 3 - Override the elevator safety protocols
Strength 7 or Jed and a rope - Climb the elevator shaftGet across to the adjacent tower
Dex >= 7 to jump the gap on the top floor
Computers 3 to call a service car to the towerStrip the old bioreactor for parts
Return to Carlos
Head Hunter
Return a frog psyker brain to Maryam on Floor 2 of Camp Reid’s tower
Frog Psyker brains can be found in Hydroponics (harder fight) or Armory (easier fight)(Optional) Receive Computer training from Maryam
Extract 3 more psyker brains for Maryam, continued in Chapter 2
The Outcast
After beating five fights in the Courthouse you will be approached by the Harbinger who will ask you to find Knurl the Outcast, continued in Chapter 2. If Jed is in the party he will add some additional context to the quest.
Chapter 1 Crossroads Quest
Crossroads
Branching multi-part quest to determine the fate of The Pit
Started by leaving Abe's General Store after the confrontation with the thugs
Side with Jonas
Streetwise 3 to earn $300 from Jonas
Ace Up Your Sleeve
Retrieve Disruption Grenades
Speak to Cole at Cole’s Gadgets
Retrieve the cores from Isaiah
Kill Isaiah and his thugs
Sneak into the vent around the corner and steal the cores
Talk to Isaiah then kill him quietly, Critical Strike 3
Convince Isaiah the cores are worthless Streetwise 2
Streetwise 3, -$50Return to Cole
Return to Jonas
Lord’s Mercy (Jonas)
Deal with Mercy
Kill Mercy
Leave and sneak back in to kill Mercy
Convince Mercy to join Jonas
Talk option 1
Persuasion 2
Persuasion 3
Persuasion 3
Persuasion 4
Persuasion 4
Streetwise 2
Persuasion 3
Persuasion 4
Persuasion 4
Streetwise 5
Streetwise 2
Persuasion 3
Persuasion 3
Persuasion 4
Persuasion 4
Streetwise 2
Persuasion 3
Persuasion 4
Persuasion 4
Streetwise 5
Streetwise 2
Persuasion 3
Persuasion 4
Streetwise 4Streetwise 3
Persuasion 3
Persuasion 4
Streetwise 4Charisma 8 + Streetwise 4
Persuasion 3
Persuasion 4
Streetwise 4Return to Jonas
Continues with "All In (Jonas)" for a straight up fight or "You Shall Not Pass (Jonas)" for an alternative route
All In (Jonas)
Deal with Braxton
Assault Regulator HQ, Kill Braxton
If Mercy is alive you will have the option of siding with her over Jonas after the fight. Mercy will survive the fight even if she is killed in combat.Return to Jonas
You Shall Not Pass (Jonas)
Prevent Regulator reinforcements from joining the attack
Kill the reinforcements
Close the gate using the control panel
Three electronics modules OR Electronics 3 and two electronics modules
Computer 3 to decontaminate the entrywayPersuade the reinforcements
Impersonate 2
Persuasion 3 or Streetwise 3
Impersonate 4
Persuasion 5
Impersonate 5
Tell the truth
Persuasion 5
Impersonate 5
Streetwise 3
Persuasion 4 or Streetwise 4
Combat reputation
Talk
Persuasion 5
Streetwise 5
Return to Jonas
Side with Braxton
Hired Thug
Samuel is one of Jonas’ henchmen, kill him.
Talk to Manny
(Optional) Persuasion 3 or Streetwise 3 - Convince Manny to supply additional men for the assault, -$300Head to warehouse in the Outskirts
Kick in the door and kill Samuel
Sneak in via the vents and kill them
Persuade Samuel’s men to kill him
Streetwise 3
Persuasion 4 or Streetwise 4Return to Braxton
Lord’s Mercy (Braxton)
Deal with Mercy
Sneak into Mercy's fortress and kill her
Deal with the gate guard
Critical Strike 4Lead an assault squad of 3 of Braxton’s men to kill Mercy
Deal with the gate guard
Critical Strike 4
Wait for the Regulators to distract the guardConvince Mercy to join Braxton
Streetwise 2
Streetwise 2
Persuasion 4
Streetwise 2Persuasion 2
Persuasion 4
Streetwise 2
Persuasion 4
Streetwise 4Charisma 8 + Persuasion 3
Persuasion 4
Streetwise 2Return to Braxton
Continues with "All In (Braxton)" for a straight up fight or "You Shall Not Pass (Braxton)" for an alternative route
All In (Braxton)
Deal with Jonas
Lead a Regulator squad to kill Jonas
If Mercy is alive you will have the option of siding with her over Braxton after the fight. Mercy will survive the fight even if she is killed in combat.Return to Braxton
You Shall Not Pass (Braxton)
Defend the entrance to Camptown from reinforcements
Head to Camptown gates
(Optional) Repair and reload the turret, Electronics 2 and Electronics 4
Persuade the mob to stand down
Talk Option 1
Impersonate 3
Impersonate 4 or Streetwise 4
Impersonate 5
Streetwise 5Option 2
Persuasion 4 or Streetwise 4
Impersonate 5
Streetwise 5Talk Option 2
Persuasion 4 or Streetwise 4
Persuasion 5
Streetwise 5Return to Braxton
Melee Equipment
Navigation Tag: EQUIPMENT_COMPENDIUM
Weapons
Bladed
Name Damage AP Cost Value Aimed Reaction Accuracy Graze Penetration Camp Knife 6-8 5 20 5 15 Toothpick 7-9 5 50 5 20 10 Machete 9-11 5 100 10 5 10 Combat Knife 8-10 5 350 10 25 5 10 Chopper 10-12 5 450 15 10 20 Johnny Reb 8-10 5 450 10 20 5 20 Bowie 9-11 5 450 15 25 5
Blunt
Name Damage AP Cost Value Aimed Reaction Accuracy Graze ArmorPen KnockD Crit Stagger Truncheon 10-12 6 50 -5 15 Utility Bar 9-11 5 100 10 Gear Mace 11-13 6 450 -5 20 10 Warhammer 13-15 7 750 -10 25 10 10 20
Pistols And Shotguns
Pistol
Name Damage AP Range Value Aimed Reaction Acc Graze Crit Stagger Ammo Clip Suicide Special 9-13 5 6 50 -5 9mm 1 Piper Jack 10-14 5 2 50 -5 15 9mm 4 Rounder 6-10 4 4 50 -10 9mm 6 Springer 11-15 5 7 250 9mm 6 Pepperbox 12-16 5 2 250 15 9mm 6 Bulldog 8-12 5 6 250 5 -5 9mm 6 Bulldog II 10-13 4 4 500 5 .45 6 Pepperbox MK2 13-17 5 2 500 20 5 9mm 6 Longslide 12-16 5 8 800 5 5 9mm 3 Webler 11-14 4 4 800 10 .45 6 Damaged Energy Pistol 17-21 5 10 1000 5 Cells 10
Shotgun
Name Damage AP Range Value Acc Graze ArmorPen KnockD Crit Stagger Ammo Clip Boomstick 11-15 4 2 50 25 5 5 Shells 1 Street Sweeper 12-15 5 4 150 5 15 10 5 Shells 4 Gatling Gun 13-17 5 3 150 25 5 10 Shells 5 Double Trouble 13-17 4 2 900 35 10 10 Shells 2 Rusty Doomsayer 13-15 5 6 800 5 15 10 5 Shells 8 Judgment 13-15 4 5 1200 5 15 10 5 Shells 5
SMGs And Rifles
SMG
Name Damage AP Range Value Aimed Reaction Acc Graze APen Crit Stagger Ammo Clip Flyapart 8-11 4 3 50 5 -5 10 10 9mm 20 Plugger 9-12 5 5 50 10 -5 10 10 9mm 20 Tommy Gun 10-14 5 5 250 5 -5 15 15 9mm 20 The Grinder 10-13 4 3 350 5 -5 15 15 9mm 20 Old Stanley 11-14 5 6 800 10 20 10 9mm 20 Spitfire 11-14 4 4 900 20 10 15 9mm 25
Rifle
Name Damage AP Range Value Aimed Reaction Acc Graze APen KD Crit Stagger Ammo Clip Bolter 12-14 7 9 50 5 10 5.56 1 Howler 11-15 6 7 250 5 -5 10 5 9mm 20 Old Betsy 14-16 7 10 250 5 5 10 5 .45 5 Pipe Dream 12-16 6 8 800 5 10 5 5.56 20 M16 14-18 7 11 750 5 15 5.56 15 Long Arm of the Law 16-18 7 12 1500 5 5 20 5 10 .45 6 Energy Rifle 21-24 7 13 3000 5 10 Cells 10
Grenades And Gadgets
Grenades
Item Value Radius Duration Effect Smoke (low-grade) 150 3 3 Melee THC Penalty -15, Ranged THC Penalty -60 Smoke (mid-grade) 300 3 4 Melee THC Penalty -25, Ranged THC Penalty -80 Flashbang (low-grade) 150 2 1 Attack THC Penalty -40, AP Penalty -4, Evasion Penalty -40 Flashbang (mid-grade) 300 2 1 Attack THC Penalty -70, AP Penalty -7, Evasion Penalty -70 Gas (low-grade) 150 3 3 Damage 6-6, Physical Stat Damage 1 Gas (mid-grade) 300 3 3 Damage 8-8, Physical Stat Damage 2 Gas (high-grade) 600 3 3 Damage 10-10, Physical Stat Damage 3 Stasis 750 1 2 Freezes all characters out of space-time Pulse 600 10 1 "Damages unshielded electronics", currently deactives all gadgets in huge AOE but doens't appear to impact turrets yet Disruptor 750 2 1 Targets lose AP for 3 turns
Gadgets
Item Value Effect Energy Shield 500 Activates energy shield during combat, adds regenerating shield HP, prevents user from engaging in melee combat but can shoot through Distortion Field 500 Enemy ranged THC penalty -35, damages melee attackers and applies Zapped (-5% THC) Cloaking Field 500 Enemy detection -25%/turn, enemy thermal vision -25
Armor Equipment
Arms
Name DR Melee DR Ranged DR Energy Value Evasion Sneak Reaction Initiative AP Protective Sleeves 1 1 50 Shield Armguards 2 2 1 100 Raider Armguards 3 2 100 Scav Armguards 4 3 1 250 -10
Vest
Name DR Melee DR Ranged DR Energy Value Evasion Sneak Initiative AP Protective Vest 1 1 50 Ballistic Vest 1 2 100 Reinforced Ballistic Vest 2 2 150 -5 -10 -5 Fancy Ballistic Vest 3 2 1 200 -5 -10 -5 Heavy Ballistic Vest 3 5 400 -10 -10 -10 Assault Armor 5 3 400 -10 -20 -10 Scav Armor 3 3 3 400 -10 -10 -10 Enforcer Armor 6 8 7 700 -30 -10 -25 Tactical Vest 8 7 8 800 -30 -10 -25
Energy Armor
Name DR Melee DR Ranged DR Energy Value Evasion Sneak Initiative AP Shield HP Energy Armor 2 2 3 1000 -10 -50 -5 40
Jacket
Name DR Melee DR Ranged DR Energy Value Evasion Sneak Initiative AP Worker Jacket 1 1 50 -5 Traveler Coat 3 2 2 200 -10 -10 -10 Scrapper Coat 2 2 3 200 -10 -10 -10 Gunslinger Jacket 1 2 2 150 -5 -5 -5 Scav Jacket 3 1 2 150 -5 -5 -5 Granger Coat 5 3 6 700 -20 -10 -20 -1 Explorer Coat 3 4 5 700 -20 -10 -20 -1
Boots
Name DR Melee DR Ranged DR Energy Value Evasion Sneak Initiative Boots 1 1 10 Worker Boots 2 1 20 Heavy Boots 2 2 50 Raider Boots 5 4 100 -15 -10 -10 Scavenger Boots 6 5 2 150 -15 -10 -10 Guard Boots 5 6 2 150 -15 -10 -10 Welding Boots 7 5 5 200 -20 -20 -15 Military Boots 6 7 3 300 -15 -10 -10 Enforcer Leg Armor 8 10 6 400 -25 -20 -20
Head Equipment
Helmet
Name DR Melee DR Ranged DR Energy Value Resist Optical Resist Toxic Thermal Initiative Evasion Accuracy Bowler Helmet 3 2 50 Bucket Helmet 2 3 50 Battle Bowler Helmet 5 4 100 25 -10 -10 Scav Helmet 4 5 150 4 Diver Helmet 4 5 200 4 Ballistic Helmet 4 7 3 350 30 3 30 -15 -15 5 Welding Helmet 4 4 3 300 100 4 -20 -20 Safety Helmet 4 3 2 250 30 Enforcer Helmet 5 7 5 750 45 45 5
Breather
Name Resist Toxic Value Face Mask 2 100 Common Respirator 3 100 Half Mask 4 200 Biolab Gas Mask 6 750
Eyes
Name Thermal Vision Resistance Optical Value Aimed Accuracy Reaction Smart Glasses 15 30 50 Scanner 25 30 50 5 Maintenance HUD 30 15 150 5 Work Goggles 30 45 350 5 Scavenger Goggles 45 45 500 3 3 5
Merchant Inventories
The Pit
Abe's General Store
50x .45
50x 5.56
100x 9mm
100x Shells
1x Energy Cell
Utility Bar
2x Electronic Modules
2x Rope
Work Goggles
Common Respirator
Welding Helmet
Cole's Gadgets
2x Flashbang (low-grade)
Flashbang (mid-grade)
3x Gas (low-grade)
Gas (mid-grade)
3x Smoke (low-grade)
Smoke (mid-grade)
Distortion Field
Energy Shield
Bionic Eye (Perception implant)
Frank Boswell, Gunsmith
x75 .45
x75 5.56
x100 9mm
x100 Shells
Long Slide
Pipe Dream
Old Stanley
Fine Clothing and Armor
Scav Helmet
Scavenger Goggles
Scav Armor
Scavenger Boots
Medbay
6x Regen Stim
4x Aggro Stim
100x Medkit
Hit & Kill
2x Energy Cell
x50 Shells
x25 .45
x25 5.56
x50 9mm
Flashbang (low-grade)
2x Gas (low-grade)
2x Smoke (low-grade)
Judgement
General Store next to Courthouse
x50 .45
x50 5.56
x100 9mm
x100 Shell
Warhammer
Common Respirator
Maintenance HUD
2x Smoke (low-grade)
Smoke (mid-grade)
2x Flashbang (low-grade)
Flashbang (mid-grade)
2x Gas (low-grade)
Gas (mid-grade)
Combat Knife
Gear Mace
Caleb's Bar in Promised Land (only during Crossroads siding with Jonas)
x100 .45
x100 5.56
x100 9mm
x100 Shell
4x Regen Stim
2x Aggro Stim
x25 Medkit
Source: https://steamcommunity.com/sharedfiles/filedetails/?id=2462652161
More Colony Ship: A Post-Earth Role Playing Game guilds
- All Guilds
- [OBSOLETE]JACK OF ALL TRADES - how to get a versatile (solo) character
- Quick start for talk character.
- CHARACTER CREATION AND ZONE SKILL CHECKS