Introduction

 Variable Trigger
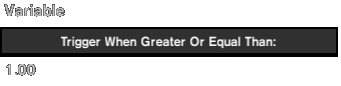 Variable Action
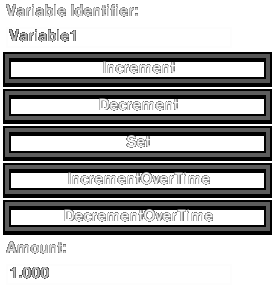 Toggling Triggers
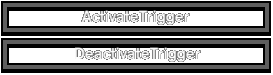
 Trigger Map Key
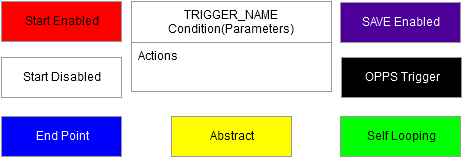
Before learning about advanced triggers you must have basic knowledge of the tools within the Trigger tab of the level editor.
In order to create advanced triggers it is important to understand how to manage triggers with other triggers. Every trigger has to fulfill at least two requirements: Activation and Condition. By default all triggers are active, this is determined by:
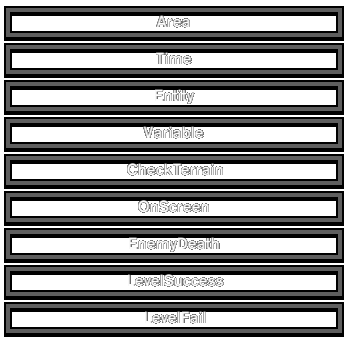
The Conditions can be any of the following:
Most of the conditions are simple:
Area
Check Terrain
Entity
For advanced triggers, the most valuable condition is the .
It is possible to quantify requirements and set locks with this trigger. It can operate with:
Greater than or equal to (>=) Smaller than or equal to (<=)
This action is the fundamental mathematical action of Broforce. It can be used to count time, kills, rescues, and just about anything. It can also lock and unlock triggers similar to the activation requirement, by setting variables to 0 or 1. For this guide, symbols will represent these actions:
Increment by 1 (variable++) Increment by X (variable += X) Decrement by 1 (variable--) Decrement by X (variable -= X) Set to X (variable = X) The Level Event action includes the following actions:
The activity of a trigger can be determined by these actions. When a trigger fulfills both activation and condition it will start its actions and automatically be deactivated. It will not occur again until it is reactivated. Those corresponding lines will be used in forming relationships in Trigger Maps.
Triggers can be identified with chunks of data.
The properties of a trigger must be easily identified, knowing whether it is activated by default is critical.
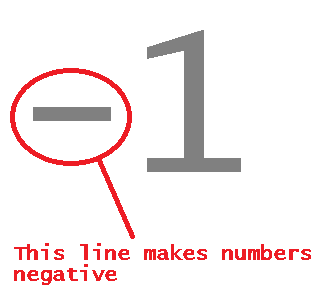
Negative Values
 Initial Trigger
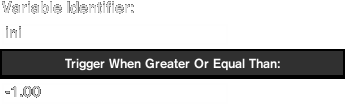 Negative Damage
 Implosions
 Negative Zoom
Using Negative numbers has some interesting effects.
An interesting exploit that is now hard coded into the game is a Negative Variable Trigger or . This requires that a variable trigger is set with the condition that it must be greater than a negative number. The result is a trigger that starts immediately as the level loads, if it is active by default. This is a better alternative to an Area or OnScreen Trigger at spawn, because it is a lot cleaner and easier to test with.
The Damage Unit feature of the Level Event Action can heal specific enemy targets with negative damage. Vehicles and saw blades are unaffected by this action. Dead things can be brought back to life also. Increasing an enemy's health to an absurd amount tends to disable their AI (they develop a god complex) and collision detection (and they transcend reailty), so beware!
When using a Splosion action, setting it to a negative value results in . These do the opposite of explosions, so they increase the health of those affected. This includes enemies, bros, terrain, vehicles, and saw blades. While there are more healing options with this tool, it has a large area of effect, so it is difficult to pick specific targets without healing others nearby. When dealing with terrain, explosions have a 4x4 square unit range of effect. The range is typically larger when affecting enemies. It is common to place all in an , so the stage health is set in the beginning.
This whole block of terrain is affected. Notice the reference point of the explosion. Shockwave effects can nullify the increased health of terrain, so Bronan and Mech Drops can destroy this terrain easily. Spawning Steel Blocks into affected terrain will make it absolutely invincible, but that is very time consuming.
Applying a negative zoom in the camera action will make the camera zoom in so hard that the world goes upside down. Bros cannot move when this happens so do not use this. I regret bringing it up.
Variable Manipulation
Calculation Delay Range Equivalence
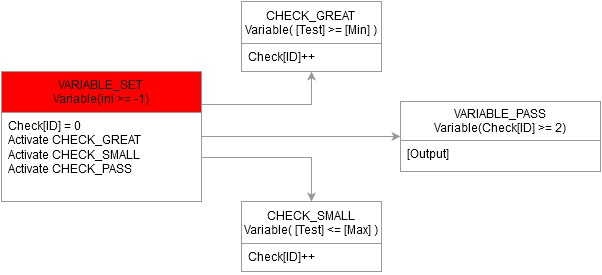 Linked Equivalence
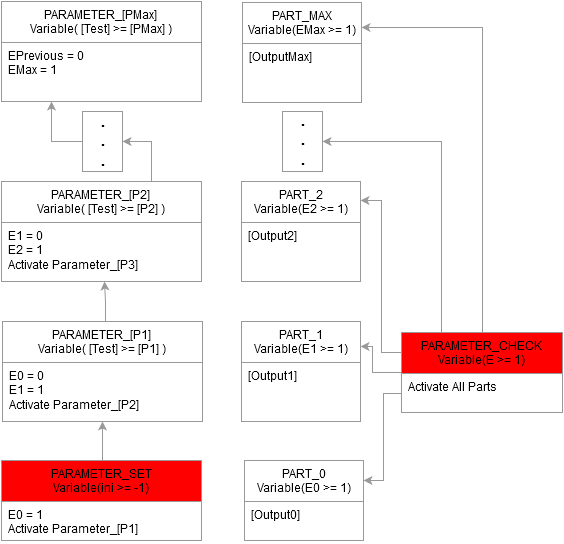 Compartmentalization
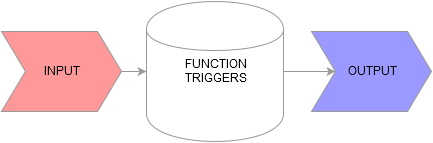
Here are some advanced concepts with the Variable trigger and Variable action.
Setting an order to variable actions is important. Make sure variables are accounted for at the appropriate times.
Red triggers are activated by default, but this does not mean its condition is also met. Unless it is an Initial Trigger.
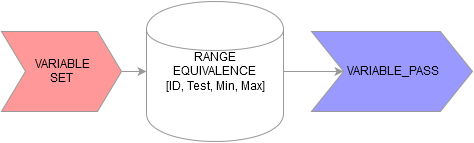
While the trigger conditions only factor >= or <= , a trigger that applies both can use a specific range or number as a condition.
Values in brackets are variables that change depending on how the trigger is implemented
In this example VARIABLE_PASS starts if [Test] is between [Min] and [Max], otherwise it will have no ending trigger start. This function is mainly used in a password system, which is a master level topic discussed later.
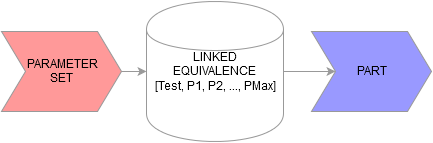
It is possible to create equivalence with two sets of variable dependent triggers. However, there cannot be gaps between each link, so all ranges between must be considered even if it has no action outside linking the triggers. This is useful for creating a selection of specific triggers.
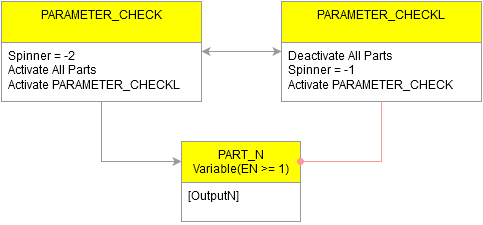
They are linked because the PARAMETER and PART triggers are prepared for use in lockstep, which is started when the variable E is incremented. Notice that the system is designed to always have an ending trigger, as the PART_0 setting is prepared to start by default. This function is traditionally used in grading ranges of kills, consider replacing Parameter with a KillCounter and making PARAMETER_CHECK a Level Success Trigger, and then each PART will represent a grade range.
Mentally categorize triggers together in groups so it is easier to understand their purpose. The main concern is identifying the input and output of the triggers:
Consider the previous examples:
This function starts from VARIABLE_SET and every [ID] whose [Test] is between [Min] and [Max] will fulfill the requirements of VARIABLE_PASS and then the output actions will occur.
This system initiates from the input trigger PARAMETER_SET and uses the value of [Test] to select one among the possible PART triggers, which are based on the conditions set by the [P] values for an output action.
Variable Application
Random Number Generator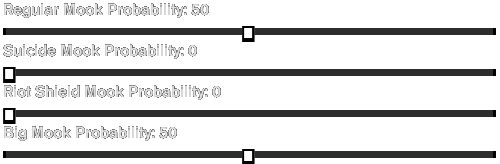


 Democracy Simulator

 Horizontal Signpost Feedback
Variable Actions can be used to count strange and wondrous things.
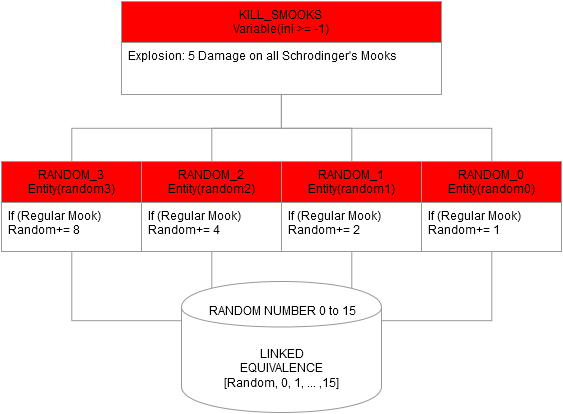
Apply a binary number system to killing random mooks and use linked equivalence for those values to produce a random number generator.
There are no probability based triggers, so the probability processes within the Meta tab must be connected to triggers.
Binary Relationship
When using Mook[R] or the random mook doodad, the Meta tab probability is being used by entities. The concern is about differentiation of the mooks properties. The main consistently testable relationship between a Regular Mook and a Big Mook is their health, as the former goes down easily with almost no health and the latter has 25 health. Their health will be tested with an explosion action of 5 damage, so their binary relationship is their state of being dead and not dead. Their probabilties are set to an even 50/50, for uniform distribution.
Big Mooks cannot be killed here, so they are worth nothing.
Regular Mooks will face certain death, so they are the ones to count.
Schrödinger's Mooks
0110 in binary = 6 in decimal.
This set of Schrödinger's Mooks, or Smooks, is not meant to be seen by the player, as to the player, Smooks are both alive and dead. Smooks represent a binary number in human sacrifice form. In this case, the highest order Smooks are in the left and their death places a greater change in the random number being generated.
If you look at this long enough you will understand how to convert binary to decimal.
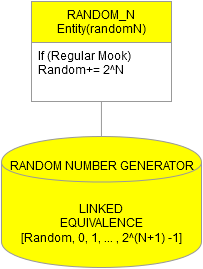
Random Linking
The triggers are just connected by the variable 'Random'
The Linked Equivalence method uses a random variable as its Test input. The amount of parts in the link increase exponentially depending on how many Smooks are being used. The relationship is demonstrated here on this Abstract Trigger Map, with N as the max amount of Smooks:
Do you understand the maths?
These triggers are made in America.
Make triggers operate in response to the amount of players active and the actions they take.
Steel Caucus
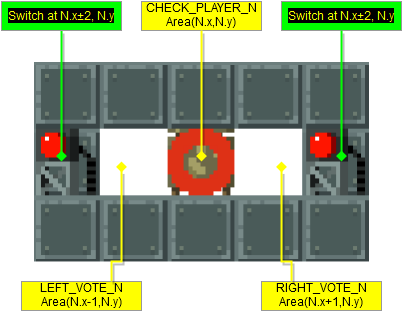
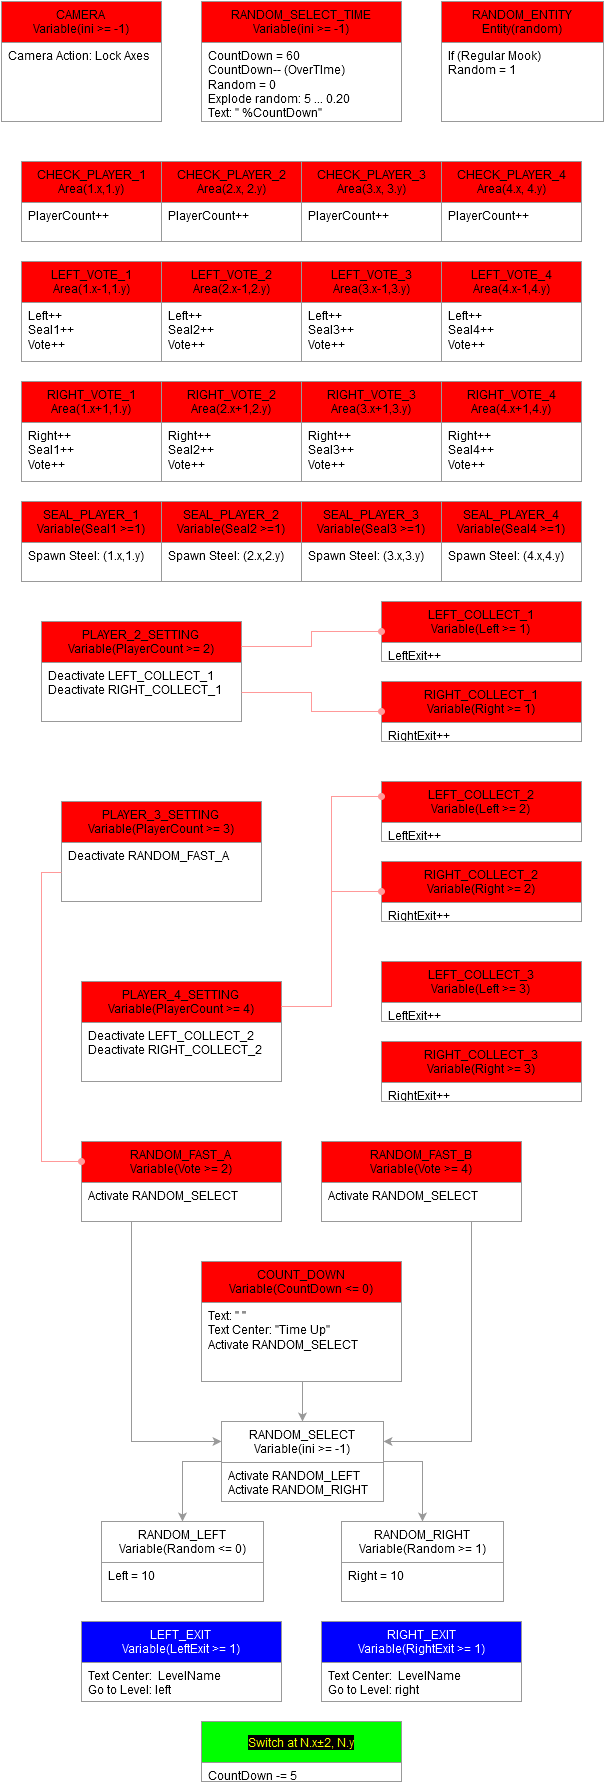
This structure is designed to count each player's vote. They are spawned in the middle, and their vote depends on whether they go left or right, and they have a limited time to cast a vote. Additionally, switches were added so that voters can pressure nonvoters to vote by decreasing the time limit. The final decision will be randomly selected if the time limit is reached or if the votes do not result in a majority decision. The variables being applied will assess active players, left votes, right votes, and total votes to immediately determine the majority needed or if a draw has occurred. A single Smook is used to determine the random final decision.
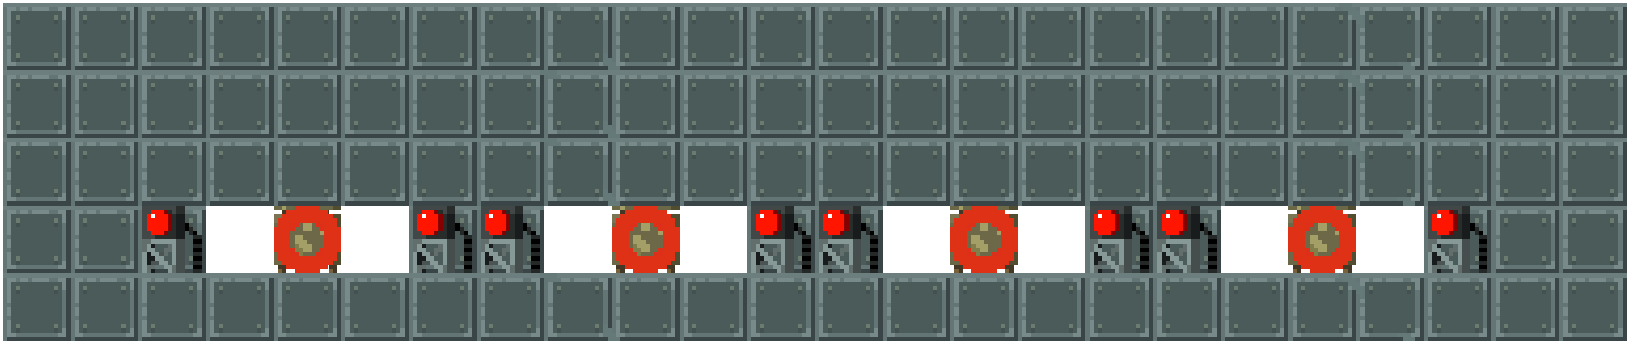
The whole Caucus of four bros will be placed in here
The SEAL triggers ensure the bro cannot vote again. Unless they are Brofessional
The COLLECT triggers determine the current majority required, while the RANDOM_FAST triggers determine the current draw conditions. The PLAYER_SETTING triggers change the requirements for votes by deactivating the lesser requirements of the COLLECT and RANDOM_FAST triggers with each added player.
This is the most confusing part. Each player needs a signpost with voting information, and each voting position needs a signpost to overlap the information with their response. There should be a total of 12 signposts, as there is 3 for each player. Lining up all the signpost text together is incredibly difficult, so it is still possible to make set for each player instead.
Looping
Frequency

 Series
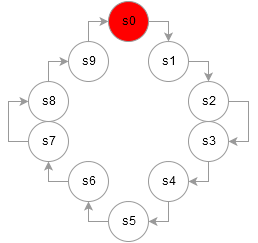
 Parallel
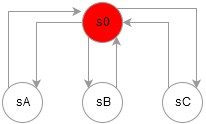 Sensors And ScannersNotes
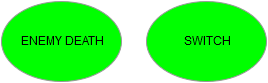
This is how to repeat triggers.
The Activate Trigger action warns users that a trigger should not activate itself:
That is dangerous. Don't do that, or the trigger will repeat ceaselessly and constantly. However, there is a way to bypass this limitation:
This is the simplest form of looping triggers. Have two triggers activate each other. The red indicates which trigger is active by default, or the starting point. Be sure to put in a delay or the triggers will repeat every frame if initialized. The delay determines the frequency of the loop.
The example shown has TRIGGER X activate TRIGGER Y after a 1 second delay, and it increases the image intensity immediately. TRIGGER Y activates TRIGGER X after a 1 second delay, and it decreases the image intensity immediately. Both triggers are Initial Triggers, so their conditions always pass.
Conditions of all triggers need to pass in order for a loop to operate. Using different conditions for each trigger in a loop can be more methodical, as it increases the amount of conditions that need to be met. It also can determine which parts of the loop will always continue, and which part the loop will stop at.
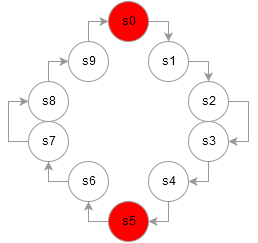
Looping triggers in series takes much more work to do, but it eliminates the use of delays for non-activation actions. This means the loop will immediately end if its condition is no longer met, as delayed actions are unconditionable once a trigger starts. Also series loops are more flexible, and can have multiple starting points.
For more abstract methods, a parallel loop could be used. This means that one trigger can affect many triggers, and their loops are shared. This is useful for limiting the the amount of triggers when there are multiple optional loops.
Using an Area or OnScreen condition for a loop can allow for better performance. Like spawning objects only when the player is nearby or sending an elevator down when a bro is below it. It would not be appropriate to have those actions occur unconditionally.
Camera Actions and Spawn Block actions are not loopable. Most other actions are loopable, so it is always fun to try looping things for a new mechanic. Looping character commands is good practice for making custom artificial intelligence. Enemy Death Triggers and Switches are already self looping, so they do not need another trigger to reactivate.
Rescue Trigger


This is a strange phenomenon that results from how Bros are loaded in. In order to trigger an event based on saving a bro, simply make an Area Trigger at (0,0), and that is already set up when a trigger is created. This occurs because bros are spawned at that position then teleported back to the position in which they were saved.
Connect that Area Trigger to a looping trigger and apply a variable increment by 1 for counting rescues. Set the looping trigger to at least a 2.00 second delay to avoid over counting. It is possible to make rescue requirements for levels with this techinique, or make cool effects for each rescue.
Be sure to delay the activation of the Area trigger upon level load, since it may count spawning in from the helicopter or truck as a rescue. Using a spawnpoint will work fine regardless though.
Pseudo-Random Spinner
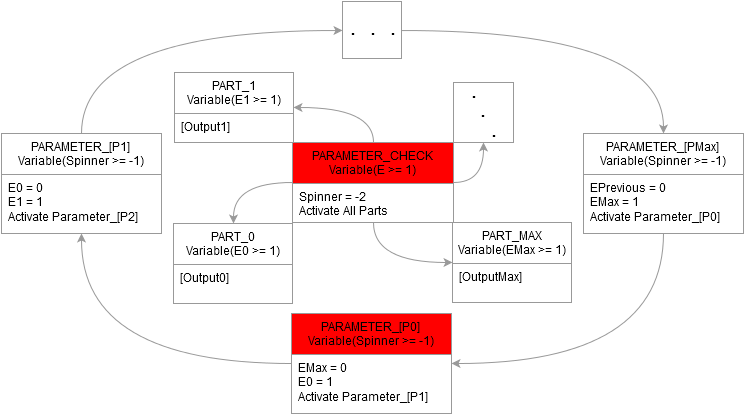

Apply both Linked Equivalence and series looping to produce some sort of wheel of fortune.
The moment PARAMETER_CHECK starts, the spinner will be set to -2, so it will end the loop and output the actions of the trigger that the loop stopped at. The simplest Pseudo-Random Number Generators are based on time. If the user cannot see which state the loop is currently in, the position where it stops at feels random. Trying grabbing a number greater than 70 out of this loop:
Now try doing it with your eyes closed.
The Spinner can also be looped again for repeated uses:
The time dependency of this method requires that the activation triggers must start by player action. If they are started systematically from Initial Triggers the outcome will likely be the same every time. While it is easier to repeat the spinner, it is not truly random.
Menu Systems
 Menu Node
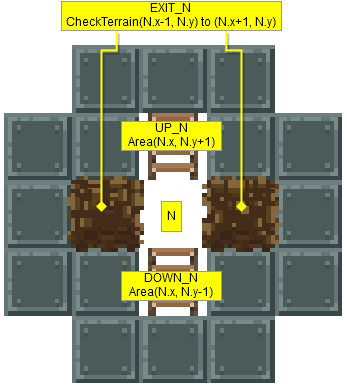 Teleport Loop
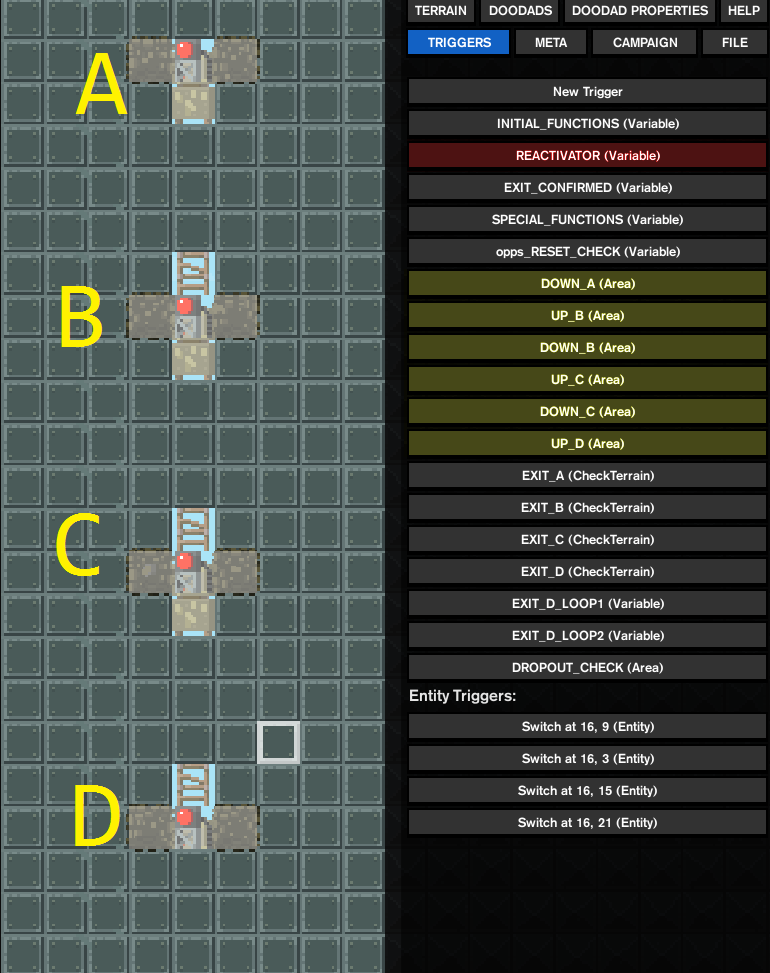
 Vertical Signpost FeedbackNotes
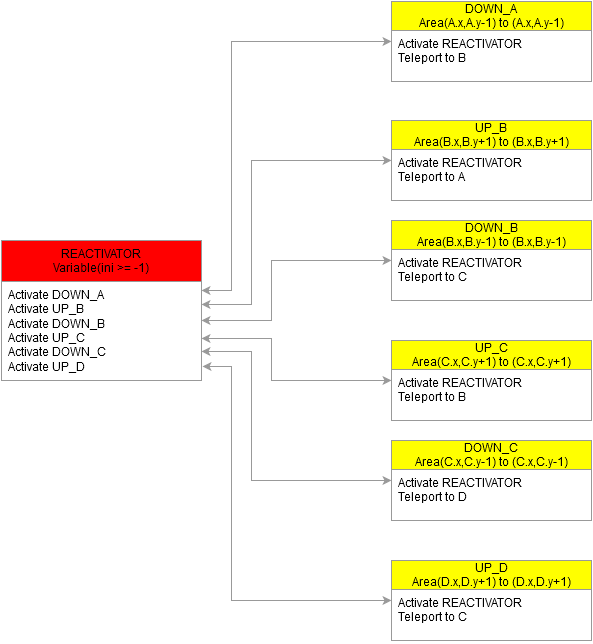
Combine knowledge of camera actions, teleporting bros, parallel looping, and bulk text signposts to make custom menus, or dialogue. This design is made by spawning players in nodes in which they teleport between, and the signpost they are nearest to will show this change on the text in camera view. Firing their weapon should result in terrain being destroyed which results in a menu selection. This is a level dedicated to level selection not gameplay.
This structure is where bros will actually be during the menu sequences. Bros are teleported into the middle. The upper ladder has an Area trigger that teleports bros to the node above, and the lower ladder teleports them below. Destroying the Earth on the sides starts a Check Terrain trigger that will select another level or warp bros to another scene. A signpost should be placed in the node to provide visual feedback. Using switches as an alternative to destroying terrain is also possible.
REACTIVATOR is the main trigger of the loop. The highlighted triggers are secondary processes of the loop.
While it is possible to constantly loop the REACTIVATOR, it is not good practice to unnecessarily loop triggers. With this setup, triggers loop immediately after use.
This is still the most difficult part, but less so than that of the democracy simulator. First a camera action must be set up to lock view at the signpost text. Every node should have a signpost. Each signpost must have the same text but with some variation, namely a bracket to see what is selected and more lines to calibrate distance the signpost is from the camera. The lower the signpost is the more lines are needed to push the text up.
Be sure to Force Specific Bros in this type of level. The Brodator is ideal, because his weapon deals enough damage to destroy a block of terrain without affecting much else. The Brofessional can teleport, and his gun does not reliably destroy terrain in a single shot, so he is not a good choice.
Brogramming
 For Loops
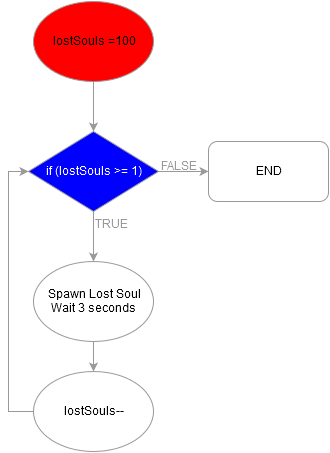
 Variable Time Loops
 Mutual Exclusion
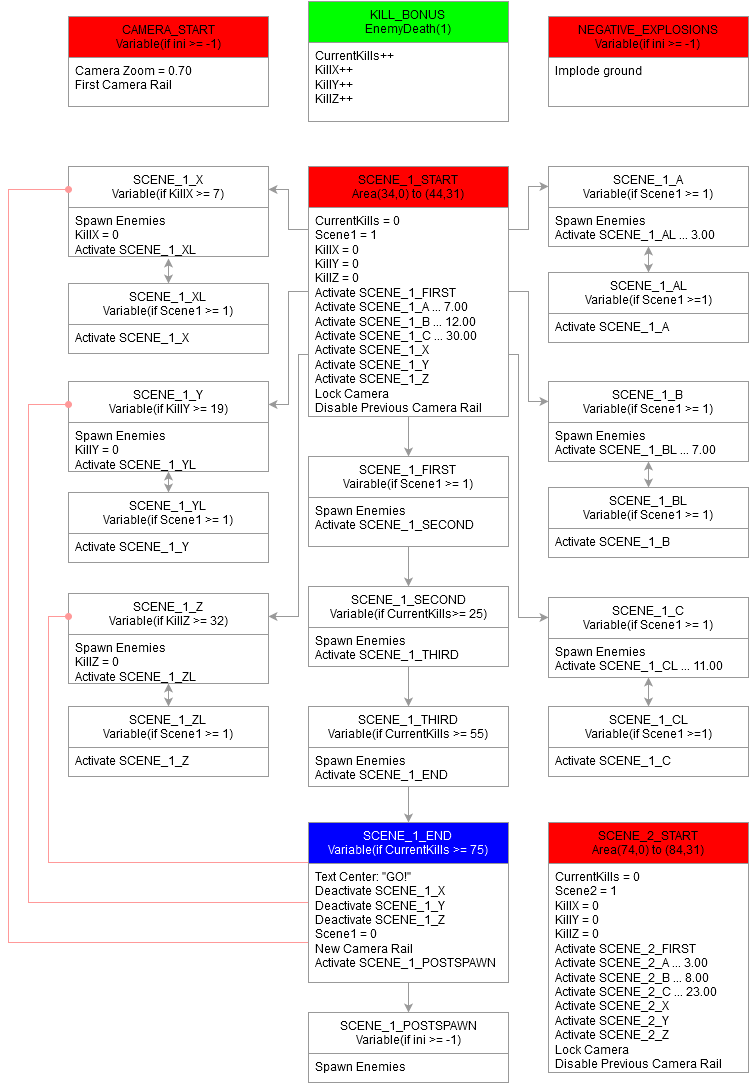
 Complex Math Loops
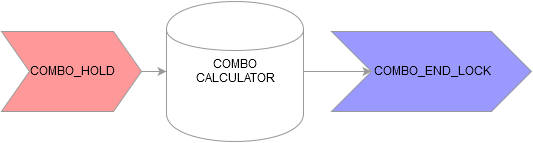


Brogramming in Broforce takes a lot thought to do right, and there is hardly any reason to use it since Broforce is a mindless testosterone driven romp. Here is some cool maths and computer science stuff anyway.
The general idea of Broforce Brogramming is working outside limitations, as variables can only be incremented, decremented, and set to constants. Variables cannot be directly affected by other variables, but it can be influenced by other variables indirectly.
For those familiar with programming, this concept should be easier to grasp, as earlier discussion of trigger looping is essentially about sentinel controlled loops. A for loop has numerical basis for its condition and is therefore considered a counter controlled loop.
In Broforce terms, loops that are conditioned by incrementing variables are counter controlled, and loops that depend on other conditions are sentinel controlled.
Brogramming 101
Objective: Spawn a total 100 Lost Souls, with one spawning every 3 seconds.
Pseudocode:
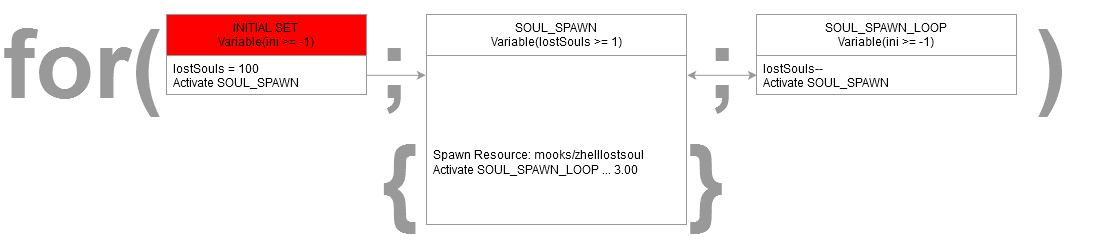
for(lostSouls=100;lostSouls>=1;lostSouls--) { Spawn Lost Soul; Wait 3 seconds; } Flowchart:
Trigger Map:
Click image for zoom
Notice the first arrow is not symmetric (it has one point on one end), as the initial set trigger is not part of the loop. It only precedes it.
That wasn't so hard right?
The rate in which loops occur can be manipulated by variables as well.
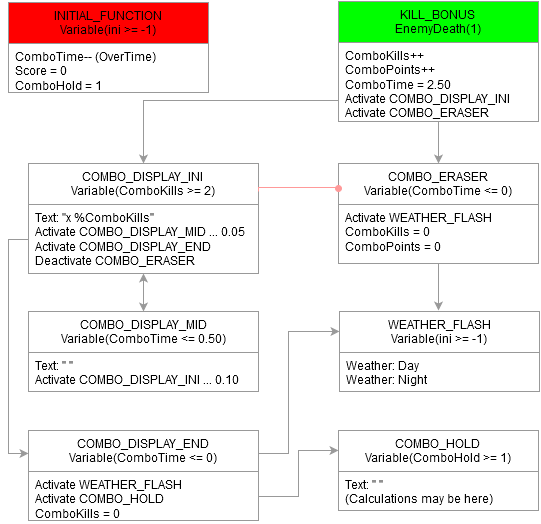
In this example a Combo Counter will be produced. It operates such that it counts kills that occur within 2.50 seconds of each other. If a kill does not occur within 2.50 seconds of the last kill, then the counter will reset. It will only display the count for combos greater than one kill. For more cosmetic effects, the counter will flicker when less than 0.5 seconds remain in the combo. When the combo ends, the background will flash from day to night.
Because some loops should not be active at the same time, loops should be locked away while other loops are in play.
A modified excerpt from the Brotal Slug Campaign
In Brotal Slug, a scene is where the camera is locked and will not be unlocked until a certain condition is met, which typically involves killing a certain amount of enemies that are being spawned. Each scene in this design share variables, but multiple scenes should not be active at the same time. This complicated set of instructions allow for new gameplay experiences in Broforce:
CAMERA_START sets up the camera settings as the level loads. NEGATIVE_EXPLOSIONS determines which parts of the terrain will be indestructible.
The variables CurrentKills, KillX, KillY, and KillZ have unique conditions in each scene, as they measure the amount of kills needed for each scene or the frequency of enemy spawns in accordance to kills. The KILL_BONUS trigger is an Enemy Death Frequency action that increments each of those variables.
SCENE_N_START initiates all the loops for that scene. The variable Scene1 is specific to scene 1, and it determines when the scene's loops are locked or unlocked by setting its value to 0 or 1.
It is set to 1 at the start of the scene and then set to 0 at the end of the scene.
SCENE_N_A, B, and C and their respective loops are simply frequency loops that spawn enemies over time. This is to ensure that the enemy kill requirement can still be met even if some enemies go unkilled while out of bounds. SCENE_N_X, Y, and Z operate to spawn a set of enemies when every time a certain amount of enemies are killed. Notice how their kill counting variables reset when the condition is met. SCENE_N_FIRST, SECOND, and THIRD, spawn enemies based upon a fixed amount of kills, and is not repeatable, so designed for setting up unique enemy waves.
SCENE_N_END Terminates the loop and the camera lock. Notice how only the XYZ loops are deactivated directly, because they do not soley depend on the SceneN variable lock. SCENE_N_POSTSPAWN is just for the events that occur after the scene has ended. Then when the next scene occurs a similar process is repeated.
All those triggers make a scene that is placed in a neat little package that is cloned and modified to be used in series, producing single Brotal Slug level.
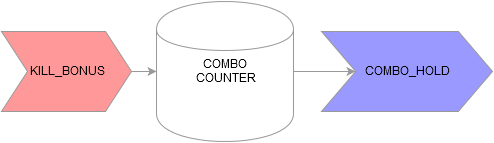
The combo system developed previously had no bearing on any value beyond itself. Now with mathematical application, a new scoring system can be developed with a Combo Calculator.
Remember how compartmentalization works. Note that the output of the Combo Counter is the input of the Combo Calculator
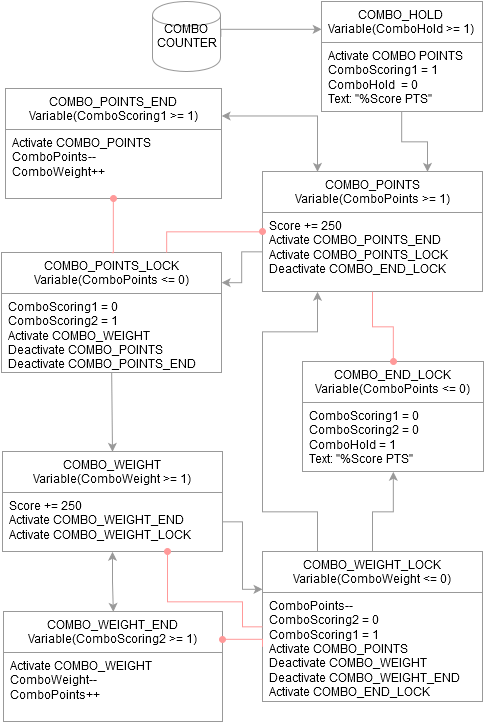
Brogramming 570
Objective: Hotline Miami 2's combo bonus algorithm is the following:
Score += 250(ComboPoints) + 250(ComboPoints)^2
Emulate that in Broforce.
Pseudocode 1:
Score += 250*ComboPoints + 250*Math.Pow(ComboPoints,2); This code is too complicated for the Broforce level editor. Variables can only be incremented or set to constants.
Pseudocode 2:
for(i = ComboPoints;i >= 1;i--) { Score += 250; for(j = ComboPoints;j >= 1;j--) Score += 250; } This code is still too difficult for the level editor. Remember variables cannot be set to other variables.
Pseudocode 3:
ComboScoring1 = 1; ComboScoring2 = 0; while(ComboPoints >= 1) { while (ComboScoring1 >=1) { Score += 250; ComboPoints--; ComboWeight++; if(ComboPoints <= 0) { ComboScoring1 = 0; ComboScoring2 = 1; } } while (ComboScoring2 >= 1) { Score += 250; ComboPoints++; ComboWeight--; if(ComboWeight <= 0) { ComboScoring1 = 1; ComboScoring2 = 0; } } ComboPoints--; } ComboScoring1 = 0; ComboScoring2 = 0; This is how Broforce does math. The hard part is actually converting that code into triggers.
Trigger Map:
If only the calculation speed was faster...
Save Systems
 Once Per Play Session
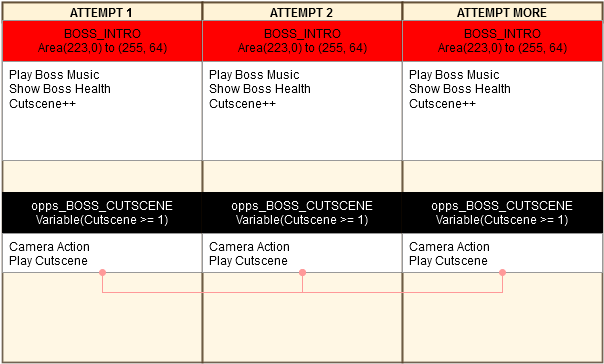
 Trigger Locking
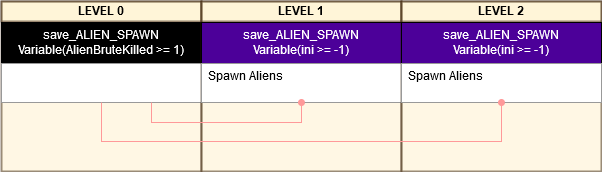
 Reset Checking
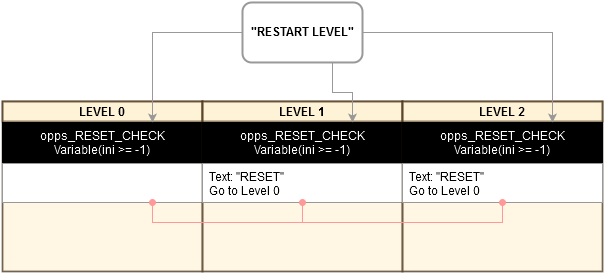 Limited Continues
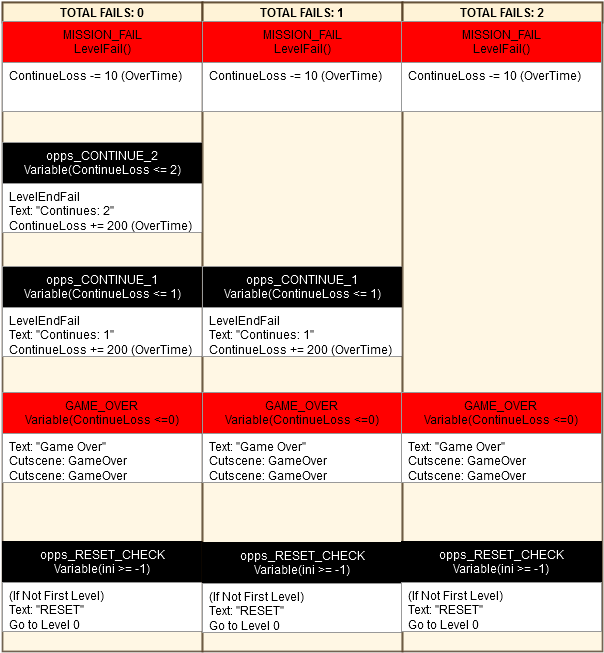
This is how to save data between levels. The OPPS checkbox:
Saving triggers were not actually implemented to the game. However, criticism of Broforce's repeating cutscenes led to an option to ensure that a trigger will not repeat upon reload by mission failure. Abuse this feature to create a makeshift save system.
Save Triggers should only be pure Variable triggers. If you want to convert an Area, OnScreen, or CheckTerrain trigger to Variable, make sure the Trigger Area is set to (0,0)-(0,0) before changing to Variable Type
This feature, as mentioned by the checkbox description, is intended for cutscenes. By not repeating a trigger on reload, it essentially transforms the trigger setup of the second attempt of a level. Triggers that always have this box checked across the whole campaign are called OPPS Triggers.
After the first attempt that triggers opps_BOSS_CUTSCENE. The trigger will no longer occur in any further attempts. The black indicates that the OPPS checkbox is enabled. Notice that there are lines indicating a trigger deactivation, but there is no deactivation action, as it is done implicitly.
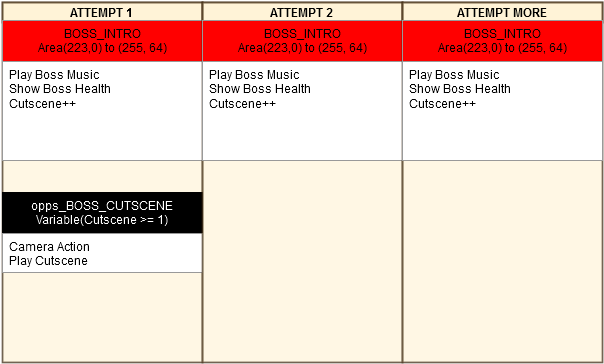
If it is triggered in the first attempt then this is essentially what happens.
The checkbox description also begs the user to enter a name for the trigger in order to memorize which trigger will not repeat. It forces a trigger with that name to permanently uncheck its "Start Enabled" checkbox once it is started. It cannot do the opposite, so it is a fixed one way lock. Note that if the "Start Enabled" box is already unchecked, then the "" quality is nullified. Using Activation actions for these types of triggers is also not advised, unless the trigger is supposed to occur at least once for each successive attempt, where as the trigger could potentially occur twice or more in the first attempt of the level.
The purple indicates the trigger has an OPPS checkbox enabled in another level.
Aliens will no longer spawn in this campaign if the AlienBruteKilled variable happens, presumably by an entity trigger uses a tagged Alien Brute, that sets the variable AlienBruteKilled to 1 . Remember that only Variable triggers work for save triggers, so it is required to have other triggers change variables.
This lock also carries over to other levels. Triggers sharing the same name will be nullified if it has already been used in a previous level where the OPPS checkbox is enabled.
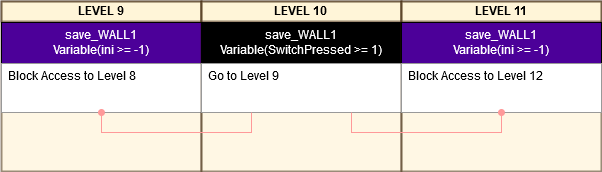
For nonlinear campaigns, triggers that prevent progress can be locked from other levels.
Saving data in Broforce campaigns is inverted and static. It is considered inverted because when a campaign begins with this technique, all triggers are active, and then triggers are locked or removed as the campaign progresses. Most other games unlock objects and add on to the data as the game progresses. The static quality derives from the irreversible nature of the save system. Once a trigger is locked, it stays locked, so it is not functionally equivalent to a global variable. Triggers that rarely have the OPPS box checked across the whole campaign are called SAVE Triggers.
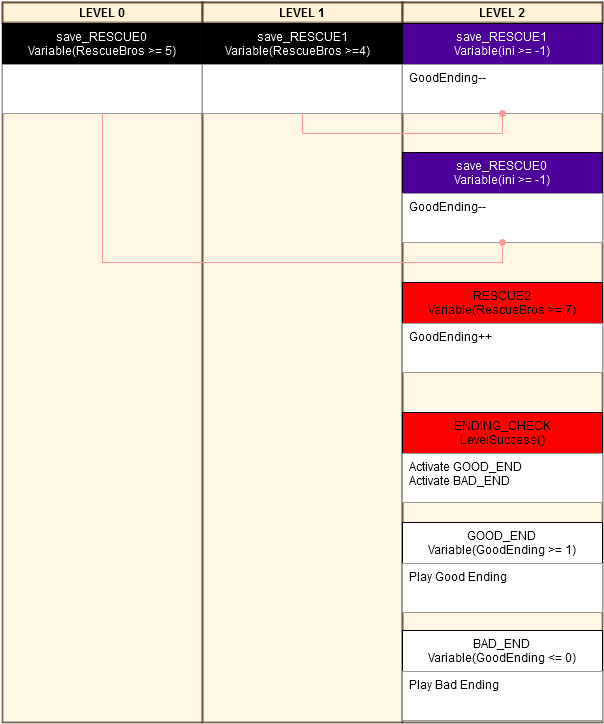
This combines both variable manipulation and save systems. The player must rescue all 16 bros within three levels to get the "Good Ending".
One problem with this method of saving is that the "Restart Level" function in the pause menu will reenable all OPPS triggers and SAVE triggers. However, this problem can be circumvented by placing a opps_RESET_CHECK trigger on every level. This trigger is an OPPS Trigger and an Initial Trigger, but it starts with no actions in the first level. In any other level its actions send the player back to the first level, or whatever restarting point is appropriate. The first level trigger exists to lock the following opps_RESET_CHECK triggers. If the player uses "Restart Level" on a level after the first level, they will be sent back to the first level. It is essential that this method is used in any campaign with save systems.
While can be a hassle in most cases, it is beneficially for limiting attempts since it prevents players from restarting in order to save an attempt. This method requires crude variable manipulation since activation actions are ineffective for OPPS Triggers or SAVE Triggers.
Failing three times in this campaign will result in a Game Over and players will be booted to the main menu. Cutscene actions are hidden, and playing two at the same time makes them unskippable and could potentially crash the level.
Password Systems

 Process And ApplicationMethodsSystem Of Systems
 Initialization
 Switch System
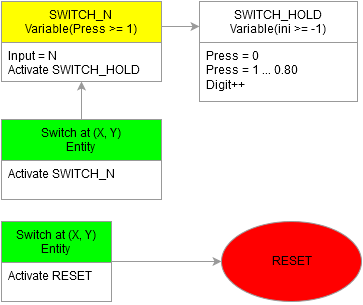 Digit System
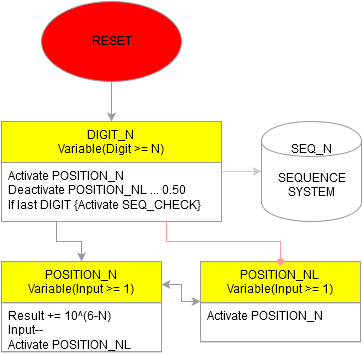 Sequence System
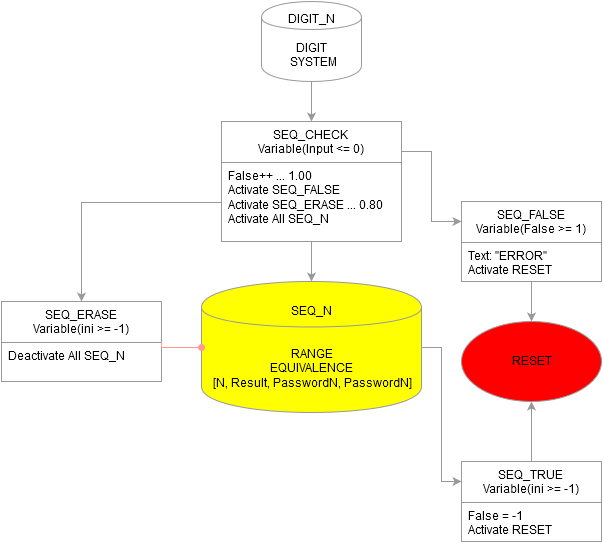
 Save System
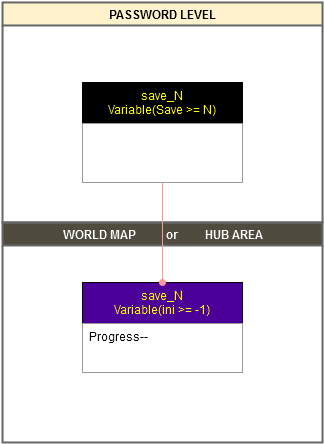 Progress System
 Raw Example
How to make a password system in Broforce:
You must have courage.
Feel it in your heart.
Produce a sequence comparator.
This is an application of most of the methods covered in this guide. It is a 6 digit password system and the value 0 cannot be entered.
531441 possible sequences.
Different switches cannot be pressed at the same time, preventing simultaneous inputs.
When digit N is entered, the last input is added to the sequence by multiplying it by 10^(6-N).
The comparator checks if the sequence is exactly the same as a valid sequence.
If a valid sequence is entered then it locks various SAVE triggers to determine progress.
The campaign will have a selection of progress points.
The whole process should be repeatable, especially if the player enters an invalid sequence.
Mutual Exclusion
For Loops
Range Equivalence
s
Linked Equivalence
Series and Parallel Loops
By combining all of those methods a system of systems is created. Each system collects an input variable and uses that variable to determine its output variable.
The is based upon mutual exclusion, so its input system is based on a locking variable called Press. The switches cannot be pressed at the same time in order to prevent a calculation error, so it only passes out the number inputted when Press is active or 1. The user directly controls this system only.
The is based on For Loops, so it is a multiplication of a variable. Everytime it decrements its input by 1 it increases its output Result based on the current digit. So it first increases by 100000, then increases by 10000, then later increases by 1000, 100, 10 and finally 1.
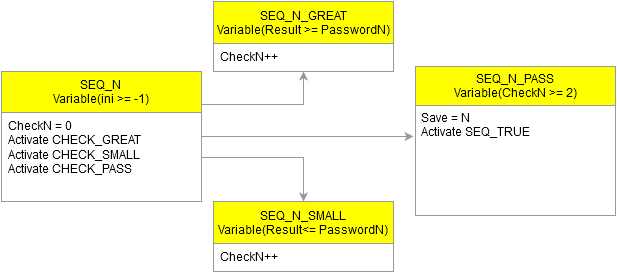
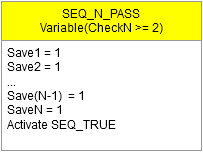
The takes the Result variable and uses Range Equivalence to determine if the Result is indeed a valid password sequence. If this is false then the whole system is reset, If this is true, then the Save variables are modified for output.
The allows the Password Level to have influence over the whole campaign. When the triggers in this system are started, they lock out triggers of the same name in other levels. The variable Save in the Password Level modifies the Progress variable of the Hub Level implicitly.
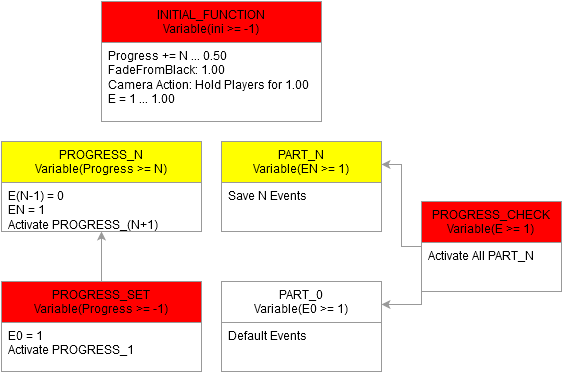
The final Progess System uses Linked Equivalence with the Progress variable to determine which point player will be set in the campaign. This system takes place in a Hub Level separate to all the triggers. The design of a Hub Level can vary. Some campaigns can just use a level list, while others can use a map with various points for entering other levels.
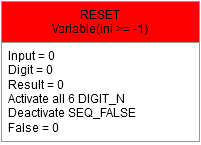
While not within a system, it is the foundation of all the other triggers. It also allows the switches to be pressed for the first time.
The INITIAL_FUNCTIONS will only happen once, and the RESET Trigger will be looped when necessary.
There are nine different switches for inputting the numbers 1-9. There is also a dedicated reset switch. Switches temporarily disable themselves for 0.80 seconds
There are six different digits for each value inputted to the sequence. Each digit has a fixed calculation time of 0.50 seconds.
The amount of sequences are determined by the amount of passwords used in the campaign.
Range Equivalence for passwords has their Min and Max values equal, so it is not really a range.
A series of different Save variables can be used for nonlinear campaigns.
The save triggers transfer values to other levels
The way progress is determined really is not that different from a Linked Equivalence.
Only different variables and calculation delays have to be considered.
For example here is a three Password System. All the abstract trigger maps are combined to produce this:
Are you still reading this guide?[drive.google.com]
Organization
Time And PlaceDebugging TriggersNaming ConventionsTemplatingBFC RepositoryThe way triggers are formatted is just as important as how they function. Not understanding how triggers are related could lead to confusion and unnecessary rework.
Sharing actions under the same trigger just because they are expected to operate at the same time is not a good practice. Only communists needlessly share things. If multiple equivalent actions are shared among different triggers, consider moving the set of actions to its own trigger which will be activated by the triggers the actions were in before. Properly categorize actions within specific triggers, so they will be easier to find individually, and easier to delete or repeat collectively.
Consider producing an Initial Trigger such that it will only be activated for testing purposes. It can trace variables with the TextDisplayContinuous action, or deactivate and activate other triggers immediately. It is also possible to test with more lives with the Bro Change action. This Debug trigger should be disabled or removed when the level is finalized.
In order to organize triggers, variables, and tags it must have some sort of convention.
My personal set of rules:
TRIGGERS: ALL_CAPS_AND_UNDERSCORES
Variables: CapitalizedNoSpaces
tags: lowercase
Special stuff:
ini for Initial Trigger Variable.
L appended to Looping Trigger Name.
save_ before SAVE Trigger Name.
opps_ before OPPS Trigger Name.
It is all arbitrary, but whatever helps keep it organized is fine.
After mastering the art of Triggers, it is also helpful to make levels with common triggers so they can be easily recycled for other levels through Additive Loading. This is especially important for Save Systems, since the name of the triggers involved must be consistent throughout the whole campaign. reduces rework in each level, by loading levels with preset elements.
https://drive.google.com/folderview?id=0B6haS_TovWoqMkxfZmE1VHBRRG8
Source: https://steamcommunity.com/sharedfiles/filedetails/?id=336602904
More Broforce guilds
- All Guilds
- COMO ABRIR BROFORCE
- How to achieve this legal (There can bro only one)
- Broforce |
- HOW TO OPEN THE GAME
- All Bosses (With Cutscenes) HD
- Zapisy po osignicia
- Broforce
- | Saves for achievements
- How to Open: Broforce
- Broforce Guide 307