
More Borderlands 3 Guides:
- Borderlands 3 Shift Codes!
- Borderlands 3 Tips and Tricks.
- Borderlands 3 Achievements Guide.
- Borderlands 3 Easter Eggs and References.
Holy Spirits Rewards And Requirements
Below are the rewards for completing this mission and the level requirements.
- Level Requirement: 15
- Rewards: Money, Experience, Unique Shield: Mendel’s Multivitamin Shield
How To Unlock Holy Spirits
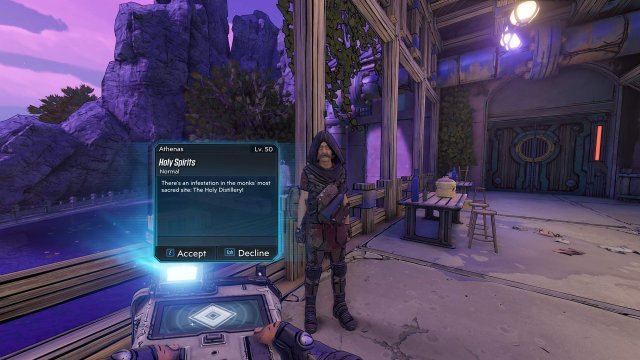
To unlock Holy Spirits you need to accept this mission from Brother Mendel on Athenas. You’ll find the exact location below. If there's no exclamation point there you will not be able to do the mission.
Holy Spirits Side Mission Location

This mission is assigned on Athenas. Speak to Brother Mendel at the Storm Brewin to accept it.
Holy Spirits Walkthrough
Mission Objectives- Follow Brother Mendel
- Enter Cellar
- Clear Ratch Gunk (3/3)
- Kill Ratch Broodmothers (3/3)
- Optional: Harvest Intoxicated Ratch Livers (0/5)
- Destroy Ratch Nest
- Take Bell Striker
- Repair Bell
- Ring Bell
- Optional: Place Intoxicated Ratch Livers
- Return To Mendel
- Follow Brother Mendel
- Enter Cellar
- Clear Ratch Gunk (3/3)
- Kill Ratch Broodmothers (3/3)
- Optional: Harvest Intoxicated Ratch Livers (0/5)
- Destroy Ratch Nest
- Take Bell Striker
- Repair Bell
- Ring Bell
- Optional: Place Intoxicated Ratch Livers
- Return To Mendel
After accepting the mission, follow Brother Mendel and he’ll open the gate to let you into the ratch-infested depths of the brewery. Head down the stairs and around the corner to enter the cellar.
Clear Ratch Gunk (1/3) / Kill Ratch Broodmothers 3/3

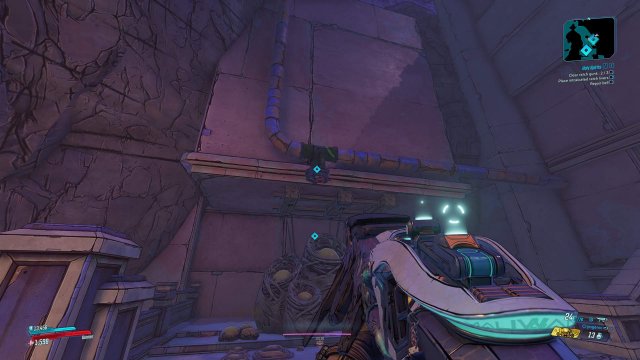
At the bottom of the stairs, turn right, then examine the cask sitting on the shelf on your right. Shoot the cask on the red mark to destroy the first bit of ratch gunk.

Head through the gap made in the wall, then take out the ratch in the room, including the broodmother.
Follow the path around and kill the remaining two giant white ratch to complete your killing quota.

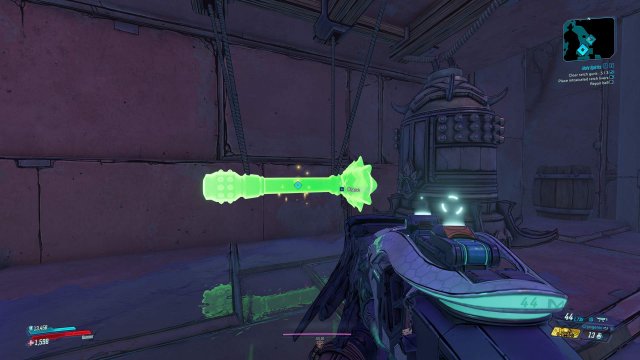
Optional: Harvest Intoxicated Ratch Livers (4/5)

Head left and cross over the pool of wine, then head left to find an intoxicated ratch. Melee the abdomen to obtain an intoxicated ratch liver. Use the images below to each intoxicated liver in this section.

Clear Ratch Gunk (2/3)

After killing the broodmothers and finding the first three of the Intoxicated Ratch Livers (should you care to do so), head up the stairs on the right side to find the next bit of ratch gunk, then clear it by shooting the next red trigger.

Destroy Ratch Nest / Take Bell Striker
After heading through the second bit of ratch gunk, you’ll run into a Ratch Nest. Kill it and pick up the Bell Striker it drops.

Optional: Harvest Intoxicated Ratch Livers (5/5)
After picking up the Bell Striker, turn right to find the final Intoxicated Ratch. Liberate it of its liver, then continue.

Clear Ratch Gunk (3/3)
After picking up the Bell Striker, head up the stairs on the left and shoot the final red mark to clear the third bit of ratch gunk, to clear the way to the bell, itself.

Repair Bell / Ring Bell
Place the ringer next to the bell to repair it, then ring it to open the way forward.
Optional: Place Intoxicated Ratch Livers
Once you head through the doorway, turn right and you’ll find a barrel. If you’ve gathered all of the intoxicated ratch livers, place them there.
Return To Mendel
Turn left to find Mendel waiting for you. Speak to him to complete the mission and claim your reward.
Source: https://gameplay.tips/guides/5787-borderlands-3.html
More Borderlands 3 guilds
- All Guilds
- Borderlands 3 - Christmas Shift Codes
- Borderlands 3 - How to Kill Shiv (Tips, Tricks, and Strategies)
- Borderlands 3 - The Family Jewel Walkthrough Guide
- Borderlands 3 - 100% Achievements Guide
- Borderlands 3 - Completely AFK Purple Gun Farm Guide (Zane Works)
- Borderlands 3 - Complete Zane Guide (How to Level)
- Borderlands 3 - How to Skip Splash Intro
- Borderlands 3 - Transferring Save Files and Importing Existing Characters Guide
- Borderlands 3 - Shift Codes (March 2021)