Intro And Required Resources
Hi everyone! My name is Neph. I've been PC gaming for many years now and specifically have an interest in first-person shooters. I would consider myself an above-average player in most shooters and I'm constantly looking for ways to improve. A few of my friends have asked how I find my sensitivity so I thought I'd just make a quick reference guide.
Please keep in mind that I am not a professional gamer, I don't have any real accolades or qualifications, and I haven't trained with any coaches. This is how I personally get my preferred sensitivity and it has been iterated on many times over the years. I want to keep this updated for myself, my friends, and YOU. I hope the topics and ideas discussed in this guide help you, and if they do please let me know!
What you need: Your preferred mouse/mouse pad
Approximately 1 hour of your time
These following workshop items:
https://steamcommunity.com/sharedfiles/filedetails/?id=2744739689
https://steamcommunity.com/sharedfiles/filedetails/?id=2744714841
https://steamcommunity.com/sharedfiles/filedetails/?id=2740832136 This Google spreadsheet: HERE [docs.google.com]
NOTE: You will have to login to your google account and make a copy of the spreadsheet for your own use. Steam seems to think the spreadsheet is malicious, I promise you it is not. If you need the link you can grab it off the video in the description.
Video Walkthroughhttps://youtu.be/7Q6a4MjXk9k
Getting Started

Okay, before we begin the actual test, we will need to set some parameters. The following section is intended for all skill levels and may not be needed for more advanced users. If you feel you don't need some of this information, please skip to the next section.
Windows SettingsThere is one very important Windows configuration to check before you get started with this guide.
To check, press your Windows key and type in "Mouse Settings".
Full screen this window and click "Additional mouse options" on the right-hand side.
Once that window opens, click the "Pointer Options" tab at the top and make sure the box that says "Enhance pointer precision" is UNCHECKED. Leave all other options at their default.
This has been an option in Windows for a few iterations and most guides will suggest that you make sure this is disabled.
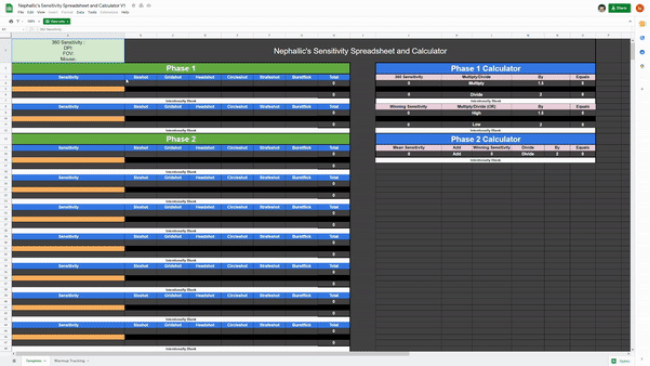
The SpreadsheetI spent some time making the provided spreadsheet to be used with this guide. It has sections to track your progress and built in calculators to make the math as easy as possible. Record the following parameters of your test in the top left section intended for these values (A1). The last value, 360° sensitivity, will be covered in the next section.
DPII'm sure many of you know this, but DPI is NOT EQUAL to game sensitivity. This is an important concept that I've heard people get confused about. DPI (or CPI) stands for dots/counts-per-inch and it is how a mouse measures physical distance. Many modern mice advertise sensors with the ability to reach incredibly high DPI numbers as a selling point and/or an indicator of quality; this is not necessarily the case. Often, when using a too high DPI will make it harder to achieve a comfortable sensitivity within your preferred game.
There is a larger discussion to have about mouse DPI, but for the purposes of gaming, I would suggest a DPI of somewhere between 800 and 1600. Most mice have some sort of software where you can set your DPI. Other mice may have a hardware DPI switch that increases in stages per button press.
In my opinion being consistent is important for improvement, and I would suggest avoiding using sensitivity stages or clutches.
Choose a DPI that you like for regular Windows mouse usage and stick with it. Typically, the larger your monitor is, the higher DPI you'd want. This is for everyday ease of use, when the monitor is large and the DPI is low, it'll feel extra slow to navigate windows regularly. When I was gaming in 1920x1080 I used a DPI of 800, but once I switched to a 2560x1440 monitor, 800 DPI felt too slow and I had to increase it to 1600 as a result.
Enter your chosen DPI in cell A1 of the spreadsheet.
Field Of ViewEvery game typically has it's own configurable field of view (FOV). FOV can be expressed in multiple different ways but it is commonly either horizontal field of view (HFOV) or vertical field of view (VFOV). If you're doing this test to ultimately be used for a specific game, I would change your Aim Lab FOV to be the same as the FOV from that game. If you do not have a preexisting preferred FOV, feel free to use the default Aim Lab FOV.
NOTE: To ensure your FOV is correct within Aim Lab, open "Settings", navigate to "Controls" and scroll to the bottom and make sure "Field of View Options" is set to "Advanced". This allows you to see the actual HFOV (most common) that is being used. Make sure to check what type of FOV your preferred game is using when doing conversions.
Enter your FOV in cell A1 of the spreadsheet.
MouseLastly, record which mouse you are testing on. Not every mouse is the same and it MAY affect your results. If you decide to get a new mouse, mouse pad, or desk, I would suggest redoing this test in its entirety. Mouse weight, mouse pad friction, and desk space can all affect the ultimate results.
Enter your mouse in cell A1 of the spreadsheet.
Finding Your 360° Sensitivity

Once all of the parameters from the previous section are recorded in the spreadsheet, it is time to determine your 360° sensitivity.
SetupThis workshop item will be used for this step:
https://steamcommunity.com/sharedfiles/filedetails/?id=2744739689
Once your subscribed to the above workshop item, you can start up Aim Lab. The following navigation has been changing as Aim Lab updates, but the easiest way to find this subscribed workshop task is to use the top headers in Aim Lab to navigate to "Custom" and then "Workshop". Click "Tasks" on the left-hand side and search for "Femboy". Click the "favorite" heart on the top right of my task when the search is complete.
While you're here, you should click on the "PLAYLISTS" section on the left-hand side and repeat the above steps. You will need these later.
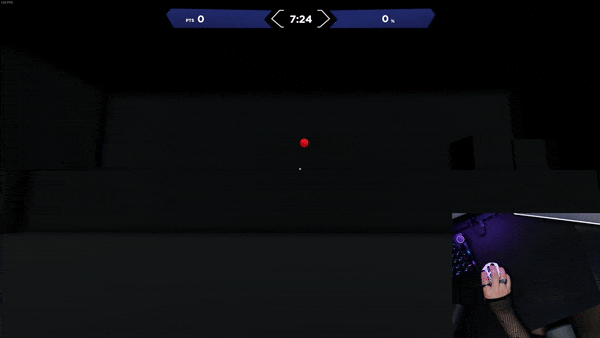
The TestOn the top tab navigation, go to "Training" and then on the left hand side, "Favorites". Select the "Femboy 360 Sensitivity Test" and click "Play now".
This task is just a very simple task that is not intended to actually be completed. The test has a duration of 10 minutes, but you likely won't need that full amount of time. To begin this test, make a note of the default Aim Lab HIPFIRE sensitivity of "1.5".
NOTE: For this whole test we will be using the "hipfire" sensitivity ONLY. Do not change the values for the ADS sensitivity or FOV within Aim Lab. While doing these tests, avoid holding down right click to ADS. All the tests should be done using hipfire only.
Click to begin.
Place your cursor in the middle of the target with your mouse as far to the left of the usable mousepad as possible. Move your mouse slowly from left to right until it completes a full rotation and make a note of how much mousepad you do/don't have left.
If you ran out of mousepad, your sensitivity is too low, increase the Aim Lab sensitivity slightly and repeat.
If you have excess mousepad, your sensitivity is too high, decrease the Aim Lab sensitivity and repeat.As you get closer to your 360° sensitivity, you may want to move your mouse back and forth to make sure.
Once you find your 360° sensitivity, record it in the spreadsheet in the same section previously used. Return to the main menu.
Example: The default Aim Lab sensitivity of 1.5 is FAR too high for my usable mousepad space and DPI. I lower the sensitivity to 1 and repeat. 1 is still to high; I lower the sensitivity to .5, which is much closer, but still too fast. I lower the sensitivity to .45 and repeat. .45 is too much still; I lower the sensitivity to .43 and repeat; this feels correct and I will record it in the spreadsheet. .43 is my 360° sensitivity within Aim Lab.
Congratulations, the first real step of this guide is complete. In the next section, I will cover how we use these numbers to find a solid baseline sensitivity.
Generating The First Numbers [Phase 1]
Now that you have your 360° sensitivity, we have to crunch some numbers.
Spreadsheet TimeThis is where the spreadsheet will be heavily used. If possible, open the spreadsheet on another monitor and be prepared to Alt+Tab a lot between it and Aim Lab.
Under the sectioned labeled "Phase 1", input your 360° sensitivity in the orange cell (A5).
We will now be generating high and low sensitivities to test. To the right, In the "Phase 1 Calculator", enter your 360° sensitivity in the two "360° sensitivity" column spaces marked with a "0". This will generate two sensitivities, a "high" sensitivity and a "low" sensitivity.
Take the results from the calculator and copy them back above and below your 360° sensitivity recorded in the orange cell (A5). You should now have three numbers stacked under the "Phase 1" table in "Sensitivity" cells (A4, A5, A6). It does not matter if the numbers are ascending or descending, but try and be consistent as you move forward with the spreadsheet.
It is time to use our second resource: https://steamcommunity.com/sharedfiles/filedetails/?id=2744714841
Within Aim Lab, use the top tab navigation, go to "Training" and then on the left hand side, "Favorites". Select the "Femboy Sensitivity Test" playlist and click "Loop". There are six tasks in this playlist:
Sixshot
Gridshot
Headshot
Circleshot
Strafeshot
Burstflick
These tasks cover a range of speed, precision, and tracking.
Press the "Escape" key and navigate to "Options". From here, navigate to "Controls". Set your sensitivity to the "low" sensitivity generated in the previous step.
Play through each of the six tasks once with both the "low" and the "high" sensitivity and record your scores in the cells to the right of the sensitivity that you are testing. While this whole test is relying heavily on mathematics, this is where you really need to be true to yourself and focus on how you FEEL.
Once you finish the first loop on the low sensitivity, repeat the above steps after changing your Aim Lab sensitivity to the "high" sensitivity. Again, focus on FEEL.
Once you're finished, review which sensitivity FELT better for you. If you are having trouble deciding, look at the scores from the exercise, both per task and total.
Decide which sensitivity felt better. Cross out the sensitivity you didn't like.
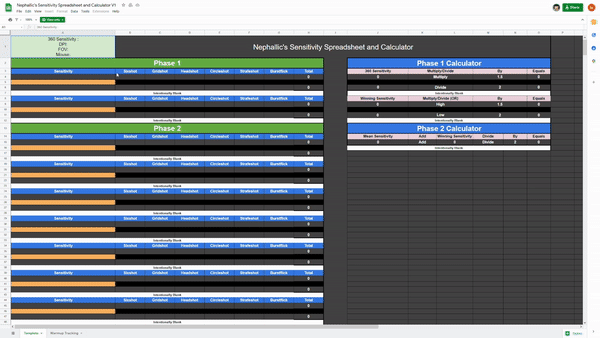
If you chose the "high" sensitivity move back to the "Phase 1 Calculator" and use the second section, specifically row 9. In this section the "Multiply/Divide" header changes the values to "High" or "Low". Input the "high" sensitivity into cell J9.
If you chose the "low" sensitivity move back to the "Phase 1 Calculator" and use the second section, specifically row 11. In this section the "Multiply/Divide" header changes the values to "High" or "Low". Input the "low" sensitivity into cell J11.
NOTE: You do NOT do this for both. It is one or the other. If you choose the high sensitivity, you are multiplying it again by 1.5. If you choose the "low" sensitivity you are dividing it again by 2 (via the calculator in the step above)
The New NumbersAt this point of the test you will have three numbers. These numbers are to be inputted into cells A9, A10, and A11.
If you chose the "high" sensitivity, that sensitivity becomes the median and goes in the orange cell (A10). Your "low" sensitivity is your 360° sensitivity and your new "high" sensitivity is the number generated in the previous step from the calculator.
If you chose the "low" sensitivity, that sensitivity becomes the median and goes in the orange cell (A10). Your "high" sensitivity is your 360° sensitivity and your new "low" sensitivity is the number generated in the previous step from the calculator.
Play through each of the six tasks once again and record your scores in the cells to the right of the sensitivity that you are testing. Remember to focus on FEEL. If you can tell immediately one of the sensitivities does not work/feels terrible/etc. cross it out and discontinue this test. The other sensitivity automatically becomes the winner.
Congratulations, you have completed this section. We now can move onto the real meat and potatoes of the testing process.
Testing... [Phase 2]
Welcome to Phase 2! This is where the calculator will be immensely helpful; you will be using it often.
To BeginFrom Phase 1, you should have two sensitivities. One will be the median sensitivity and the other is the winning sensitivity.
Using the "Phase 2 Calculator" you can add these numbers together and divide by 2 to get the average. The forumlas built into the spreadsheet do this for you, just input the sensitivities in the two cells (J15 and L15)
Once you have the average, you will be left with three numbers again. The average (mean) sensitivity will now go in the first orange cell under the "Phase 2" header in the spreadsheet (A16). You then place the numbers that were used to get the average in the "high" and "low" cells respectively.
Once again it is time to use our second resource: https://steamcommunity.com/sharedfiles/filedetails/?id=2744714841
Within Aim Lab, use the top tab navigation, go to "Training" and then on the left hand side, "Favorites". Select the "Femboy Sensitivity Test" playlist and click "Loop". As a reminder there are six tasks in this playlist:
Sixshot
Gridshot
Headshot
Circleshot
Strafeshot
Burstflick
Play through each of the six tasks once with both the "low" and the "high" sensitivity and record your scores in the cells to the right of the sensitivity that you are testing. Again, focus on FEEL.
Once you finish the first loop on the "low" sensitivity, repeat the above steps after changing your Aim Lab sensitivity to the "high" sensitivity.
Once you're finished, review which sensitivity FELT better for you. If you are having trouble deciding, look at the scores from the exercise, both per task and total.
Decide which sensitivity felt better. Cross out the sensitivity you didn't like.
Move back over to the "Phase 2 Calculator" and input your two numbers, both the current average and the winning sensitivity. This will generate your new average which goes in the next orange cell (A21). You then place the numbers that were used to get the average in the "high" and "low" cells respectively.
You will repeat this test until the sensitivities are so close to each other that you cannot tell the difference. This is different for different people, the test is however long you would like to make it/feel comfortable with.
Congratulations, you now have a personalized sensitivity for Aim Labs. How do we use this?
What Now?
Now that you have your ideal sensitivity for Aim Lab, how can we use it?
More MathI'll be the first to admit that I am TERRIBLE at math. To actually use the sensitivity that we found in the testing, I use a website called Mouse-Sensitivity[www.mouse-sensitivity.com]
To set this up, do the following:
Scroll down to the "Input" section.
Set the first "Convert from" section to "Aim Lab".
Enter your Aim Lab sensitivity.
Enter your mouse DPI.
Enter your Aim Lab FOV.
Enter your Aim Lab Resolution.
Enter your monitor's size (inches).
Keep "Aim" set to "Hipfire".
Set "Location" to "In-game".
Set the "Convert to" the game that you would like to use your sensitivity in.
Enter your mouse DPI.
Enter the FOV that you use in your selected game using the correct FOV type. If you don't know which FOV type your game uses, it might be worth Googling.
Enter your preferred game's resolution. This should typically be the same as the Aim Lab one.
Enter your monitor's size (inches). This should be the same as the above unless you have changed monitors.
Set your "Aim" to "Hipfire" or "All".
This website automatically calculates what your sensitivity should be in the game you selected. Depending on the game and it's limitations, it may not be a perfect 1:1, but it will get as close as it can.
Warmup DrillsIf you'd like to use Aim Lab to warm up, I've included a second tab on the provided spreadsheet to track your progress. Additionally, the workshop item below will help: https://steamcommunity.com/sharedfiles/filedetails/?id=2740832136
Typically, I try and do two full loops each day and record the best score that day per task.
Conclusion
I appreciate you for sticking through the process. I hope that if you followed the whole guide it has improved your Aim Lab or other game experience somewhat. I've been wanting to type up this guide for awhile, but enough demand built up within my friend circles and inspired me to actually do it.
Final ThoughtsOne thing to remember is that if you're switching from a DPI/sensitivity that you've used for awhile, it will TAKE TIME for you to fully acclimate to your new sensitivity. It is definite worthwhile to re-run this test every so often to average your totals together and get a more refined sensitivity.
Credits
Credit to corehaven on Youtube and Derrick "impulsivE" Truong. Without both of these people, I wouldn't have learned how to do and/or refine any of the items discussed in this guide.
Huge thanks to Gin, Abraxas, AcesHighest, Lily, and Ash for being guinea pigs and helping me test this guide!
Source: https://steamcommunity.com/sharedfiles/filedetails/?id=2744718770
More Aim Lab guilds
- All Guilds
- How to Cheating in Aimlabs
- How to Close Aimlabs
- How to Open Aimlabs
- Aimlabs
- Aimlabs
- HOW TO CLOSE GAME
- Valorant
- how to not aim
- UNREAL FORTNITE 100%
- How to have fun on Aimlabs!